
Manage a Family or Team Account
So far, with perhaps one or two exceptions, I haven’t mentioned ways in which 1Password Families or 1Password Teams accounts differ from individual 1Password accounts—what unique things you can do when your account supports multiple people. So I’d like to spend a few pages here doing just that.
I don’t offer complete details here (and the details I do offer could quickly go out of date), but I do include numerous links to AgileBits’ online documentation for 1Password accounts. Read on to learn about creating additional group vaults, adding family or team members, setting up permissions, and other tasks.
Before you can do any of the activities in this chapter, you must open a web browser; go to your-account-name.1password.com; and log in with your email address, account key, and master password. Everything here happens in the web interface.
Create a Family or Team Vault
Each family or team member gets a personal vault automatically, plus access to a single shared vault. However, you can create additional vaults if you like, each one with different contents and its own set of permissions for who can access it and how.
In your browser, you should see at least three categories—All Vaults, Personal (for all the user-specific vaults in your group), and Shared or Team (the default shared vault for your group). If you’ve already created other vaults, they appear here too.
To add a vault, click New Vault, enter a title and description for the new vault, and click Create Vault. Repeat as desired to add more vaults.
Invite Users to Your Family or Team
To invite people to your family or team account, click Invitations in the sidebar on the right in your browser window. Click Invite by Email, enter one or more email addresses (separated by commas) and an optional message, and click Invite.
Each invitee receives an email message with simple instructions they must follow to join your family or team account, which includes adding the family or team to their copy(ies) of 1Password. Once a family or team member accepts your invitation, you (the administrator) also receive an email message containing a link you must click to confirm the new member. (You can also find a button for confirming new members by clicking Invitations in the sidebar.)
Family or team members initially receive access to the Shared vault and to their personal vault within the 1Password account. (See Share Items with Family or Team Members, ahead.)
Specify Permissions
You can change permissions for any vault except a personal vault or the main Shared vault in a family account. To change what permissions any user has for a vault, follow these steps:
In the sidebar in your browser window, click Vaults.
Click a vault name.
Click the gear
 icon next to a member’s name to open a menu of permissions (Figure 35). Check or uncheck the permissions you want that user to have for that vault.
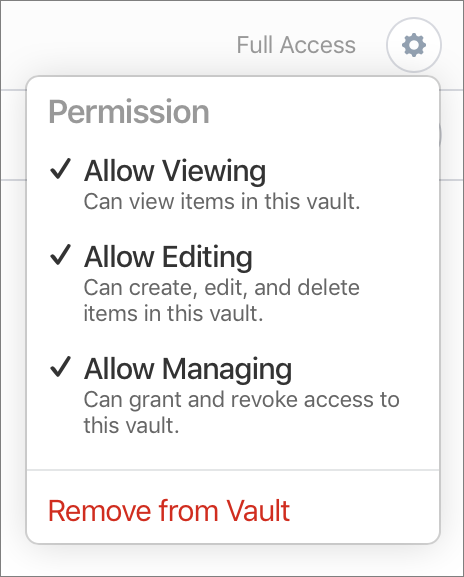
Figure 35: Permission settings for a family or team account.
You have three options for family and team accounts: Allow Viewing, Allow Editing (if unchecked, the user has read-only access to the vault), and Allow Managing (if checked, the user has administrative privileges, just as you do).
Changes apply immediately. To learn more about permissions, read the support document Create and share vaults. To learn how to add team members to groups (not available for family accounts), read Use the built-in groups in your team.
Suspend or Revoke Vault Access
To remove a family or team member completely from a particular vault, but not from your family or team (and keep access to other vaults intact), do this:
In the sidebar in your browser window, click Vaults.
Click a vault name.
Click the gear
 icon next to a team member’s name to display a pop-up menu of permissions. (This menu does not appear for the main Shared vault in family accounts.) Click Remove from Vault at the bottom of this menu.
If you want to suspend a member’s access to all your family or team vaults—with the option to restore it later—follow these steps:
In the sidebar on the right, click the People link.
Click the name of the user you want to suspend.
Click Actions, and then choose Suspend People from the pop-up menu.
If you later decide to delete that team member permanently, follow the same steps, but click Delete People in step 3.
Share Items with Family or Team Members
All members of a family or team have access to a Shared vault, and merely saving a new item in that vault, or moving it to that vault, gives all the other family or team members access to it. However, you can create as many shared vaults as you need—including those that are shared by only a subset of your family or team, or that are constrained in other ways. Follow the instructions earlier in this chapter to create new vaults and configure access for various family or team members.
To move an item to a different vault, do either of the following:
In the 1Password app, drag an item to the shared vault in the sidebar.
In the 1Password app, right-click or Control-click an item and choose Move from the contextual menu, or click the “More options”
 pop-up menu > Move. Then select a vault.
An alert appears, confirming who will have access to the about-to-be-shared item. If it’s what you expect, click Move Item (0r Move X Items).
If you later want to stop sharing an item, you can use the same procedure to move it from a shared vault to your Personal (or another non-shared) vault.