Rock Out with the Apple TV
The Apple TV isn’t just a great device for watching movies and TV—it’s also a fantastic hub for audio. This chapter kicks off with a quick look at improving sound quality and then cruises through the built-in audio apps on the Apple TV: The Music App and The Podcasts App.
Of course, you can also Listen to Music with Home Sharing, even if it’s not from Apple, or you may want to Rip CDs for the Apple TV. Finally, the chapter closes with a look at various ways to AirPlay Audio from a Mac to an Apple TV.
Take the Sound to Eleven
The Apple TV is a fantastic home audio system, but it needs speakers to sound its best. Modern flat-screen televisions don’t have great sound quality. To improve your audio, consider adding more hardware:
Receiver and speakers: A home theater receiver with speakers is the traditional answer to improving the sound from your TV, but a downside to this solution is cost and complexity. Also, music is usually recorded for stereo speakers, so an entire 5.1 surround system can be overkill. If you’re interested in going this route, look at The Wirecutter’s current recommendations for receivers, bookshelf speakers, and surround-sound speaker systems. Expect to spend at least $400, though you could spend many thousands.
Soundbar: A soundbar is a compact set of speakers, crammed into one bar, that addresses the problems of traditional home theater receivers. A soundbar is a better solution than a receiver for most people, since you don’t have to string wires all over your living room. Some soundbars feature “wireless” 5.1 surround, so you can have surround sound with fewer wires (These systems aren’t truly wireless—usually the only wireless connection is between the soundbar and the subwoofer, which is admittedly convenient.) Soundbars aren’t much cheaper than a receiver/speaker combination; expect to spend anywhere from $100 to $1,000 on a good soundbar. I recommend reading The Wirecutter’s current picks for The Best Budget Soundbarand The Best Soundbar.
AirPlay speakers: AirPlay speakers like the HomePod are an interesting option. Since your Apple TV can output sound over AirPlay, it can output to a wireless speaker that acts as an AirPlay receiver. The downside is that you can’t use an AirPlay speaker for the TV’s audio itself, or anything else connected to the TV. (See AirPlay from an Apple TV for setup help.)
AirPort Express and speakers: Apple’s AirPort Express isn’t just a router—it’s also an AirPlay receiver. It can receive audio wirelessly via AirPlay and then route it to wired speakers. Its 3.5 mm audio minijack port (headphone jack, in plain English) can output analog audio or optical audio, depending on the type of cable you connect. For example, you can make an optical audio connection with PTC’s TOSLINK to Mini-TOSLINK cable.
Bluetooth speakers and headphones: The fourth-generation Apple TV can now output audio to Bluetooth speakers and headphones. I don’t recommend Bluetooth speakers for general-purpose listening because Bluetooth audio is often inferior to the above connection methods, but Bluetooth headphones can be a handy option when you don’t want to disturb others.
For most living rooms, a soundbar is the way to go; they’re inexpensive and simple, and sound much better than TV speakers. Vizio makes good soundbars for the money—I purchased an older model 5.1 Vizio soundbar system for under $200 and have been quite happy with it.
No soundbar can approach the quality and flexibility of a receiver, but receivers are expensive and complicated. I recommend them for enthusiasts, but even then, only begrudgingly. I’ve owned receivers for many years, and it was always a pain helping family members use them. (Not to mention the utter chaos a toddler can cause by smashing the receiver’s buttons.)
The Music App
The Music app is built around the Apple Music streaming service, which provides access to over 30 million songs and syncs your music among your devices via iCloud Music Library (so long as they are logged in to the iTunes Store with the same Apple ID).
If you subscribe to iTunes Match (but not Apple Music), you can access your synced songs and playlists with the Apple TV Music app, but the For You, New, and Radio screens are largely useless (as described in the TidBITS article Like iTunes Radio? Prepare to Pay or Switch).
In this topic, I assume that you subscribe to Apple Music. If you don’t, that’s fine, but some features won’t work as I describe or as you might expect. If you want to play your Apple/iTunes music without the Music app, you can Listen to Music with Home Sharing.
Before I talk about the various Music app screens, I want to mention that once you start playing something in Music, it keeps on playing even as you navigate to other screens or apps on the Apple TV. It stops only if another app wants to play audio or if you press the Play/Pause button on the remote. To resume playback, you usually need to return to the Music app, which you can do by pressing and holding the Play/Pause button for several seconds (see Control Your Apple TV for more remote tips and shortcuts).
Library
If you sync your music with iCloud Music Library, you see your library in this screen (Figure 67).

The right-hand sidebar helps you play your music. Click Shuffle All to play your entire music library in a seemingly random order. Click any other option to browse in that category.
Once you start music playback, the Now Playing screen opens.
With the release of tvOS 10, playlists were moved into the Library screen. Choose Playlists to see both playlists that you’ve created on other devices and playlists saved from Apple Music. Simply click a playlist and then click a song to play it. You can also click the Shuffle button to play all tracks at random.
If the playlist was saved directly from Apple Music, the More button offers other options, such as “loving” a song (Figure 68). You can add individual songs to a playlist from Now Playing.

For You and Browse
I’ve grouped these two screens because they both help you to discover music:
For You contains an assortment of albums and playlists that Apple thinks you’ll like, based on your listening history and what you’ve marked as loved.
Browse offers newly released and popular albums, music videos, playlists, and songs, irrespective of your preferences (Figure 69). It’s split into five sub-screen: New Music, Playlists, Videos, Top Charts, and Genres.

Figure 69: The Browse screen is handy for finding new music.
As you play media from For You and Browse, you’ll encounter three types of interfaces, depending on what you’re playing:
Playlist or album: To interact with a playlist or album, click it to see a detail view, as in Figure 70.

Figure 70: While viewing an album or playlist, you can read a description, play a track, add it to your library, shuffle it, and more. Here are the highlights of what you can do from a detail view:
Start playback: Click the track you want to hear first. The Apple TV begins playback and shows the Now Playing screen—click the touchpad for more playback options or press Menu to return to the detail view. To stop playback, press the Play/Pause button.
Add it to your Apple Music: Click the Add button. Albums are added to My Music, and playlists can be found in Playlists.
Shuffle: Click the Shuffle button to randomize playback order.
Go to Artist: Click Go to Artist to see more songs, albums, and playlist with that artist.
Get more commands: Click the More button to see Add to Library, Play Next (add to the beginning of the Up Next queue, after the current song; see Now Playing), Start Station (create a radio station based on the album or playlist), Love, and Dislike (tell Apple Music whether or not you like the song).
Music video: Select a music video in the Browse screen to see Play, Add (to your library), and More, which offers additional options like Add to Library, Add to a Playlist, Shuffle, and more (Figure 71). See Control Video Playback.
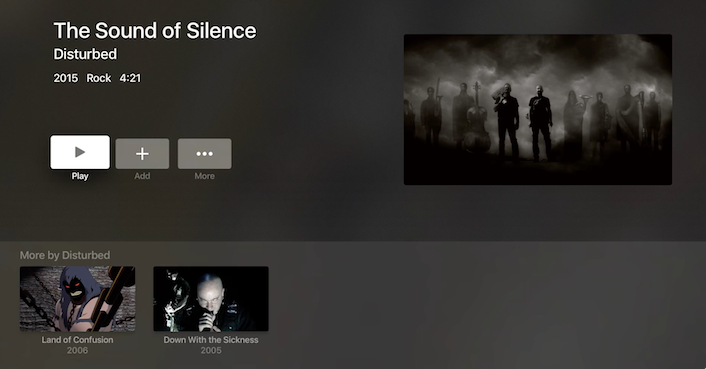
Figure 71: The detail screen for a music video, lets you play it, add it to your library, “love” it, or look up more artist information. Track: If you select a track in the Browse screen, it plays instantly (see Now Playing).
Radio
The Radio screen shows streaming radio stations (Figure 72). You can’t control which tunes these stations play, but you can influence what’s played in any custom radio station that you’ve created.
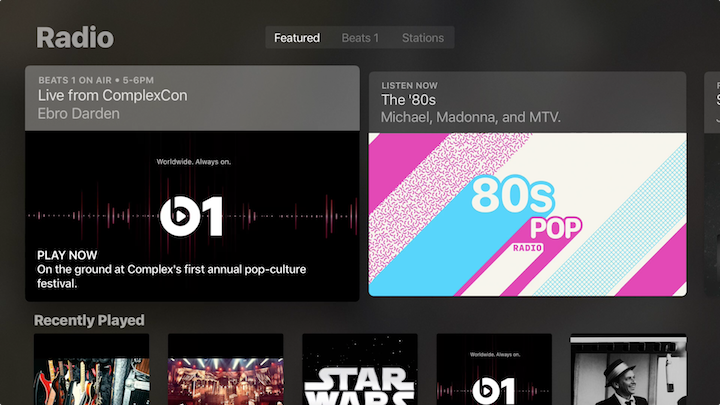
To begin playing a radio station, just click it. Here are the types of radio stations available:
Beats 1: This is Apple’s own live radio station, staffed by real-life DJs who hand-pick the songs. The station has several artist-hosted shows, with most of the focus on pop and hip-hop.
Genre stations: Tune in to one of these stations to listen to music by genre (including Rock, Country, and Workout) and talk stations (such as ESPN and NPR).
Custom stations: These are stations that you’ve created. To create a station, work from the More button while viewing an album or playlist in the For You and Browse screens or while viewing a song in Now Playing, after performing a Search (Music), or with Siri. You can customize a station with options in Now Playing.
Search (Music)
If you know the name of a tune, album, playlist, or artist, you can come to this screen to pull it up quickly and start listening to it—and even create a custom radio station based on it. As you enter text, search suggestions appear below the keyboard in two views: All Apple Music, which displays everything available on Apple Music, and Library, which displays only what’s in your library.
Enter your search text, select either All Apple Music or Library to tailor your results, and then select a result.
For example, enter lorde to search for tracks by the singer Lorde. Select All Apple Music. Select “Lorde”. Now you can access her artist page, individual songs, albums, playlists, music videos, and stations. If you play Lorde Radio, that station is added to the Radio screen. (I explain how to customize a station in Now Playing).
Now Playing
When the Now Playing screen opens, you see the album art for the currently playing song, along with its name and perhaps the band or artist name, depending on what information the Apple TV has about the tune.
To access the controls and view the Up Next queue (Figure 73), click the touchpad.

When you first view the Up Next queue, the currently playing track is highlighted. Swipe right and left on the touchpad to move through the songs in the queue. To play a song, click it.
Swipe down to reach the timeline for the current song, which you can scrub through by first pausing, and then swiping left and right.
To add a song to your library, click the plus ![]() button above the song. To view lyrics, click the Lyrics
button above the song. To view lyrics, click the Lyrics ![]() button.
button.
You can choose different speakers with the output ![]() button, mix up the playlist with the shuffle
button, mix up the playlist with the shuffle ![]() button, and repeat a song with the repeat
button, and repeat a song with the repeat ![]() button.
button.
To further control playback, highlight the currently playing song, and swipe up to highlight the More ![]() button. Click it to see options like the following (not all options appear all the time):
button. Click it to see options like the following (not all options appear all the time):
Go to Album: Navigate to the current song’s album.
Go to Artist: See more from that artist.
Add to Library: Add the song to your library; the song becomes available in the Library screen.
Add to a Playlist: Add the song to an existing playlist, or create a new one with the song.
Play Next: Move this song to the first slot in the Up Next queue.
Create Station: Make a radio station based on the song.
Love: Denote the song as “loved” for your Apple Music recommendations.
Dislike: Denote the song as disliked for your Apple Music recommendations.
Play More Like This: Tell Apple Music to play more tunes like this in the current custom radio station.
Play Less Like This: Tell Apple Music to play fewer tunes like this in the current custom radio station.
To return to the regular Now Playing screen, press Menu. To select another screen in Music, press Menu again.
Listen to Music with Home Sharing
In the Music app, you can play music from the Apple cloud, but that’s no help if just want to listen to the music stored in the iTunes library on your computer (without paying a subscription fee and turning on iCloud Music Library). To pull off this trick, set up Home Sharing, as described in Computers.
Once you’ve made the necessary Home Sharing connection, open the Computers app and select My Music. The playback controls are identical to those described in Library.
The Podcasts App
With the Podcasts app on your Apple TV (Figure 74), you can watch, listen to, and subscribe to all your favorite podcasts. Your subscriptions, playback positions, and stations sync via iCloud with iTunes on your computer and the Podcasts app for iOS.

The Podcasts app is split into six screens:
Unplayed: If you subscribe to podcasts, the episodes you haven’t yet finished appear here. Select an episode to play it. If you press and hold the Siri Remote touchpad over a podcast episode, you see a number of options: Play Next, Add to Up Next, Mark as Played, View Full Description, and Delete.
My Podcasts: Your subscribed podcasts, if you have any, appear here. You can also create “stations,” which are like playlists for podcasts, that appear alongside subscribed podcasts in this screen.
Featured: This screen lists podcasts selected by Apple’s editors. You can open a podcast to watch or listen to individual episodes or to subscribe.
Top Charts: The Top Charts screen lists the most popular podcasts, and you can choose to view them by category. As with the podcasts listed in the Featured screen, you can play individual episodes or subscribe.
Search: You can search for podcasts here. The Search screen also displays a list of popular podcasts—just in case the contents of the two previous screens weren’t sufficient.
Now Playing: In this screen, you can see and control the currently playing episode and see what’s next in the Up Next queue (if anything).
When you first enter this screen, it displays the currently playing episode’s show art and title. Press the touchpad to see the Up Next queue and the episode timeline, which you can scrub through by pausing and then swiping left or right on the touchpad. If you swipe up and click the More
 button, you can subscribe to the podcast and choose the output speaker. If you’re subscribed to the podcast, the More button lets you mark the episode as played, view the full episode description, and choose the output speaker.
Manage Podcasts
To look for a new podcast to try, look in the Featured, Top Charts, or Search screen.
Once you find a podcast that looks interesting, you can play a single episode or subscribe to it:
Play: Choose the podcast and then choose the desired episode.
Subscribe: To subscribe to a podcast so that it appears on the Unplayed and My Podcasts screens, choose the podcast and then choose Subscribe. Apple records your subscription in the signed-in iCloud account. The podcast is added to the Apple TV My Podcasts screen, and to your subscribed podcasts in iTunes and the iOS Podcasts app (if iCloud syncing is enabled in those apps).
Unsubscribe: On the My Podcasts screen, highlight the podcast icon, press and hold the touchpad until a menu appears, and choose Delete.
Once you’ve subscribed to podcasts, you can assemble them into a station:
Create a station: Enter the My Podcasts screen. If you don’t yet have any stations, click the Create a Station button (you may have to scroll down to see it). If you already have stations, click the New Station
 button instead. Enter a name for your new station and click Done.
Next, highlight the podcasts you want to include and click the touchpad to set them to On and add them to the station. (To remove a podcast, click it again to change it to Off, or click Include All Podcasts to select everything.)
When you’re finished, press Menu to go to the Station Settings screen, where you can further tweak the station settings. Finally, press Menu again to view the station. Press Menu once again to return to the My Podcasts screen.
Modify a station: Click it in the My Podcasts screen and click Station Settings.
Delete a station: On the My Podcasts screen, highlight the station’s icon, press and hold the touchpad until a menu appears, and choose Delete.
Rip CDs for the Apple TV
Still have your music collection trapped in plastic discs? The bad news is that the Apple TV won’t play them. The good news is that it’s easy to rip CDs to your iTunes collection on your computer, where they can be accessed by your Apple TV or sent into the cloud with iCloud Music Library or iTunes Match.
Before we rip a CD, let’s fix our settings:
Open iTunes and choose iTunes > Preferences (or, in Windows, choose Edit > Preferences).
Click the General button on the toolbar.
At the bottom of the General pane, next to “When a CD is inserted,” choose Ask to Import CD from the pop-up menu (Figure 75)—or, if you have a bunch of CDs to rip at once, make the process go faster by choosing Import CD and Eject. (Needless to say, you won’t see this option if your Mac doesn’t have a CD drive.)

Figure 75: From the iTunes preferences, you can set what iTunes will do when you insert a CD into your computer’s optical drive. Select “Automatically retrieve CD track names from Internet.”
Click the Import Settings button to open the Import Settings dialog (Figure 76).

Figure 76: In the Import Settings dialog, you can set the quality you want to rip your CDs at. In the Import Settings dialog, I recommend either of two options:
Option #1: To save storage space, choose AAC Encoder from the Import Using pop-up menu. Then choose iTunes Plus from the Setting pop-up menu. These choices (shown in Figure 76, above) tell iTunes to rip CDs in a way that matches the typical quality of songs in the iTunes Store.
Option #2: To produce larger files with CD-quality audio, choose Apple Lossless Encoder from the Import Using pop-up menu.
When you’re happy with your settings, click OK to leave Import Settings, then OK again to leave Preferences.
Now, insert the CD into your computer’s optical drive (or an external drive). If you need to buy an optical drive, you might as well leap to Blu-ray—see The Blu-ray Bag of Hurt for recommendations.
If you chose Import CD and Eject back in Step 3, then iTunes begins ripping your CD automatically. Otherwise, follow the prompts to begin ripping your CD, or if you don’t see any prompts, in the iTunes navigation bar, click the CD ![]() icon and then click Import CD near the upper-right corner.
icon and then click Import CD near the upper-right corner.
After the rip, if iTunes doesn’t eject your CD automatically, click the CD ![]() icon and then click the eject
icon and then click the eject  button.
While ripping a CD, iTunes tries to import album art into the ripped file, but sometimes it can’t. Fortunately, it’s easy to add it yourself:
Search Discogs for the imported CD. Open the album listing and click the artwork to see it at full size.
Control-click the image, and choose Copy Image.
In iTunes, select the album with missing artwork and then choose Edit > Get Info (⌘-I).
iTunes may ask if you want to edit information for multiple items. If so, click Edit Items.
Open the Artwork pane in the multiple-items window.
Press ⌘-V to paste the artwork in.
Click the OK button.
After a bit of processing, iTunes associates the pasted-in artwork with the imported CD.
To listen to your album through your Apple TV, you can AirPlay Audio from a Mac, add it to an iCloud Music Library and/or iTunes Match library (see The Music App), or turn on Home Sharing (see Listen to Music with Home Sharing).
AirPlay Audio from a Mac
Back in Master AirPlay, you learned the basics of how to send AirPlay audio from your Mac and AirPlay from iTunes. Here are a couple more Mac audio AirPlay tricks.
AirPlay All Mac Audio
Just as AirPlay Mirroring and AirPlay Display let you send video from your Mac to your Apple TV, you can do the same for audio. Press the Option key and click the Volume ![]() icon on your Mac’s menu bar. (If you don’t see it, enable it in System Preferences > Sound by selecting the Show Volume in Menu Bar checkbox.) You see a list of all available audio outputs, including AirPlay devices (Figure 77).
icon on your Mac’s menu bar. (If you don’t see it, enable it in System Preferences > Sound by selecting the Show Volume in Menu Bar checkbox.) You see a list of all available audio outputs, including AirPlay devices (Figure 77).

Choose an output option and all the noise made by your Mac (including system beeps and notification pings) plays through that device.
Extend AirPlay with Airfoil
Transmitting all audio from your Mac to your Apple TV is cool, but you may hear unwanted sounds as well, like error beeps. And it’s cool that iTunes can output to multiple AirPlay receivers, but what if you want to do that with another application? The Airfoil app from Rogue Amoeba makes such AirPlay wizardry possible.
Once you’ve installed Airfoil, launch it and select your source app from the menu at the top of the window (Figure 78).

Below the menu is a list of receivers. To send audio to a receiver, click the Transmit ![]() button aligned with it. (You might have to quit and reopen the source application before Airfoil can AirPlay the audio.) You can send audio to multiple outputs, and you can adjust the output volume for each AirPlay device with the slider underneath the Transmit button.
button aligned with it. (You might have to quit and reopen the source application before Airfoil can AirPlay the audio.) You can send audio to multiple outputs, and you can adjust the output volume for each AirPlay device with the slider underneath the Transmit button.
Don’t have enough speakers to go around? With Rogue Amoeba’s free Airfoil Satellite and Airfoil Speakers apps for iOS, Mac, Android, Windows, and Linux, you can turn your devices into Airfoil receivers!