
View Your Photos and Home Movies
Nothing says “Party!” like 700 vacation photos. All kidding aside, the Apple TV makes it easy to display your photos on your TV. And, you can easily AirPlay photos and home movies from your iPhone, iPad, or iPod touch. tvOS 10 introduced a new feature, called Memories, that helps automatically sort your best photos.
I also show you how to use your photos for Customizing the Screensaver and Making Slideshows.
Home movies are great on the Apple TV. I explain how to View Photos and Videos via AirPlay directly from your iOS devices and even view iMovie projects in The iMovie Theater App.
The Photos App
The Photos app displays photos from three different iCloud services: iCloud Photo Library, My Photo Stream, and iCloud Photo Sharing.
You may already have one or more of these photo services enabled on the Apple TV—if that’s the case, when you open Photos, you’ll see photos. But if you need to tweak your setup, here’s the basics of how to turn on each of these services (to go beyond the basics, read Take Control of iCloud).
Setting up iCloud Photo Library
This Apple service can sync all your photos and videos between all your Apple devices (and Windows PCs).
To set a device to sync photos and videos with iCloud Photo Library:
Mac: Open Photos, go to Photos > Preferences > iCloud, and check iCloud Photo Library. All your photos and videos in Photos will be uploaded to your iCloud Photo library.
iOS: Go to Settings > iCloud > Photos, and turn on iCloud Photo Library.
Windows: Install and configure the iCloud for Windows app.
To enable iCloud Photo Library on the Apple TV, go to Settings > Accounts > iCloud. Ensure that you are signed in with the same iCloud credentials that you are using with iCloud Photo Library elsewhere and turn on iCloud Photo Library. In my testing, pictures and albums appeared quickly, if not quite instantaneously.
Setting up My Photo Stream
With this Apple service, new photos taken with an iOS device or imported onto a Mac or Windows PC are automatically copied to Apple’s iCloud servers and then spread to all your other devices. There are a few fussy rules for how this works, exactly, but for most people the upshot is that My Photo Stream simply and automatically displays all your recent photos on a variety of devices, including the Apple TV.
To set a device to add new photos to My Photo Stream:
Mac: Turn on My Photo Stream in order to add imported photos from a non-Apple camera. Go to the preferences for your app (iPhoto, Aperture, or Photos) and select the My Photo Stream checkbox (in Photos, choose Photos > Preferences and look in the iCloud pane). Now, newly imported photos appear in your My Photo Stream and you can view your My Photo Stream on your Mac.
iOS: Go to Settings > Your Name > iCloud > Photos and turn on My Photo Stream. Now, newly taken photos appear in your My Photo Stream and you can view your My Photo Stream in the Photos app.
Windows: You can access My Photo Stream through the iCloud for Windows app.
To view your My Photo Stream in the Photos app on your Apple TV, on the Apple TV, go to Settings > Accounts > iCloud. Ensure that you are signed in with the same iCloud credentials that you are using with My Photo Stream elsewhere.
It may take a few hours or even overnight before you see your photos. In testing, one of my editors didn’t see any photos even after waiting until the next day. She solved the problem by returning to the iCloud screen on her Apple TV, turning off the My Photo Stream switch for a moment, and then turning it back on.
Setting up iCloud Photo Sharing
Albums from iCloud Photo Sharing include albums that you’ve created and albums that have been shared with you. You may also see these albums referred to as “streams.” You can create these albums on a Mac or an iOS device, and you can share them with your friends and family. You an also view them on your Apple TV.
To turn on iCloud Photo Sharing:
Mac: Go to System Preferences > iCloud, click the Photos Options button, and select the checkbox for iCloud Photo Sharing.
iOS: Go to Settings > Your Name > iCloud > Photos, and turn on iCloud Photo Sharing.
On Photos on a Mac or in iOS, to populate an iCloud Photo Sharing album, select one or more images in the Photos app, click (or tap) the Share ![]() icon, select iCloud Photo Sharing, and follow the prompts. (For directions, see my other book, Take Control of iOS 11.)
icon, select iCloud Photo Sharing, and follow the prompts. (For directions, see my other book, Take Control of iOS 11.)
To view your iCloud Photo Sharing albums in the Photos app on your Apple TV, on the Apple TV, go to Settings > Accounts > iCloud. Ensure that you are signed in with the same iCloud credentials that you are using with iCloud Photo Sharing elsewhere, and select iCloud to see the iCloud screen and turn on the iCloud Photo Sharing switch.
Viewing Your Photos
The Photos app has as many as four screens, and if you’ve turned on iCloud Photo Library, you can switch among them from the navigation bar at the top of the app:
Photos: This screen displays all your photos from iCloud Photo Library in a giant grid.
Memories: New to tvOS 10, Memories are automated collections of photos generated in Photos for iOS and macOS and synced to your Apple TV via iCloud Photo Library. They’re based on photo attributes like date taken, location taken, and who is in the picture. Be sure to check Memories regularly, because more are added all the time (Figure 79).

Figure 79: Memories are based on date, location, and who’s in the picture. Check them often, as Apple regularly updates them. Open a Memory, and you see a collection of photos headlined by a slideshow of any photos and videos in the Memory (Figure 80).

Figure 80: There are two options for viewing Memories: browsing photos as normal, or playing the header video at the top, which includes all the photos in that Memory. Swipe down to reveal Places, which shows the Memory’s photos on a map, and Related, which exposes related Memories (Figure 81).

Figure 81: Memories on the Apple TV can display your photos on a map and show related Memories. Shared: This screen appears only if you’ve turned on My Photo Stream or iCloud Photo Sharing (or both). Photos shown here come from various services, including the My Photo Stream, iCloud Photo Sharing, and the Family Sharing photo album (Figure 82). (If you’ve not enabled iCloud Photo Library on the Apple TV, you see only this screen, and it has no navigation bar at the top, since there are no iCloud Photo Library photos on the device for you to view.)

Figure 82: Photos lets you view your My Photo Stream and shared iCloud Photo Stream albums. In this image, the Activity stream is highlighted: it shows the most recent photos. Here’s how the Shared screen is split up:
Activity: This collection amalgamates all the albums that are shared by either you or your friends in iCloud.
My Albums: This collects the albums that you’ve created within any of the shared services that display on this screen.
Shared by Family and Friends: Here are the iCloud Photo Sharing albums that have been shared with you by other people.
Select an album or stream to view it. Your Activity stream and My Photo Stream are laid out as a scrolling mosaic, while albums are displayed as a grid of photos (Figure 83).

Figure 83: While viewing a photo grid, you can scroll up, down, left or right. Albums: These are your private online albums from iCloud Photo Library.
Here are some tips for working with photos and videos:
View photos full-screen: To see a highlighted photo full-screen, press the touchpad. You can swipe left and right to scroll through full-screen photos.
Run a slideshow: While viewing an album or stream, click Play Slideshow in the upper-right corner. (See Making Slideshows, later in this chapter.)
“Like” and read comments on shared albums: While viewing a full-screen photo from an album in the Shared screen, press the touchpad and swipe up to view who posted the photo and when, as well as any comments or likes (Figure 84). You can “like” or “unlike” a photo in this view by pressing the touchpad again—however you can only view comments, not leave them. Press Menu to back out of this view.

Figure 84: Friends you’ve shared your photos with can like or comment on them. To see these, press the touchpad while viewing a photo. To “like” a photo, press the touchpad again. Delete or unsubscribe from a shared album: Open an album in the Shared screen and select People in the upper-right corner. If you own the album, you can delete it by clicking Delete Shared Stream. If you do not own the album, you can unsubscribe from it by selecting Unsubscribe.
(You can’t delete individual photos or videos on the Apple TV. You have to do that from a Mac or iOS device, or on iCloud.com.)
Play a video: A video is denoted by a camera
 icon in the lower-right corner of its thumbnail. Highlight the thumbnail and press the touchpad. As with most videos, you can press Play/Pause to stop playback. To scrub through a video, first pause it and then swipe left or right.
View a Live Photo: If the photo you’re viewing is a Live Photo, with a short, embedded video, you can view that video by opening the photo and then pressing and holding the touchpad for several seconds. Note that as of tvOS 10, there is nothing in the interface to denote that a photo is “live.”
View Photos and Home Movies with Home Sharing
You can use your Apple TV to view photos stored on your computer, but first you have to set Home Sharing up to share them. Open iTunes (yes, iTunes) and do the following:
On your computer, turn on Home Sharing if it isn’t already enabled—choose File > Home Sharing > Turn On Home Sharing.
Choose File > Home Sharing > Choose Photos to Share with Apple TV.
In the Photo Sharing Preferences dialog, select the checkbox labeled Share Photos From and then choose from the adjacent pop-up menu whether you want to share a Photos library or a folder.
Pick among the remaining options to share either the entire library, folder, or only certain sub-folders, albums, or Faces. You can include videos as well; see the sidebar, Sharing Home Movies with the Apple TV, just ahead, for more on the “Include videos” checkbox.
Click the Done button, located at the lower-right corner.
Your photos (and home movies) are now viewable in the Computers app on the Apple TV. Your photos are also available for use in the Apple TV screensaver, as I explain in the next topic, Customizing the Screensaver (look for the Home Sharing bullet item).
Customizing the Screensaver
By default, when you leave your Apple TV alone for 5 minutes, it’ll display the Aerial screensaver, which shows overhead videos of places around the world. Let’s look at a few ways to mix up the screensaver.
You might have noticed a Set as Screensaver button in the upper-right corner of the various albums and streams described earlier in this chapter. Select it, and you are asked if you want to use that album or stream for your screensaver. Choose Yes, and the screensaver displays random photos from the album or stream.
For more control over your screensaver, visit Settings > General > Screensaver (Figure 85). From there, you can set how long to wait until the screensaver starts and whether to show the screensaver while playing music. You can also preview your screensaver.

To change the type of screensaver, click Type and select one of the following:
Aerial: The default Aerial screensaver shows overhead videos of areas around the world, shot with helicopters and drones. While it’s a great default, note that it can consume a lot of bandwidth every time new videos are downloaded. You can control how often Aerial downloads new videos in Settings > General > Screensaver > Download New Videos. Choose Never to prevent Aerial from downloading new videos.
Apple Photos: This option displays a number of nature photos, and was the default screensaver on previous Apple TVs. You can pick from a few sets of images, including Animals and Landscapes.
My Photos: With My Photos, you populate the screensaver with images from the Photos app:
Choosing My Photos takes you to the Photos app. If you’ve turned on iCloud Photo Library on your Apple TV, those photos do not work with the screensaver feature—the screensaver works only with photos shown on the Shared screen (in other words, it works only with photos that aren’t in your iCloud Photo Library; see Viewing Your Photos, earlier, for information about the Shared screen). To access this screen after you’ve chosen My Photos, you may need to press Menu.
Select a stream or album in the Shared screen, click the Set as Screensaver button near the upper-right corner, and then click Yes.
Home Sharing: The Home Sharing option lets you make a screensaver from photos shared via iTunes, as well as thumbnails of Home Videos. Interestingly, it also lets you create a screensaver from album covers for your music, movies, and even podcasts stored in iTunes.
My Music: This screensaver displays album covers from your music library in the Music app.
All but the Aerial screensaver also let you choose a transition type, which sets how photos are displayed. Here’s a quick description of each:
Random: For people who can’t decide, Random uses an assortment of any of the below.
Cascade: This animated grid works well for displaying lots of photos at once, and it is ideal for lower-resolution photos taken with mobile devices.
Flip-Up: With Flip-Up, one large photo shows and then it slides to the side or disappears, making room for the next photo. Flip-up is good for high-quality, high-resolution photos.
Floating: Generally a safe choice for all types of photos, this option shows lots of mixed-size photos floating up from the bottom of the screen and occasionally spinning.
Origami: Select Origami and the screensaver displays several images at a time. The images “fold” on and off the screen.
Reflections: Reflections shows mosaics of medium-sized photos on a white background. It’s called Reflections because you can see the pictures reflected at the bottom of the screen. It’s a safe choice for most photos.
Shifting Tiles: Good for all photo sizes, Shifting Tiles shows photos as a tile mosaic, with one or two tiles at a time sliding out to be replaced with new ones.
Shrinking Tiles: This one starts with one or more large photos, then “shrinks” them down to fit more photos on screen, and then replaces them all with more large photos and repeats the cycle. High-resolution photos look great in this screensaver.
Sliding Panels: Recommended for larger photos, Sliding Panels shows grids of photos in various sizes.
Snapshots: With Snapshots, you see white-bordered photos stack one at a time and float up. Older images fade from color into black and white. I like this one for larger pictures.
Ken Burns: Named for filmmaker Ken Burns, who pioneered the effect of zooming and panning on a still image, one large photo at a time pans across the screen, with the zoom level changing simultaneously. You can set how long each slide appears and what transition to use.
Classic: This choice simply shows one large image at a time. Like Ken Burns, it has its own settings for screen time and transitions.
Making Slideshows
While viewing an album or stream in the Photos app, select Play Slideshow in the upper-right corner to start a slideshow. You’ll be taken to the Slideshow screen (Figure 86). If you select Start Slideshow, the slideshow begins right away, but you can also set whether to shuffle photos (display them in random order) and repeat photos, and pick themes and transitions. Notice that many of the themes are identical to those I just described for the screensaver.

Once a slideshow has begun, press Menu to end it.
You can also create video slideshows in Photos on the Mac that can be exported into iTunes for playback on the Apple TV:
In Photos, select the pictures, albums, or events you want to turn into a slideshow.
Choose File > Create > Slideshow.
Give your slideshow a name and click OK.
Photos shows the new slideshow in the Projects pane (or selects it in the Projects sidebar category, if the sidebar is showing).
As desired, set up a theme, pick some music, and set up a duration. If you need help, check Jason Snell’s Photos: A Take Control Crash Course.
Click Export in the upper-right corner, or choose File > Export > Export Slideshow.
In the Save dialog (Figure 87), type a name for the exported slideshow and choose an export folder from the Where pop-up menu (the default Movies folder is fine).

Figure 87: To export Photo images as a slideshow for the Apple TV, choose File > Export and then make your Export dialog look like this. From the Format pop-up menu, choose High Definition (1080p).
Select “Automatically send to iTunes.”
Click Save.
The export process may take several minutes—or longer—depending on how many files you’ve selected for the slideshow.
After the export finishes, the slideshow appears in your Home Videos collection in iTunes. If you’ve turned on Home Sharing, you can access it on the Apple TV in the Computers app. Look under Home Videos.
The iMovie Theater App
Earlier, in View Photos and Home Movies with Home Sharing, we looked at how the Apple TV can access home movies stored on a Mac using Home Sharing. That’s all fine, but for iMovie buffs, there’s another option—the iCloud-powered iMovie Theater, which works for movies up to 15 minutes in length. (Uploaded movies to iMovie Theater count against your iCloud storage quota.)
Sharing a movie to iMovie Theater couldn’t be easier:
Mac: Check your iCloud settings. Go to System Preferences > iCloud, and if you are not already signed in to iCloud, sign in. Now, find the iCloud Drive checkbox, and click its Options button. In the dialog that appears, ensure that the iMovie checkbox is selected and click Done.
Next, switch to iMovie 10.1 or later and make sure you’re in the Projects view (choose Window > Go to Projects). Select the project that you want to share, click the Share
 button in the upper-right corner, and then click Theater (Figure 88).
Figure 88: To send a project to iMovie Theater from a Mac, select it, click the Share button, and then click Theater. iMovie switches to the Theater pane and displays a thumbnail icon for the movie with an upload progress bar.
iOS: Open the Settings app, tap iCloud, and sign in to iCloud, if you haven’t already. Still in the iCloud settings screen, tap iCloud Drive and enable iCloud Drive, if you haven’t already. Now, switch into iMovie, select a video in the Projects screen, tap the Share
 button, and then tap iMovie Theater.
To check your movie’s upload progress, on the Theater screen, tap the movie thumbnail. Various controls appear, including a progress circle.
Once your movie finishes uploading to iCloud, to see it, open the iMovie Theater app from the Apple TV Home screen (Figure 89).

View Photos and Videos via AirPlay
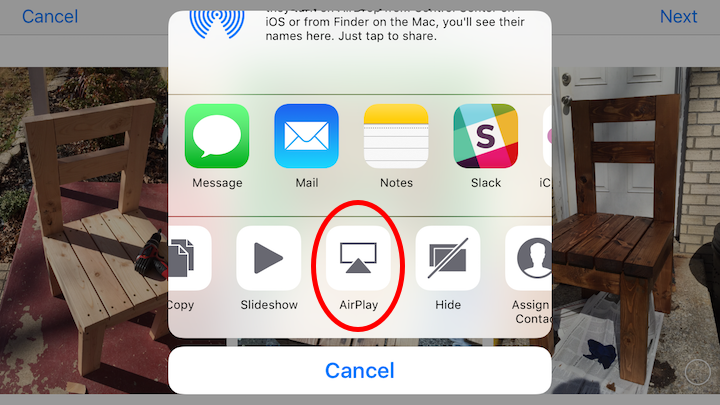
It’s easy to AirPlay photos and videos from an iOS device. Choose any photo or video, tap the Share ![]() icon, tap Next, tap the AirPlay icon, and choose your Apple TV (Figure 90).
icon, tap Next, tap the AirPlay icon, and choose your Apple TV (Figure 90).
As long as AirPlay is enabled, any photo or video that you pull up in the Photos app appears on your Apple TV. To indicate this, the Photos app displays an AirPlay ![]() icon in the upper-right corner.
icon in the upper-right corner.
To turn off AirPlay, tap that AirPlay ![]() icon followed by Cancel, or use Control Center (see AirPlay from iOS).
icon followed by Cancel, or use Control Center (see AirPlay from iOS).