
Control Your Apple TV
The Siri Remote is simple, yet highly advanced. It’s used to navigate the Apple TV’s interface, summon Siri, play games, and even to control your home entertainment center. I explain how to use it in the pages that follow.
I also look at other remote options in these topics:
Run the Apple TV Remote App discusses the Apple TV Remote app. Designed for the fourth-generation Apple TV and Apple TV 4K, this app is optimized for the iPhone and iPod touch. It can do nearly anything the Siri Remote can do, plus its software keyboard eases password entry.
Using the iOS 11 Control Center explains how to use a shortcut in iOS’s Control Center to operate your Apple TV.
Use the Old Apple Remote describes how to use the older Apple remote that came with some older Macs or with an older Apple TV.
Use a Third-Party Remote talks about mapping pretty much any remote to an Apple TV.
Run the iTunes Remote App looks at how to use this iOS app as an Apple TV remote. Like the Apple TV Remote app, this app simplifies password entry.
Use the Remote App on the Apple Watch explains how to control your Apple TV from your wrist.
Become an Apple TV Keyboard Jockey covers connecting a wireless keyboard to your Apple TV.
Meet the Siri Remote
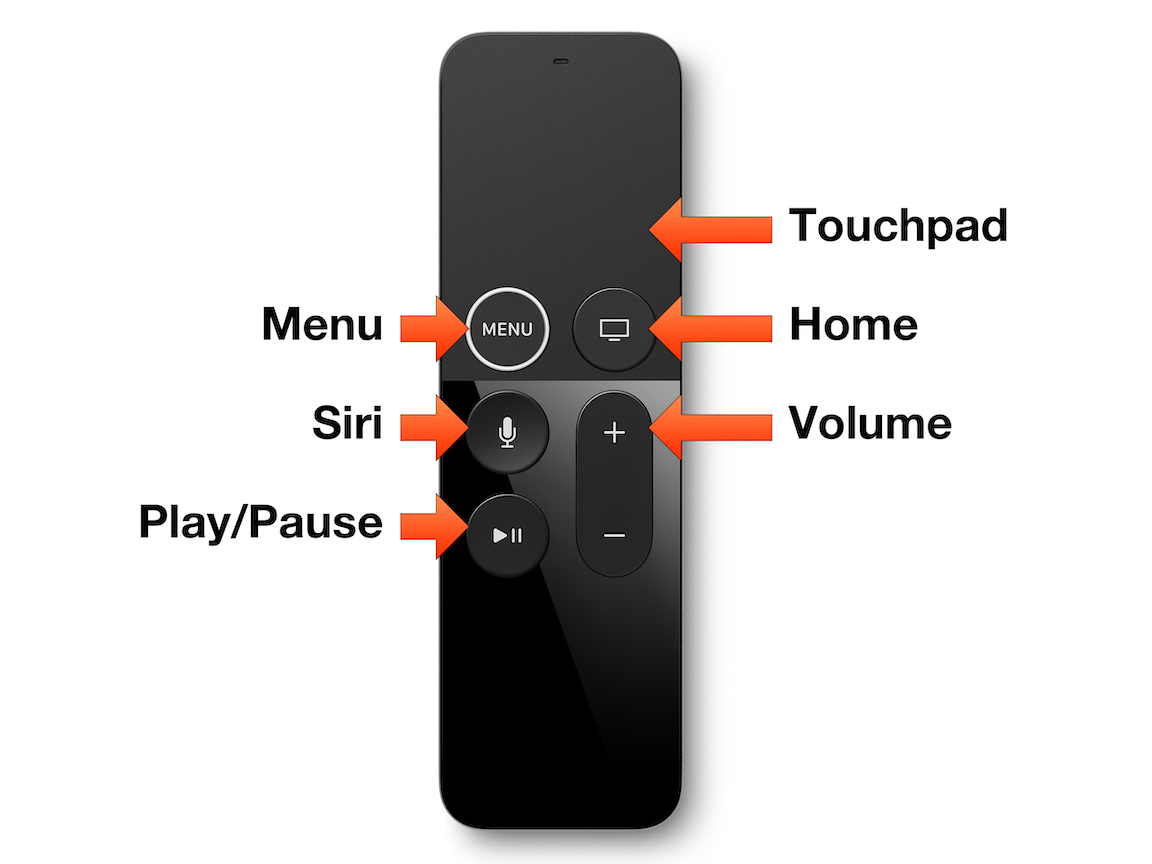
Let’s take a look at each button on the Siri Remote (Figure 4).
Here’s what you can do with each button on the remote:
Touch surface (or touchpad): Swipe up, down, left, or right to move the highlight. If you find swiping to be too fiddly, you can tap in the direction you want to move instead. To select the highlighted item, click the touchpad.
Menu: In the Apple TV interface, pressing the Menu button takes you back to the previous screen, but in some apps, it brings up a menu. Long-press Menu to return to the Home screen in one jump.
Home: By default, one press returns you to the TV app. A second press takes you to the Home Screen. A double press brings up the App Switcher. Long-press the Home button to bring up the sleep menu.
Play/Pause: As you would expect, this button starts and suspends playback. It also acts as an action button in some apps.
Volume Up/Down: The volume buttons control the loudness of your TV, receiver, soundbar, or other connected speaker. See Control TV and Audio with the Siri Remote, slightly ahead.
Siri: To speak a Siri request, hold the Siri button to see the Siri prompt and keep the button down while you speak into the Siri Remote. When you finish speaking, release the button. The main microphone is near the top front of the touchpad. The mic on the back is used to filter ambient noise. (For more about what to say, read Dictate Text with the Siri Remote, Searching with Siri, and Siri Video Options, later.)
The Siri Remote has a few more interesting components:
Accelerometer and gyroscope: These add motion-sensitivity to the remote, allowing it to serve as a 3D controller for some games.
Infrared light: Found on the top edge, this light makes it possible for the Siri Remote to control TVs that do not support HDMI-CEC.
Lightning port: The Siri Remote is powered by an internal lithium-ion battery, which can be recharged via the Lightning port on the bottom edge. The Lightning port is also used for the Remote Loop accessory, which I discuss a few pages ahead, in the sidebar Protecting Your Siri Remote.
Siri Remote Shortcuts
Here’s a collection of shortcuts that you may want to memorize, in order to get more out or your remote:
Put the Apple TV to sleep: Hold the Home button for several seconds, and click Sleep when prompted.
Restart the Apple TV: Press and hold the Menu and Home buttons for a few seconds until the LED on the Apple TV flashes. Then release the buttons.
Return to the Home screen without pressing Home: Hold down the Menu button for a few seconds.
Highlight the first Home screen icon: While on the Home screen, press Menu.
Start the screensaver: On the Home screen, highlight the first icon as in the above bullet item, and press the Menu button once.
See the Now Playing screen: While a song is playing in the Music app, press and hold the Play/Pause button for several seconds.
See Siri commands: Press the Siri button once and wait.
Charging the Siri Remote
If there’s anything certain in life, it’s the fact that batteries run down. When your Siri Remote needs a fresh charge, the Apple TV tells you with an onscreen alert. Connect your remote to power with the Lightning to USB cable that came with your Apple TV, or if that’s gone missing, try any Apple USB adapter, such as one that came with an iPad or iPhone. (Plug the USB end of the cable into a computer or into a power-to-USB adapter.)
To check the remote’s charge, select Settings > Remotes and Devices and look at the battery indicator on the Remote menu item or click Remote to see the exact charge percentage.
According to Apple, it takes approximately 9 hours to charge the remote and it’s okay to use the remote while it’s charging.
Control TV and Audio with the Siri Remote
The Apple TV and/or Siri Remote can turn your TV on and off, and adjust the volume, using either HDMI-CEC or infrared:
HDMI-CEC: Newer TVs support the HDMI-CEC protocol (CEC is short for Consumer Electronics Control). This protocol allows HDMI-connected devices to control one another. If your TV supports HDMI-CEC, the Apple TV can turn the TV on when it’s awakened, and on some sets even change the input to the HDMI port the Apple TV is connected to. The Apple TV can also use HDMI-CEC to control the volume on supported devices. Some TVs that support HDMI-CEC can even control the Apple TV with the TV remote.
Infrared: TVs and audio devices that do not support HDMI-CEC can be controlled by the Siri Remote, thanks to the built-in infrared light on the top edge of the Siri Remote. Infrared can’t be used to change input, but the Siri Remote can turn your TV on or off and control the volume—aim the Siri Remote at the front of the Apple TV and make sure nothing blocks the path of the infrared light.
Out of the box, the Apple TV should configure itself to operate your TV’s volume and power automatically. If you don’t want the Apple TV to turn your TV on and off, you can disable that in Settings > Remotes and Devices > Turn On Your TV with Your Remote (it may be called Control TVs and Receivers). Likewise, you can disable volume control in Settings > Remotes and Devices > Volume Control.
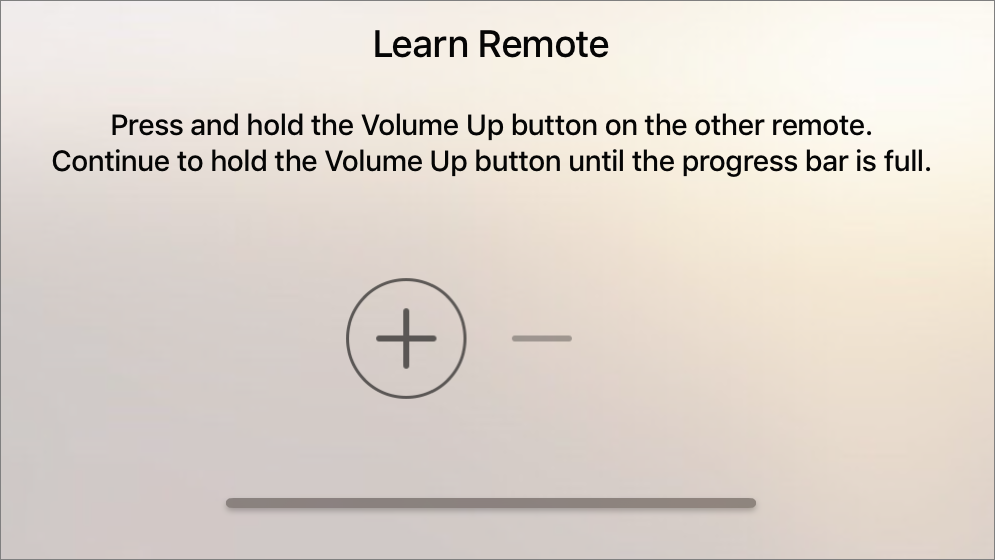
To program the volume buttons on the Siri Remote manually, go to Settings > Remotes and Devices > Volume Control and choose Learn New Device. You’re prompted to press the Volume Up and Volume Down buttons on the device’s remote control so the Apple TV and Siri Remote can learn how to control that device (Figure 5).
Dictate Text with the Siri Remote
You can use the Siri Remote to dictate text to the Apple TV. But first, you must activate it with one of two methods (unless you activated it during Initial Setup):
Go to Settings > General, scroll down, and turn on Dictation. Also in Settings > General, you can select About Dictation to read about how most of your spoken text are sent over the internet to Apple to be processed, but text spoken into username and password fields is processed only locally.
If the Apple TV has never had Dictation turned on before, while viewing a text-input field, hold down the Siri button to display a screen prompting you to use dictation and choose Use Dictation.
With dictation enabled, you can press and hold the Siri button to speak text into any text-entry field (Figure 6).

Just as with Siri commands, be sure to keep the button pressed until you’re finished speaking. You aren’t limited to having Siri recognize words; it can also understand numbers, letters, and punctuation, so you can speak passwords.
Run the Apple TV Remote App
The Apple TV Remote app perfectly emulates the Siri Remote, and it even adds a few features, such as easier text entry and a game controller mode.
Setting up the Apple TV Remote App
To get started, download the free Apple TV Remoteapp from the App Store on your iPhone or iPod touch.
Turn your TV on and change it to the Apple TV’s input. Open the Apple TV Remote app, tap Add Apple TV, and tap your Apple TV’s listing. A 4-digit pairing code appears on your TV screen. Enter that code in the app to pair the app to your Apple TV (Figure 7).
Using the Apple TV Remote App
The commands and shortcuts for the Siri Remote also work in the Apple TV Remote app (see Meet the Siri Remote). However, there are a few additional features:
Media control: While video is playing, 10-second skip buttons appear to either side of the Menu button. Press these to rewind and fast-forward in the video. Or, to scrub through the video’s timeline, tap Details in the upper right (Figure 8).

Figure 8: While watching video, you can use the skip buttons to navigate or tap Details at the top right to scrub the video’s timeline (left). To scrub, drag the small white playhead on the timeline bar horizontally (right). Text entry: When you select a text-entry field with the app’s touchpad, a text-entry field and onscreen keyboard appear in the app. Enter text and tap Go to send it. If the keyboard doesn’t go away on its own, you can tap Done to dismiss it—to bring it back, tap the Keyboard
 icon (Figure 9).
Figure 9: The Apple TV Remote app makes text entry a snap (left). To bring back the keyboard, tap the Keyboard icon at the top of the screen (right). Game mode: While playing some games, you may see a Game Controller
 icon in the app. Tap it to reveal a landscape-oriented game controller—the controls are the same, but better oriented to gaming. Tap Close to leave this mode (Figure 10).

Using the iOS 11 Control Center
You can control your Apple TV from the iOS 11 Control Center, but you have to enable Apple TV Remote first in Settings > Control Center > Customize Controls.
You’ll also need to pair your iOS device to your Apple TV if it’s not already paired:
On the Apple TV, go to Settings > Remotes and Devices > Remote App and Devices.
Unlock your iOS device and bring it close to the Apple TV box.
A Pair Apple TV box should appear on your iOS device. Tap pair and enter the PIN that appears on your TV.
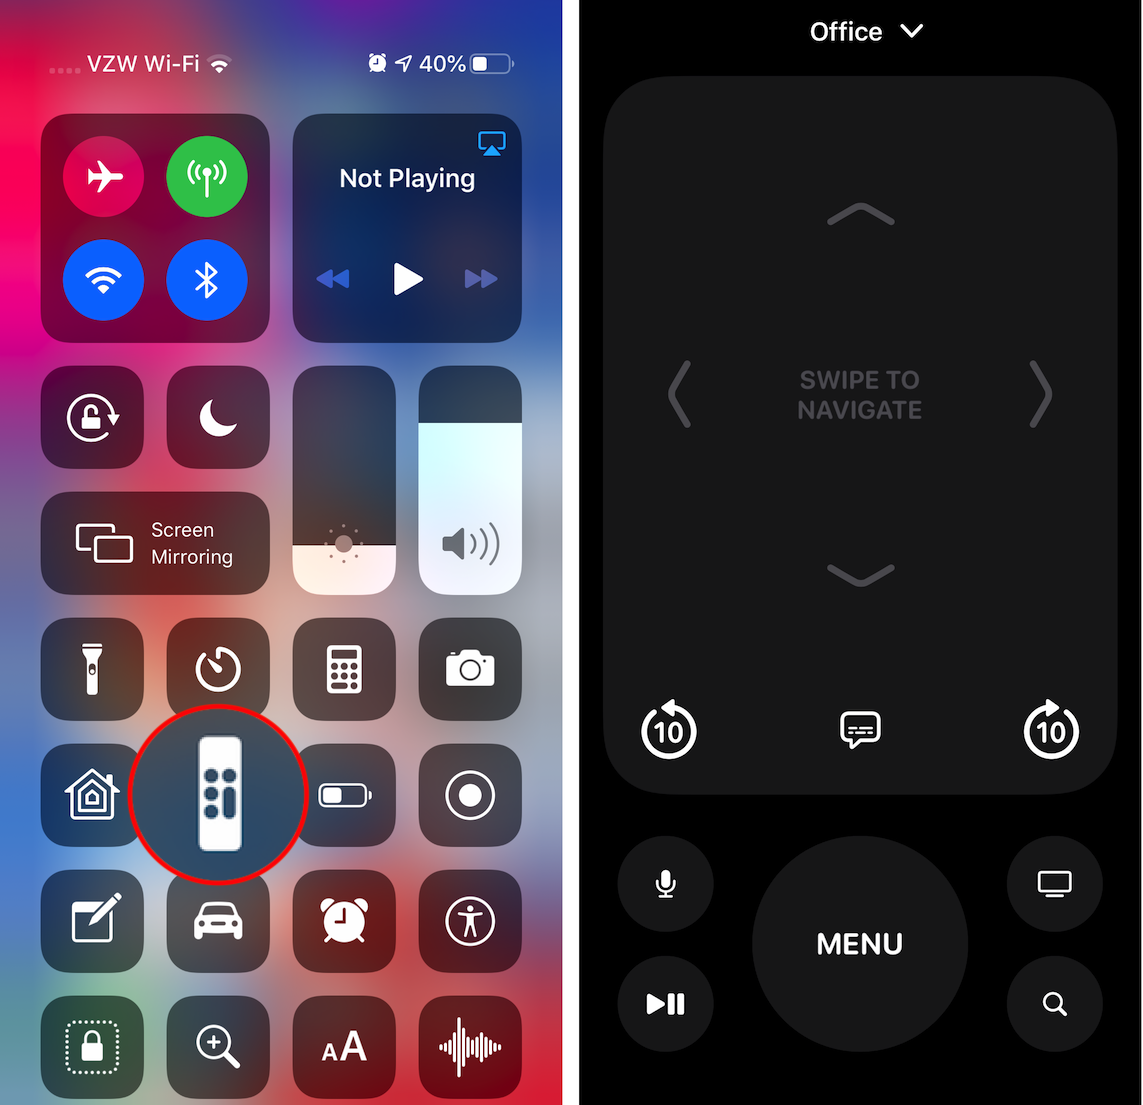
From Control Center, tap the Apple TV button to reveal the remote, even while the iOS device is locked (Figure 11). The controls work the same as the Apple TV Remote app. You do not have to have the app installed to see the Apple TV Remote option.

Use the Old Apple Remote
You can use an older Apple Remote, if you happen to have one, to control the fourth-generation Apple TV (Figure 12).

Here’s what you can do with the controls on the Apple Remote:
Directional ring: Located at the top of the Apple Remote, this ring has dots to indicate up, down, left, and right. Press a dot to navigate the menus. Less obviously, you can press the Up or Down dot to reveal additional options while playing content.
Select: Press the silver button in the center of the directional ring to select menu options.
Menu: The Menu button is a bit of a misnomer, as it doesn’t display a menu, but rather takes you back to the previous screen.
Play/Pause: This button starts and suspends playback.
Use a Third-Party Remote
Are the Siri Remote or Apple Remote not doing it for you? Too small? Too hard to hold? That’s cool; the Apple TV can be programmed to use any infrared remote, not just a universal remote. In a pinch, you can use an old, unused remote to control your Apple TV.
To teach the non-Apple remote how to communicate with the Apple TV, follow these steps:
On the Apple TV, navigate to Settings > Remotes and Devices > Learn Remote.
If the remote you want to set up is a universal remote, working on that remote, choose an unused device.
Select Start on the Apple TV screen.
For each of the navigation and selection buttons shown on the Learn Remote screen, hold down the corresponding button on your remote until the bar at the bottom of the screen is full (Figure 14). If you make a mistake, press the Menu button on the Siri Remote to back out and start again from the beginning.

Figure 14: You can choose almost any button on your remote to stand in for various Apple TV commands. Enter a name for the remote.
After entering a name, you’re technically done. However, one essential button is missing from the guided setup: the Play/Pause button.
Unless you’ve run out of extra buttons on your remote, select Set Up Playback Buttons to see options for not only play and pause, but also rewind and fast forward, previous and next chapter, and even skip back and skip ahead (which rewind or fast-forward your media 30 seconds). Set these just as you set the basic buttons. If any of these controls doesn’t match an available button on your remote, press the Right button on the remote to skip its setup icon.
The Remotes and Devices screen now lists your remote, using the name you gave it, under Learned Remotes.
If you later decide that the buttons you chose aren’t ideal, you can make changes by navigating to Settings > Remotes and Devices and selecting your remote from the Learned Remotes list. You can rename the remote, delete it entirely, or redo the basic or playback buttons.
Run the iTunes Remote App
The Apple TV Remote app, discussed previously, is optimized for the fourth-generation Apple TV and the iPhone screen size. If that won’t do, you’ll be glad to know that the previous Remote app is still available under the iTunes Remote name. It offers a few advantages over the Apple TV Remote app, such as optimization for any iOS screen size and the capability to connect to iTunes libraries.
Setting Up the iTunes Remote App
To begin, download the free iTunes Remote app from the App Store.
Open the iTunes Remote app to its main screen (Figure 15, left).

Of the two ways to connect the iTunes Remote app to your Apple TV, Home Sharing is better if you already have it set up on the Apple TV, but the manual method is better for connecting to a single Apple TV without dealing with Home Sharing. To make the connection:
Manually: Tap Add a Device (at left in the figure above). A 4-digit code appears on your iOS device. On the Apple TV, go to Settings > Remotes and Devices > Remote App > Your iOS Device and enter the code. (To unpair your iOS device later, select it again on the Apple TV in Settings > Remotes and Devices > Your iOS Device, and select Remove when prompted.)
Via Home Sharing: Tap Set Up Home Sharing, and enter the Apple ID credentials that you use for Home Sharing. If you don’t have Home Sharing enabled on your Apple TV, iTunes Remote instructs you to turn it on; see Computers.
Next, the Remote screen shows a grid of available devices you can control from the app (shown at right in Figure 15, above).
Using the iTunes Remote App
Now that you’ve connected the iTunes Remote app to your Apple TV, select the Apple TV from the Remote screen. iTunes Remote opens the Apple TV control screen, with a large, blank gesture area where you can drag, tap, and press, just like on the Siri Remote (Figure 16, left). Near the top of the screen, notice the ? button—tap it to open the Help screen, which serves as a quick reference (Figure 16, right).

As for the buttons at the bottom of the control screen, Options ![]() currently does nothing, and Menu and Play/Pause
currently does nothing, and Menu and Play/Pause ![]() behave just as they do on the Siri Remote.
behave just as they do on the Siri Remote.
When media is playing on the Apple TV, you can tap Now Playing in the upper right to see playback controls. To exit the Now Playing screen, tap the white ![]() arrow in the upper-left corner.
arrow in the upper-left corner.
Use the Remote App on the Apple Watch
To open the Apple Watch’s built-in Remote app, press the Digital Crown to bring up the Home screen and tap the Remote app ![]() icon.
icon.
If you used Home Sharing to set up the Remote app on your iPhone, your connected devices should appear.
If your devices don’t appear, you can pair your Apple Watch manually to control an Apple TV outside your Home Sharing circle:
In the Remote app, tap Add Device (Figure 17). A 4-digit code appears.

Figure 17: Once you’ve added your Apple TV to the Remote app’s device list (left), the app lets you navigate the Apple TV’s interface and control media playback from your wrist (center, right). On the Apple TV, go to Settings > Remotes and Devices > Remote App, and select your Apple Watch from the list.
Enter the 4-digit code.
Back on the Apple Watch, open Remote and tap your Apple TV in the list. The controls, shown in the figure just above, are simple:
Swipe: Swipe in this area to navigate the Apple TV interface.
Menu: Tap to return to the previous screen.
Play/Pause: Tap to play or pause media.
Become an Apple TV Keyboard Jockey
If you skipped reading Initial Setup you might have missed the fact that you can control the Apple TV with a Bluetooth keyboard, as I describe below. Another option is to type on your Mac’s usual keyboard with help from a third-party app that I describe in the sidebar Controlling the Apple TV with Your Mac’s Keyboard, later in this chapter.
Managing Bluetooth Keyboard Connections
To pair a Bluetooth keyboard with the Apple TV:
If your keyboard is paired with another device that’s still in use within Bluetooth range, you must unpair it first. On a Mac, you can unpair the keyboard in System Preferences > Bluetooth; in iOS, open Settings and tap Bluetooth.
Make your Bluetooth keyboard discoverable by putting it into pairing mode. A Bluetooth keyboard may put itself into pairing mode if you simply turn it on while it isn’t paired to anything else. If you need help, check your keyboard’s documentation.
Go to Settings > Remotes and Devices > Bluetooth.
Choose the keyboard, under Other Devices.
To temporarily unpair a Bluetooth keyboard:
Go to Settings > Remotes and Devices > Bluetooth > Your Keyboard.
Choose Disconnect.
To reconnect to that keyboard in the future, return to Settings > Remotes and Devices > Bluetooth and select that keyboard.
To fully unpair a Bluetooth keyboard:
Go to Settings > Remotes and Devices > Bluetooth > Your Keyboard.
Choose Forget Device.
When prompted, choose Forget Device again to unpair it from the Apple TV.
If you later change your mind and want to use the keyboard with your Apple TV, you’ll need to go through the full set of steps, above, for pairing the keyboard.
Using Your Keyboard
Using a keyboard to control your TV is easy. Press the arrow keys to navigate, press Return to simulate pressing the Siri Remote touchpad, and hit Esc when you would press Menu. The media keys might also work to control playback. If you pair an Apple Magic Keyboard to your Apple TV, you can also use a number of shortcuts detailed in this Apple Support article.