
Organize Your Information
Once you’ve gotten into the habit of collecting data in DEVONthink, you may quickly discover that you have hundreds or even thousands of pieces of information. Although you could, if you wanted, simply keep everything in your inbox and then search for whatever you need, DEVONthink offers numerous ways of grouping, labeling, tagging, and otherwise organizing your information. Once you’ve shown DEVONthink how you prefer to have your information organized, you can also take advantage of its almost magical Classify features.
The better you organize your data in DEVONthink, the easier it is to find what you’re looking for and to see the connections between related items.
Understand Groups and Tags
Before I tell you how to group and tag documents, I want you to know a bit about how the two mechanisms operate.
Groups and tags are two ways of categorizing documents. Conceptually, they follow different models: you put documents in groups (so a document normally exists in only one location), whereas you apply tags to documents (so a document can have any number of tags). Of course, DEVONthink’s use of replicants makes it possible for a single document to exist in more than one location, but tags let you apply multiple categories to a document more simply and directly.
Groups tend to work best for data that has a largely self-evident logical structure, whereas tags are generally more freeform and subjective—how you want to think of particular documents rather than what data they objectively contain.
In order to enable groups and tags to work together as effectively as possible, DEVONthink uses the same underlying construct for both. That is to say, behind the scenes, both groups and tags are merely labels—pieces of metadata associated with documents. In many respects, groups and tags function (and even look) almost exactly the same, and you can mix and match groups and tags freely (but see the sidebar Stepping Stone: Are You a Grouper or a Tagger?, ahead).
However, there are some subtle differences in behavior between groups and tags, and they interact in sometimes surprising ways.
To reduce the likelihood of confusion, you should be aware of the following facts:
Every tag is also a group—of sorts. All your tags are listed under Tags in the Globals portion of the Navigate sidebar, and if you drag a document from outside DEVONthink to one of these tags (meaning it’s not already in an inbox or some other group), the only place that document appears in your database (other than in its inbox) is in that tag’s “group.”
Groups and tags can both be hierarchical—you can nest one inside another, as many levels deep as needed, just like folders in the Finder. You can drag and drop groups anywhere they appear in your database to rearrange them, but it may not be obvious how to rearrange tags. The easiest way to do so is to go to the Tags list under Globals in the Navigate sidebar and drag one tag onto another, thus making the first tag a “child” of the second one (and causing all child documents to inherit the parent tags).
When you create a new database, groups do not function as tags by default, but you can enable them to if you like; having done so, you can then individually prevent particular groups from being used as tags, just as you could before. DEVONthink refers to a group that also functions as a tag as a group tag.
To enable group names to be used as tags, first select a database in the sidebar and choose File > Database Properties. Then make sure Exclude Groups from Tagging is unchecked. This makes all groups eligible to be used as tags, as indicated by group tag
 icons that look like stacks of tags. To then prevent a particular group from being used as a tag, select that group and choose Tools > Get Info. In the Exclude From section, check Tagging. Groups that are excluded from tagging have group
  icons that look like stacks of rectangles.
In the various locations in which DEVONthink shows tags (such as in the tag bar at the bottom of the window and Tag view), group tag names appear in stacked
 tokens, whereas tags you create manually—that is, ordinary tags—appear in plain
  tokens.
When group tags are enabled, documents have tags not only for the group tag that contains them, but also for any group tags higher in the structure. So, if a document is in the Cakes group tag, which is inside the Desserts group tag, which is inside the Recipes group tag, it gets Recipes, Desserts, and Cakes tags.
Both ordinary tags and group tags apply dynamically—if you change the hierarchy of groups or of the tags in your Tags list, all documents in those groups, or marked with those tags, update themselves to reflect the current arrangement.
You can have more than one group or group tag with exactly the same name, because DEVONthink places no restrictions on how many times you can reuse a group or group tag name. However, avoid doing this if you can, as it increases the likelihood that you’ll accidentally apply the wrong tag.
If you’ve enabled groups to be used as tags, additional curiosities arise:
If a document is in a group, ipso facto, it’s tagged with that group’s name. If you remove the group’s tag from the document, the document disappears from that group (and, if that was the document’s only tag, DEVONthink moves it to that database’s inbox).
If you replicate a document to another group, not only the new replicant, but all replicants get the tag of the new group name (and its parent groups). So, if a document is in the Cookies group and you replicate it to the Sweets group, both replicants will be tagged with both group names.
If all that leaves your head spinning, don’t worry. It is a lot to keep straight, but my advice is to spend some time playing with groups and tags (following the instructions in the next couple of topics) and see for yourself how they work. If you get stuck or find that something isn’t working the way you expect, refer back to the preceding list, which may help you make sense of what you’re seeing.
Create and Use Groups
Creating groups is as easy as creating folders in the Finder (and in some cases, easier). DEVONthink gives you lots of ways to get documents into groups, including moving, duplicating, replicating, and using the groovy Classify features.
Create a Group
You can make a group in the current location in your DEVONthink database in any of the following ways:
Choose Data > New > Group (⌘-Shift-N).
From the Actions
 pop-up menu on the toolbar, choose New > Group.
Right-click (or Control-click) anywhere a group or document may appear and choose New > Group.
After creating a new group (in any of these ways), type a name for it and press Return; you can select it and click its name later to rename it. The names of empty groups are shown in gray; when a group contains one or more items, the name is shown in black.
DEVONthink places no restrictions on how many groups you can create, how deeply you can nest them, or what you can name them (you can even have multiple identically named groups in the same location if you like, which strikes me as problematic). However, I tend to get the best results—especially when using features that rely on artificial intelligence—with a modest number of groups in a database (say, fewer than a hundred or so), nested only a few layers deep, and with more than a few documents in each one.
Move Documents
You can freely reorganize your documents whenever you like. The fundamental way to do so is to manually move them between locations. To move one or more selected items, do any of the following:
Drag the item(s) to another group.
From the Actions
pop-up menu on the toolbar, choose Move To > Name of Group.Right-click (or Control-click) the document, and choose Move To > Name of Group.
Choose Data > Move To and select a group in the popover.
Classify Documents
If you’re not sure where a document belongs—or if you have a pretty good idea but want to save yourself the effort of navigating to that location—you can use the Classify features to help you choose a home for each piece of data. These features examine the contents of a document and, by comparing them to the contents of other documents in your database, recommend one or more locations in which to store it.
Classify Documents Manually
To classify a single document manually, select it and choose Tools > Inspectors > See Also & Classify (Control-S) or click the See Also & Classify ![]() icon at the top of the inspector. For now, pay attention to the top of the inspector—the Groups portion (Figure 51).
icon at the top of the inspector. For now, pay attention to the top of the inspector—the Groups portion (Figure 51).
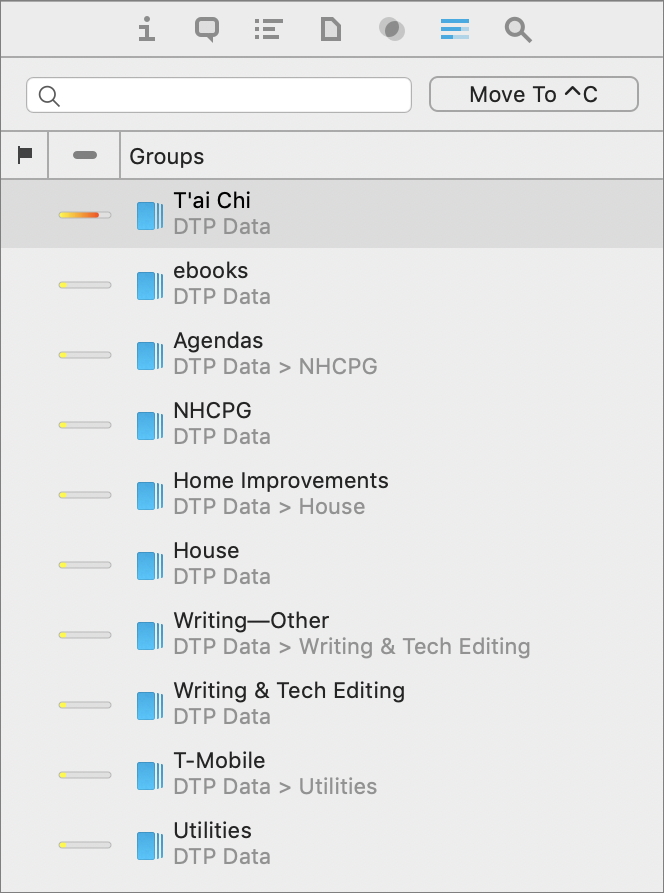
The groups listed here are the ones DEVONthink deems to have contents most similar to the document you’ve selected; the column to the left of the group names contains bars that indicate the approximate level of relevance for each group. The topmost group (that is, the one with the highest score) is selected by default. To move the document into this group, click Move To or press Control-C.
If you think a different group is a better match, double-click that group name, or select it and then click Move To. And, if you think the document belongs in more than one group, ⌘-click to select more than one and click Move To; DEVONthink puts a replicant of the document in each one.
Use the Classify and Classify to Commands
If, after using the Classify feature of the See Also & Classify inspector for a while, you realize that you nearly always accept DEVONthink’s default choice, you can skip a step or two and have DEVONthink move a document—or more than one document—right into the highest-scoring group. DEVONthink 2 used a command called Auto Classify to accomplish this; in DEVONthink 3, the command is Classify to “Group Name” (for single documents with only one recommended group), Classify to X groups (for documents that appear to belong in multiple groups), or simply Classify (if multiple documents are selected).
To use whichever version of the Classify command, select one or more documents and then choose Data > Classify (with or without additional words in the command); this also appears on the Actions ![]() pop-up menu on the toolbar and the right-click/Control-click contextual menu. DEVONthink then examines each one and moves it to the location it deems best. (If it can’t find a suitable location, it leaves the document where it is and displays an error message in the Log panel.)
pop-up menu on the toolbar and the right-click/Control-click contextual menu. DEVONthink then examines each one and moves it to the location it deems best. (If it can’t find a suitable location, it leaves the document where it is and displays an error message in the Log panel.)
Duplicate and Replicate Documents
In some cases you may want to make an exact copy of a document (a duplicate) or create a pointer that lets DEVONthink store just one copy, but display it in an additional location (a replicant).
Make a Duplicate
The most common reason to make a duplicate is that you want to modify a document but leave the original intact. (For example, you may want to use last year’s annual report as the basis for this year’s report, making additions and modifications as necessary.)
To duplicate a document, first select it and then do any of the following:
Choose Data > Duplicate (⌘-D) to make a duplicate in the same location.
Hold down the Option key while dragging the document to another group.
From the Actions
pop-up menu on the toolbar, choose Duplicate To > Name of Group.Right-click (or Control-click) the document, and choose Duplicate To > Name of Group from the contextual menu.
Make a Replicant
Replicants let you store a single document or group in several different places in your database without taking up extra disk space. (You cannot replicate a document across databases.) Because all replicants are pointers to the same underlying file, changes you make to any replicant are reflected in all of them. Replicants make sense for documents that don’t belong in just one group, but fit well into several (and for groups that seem to belong in multiple places).
For example, if you have an ebook copy of The Hunchback of Notre Dame in your database, that might belong in your Paris group, your Fiction group, or your History group. With replicants, it can be in all three at the same time, and any annotations you make in any location are visible in the others too.
To replicate a document or group, first select it and then do any of the following:
Hold down the ⌘ and Option keys while dragging the item to another group.
From the Actions
pop-up menu on the toolbar, choose Replicate To > Name of Group.Right-click (or Control-click) the item, and choose Replicate To > Name of Group from the contextual menu.
For all practical purposes, having a replicant of a document in three groups is equivalent to having a single document with three tags applied. You may need to experiment with both approaches to see whether one or the other (or a combination) works best for you.
Tag Documents
Tags function almost, but not quite, like groups (and in some cases groups and tags are interchangeable). Tags let you apply categories to documents without moving them to another location, and a given document can have as many tags as you need.
Any tags you’ve applied in the Finder stay with the document or folder when you import it in to DEVONthink; likewise, any tags you apply in DEVONthink turn into Finder tags when you export a document or group (or drag it from DEVONthink to the Finder). Furthermore, any tags you apply to indexed items appear as Finder tags on those items. DEVONthink also recognizes tags applied to email messages using MailTags (part of the MailSuite plugin for Apple Mail).
The remainder of this topic discusses tagging within DEVONthink.
Use the Tag Bar
Although it’s possible to create tags by themselves (select a tag in the Tags list and choose Data > New > Tag), that’s a rather odd thing to do; normally you’ll create a tag by applying it to a document. There are numerous ways to do this, of which the easiest is usually as follows:
Select a document.
Make sure the tag bar is visible at the bottom of the window or view/edit pane. If not, choose View > Show Tags (⌘-Control-Option-T).
To make a new tag and apply it to the current document, click in the tag bar and start typing.
When you’re finished typing the name you want the tag to have, press Tab.
The new tag appears in a blue rectangle, known as a token. You can repeat this process for as many tags as you want the document to have.
Use Autocompletion
Once you’ve created some tags, DEVONthink uses autocompletion to help you apply them. That is, as you’re typing a tag name, DEVONthink looks for matches in existing tag names (within the current database only). If it finds any, it displays them in a pop-up menu. To accept one of these suggestions, select it (using the arrow keys or the mouse) and press Return; if none of them is what you want, simply keep typing normally.
Use Pop-up Tag Menus
You may notice that if you hover over any tag in the tag bar, it displays a small arrow on the right side, indicating that it’s also a pop-up menu. Click the arrow to reveal the following commands:
Reveal Tag: Choose Reveal Tags to show the Tags list (described ahead) and highlight the selected tag in the main view.
Remove Tag: This command removes the tag from (only) the selected document.
Related Tags: Any additional tags that DEVONthink’s artificial intelligence judges as potentially applicable to this document appear under Related Tags. (Tags that are dimmed are related, but already applied to the document.) To add one of these tags, select its name.
Work with Group Tags
If you enable groups to be used as tags (see Understand Groups and Tags), the tag bar shows not only ordinary tags ![]() but also group tags
but also group tags ![]() representing the name of the tag group containing the document (if any—this doesn’t apply to documents in an inbox or at the top level of your database), as well as each of its parent tag groups.
representing the name of the tag group containing the document (if any—this doesn’t apply to documents in an inbox or at the top level of your database), as well as each of its parent tag groups.
These tags behave much like ordinary tags. Use the pop-up menu to reveal the group in the current view, to remove the current group tag, or to apply related tags. (If you remove a group tag, DEVONthink moves the document out of the selected group; if you remove all the group tags, the document moves to the database’s inbox.)
Use the Tags List
The Globals portion of the Navigate sidebar has a hierarchical Tags list, which contains a list of all your (non-group) tags, organized by database. Click any of these tags to display all the documents with that tag.
You can do the following in the Tags list:
Rename a tag: Select it, then click its name again to make it editable, and type a new name. The new name applies to all documents with that tag.
Assign a tag to a document: If you drag a document to a tag in the Tags list, DEVONthink assigns that tag to the document.
Move a tag: Tags can contain other tags, such that applying a “child” tag to a document also applies all its “parent” tags. In the Tags list, you can drag and drop tags just as you would do for groups to rearrange their hierarchical structure.
Apply Image Tags Automatically
In macOS 10.13 High Sierra or later, DEVONthink 3 can automatically tag images by analyzing them using Apple’s machine learning (the same technology used in Photos) to make educated guesses about their content. To try this, select an image and choose Data > Tags > Add Tags to Images. Although you might have better luck, my results with this feature have been so-so. For example, I tried it on a photo I took in Redwoods National Forest in northern California and got the tag “rainforest.” A photo of a roadside attraction in the same area called the One Log House got a tag of “motel.”
Work with Metadata
Numerous document attributes I’ve already discussed (such as tags, labels, flags, read/unread status, and “Exclude from” settings) can be considered metadata—that is, information about the document as opposed to the contents of the document. (For that matter, even the document’s name is a type of metadata.) The same goes for the document’s Added, Created, and Modified time stamps.
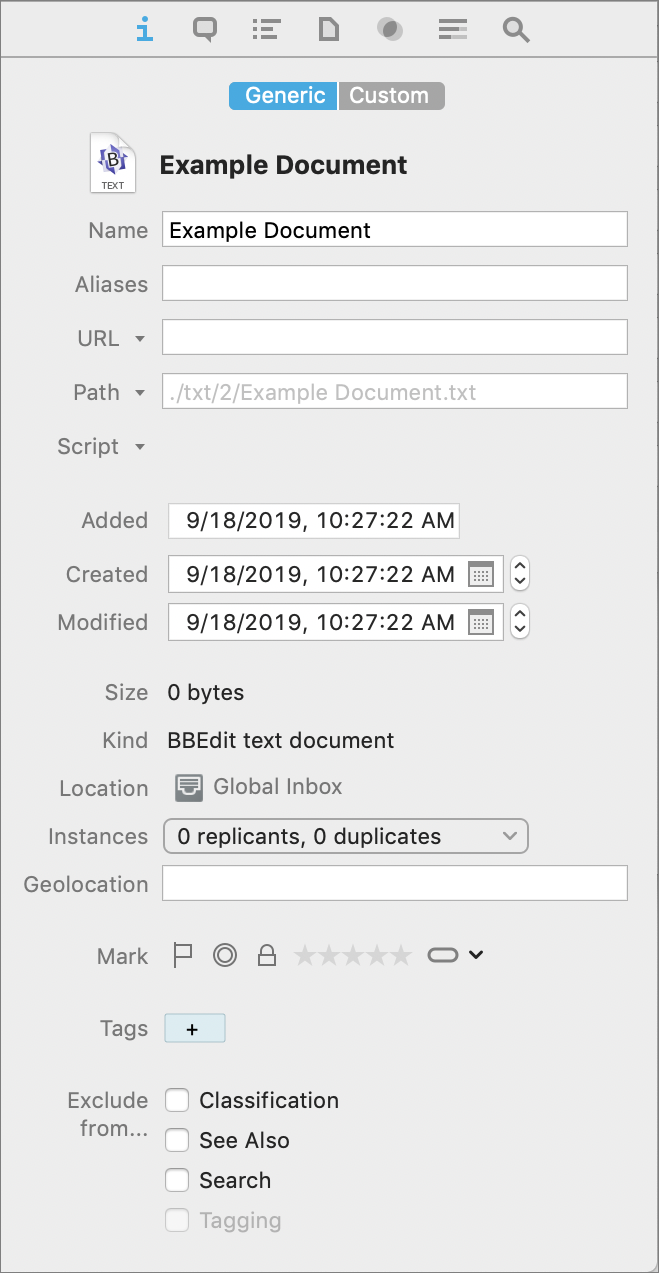
DEVONthink 3 adds even more kinds of metadata than earlier versions offered, and the Pro and Server editions go a step further by letting you create your own custom metadata types. The easiest way to see most metadata settings in one place is to select a document and display the Info inspector (Figure 52), with the Generic tab selected. Let’s take a quick spin through the three major new categories of metadata.
Geolocation Data
Any document can have an associated geographical location. In fact, most modern smartphones, tablets, and cameras add this metadata automatically using GPS or Wi-Fi location data. If a photo or other document already has geolocation data, it appears in the Geolocation field in a human-readable form (such as “Los Angeles, CA, USA”)—even if, behind the scenes, your camera stored precise latitude and longitude.
You can manually edit the geolocation data for any document, or add your own for documents that don’t already have it, by typing in the Geolocation field. You might do this, for example, to indicate where you were when you created a note, or the location that a book or article refers to.
DEVONthink 3 also has a couple of other neat geolocation tricks:
To display a map showing pins for each document with geolocation data in the current selection in the Navigate sidebar, choose Tools > Filter > Maps. The map (Figure 53) appears at the bottom of the sidebar.
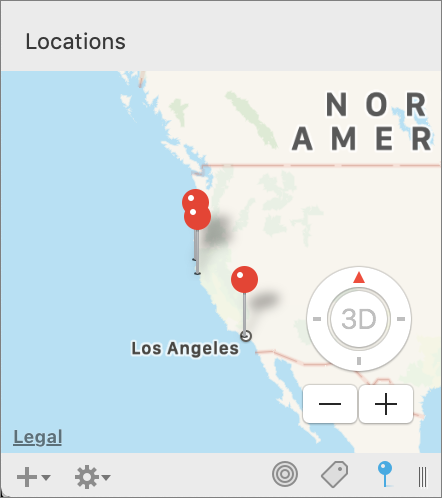
Figure 53: This map has pins for each document with stored geolocation data in the current view. To add tags based on geolocation data, select one or more documents and choose Data > Tags > Convert Geolocation to Tags. DEVONthink creates a tag for each portion of the geolocation data (as separated by commas). For example, if the geolocation data is “Los Angeles, CA, USA,” you’ll get three tags: “Los Angeles,” “CA,” and “USA.” Note that this adds tags but does not remove the contents of the Geolocation field.
Star Ratings
You’re familiar with star ratings from apps such as Music, TV, and the App Store. DEVONthink 3 offers them too, allowing you to categorize documents according to how much you like them. Most of us would use this for only a subset of our documents, such as a collection of photos, ebooks, or articles. Rating documents lets you sort, search, and filter them based on how many stars they have.
To assign, change, or remove a star rating, select a document and choose a number of stars (which can be zero) from the Data > Rating submenu (or from comparable locations on the Actions ![]() pop-up menu on the toolbar or the right-click/Control-click contextual menu); you can also change star ratings on the Info inspector.
pop-up menu on the toolbar or the right-click/Control-click contextual menu); you can also change star ratings on the Info inspector.
Custom Metadata
Users of DEVONthink Pro or Server have even more options when it comes to metadata: you can use any of numerous additional predefined fields, or create new ones of your own, and apply this custom metadata to any document. For example, if you store ebooks in your DEVONthink database, you might want to track author names or ISBNs; or if you store recipes, you might want metadata for the number of servings or type of dish (appetizer, main course, salad, etc.).
Before you can apply custom metadata, you must tell DEVONthink which fields you want to use and how they should be configured. To do this:
Go to DEVONthink 3 > Preferences > Data (Figure 54).
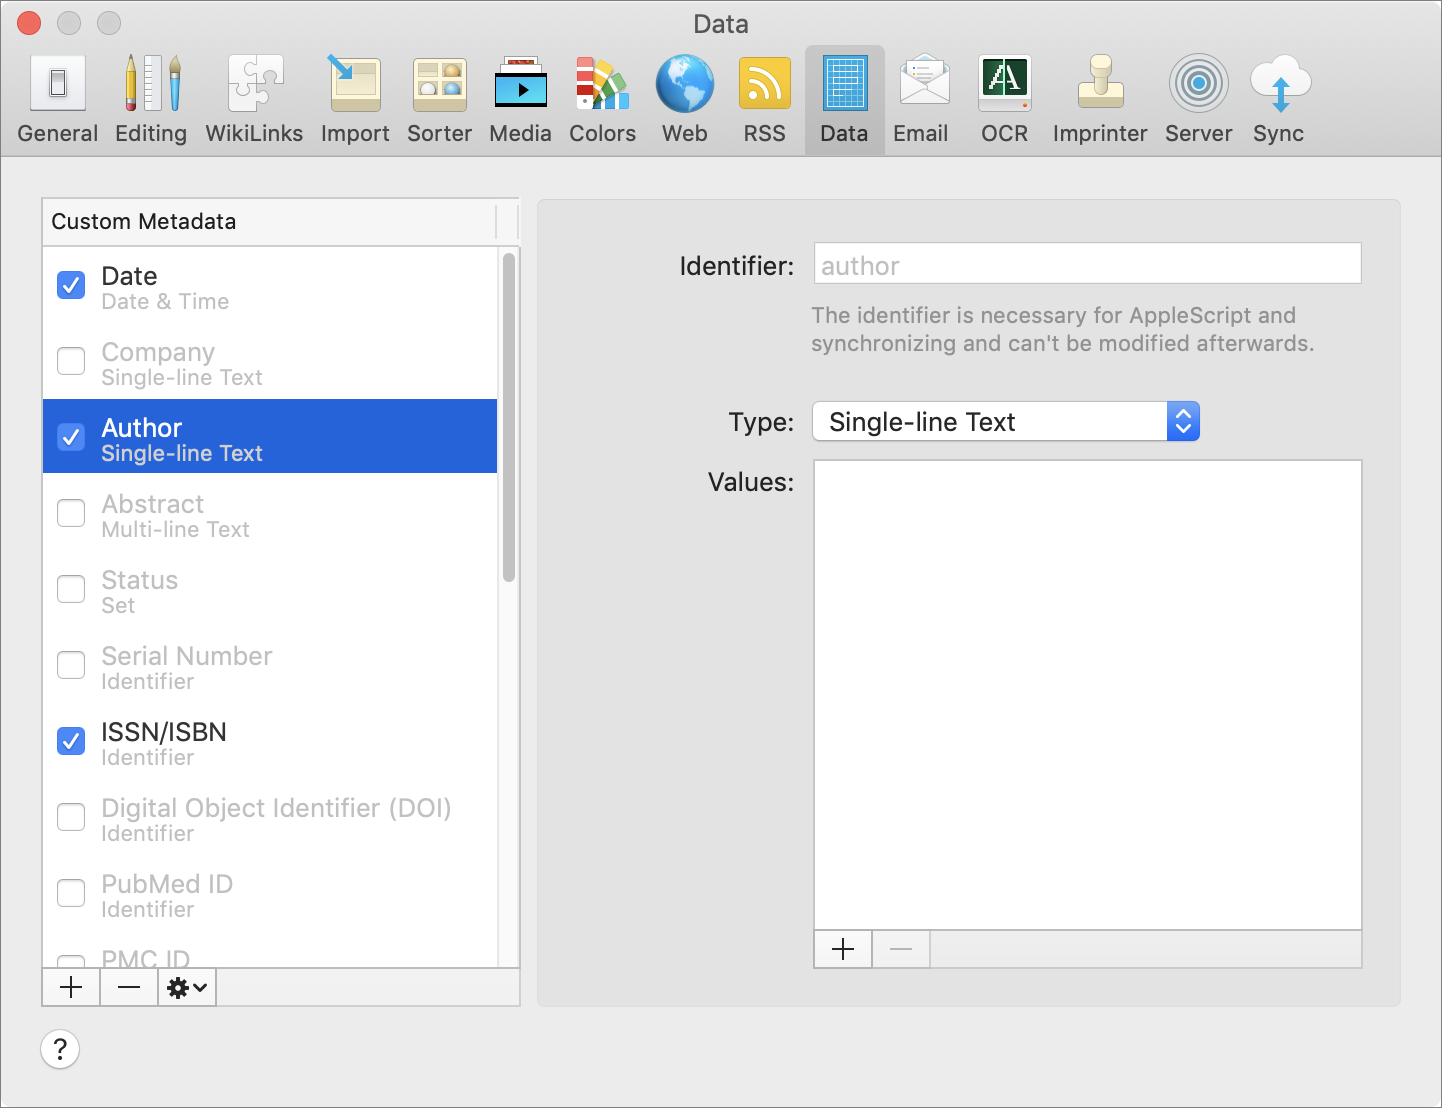
Figure 54: Configure custom metadata fields on the Data preference pane. If you want to use any of the predefined custom fields, simply select the checkboxes next to their names.
To add a custom field of your own:
Click the plus
 button, type a name for your custom field, and press Return.
Choose a data type from the Type pop-up menu. (The options available are identical to those for sheets; refer back to Sheet.) In some cases, you’ll need to specify additional characteristics—for example, numbers and dates can have different formats, and the Set option lets you specify a list of choices for each field in that column (which appear as their own pop-up menu).
To add another custom field, repeat step 3. Continue for as many fields as you want to add.
Once you’ve done this, you can apply your custom metadata to any document by visiting the Custom tab of its Info inspector (Figure 55), where the extra fields appear.
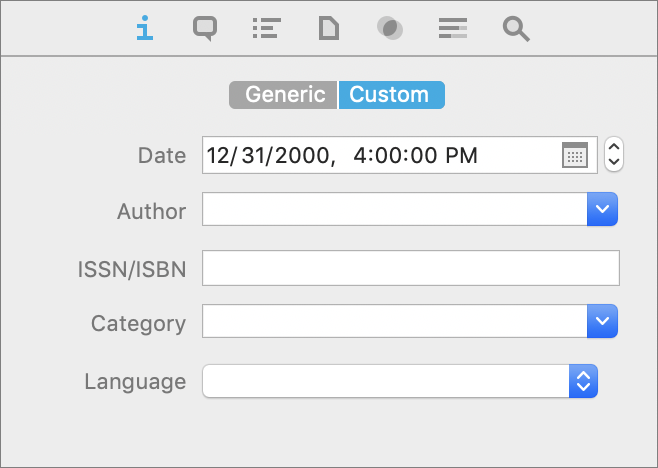
You can also add your custom fields to table views by choosing View > Columns > Field Name, and you can sort on these fields by choosing View > Sort > by Field Name.
Work with Highlights
DEVONthink 3, like most word processors and PDF readers, permits you to apply highlighting (in various bright shades) to selected portions of text in a document, in much the way you might use a highlighter pen to mark up a book or magazine.
You can apply highlighting in any type of document that supports formatted text, including PDF, rich text, HTML, and formatted notes. To do so, start by selecting some text. Click the Show Editing Bar ![]() button on the navigation bar and then click the highlight
button on the navigation bar and then click the highlight ![]() icon on the editing bar or choose Format > Highlight (⌘-Shift-L). To remove highlighting from the selected text, repeat that action. You can also click and hold the highlight
icon on the editing bar or choose Format > Highlight (⌘-Shift-L). To remove highlighting from the selected text, repeat that action. You can also click and hold the highlight ![]() icon or choose Tools > Highlight Color to display a menu from which you can select a different highlight color.
icon or choose Tools > Highlight Color to display a menu from which you can select a different highlight color.
If you’d like to make a list of all the highlighted passages in one or more documents, select those documents and choose Tools > Summarize Highlights. DEVONthink creates a new document with each highlighted passage (and its line number) listed, grouped by document name.
Work with Links and WikiLinks
Webpages contain clickable links to other webpages (often represented by blue, underlined text). Other kinds of documents—including email messages and PDF files—likewise can contain links to webpages. DEVONthink documents, too, can contain links to webpages, but they can also contain links to other items in your database, which is the sort of link I’m concerned with here.
Like webpage links, links to other DEVONthink documents appear in blue underline and let you navigate quickly to related content. Clicking a link replaces the current view with the linked document—after prompting you to save, if necessary. To return to the previous document, click the Go Back ![]() button on the navigation bar. You can ⌘-click a link to open it in a separate tab.
button on the navigation bar. You can ⌘-click a link to open it in a separate tab.
A special kind of link called a WikiLink lets you link directly to a particular document by name, creating the document if it doesn’t already exist.
Create a Standard Link
You can create a link to another DEVONthink document in any of several ways.
Your options are:
Start from the link’s source: Select some text in a rich text document, right-click (or Control-click) it, and choose Link to > Destination (that is, any group, tag, or document, in any open database) from the contextual menu. The text you selected becomes a clickable link to the destination you chose.
Start from the link’s destination: Select a document in your database and choose Edit > Copy Item Link (⌘-Control-Option-C) to put a link to that document on the clipboard. Then place your insertion point in any rich text document and choose Edit > Paste (⌘-V) to paste a link to the first document at that location.
Drag and drop: Double-click a rich text document to open it in its own window. Then ⌘-Option-drag a document from elsewhere in your database and drop it at the spot where you want the link to appear. The link appears as the linked file’s name.
Create a WikiLink
To create a link to another document or group by name—a WikiLink—type the other item’s exact name in a rich text document, select it, and choose Format > Make Link (⌘-Shift-M). The Make Link command is also found on the right-click/Control-click contextual menu. The text becomes blue and underlined. Clicking it opens the linked document or group.
If you select some text and choose Format > Make Link but there isn’t already a document or group with that exact name, DEVONthink creates a new document with that name (in the same location as the document you’re currently editing) the first time you click the link, using a special template.
To adjust the text and variables used in this template, go to DEVONthink > Preferences > WikiLinks (Figure 56). Make your desired changes in the Template field at the bottom of the window. The template can include placeholders; refer back to Using Placeholders.
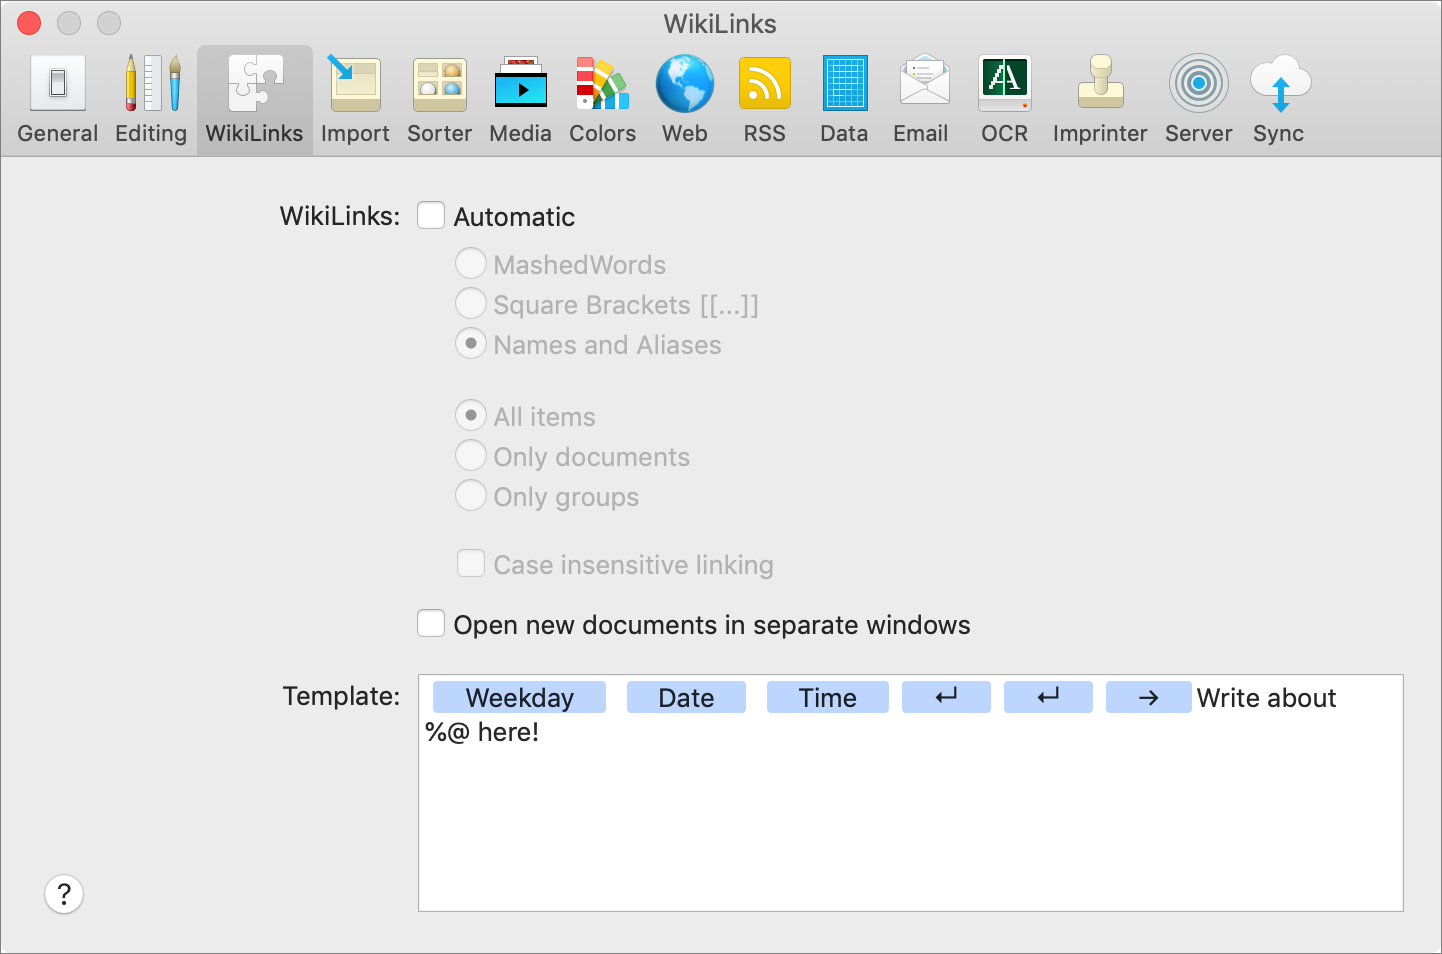
If you use WikiLinks often, you can have DEVONthink create them as you work in a much more automatic manner. In DEVONthink 3 > Preferences > WikiLinks, check the Automatic box next to WikiLinks to turn on this feature. Then select one of the following radio buttons:
MashedWords: DEVONthink creates links automatically only when you type a string with no spaces and a capital letter in the middle (sometimes called CamelCase or an InterCap). For example, type
AppleScriptand that word becomes a WikiLink to a (new or existing) document named AppleScript.Square Brackets [[…]]: DEVONthink creates links automatically only when you type a string surrounded by double square brackets, like this:
[[lorem ipsum]]. (This convention comes from Wikipedia.)Names and Aliases: With this (default) setting, DEVONthink creates a link to any document in your database as soon as you type its full and exact name. DEVONthink also creates links automatically to any string of text that you’ve defined as an alias for a document. (To create an alias, which in DEVONthink is simply an alternative name, select a document and choose Tools > Get Info, ⌘-Shift-I, or use the Info inspector. Type one or more aliases, separated by commas, in the Aliases field.)
DEVONthink 3 offers two new preferences for working with automatic WikiLinks:
Item type: By default, you can create automatic WikiLinks to either documents or groups (including tags). To change the behavior so that automatic links are created only to documents or only to groups, select the “Only documents” or “Only groups” radio button, respectively.
Case sensitivity: By default, the names of documents in automatic links must match exactly, including case. To make linking case-insensitive (so the text “apple” would link to a document named Apple, for example), select “Case insensitive linking.”
You can also adjust DEVONthink’s behavior when you click a WikiLink. If Open New Documents in Separate Windows is checked, DEVONthink opens a new window the first time you click a WikiLink for a document that didn’t previously exist. If it’s unchecked, as it is by default, the new document opens in the current view, replacing the existing document.
Move Data Between Databases
Just as you can drag documents or groups from one group to another, you can drag items from one database to another. (And note: this really does move items, deleting them from one database and adding them to the other, although you can also copy items if you prefer, as I describe ahead.)
To move one or more selected items to another database, do any of the following:
With the Navigate sidebar visible (View > Navigate), drag the item(s) to the location of your choice in the other database. This moves them from the current database to the other database’s inbox.
Assuming you have enough room on your screen, open a new window for the second database (choose File > New Window > Name of Other Database) and then drag the item(s) from one window into the desired location in the other.
Choose Move To > Destination in Other Database from the Actions
pop-up menu on the toolbar or the right-click/Control-click contextual menu. (To copy rather than move, use the Duplicate To submenu instead.)
Split and Merge Documents
From time to time you may encounter a document divided into sections that cover different topics—say, an academic paper or a long ebook—and realize that the data would serve you better if it were stored in DEVONthink as multiple documents, each containing part of the data. The reverse may also be true: you may have a bunch of snippets or fragments that make more sense in a single document. If either case applies to you, you can use DEVONthink commands to quickly split or merge documents.
Split a Document
To split a document, put the insertion point at the location where you want to divide the document in two and choose Tools > Split Document. DEVONthink instantly creates two documents—one with the original name that contains the material before the insertion point, and another with the original name plus 2 and the material after the insertion point.
Merge Documents
To merge two or more documents, select them and choose Tools > Merge X Documents, or use the Merge X Documents command on the Actions ![]() pop-up menu on the toolbar or the right-click/Control-click contextual menu. DEVONthink creates a new document containing the contents of all the selected documents (and a name such as “5 merged documents”) but normally does not delete the originals. If you want to delete the originals, hold down Option and choose Tools > Merge & Delete X Documents.
pop-up menu on the toolbar or the right-click/Control-click contextual menu. DEVONthink creates a new document containing the contents of all the selected documents (and a name such as “5 merged documents”) but normally does not delete the originals. If you want to delete the originals, hold down Option and choose Tools > Merge & Delete X Documents.
You can create a merged document from almost any type of file (including graphics, plain and rich text, Markdown, PDF, sheets, and webpages). DEVONthink saves the resulting document as a PDF if the constituent documents include only PDFs, PostScript files, and/or images. If any of the merged documents is of a different type, the result is a rich text document.