Sync DEVONthink Databases
If you have more than one Mac—or a Mac and one or more iOS devices—you’ll probably want to use DEVONthink on each one, and that in turn almost certainly means you’ll want your data to stay in sync across your devices. We’ve all become accustomed to near-instant syncing of data such as email, contacts, and calendars. In addition, cloud services like Dropbox and iCloud Drive enable us to keep files and folders in sync everywhere. You can have that same experience with your DEVONthink data.
Although DEVONthink has excellent sync capabilities, they work differently from other apps and services you may have used, and the configuration is a bit unusual. If you’re setting up syncing for the first time, there are a few things you’ll have to know, but after the initial setup, syncing should be nearly transparent.
Understand Sync Basics
Before you jump in and set up syncing, you should be aware of the numerous choices DEVONthink offers and how they compare. It’s worth taking a few minutes to think through your options in advance in order to achieve your desired results.
External vs. Built-in Syncing
As I explained in How and Where Databases Are Stored, even though DEVONthink stores all your documents as individual files on disk, it also keeps a great deal of information in a proprietary database; the database and the files together are kept in a package—a folder that looks like a single file. Because of the way databases work, syncing is tricky and dangerous if you try to do it outside DEVONthink (for example, by using a sync app such as ChronoSync to sync files over your local network, or by storing your database in a folder that syncs via a cloud service). Making even a small change to a single document changes not only the corresponding document file but also various parts of the database. As a result, if the data is synced externally while the database is open in more than one place, errors and data loss could occur.
However, using DEVONthink itself to perform the syncing is another story altogether. DEVONthink can sync any or all of your databases with any number of other Macs and iOS devices, and it’s safe to make changes with the database open on more than one device—DEVONthink knows how to merge your changes quickly and intelligently.
Sync Locations
Any database can sync to one or more locations (or none, which is the default); you can choose whichever combination best meets your needs. Conceptually, the various destination choices fall into two categories: direct, in which a database syncs between two copies of DEVONthink running on different devices; and indirect, in which each copy of DEVONthink syncs independently with a sync store—a copy of the database stored in central location, such as a file server or cloud service.
Each method has certain implications:
For direct Mac-to-Mac (or Mac-to-iOS, or iOS-to-iOS) syncing to work, DEVONthink must be running on both devices, which must also be on the same network. If this arrangement is possible, direct syncing is the fastest and most efficient option, and has the lowest risk of conflicts.
Indirect syncing lets any copy of DEVONthink sync at any time, without regard to whether another copy of DEVONthink is running. As long as each device can reach the sync destination, the devices need not even be on the same network. But because each Mac or iOS device syncs independently, it becomes slightly more likely that a given document could change in more than one location between syncs, resulting in a conflict (see Set Syncing Options).
With either method, you can sync more than two devices. However, each sync operation occurs between a single pair of locations. As a result, in order for any particular change to propagate from one device to another, two sync operations may be required (depending on the timing of the syncs).
DEVONthink uses the term location to refer to a sync endpoint, which can be another Mac or iOS device on your local network (if you’re doing a direct sync) or the cloud storage destination for your sync store (if you’re doing an indirect sync). Here are the location types you can choose, and what you should know about each:
Bonjour (direct connection): This option lets you sync directly with a copy of DEVONthink running on another Mac or iOS device on your local network. Although the syncing is bidirectional, one device effectively acts as a server and the other(s) as client(s). You must set up a password on the server and then authenticate with that password on your other devices; this prevents unauthorized users from syncing with your databases.
Local sync store: The desktop versions of DEVONthink can sync a database to any folder you can navigate to in the Finder; typically, you would choose a folder on a local network server, although you could also use an external hard drive, flash drive, or other storage. After you’ve synced one copy of DEVONthink to this folder, copies running on other Macs can optionally sync with that same location. Unlike a direct (Bonjour) connection, this requires making a separate copy of your sync data; on the other hand, it also permits syncing when one or more of the devices is offline.
Dropbox account: If you have a Dropbox account with enough free space to hold your database, you can sync to it. You can then sync your other devices to the same Dropbox account. Keep in mind that you can’t sync to a Dropbox folder someone else has shared with you; for security reasons, DEVONthink can read and write files only in a single, specific location in your Dropbox. When you set up Dropbox syncing the first time, DEVONthink asks for your Dropbox credentials to authorize access.
iCloud: Assuming you have sufficient storage space in your iCloud account, DEVONthink can use iCloud to hold your sync store, making it accessible to your other devices. Unlike Dropbox, setting up iCloud requires no additional authentication steps. On the other hand, iCloud syncing is slower (due to Apple’s design decisions—that’s out of DEVONthink’s control) and because iCloud Drive lacks a feature comparable to Dropbox’s Selective Sync, syncing via iCloud requires lots of extra disk space. Be sure to read Database Size Considerations, ahead, to understand how this works—which may not be what you expect!
WebDAV Server or CloudMe: You can sync your database to a WebDAV server on your local network or on a remote network. You’ll have to specify the server address, the path to the desired location on the server, a Store Name (the filename you want to use on the server), your username, and your password. (DEVONthink uses HTTPS and/or a custom port if those are included in the URL.) Because the cloud storage offered by CloudMe is accessible over WebDAV, you can use those as locations for a sync store, and DEVONthink even offers shortcuts to set up those services.
Regardless of how you choose to sync your databases, DEVONthink strongly encrypts your data using AES-256. For direct connections, DEVONthink encrypts the data in transit. For all indirect connections, the sync stores are encrypted as long as you enter an encryption key when setting them up (see Configure Syncing), which I recommend.
Database Size Considerations
As I mentioned earlier in the sidebar How Many Databases Do You Need?, DEVONthink’s performance can suffer if a single database grows too large. That applies to syncing performance too. Although there are no hard limits on database size, depending on variables such as the bandwidth of your internet connection, the sync method you use, and the kinds and sizes of files in your database, databases over a few gigabytes in size (give or take) might sync much more slowly than you like on their initial upload or download—or if you routinely add very large files. If you have large databases and are frustrated by the pace of syncing, splitting them into smaller databases may help.
But syncing speed isn’t the only thing to worry about when it comes to database size—you should also bear in mind disk space requirements. Direct connections and WebDAV/CloudMe connections don’t use any extra space on your Mac for syncing, and local sync stores are typically on network volumes or other external storage. But iCloud does require extra storage on your main disk, at least temporarily—however large your DEVONthink databases are, you’ll need that much space again for your initial sync, though that space will free up again afterwards. (Dropbox sometimes needs extra space too, but we’ll get to that in a moment.) If you have loads of empty space on your disk, there may be nothing to worry about. But if you’re highly constrained in your storage space, this fact may affect your choice of sync method.
When you select Dropbox as a sync location, DEVONthink initially copies all your data to Dropbox’s servers, and then—assuming you have the Dropbox app installed—the Dropbox app copies all that data back to the Apps/DEVONthink Packet Sync folder inside your Dropbox. Afterwards, every time you sync, changes in your DEVONthink database—still stored in its original location—are sent to the copy in your Dropbox, while any changes in the Dropbox copy of your database are absorbed into your main copy. The direct connection between DEVONthink and Dropbox means it works even if you don’t have the Dropbox app installed on your Mac. And it’s faster and more reliable than letting Dropbox sync the files externally.
If you leave it at that, the amount of hard disk or SSD space on your Mac used by DEVONthink will double: the original copy of your DEVONthink database will still be in ~/Databases or wherever you put it, and a second copy will be in your Dropbox folder. (The same goes for any other Macs that use the same Dropbox account.) But you can avoid the storage hit by turning on Dropbox’s Selective Sync option for your DEVONthink data, as I explain in Add an Indirect Connection, ahead. This feature lets you pick and choose which of your Dropbox folders are stored locally on any device.
With iCloud, DEVONthink makes local copies of all your files in the iCloud Drive folder; then, after they sync (which may take longer than with Dropbox, as it’s handled by macOS), DEVONthink deletes those local copies. Although it isn’t quite like Dropbox’s Selective Sync, you do get approximately the same end result—but only after syncing is complete. That means you’ll need to have at least as much free space on your disk as the size of your database for your initial sync; and afterwards, the amount of storage space used will rise and fall as files are synced and then the extra copies are deleted.
In sum, if you have very little free space on your Mac—or if you want the best syncing performance—you might find Dropbox to be a better choice than iCloud.
Choose Your Sync Method(s)
Which option is best for you? That depends on numerous factors, such as database size (as I just described), which services you have accounts with, and personal preference. I’ve had the best results personally using direct connections and Dropbox. Although I prefer iCloud Drive to Dropbox is some respects, the current design of the two services makes Dropbox a more flexible and efficient choice for syncing my DEVONthink databases.
Once you’ve chosen one or more sync destinations for a given database, you can optionally configure DEVONthink to sync automatically, manually, or on a recurring schedule.
Configure Syncing
Syncing is quite easy—it takes much longer to explain it than to set it up! The procedure requires three quick steps: Add a Location, Select or Import Your Database(s), and Set Syncing Options. You must go through these steps on each device you want to sync.
All the following steps take place in DEVONthink 3 > Preferences > Sync, which initially looks like Figure 76.
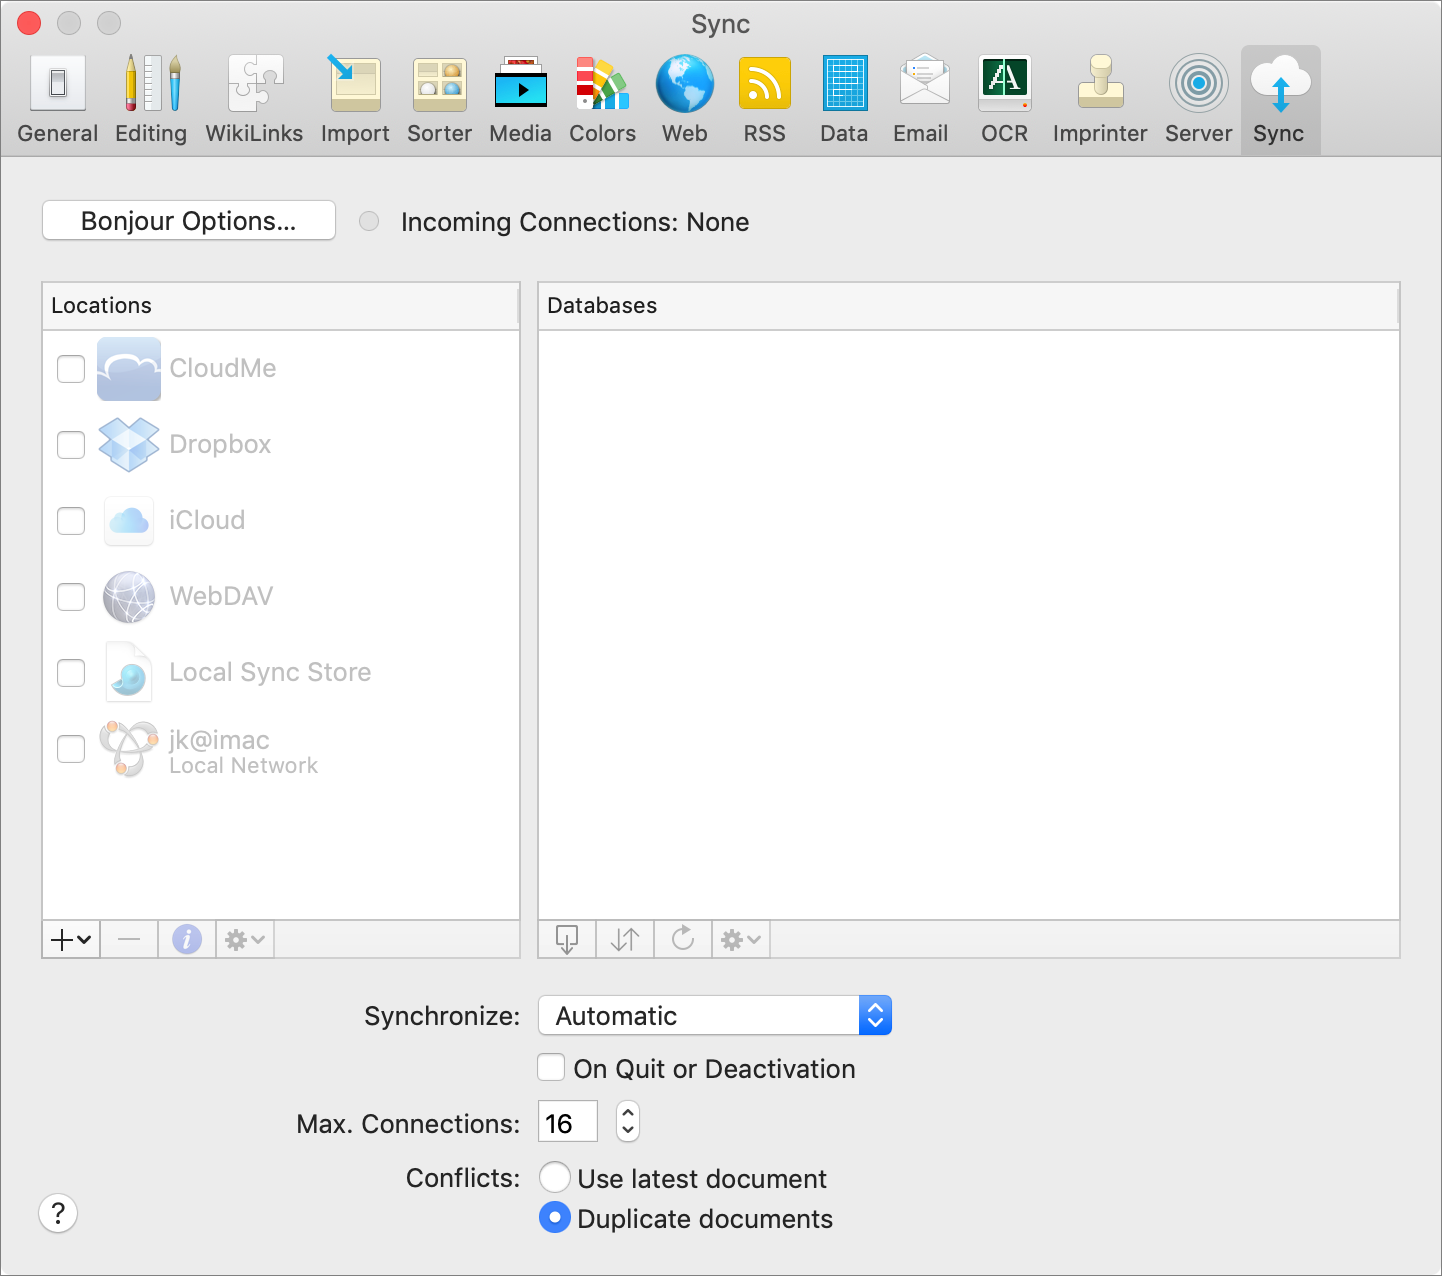
Add a Location
The Locations list on the left side of the Sync preference pane shows all the locations to which you can sync DEVONthink. The list includes any Macs on your local network that are running DEVONthink and configured to accept incoming Bonjour connections, and one instance each of the various other account types. (You can add more, if need be—for example, you can have multiple CloudMe accounts, multiple WebDAV accounts, and so on, though only one iCloud account. You’re also limited to one Dropbox account, though that account can contain multiple sync stores.)
To add a location, select its checkbox and fill in the relevant details in the dialog that appears. Each location asks for slightly different information, and in particular, the details differ significantly between direct connections (discussed next) and indirect connections such as Dropbox, iCloud Drive, and WebDAV (see Add an Indirect Connection).
Add a Direct Connection
For direct connections, there’s not even a checkbox to select until you set up one of your Macs to function as a server (see Set Bonjour Options, just ahead). However, once you’ve done so, connecting from another device requires little more than entering your password (see Connect to a Local Mac).
Direct connections are different from all the other location types in that you’re not syncing all devices to a central location; instead, one device (a Mac, for the purposes of this chapter) functions as a server and your other devices function as clients. Whichever Mac is going to be the server has to be set up before any of the clients. Syncing works the same way regardless of which Mac you choose as the server. If you have one Mac that’s on and connected to your network all the time, that one would be a better choice for a server than a Mac that spends a lot of time turned off, asleep, or offline. Other than that, the choice is pretty arbitrary.
Once you’ve chosen a Mac to function as the server, you must set its Bonjour options (as described next). Then, on the other Macs on your network, follow the steps under Connect to a Local Mac.
Set Bonjour Options
On the Mac you want to function as a server, click Bonjour Options and fill in the dialog that appears (Figure 77).
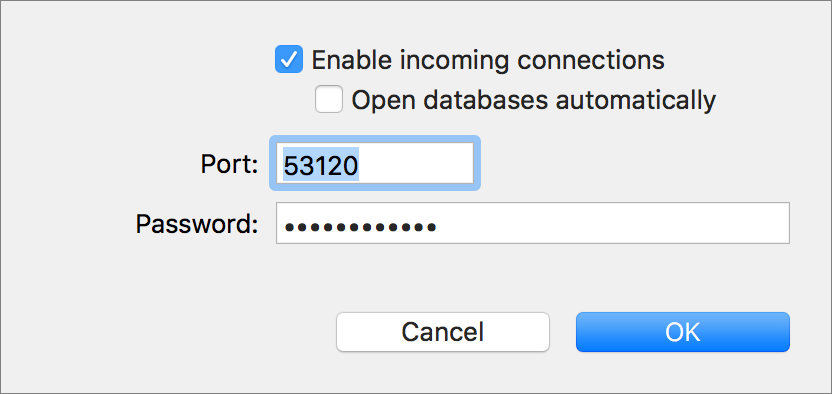
Here are the options:
Enable incoming connections: Select this to permit DEVONthink on this Mac to accept connections from DEVONthink on other devices on your local network. (If this is deselected, then regardless of your other settings, this Mac cannot function as a server.)
Open databases automatically: Once you’ve set up syncing and selected databases from this Mac on another device, you might (accidentally or intentionally) close one of those databases on this Mac, which would prevent it from syncing to your other devices. To avoid that problem, select this checkbox, which permits clients to request that this Mac open any databases previously set up for syncing when a sync is required.
Port: This is optional. If you leave it blank, DEVONthink picks a random, high number—and that’s fine for most users. However, if you want to use a specific port number (perhaps because of a firewall configuration on your network), enter the port number here.
Password: A password is mandatory; it enables DEVONthink to encrypt your data while it’s in transit over your network, and prevents eavesdropping.
After you’ve filled in a password and at least selected the first checkbox, click OK. Once you’ve done that, this Mac appears in the Locations list as an option for other Macs and iOS devices on your local network. On those devices, you can then proceed to the next topic.
Connect to a Local Mac
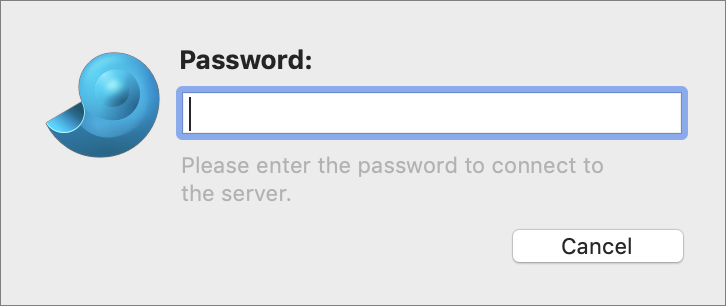
Once you have a server set up to receive connections, go to your next Mac, open DEVONthink 3 > Preferences > Sync, and select the checkbox next to the first Mac’s name in the Locations list. In the Password alert that appears (Figure 78), type the password you set up on the server Mac. (You don’t even need to press Return or click OK!) That’s it—you’re connected. Proceed to Select or Import Your Database(s).
Add an Indirect Connection
For indirect connections (all locations other than direct connections), after you select the appropriate checkbox in the Locations list, you must specify account and sync store settings in a dialog (Figure 79).
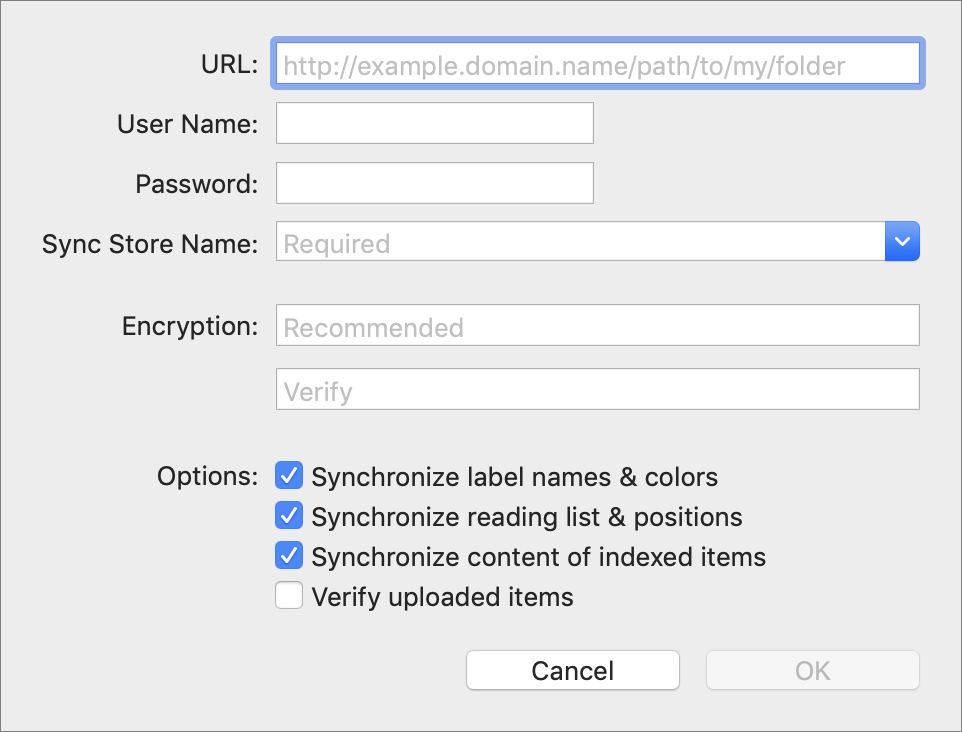
The fields and controls in this dialog vary somewhat from one location to another. You may see the following:
URL: For WebDAV locations only, enter the server’s full URL. (For local sync stores, in place of a URL, a standard file selection dialog appears; use its menu to select a location.)
User Name and Password: For WebDAV locations, enter the credentials you use to log in.
Sync Store Name: Enter a name for the sync store—that is, the package that’s stored in your Dropbox, on a local server, or wherever you choose—that serves as the central repository for syncing between this Mac and other devices. (For local sync stores, the field is labeled Save As.)
What sort of name should you enter? Well, the sync store can hold sync data for multiple databases if you like, so you may not want to name it after a particular database. It can also sync data from many devices, so you shouldn’t name it after your Mac. In fact, the only reason the name might matter is if, for some reason, you wanted to set up multiple sync stores in the same location. So, enter anything you like here, though for compatibility reasons, it’s safest not to include spaces or punctuation other than hyphens and underscores. (I named mine HomeDepot. As in, you know, a store where you can buy sinks. Because that’s how I roll.) Once you’ve set up a sync store for one device, you should enter exactly the same name when setting up additional devices.
Encryption: If you want your sync store to be encrypted—and you absolutely do!—enter and verify a password in the fields provided.
Options: The bottom of the dialog has a series of checkboxes that let you specify sync options for this sync store:
Synchronize label names & colors: Choose whether to sync label names and colors (see the sidebar Using Labels and Flags) using this sync store. It’s optional because this is a global preference, not a database-specific preference, and you may want different copies of DEVONthink to use different label names or colors.
Synchronize reading list & positions: Select this to synchronize reading and playback positions along with document contents. (This applies to PDFs, plain text, rich text, Markdown, audio, and video files.)
Synchronize content of indexed items: By default, DEVONthink syncs the content of any indexed items (that is, items whose original files are not stored within your DEVONthink database), so you can view and work with the files on your other devices. However, if you deselect this checkbox, DEVONthink syncs only their metadata, not the original files themselves.
- Verify uploaded items: Select this checkbox to make DEVONthink verify the integrity of each file after it has uploaded to another device. This option is usually unnecessary (and may slightly increase the amount of time each sync requires), but if you experience missing or corrupted files during syncing, you can enable it to confirm that each transfer took place correctly.
Once you’ve filled in the dialog with all required information, click OK. DEVONthink copies your sync store to the location you selected.
You can then move on to Select or Import Your Database(s)—unless you added a Dropbox location, in which case you should complete a few additional steps first:
If your web browser opens automatically to a sign-in page for Dropbox, enter your Dropbox username and password, and click Sign In. (If your browser does not open automatically, skip to step 5.)
If you have Dropbox’s two-factor authentication enabled (always a good idea, though not a requirement to sync with DEVONthink), you’ll be prompted to enter your authentication code. Do so and click Submit.
Click Allow to give DEVONthink access to its own folder (and no other folders) in your Dropbox.
Your browser should return you to DEVONthink to finish the setup process; if it doesn’t, you can switch back manually.
At this point, DEVONthink begins copying your sync store to Dropbox—but you aren’t done yet. I strongly recommend that you use Dropbox’s Selective Sync feature to avoid storing a local copy of the synced data, as I described in Database Size Considerations. To do this, continue with the remaining steps.
Go to the Dropbox
 menu on the menu bar.
Click the tiny down
 arrow in the upper-right corner of the Dropbox popover next to your account photo, and choose Preferences from the pop-up menu.
Click Sync, then “Choose folders to sync” under the Selective Sync heading.
Navigate to Apps and deselect the DEVONthink Packet Sync checkbox (Figure 80).
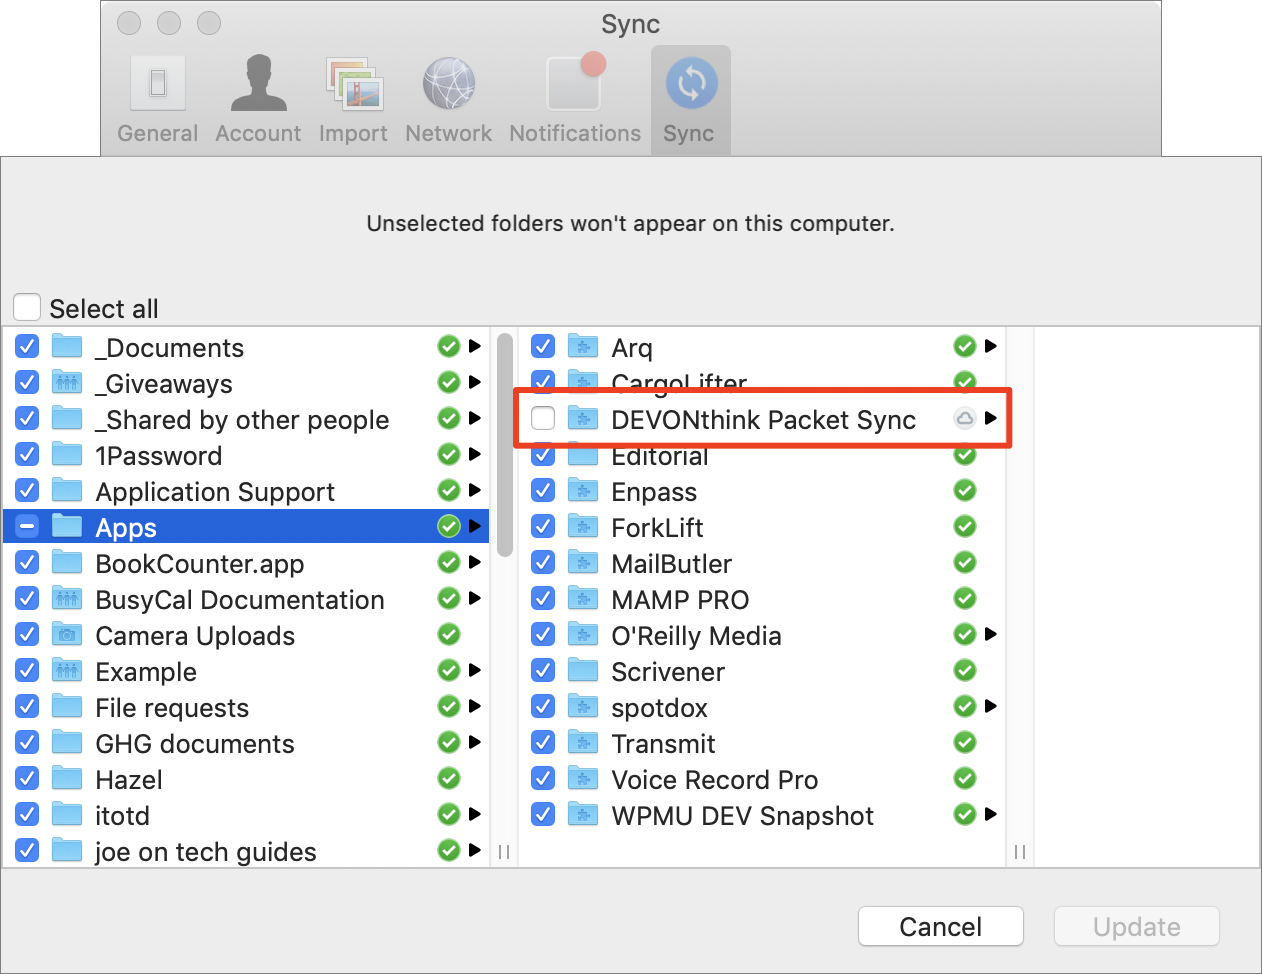
Figure 80: Deselect the DEVONthink Packet Sync checkbox to avoid making a duplicate copy of your sync data on your Mac. Click Update.
Dropbox may take several minutes to remove the local copy of that folder.
Note that even though this procedure removes the sync folder from your Mac, it’s still stored on the Dropbox servers, so you’ll need to be sure you have enough storage space in your account to hold it. And, you’ll have to repeat this procedure on each of your Macs.
Select or Import Your Database(s)
Now that you have a location (or more than one) configured, you must next determine which databases will sync to that location. You can sync all your databases to the same location, each to a different one, or certain databases to each of several locations—whatever you like. The most common scenario is to sync any given database to just one location.
With your location selected in the Locations list on the left, look in the Databases list on the right. (Figure 81 shows the list as it might appear for a direct connection.)

The LOCAL portion of the Databases list contains the databases currently open on this Mac. In the REMOTE portion, for direct connections, you’ll see databases open on the other Mac that can be imported (or opened, if they already exist on your Mac but are closed); for indirect connections, you’ll see databases in the sync store that do not already exist on this Mac. (If you previously synced a database between these two Macs in some other way—using file sharing, an external sync utility, or the previous version of DEVONthink’s syncing capability, for example—and it’s open on both Macs, it appears in the LOCAL section.)
Sync a Local Database
To sync a database in the LOCAL category, simply select its checkbox. If the location is anything but a direct connection, DEVONthink immediately begins uploading your data to the sync store (or, if the database already exists in the sync store, merging it).
Sync a Remote Database
To sync a database in the REMOTE category, you must import it, thus creating a local copy. To do so, double-click the database in the REMOTE portion of the list. Leave the database’s name as it is in the remote location, navigate to where you want it to be stored, and click Create. DEVONthink imports the database, enables syncing, and begins the sync process immediately.
Use Additional Sync Controls
Under the Databases list are two additional icons you may find useful:
Sync now: Click the Force Sync
 button to force an immediate sync, if syncing is not set to Automatic (see just ahead).
Refresh: If the list of databases on this Mac, on the remote Mac, or in the sync store changed recently and the current selections don’t appear here, click the Refresh
 button to refresh the view.
Set Syncing Options
The final three syncing options can be set at any time (including before setting up locations and databases). These settings, at the bottom of the Sync preference pane, apply to all locations and databases:
Synchronize: When this pop-up menu is set to Automatic, the default, DEVONthink frequently checks for changes in both remote and local copies of each database and syncs them with the other location soon after they occur. If you prefer to sync on a fixed schedule, you can instead choose “Every minute,” “Every 5 minutes,” “Every 15 minutes,” “Every 30 minutes,” Hourly, or Daily from this menu. Or choose Manually to sync only when you Click the Force Sync
 button. If you also want DEVONthink to sync when you quit the app, even if it’s not otherwise time to do so, check On Quit or Deactivation. (This can avoid surprises of last-minute changes that weren’t synced, though it also prevents DEVONthink from quitting instantly.)
Max. Connections: DEVONthink can open up to 16 multiple, simultaneous connections to any location (8 for Dropbox), enabling it to copy multiple documents at the same time. If you suspect that DEVONthink is slowing down your network because it has too many connections active, you can reduce this number.
Conflicts: If a document changes both locally and remotely between syncs (a rare occurrence when Synchronize is set to Automatic and you have a fast network connection), this set of controls determines what will happen. If you select “Use latest document,” the more recently changed document will overwrite the older one. If you select “Duplicate documents,” both copies sync in both directions—preventing data loss, but forcing you to manually sort out, later on, which version of each document you want.