Format Notes
You can get by without formatting the text in your notes—in fact, the Notes app didn’t even offer any formatting at first—but doing so makes your notes more attractive and easier to read.
Learn Basic Formatting
Notes offers most of the basic formatting options you’ve come to expect like bold, italic, and even strikethrough.
On a Mac, these formats are available on the Format > Font submenu, or by selecting text, Control-clicking, and using the Font submenu of the contextual menu.
In iOS and iPadOS, you access these formats by tapping the Aa ![]() icon in the toolbar. In iOS, if you don’t see this toolbar, tap the plus
icon in the toolbar. In iOS, if you don’t see this toolbar, tap the plus ![]() button to reveal it.
button to reveal it.
Tap the Aa ![]() icon to see a full range of formatting options (Figure 6). To apply formats like bold and italic, you must first select the desired text.
icon to see a full range of formatting options (Figure 6). To apply formats like bold and italic, you must first select the desired text.

If you’re using a MacBook Pro with a Touch Bar, you’ll also see many of these formatting options there (Figure 7).

To remove a format, simply reapply the same format over the formatted text, or apply the formatting you want.
Apply Styles
While formats apply to individual characters, styles apply to the entire paragraph where the insertion point is located. As I demonstrate below, these styles can add much-needed structure to your documents for additional clarity.
On both macOS and iOS, styles are available by clicking the Aa ![]() button, and in macOS they’re under the Format menu as well.
button, and in macOS they’re under the Format menu as well.
Title (⌘-Shift-T): This is one of my favorite formatting options, because it can help make your Notes a lot easier to read and manage. The first line in your note acts as its title, and the title style, which is applied to the first line of a new note in Apple’s latest operating systems by default, can help clarify that. Let me demonstrate.
I whipped up a daily to do list for myself, but note how it’s listed in the note list as “Write ExtraBITS,” which was the first item in my list. That doesn’t do much to help me know what’s in that note! (Figure 9)

Figure 9: Here’s a to do list I quickly threw together. If I add a title to the first line of a note, it makes identifying that note in the list a lot easier (Figure 10), but the title text looks like just any other text—it doesn’t stand out in any way.
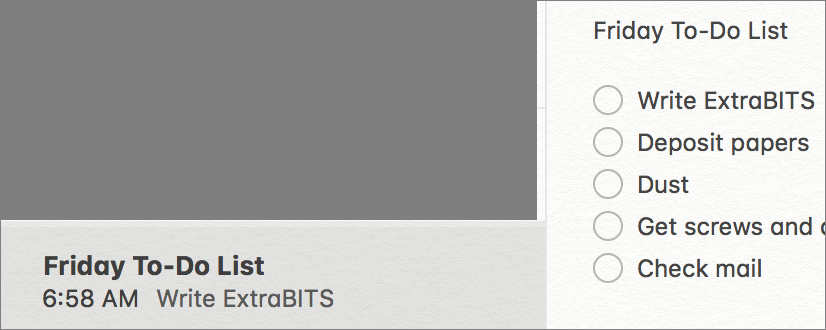
Figure 10: With a title added in the first line of the note, it becomes easier to retrieve later. If I apply the title style to that title, it makes the note a lot more readable! (Figure 11)

Figure 11: Thanks to the title style, the title now stands out from the body text. This may seem like overkill for a one-off to do list, but it’s a good habit to form, especially if you start developing more complex notes.
Heading (⌘-Shift-H): In addition to title, you can further divide your notes into headings, which are especially useful for longer documents. Headings are also useful for combing multiple notes into a single note. For example, my wife and I use a shared note (which I explain how to do in Share from Notes) to track our monthly bills. I started off by making a shared note for each month, but that soon because unwieldy, so I created a single note for each year, split into headings for each month (Figure 12).

(And before you send me email, yes, if I did this in a spreadsheet like Numbers or Google Sheets, it could also do math and charts for me. But this method is easier and more readable for everyone involved. You do you.)
Subheading (⌘-Shift-J): If you need to divide your notes even further, subheadings let you break down headings into smaller pieces.
Body (⌘-Shift-B): This style simply denotes text as regular, plain body text. It’s primarily used to remove the other styles listed here.
Monospaced: This isn’t a structural style, but rather applies a monospaced, typewriter-style look to text. Feel free to use this liberally if that’s the look you prefer, which is also the style typically applied to fiction manuscripts and screenplays, though I don’t think Notes is the right tool for either one of those jobs. I personally like to use this style to denote code in a note, like a snippet of HTML or some scripting language.
Work with Lists
Lists are one of the most useful features in Notes, letting you split out items and tasks:
Bulleted, Dashed, and Numbered lists: On a Mac, you can find these list options in the Format menu or by control-clicking and choosing Paragraph Styles. In iOS, tap the Aa
 icon to reveal these options (Figure 13).
Figure 13: From left to right: dashed, numbered, and bulleted list. Bulleted and dashed lists are used whenever you want to itemize things that don’t have to be in any particular order. See how much clearer the list of bill payments in Figure 14 is than Figure 12.
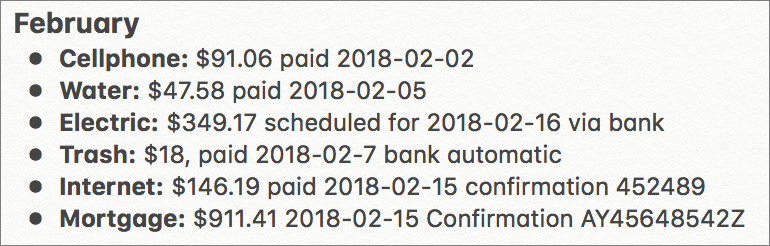
Figure 14: Bulleted lists add clarity to any list that doesn’t have to be arranged in a particular order. Use numbered lists when the order of list items is crucial, such as with instructions.
Checklists: On both macOS and iOS, the checklist button (⌘-Shift-L) lets you create a checklist (or transform selected text into a checklist) of items that you can mark off by clicking the bubble
 or pressing ⌘-Shift-U (Figure 15).
Figure 15: You can quickly create a functional task list in Notes. You can easily move checklist items in iOS 13, iPadOS 13, and macOS 10.15 Catalina by tapping (or clicking) and holding on a check bubble until it “lifts” off the virtual page and then dragging and dropping it where you want to go. In iOS and iPadOS, a horizontal orange line indicates where the checklist item will go.
You can also make checked items drop automatically to the bottom of the list. In iOS and iPadOS, you can set that in Settings > Notes > Sort Checked Items. Tap Automatically to enable that feature.
Checklists are one of the best features of Notes, because they allow for impromptu task and shopping lists. Although I have better tools for both jobs, I find myself using these constantly because of how convenient they are.
Indent Lists
You can indent bulleted and numbered lists to nest items, and the symbols and numbers will change when you do so. You can apply multiple levels of indent, and you can also outdent indented items to reduce their indent level. Use this to create basic outlines in Notes (Figure 16). You can also indent and outdent dashed lists, but the dash symbol doesn’t change.

Checklists can also be indented to create nested to do lists, like those used in the Getting Things Done task system. In Figure 17, I’ve taken my basic task list from Figure 15 and turned it into a project list broken into smaller steps.

I could take this even further and use headings to split my list into location-based contexts (another big part of Getting Things Done) (Figure 18).

Press Tab on the keyboard while the insertion point is in a list item to indent it. Hold Shift while pressing Tab to outdent it. On a Mac, you can also Format > Indentation > Increase or Decrease or press ⌘-[ or ⌘-], respectively. In iOS, swipe the check item right or left to indent and outdent, or tap the Aa ![]() button and tap the indent
button and tap the indent  and outdent
  buttons.
Make Tables
You can make rudimentary tables in Notes. To do so, click or tap the Add a Table ![]() button, which creates a 2×2 table. Alternatively, you can convert selected text into a table by selecting it and clicking or tapping the Add a Table
button, which creates a 2×2 table. Alternatively, you can convert selected text into a table by selecting it and clicking or tapping the Add a Table ![]() button (on iOS, you may have to tap the plus
button (on iOS, you may have to tap the plus ![]() button to reveal it). Each new line becomes an individual row in the new table (Figure 19). Unfortunately, tabbed items aren’t automatically placed into their own columns, so you’ll have to move them by hand.
button to reveal it). Each new line becomes an individual row in the new table (Figure 19). Unfortunately, tabbed items aren’t automatically placed into their own columns, so you’ll have to move them by hand.

To convert a table back to text, click or tap in the table, click or tap the Add a Table ![]() button, and then choose Convert to Text.
button, and then choose Convert to Text.
While the insertion point is in a cell, the Next key on iOS and iPadOS or the Tab key on a Mac moves it between cells, from left to right. Pressing Return on a physical keyboard moves the insertion point down one cell or creates a new empty row below if one doesn’t exist. However, pressing Return again after you’ve created a cell moves the insertion point outside of the table and deletes the new cell.
Clicking or tapping a cell reveals ellipsis ![]()
![]() buttons which you can click or tap to reveal options to add or delete rows and columns (on a Mac you also have to click an arrow
buttons which you can click or tap to reveal options to add or delete rows and columns (on a Mac you also have to click an arrow ![]() after the ellipsis). You can delete the entire table by placing the insertion point just after it and tapping Backspace to delete it like any other element in a note.
after the ellipsis). You can delete the entire table by placing the insertion point just after it and tapping Backspace to delete it like any other element in a note.