
Back Up Your Disk
If you’ve read pretty much any book I’ve written about the Mac, you know I consider a solid backup plan to be essential for every Mac user. I hope you already perform backups regularly, and if you don’t, this is a perfect time to start.
Regardless of what you do normally (such as using Time Machine or Backblaze), I want to state emphatically that before upgrading to High Sierra, you should create a specific type of backup called a bootable duplicate. That’s an exact copy of everything on your startup volume, stored on another disk in such a way that you could start up your Mac from that other disk and it would behave precisely as it does when you boot from your regular startup volume.
Even though the High Sierra installer doesn’t force you to make this type of backup, it’s not something you can safely skip if it’s inconvenient or if you’re fairly sure you won’t have problems. In my professional opinion, creating a duplicate is a mandatory, integral part of the upgrade process. In this chapter I tell you both why and how to do this.
After you duplicate your startup volume, I’m going to tell you to do some spring cleaning (see Clean Up Your Mac), and then I’m going to tell you to update your duplicate. I wanted to warn you about this up front so you know it isn’t a mistake or capricious advice—it’s for your own good. You need a great backup before you delete any files (in case you accidentally delete something you need), but you also need a freshly updated backup right before installing High Sierra.
Let me also point out that whatever the virtues of Time Machine, it’s no substitute for a bootable duplicate, as I explain in the sidebar But I Really Don’t Want to Make a Duplicate!.
Why You Need a Duplicate
As I said, the particular type of backup you want at this moment—regardless of any other backups you may have—is a bootable duplicate, which is a clone or mirror image of everything on your startup volume. You can’t make a bootable duplicate in the Finder by dragging and dropping files onto another disk, and backup programs like Time Machine and Backblaze (though they’re both fantastic for what they do) can’t make them either. You must use a backup program that’s designed specifically for making a bootable duplicate.
Everyone should create a bootable duplicate and update it regularly (at least once a week) as part of a solid backup regimen. In day-to-day use, duplicates are important because they let you get back to work almost instantly in the event of a major disk error or even a complete failure of your hard drive or SSD. You simply plug in the backup drive, reboot while holding the Option key, and select the external drive, and you’re back up and running. You can then use the backup disk to repair your internal startup volume and restore your files—or if the drive is too far gone, replace it at your leisure.
However, aside from that “nice-to-have” reason for making a duplicate, you truly need one when it comes time to upgrade your operating system. Despite Apple’s valiant efforts at idiot-proofing the installer, something could go wrong—either during the upgrade or afterward—that deletes important files, leaves your disk unusable, or results in your needing to revert to your previous version of macOS. Bootable duplicates let you recover from these situations handily.
In addition, you may choose (for reasons discussed later, in Plan B: Clean Install) to erase your entire startup volume, install a clean copy of High Sierra, and then copy your personal files, third-party software, and other data back to your High Sierra volume. To be sure you have everything you might need during this process (and in exactly the right form), you must have a bootable duplicate.
Prepare for a Duplicate
To create a duplicate, you’ll need a few hardware and software ingredients, and you’ll need to follow a few preliminary steps.
Hardware
You’ll need an empty hard drive for your duplicate. If you don’t happen to have an extra (internal or external) hard drive, take heart: hard drives are pretty cheap these days. For example, you can easily find a 4 TB external drive for less than $120, and compared to the cost of losing your data, that’s quite reasonable. Look for one with a fast interface (Thunderbolt 2 or 3, or USB 3), and with enough capacity to accommodate your growing backup needs over the next few years.
Software
Many (but not all) backup apps can create bootable duplicates. If you don’t yet have a suitable tool, try Carbon Copy Cloner or SuperDuper. These two apps operate similarly and are easy to use.
Which Volumes to Duplicate
You should create duplicates of your primary startup volume and any other volume on the same physical media. If you have a single, unpartitioned hard disk or SSD, then you have only a single volume to worry about. If you have multiple partitions (or multiple internal or external hard drives or SSDs) that contain bootable systems, I recommend making duplicates of all of them.
Prepare Your External Drive
Before you can create your duplicate, you must perform a few quick steps to partition and format your disk. If the drive is already empty and properly formatted, you can skip these steps. But many new hard drives come formatted in a way that’s incompatible with bootable duplicates. (For example, I recently bought a 4 TB Seagate backup drive that came formatted as NTFS and included special software needed to use the drive on a Mac. That’s fine for ordinary backups, but it won’t work for a bootable duplicate.)
To prepare your drive, connect it to your Mac, turn it on, and launch Disk Utility (in /Applications/Utilities). In the list on the left, select your external disk. (The disk is the topmost icon in any group, with any volumes it contains indented beneath it.) The remaining steps depend on which operating system your Mac is using.
Configure a Drive in El Capitan or Later
Follow these steps in Disk Utility, with your external disk selected:
- Click the Erase button on the toolbar.
- In the dialog that appears, type a name for your disk in the Name field. Leave the Format pop-up menu set to Mac OS Extended (Journaled) or OS X Extended (Journaled), choose GUID Partition Map from the Scheme pop-up menu (if present), and click Erase. If you want your disk to have a single partition, you’re done; skip the remaining steps. (One partition is usually fine; to put both a duplicate and other backup data on the drive, make two partitions.)
- To add a partition, leave the disk selected on the left and click Partition. A dialog appears with a pie chart showing a single partition on the disk.
- Click the plus
 button to add a partition (Figure 2). Enter a name for the second partition in the Name or Partition field and leave the Format set to Mac OS Extended (Journaled) or OS X Extended (Journaled). To adjust the size of the partition, drag the handle on the pie chart or type a new number in the Size field. Repeat this step if you want to add more partitions.

Figure 2: Use this dialog to configure a secondary partition in El Capitan or later. (Details vary based on your operating system.) - Click Apply.
Disk Utility has now erased your disk and added any partitions that you specified. If you see an alert asking whether you want to use the new volume for Time Machine, click Don’t Use, since you’ll be using different software to create your bootable duplicate.
Configure a Drive in Yosemite or Earlier
Follow these steps in Disk Utility, with your external disk selected:
- Click the Partition button.
- From the Partition Layout pop-up menu (called Volume Scheme in Snow Leopard), choose the number of partitions you want—do not leave it set to Current, even if you want to keep the same number of partitions. One is usually fine; to put both a duplicate and other backup data on the drive, make two partitions.
- For each partition, give it a name and choose the Mac OS Extended (Journaled) format.
- If you’ve chosen to create more than one partition, resize the partitions manually by dragging the dividers, or enter a size for each partition. (The first partition must be at least as large as the amount of data on your startup volume.)
- Click Options. In the dialog that appears, select GUID Partition Table. Click OK.
- Click Apply, and then click Partition.
Now that you’ve partitioned and formatted your disk, quit Disk Utility. If you see an alert asking whether you want to use the new volume for Time Machine, click Don’t Use, since you’ll be using different software to create your bootable duplicate.
Create a Duplicate
Creating a bootable duplicate with either of my recommended utilities is quite easy: you simply choose a source disk (your existing startup volume) and a destination disk (your backup drive), specify a few options, and click a button. Although each backup app comes with its own instructions, here’s a quick overview of how to create a bootable duplicate with Carbon Copy Cloner ($39.99, free 30-day trial available), my personal favorite.
To create a duplicate with Carbon Copy Cloner, follow these steps:
- Launch Carbon Copy Cloner (Figure 3).
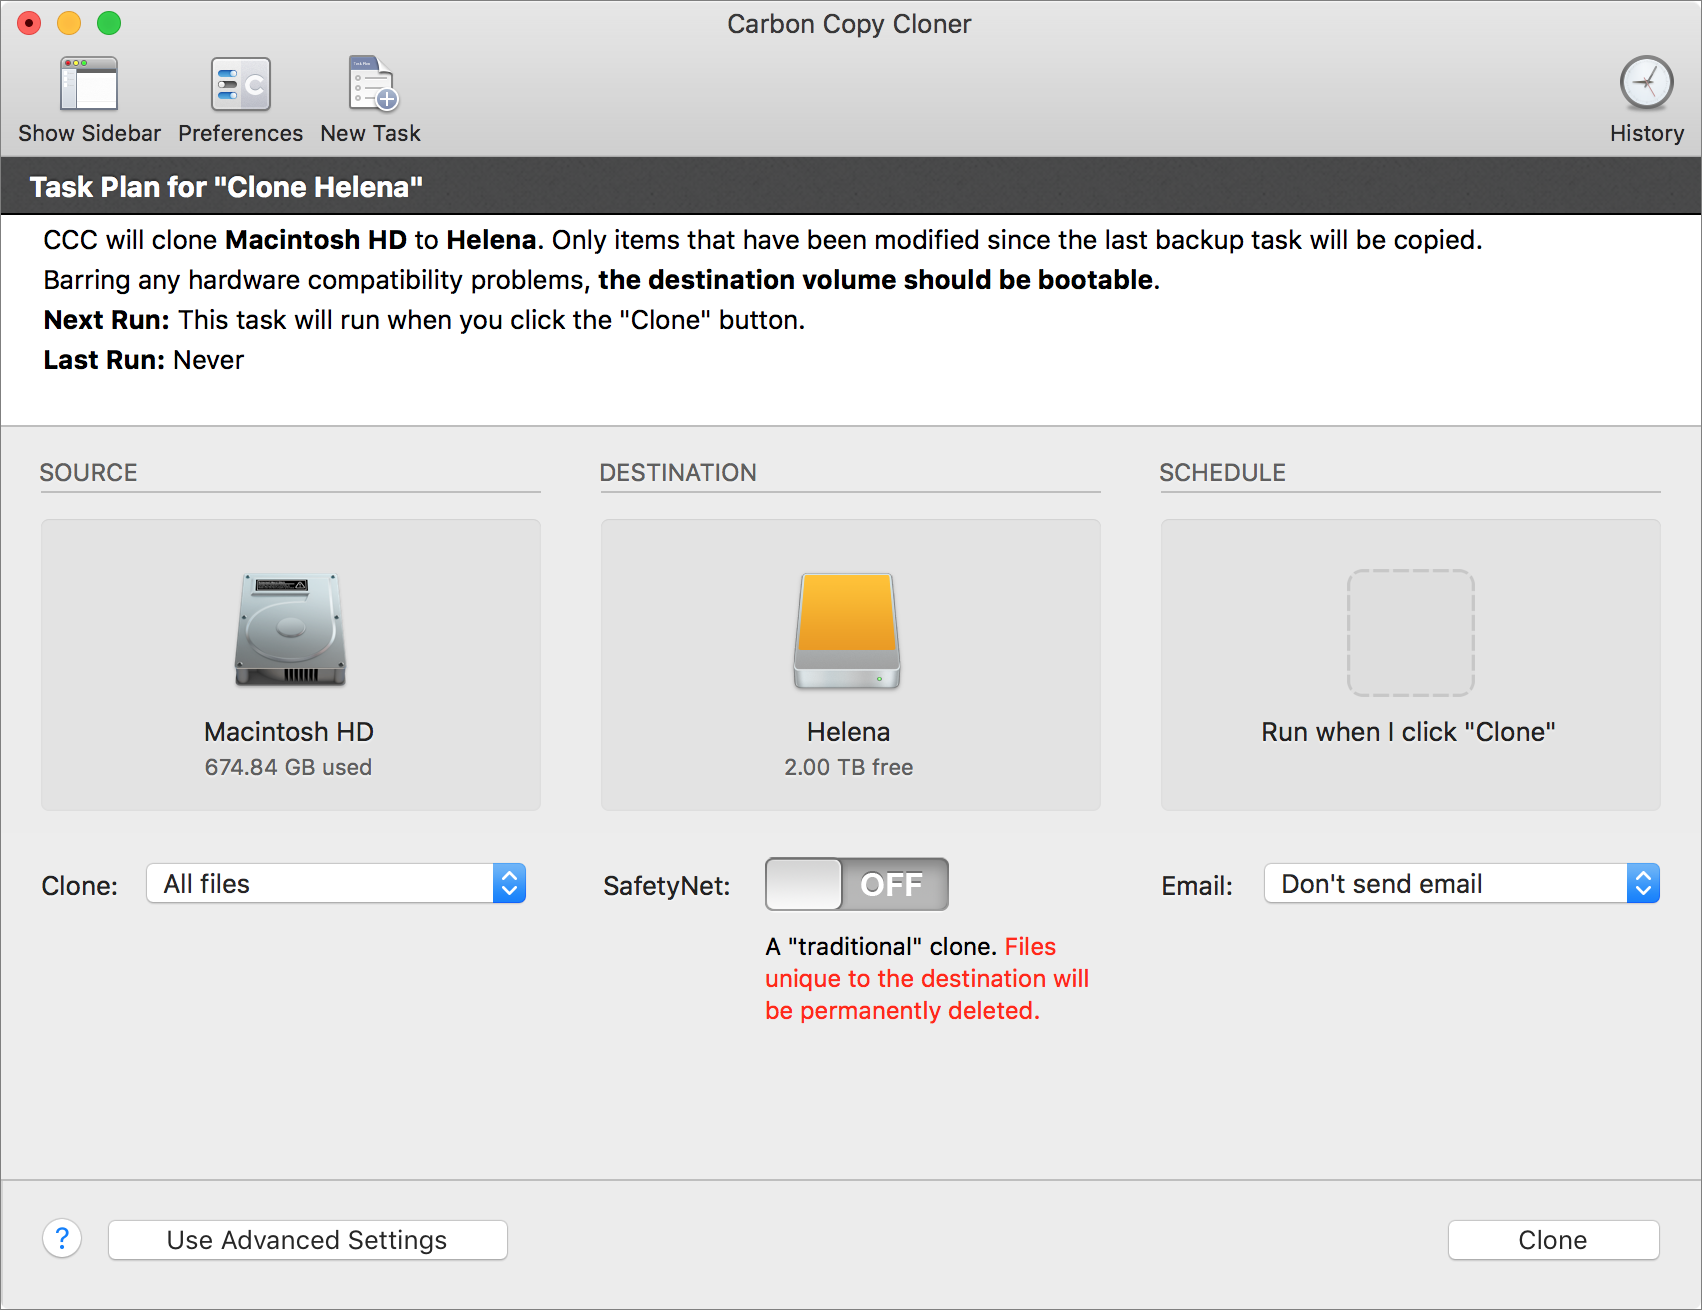
Figure 3: Carbon Copy Cloner shows you the source, destination, options, and an explanation of what’s going to happen. - Click in the center of the SOURCE area, and select your startup volume from the popover that appears.
- Click in the center of the DESTINATION area, and select the disk or partition set aside for duplicates on your external disk from the popover that appears.
- Under the DESTINATION area, if you’re using version 4.x of Carbon Copy Cloner, make sure the SafetyNet switch is set to Off. If you’re using version 5.x, choose SafetyNet Off from the pop-up menu.
- Click Clone and follow the prompts—you may be asked to enter your administrator password to make an immediate duplicate, and you may also be asked to install a helper tool (which is a good idea).
Carbon Copy Cloner creates the duplicate and displays a message when your backup is complete. This process may take several hours or more (depending on the size and speed of your drive, among other factors).
Test Your Duplicate
Even if your backup app reported no errors, you should test the duplicate to make sure it truly is bootable before taking the plunge and upgrading to High Sierra. Follow these steps:
- Make sure the drive with your duplicate is connected to your Mac.
- Choose Apple > Restart.
- Immediately press and hold the Option key until you see a screen with an icon for each available startup volume.
- Click the volume containing your duplicate (or use the arrow keys to select it) and press Return.
Be prepared to wait much longer than usual for your Mac to start up—as much as 10–15 minutes. Longer boot times are normal when starting a Mac from any new volume, but the time can be longer still if your backup drive uses a slow interface, such as USB 2.0.
- When your Desktop appears, you may see alerts about supplying passwords for services such as iCloud, Messages, FaceTime, and Dropbox; you can ignore and dismiss these since you’re only conducting a brief test. Verify that your Mac used your duplicate as the startup volume. (If in doubt, choose Apple > About This Mac and see what’s listed next to Startup Disk.)
- Do a few spot checks to confirm that important files are where they should be, that you have network access (try viewing a news page on the web), and that a few apps launch. I recommend not checking your email, though, as doing so may download messages and delete the originals from the server—you’ll miss them when you return to your usual startup disk.
- Choose Apple > Restart to boot from your normal startup volume.
You’ve just confirmed that your duplicate works correctly.