Section 3: Putting Movement in the Still
Creating the Illusion of Flight and Speed

Grumman G-21 Goose | Shutter Speed: 1/160 sec
The phone rings. “You doin’ anything this weekend?” We’d just gotten home from photographing moose in Alaska, and the weekend was only a couple days off. I said, like always, “Nope, what’s up?” “We might have a few air-to-airs happening during the Nut Tree Air Fair. Want to come over?” I couldn’t have said yes any faster. The caller was a longtime friend, and pilot, who was flying the subject aircraft in many of my air-to-air photos. After we hung up, the aircraft he mentioned as possible subjects sunk in. I instantly sent a text back, “I’m excited, thanks for calling!”
The next day, I sent another text asking for a few more specifics, like location, exact aircraft models, photo platform—all those things you need to know to do your homework and be a professional. Then, I started watching the weather. If there is one thing that will surely squash shooting aircraft, it’s wind. Lucky me, the biggest storm in decades was predicted for the weekend, with huge winds and big rains. We kept moving forward as if there were no weather concerns. We then made the five-hour drive to the airport and the dinner dance happening Friday night. At the dinner dance, there was the 1933 Lockheed Vega Shell #7, flown often by Jimmy Doolittle (leader of the historic raid on Tokyo during WWII), and a 1935 Kinner Playboy R-5 as “decoration.” Oh, man. It was hard to contain my excitement!
After dinner and pleasantries, the conversation at the table changed to the next day. The smiling faces turned sour as the topic of weather came up. The iPhones came out and the browsing of charts and reading of forecasts began. It was not looking good for the next day and our photo missions. It was looking so bad that a couple apologized for having me come over for what they thought would be nothing. There is one thing I learned very early on in aviation photography: just show up! No plans were made for the next day for flying because of the winds, but it was set that I’d be at the hangar before sunup just because I was there.
The next morning, we woke up to broken skies and winds gusting up to 10 knots. We drove over to the hangar to see a gorgeous Ryan ST-A, a Waco DSO, a Monocoupe 110 Special, and a Hawker Sea Fury stacked inside. Wow! The quiet was then broken with, “Oh, I should open up the other hangar for you.” So, we walked next door to see two gorgeous, polished Beech 18s! I looked out to see dawn slowly coming and lighting up the rolling oak-covered foothills off in the distance. It was time to move the aircraft for the Air Fair that started in a few hours.

1929 Waco DSO

Hawker Sea Fury Mk. 11
As often happens, the plane wanted was the one in the back of the hangar. That was okay, as the light was on the verge of being gorgeous. The first plane out to get to the plane in the back was the 1929 Waco DSO. As they pushed it out, I asked, “Can you put it in the corner there for a couple of static shots?” The wind had died down enough, so it was safe, and they pushed it over to where I asked. I bent over, knees on the ground and butt in the air, and started shooting statics hand-held as there was no time for getting, setting up, and using a tripod. I wasn’t paying attention to the conversation behind me as I shot, but as often happens, things changed. Now that the Waco was already out, it would be taxied into position for the Air Fair.
The Waco has no starter; it has to be hand-propped to get the engine started (it scares me every time I watch it performed!). Within a few moments, just as the light peeked over the hangar, the engine came to life as the props turned. I was hand-holding the D5 with the 24–70 VR, shooting at a really slow shutter speed to get some prop blur. I was able to get a few clicks off, and then the Waco started to roll and proceed past me. But in that moment, I knew I had the photo. Great light, great background, great plane, and a tack sharp photo—perfect start to the day.
About five hours later, there was a change in the weather, and while the clouds were still piling up for the big rains about to fall, the winds died down. They died down long enough to do an hour air-to-air flight with an amazing Hawker Sea Fury Mk. 11. (I’m really fortunate to have good friends who want to fly for my camera and make things happen.) The air was a little rough, really pushing the hand-holding, shooting at 1/60 to get a sharp photo. But just like earlier, the light, plane, background, and technique came together to get the sharp photo.
The Camera Has to be a Rock!
When I started out in aviation photography, I had one huge advantage over most starting out: I was an old hand at the essential techniques of hand-holding and panning. Being live-or-die techniques for the wildlife photographer, I had decades of practice at these two techniques, giving me a huge edge. And, combining that with the autofocus technology our camera bodies provide, creates a lethal combo for making sharp images.
Providing our camera a rock-steady platform on which to operate is an essential part of successful, sharp photographs. We must be able to deliver tack sharp images in aviation photography, and we require it under any circumstance. There simply is no exception to this very basic concept. In the vast majority of our aviation photography, we are the platform that’s providing stability for our camera. This is because tripods often tend to only get in the way (either in carrying about, setting up, or shooting on). If you look at this simply from a practical standpoint, by mastering hand-holding, you make your own life easier and possibly save some pennies. When you can properly hand-hold, you don’t have to carry that tripod around all day at an air show. When you can properly hand-hold, you don’t need to spend the money so soon to own a tripod (but, you will end up with one).

Proper hand-holding
Proper hand-holding—just what is it? Proper hand-holding is really no more than a methodology that uses gravity to help bring stability to us, the shooting platform. At the same time, we provide ourselves with complete flexibility to move that stability to follow our subject when we need to. Like in the photo on the left, be it in an awkward posture or bouncing photo platform. Since we all have different body shapes, arm strength, and abilities, we have to take the basic formula and mold it to ourselves.
Quick Brief
Using a strap to take the weight off your wrist/arm when not shooting is a must for all-day shoots (see Section 1 for more on using a strap).
What’s the basic formula? Proper hand-holding starts by grasping the lens barrel with your left hand, palm up. It is essential that this awkward-feeling position of your hand is used all the time—no exceptions. With your palm facing up, the lens rests in your palm because gravity is forcing it down. This bend of the wrist is a must in the technique and can be a strain on the wrist when you’re working with a big piece of glass, like the 200–400 VR II, but there is no way around it. It’s a must.
Next we grasp the camera body with our right hand. Depending on the size of your hand in comparison to the camera body, you can either wrap your fingers around the body or just partly around it. You need to be comfortable to the point that you can fire the camera without causing any movement in the process. This is why learning to roll your finger to fire the camera is essential. Most photographers “jab” at the shutter release rather than roll their finger. Jabbing creates movement in the camera, which causes images not to be tack sharp. “Roll” means you rest your finger on the shutter release, and by lightly depressing, you activate the camera system and by pressing harder, the camera fires. At no time, does your finger lift off the shutter release.

AD/A-1 Skyraider Attack Bomber
Bring your elbows into your sides while grasping your camera and lens as I just described. This is probably the only time in life when having more to rest your elbows on is beneficial. At the same time, press the camera body against your face. If you’re not wearing glasses, an eyecup can be a real aid, acting as a shock absorber between the camera body and you. With the lens resting in your palm, your elbows against your sides, and the camera pressed against your face, you have three points of contact with the camera and that creates a stable platform on which to operate.
This is probably the weirdest sounding part of this technique: you need to practice just firing the camera every day! This technique has to be second nature. A very common comment I receive still is, “My photos are so much better on Sunday than they are on Saturday. Why?” Most photographers work during the week, so on Saturday they are getting used to their cameras again. On Sunday, it’s all second nature. Breaking this routine means you hold the camera every day and fire the camera, practicing until you can get a sharp image while hand-holding down to 1/20 with a big lens. After you’ve given your camera a stable platform for the static subject, we have to continue to give it a stable platform while we’re panning.
Quick Brief
I practice every day, so that I can hand-hold down to 1/2-second exposure with confidence.

1910 Hanriot
Now, there is often the question: right eye or left eye? Because of the ergonomics of camera bodies, shooting left eye works the best for me, but that might not be the same for you. Many people are not left-eyed, and I’ve known many who have been able to switch from right to left eye; some can’t. Is it a must to be left-eyed? No, but it does make things easier and smoother. It’s all up to you, but if you have issues getting sharp images hand-held and you shoot right-eyed, it might be something to consider.
Keeping Up Rock Steady
When photographing static aircraft (where the plane is parked and the engine is not turning), hand-holding is at its simplest. All we have to do is pull the camera to our eye and squeeze off a click or two. As long as the camera doesn’t move, and the subject doesn’t move, we have a sharp photo. This gets complicated when you’re shooting statics in early light and want any amount of depth of field. This gets even more complicated when that engine turns over and the prop or jet starts rolling. You need to have the confidence that you can hand-hold down to 1/30 or slower for these moments. This increases again when you need to move the camera—panning—to keep that moving aircraft in your viewfinder.
Quick Brief
Got a real slow shutter speed and a subject that’s not moving? Try the technique of pulling the camera into your left shoulder and use your left hand to pull it in harder.
Aircraft are meant to fly! They grab our imagination and light our passion when they break the earthly bounds and take to the sky. When they take to the air, we’ve got to follow them with our camera and that’s when our rock-steady technique has gotta move! That rock-steady camera is now racing to keep up with the aircraft. And, the goal is for our camera and subject to move in sync. When the camera and subject move in sync, as far as the camera records it, the subject is not moving. We need to capture that flight to grab the imagination, and that requires a sharp image. We use a simple technique to accomplish this: panning.
Panning is the technique we use to keep the camera (the film plane) in sync with a subject while it’s moving, and in doing so, we stop all subject movement. No matter the speed of our subject, we can freeze it in space, even with a shutter speed of 1 second, if we keep pace with it with our camera body. When we do this, as far as the camera body is concerned, the subject is not moving relative to the film plane. The subject is frozen with camera movement (isn’t that trippy?!).
We start by using proper hand-holding technique, giving our camera a solid platform. Then, we pan by twisting at the waist, and as we go, the camera goes with us. It is that simple, once you practice it a lot. What do you practice? You practice simultaneously twisting at the waist, keeping your AF sensor on the moving subject, and firing by rolling your finger. This is where you want to be sure you’re using the right autofocus mode—my preference being Auto-area AF (AAA) for ground-to-air and air-to-air (we talked about this in Section 1). And, you want to make sure your camera is set to continuous high firing mode. Making sure you’re using proper hand-holding technique (which you have been practicing), follow a moving subject in the viewfinder and shoot!
Since you want to practice panning prior to actually having to use it, you need to find a moving target. The best option would be of the same basic size, like cars. With the lens attached that you are going to shoot planes with, photograph cars driving by. And, don’t make it easy on yourself; make it hard. This has to be a second-nature technique that you can call on anytime and it will deliver. Be really close to the car as it passes, increasing your panning timing and increasing difficultly. I would shoot at a shutter speed of 1/60 or slower to make it even more difficult. When you get sharp images at that shutter speed (which is something you’ll use), then you know you’ve mastered proper hand-holding and panning.
Now, while you’re panning, does your camera seek focus lock? Does your camera search back and forth to find or maintain focus while you’re panning? If it does, this is not a camera issue, but what we like to politely call “pilot error.” It means your panning is not as smooth as it needs to be. The AF sensor is being taken off the point you assigned as being the focus point. The cure: more practice.
But, here’s the problem with all of this: When we are panning perfectly, we are freezing our subject in the act of getting a sharp image. But, we’re photographing a subject traveling perhaps 500 mph! We want to communicate that speed, the magic of flight, in our still photograph. How do we do that? Communicate movement while getting a sharp subject? This really is the heart and soul of aviation photography and where romance is so important.
Prop Blur
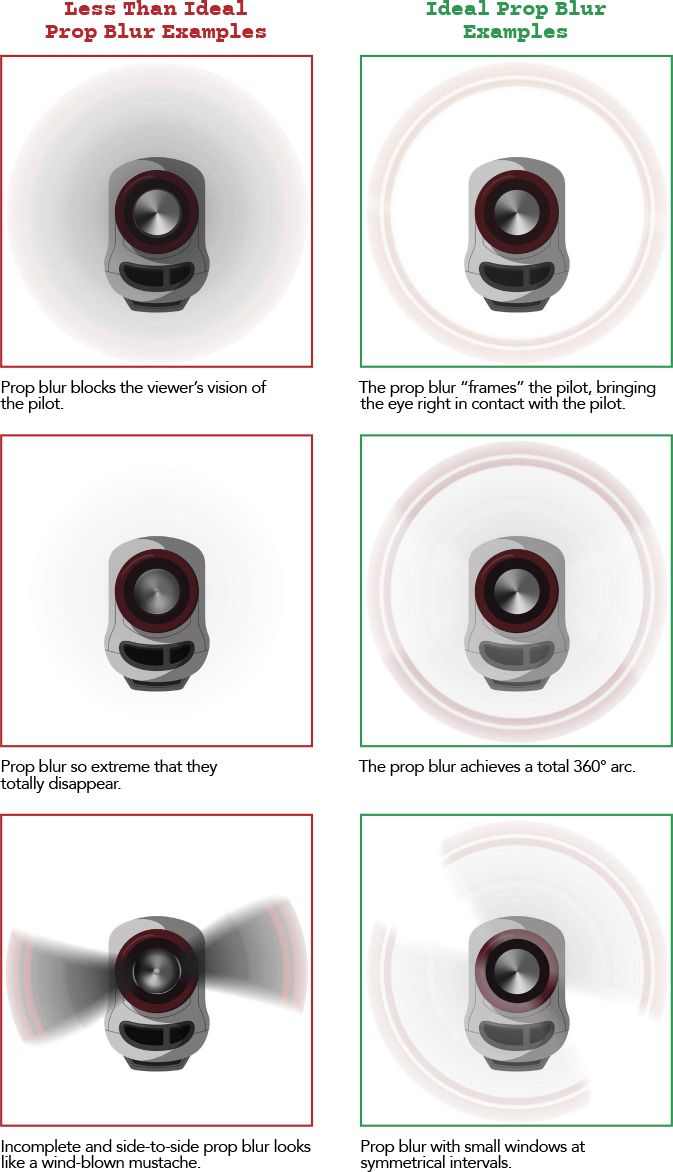
As we pan, the camera is keeping pace with the aircraft. To be more specific, and this is an important fact you need to remember, the film plane (sensor) is keeping pace with and is focused on the fuselage. The fuselage, where the pilot is, is the element that we are working to keep parallel with the film plane and capture sharp with our panning. Even when we’re shooting at a really slow shutter speed, when we pan properly and keep up with that fuselage, it will be tack sharp (with an exception that we’ll discuss). All of this will freeze the plane’s forward motion solid! But, this is a paradox because we want to communicate that motion and speed in our photograph. We need to bring the romance of flight to our still image!

Beechcraft AT-6

Those elements, not parallel to the film plane in this process, will not be captured sharp by our panning—the wings and prop, for example. They are perpendicular to the film plane and will be somewhat out of focus, even when the fuselage is perfectly sharp. That’s the exception; even though the tail is part of the fuselage, there are times when you have the front of the fuselage sharp, but the tail is out of focus. That’s because, in the act of flying, rudder is applied, so the tail will slip back and forth out of the same plane of focus as the front of the fuselage.
When we were kids, many of us made model airplanes. We’d take these models and hang them from the ceilings of our bedrooms. Staring up at them from our beds, they had the appearance of flight as our imaginations latched onto them hanging there. But, the reality is we always knew they were models, in part, because their props were frozen. When a plane is flying, we know the prop is spinning, even though we can never actually see the prop. Can we do the same thing in our photographs? Speak about the prop without actually showing it? In doing so, what does that communicate in our photographs?

FG-1D Corsair

P-51D Mustang
Since the prop is not parallel to the film plane and it is spinning, we can blur it with shutter speed. We can do this at the same time we’re getting the fuselage sharp with panning. The slower the shutter speed, the greater the prop blur will be. We also describe prop blur as disk blur: full, half, one-quarter, etc. Looking at the chart, you can see that, based on engine RPMs, and the number of propeller blades, we can blur the prop. Of course, you have to be able to see the prop. If the aircraft is coming towards you or away from you, and is front lit, then this technique is worth your time. If the plane is flying parallel to you or there is no sun on it, then you won’t see the prop blur no matter what you do.
Shutter Speed for a 360- degree propeller arc |
||||
Prop RPM |
Number of Propeller Blades |
|||
2 |
3 |
4 |
5 |
|
1200 |
1/20 |
1/45 |
1/60 |
1/90 |
1500 |
1/45 |
1/60 |
1/90 |
1/125 |
2000 |
1/60 |
1/90 |
1/125 |
1/150 |
2400 |
1/60 |
1/90 |
1/125 |
1/160 |
2500 |
1/90 |
1/125 |
1/160 |
1/200 |
2700 |
1/90 |
1/125 |
1/160 |
1/200 |
2800 |
1/90 |
1/125 |
1/180 |
1/200 |
3000 |
1/100 |
1/160 |
1/200 |
1/250 |
2-PROP AIRCRAFT
3-PROP AIRCRAFT

4-PROP AIRCRAFT

Less Than Ideal Prop Blur Image Examples

Ideal Prop Blur Image Examples

This is when shutter speed priority mode comes into play. We will set the shutter speed we desire for the prop blur we desire, and the camera will take care of the aperture. The basics of communicating speed and movement are that simple. That’s until you look at the examples in the chart and see that with the P-51D Mustang, you need 1/60 for a full disk, or with the FG-1D Corsair, you need 1/20. These are the extremes in slow shutter speeds you’ll need to function at while panning, but all it takes is one sharp image with that prop blur and you’ll be hooked!
Do you shoot all the time at these slow shutter speeds? Nope! For example, again, if you can’t see the prop because you are shooting sideways to the aircraft, there’s no reason to try to blur the prop. If you can see the prop and every one of your photos have the exact same blur, isn’t that a little boring visually? So varying your shutter speed only makes sense. And, remember that in shutter priority mode, your aperture will be changed to make the correct exposure (exposure compensation affects this, as well). There might be times when you don’t want a lot of depth of field and times you do. This has to be weighed against prop blur you do want at times. And, what about those aircraft that don’t have a prop, what do you do then?
Quick Brief
The physically closer you are to a subject, the faster you have to pan (twist at the trunk). The further away, the slower you pan.
Quick Brief
As the aperture gets smaller, more dust appears in your photo. In shutter priority mode, as you go for more prop blur, you’re going to get more dust in your photo.
Jets have no prop, so shooting at a slow shutter speed to blur them is kinda useless. When the jets take to the air, going to aperture priority mode makes the most sense, and with a simple f-stop like f/5.6 or f/8, just shoot. I like jets. They are pretty cut-and-dried; simple to shoot. But here’s the bad thing about jets: jets have no props! They always look like a model hanging from the ceiling because there is nothing about them that says they are flying. At the same time, when those prop-powered aircraft are sideways, and we can’t see the props, how do we say visually they are flying? And the bigger question, how do we introduce romance into this ground-to-air photography?
Creating the Illusion of Flight, Speed, and Romance
Keep in mind that our goal with all of this is to communicate flight, movement in a still image, the romance of flight. When we can do this, we no longer have that model dangling from a string, but rather an aircraft in flight. We can achieve this pretty simply with practice and shooting at a slow shutter speed. But, we want to go beyond this in our photographs. We want our planes soaring through the heavens and the viewer of our photographs sitting right there in the cockpit with the pilot.
One of the first ways we can take our ground-to-air images up a notch is to not fill the frame with the aircraft. This probably sounds downright odd, but it has to do with the illusion of flight in a still image. When we leave space in our frame for the plane to fly into or out of, the mind creates the movement in doing just that. It is such a simple thing, but it’s often taken for granted. Give your aircraft space.
At the same time, place your aircraft in the frame to suggest more than movement. You can put it in various places in the frame to suggest the plane is climbing, dog fighting, landing, cruising, at just about any altitude, or any accurate gesture you wish. You not only place the plane in the portion of the frame you want to communicate these things, but you also turn your camera body to emphasize it. Level flight does not mean level camera body!

B-29 FIFI

P-40K Warhawk Aleutian Tiger


When a plane is in level flight, it’s not actually level to the earth. When you’re sitting in your seat on a commercial flight, and the flight attendants bring out the beverage cart, they are pushing the cart uphill to get it to the front of the aircraft. The plane, though in level flight, flies with its nose higher than its tail. That’s how it maintains lift. If we have our camera level to the earth, and we take a click of a plane flying in level flight, what have we got? We look at the photo and the plane has its nose pointed upwards. When someone looks at the photo, will they think the plane is in level flight or climbing in altitude? With the nose pointing up, it looks like it’s climbing.
Quick Brief
When I started out, a great aviation photographer gave me great advice I’ll pass along to you here: Richard said, “Photograph the planes as they go away from you!”
That’s right, along with thinking about shutter speed, exposure, panning, and composing, you’ve gotta think about turning the camera body! See why you need an autofocus system that’s working for you? Imagine how hard all of this must have been back in the day when you had to focus and advance the film besides everything else!
When you give your aircraft more space in the frame to mentally travel, then you’re going to also want to turn your camera body to give it attitude and gesture. You can turn the body to make the plane climb, climb steeply, bank, dive, crash, whatever you want to communicate. At the same time, if the plane is making a banking turn, you can make that turn a high-g turn or almost make it look like it’s going straight, depending on how you turn the body.
Can we take this even further? You want to say that jet is hauling ass? You want to make that warbird look like it’s finishing up a strafing run? How can you communicate that kind of speed in a still capture? When you’re panning, the object that you’re stopping with your panning action is the fuselage of the aircraft. Anything behind that aircraft, though, is standing still—it ain’t moving—so there is no way it will be sharp. You can, in fact, accentuate a blurred background by changing up your shutter speed. Now, the closer the background is to the aircraft, the more it will be blurred. The more the background is blurred, the faster the plane will look. The problem is, other than takeoff and landing, planes tend to avoid being close to the ground. Then what?
Quick Brief
While you can straighten out a banking turn with the camera body, the rudder and aileron will still tell those in the know that the plane was turning.

MiG 15

Aeronca 7AC
Clouds, We Need Clouds!
There is a scene in the movie Aviator that explains it all: Howard Hughes is in his dailies room, looking at clips from his movie Hell’s Angels. The WWI biplanes are buzzing around on the screen, and all you see in the frame is the aircraft. There are a bunch of them in dogfights, but they are against a bald sky, and you can tell that even though it’s a B&W flick. Howard Hughes stands up, walks up to the screen and complains. As he casts his shadow on the screen, he looks at his shadow and the planes moving about it and screams, “They look like a bunch of...damn models.... Without something standing still behind the planes, we’ve got no idea of how fast we’re moving. We got no sense of relative motion!”
Quick Brief
Like pilots, aviation photographers that know weather can predict it and operate better. There are a number of apps for the smartphone/tablet that can assist. Two that I use are Radar Cast and NOAA’s ADDS.
Clouds are these magical elements that, when we have them in our aviation images, add so much. When the majority of the public looks at a plane, they look up at them in the sky, flying, and often behind them are clouds. Whether you’re photographing props or jets, clouds communicate so much in our photograph about flight. Everyone knows when a plane is in flight—it’s in the sky. But, a bald sky taps the imagination of flight as much as the ceiling for your models. Yet, when you add clouds, you now give that aircraft a place and the viewer knows they are looking up in the sky.

Canadian Harvard
Clouds are also great for providing the illusion of speed in a still image! When the aircraft is physically close to you and the clouds are far away, say 5000 AGL (Above Ground Level), when you pan, they blur. This illusion is simply gorgeous in your photographs! Of course, overcast doesn’t work as we’ve already discussed in Section 2. Ground fog works great for a background, but not for the illusion of speed. What you need are those gorgeous cumulonimbus, cumulus, altocumulus, or stratocumulus clouds.
The problem with clouds is they are never around when you need them. Air shows happen on a given date, with or without clouds. And, there is nothing you can do about that. When you understand all these different elements, though, you can take advantage of them when you have them and work with other strategies when you don’t. Just like any other type of photography, you gotta have the Photo Gods smiling on you to make that great click!
When it comes to bringing romance to your ground-to-air shots, clouds are essential! If you have multiple aircraft in the frame that you can play against each other, having no clouds works sometimes. With multiple aircraft, one will have gesture when the other often won’t—one will be sharp and the other often slightly soft. All these combos can work. But, not as well as a sure-fire bet like clouds!
Does just throwing clouds in the background make your photography an instant success? Not even! They can instantly cause an exposure nightmare. If they block the sun from lighting the subject, you’ll instantly curse them. The best-case scenario I think is when you have forming thunderheads (cumulonimbus) in the afternoon. The clouds themselves are a great photograph, but then when you can add an aircraft, you tap into the viewer’s imagination with little effort. Add a little color or drama that the black thunderheads gain with time, and you’ve got a great photograph!
Your Challenge Is Putting It All Together
While it sounds so simple, making that sharp image of a flying aircraft has multiple aspects that you can now do. Using proper hand-holding, you’re going to pan using a shutter speed that will blur the prop (if there is one) with a background to communicate the romance of flight. You’re going to add to this an exposure you feel brings out the story, and with that, you’ll grab the viewer’s heartstrings.
This I know you can do. It won’t come without practice; it won’t come without some failures. But it will come, and the best part is it’s just the beginning of something great!

Piper PA-11