Scrollbars allow you or your users to scroll the viewable area of a window. A scale widget is a slider whose value changes as the slider is moved. Text widgets provide areas for displaying and editing text. Except for very short text documents or small objects of any variety, you will need to use vertical or horizontal scrollbars (or both) to allow users to view different portions of a window’s content. In a text document, for example, you’d add a vertical scrollbar to enable users to scroll the document up and down. If you’re writing a game that needs a player map, similarly, chances are good that you would need both vertical and horizontal scrollbars so users could look at different parts of the map.
Text widgets are used, well, to display text. In the context of a game, you might not need to display long sections of text, but most other applications usually do involve text display and manipulation. As you will see later in the chapter, Tk’s text widget is a full-featured text display and manipulation tool. The price of this feature set is that the text widget is complex.
This chapter’s program, gword_search.tcl, presents a simplified version of the classic word search puzzle to illustrate how to program Tk’s text widget. The game shows users a randomly ordered collection of letters from which the player must select a word made up of consecutive letters. The player selects a word from the jumble of letters and clicks the Score button. If the correct target word is selected, the word is highlighted in green and disabled. If the selected word is incorrect or isn’t the target word, the selection is highlighted in red. To start the game, execute the gword_search.tcl script found in this chapter’s code directory. Figures 14.1 through 14.3 show the progress of the game.

The scrollbar command creates a scrollbar widget, which is used to change the visible area, referred to as the viewport, of another widget. Scrollbars work with four of Tk’s standard widgets: entry widgets, text widgets, listbox widgets, and canvas widgets. Although they only work with these four standard widgets, the scrollbar protocol is general enough that you can use it to control widgets that you create, but creating a widget from scratch, as opposed to using Tk’s stock widgets, is not a subject I’ll cover in this book. I do describe how you can interact with the scrollbar protocol directly instead of using its built-in defaults, however, but I think you’ll see that this is not an undertaking for the faint of heart.
Scrollbars can move the viewport horizontally, vertically, or both. They consist of a slider, a trough in which the slider moves, and arrows at each end of the trough. The position and size of the slider provide a visual cue about how much of the document is visible in the associated window. For example, if the slider in a vertical scrollbar covers the top third of the area between the two arrows, it means that the associated window displays the top third of its document.
The best way to get started is to look at an example, simple_scroll.tcl, in this chapter’s code directory. It uses the text widget that you will learn about later in the chapter, but the principles for connecting a scrollbar to a scrollbar-supporting widget are the same, regardless of the widget to which the scrollbar is connected:
proc ReadFile {f} {
    set fileId [open $f r]
    set input [read $fileId]
    close $fileId
    return $input
}

set t [text .t -background #ffffff]
$t insert end [ReadFile "README"]

set sb [scrollbar .y -command [list $t yview]]
$t configure -wrap word -yscrollcommand [list $sb set]

grid $t $sb -sticky nsew
grid columnconfigure . 0 -weight 1
grid rowconfigure . 0 -weight 1
grid columnconfigure . 1 -weight 0
The most important two lines of code in simple_scroll.tcl are
set sb [scrollbar .y -command [list $t yview]]
$t configure -wrap word -yscrollcommand [list $sb set]
because they connect the scrollbar and the text widgets together. The first line invokes the text widget’s yview operation when the scrollbar is repositioned. In effect, the first command wires the text widget’s display to the scrollbar so that moving the slider up moves the viewport up, and moving the slider down moves the viewport down. If the scrollbar had been oriented horizontally, I would have invoked the text widget’s xview operation.
The second command completes the circuit, so to speak, wiring the scrollbar to the text widget by invoking the scrollbar’s set operation whenever the view in the text widget changes. Thus, if you use the up or down arrow keys to change the text viewed in the text widget, the slider’s position in the scrollbar changes accordingly.
Tip: A Confession of Confusion
For some reason, when I was first learning Tk, the connections between the scrollbar widget and the widgets on which they operated confused me. I finally settled on this formulation of the relationship:
The
scrollbar’s-commandattribute must invoke the connected widget’s scrolling operation, which isyviewfor vertical movement orxviewfor horizontal movement.The connected widget’s scrolling attribute (which is either
-yscrollcommandfor vertical scrolling or-xscrollcommandfor horizontal movement) must invoke thescrollbar’ssetoperation.
Perhaps I’m just easy to confuse, but these two rules work for me, so I hope they help you.
The four grid commands are important, too:
grid $t $sb -sticky nsew
grid columnconfigure . 0 -weight 1
grid rowconfigure . 0 -weight 1
grid columnconfigure . 1 -weight 0
The first command lays out the text widget, followed by the scrollbar. The order in which the widgets are passed to the grid command ensures that the scrollbar appears on the right side of the text widget. The second and third grid commands assign a weight of 1 to column 0 and row 0. Recall from Chapter 11 that the -weight option for the grid command controls whether or not the specified column or row resizes when the master resizes. A non-zero value means that they will resize. Bear in mind that column 0 and row 0 in this case corresponds to the text widget. The last grid command sets the weight of column 1 (the second column) to 0, meaning that this column (which happens to contain the scrollbar) won’t resize horizontally when the master widget resizes. Putting it all together, then, when you resize the window containing the text and scrollbar widget, the second, third, and fourth grid commands allow the text widget to resize in both the horizontal and vertical directions while constraining the scrollbar widget to resize only vertically while its width remains static.
Figures 14.4 and 14.5 show what simple_scroll.tcl’s window looks like.

The documentation for the scrollbar widget describes the scrollbar in terms of the following five components:
arrow1—. The arrow at the top left end of the scrollbar.
trough1—. The space between the
sliderandarrow1.slider—. The rectangular box in the scrollbar that indicates the amount and location of text visible in the associated widget.
trough2—. The space between the
sliderandarrow2.arrow2—. The arrow at the bottom or right end of the scrollbar.
For the most part, I won’t use these terms, but they appear in the documentation and some scrollbar-related operations use them, so you should be aware of them and to what they refer. Figure 14.6 shows each of these widget parts as they are described in the scrollbar documentation.

If you play with the window created by simple_scroll.tcl, notice that the size of the slider (its height in the trough) corresponds proportionately to the size of what is available in the viewport, relative to the total size of the item you are viewing through the viewport. For example, in Figure 14.4, the slider is just over half the size of the scrollbar, indicating that approximately half of the document is visible in the associated text widget. In Figure 14.5, on the other hand, the slider extends the full length of the trough, which means you are viewing the entire document.
Similarly, the location of the slider corresponds roughly to where in the item being viewed the viewport resides. In Figure 14.4, the top of the slider is anchored against the top of the scrollbar, so you can surmise that you are looking at the top of the document. In Figure 14.5, however, the resized window shows all the document, so the slider is anchored to the top and the bottom of the scroll trough.
The behavior I’ve described in this section relies on the default values for the scrollbar protocol and its default bindings. The scrollbar protocol defines the messages exchanged between scrollbar widgets and the scrollable widgets (entry, text, listbox, and canvas widgets) to which they are related. Thus, when you use the mouse or keyboard to scroll the text widget in simple_scroll.tcl, it sends messages to the scrollbar indicating the text’s current position in the text widget, which the scrollbar uses to adjust its appearance (such as the slider’s height and its location in the trough). Likewise, when you use the slider to scroll the text in the text widget, the scrollbar widget sends messages to the text widget telling it how to update the text displayed in the viewport.
The information to take away from this is that scrollbars have a protocol that defines how scrollbars and their associated widgets stay in sync. I have relied on the default values of the protocol. You should be able to do the same for a long time before you need to dig into the innards of the protocol and learn to use other scrollbar commands and attributes to modify the protocol’s default behavior.
Similarly, my description of Tk’s scrollbar widget assumes that you use its default bindings. You have less need to modify the default bindings for the scrollbar widget than you do to tweak the protocol settings. The capability exists (using the bind command described in Chapter 10), and it isn’t difficult or complicated to do so. However, most users have been heavily conditioned to expect scrollbars to behave a certain way. Consequently, changing that behavior in the absence of a compelling reason to do so violates the principle of least surprise and will usually confuse, if not downright annoy, your users.
Note: The Principle of Least Surprise
When applied to user interfaces, the Principle of Least Surprise, also known as the Principle of Least Astonishment, the Rule of Least Surprise, or the Rule of Least Astonishment, boils down to, “When creating a user interface, do the least surprising thing.” As Eric Raymond writes in The Art of UNIX Programming (http://www.faqs.org/docs/artu/ch11s01.html):
The Rule of Least Surprise is a general principle in the design of all kinds of interfaces, not just software: “Do the least surprising thing.” Thus, to design usable interfaces, it’s best when possible not to design an entire new interface model (Eric Steven Raymond, The Art of UNIX Programming, Chapter 11).
In other words, if it isn’t broken, don’t fix it.
As explained in the previous section, when you move a scrollbar, it calls the command specified by its -command attribute, passing some additional parameters that specify the requested operation. The related widget (suppose it is a text widget) responds to this command (using its -xview or -yview attribute, for example) to update the display. To complete the scrolling operation, the scrollbar’s position and size have to be updated. This is accomplished by the text widget invoking the command specified in its -xscrollcommand or -yscrollcommand attribute (the set command in simple_scroll.tcl), passing parameters back to the scrollbar that tell the scrollbar how to update its size and position.
The scrollbar’s set command takes two arguments, first and last, real numbers between zero and one (0.0 and 1.0) that indicate the position of the top and bottom (or left and right for horizontal scrollbars) of the widget’s display. The first argument specifies the (relative) position of the top of the widget; the last argument specifies the (relative) position of the bottom of the widget’s viewport. In effect, first indicates an offset: how far down from the top or in from the left of the item being viewed in the widget the viewport is. Similarly, last indicates how much of the item in the widget is currently in the viewport.
In the following script, mod_scroll.tcl, I’ve modified the simple_scroll.tcl script presented earlier, replacing the scrollbar’s set command with a wrapper procedure, Scroll, that displays the values passed to the set command:
proc ReadFile {f} {
    set fileId [open $f r]
    set input [read $fileId]
    close $fileId
    return $input
}

proc Scroll {sb args} {
    foreach {first last} $args {
        puts "first=$first, last=$last"
    }
}

set t [text .t -background #ffffff]
$t insert end [ReadFile "README"]
set sb [scrollbar .y -command [list $t yview]]
$t configure -wrap word -yscrollcommand {Scroll $sb}

grid $t $sb -sticky nsew
Marta Justak, 14tclbook-Fi.doc
grid columnconfigure . 0 -weight 1
grid rowconfigure . 0 -weight 1
grid columnconfigure . 1 -weight 0
The key piece of code is the Scroll procedure. It takes the scrollbar widget as a required argument. The keyword args specifies optional arguments. Before executing the scrollbar's set command, it displays the values of the arguments passed to set. Astute readers will notice that the script itself does not pass values to the set command. If you don’t explicitly pass values, the scrollbar protocol makes some intelligent assumptions on your behalf—the purpose of this script is to show you what those “intelligent assumptions” are.
To generate the output below, I started the script, which displayed the first two lines of output. When the scrollbar is first mapped, it has no length, thus the offset and size are both 0 (first=0, last=0). The second line of output appears after the text widget is filled with the text read from the input file. The offset is still 0 because the viewport is at the top of the widget. The size value, though, has changed to reflect the fact that just over half of the document (last=0.521739) is visible in the viewport.
Next, I pressed Ctrl+End to scroll to the end of the document, resulting in the third line of output, first=0.478261, last=1. This output indicates that the top of the viewport is just under halfway through the document being displayed. The bottom of the document is visible, as indicated by the output last=1. Finally, I clicked arrow1 (the arrow at the top of the scrollbar) twice, scrolling two units up into the document, resulting in the fourth and fifth lines of output:
$ ./mod_scroll.tcl
first=0, last=0
first=0, last=0.521739
first=0.478261, last=1
first=0.456522, last=0.978261
first=0.434783, last=0.956522
The point of this is to demonstrate that you can, if you wish, interact directly with the scrollbar protocol, but that doing so is ugly and, in most cases, unnecessary.
Tk’s scale widget, referred to as a slider in other GUI toolkits, displays a slider that can move back and forth or up and down in a trough. You decide the range of values the widget displays by assigning numeric values with the -from and -to attributes. As the slider moves along the trough, the scale widget’s current value changes. You can access the current value of the widget through its -variable attribute.
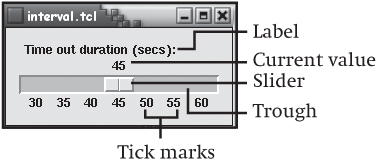
The following example uses a scale widget to set the maximum amount of time, in seconds, allowed to elapse between turns (see interval.tcl in this chapter’s code directory on the Web site):
scale .s -from 30 -to 60 -orient horizontal -length 200
    -label "Time out duration (secs):" -tickinterval 5 -showvalue true
grid .s -padx 10 -pady 10
The scale command creates a scale widget whose value ranges from 30 to 60. It will be laid out horizontally. The attribute -tickinterval 5 creates tick marks below the slider that increment in units of 5. The -showvalue true attributes cause the scale widget to display its current value between the top of the scale itself and the label.
Figure 14.7 shows the resulting window.
The scale widget supports a reasonably standard set of attributes that control its size, appearance, and behavior. Table 14.1 highlights the scale-specific attributes that you need to know or that you haven’t encountered in the discussions of widgets in the previous chapters. As usual, for more information and to view the full list of both standard and scale widget-specific options, please refer to the scale man page (man 3tk sscale).
Table 14.1. Attributes of the scale Widget
Attribute | Description |
|---|---|
| Defines the size of “large” increments by which to adjust the |
| Specifies the mouse cursor to display when the mouse hovers over the |
| Sets the number of significant digits to retain when converting |
| Defines the smallest value the |
| Specifies the text label that appears above or to the left of the |
| Sets the length of the widget in screen units (pixels by default). |
| Defines the orientation of the widget; must be either |
| Specifies the number of milliseconds a button or key must be pressed before it begins to auto-repeat. |
| Sets the number of milliseconds between auto-repeats. |
| Defines the value to which the |
| If true, the current value of the |
| Specifies the length of the slider in screen units (pixels by default). |
| Sets the relief style of the slider. |
| Defines the interval between tick marks. |
| Specifies the largest value the |
| Sets the color of the trough. |
| Defines the variable whose value is the widget’s current value. |
Although the scale widget supports a rich set of attributes, the list of operations you can perform with it is limited, which is perhaps unsurprising when you consider that its function is limited to moving a slider back and forth (or up and down) in a trough. Table 14.2 lists the operations you can perform on a scale widget.
Table 14.2. Operations for the scale Widget
Description | |
|---|---|
| Returns a two-element list consisting of the x and y coordinates of the point along the center of the trough that corresponds to value, or to the |
| Returns the |
| Returns a string indicating what part of the |
| Sets the value of the widget to |
The text widget is perhaps Tk’s most sophisticated widget. Naturally, you can use it to display and edit text, but its capabilities extend far beyond mere text display and manipulation. A reasonably complete list of the text widget’s features includes, in no particular order, the following elements:
Controlling line spacing and justification
Setting the font family, size, weight, and color
Moving around within the text using marks
Executing commands and setting text attributes using tags
Displaying images
Inserting, modifying, and deleting text
Cutting, copying, and pasting text
Adjusting tab stops
Selecting text
Searching text
Embedding other Tk widgets into the
textwidgetUndoing and redoing edit operations
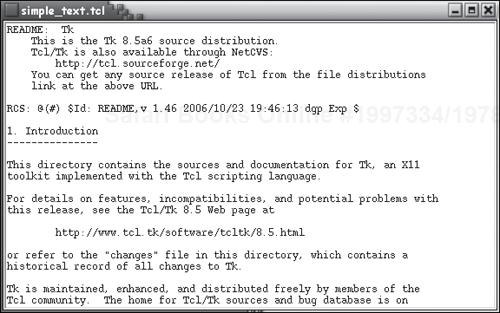
I’ll start with the following script, simple_text.tcl in this chapter’s code directory:
proc ReadFile {f} {
    set fileId [open $f r]
    set input [read $fileId]
    close $fileId
    return $input
}

set t [text .t -height 25 -width 80 -background #ffffff]
$t insert end [ReadFile "README"]
grid $t
This script creates a window consisting of a single text widget that is 25 lines tall (-height 25) and 80 characters wide (-width 80) with a white background (-background #ffffff). After creating the widget, I insert the contents of the file named README at the “end” of the widget ($t insert end [ReadFile "README"]). Because the text widget is initially empty, the “end” in this case is actually the top. The ReadFile procedure opens the specified file, reads its contents into a string variable, and then returns that string to the caller. Figure 14.8 shows the resulting figure.
You can insert, delete, and modify text in the text widget immediately, that is, without making any changes in the code. Scrolling is a bit more awkward if you don’t have a mouse with a wheel, but you can use the keyboard arrow keys to scroll through the document. Although you can modify the text, you won’t be able to save your changes because I haven’t provided that functionality. The next few sections add a scrollbar and a menu that allows you to open files, save files, and exit the script.
Before I start showing off the features of the text widget, you’ll likely want to know the attributes and options you can use. There are a lot of them, as Table 14.3 makes clear, and this is not the complete list (refer to the text man page for the comprehensive list).
Table 14.3. Arguments for the text Widget
Argument | Description |
|---|---|
| If 1 or true, automatically inserts separators in the undo stack (used with -undo). |
| Specifies the height of the |
| Sets the maximum number of undo operations. |
| Defines the amount of additional space (in screen units) above each line of text. |
| Defines the amount of additional space above and below wrapped lines of text. |
| Defines the amount of additional space (in screen units) below each line of text. |
| Controls whether text can be inserted ( |
| Sets the tab stops in the widget. |
| If I or true, enables the undo mechanism; defaults to 0 (no undo capability). |
| Specifies the width of the |
| Defines the wrapping behavior of the widget; must be one of |
| Sets the command used to communicate with the horizontal |
| Sets the command used to communicate with the vertical |
| Deletes a range of characters from the text, as specified by index arguments. |
| Returns a five-element list describing the geometry of the area containing the specified index. |
| Returns the contents of the |
| Provides a facility for modifying the contents of the undo stack. |
| Returns a range of characters from the widget. |
| Returns the position that corresponds to the specified index. |
| Inserts text and optional tags into the widget starting at the specified index. |
| Provides the ability to create, modify, delete, and interact with text marks. |
| Searches text for a specified pattern, beginning at specific index. |
| Scrolls the text at the specified index into view. |
| Provides the facility for working with tags. |
| Changes the horizontal position of the text in the widget. |
| Changes the vertical position of the text in the widget. |
Using what you learned about the scrollbar widget in the previous section, adding a scrollbar to simple_text.tcl involves just a few lines of code. In the interests of simplicity, I’m only going to add a vertical scrollbar. I’ll use the text widget’s -wrap attribute so that text wraps automatically. If you follow the rules I suggested, you need to do three things:
Add the
scrollbarwidget to the window.Invoke the
textwidget’syviewoperation in thescrollbarwidget’s-commandattribute.Invoke the
scrollbarwidget’ssetoperation from thetextwidget’s-yscrollcommandattribute.
The resulting script, scroll_text.tcl in this chapter’s code directory, is shown below:
proc ReadFile {f} {
    set fileId [open $f r]
    set input [read $fileId]
    close $fileId
    return $input
}

set t [text .t -height 25 -width 80 -background #ffffff -wrap word]
set s [scrollbar .s]

$s configure -command [list $t yview]
$t configure -yscrollcommand [list $s set]

$t insert end [ReadFile "README"]

grid $t $s -sticky nsew
grid columnconfigure . 0 -weight 1
grid rowconfigure . 0 -weight 1
grid columnconfigure . 1 -weight 0
The ReadFile procedure is unchanged from the previous scripts. I added a new attribute to the command that creates the text widget, -wrap word. This attribute controls how text that is too wide to fit in the text widget is handled. It can be one of three values: none, char, or word. A value of none causes text to be truncated; char allows text to be wrapped at any characters; word breaks text at word boundaries (white space).
The scrollbar command creates a scrollbar widget named .s, a reference to which is stored in the variable $s. I don’t specify any attributes when creating the widget, so it assumes default values.
After creating the widgets, the two configure operations connect the scrollbar and text wid-gets using the rules I gave you in the previous section. I set the scrollbar’s -command attribute to the text widget’s yview operation. Then I set the text widget’s -yscrollcommand attribute to the scrollbar’s set operation.
After populating the text widget using my now-familiar ReadFile procedure, I lay out the widgets, using the same procedure described for the simple_scroll.tcl script in the previous section. Figure 14.9 shows the resulting window. Figure 14.10 shows the window when it is scrolled to the bottom of the text widget’s contents. Figure 14.11 illustrates selected text. Figure 14.12 proves that you can, in fact, edit the contents of a text widget without writing any code.


One change from all the scripts I have shown you previously is that I use the list command to build the command specified as the attribute for -command and -yscrollcommand. The reason for this change is that the list commands handle quoting and spaces embedded in arguments automatically. Using double quotes for grouping would not deal with the embedded spaces. While using braces around the arguments would handle embedded spaces and accomplish the needed grouping, it would also inhibit substitutions that you might otherwise need performed. Although this is not an issue in these two commands, as your commands become more sophisticated, quoting and embedded spaces become a real consideration, and, as you’ve seen throughout this book, Tcl (and thus Tk) are more sensitive to white space than other programming languages.
As promised, this section shows you how to add a menu, open an arbitrary file, and save the contents of the text widget to an arbitrary file. Although it probably seems like I’m creating a text editor (and, truthfully, I am gradually evolving a simple-minded text editor), what I’m really doing is using simple examples to show you how to perform typical operations with and on text widgets. I also hope to convey that just a few lines of Tcl and Tk code make it possible to create scripts that are surprisingly capable compared to the amount of code required to implement them.
The following script, menu_text.tcl in this chapter’s code directory, shows the latest iteration of the simple_text.tcl script with which I started:
proc ReadFile {w} {
set f [tk_getOpenFile -title "Open file"]
# Bail if no filename is specified
if {$f == ""} {
return
} else {
set fileId [open $f r]
# Clear the current contents of $w first
$w delete 1.0 end
# Read straight from the file into $w
$w insert end [read $fileId]
close $fileId
}
}
proc SaveText {w} {
set f [tk_getSaveFile -title "Save file"]
# Bail if no filename is specified
if {$f == ""} {
return
} else {
set fileId [open $f w]
puts -nonewline $fileId [$w get 1.0 "end - 1 chars"]
close $fileId
}
}
set t [text .t -height 25 -width 80 -background #ffffff -wrap word]
set s [scrollbar .s]
$s configure -command [list $t yview]
$t configure -yscrollcommand [list $s set]
set main [menu .main]
. config -menu $main
set mFile [menu $main.mFile -tearoff 0]
$main add cascade -label "File" -menu $mFile
$mFile add command -label "Open" -command [list ReadFile $t]
$mFile add command -label "Save" -command [list SaveText $t]
$mFile add separator
$mFile add command -label "Exit" -command exit
grid $t $s -sticky nsew
grid columnconfigure . 0 -weight 1
grid rowconfigure . 0 -weight 1
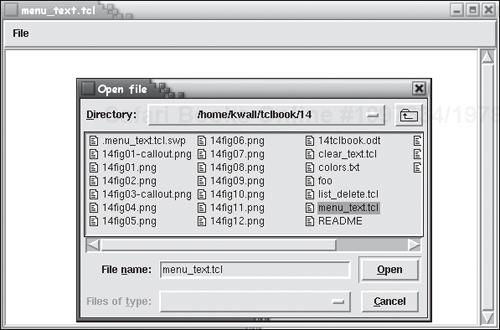
grid columnconfigure . 1 -weight 0There’s a lot going on in this script. I’ve modified the ReadFile procedure and added a new one, SaveText. Both accept a single argument, the widget into which to dump the contents of a file (ReadFile) or from which to read the text to save to a file (SaveText). ReadFile uses the tk_getOpenFile command to create a ready-made file open dialog box (see Figure 14.14). tk_getOpenFile returns the name of the file selected in the dialog, so I use that name in the open command. Another change to ReadFile is that I read the contents of the file directly into the text widget, instead of returning the text as a string variable. The condition if {$f == ""} is necessary because the user can close the file open dialog without selecting a file (by clicking the Cancel button). If that happens, I just exit the ReadFile procedure.
The SaveText procedure works similarly. The tk_getSaveFile command creates a ready-made file save dialog box, so if the user selects a file, I open it and use the command puts [-nonewline $fileId [$w get 1.0 "end–1 chars"] to get the contents of the text widget and save it directly into the file (see Figure 14.17). If the user doesn’t select a file in the file save dialog box, I just exit SaveText without taking any action.
The rest of the new code in this script adds the menu and menu entries. First, I create the menu bar itself (set main [menu .main]) and associate it with the root window (. config -menu $main). Next, I create a File menu item and add it to the $main menu. Then I add four entries to the File menu: Open, Save, a separator, and Exit:
The Open entry invokes the
ReadFileprocedure.The Save entry invokes the
SaveTextprocedure.The separator entry creates visual separation between the Open and Save entries and the Exit item.
The Exit entry terminates the script (without saving any changes to the contents of the
textwidget).
The rest of the script consists of the same layout commands that I used in the previous iterations of this script, so I won’t rehash them here. Figures 14.13–14.16 show the new Tk features that menu_text.tcl uses.


I think you’ll derive the most benefit from marks and tags. Marks are beneficial because they enable you to move around within the contents of a text widget programmatically, find where the user (or at least the current insertion point) is in the text, and modify the contents of the widget (in terms of adding or deleting text). Tags are most commonly used to apply visual attributes to the text in a text widget. Other uses of tags include binding commands to ranges of text and manipulating the text selection. Marks and tags are certainly the two features upon which the word search game at the beginning of the chapter relied. Before I get to marks and tags, though, you’ll need to know how to find your way around inside a text widget.
A fair portion of the commands, options, and attributes for text widgets expect one or more index arguments that specify the text within the widget on which to operate. Given the number of operations that you can perform, there is a correspondingly large number of expressions used to specify index values. These expressions fall into two broad categories: bases and modifiers. Bases define the starting point for an operation. Modifiers define the direction in which an operation works or the number of characters on which to operate. All text operations require a base or starting point; modifiers are optional. Table 14.4 lists the expressions used to specify text index values and whether the expression represents a base value or a modifier.
Table 14.4. Expressions Used for Text Indices
Expression | Type | Description |
|---|---|---|
| Modifier | Moves the index backward by |
| Modifier | Moves the index backward by |
| Base | Refers to the character that covers the pixel at widget-relative coordinates |
| Modifier | Moves the index forward by |
| Modifier | Moves the index forward by |
| Base | Refers to character immediately following the last newline. |
| Base | Refers to character on line |
| Modifier | Moves the index to the last character (the newline) on the line. |
| Modifier | Moves the index to the first character on the line. |
| Base | Refers to the character immediately following the mark named |
| Base | Refers to the first character in the tag named |
| Base | Refers to the last character in the tag named |
| Modifier | Moves the index to end of the word containing the current index. |
| Modifier | Moves the index to the beginning of the word containing the current index. |
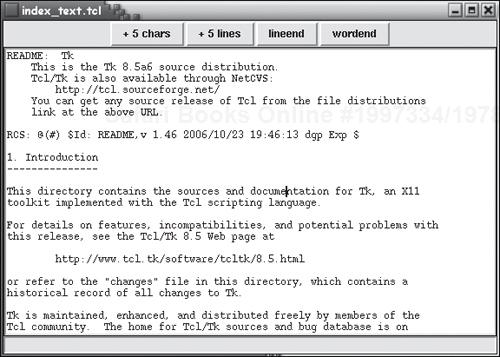
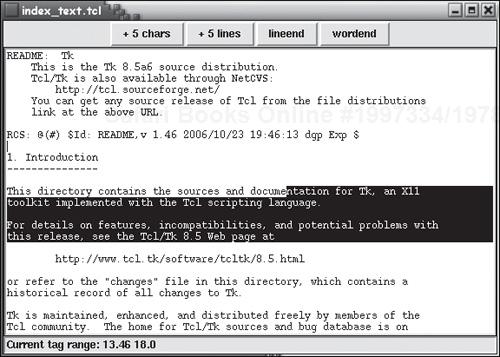
The following script, index_text.tcl, illustrates how to use some of the text indexing operations shown in Table 14.4.
proc ReadFile {f} {
    set fileId [open $f r]
    set input [read $fileId]
    close $fileId
    return $input
}

proc DoTag {w c} {
    global status

    $w tag delete t
    $w tag configure t -background [$w cget -foreground]
    $w tag configure t -foreground [$w cget -background]
    $w tag add t [$w index insert] "[$w index insert] $c"

    $status configure -text "Current tag range: [$w tag ranges t]"

}

set t [text .t -height 25 -width 80 -background #ffffff]
$t insert end [ReadFile "README"]

set f [frame .f]
set b1 [button $f.b1 -text "+ 5 chars" -command [list DoTag $t "+ 5 chars"]]
set b2 [button $f.b2 -text "+ 5 lines" -command [list DoTag $t "+ 5 lines"]]
set b3 [button $f.b3 -text "lineend" -command [list DoTag $t lineend]]
set b4 [button $f.b4 -text "wordend" -command [list DoTag $t wordend]]

set status [label .status -relief sunken -anchor w]

grid $f -sticky nsew
grid $b1 $b2 $b3 $b4 -sticky nsew
grid $t -sticky nsew
grid $status -sticky nsew
The script uses tags (and marks), which you haven’t learned how to use yet, but they are only a means to an end, providing visual evidence of how text indices work. The gist of the script is just this: Using your mouse, click somewhere in the text with the left mouse button. This sets the insertion point (see Figure 14.17). After setting the insertion point, click one of the buttons at the top of the window. This moves the index from the insert point to the index specified on the button label (five characters forward, five lines forward, the end of the current word, or the end of the current line). In addition to moving the index point, the DoTag highlights the range of text (Figure 14.18) between the insertion point and the specified index, resulting in a visual illustration that the index has, in fact moved.
In Tk’s terminology, a text mark is a name that refers to a space between two particular characters. Marks are ordinarily used as reference points in operations that require indices. You can use any character when naming marks, but I recommend not using strictly numeric names, the plus sign (+), the minus sign (-), or spaces, because these elements are used when performing index arithmetic. Names containing these characters potentially complicate index math.
In addition to the marks you create, widgets that support marks include a few predefined marks that cannot be deleted with the mark unset operation listed in Table 14.5. The two most important predefined marks are insert, which refers to the location of the insertion point (where text will be inserted), and current, which refers to the character closest to the mouse cursor. Marks are also persistent. If the text surrounding a mark is deleted, the mark remains in place.
Table 14.5. Supported Mark Operations
Operation | Description |
|---|---|
| If |
| Returns a list of all currently defined marks. |
| Returns the name of the next mark occurring at or after |
| Returns the name of the next mark occurring at or before |
| Defines a mark named |
| Deletes the mark or marks specified by |
Notice that a mark resides between two characters. Depending on the value of the mark’s gravity (which defaults to right), text will be inserted to the left or the right of the mark. If a mark’s gravity is left, text will be inserted to the left of the mark; right gravity means that text will be inserted to the right of the mark. Referring back to index_text.tcl, for example, the expression $t index insert returns the index of the character immediately to the right of the insert mark.
Table 14.5 lists the supported mark operations, which are invoked using the mark command after the name of the widget that supports them (such as text widgets).
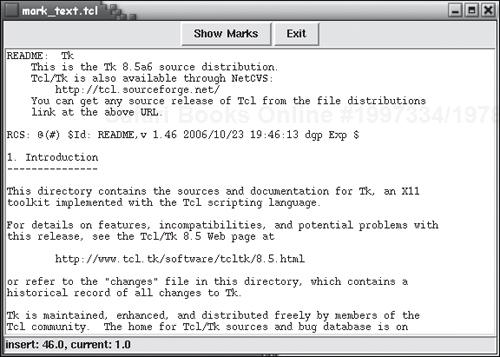
The following script, mark_text.tcl in this chapter’s code directory, shows all of the currently defined marks in a text widget when you click the Show Marks button.
proc ReadFile {f} {
    set fileId [open $f r]
    set input [read $fileId]
    close $fileId
    return $input
}

proc ShowMarks {t} {
    global status

    foreach m [$t mark names] {
        append s "$m: [$t index $m], "
    }
    $status configure -text "[string trimright $s {, }]"
}

set t [text .t -height 25 -width 80 -background #ffffff]
$t insert end [ReadFile "README"]

set f [frame .f]
set b [button $f.b -text "Show Marks" -command [list ShowMarks $t]]
set e [button $f.e -text "Exit" -command exit]
set status [label .status -relief sunken -anchor w]

grid $f -sticky nsew
grid $b $e -sticky nsew
grid $t -sticky nsew
grid $status -sticky nsew
The workhorse code in this script is the ShowMarks procedure, which is invoked by the button b. ShowMarks iterates through the list of mark names returned by the mark names command, appending the name of each mark and the index value to which it corresponds to the string variable $s. After exiting the foreach loop, I update the text of the label that appears below the text widget with the value of this string, after removing the terminating comma and space.
As you can see in the following figures, the list and value of marks defined automatically by the text widget changes, depending on the state of the text in the widget. For example, in Figure 14.19, I’ve just started the script and have neither selected any text nor placed an insertion point using the mouse or keyboard. As a result, the insert mark is at index 46.0, that is, on line 46, character 0, which corresponds to the beginning of the line just past the end of the file. The current mark is at index 1.0, because that was the character closest to the mouse cursor when I clicked the Show Marks button.
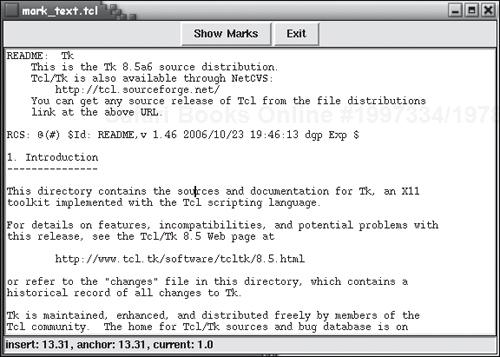
After placing the insertion point (see Figure 14.20), there’s a third mark automatically defined, anchor, with a value of 13.31, in addition to insert (at 13.31) and current (still at 1.0). Recall from Chapter 13 that an anchor point is the base from which a selection begins.
Notice what happens when I double-click on the word sources on line 13 to select it. Selecting text changes the marks subtly, as you can see in Figure 14.21.

The anchor mark moved to where I double-clicked index 13.32, which corresponds to the space between the letters r and c in the word sources. The insert mark, meanwhile, moved to the end of the word sources, or index value 13.35.
Tags are a special annotation for text, similar to marks but far more capable and versatile. Whereas text marks are used for positioning and movement purposes, tags have a wider variety of uses. They are most commonly used to apply visual attributes to the text in a text widget, including some that are not available as global attributes (such as strikethrough and stippling). Table 14.7 lists all of the text attributes you can apply with tags. Other uses include bind commands to ranges of text, and manipulating the text selection (described in Chapter 13). In addition, unlike marks, one tag can be applied to multiple ranges of text, and multiple tags can be applied to a single range of text.
Table 14.6 lists the operations you can perform with text tags.
Table 14.6. Tag Operations
Operation | Description |
|---|---|
| Applies the tag |
| Returns the binding(s) defined for the tag |
| Deletes the tag specified by |
| Assigns the lowest available priority to the tag |
| Returns a two-element list of indices for the next range to which the tag |
| Returns a two-element list of indices for the previous range to which the tag |
| Assigns the highest available priority to the tag |
| Returns a list of all the index ranges to which the tag |
| Removes the tag |
Table 14.7. Supported Tag Attributes
Description | |
|---|---|
| Sets the background color of the tagged text. |
| Defines the bitmap used for the background stipple. |
| Specifies the width of the border for 3D effects. |
| If true (or the equivalent), text tagged with this attribute is hidden. |
| Defines the bitmap used for the foreground stipple. |
| Sets the font used for the tagged text. |
| Specifies the foreground color of the tagged text. |
| Defines the justification of the tagged text ( |
| Sets the spacing for left indentation of tagged text. |
| Sets the spacing for left indentation of tagged text that gets wrapped. |
| Specifies the offset from the baseline for superscripted (positive) or subscripted (negative) text. |
| If true (or the equivalent), text tagged with this attribute is displayed with a horizontal line through it (also referred to as strikethrough). |
| Defines the type of relief, which must be one of |
| Sets the size of the right-hand margin. |
| Specifies the amount of space above a line. |
| Specifies the amount of space above the wrapped part of a line. |
| Specifies the amount of space below a line. |
| Defines the tab stops for the tagged text. |
| If true (or the equivalent), the tagged text is underlined. |
| Sets the line wrap style, which must be one of none (the default), |
Readers can use this program to experiment with text attributes, manipulating the insertion point, modifying line spacing, and keeping track of the text cursor.
#!/usr/bin/wish
# gword_search.tcl
# Word search game

# Block 1
# Read the puzzle data from the specified file
proc ReadFile {f} {
    global words lines

    set fileId [open $f r]
    while {[gets $fileId input] > -1} {
        lappend words [lindex $input 0]
        lappend lines [lrange $input 1 end]
    }

    close $fileId

}
# Block 2
# Clears all tags
proc Clear {t} {
    $t tag remove correct 1.0 end
    $t tag remove incorrect 1.0 end

}

# Block 3
# Determine if the text selected in t is the target word
proc Score {t} {
    global lStatus words

    # The starting and ending points of the selection
    if {[$t compare anchor < insert]} {
        set start [$t index anchor]
        set end [$t index insert]
    } else {
        set start [$t index insert]
        set end [$t index anchor]
    }

    # Fetch the selected text
    set word [join [string trim [selection get]] ""]

    # Determine the line number of the selected text    set n [string range $start 0
[expr [string first "." $start] - 1]]

    # What's the target word?
    set target [lindex $words [expr $n - 1]]

    # Is it a match?
    if {$word == $target } {
        $t tag add correct $start $end
    } else {
        $t tag add incorrect $start $end
    }
}

# Block 4
# Define the widgets
set fPuzzle [frame .fpuzzle]
set fButtons [frame .fbuttons]
set lStatus [label .lstatus -relief sunken -borderwidth 2 -anchor w]
set puzzle [text $fPuzzle.puzzle -width 21 -height 9 -bg #ffffff
    -font "Courier"]
set bScore [button $fButtons.bscore -text "Score" -anchor n
    -command [list Score $puzzle]]
set bClear [button $fButtons.bclear -text "Clear" -anchor n
    -command [list Clear $puzzle]]
set bExit [button $fButtons.bexit -text "Exit" -anchor n -command exit]

# Display the widgets
grid $fPuzzle -column 0 -row 0 -padx {10 5} -pady 10
grid $fButtons -column 1 -row 0 -padx {5 10} -pady 10
grid $puzzle -padx {5 0}
grid $bClear -sticky nsew -padx {5 5} -pady {10 2}
grid $bScore -sticky nsew -padx {5 5} -pady {2 2}
grid $bExit -sticky nsew -padx {5 5} -pady {20 10}
grid $lStatus -columnspan 2 -sticky nsew
wm title . "Word Search"

# Block 5
# Populate the text widget
set words {}
set lines {}

ReadFile "puzzle.txt"
for {set i 0} {$i < [llength $lines]} {incr i} {
    $puzzle insert end [format "%s
" [lindex $lines $i]]
}

# Make the puzzle text read-only
$puzzle configure -state disabled

# Define tags
$puzzle tag configure correct -background "dark green"
$puzzle tag configure incorrect -background "dark red"The ReadFile procedure in Block 1 opens the file whose name is specified as an argument and then parses the contents of the file into two lists: words and lines. These variables are declared global to enable ReadFile to access and modify them. The $words list contains the target words, and the $lines list contains the jumbled letters that make up the puzzle itself. The format of the puzzle data file is a word followed by a space followed by a series of 11 space-delimited letters:
open e o p e n u g r i v c

...

"" z o t z g v a n e r s

...

tell a m a j y r a t e l l
Notice that once again, the puzzle contains a line that lacks a valid word.
Block 2 defines the Clear procedure, which removes the two tags from the puzzle text. It is called when the player presses the Clear button to reset the game board and restart the game.
In Block 3, I define the Score procedure that is invoked when the player presses the Score button after selecting a candidate word. The first if-else block determines the starting and ending points of the selection. The conditional evaluation is necessary because the anchor point of a selection isn’t necessarily the beginning point of a selection. I’m going to use the starting and ending points of the selection (saved in the $start and $end variables, respectively) to add a tag to the selected text, and the syntax for adding a tag requires that the start value should be less than the end value.
Next, I retrieve the selected word using four levels of Tcl command substitution. Reading from the inside out of the expression set word [join [string trim [selection get]] ""], I do the following:
Use
selection getto fetch the text of the selection from the clipboard.Use the
string trimcommand to remove any leading and trailing spaces from the text returned byselection get.Use the
joincommand to remove embedded space characters from the string returned bystring trim.Save the string returned by
joinin the variable$word.
Once I know the word the player has selected, I need to find from which line of the puzzle the player selected the word so I can use that line number to index into the list of target words (stored in $words) to see if I have a match. To determine the line number, I use the string first command to parse the line number of the index value stored in $start. I store the line number in the variable $n and then use the lindex list command to extract the corresponding word from the list of target words. Because the text widget’s lines are numbered from one while lists are numbered from zero, I have to subtract 1 from the value stored in $n to extract the correct word from the list of target words. I store the target word in the string variable $target.
Finally, I compare the word the player selected ($word) to the target word ($target). If they match, I add the tag correct to the text range that the player selected, which highlights it in green. If the two strings don’t match, I add the tag incorrect to the text range, which highlights it in red. After tagging the selected text range, the procedure exits.
In Block 4, I define and display the widgets that make up the game. The only remarkable feature in this block involves being careful when defining the text widget itself. Specifically, when displaying the puzzle text, I use a monospace font, Courier, to make sure that each letter takes up the same amount of vertical and horizontal space in the text widget. This measure ensures that the letters line up evenly both horizontally and vertically. If I use a proportionally spaced font, such as Times, the letters will not align properly.
After I lay out the various widgets, I populate the text widget with the puzzle data. First, I read the data file (puzzle.txt) with the ReadFile procedure, which stores data in the $words and $lines lists as I described earlier. Next, I iterate over the $lines list and insert each line into the text widget. Once the text widget is populated, I make it read-only by setting its -state attribute to disabled ($puzzle configure -state disabled). The purpose of this step was to keep the player from accidentally editing the contents of the text widget during the game. I have to disable the text widget after populating it because it is not possible to insert, delete, or modify text in a text widget, even programmatically, if it is disabled.
The last step is to define the two tags, correct and incorrect, that I use to tag the text as the user plays the game. The tags are simple: The correct tag has a -background attribute of "dark green" while the incorrect tag has a "dark red" attribute.
At this point, the game is ready to play.
Here are some exercises you can try to practice what you learned in this chapter:
14.1 Modify gword_search.tcl to keep track of the number of correct and incorrect selections and to display the results at the end of the game.
14.2 Modify the
Clearprocedure in gword_search.tcl to clear only incorrect guesses.