
CHAPTER 8
LOCATION SHOOTING-TECHNIQUES
This chapter is mainly about the terminology of shooting – the common language everybody uses to describe shots. It also offers suggestions as to the impact you can achieve by using one type of shot rather than another, what will work and what will not work. Most of the terms apply whether you are shooting on location or in a studio.
Types of Shot
The most basic shot is the static. The camera doesn’t move and the size of shot remains constant. It sounds boring but the vast majority of shots you see on television are static shots. The key to making them interesting is the action – what is happening in the shot.
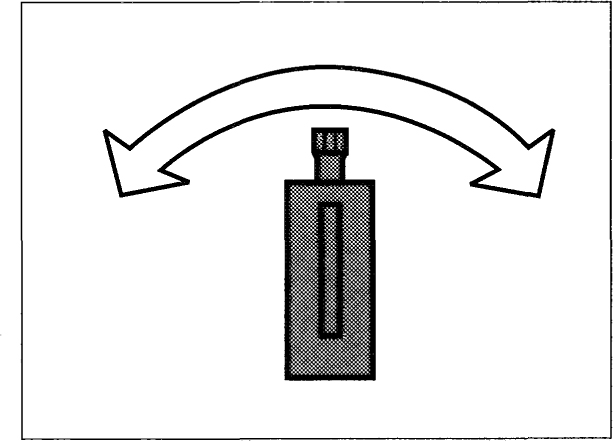
On a fixed tripod when you traverse the camera horizontally from left to right or right to left you are executing a pan or panning shot.
Pan
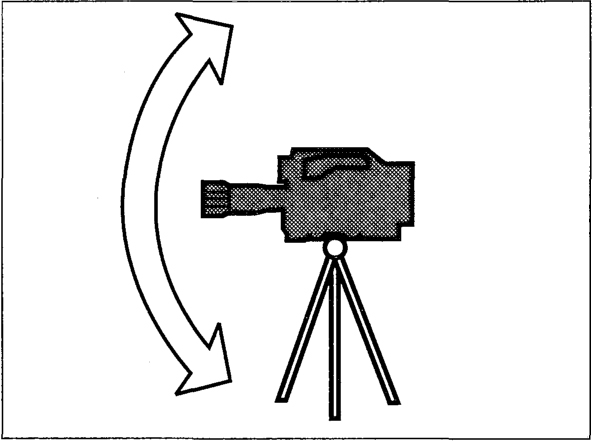
If the camera itself is moving in either direction you are executing a track or tracking shot.
Track
Similar to a track is a crab. The camera moves crab-like in a slight arc, possibly panning slightly at the same time.
Crab

As a general rule it is always best to pan or track from left to right. That is the way our eyes are accustomed to work when we read. If you don’t believe it, pick up a camera and try panning it both ways on a static subject such as a row of houses. You will find the pan from left to right feels more comfortable. The right to left pan can induce a slight queasiness unless you are panning with an object that is itself moving from right to left.
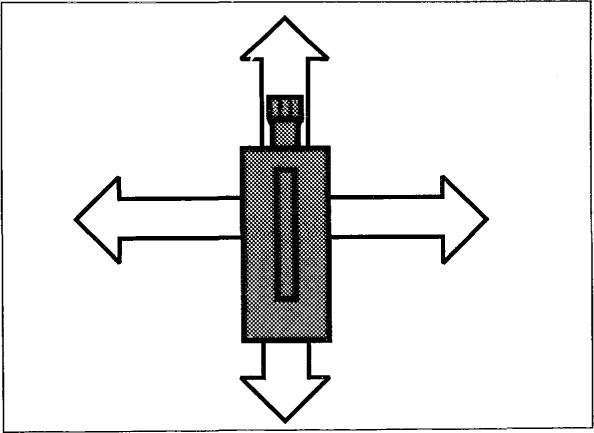
When the camera moves through the vertical axis on a fixed tripod, it is said to be tilting up or down. This is also referred to as a pan up or down.
Tilting up or down
If you are using a crane or jib arm and the camera itself is moving up or down you would talk about it either elevating or depressing or craning up and down.
Elevating/depressing or craning up/down
Shot Sizes
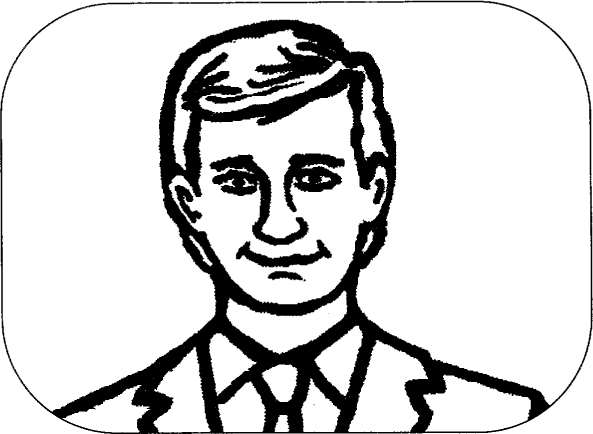
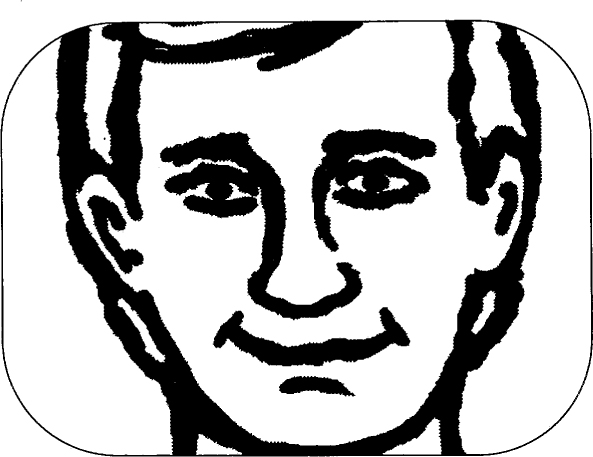
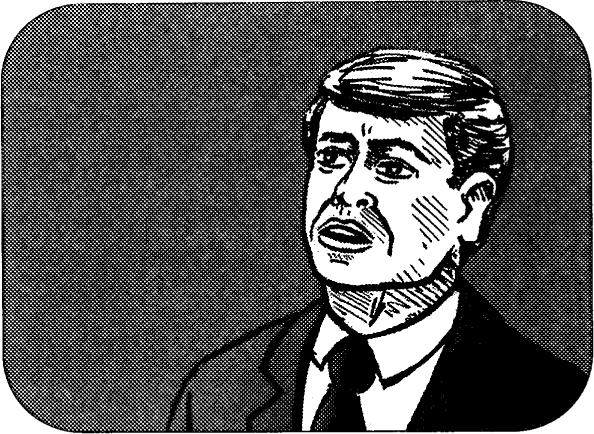
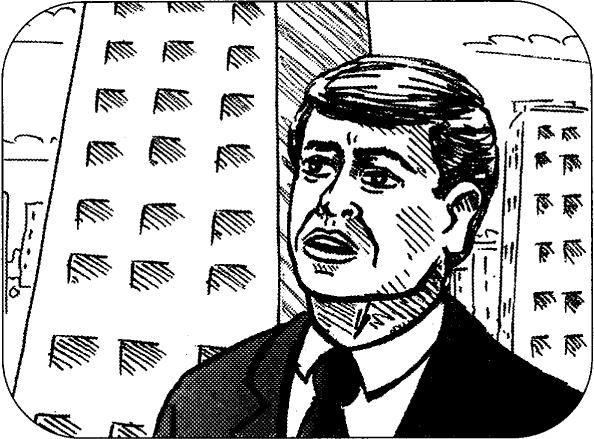
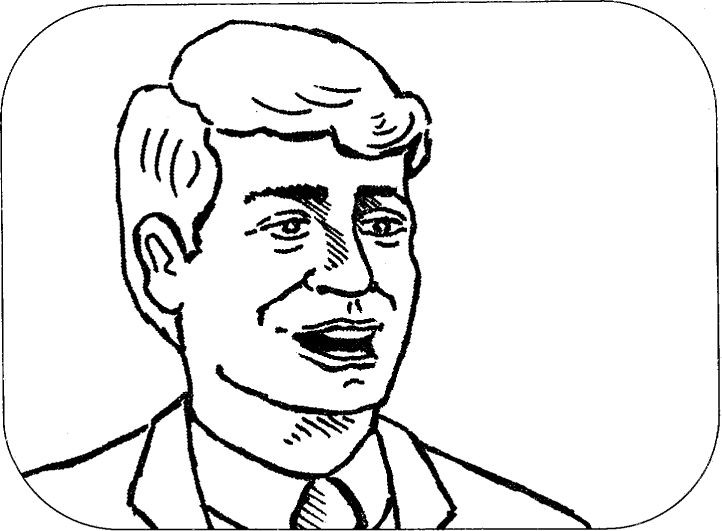
There is a standard language used to describe shot sizes. These are expressed in terms of shooting a human figure. A long shot generally means a full-length shot. Cutting off at around the knees is a medium long shot, at the waist a mid shot, at the breast-pocket of a man’s jacket a medium close up, just below the tie a close up and going in even tighter a big close up. These would be abbreviated on a script or log as LS, MLS, MS, MCU, CU and BCU.
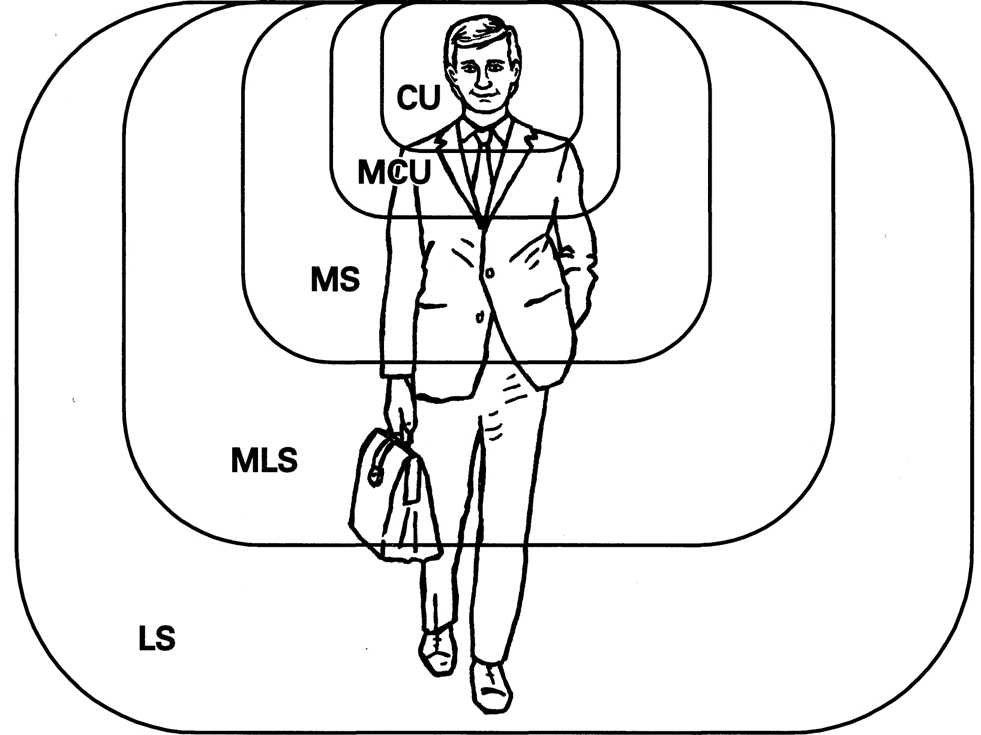
These two pictures show the relative difference between close up and big close up.
CU
BCU
You can apply the terms as an easy reference to anything you are shooting, not just human figures. You might talk about a long shot of a house with a person in the foreground, followed by a mid shot of the house and a close up of the front door. The terms are really just a way of describing the relative sizes of shots of the same scene or subject and you need not get hung up on them.
You may also want to describe shots in terms of the position of the camera relative to the subject – a low angle or high angle shot – LA and HA. Finally there is the wide angle or WA. Strictly speaking this is a reference to the lens angle but everyone uses it to describe a wide shot that shows all the action or a group of people.
Long shot
Mid shot

Close up
Changing Shot Sizes
There are two ways of changing the size of your shot. You can either zoom in or out or you can track in or out. To track the camera you will need to be on a dolly of some sort and the lens will need to be set at a wide angle. Tracking with the camera zoomed tight on a narrow lens never works. You would need to be constantly adjusting the focus – a near impossibility – and the slightest movement of the camera will result in an extremely jerky and unstable picture.
There is quite a difference between the visual effect of a zoom in and a track in. When you zoom in you are actually changing the lens angle all the time. The background is continuously shrinking and defocusing. When you track in the lens angle remains constant. The viewer has a sense of actually moving in on the subject rather than simply seeing the subject get bigger in the screen. If you have an opportunity, try it both ways and you will see the difference.
There is a standard language used when changing or setting up shot sizes. If you want the camera to zoom in or out slowly and gently you would talk about easing in or easing out. If you want to adjust a shot to be a tiny little bit tighter you would talk about easing in or out a gnat’s – as in gnat’s whisker – i.e. something imperceptibly narrow.
Describing Shots
Another way of describing shots is to refer to the number of people appearing in them. A shot showing just one person is referred to as a single, one showing two people a 2-shot, one with three people in it a 3-shot. When you get past three people you would probably talk about a group shot or the wide angle.
In any shot with more than two people in it you are likely to be seeing more of one person’s face than those of the others. You would therefore describe that shot as favouring that person.
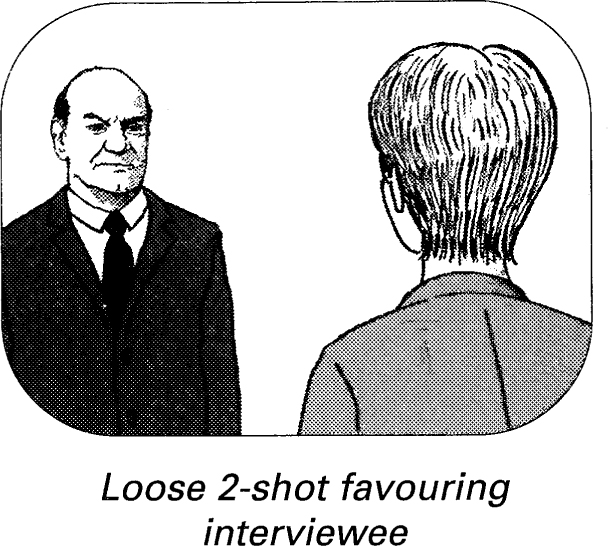
The illustration shows a 2-shot of a female reporter with male interviewee favouring the interviewee. As we can see quite a lot of both of them, we would describe this as a loose 2-shot. This would probably be shot with the camera zoomed out on its widest angle so you might also call this a wide angle 2-shot.
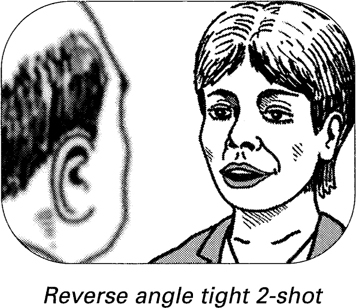
Let’s suppose you shoot a 2-shot looking the other way.
Now you are favouring the woman interviewer. This is referred to as the reverse angle. It also happens to be a much tighter shot showing far less of the two people so it is described as a tight 2-shot. To achieve it the operator has actually moved the camera further away from the subjects and then zoomed in tighter. The foreground figure would be slightly soft or out of focus while the interviewee is sharp or in focus.
Point of View
Most of the time the camera views things as a third party. In the 2-shots above the camera is an observer and is not part of the action. But let’s say one of the people in the shot was looking down at something and you wanted to shoot the object as it would be seen by that person. You would call that a pov shot or point of view shot. We might see a man walking towards camera and then cut to a tracking shot with the camera simulating his walk as it moves towards a door. This would be shot from the man’s point of view. The camera would have become part of the action.
A Bit of Art
The further the camera is away from a subject or subjects and the narrower the lens angle, the more critical the focus will be. You can put this to good effect by throwing or pulling focus from one object to another.
You might have two people in a tight 2-shot, both facing the camera but with one a few feet behind the other.
Each time one of them speaks you pull focus to make their image sharp and that on the other person soft. You are more likely to do this on a drama than a news program. But there are numerous ways you can use the technique. Familiar examples include throwing focus from one flower to another or from a barbed wire fence to the starving prisoners behind it. Another favourite is to start completely defocused on a city night scene. When the camera is defocused all the viewer sees is an interesting little light show. As you focus up the image is revealed.
Chromakey
If you want to add a background to an interview talking head you can shoot the subject against a blue or green screen and then key in whatever picture you want in the online edit. The new background picture will fill any part of the original picture that contains either blue or green. So it is absolutely vital that the interviewee is not wearing anything containing the colour you have chosen as your chromakey colour. It is also important that your blue or green screen is evenly lit. The technique can be effective but if you are shooting on location with only one camera and standard equipment you do not have an absolute assurance that it is going to work. If your subject has fuzzy or thinning hair and you can see through their hair to the screen you will not get clean separation between foreground and background pictures. Chromakey is also referred to as CSO or colour separation overlay.

A Few Rules
Innovation is the lifeblood of any industry and television is no exception. But the fact is that 99% of all shooting for television follows a number of rules. You need to know them before you work out ways of breaking them.
The guidelines for framing and composing shots for television are very similar to those for still photography but there are important differences.
Headroom: on a static shot of a talking head always allow sufficient headroom or clear space above a person’s head (on a big close up this does not apply). But some of the headroom you see in the viewfinder will be lost in cutoff.
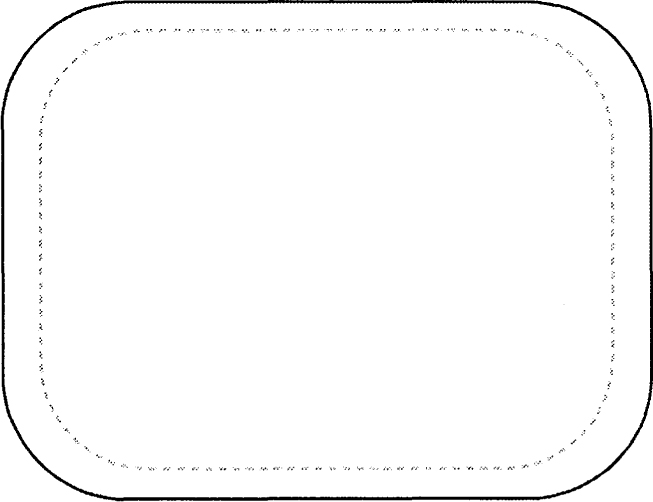
Cutoff: domestic television monitors will almost always cut off the edges of the picture you see in your viewfinder. The monitor you use for shooting should allow you to switch between what the camera can see and ‘puntervision’ – the ‘safe’ area that a domestic monitor is likely to show. You always need to compose shots to allow for any cutoff.
Domestic TV set may cut off area of picture outside dotted line
Shot framed for the camera without allowing for cutoff

On domestic monitor shot is tighter than you wanted with no headroom
Framing: on a static talking head where the person is looking camera right, the framing should place the person to the left of the picture rather than in the centre. Give the person some looking space. If you are panning with a person walking or a vehicle on the move, don’t place them in the centre of the picture - allow them some leading space ahead of themselves.
Allowing looking space
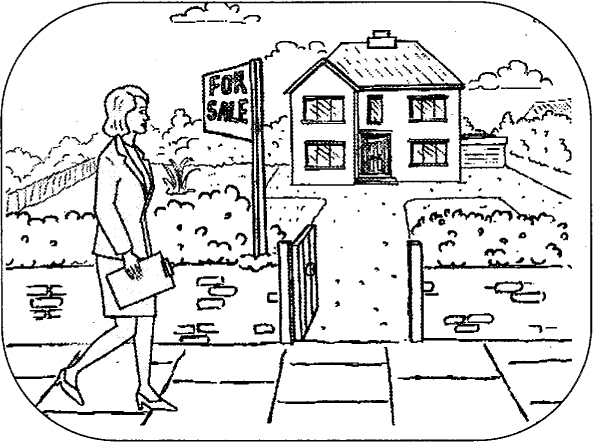
Foreground: try and add a frame to your pictures by including something in the foreground. The shot of the house alone is boring. The shot of the house with tree and overhanging branch in foreground is a bit more interesting. The overhanging branch or similar is known in the trade as dingle.
Without dingle

With dingle
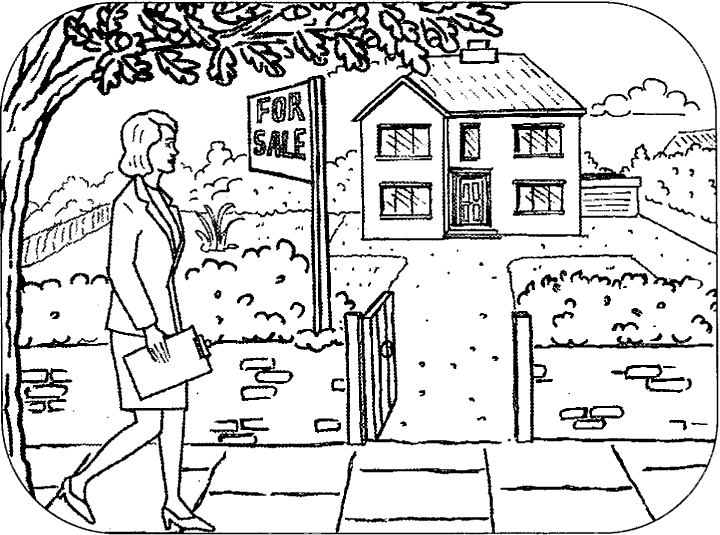
Pans: as a general rule pans should start and end with something. There should be a reason for panning. A pan that tells a story might start on a For Sale sign and pan to the house in question. The shot will be further improved if you have someone walk past the sign and then up to the house as you pan. You have introduced some action and given the camera a reason to pan.
Zooms: overuse of the zoom is a sure sign of an amateur at work. Think of the zoom as a means of changing from wide angle to close up quickly. A straight cut from the wide to the close is often far more effective than having to sit and watch the camera at work. Chop out the zooms in the edit wherever possible or only keep them in if they really are achieving a strong visual effect. Zooming out from a subject to reveal something unexpected can be effective but don’t just zoom for the sake of it.
Take a look at some well made, popular TV programs. Count the number of times you see an in-vision zoom. Very seldom, except on the news where the camera operator is having to grab action.
Holds: it is always best to shoot a static hold at the beginning and end of any shot involving camera movement. It will make life far easier when you come to edit. Don’t just switch on and start to pan or zoom immediately. Hold for a second or two and then start the camera movement. You can always lose the hold but you can’t add it if you need it.
Rehearsal: wherever you can, try and rehearse any shot involving movement or action – even something as simple as our person walking past the For Sale sign and up to the house. Tape is not that cheap and you will save time in the edit if you are not having to search through all the duff takes.
Instructions
Once a shot has been set up the director should check that everybody is ready. If the camera operator is happy with the lighting the director says:
‘Turn over’
At this point the sound recordist says ‘Hang on, I haven’t taken a level yet’.
The sound recordist gets the person being shot to say a few words and makes any necessary adjustments. This has probably happened because the director didn’t warn the sound recordist they were about to start shooting. The director tries again.
The camera operator starts to record, allows time for picture and time code to stabilise (usually up to 10 seconds) and says:
‘Speed’
The director then says:
‘Action’
With a bit of luck everything then starts to happen according to plan. Once the action is completed, the director says:
‘Cut’
If the shot is not working out as planned, the director will probably call ‘Cut’ sooner to save tape and sort out the problem. On other occasions the director may want to continue shooting after the point at which the camera operator may think he should cut. In that case the director would say ‘Keep running’ or ‘Keep rolling’.
At the end of a day’s shooting the director will say ‘That’s a wrap for today’. But before saying so, the director should make absolutely sure there is nothing else to shoot. People and equipment have a habit of disappearing very fast once those magic words are spoken.
Making It Happen
If you are directing for the first time, you need not worry too much about using exactly the right words. What is important is that you communicate as fully as possible with everyone on the team. They each need to know what you want to do and what you want to achieve. It is important to brief your sound recordist as fully as your camera operator. If you are planning a wide shot with full sound, the sound recordist needs to know so as to think about how to get the results you want without mikes or cables appearing in shot. A good camera operator will want to know how one shot is going to cut with another and will shoot them so that they do. So it is worth talking through how you see a sequence working with your shoot team. They will often make helpful suggestions and you can learn a lot from their experience.
Very few successful television programs are made without a high degree of teamwork between those involved. Part of the director’s job is as an on-site people manager who makes sure people are fully informed and working well together.
Logging Shots
In a perfect world everything should be logged on paper as it is shot. This task is usually performed by the production assistant; otherwise by the director. Logging shots achieves two things. It tells you whether you have shot everything you need to shoot and it makes finding shots that much easier when you come to edit.
This is what a typical log might look like:
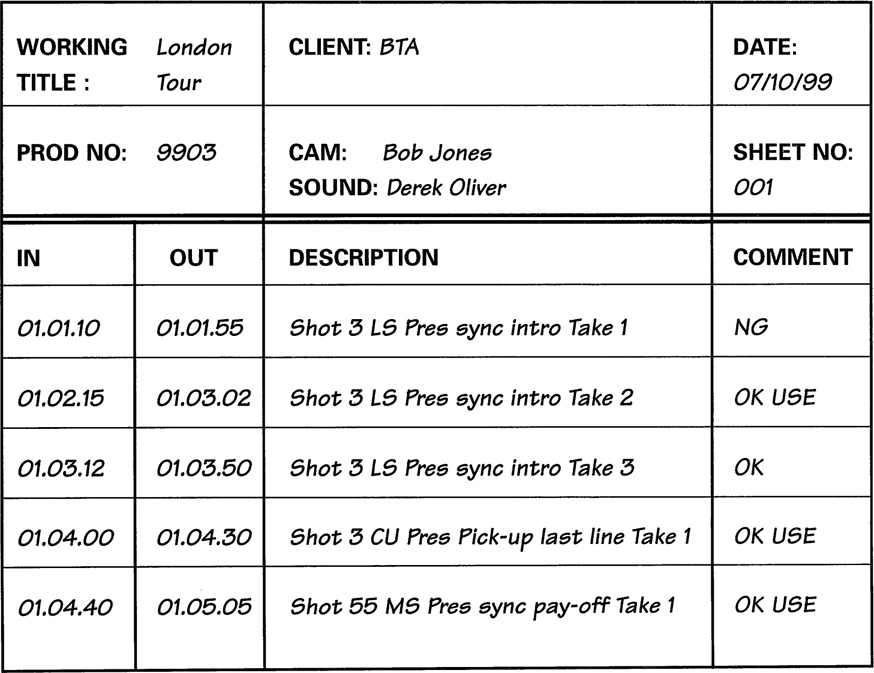
In the first column you make a note of the time code at the start of each take – the IN. The time code need only show Roll Number:Minutes:Seconds. Don’t worry about frame numbers.
In the next column you note the time code at the point you cut - the OUT. If you forget to note the IN code or there isn’t time to get it from the camera operator, you can always use the OUT code as a rough reference both for the end of that take and the start of the next one.
In the DESCRIPTION column you make a note of the shot size and action for the particular take, ideally with a reference to the shot number on the shooting script. You also note the take number. In the final COMMENT column you mark whether the take is OK and whether it is the one you think you will use when you edit.
In the example above you can see there are three takes of the presenter’s intro shot in long shot. Take 2 was OK but you then shot a ‘safety’ – Take 3. You decided at the time that Take 2 was in fact better so marked that one as OK USE. You then shot a variation on Shot 3 – a close up of the Presenter delivering the last line. This is known as a pick-up. You are picking up on a line of the dialogue.
This is a fairly simple log. You could refine it by splitting the DESCRIPTION column into three separate columns to show shooting script number, description of the shot and the take number separately. If you then entered all the information on a computer you would be able to sort it into Shooting Script order and only show takes marked as OK USE. You would then in theory have a paper log of your finished program and a nice easy edit. But don’t throw away the original log. You may still need it.
Jargon point
The tapes you shoot on are referred to as either rushes or masters. The word ‘rushes’ conies from the feature film world and originally meant a rush print of the previous day’s shooting, processed overnight and viewed first thing in the morning to see if all the shots had worked. The word ‘master’ is a more accurate description but in the world of tape people also talk about an edit master, meaning a completed program. So to avoid confusion we shall stick to the term rushes.