
CHAPTER 12
MULTI-CAMERA SHOOTS
There are two types of multi-camera shoot: a program shot in the studio and an outside broadcast (OB). The roles people perform and the techniques involved are very similar for both. But there are two important differences between any multi-camera shoot and a single-camera location shoot.
The first major difference between a multi-camera shoot and a single-camera location shoot is the number of people involved. In theory a single camera unit can consist of just one person fulfilling the roles of director, camera operator, sound recordist and reporter. On a multi-camera shoot the team consists of camera operators, sound crew, lighting crew, the vision mixer, vision control, engineers, tape operators, the designer, set builders, costume, make up, the floor manager and assistants, the production team and the on-air talent – the presenters.
On a single-camera shoot you can risk just turning up and hoping it will happen – or making it happen. A multi-camera shoot always requires a high degree of planning, co-ordination, teamwork and communication.
The other major difference is that multi-camera shoots are shot either live or ‘as live’. In other words you record the whole program or segments of it as it will be shown, cutting between shots and mixing sound as you go. Multi-camera shooting calls for instant decision-making and fast reflexes.
The Set-Up
Before we look at the process, we’ll run through the set up and see who and what you will be working with.
The most basic television studio consists of two separate areas -the studio floor itself and a suite of control rooms, more commonly referred to as the gallery. Production, lighting and sound may occupy separate galleries. You might also have separate areas close by for make-up, dressing rooms and the green room where you stick guests until they are needed.
Studio
The studio will normally have a permanent lighting rig in the ceiling. To allow maximum lighting flexibility the studio ceiling needs to be anywhere between 15 and 50 feet high. Two or three of the walls will consist of a continuous curved eye or clyclorama made of either fabric or plaster. Ideally the eye curves both at the corners and where it meets the floor. The floor needs to be an absolutely smooth, painted surface. It will usually need to be repainted before every production. The whole studio floor area must be fully soundproofed.
On the studio floor equipment is likely to consist of the cameras, sound booms, and prompter, each with their own operators. The output of cameras and mikes is transmitted via cables connecting to the fourth wall of the studio and thence to the gallery. People working on the floor will include the floor manager plus any assistants, camera operators, sound assistants and sparks. Dedicated studio cameras are mounted on gas-filled pedestals which means they can elevate and depress as well as pan and tilt. With built-in rubberised castors they can be tracked easily and silently anywhere along the studio floor.
The Gallery
Seated in the production gallery are the director, the production assistant, the vision mixer and the technical manager. The producer will also probably be in the production gallery but seated back from the others. Sound and vision supervisors will be in their own galleries. Tape operators controlling play-in or record machines (VTs) will be wherever their machines are located. This may be in the production gallery or in a VT bay somewhere else deep in the building wired to the gallery.
The director, production assistant and vision mixer sit at a console into which is built a mixer and effects bank. In front of them is a bank of monitors, each of which is showing the output of the various sources: each of the cameras, VTs, graphics, caption generator, remote studios, etc.
Two of the monitors – usually on top of the rest – show the transmission (TX) picture and the preview image. The TX picture is the source that the vision mixer has selected as the transmission picture at a given moment. The preview monitor shows the picture the vision mixer expects to be going to next. If there are separate control rooms, each will have its own set of monitors, replicating the set-up in the production gallery. The sound console will have a built-in sound mixer desk and machines for playing in music or sound effects. The lighting gallery will contain faders for the lights being used and controls for monitoring and controlling picture quality – referred to as racks.
Selecting Output
In the production gallery the vision mixer selects the transmission output by pressing an illuminated, numbered button on the mixer. The first numbers from 1 upward will correspond to the individual numbers of each of the cameras. Other sources are then allocated the remaining higher numbers. So, for example, if you were working with four cameras, two VT machines and a remote studio the mixer numbers could be allocated as follows:
| SOURCE | MIXER No |
| Camera 1 | 1 |
| Camera 2 | 2 |
| Camera 3 | 3 |
| Camera 4 | 4 |
| VT1 | 5 |
| VT2 | 6 |
| New York Studio | 7 |
The vision mixer’s effects bank controls the look of the transition from one transmission picture to the next. With nothing selected a straight cut results but there is usually the option to use dissolves (or mixes) and wipes. The more sophisticated the set-up, the more varied and complex the mixing options. The range of visual effects possible in a studio are very similar to those used in an online edit suite and are explored in more detail in Chapter 16. In some studios – particularly where there is heavy use of chromakey – it is not uncommon for two vision mixers to work alongside one another managing the effects.
The last point to realise about the physical set up of most studios is that people working in the galleries cannot see through to the studio floor. All they see is the studio’s output – what the cameras are seeing. This might seem to be an impossible way to work. In fact it is far better to concentrate solely on the output of monitors. But you do need to have a good mental picture of where cameras are, whether they are getting caught up in one another’s cables, likely to bump into one another or appear in one another’s shots.
Communication
When a well rehearsed and fully prepared production is actually being transmitted or recorded, the only people who should be talking will be the director, the production assistant and the vision mixer. These three communicate with the entire team through a system known as talkback. A mike on the gallery desk picks up everything they say – open or omni talkback (from omnibus – for everyone). Their instructions are then relayed to the other control rooms, the VT bay and anyone on the floor wearing cans or headphones. This would normally only be the floor manager, camera operators, teleprompt and sound boom operator. Anyone else on the floor would follow voice or hand signals from the floor manager. The director’s open talkback is usually only one way – from the director to everyone else.
Anyone needing to talk to the director would use switch talkback. Before talking – usually only when asked to do so by the director during rehearsal – they would flick or hold down a switch to do so. The reason for talkback being open only one-way is fairly obvious. The director doesn’t want to be listening to a host of disembodied voices chatting to one another as they sort out their particular problems. This is quite apart from the need to spare the director the embarrassment of overhearing technicians taking bets on whether this production is going to turn out to be as big a shambles as the last fiasco they worked on. The director might also have a separate switch talkback facility into the presenter’s ear. Cameras also communicate visually with the director. On rehearsal if a camera operator wants to come onto talkback to the director the convention is for the camera to keep zooming in and out until the director says ‘Yes, Pete, talk to me’. The director should have a list of the names of the camera operators and their camera number in front of him and try to talk to them as human beings rather than by number. Cameras respond to a question from the director by either tilting up and down – nodding Yes – or panning back and forth from left and right – No.
Cabling Cameras
If you are directing a studio shoot one of the first questions you will need to answer is – how do you want the cameras to be cabled? In the gallery the monitors will be showing you the camera’s output in number order from left to right.
Let’s say you are going to be shooting a discussion between two people – one either side of the presenter.
Assuming you have three cameras facing the set, to get decent eyelines the two outside cameras will be cross-shooting. The left-hand camera will be shooting the person camera right and the right-hand camera will be shooting the person camera left. If you cable the cameras from left to right going 1 2 3, this is what you will see on the monitors.
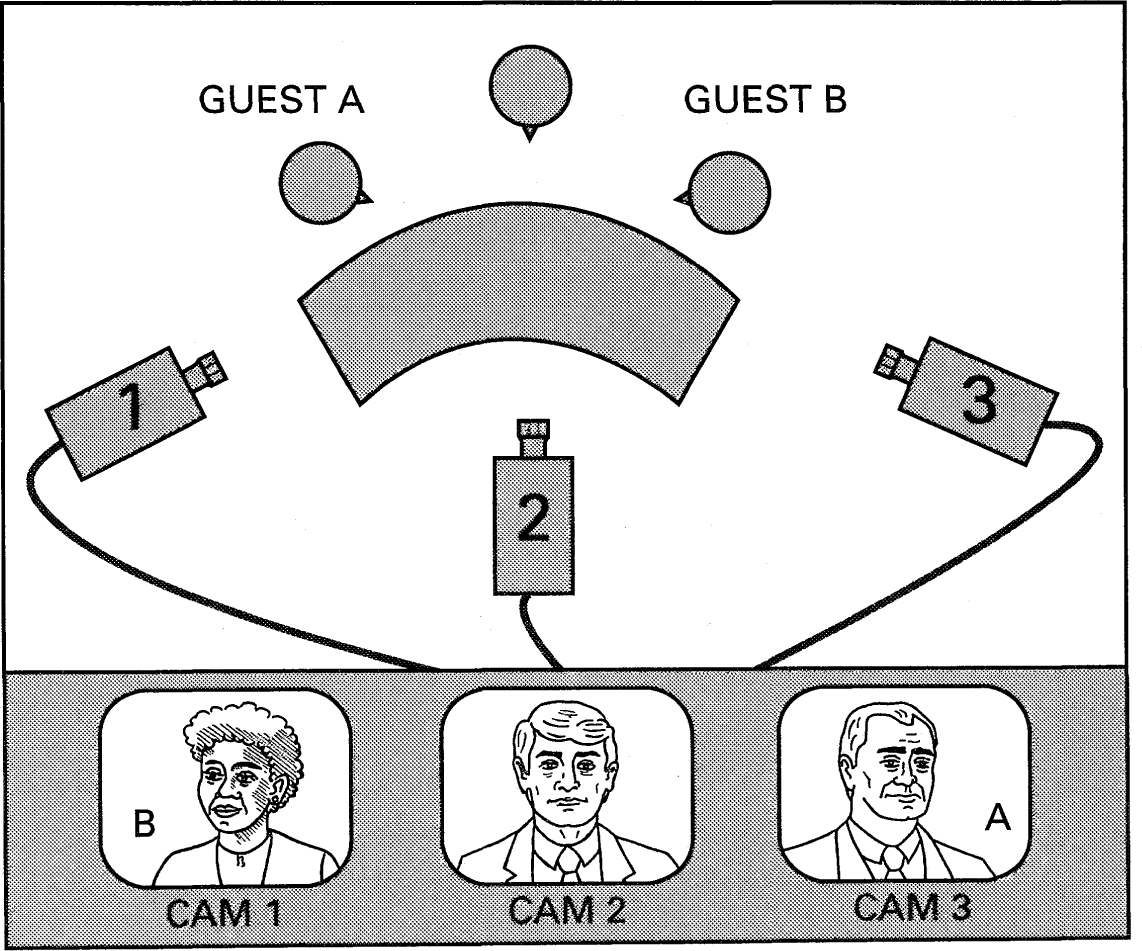
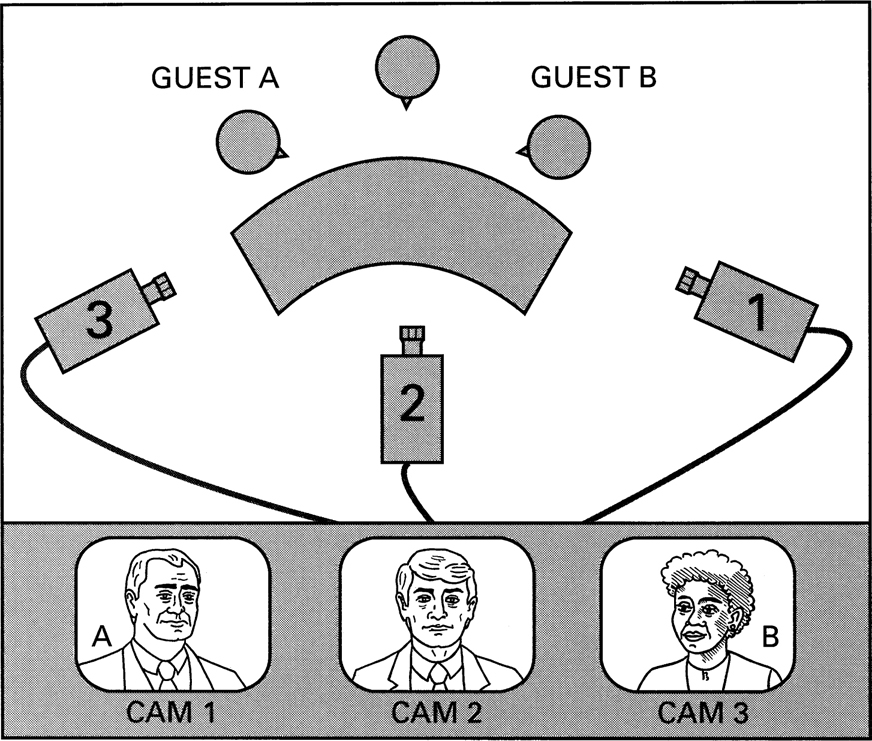
As you look at the monitors each of the two guests is facing out. This doesn’t matter. When you cut between them it will look fine as far as the viewer is concerned. But it is a confusing set of images to work with so you would do much better to cable the cameras in reverse order 3 2 1.
That way this is what you will see on the monitors.
If you are using a prompt system you will also need to think about which camera or cameras it will be mounted on. There are two considerations here. You need to work out which cameras will be closest to your presenters. You then need to remember that with a prompt system mounted a camera is slightly less manouverable than normal. So don’t expect the prompt camera to be able to tilt down much or to be able to get close ups of props on a low table.
The Process
As you can see, a studio shoot involves a large number of people and equipment. It won’t happen unless there is a good deal of planning and communication. The planning process needs to start as early as possible and all communication needs to be as precise and detailed as possible. The planning process can be divided into the following stages:
• Deciding Content. At an early stage the producer – or whoever is responsible for the editorial content of a program – should discuss with the director what they plan to do and what they think they will need. If they are saying they want five separate discussion areas in a studio the size of the shoe box it is up to the director to say it can’t be done or they will need to use a larger studio.
• Deciding the Look. Once the director knows what the editorial brief is a set designer will be briefed. Both producer and director might discuss their ideas with the set designer.
• Technical Briefing. The director should meet with the technical manager, the sound supervisor and the lighting supervisor and brief them on what it is anticipated will be needed. The set designer should also be at this meeting.
• Set and Light. The set is built or assembled in the studio and the lighting crew light it following the director’s brief.
• Camera Rehearsal. The director and all of the technical crew ‘stagger through’ the program. Cameras are operated with shots and moves being rehearsed but the people who will be appearing on camera are probably not present. Lighting adjustments can be made based on what the cameras are actually seeing and showing and Sound can check that they have got mikes that work wherever they are needed. At this stage there could possibly be a script but there may only be a running order – a listing of the key sequences in the program and what happens in each of them.
• Full Rehearsal. This involves everybody and is more for thoseappearing on camera than for the technical crew who already know what they have to do. It is also an opportunity for Lighting to see the people who will actually be appearing and for Sound to listen to them. If presenters are using a prompt system they should deliver their pieces to camera using it and check it is how they want it. It is also an opportunity to check the link into any graphics or VT sequences that are going to be played into the program.
• Record or Transmission.
Paperwork
The type of paperwork that is needed, or that you will be able to produce, will vary depending on the kind of program you are shooting. We will work through a simple example.
Example
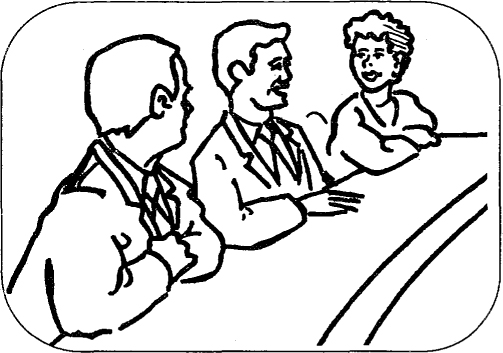
Your program consists of a title sequence, followed by a presenter, ZENA, to camera shot against Chromakey blue. ZENA introduces the first item, we cut away to a couple of graphics. She then links into a 2-minute VT package. We come back to her and she links into a discussion chaired by a second presenter, JOHN. At the end of the discussion ZENA pays off to camera and we end with closing titles from VT with the end credits being added from a caption generator. We will also be using the caption generator to superimpose name captions for each of the guests, Mr JONES and Mrs SMITH.
Running Order
The first thing to do is to draw up a running order. As it name suggests a running order is a sequentially numbered list of the elements that go to make up a program along with the duration of each sequence and the technical information that everyone needs to know for each one. Different programs may design their running orders to suit their particular needs. In this case the running order will start off looking like this:
| SEQUENCE | POSITION | SOURCE | DUR | |
| 1 | Opening titles | VT | 00.30 | |
| 2 | ZENA to camera linking to | PromptCam + CSO | 0.20 | |
| 3 | HOUSING PACKAGE | VT | 02.03 | |
| 4 | ZENA to camera linking to | PromptCam + CSO | 00.10 | |
| 5 | JOHN + 2 discussion | Cams | 04.30 | |
| 6 | ZENA pay off | PromptCam + CSO | 00.15 | |
| 7 | CLOSING TITLES | VT + CAPGEN | 00.20 | |
At this stage the running order is incomplete. It only contains editorial information and an indication of the technical sources. The director now adds the rest of the information.
Floor Plan
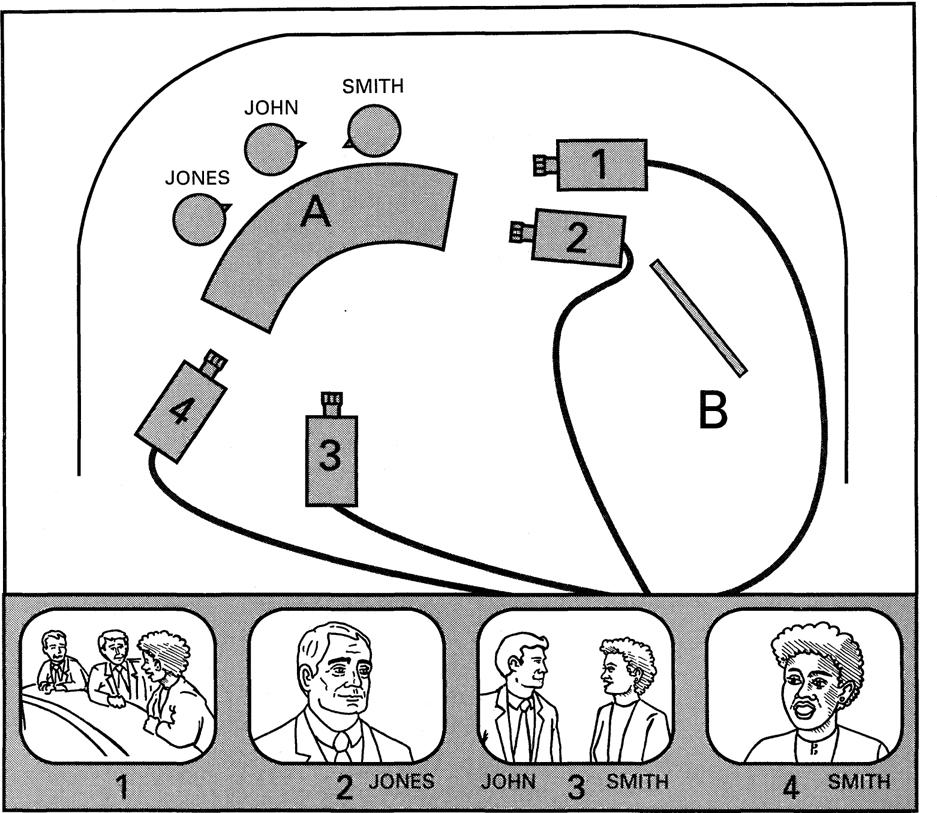
Working with a floor plan of the studio, the director works out which cameras will be involved in each sequence and roughly what they will be doing. The floor plan of the studio is a bird’s eye view showing where the cycle starts and finishes, all of the cable runs and the shootable floor area which will be painted and lit. In this case it also shows the position of the set – the desks or any other furniture that has already been decided on by the director and the designer. The set may be split up into a number of different areas - discussion desk, presenter in front of chromakey screen, etc.

Each of these areas is designated by a letter; in this case A for the discussion desk, B for the presenter position.
We have four cameras cabled 4 3 2 1. The discussion area A is upstage left and the single presenter area B with a chromakey screen is downstage right. Only ZENA needs a prompt camera so you are going to have decide which it should be.
You also decide that at the end of Sequence 4 as ZENA links to the discussion you want to cut to a wide shot showing her in the foreground and the discussion area in the background.
Plotting Moves and Shots
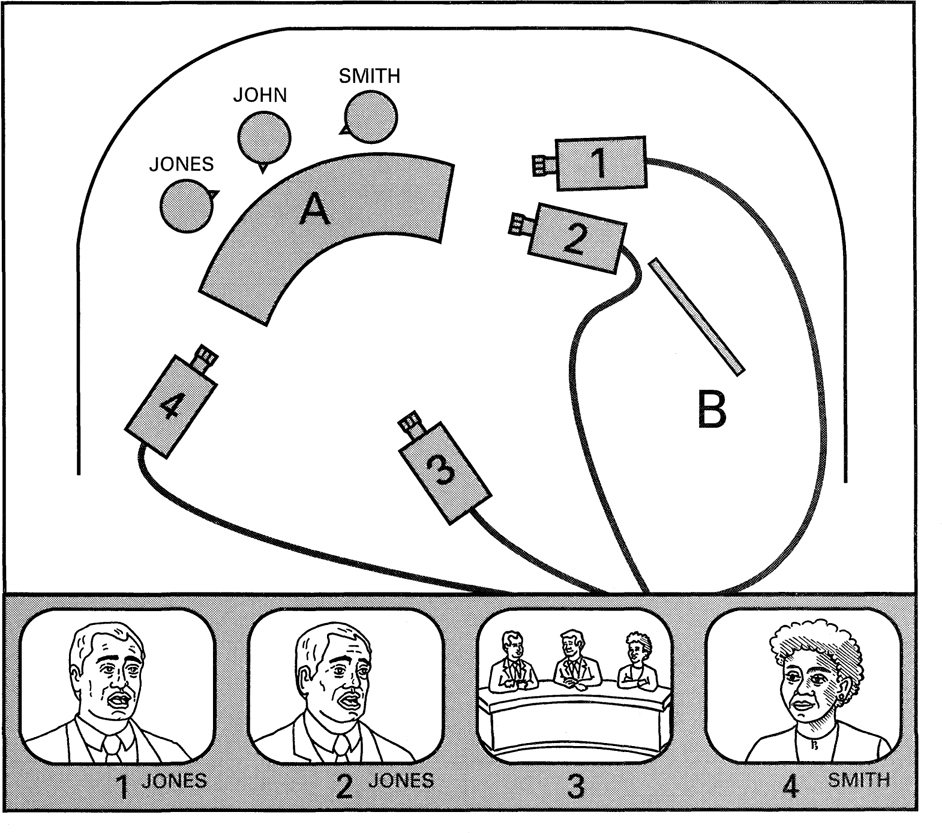
Before you finalise the prompter decision you need to work out what shots you are likely to want and what each of the cameras will be doing. This can be a bit of a chess game. At the moment it looks as though Camera 1 would be the best choice for the prompter – but it’s not that simple.
What you need to do is work out where you want cameras to be for the majority of the shoot and take account of what is likely to be happening when they make their first move. So you need to think ahead to the moment ZENA hands over to JOHN in the discussion area. You will want a camera on her, a camera to give you the linking shot showing her and the discussion area, a camera on JOHN and the two guests and a camera giving a single of the first guest he will be introducing. You also know that as soon as you cut to the linking shot, ZENA’s camera goes to join the discussion, followed by the linking shot camera once you are off it.
Here is a solution:

The best shot of the person sitting camera left, Mr JONES, will be on Camera 1 and the best shot of the person sitting camera right, Mrs SMITH, will be on Camera 4. JOHN is going to introduce Mr JONES first. So Camera 1 will need to be offering Mr JONES’ medium close up.
Camera 3 is ZENA’S camera on which you will mount the prompter, while Camera 2 gives the shot linking ZENA to Area A.
That leaves Camera 4 giving a 3-shot of JONES, JOHN and SMITH which you will be cutting to immediately after the handover shot on Camera 2 as JOHN introduces the discussion. You will then be going to Camera 1 as he tells us who JONES is and while you are on 1, Camera 4 will quickly zoom in on SMITH. You will then cut to 4 as JOHN says who SMITH is.
(Note that Camera 1 has gone right round the outside of the studio with its cable behind the CSO flat to take up position. This way there is no risk of the cable appearing in Camera 2’s wide shot.)
Once they have finished on ZENA Cameras 3 and 2 will clear to join the discussion. They will be able to offer a variety of wide shots, singles of JOHN and alternative singles of SMITH and JONES. But they won’t be able to offer such good eyelines as Cameras 4 and 1.
This is what will happen:
MS ZENA to camera Camera 3
Link Shot ZENA plus Area A Camera 2 (Clear Cam 3 to Area A)
3-shot Area A as JOHN introduces discussion Camera 4 (Clear Cam 2 to Area A)
MCU JONES as JOHN introduces him Camera 1 (Cam 4 zooms into MCU SMITH)
MCU SMITH as JOHN introduces her Camera 4
Detailed Running Order
You can now make up a more detailed running order:
| SEQUENCE | POSITION | SOURCE | DUR | |
| 1 | Opening titles | VT1 | 00.30 | |
| 2 | ZENA to camera plus graphics linking to | B | PromptCam 3 + CSO + FRAMESTORE | 00.20 |
| 3 | HOUSING PACKAGE | VT2 | 02.03 | |
| 4 | ZENA to camera Link shot Area B to Area A | B | PromptCam 3 + CSO | 00.10 |
| Cam 2 | ||||
| 5 | JOHN intro | A | Cam 4 WA | 04.30 |
| Intro JONES | Cam 1 MCU JONES | |||
| Intro SMITH | Cam 4 MCU SMITH | |||
| Discussion JONES, JOHN, SMITH | Cams 1, 2, 3, 4 + CAPGEN | |||
| 6 | ZENA to camera pay off | B | PromptCam 3 + CSO | 00.15 |
| 7 | CLOSING TITLES | VT1 + CAPGEN | 00.20 | |
As well as thinking about what shots the cameras will be offering, the director has also had to consider how the VT packages are to be played in. If there are a number of different packages and not a lot of studio time between them, it is best to have them playing in from alternate machines. As you can see above VT1 has the opening titles, VT2 has the housing package and then it’s back to VT1 at the end for the closing titles.
Camera Cards
The information on the running order can now be transferred to camera cards for each of the camera operators. So Camera 3’s card will show:
| Sequence 2 | B | MS ZENA |
| Sequence 4 | B | MS ZENA |
| Sequence 5 | A | DISCUSSION WA & MCU JONES |
| Sequence 6 | B | MS ZENA PAY-OFF |
Camera cards are either produced in the production office and given to cameras or the camera operators may write them up themselves on the camera rehearsal. Operators will almost always add their own notes to prepared cards. For example towards the end of Sequence 5 Camera 3 will have to get from Area A back to ZENA in Area B. On rehearsal camera operator and director may agree this is going to take 10 seconds. The director won’t actually give the operator a cue to move. They agree that the operator will take a cue from the production assistant’s countdown – when the operator hears there is 15 seconds to go on the discussion. So the operator might just pencil move on 15" beside Sequence 5.
Script
The layout of a studio script follows the same principle as the shooting script for a single camera production shot on location. It is set out in two columns with visuals on the left and sound on the right. Each sequence is numbered, following the running order, and each shot is numbered. Because the program is being shot ‘as live’ each cutting point is clearly marked. The script also shows the duration of VT inserts and the IN and OUT words.
This is how the first part of the script for our worked example might look:
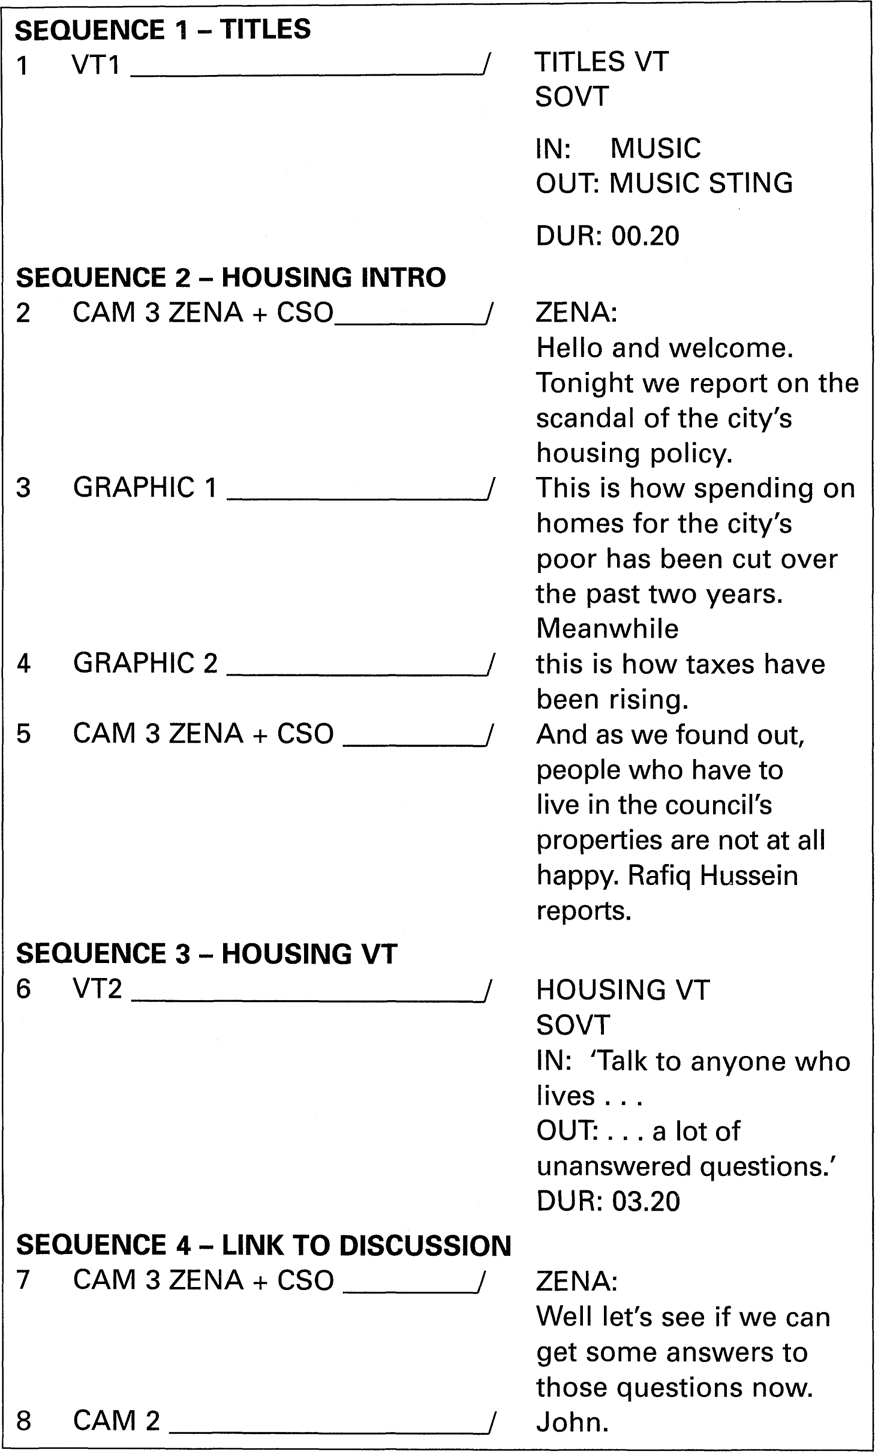
As you can see a line with a forward slash (____/) is typed across the page to show the exact cutting point for each shot. SOVT stands for sound on VT. If you were running film into a program it would come from a telecine machine, abbreviated to TC or TK. Nowadays this is unlikely as film is always transferred to VT before transmission. Graphics are usually created on Paintbox or a similar system and then stored for play-in on a magnetic disk called Framestore.
The full script will be needed by the presenters, producer, director, production assistant, vision mixer, technical manager, sound supervisor, lighting director, prompt operator and floor manager. Everyone else works off either the running order or camera cards.
Making It Happen
On full rehearsal or record/transmission the voice that everyone is listening to is that of production assistant (PA). It is the PA’s job to call the shots and let everyone know where they are in the program and what’s going to happen next. The PA is also responsible for timings and keeps stopwatches running on the overall program duration and on individual items. On a complex production there will often be two PA’s – one calling the shots and the other monitoring timings.
The PA or the director will cue VT to run. Either the director or the vision mixer will cue cameras on shots that are required – but it’s best if they decide beforehand which of them is going to do the talking. On a tightly-scripted production – say a drama -everything will be fully rehearsed. The PA calls the shots, the vision mixer talks to cameras if need be. The director is concentrating on the actors’ performances and at the end of a take communicates with the performers through the floor manager. On a live magazine program or chat show the director will tend to do all the talking to cameras.
In our example this is the sort of dialogue that everyone could expect to hear on talkback as we come out of Sequence 3 and into Sequence 4:
This is often accompanied by a good deal of arm waving and conducting. Between them the camera operators and the vision mixer normally manage to make it all work despite the director.
That’s what is happening in the gallery. Meanwhile on the studio floor the floor manager gives ZENA a countdown by holding up a hand with five fingers extended, dropping each one by the second, and then letting the hand fall just below the lens. At the same time a red cue light on top of the camera immediately illuminates as the vision mixer selects Camera 3 as the TX picture. ZENA knows she is on camera and flashes that smile she is famous for.
Shooting a Discussion
Once a program gets into an unscripted sequence such as a discussion the director has to start doing some serious work. You may have some idea of the order in which people are going to speak but the guiding principle is that you must be ready for anything to happen. The easiest way to ensure this is to always have one camera on a wide shot. But don’t just keep one camera on the same old wide shot throughout. It’s boring.

So let’s say in our worked example you are on Camera 1 (the TX picture) with an MCU of JONES, Camera 2 is giving you a wide shot of the group, Camera 3 is on an MCU of JOHN who is looking toward the speaker, JONES, and Camera 4 is on an MCU of SMITH.
If JOHN looks as though he is going to put another question to JONES you might go to 3 to take it. But if he turns to bring in SMITH you have the option of going via the wide shot on 2 and then cutting to SMITH on 4.
This is what he does so you are now on Camera 4 showing SMITH.
You get 1 to give you a 3-shot over SMITH’s shoulder. But if JONES interrupts, or you want a reaction shot from him, you don’t have a close shot so Camera 2 moves upstage and offers an MCU of JONES. Camera 3’s single of JOHN isn’t a lot of use now as he is turned away from camera so Camera 3 zooms out to give a 2-shot of JOHN and SMITH.
You cut to 3 as JOHN puts another question to SMITH but she is half way through her answer when JONES interrupts. You cut to 1’s 3-shot favouring JONES and then pick him up on his single on 2. The eyeline isn’t good.
Camera 1 zooms into the better MCU on JONES. You can’t cut from 2 to 1 – the shots are too similar. So Camera 3 moves swiftly downstage and comes out to a 3-shot. You cut to 3 for a couple of seconds and then to 1. Camera 2 could now come out wider to either a 2-shot of JONES and JOHN or a 3-shot; alternatively you could get Camera 2 to come downstage to offer a head on shot of the group while Camera 3 moves back upstage to give a close shot of JOHN looking towards JONES. And so it goes on …
Look and Listen
Directing any unscripted multi-camera sequence doesn’t just involve making sure you have the right shots available and the right people covered by the cameras. It also involves looking and listening; listening to what is being said and looking at what is happening on all the cameras – not just the one currently selected. If SMITH is speaking and you are on her and she refers to something JONES has said, you need to see how JONES is reacting and then possibly cut back to him as he smiles, frowns, smirks or whatever.
Cues and Countdowns
During the discussion JOHN needs to know how long he has got to go, when he should wind it up and when he should hand back to ZENA. The producer will have allotted a specific period of time for the discussion – let’s say 5 minutes. If this is a live program, it’s important JOHN sticks to this or it could throw out the timings for the entire show. Every minute the PA will call out the number of minutes to go – ‘4 minutes to go on discussion’. If JOHN is wearing an earpiece he will hear this on switch talkback. If he isn’t he will be getting visual cues. The floor manager will be positioned somewhere out of shot but in JOHN’S eyeline and will hold up a hand with four fingers extended. At three minutes he will hold up three fingers and so on. With 10 seconds to go the floor manager holds up both hands with all fingers and thumbs extended and if JOHN starts to overrun the floor manager then makes a cutting gesture across the throat.
If the overall timing is not too critical and the producer wants to bring the discussion to a gentle conclusion – usually because the guests are agreeing with one another and the viewers are starting to switch channels – the floor manager will wind an arm in slow circles – a slow wind. If the guests still keep chatting on and JOHN hasn’t quite got the message the floor manager will give him a fast wind. Alternatively, if the discussion is going particularly well and the producer decides to let it run beyond the planned duration, the floor manager gives a ‘stretch’ signal placing the palms of both hands together and then stretching them apart.
The decision to wind early or to stretch is an editorial decision taken by the producer who then communicates it via the director and PA to JOHN. They both need to know the decision – it may mean a change of plan from what was rehearsed – and they are the ones who then need to relay it to the floor. A third voice no one has heard before suddenly coming on talkback is a recipe for confusion.
Outside Broadcasts
The set-up for a multi-camera outside broadcast is very similar to the one we have seen in the studio. The difference is that instead of a gallery, the production team work from a mobile scanner. The scanner contains a scaled down mixer desk built into a van or truck. A full-scale OB unit could consist of four or five vehicles - the scanner truck, sound, a mobile control room, a generator truck, etc. As well as many of the people we have encountered in the studio an OB unit will also need riggers, engineers and drivers. There’s not a lot of room in a scanner and very often directors will do their own vision mixing. One other difference is that the floor manager role on an OB is called the stage manager.
Again, you don’t just book an OB unit and turn up at an event expecting it all to happen. A good deal of preparation is necessary. The first thing the director has to do is find out what is likely to happen during the event itself and then decide where cameras ought to be positioned. Will the camera positions allow you to cover all of the action from as many different angles as possible and – our old friend again – is there any danger of crossing the line? Get the answers to those two questions right and you are half way home.
Always try and get one camera at least shooting from as high an angle as possible. This will give a perspective that the viewers would not normally get themselves if they were spectators at the event. It will also give you the best master shot and help you out of any line crossing problems. But don’t rely on a high angle camera to be able to offer very tight shots. As soon as the camera is in tight the slightest ground tremor will produce a very shaky picture.
Looking and listening is just as important on an OB as it is in the studio. Most outside broadcasts consist of live pictures with live on the spot commentary. Both need to work together. The commentator will have one eye on the event itself and the other on a monitor showing the TX picture. Most of the time the commentator will follow what is on the monitor but if something else is happening and the commentator mentions it, the director should try and get a camera on it and show it. There is nothing more frustrating for the viewers than hearing a commentator say ‘Amazing scenes at the other end of the pitch as the police baton charge the English fans’ while the pictures are showing yet another dismal game of football.