
Chapter 1. Introduction to testing Vue applications
- What testing is
- Why testing is useful
- The difference between unit tests, end-to-end tests, and snapshot tests
- Core Vue concepts
As a developer, you want to ship bug-free code. Nothing is worse than finding out on Monday morning that your Friday changes broke the live application! The only way you can make sure your application works correctly is by testing it, so it’s vital that you learn how to test applications thoroughly.
A good testing approach speeds up development, improves code quality, and limits the bugs in your app. A poor testing approach cripples a project. This book will teach you to test Vue applications effectively to make sure you get the benefits of testing and avoid the pitfalls. By the end of the book you will have become a Vue testing master, ready to test any Vue application you encounter.
To learn the techniques to test a Vue application, you’re going to write a test suite for a Hacker News clone from start to finish. The Hacker News application will use Vue, Vuex, Vue Router, and server-side rendering—just like most large Vue applications.
As well as teaching you the techniques, I want to teach you the mindset and approach to testing that I’ve developed over the years. Throughout the book I’ll give you advice to hone your testing skills.
This first chapter is a primer on testing Vue applications. I’ll give you a high-level overview of testing in general, the different types of tests you’ll learn in this book, and the Hacker News app you’ll write. Finally, I’ll explain some core Vue concepts, to make sure we’re speaking with the same vocabulary.
The first thing to do is to define testing.
1.1. Defining testing
Any academic paper worth its salt defines the concepts it uses before discussing them in depth. So, like a good academic, I’ll define what I mean by testing an application before I teach you about different testing techniques.
A simple definition is that testing an application is the process of checking that an application behaves correctly. It’s a no-brainer that you should verify your application behaves correctly, but the topic gets more interesting when you talk about the different testing techniques.
There are two main approaches to testing: manual testing and automated testing. Manual testing is where you check that an application works correctly by interacting with it yourself. Automated testing is the practice of writing programs to perform the checks for you.
Most of this book is about automated testing. But to understand the benefit of automated testing, you need to understand manual testing.
1.1.1. Manual testing
Every employable developer tests code manually. It’s the next logical step after writing source code, like how the next step after chewing food is to swallow it.
Imagine you’re creating a sign-up form. When you finish writing the code, you don’t just close your text editor and tell your boss that you’ve finished the form. No, you’ll open the browser, fill out the form, and make sure it completes the sign-up process correctly. In other words, you’ll test the code manually.
Manual testing works great for small projects. If you have a TODO list app that you can check manually in two minutes, you don’t need automated tests. But when your app grows to a certain size, relying on manual testing becomes a burden.
Let me tell you about the first large JavaScript application I worked on. The application was a mess. You’ve heard of spaghetti code? This code was spaghetti, tagliatelle, and linguini code rolled into one. It was very difficult to follow the application logic, and there weren’t any automated tests. Needless to say, the code had bugs. In an attempt to stop bugs, we would manually test the application before releasing it. Every Wednesday we would pour some coffee, open a list of user journeys to test, and hunch over our laptops for four hours to work through the set of instructions. It was painful.
Definition
A user journey is a list of steps that a user can take through an application. For example—open application, fill out form, click submit.
Considering we spent 10% of our development time manually testing the app, you would have thought we would stop any bugs reaching production. Nope. The application was riddled with them. The reason is that manually testing hundreds of features is difficult—it’s all too easy to lose concentration and forget to check something.
One time when working through a user journey, I accidentally forgot to check that clicking a button would display the metadata of a music track. The other developers must have forgotten to test that feature too, because the bug was live for months!
Although some of our manual testing time was spent testing new features, most was taken up testing old features to check they still worked. This kind of testing is known as regression testing. Regression tests are difficult tasks for us humans to do—they’re repetitive, they require a lot of attention, and there’s no creative input. Put simply, they’re boring. Luckily, computers are great at tasks like these, and that’s where automated testing comes in!
1.1.2. Automated testing
Automated testing is the process of using programs to check that your software works correctly. In other words, you write extra code to test your application code. After the test code is written, you can test your app as many times as you want with minimal effort.
You can use lots of different techniques to write automated tests. You can write programs to automate a browser, call functions in your source code directly, or compare screenshots of your rendered application. Each of the techniques has different benefits, but they all have something in common: they save you time over manual testing.
In the previous section, I spoke about an untested application I worked on. One of the problems with the application was that we had a four-hour manual testing process every time we wanted to release a new version of the app. Soon after I joined the team, the CTO decided that we should write automated tests to do this work for us. Over time, we reduced the testing time from four hours of manual work to 20 minutes of automated work.
After that experience, I’ve always written automated tests for large projects from the start. It’s easier to domesticate a horse that’s lived with humans from birth than it is to tame a wild horse in captivity. In this book you’ll learn to create a tame application by writing tests right from the application’s conception.
Automated tests are great for checking that your application still works. They also make it easier to review code changes to an application. Let’s take a look at a real-world example of using automated tests—testing pull requests on GitHub.
1.1.3. Testing pull requests on GitHub
GitHub is a website that hosts Git repositories. A lot of open source projects like Vue are hosted on GitHub, and most of the companies I’ve worked for keep their code in private GitHub repositories.
Definition
Git is a version-control system. I’m going to assume you’ve used it before and are familiar with the concepts of merging, branching, and committing. If you haven’t, check out the Git docs: https://git-scm.com.
Pull requests are part of the GitHub workflow. They give developers the chance to review code changes made on separate branches before they are merged into the master branch.
Note
if you aren’t familiar with the GitHub flow, read Understanding the GitHub Flow—https://guides.github.com/introduction/flow.
Without tests, when you review a pull request you need to pull code changes to your machine, run the app, and test the code manually to verify that it still works. This is time-consuming, and you won’t be surprised to hear some people skip this process entirely when they review pull requests.
Automated tests make this process much easier. When you have automated tests in a project, you can set up a service to download the pull request branch, run the test suite, and report back whether the tests passed or failed (figure 1.1). As long as you trust the tests, there’s no need to check the code on your own machine.
Figure 1.1. A pull request that passed the tests; the tick appears when the tests have passed.

Note
Most open source projects require developers to write new tests when they add new functionality. Vue accepts only pull requests that include tests for the new code.
As well as making pull requests easier to review, automated tests make modern workflows like continuous integration and continuous delivery possible. If you’re interested in these workflows, you can read about them on Martin Fowler’s blog (http://mng.bz/nxVK).
Now that I’ve defined automated testing and manual testing, it’s time to get more specific. The next section provides an overview of automated testing techniques, and how you can use them to check your applications.
Note
Just as the Facebook dropped the to become Facebook, it’s time to drop the automated from automated testing. From now on, I’m going to refer to automated testing simply as testing.
1.2. Testing overview
So far, I’ve spoken about tests at a high level. Now it’s time to talk about the specific types of tests you can write. In this book you’re going to learn to write three types of tests for frontend applications—unit tests, snapshot tests, and end-to-end tests.
1.2.1. Overview of end-to-end tests
End-to-end tests are the most intuitive type of test to understand. In frontend applications, end-to-end tests automate a browser to check that an application works correctly from the user’s perspective.
Imagine you’re writing a calculator app and you want to test that it sums two numbers correctly. You could write an end-to-end test that opens a browser, loads the calculator app, clicks the 1 button, clicks the plus (+) button, clicks the 1 button again, clicks equals (=), and checks that the screen displays the correct result (2). You can see an example of what that might look like as code in the next listing.
Listing 1.1. An end-to-end test to check that a calculator sums two numbers
function testCalculator(browser) {
  browser
    .url('http://localhost:8080')          1
    .click('#button-1')                    2
    .click('#button-plus')
    .click('#button-1')
    .click('#button-equal')
    .assert.containsText("#result", "2")   3
    .end();
}
- 1 Navigates in the browser to the application running locally
- 2 Clicks the calculator buttons
- 3 Asserts that the calculator displays the correct result
End-to-end tests are powerful time-savers. After you’ve written an end-to-end test, you can run it as often as you want. Imagine how much time a suite of hundreds of these tests could save!
At first, end-to-end tests seem like the only testing tool you need. But they have a few problems. First, end-to-end tests are slow. Launching a browser can take several seconds, and websites can be slow to respond. It’s common for a suite of end-to-end tests to take 30 minutes to run, and if you relied purely on end-to-end tests, your test suite would take hours to run.
Another problem with end-to-end tests is that debugging them can be difficult. To debug an end-to-end test, you need to open a browser and step through the user journey to reproduce the bug yourself. This is bad enough when you’re running end-to-end tests locally, but if your tests fail on your CI server and not on your local machine, you’re going to have a bad time.
Note
One way to avoid the reproducibility problem is to run end-to-end tests in a reproducible environment, like a Docker container. Docker containers are outside the scope of this book, but you should consider looking into them to run end-to-end tests to make sure you avoid the problem of failures on different machines.
There’s another problem with end-to-end tests—they can be flaky. Flaky tests are tests that frequently fail even though the application they are testing is working. Maybe the code took too long to execute or an API was temporarily down. Like a flaky friend, you will stop taking a flaky test seriously. “Oh no, the tests failed! Let me have a look. . . . Oh, it was that one. The one fails all the time—nothing to worry about.” Flaky tests make your test suite less useful, but they’re difficult to avoid when you write end-to-end tests!
If you made a list of everything developers complain about, I would put money on end-to-end tests being in the top three. Although they are useful, they shouldn’t be your only type of test.
In this book, only one chapter is dedicated to end-to-end tests, partly because of the downsides of end-to-end tests, and partly because end-to-end tests are framework agnostic—they work whether your application is written using Vue or MooTools.
End-to-end tests automate the kind of testing that you would do manually. You can set them up to run against a live website at regular intervals or run them against code before it’s merged into a master branch.
End-to-end tests don’t give you a new approach to testing code—you just get faster manual testing. Unit tests, on the other hand, provide you with a new tool that you don’t get from testing code manually.
1.2.2. Overview of unit tests
Unit testing is the process of running tests against the smallest parts of an application (units). Normally the units you test are functions, but in Vue apps, components are also units to test (more on those later).
Remember the calculator application? In the code, the application uses a sum function to calculate the sum of two numbers.
If you edited the function to make it easier to read, you would want to test that the function still works correctly. You could run an end-to-end test, but if the end-to-end test failed, you wouldn’t know whether the problem was with the sum function or with a different part of the source code. The only way you could know for sure that it was the sum function that was broken would be to run the function in isolation. You can do this with unit tests.
Unit tests are functions that call functions in your source code in isolation and assert that they behave correctly. Take a look at the next listing. It’s a simple program that imports a sum function, runs it, and throws an error if sum does not return 2.
Listing 1.2. A basic unit test
// sum.js
export default function sum(a, b) {              1
  return a + b
}

// sum.spec.js
import sum  from '../sum'                        2
function testSum() {
  if (sum(1,1) !== 2) {                          3
    throw new Error('sum(1,1) did not return 2')
  }
}

testSum()                                        4
- 1 The function to test
- 2 Imports the sum function into the test file
- 3 Throws an error if sum does not return 2
- 4 Runs the test
Because unit tests run against an isolated unit, when a well-written unit test fails, it acts as a flashing neon sign pointing you toward the problem code.
Unlike end-to-end tests, unit tests are fast. They run in a few seconds, so you can run unit tests each time you make a code change to get quick feedback on whether the change broke existing functionality.
A happy side effect of unit tests is that they provide documentation. If a new developer starts on a project and needs to know how a unit of code behaves, they can look at the tests to see exactly how a unit behaves.
I spoke earlier about flaky end-to-end tests—tests that regularly fail even though the application is working correctly. Well-written unit tests don’t suffer from this problem. As long as the unit test is deterministic, you can run it a thousand times, and it will pass every time.
So far, I’ve had nothing but good things to say about unit tests—I’m making them blush. But I don’t want to mislead you. Like end-to-end tests, unit tests have their own problems.
A big problem with unit tests is that they make it difficult to refactor code. People don’t often talk about this problem, but it’s one I encounter a lot.
Definition
Refactoring is the process of rewriting code—normally to improve the quality of it (but that depends on who’s doing the refactoring!).
If you have a complicated function with unit tests and decide to split the function into two separate functions, you need to change the unit tests as well as the code. This can make refactoring a lot less appealing. At times I’ve been unwilling to change the structure of my code because it required too much extra work to update the unit tests. There’s not an easy solution here, but it’s something extra to consider when you decide whether the tests you write will save you time in the long term.
Another problem with unit tests is that they check only individual parts of an application. You can test that the individual parts of a car work correctly, but if you don’t check that they work when they’re fitted together and then the engine doesn’t turn on, your tests were useless. Unit tests suffer from this problem. They make sure units of code behave as expected, but they don’t test that the units interact with each other correctly. That’s why you need to supplement unit tests with end-to-end tests.
So far I’ve given you an overview of end-to-end tests and unit tests. The final tests that you’ll learn in this book are snapshot tests.
1.2.3. Snapshot testing
Have you played Spot the Difference? Spot the Difference is a game where you have two pictures of the same thing with small differences between them. The aim of the game is to identify the differences.
Snapshot tests are similar to Spot the Difference. A snapshot test takes a picture of your running application and compares it against previously saved pictures. If the pictures are different, the test fails. This test method is a useful way to make sure an application continues to render correctly after code changes.
Traditional snapshot tests launch an application in a browser and take a screenshot of the rendered page. They compare the newly taken screenshot to a saved screenshot and display an error if differences exist. These types of snapshot tests have problems when differences between operating systems or browser versions cause tests to fail even though the snapshot hasn’t changed.
In this book, I’ll teach you how to write snapshot tests with the Jest testing framework. Instead of comparing screenshots, Jest snapshot tests can compare any serializable value in JavaScript. You can use them to compare the DOM output from Vue components. You’ll learn about snapshot tests in detail in chapter 12.
Definition
Serializable means any code that can be converted to a string and then back into a value. In reality, it refers to a V8 method, but there’s no need to go into those details!
Now you’ve seen each of the test types you’re going to write. It’s time to talk about how you can combine these different test types to write effective test suites.
1.2.4. Combining test types effectively
If you combine sugar, flour, and butter in the correct quantities, you get tasty cookie dough. If you use the wrong quantities, you get floury milk. You need to combine different types of tests together in the correct quantities to make sure you have a robust test suite, rather than a mess of test code.
In figure 1.2, you can see the frontend testing pyramid. This represents the proportion of the different types of tests that should make up your frontend testing suite. From my experience, this is the best way to structure a testing suite for a frontend Vue application.
Figure 1.2. The testing pyramid. Most of your tests should be unit tests.

Most of the pyramid consists of unit tests—they provide quick feedback when developing the application. Snapshot tests also run quickly, but they cover more ground than unit tests, so you don’t need as many snapshot tests as unit tests.
As I said earlier, end-to-end tests are great for checking an app, but they can be slow and flaky. The best way to avoid flaky tests is to not write them, so the frontend testing pyramid contains only a few end-to-end tests.
If you’re an experienced developer, you might have heard of integration tests. Integration tests are another type of tests that are often used in combination with unit tests and end-to-end tests.
I don’t recommend writing integration tests for frontend code. Integration tests on the frontend are difficult to define, difficult to write, and difficult to debug.
People define integration tests differently, especially on the frontend. Some think tests that run in a browser environment are integration tests. Some think any test that tests a unit with module dependencies is an integration test. Some think that any fully rendered component is an integration test.
In chapter 13 I’ll teach you how to write server-side integration tests (using my own definition) to make sure a server responds with the correct HTTP requests. But for the frontend tests in this book, you won’t write any integration tests.
In this book you’ll create a test suite that’s structured following the frontend testing pyramid. I’m going to teach you how to write the test suite by following a test-driven development workflow. It’s important that you understand the test-driven workflow to understand how the code in this book is structured.
1.2.5. Test-driven development
Test-driven development (TDD) is a workflow where you write a failing test before you write the source code. Before you write code in a component, you write a test to makes sure the component behaves correctly.
A popular TDD approach is red, green, refactor. Red, green, refactor is where you write a failing test (red), make the test pass (green), and then refactor the code to make it more readable.
Developing applications like this offers some benefits. First, you write source code only for the functionality that’s tested, which keeps the source code small. Second, it forces you to think about component design before you start writing code.
Note
I appreciate that TDD isn’t for everyone, and I’m not trying to sell you on it. You don’t need to join the temple of TDD to benefit from this book. The main reason I use TDD in this book is because it places the test code before the source code, and in the context of this book, test code is more important than the source code.
TDD comes in a lot of flavors—vanilla, lime, cherry, orange. I’m kidding, of course, but there are different ways of approaching TDD. This book follows a frontend-focused version of TDD.
Some TDD advocates write all test code before the source code. I don’t follow TDD that strictly. I write the unit test code before the source code, but I add end-to-end tests and snapshot tests after the code is written. My general approach to writing a Vue component follows:
1. Decide the components I need.
2. Write unit tests and source code for each component.
3. Style the components.
4. Add snapshot tests for the finished components.
5. Test the code manually in the browser.
6. Write an end-to-end test.
In real life, sometimes I don’t write unit tests for components, and sometimes I write the component code before I write tests. TDD advocates might clasp their faces in horror, but I find that a rigid approach to TDD can slow development.
A common saying is that life is about the journey, not the destination. Although this may be true about life in general, in the context of developing applications it’s the opposite. As long as you write valuable tests that save you time, how you wrote them is irrelevant.
For most of the book I will tell you what you’re going to test, show you the test code, and then show you the source code that would make the test pass. Expect that the tests will fail when you run a test before you add the source code that follows.
So far, I’ve told you about the benefits of automated testing, but before you get overexcited and create an automated-test-appreciation society, there’s a disclaimer. Automated testing is not always necessary.
1.2.6. Learning when not to test
When I started to write automated tests I wanted to test all the things. I had experienced the pain of an untested application firsthand, and, like a middle-aged man with a hangover, I was determined not to do it again. But I soon learned another lesson. Testing can slow development.
When you write tests, it’s important to keep in mind the reason that you’re writing them. Usually, the purpose of tests is to save time. If the project you’re working on is stable and will be developed for a long time, then tests pay off in dividends.
But if tests take longer to write and maintain than the time they save you, then you shouldn’t write the tests at all. Of course, it’s difficult to know before you write code how much time you will save by having tests—you’ll learn this over time—but, for example, if you’re creating a prototype, working on a short-term project, or iterating on an idea at a startup company, you probably won’t benefit from writing tests.
Even when a project benefits from tests, it probably doesn’t need as many tests as you might think. Let me tell you about the fallacy of 100% code coverage.
1.2.7. The fallacy of 100% code coverage
Code coverage is a measurement of how many lines in your codebase are run by your automated tests. Normally code coverage is measured as a percentage: 100% code coverage means every line of code runs during the execution of tests; 0% code coverage means that no lines are executed. It’s a fun measurement, but it can lead to some dire consequences.
Tests provide diminishing returns. It’s like going to the gym. When you first go to the gym, you build muscle quickly. You can lose your beer belly and look toned in a few months with only three hours of gym a week. But the bigger you get, the more time you need to spend to grow any bigger. The more hours you spend in the gym, the less benefit you get from each extra hour.
The same principle applies to tests. You can write simple tests that cover your applications’ core features in a few hours. After you’ve written those tests, increasing your code coverage gets progressively more difficult. If you aim for 100% code coverage (the holy grail for some developers), it will feel like wringing the final drops of water from a towel. It’s hard work.
Most of the time, 100% code coverage is not something to aim for. Sure, if you were working on a mission-critical payment app where bugs can cost millions, then 100% code coverage would benefit you. But in my experience, most apps do not benefit from 100% code coverage.
In the last few years, I’ve worked on projects with 0% code coverage, 100% code coverage, and coverage somewhere in between. Having 0% code coverage makes development a struggle. But 100% code coverage can make development slower and more painful than a slug climbing a sand dune.
Not only is it time-consuming to reach the fabled 100% code coverage, but even with 100% code coverage, tests do not always catch bugs. Sometimes you make the wrong assumptions. Maybe you’re testing code that calls an API, and you assume that the API never returns an error; when the API does return an error in production, your app will implode.
You don’t become a test master by striving for 100% code coverage on every app. Like a good MMA fighter who knows when to walk away from a fight, a true testing master knows when to write tests and when not to write tests.
In the next chapter you’ll write your first unit test and get started on the Hacker News application. Before that chapter, I want to give you a high-level overview of what the Hacker News app will look like.
1.3. Writing a Hacker News application
When I first learned to test frontend applications, the tutorials I read taught me how to write tests for small apps. They were useful for learning techniques, but they didn’t answer any questions I had about problems I had testing large real-world applications. I was left to answer those questions myself. In this book, I want to teach you how to test an application from start to finish, so you’re going to write tests for a real-world Hacker News clone.
Hacker News is a social news website. It has a dynamic feed of items—like news stories, blog posts, and job listings (figure 1.3). Users can upvote an item to improve its score and downvote an item to decrease its score. If you’ve used Reddit, you’ll be familiar with the concept.
Figure 1.3. The Hacker News website

Note
The best way to understand Hacker News is to visit the site yourself—https://news.ycombinator.com.
In this book you’re not going to implement the voting system. That level of complexity goes beyond the remit of testing Vue applications. What you will do is create an app that displays items, comments, and user profiles using real data from the Hacker News API.
The Hacker News clone will use Vue for the view part of the application, Vuex for state management, and Vue Router for client-side routing. Don’t worry if you haven’t used Vuex or Vue Router before. I’ll cover them in detail later in this book.
A Hacker News clone is a great app to teach how to test Vue applications. It’s complex enough for you to learn advanced testing techniques but simple enough to avoid getting bogged down in design details.
Now that you know what you’re building, it’s time to talk about Vue. For a book about testing Vue, we’ve gotten pretty far without mentioning it!
1.4. Vue testing overview
This book is about testing Vue applications, not developing Vue applications. I’m not going to teach you how to use Vue from the ground up. If you’re a complete beginner with no Vue experience, you should spend time outside this book to learn the basics of Vue if you want to get the most out of this book.
Note
To learn Vue from the ground up, I recommend Vue.js in Action by Erik Hanchett with Benjamin Listwon (Manning, 2018, www.manning.com/books/vue-js-in-action). Alternatively, the Vue docs are some of the best I’ve ever read. You can check them out at https://vuejs.org/v2/guide.
That said, throughout the book I will explain features of Vue briefly and link you to resources so you can learn about them in more detail if you need to, and two chapters in this book are devoted to learning the more-complex topics of Vuex and Vue Router.
Although I’m not going to teach Vue 101, I’ll teach you some basic concepts before the next chapter, to make sure we’re speaking the same language. The first term to add to your vocabulary is the Vue instance.
1.4.1. The Vue instance
Vue applications are made up from Vue instances. Every application contains at least one Vue instance, and when you write unit tests for a component, you will create a Vue instance with the component under test.
In listing 1.3, you can see a simple example of a Vue application. To start the application, you create a new Vue instance with an options object. Vue uses the el option to find a DOM node into which to render the nodes generated from the template string.
Note
I’m going to assume you’re familiar with the DOM. If you’re not familiar with the DOM, you can read an introduction to it on MDN (http://mng.bz/k5iQ).
Listing 1.3. Creating a Vue instance
new Vue({
  el: '#app',                           1
  template: '<div>{{message}}</div>',   2
  data() {
    return {
      message: 'Hello Vue.js!'          3
    }
  }
})
- 1 Selector used to find the DOM element into which to render
- 2 Template string used to generate DOM nodes
- 3 Data used in the template string
Creating a Vue instance that generates DOM nodes is known as mounting an instance. If you’ve written a Vue app before, you will have mounted a Vue instance to start the application running.
Note
If you’re still confused by what a Vue instance is, you can read about it in the Vue docs (https://vuejs.org/v2/guide/instance.html).
The example in listing 1.3 uses a template string to describe the DOM nodes that Vue should generate. You can use a few different ways to describe the DOM nodes that Vue should render, so let’s take a look at them now.
1.4.2. Templates and render functions
Vue gives you a way to declaratively render the DOM. In other words, you describe the DOM nodes that Vue should render.
You can describe the DOM nodes in two main ways: templates and render functions. Templates use an HTML syntax to describe a DOM, as shown in the following code.
Listing 1.4. A template string
new Vue({
  // ..
  template: '<div>{{message}}</div>',      1
  //
 ..
})
- 1 Template string that renders a message property
For Vue to use to generate DOM nodes from a template, it needs to convert the template into render functions—known as compiling the template. As shown in the next listing, you can use render functions directly in the Vue options instead of using a template string.
Listing 1.5. Using a render function
new Vue({
  // ..
  render(createElement) {
    return createElement('div', this.message)
  },
  // ..
})
Vue runs render functions to generate a virtual DOM—which is a JavaScript representation of the real DOM, shown in the following code. It then compares the virtual DOM against the real DOM, and updates the real DOM to match the virtual DOM.
Listing 1.6. Simple example of a virtual DOM
{
  tag: 'div',
  children: [
    {
      text: 'Hello Vue.js'
    }
  ]
}
Note
If you want to learn more about render functions or the virtual DOM, you can read about them in the Vue docs http://mng.bz/dP7N and http://mng.bz/VqwP.
Render functions are more difficult to read than templates. You should write most of your components with templates, but when you do so, you should be aware that Vue needs to compile the template into render functions.
Templates make code easier to read, but large templates can be difficult to understand. Vue contains a component system that you can use to split templates into self-contained units, which makes code easier to read and maintain. A lot of this book is about unit testing Vue components, so you need a good understanding of what Vue components are.
1.4.3. Understanding the Vue component system
Components are self-contained modules of code that you can use in Vue templates. They abstract away logic and make templates easier to read. If you’ve used a frontend framework like React or Angular, you’ll be familiar with the concept of components. If not, you can think of components as the building blocks of an application. For large Vue applications, it’s components all the way down.
The easiest way to explain components is to show you some code. You can see an example of a <custom-title> component in the next code sample. Notice that after you register a component with Vue, you can use it in your code like an HTML tag.
Listing 1.7. Registering a component globally in Vue
// JavaScript
Vue.component('hello-vue', {          1
  template: '<div>Hello Vue.js!</div>'
})

// HTML
  <div>
   <hello-vue />                       2
  </div>
You could define components in a few different ways, but in this book I’ll have you write single-file components (SFCs).
Note
All the techniques in this book will work the same way for any correctly defined Vue component.
Vue SFC files can be identified by their .vue extension. SFCs can contain a <template> block (similar to a template string), a <script> block, <style> blocks, and custom blocks (listing 1.8).
Note
You won’t use any custom blocks in this book, but you can read about them in the vue-loader docs at http://mng.bz/xJBW.
The object that’s exported in the <script> block is known as a component options object. It accepts most of the options that a root Vue instance can take.
Listing 1.8. A single-file component (SFC)
<template>                         1
  <div>{{message}}</div>
</template>                        1

<script>                           2
  export default {                 3
    data: {
      message: 'Hello Vue.js!'
    }
  }
</script>                         2

<style>                           4
  div {
    color: red;
  }
</style>                          4
- 1 Template block
- 2 Script block
- 3 Component options object
- 4 Style block
SFCs are not valid JavaScript or HTML. You can’t run them in the browser, so you need to compile SFCs before you send them to the client.
A compiled SFC becomes a JavaScript object with the template converted to a render function. You can see an example in the next listing.
Listing 1.9. A compiled SFC
Module.exports = default {
 render() {                       1
    var _vm = this;
    var _h = _vm.$createElement;
    var _c = _vm._self._c || _h;
    return _c('p', [_vm._v("I'm a template")])
  },
  name: 'example-template'
}
- 1 Generated render function
I hope that code didn’t scare you. Compiled SFCs aren’t designed to be human readable. You don’t need to concern yourself with compiled render functions; that’s the job of the Vue framework. The main takeaway here is that an SFC compiles into an object with a render function.
This gives you a good idea of what part of a component you should test.
1.4.4. Unit testing components
Deciding what unit tests to write is important. If you wrote tests for every property of a component, you would slow development and create an inefficient test suite.
One method for deciding what parts of a component should be tested is to use the concept of a component contract. A component contract is the agreement between a component and the rest of the application.
When you start a new job, you sign a contract with your employer. You agree that you’ll spend 40 hours a week working in exchange for a salary. Because you’ve agreed to work 40 hours as part of a contract, your employer can safely assume they can use you to produce 40 hours of work a week as long as they pay your salary.
In the same vein, when you write a component to be used in the rest of the application, you are defining a contract for how it should behave. Other components can assume the component will fulfill its contractual agreement and produce the agreed output if it’s provided the correct input.
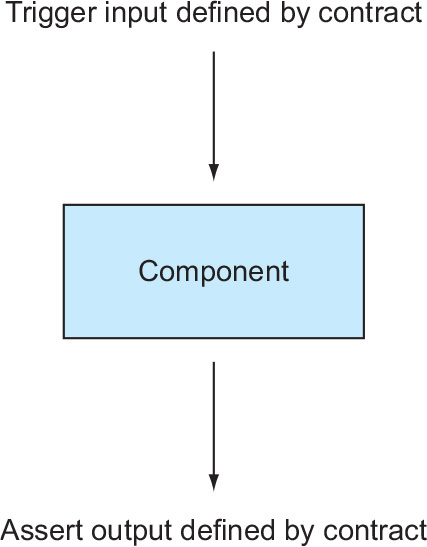
The idea of input and output is important in component contracts. A good component unit test should always trigger an input and assert that the component generates the correct output (figure 1.4). You should write tests from the perspective of a developer who’s using the component but is unaware of how the component functionality is implemented.
A common input for a component is a user action, like when a user clicks a button. The most common output is the DOM nodes generated by the render function, but lots of other inputs and outputs exist for Vue components. For example, the input could be
- Component props
- User actions (like a button click)
- Vue events
- Data in a Vuex store
Forms of output for a Vue component could be
- Emitted events
- External function calls
Note
Don’t worry if you don’t know what emitted events or data in a Vuex store are. You’ll learn about them later in the book.
Figure 1.4. Triggering an input and asserting an output in a component unit test
Imagine you have an AuthorizedStatus component. The AuthorizedStatus component accepts an authorized prop. If the authorized prop is true, it renders “you’re authorized” inside a <div> element. If it is false, it renders “you’re not authorized.”
Definition
A prop is a piece of data passed to a component. Props are a way to pass data from parent components to child components. You can read more about props in the Vue docs at http://mng.bz/A2Dz.
You can see the AuthorizedMessage component next.
Listing 1.10. AuthorizedMessage.vue
<template>
  <div>
    {{authorized ? 'you're authorized' : 'you're not authorized'}}    1
  <div>
</template>

<script>
  export default = {
    name: 'loader',
    props: ['authorized']                                             2
  }
</script>
- 1 Conditionally rendered text
- 2 A prop declaration
When you use this component in an app, you expect that it will output “you’re authorized” if you pass it an authorized prop set to true. If authorized is false, or not passed in, you expect it to be render “you’re not authorized.” This is its component contract, and it is the functionality that you should write unit tests for. In this book I’ll use the idea of a component contract to show you what tests you should write for components.
Now that you’ve got a high-level overview of testing, you’re on your way to becoming a testing master. In the next chapter, you’ll create a test script and write your first unit test!
Summary
- There are two types of testing—automated testing and manual testing.
- A frontend testing suite that follows the frontend testing pyramid is made up of unit tests, snapshot tests, and end-to-end tests.
- Testing is not always beneficial. If a test doesn’t save you time, then it’s not worth writing.
- Vue applications are made up from Vue instances that use template strings or render functions to describe the DOM.
- Single-file components compile into objects with a render function.
- You can use component contracts to define what unit tests to write for Vue components.