
Chapter 9. Understanding Vue Router
- Understanding client-side routing
- Understanding Vue Router
- Adding Vue Router to a project
When a single-page web app grows large, you might decide to split the UI into different views. You can use Vue Router to add client-side routing to handle navigation between views without causing a page reload.
This chapter is an introduction to Vue Router for readers who aren’t familiar with the library. You’ll learn about server-side routing, client-side routing, and Vue Router. At the end of the chapter, you’ll add a bare-bones Vue Router setup to the Hacker News app.
Note
If you already have experience with Vue Router, you can skip ahead to chapter 10. You will need to check out the chapter-10 GitHub branch to follow along with that chapter.
If you’ve written a React or Angular application before, you might be familiar with the concept of client-side routing. If not, don’t worry. The first section of this chapter is about understanding what client-side routing is. You’ll learn about the traditional server-side routing of websites and compare that to the client-side routing approach.
After you’ve seen client-side routing at a high level, you’ll learn about Vue Router and how to use it to add client-side routing to an application. Finally, you’ll add a Vue Router setup to the Hacker News application. First, let’s talk about routing.
9.1. Understanding routing
The definition of routing depends on the context in which you use it. In this chapter, routing means using the path of a URL to serve content.
Definition
A path is the part of a URL after the domain. For example, in the URL https://my-website.com/something/1, /something/1 is a path.
A typical website has several pages that map to URLs that you can navigate to by clicking links. This can happen in the following two ways:
- In server-side routing, a new page is requested from the server and rendered.
- In client-side routing, the page content is rendered on the client, without a new request to the server.
Don’t worry if that brief explanation doesn’t make sense to you, this section will go into more detail on the difference between the two. Let’s begin by looking at server-side routing.
9.1.1. Understanding server-side routing
Server-side routing is the traditional method of matching a path to a file. As the name suggests, server-side routing is where the server does the routing work.
Think about the Hacker News website. When you enter the URL https://news.ycombinator.com/ into the browser address bar, a request is sent to a server, which responds with the correct content for the path. This is server-side routing. The server processes the request and uses the path (/) to respond with the correct content.
At the top of a Hacker News page are links for different Hacker News feeds. For example, figure 9.1 shows the live Hacker News nav bar, including a link to the Show feed.
Figure 9.1. Hacker News site with different feed links

When a user clicks the Show link, the browser sends a new request to https://news.ycombinator.com/show. The server receives the request, processes it using the path (/show), and returns the matching document. When the browser receives the response, it loads the new document in the page (figure 9.2).
Figure 9.2. Server-sider routing
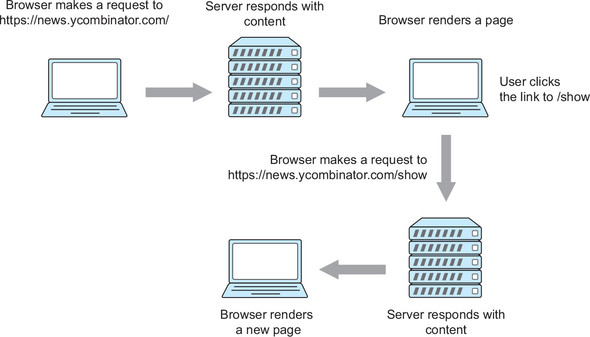
This is how navigation works on an app that uses server-side routing—each click sends a new request to the server, which processes the request and returns the correct content. This approach has worked since the dawn of the internet, and there’s nothing broken about this system. But server-side routing does have one big problem: each time a browser loads a new document, it loses the current state of the application.
We have ways around this problem—cookies, local storage, and query parameters in the URL can all be used to save state between page requests. These solutions work fine, but they make development more complex. Vue applications often have a lot of state that can be difficult to maintain using the traditional solutions. That’s where client-side routing comes into play.
9.1.2. Understanding client-side routing
In client-side routing, the routing work is done on the client. Client-side routing can be more difficult to get your head around (at least it was for me). The best way to explain it is to walk through the same example of clicking a link in the Hacker News app.
When an application uses client-side routing, you still make an initial request for the page, which is routed on the server side. If the Hacker News app were client-side routed, you would make an initial request to https://news.ycombinator.com/. The server would use the path to respond, and the browser would render the document it received.
The difference is, the server returns the same content whether the path is /new, /top, or /. The real routing work is done on the client. When the browser has loaded the JavaScript, a client-side routing library, like Vue Router, uses the path in the URL to render the correct content.
When the user clicks the /show link in the browser, the client-side router prevents the browser from making a new request to https://news.ycombinator.com/show. Instead, the router changes the URL without causing a page reload, and the page contents are rerendered with the show feed (figure 9.3). The point here is that the page content updates, but the page maintains the same state.
Figure 9.3. Client-side routing

Client-side routing makes the experience for the user faster, because they don’t need to wait for an HTTP request to finish. It also improves the experience for the developer: it’s much easier to develop apps that keep state between views using client-side routing.
In the Hacker News application, you’re going to add support for multiple feeds using Vue Router. At the end of this section, you’ll add a bare-bones router setup to the application. Before you add it to the project, you need to know some of the basic Vue Router concepts.
9.1.3. Understanding Vue Router concepts
Vue Router is the Vue client-side routing library. If you add client-side routing to a Vue project, then you’re going to use Vue Router. It’s by far the most advanced Vue routing library, and it’s maintained by the Vue organization.
Vue Router matches the path of a URL to a component that it should render. You configure the paths that Vue Router should match with a routes array.
The routes array is an array of route config objects. A route config object can have lots of properties, but the most important are path and component. The path property is used to match against the current path in the URL, and component is the component that should be rendered for the matched path.
You can see an example of a routes array in the next listing. This routes array would match the path /item to an ItemView component, and the path / would match a Main component.
Listing 9.1. A routes array
import Main from './Main.vue'
import ItemView from './ItemView.vue'

const routes = [
  { path: '/', component: Main },          1
  { path: '/item', component: ItemView }   2
]
- 1 Matches the Main component for the / path
- 2 Matches the ItemView component for the /item path
By default, Vue Router just matches a route. You need to render a RouterView component, which is a Vue Router component that renders the currently matched route component.
You can think of RouterView as a placeholder. If the current route is /item, and /item matched the ItemView component, then a RouterView component would render an ItemList component as follows:
<template>
  <router-view />
</template>
Vue Router is a plugin like Vuex. To use the RouterView component, you need to install Vue Router on Vue, as shown in the next listing.
Listing 9.2. Using Vue Router to render an App component
import Vue from 'vue'
import VueRouter from 'vue-router'

const App = { template: '<div></div>' }

Vue.use(VueRouter)                           1

const router = new VueRouter({               2
  routes: [{ path: '/', component: App }]
})

const app = new Vue({
  router,                                    3
  el: '#app',
  template: '<router-view />'                4
})
- 1 Installs Vue Router on Vue
- 2 Creates a router instance that will match the App component for the / path
- 3 Passes a router instance to Vue
- 4 Renders the matched component
You can use Vue Router to render components with a routes array and a RouterView component. Vue Router also links between pages without triggering a page load by using a RouterLink component. RouterLink accepts a to prop to link to a path, like so:
<router-link to="/item">item</item>
By default, a RouterLink component renders as an <a> element. When the element is clicked, Vue Router prevents the browser from reloading the page, updates the URL, and rerenders the RouterView.
Note
The RouterLink and RouterView components are registered as global components when Vue Router is installed on Vue, so there’s no need to register the components locally.
That’s the basic setup for Vue Router. The final Vue Router feature you need to know is dynamic route matching.
9.1.4. Understanding dynamic route matching
It’s common to use part of a route to generate the content for a page. Think about a blog post with the path /item/1234; here, the second part of the path is the ID of the blog post. In server-side routing, the server would use this ID to generate the correct page. You can use the same technique in Vue Router using dynamic segments.
You define dynamic segments in a path, denoted by a colon (:). For example, a dynamic segment for id would look like this:
import ItemView from './ItemView.vue'

const routes = [
  { path: '/item/:id', component: ItemView }        1
]
- 1 Matches an ItemView component for /item with a dynamic id segment
Matched dynamic segments are available in Vue instances on the route object ($route.params), which is added by Vue Router when you install it on Vue. You can use the dynamic segment value in a component as follows:
<template>
  <p>The ID is {{$route.params.id}}</p>
</template>
For fine-grained matching, you can use regex in the dynamic path.
Note
If you’re unfamiliar with regex (regular expressions), you can read about them on MDN—http://mng.bz/edRZ.
The following rule matches any /top or /new paths and saves the value as a type property on the $route.params object. It also matches an optional page segment:
const routes = [
  { path: '/:type(top|new)/:page?', component: ItemView }
]
You can see an example of these advanced route patterns in table 9.1.
Table 9.1. Dynamic path matching
|
Pattern |
Path |
$route.params |
|---|---|---|
| /:type(top|new) | /top | {type: ’top’} |
| /:type(top|new)/:page | /new/123 | {type: ’new’, page: ’123’} |
| /:type(top|new)/:page | /another-page/123 | Unmatched |
Note
You can read more about dynamic matching in the Vue Router docs—https://router.vuejs.org/en/essentials/dynamic-matching.html.
Now that you’ve learned the basic concepts, you can add Vue Router to the Hacker News application.
9.1.5. Adding Vue Router to an application
In this section, you’ll add Vue Router to the application. By the end of the section, the app will be using Vue Router to render the ItemList component.
First, you need to install Vue Router. Run the following command in the command line to install Vue Router as a dependency:
npm install --save vue-router
Now you need to create the routes array file. The Hacker News app will support five paths: /top, /new, /show, /ask, and /job. Each of these paths is a different Hacker News list.
You’ll use dynamic path-matching to match each of these routes as a type segment. The path will also match an optional page segment. So a path of /top/3 would create a $route.params object of { type: ’top’, page: ’3’ }. The second object in the routes array redirects a request from the root (/) to /top so that you have always access to a type parameter, even on the default route.
Create a file named src/router/routes.js, and add the following code.
Listing 9.3. An array of RouteConfig objects
import ItemList from '../views/ItemList.vue'

export default [
  { path: '/:type(top|new|show|ask|job)/:page?', component: ItemList }, 1
  { path: '/', redirect: '/top' }                                       2
]
- 1 Sets the dynamic type segment that matches top, new, show, ask, and job. Also supports the optional page segment.
- 2 Redirects the root request to top so the app has the correct property
Next, you’ll create a router configuration file. The configuration file will export an object that you’ll use to create the router instance. It’s similar to the store config file you added in chapter 7.
The configuration object will have two properties, mode and routes. mode sets how Vue Router controls the URL. You’ll use the history mode, which tells Vue Router to use the window.history.pushState method under the hood to set the URL without triggering a page load. routes is the routes array that defines which routes should be matched.
Create a file named src/router/router-config.js, and add the code from the following listing.
Listing 9.4. Router config file
import routes from './routes'

export default {
  mode: 'history',
  routes
}
Now you can create a router instance using the route config. Open the src/main.js entry file, and add the following import statements to the file below the existing import statements:
import Router from 'vue-router'
import routerConfig from './router/router-config'
Add the following code to src/main.js, below the code that creates a store instance, but before the code that creates the Vue instance:
Vue.use(Router)
const router = new Router(routerConfig)
Note
If you are having trouble adding this code to the file, you can see the finished file in the chapter-10 branch src/main.js.
As with Vuex, you need to pass the router instance to Vue when it’s instantiated in the entry file. Replace your Vue instantiation in src/mains.js with the following code:
new Vue({
  el: "#app",
  store,
  router,
  render: h => h(App),
})
Now that Vue Router is set up to match the path, you need to render a RouterView component in order to render the currently matched component. You’ll replace the ItemList component in src/App.vue with a RouterView component.
While you’re editing the App component, you should add RouterLink components to link to the different type of feeds. Open src/App.vue, and replace the <template> block with the code shown next.
Listing 9.5. Using RouterView to render components
<template>
  <div id="app">
     <header class="header">
       <nav class="inner">
         <router-link to="/top">Top</router-link>         1
         <router-link to="/new">New</router-link>
         <router-link to="/show">Show</router-link>
         <router-link to="/ask">Ask</router-link>
         <router-link to="/job">Jobs</router-link>
       </nav>
     </header>
     <div class="view">
       <router-view :key="$route.params.type" />          2
     </div>
   </div>
</template>
- 1 Adds links to different routes
- 2 Renders the app using the <router-view> component, and adds a unique key so the component rerenders when the type changes
Great—Vue Router is set up and running! Now, when you land on /top/2, the app will render the ItemList component. It’s the same as before, except now you have access to the type and page parameters, which you can use to dynamically render different lists.
It’s worth mentioning that so far you have no unit tests for the route configuration. Configuration is an example of something you should never test explicitly. Configuration doesn’t contain much logic, and unit tests for configuration often require extreme mocking. You’ll test the configuration implicitly with end-to-end tests later in the book; but as I mentioned in chapter 7, it’s just not worth the time investment to test configuration explicitly with unit tests.
In the next chapter, you’ll refactor the app to use the route parameters to render different feeds.
Summary
- Vue Router handles client-side routing in a Vue app.
- Vue Router is configured with a routes array.
- Vue Router renders the matched component in the RouterLink component.
- Dynamic path-matching adds matched values to the $route.params object.