
4. Mob Farms, Traps, and Defense
In This Chapter
![]() Create mobs on demand.
Create mobs on demand.
![]() Gather a host of useful items and resources.
Gather a host of useful items and resources.
![]() Learn to build the best mob grinders.
Learn to build the best mob grinders.
![]() Create crafty traps.
Create crafty traps.
Had enough of running around the countryside slaughtering hostile mobs just to get a few measly items? Ever fancied earning an unlimited number of experience points to use in enchanting? Take control of the mayhem with a mob farm: the equivalent of a factory for zombies, spiders, creepers, and skeletons. You’ll quickly amass a fortune in useful resources—from gunpowder to string, arrows, and more—and also gather weapons, armor, iron, and even the occasional edible. Once you know how, it’s really quite easy, and putting together a mob farm, especially when playing on Survival, is incredibly satisfying—not for the build, so much, but for the results. It will make a huge difference in giving you the resources you need to go crazy with TNT, quickly grow crops, provide countless arrows for long-range combat, and so much more. Mob farms that focus on the hostile game entities can deliver it all by driving the mods to a single area, like lambs to the...well, see Figure 4.1.

FIGURE 4.1 Mobs gathered at the base of a mob farm, ready to be attacked from a tunnel below. Don’t trip in!
Evil Mob Farms
Mob farms are composed of two parts: spawning and grinding.
The spawner is usually a darkened room designed to encourage mobs to spring into existence and then wander or be driven to a central point that feeds into the grinder. The grinder kills the mobs outright or, through fall damage, harms them enough that they can be killed with a single blow, thus quickly accruing you experience points. Large-scale mob farms can spawn hundreds of mobs per minute, grind them up like so much raw meat, and deliver their drops through an automated collection system into a bundle of chests.
Spawning Mob Mayhem
Because even the simplest spawner requires significant resources, it’s best to plan it out carefully if you’re playing on Survival. Keep the following points in mind:
![]() Mobs only spawn when the player is nearby, within an area of 240×240 blocks, so you’ll need to be close to the farm for it to operate. There are ways to control spawning with mods, but I’ll focus on the default behaviors here.
Mobs only spawn when the player is nearby, within an area of 240×240 blocks, so you’ll need to be close to the farm for it to operate. There are ways to control spawning with mods, but I’ll focus on the default behaviors here.
![]() Mobs can only spawn on opaque blocks, ruling out the use of glass platforms.
Mobs can only spawn on opaque blocks, ruling out the use of glass platforms.
![]() Hostile mobs only spawn at a light level of 7 or less, and the darker the better. (You can check the light level by turning on the debug screen. Press F3 on a PC; press fn+F3 on Mac OS X.) The darkness can make it difficult to see exactly what is happening inside a spawner unless you have cheats enabled and switch to Spectator mode by typing in the command /gamemode spectator.
Hostile mobs only spawn at a light level of 7 or less, and the darker the better. (You can check the light level by turning on the debug screen. Press F3 on a PC; press fn+F3 on Mac OS X.) The darkness can make it difficult to see exactly what is happening inside a spawner unless you have cheats enabled and switch to Spectator mode by typing in the command /gamemode spectator.
![]() Slimes generally spawn at levels below 40 above bedrock, and even then only in a small percentage of chunks. However, they do spawn in swamp biomes at levels 51 to 69. Therefore, it only makes sense to build a spawner to gather slime in a swamp. Given slimes’ use in providing the slimeballs for sticky pistons and slime blocks, a spawner at the right level in a swamp can be quite useful.
Slimes generally spawn at levels below 40 above bedrock, and even then only in a small percentage of chunks. However, they do spawn in swamp biomes at levels 51 to 69. Therefore, it only makes sense to build a spawner to gather slime in a swamp. Given slimes’ use in providing the slimeballs for sticky pistons and slime blocks, a spawner at the right level in a swamp can be quite useful.
![]() In an optimal configuration, up to 79 hostile mobs can spawn within a single potential area, but this represents the maximum amount available within the entire vertical section of the world. Therefore, a mob farm over an area filled with caves will not be as successful as one with fewer dark underground locations, unless you take the time first to light the caves so that they become invalid mob spawn locations, leaving only your own mob farm as the most viable location. You can also use Spectator mode, if you like, to check out the underground terrain, but it’s a good idea to avoid it for a true survival experience.
In an optimal configuration, up to 79 hostile mobs can spawn within a single potential area, but this represents the maximum amount available within the entire vertical section of the world. Therefore, a mob farm over an area filled with caves will not be as successful as one with fewer dark underground locations, unless you take the time first to light the caves so that they become invalid mob spawn locations, leaving only your own mob farm as the most viable location. You can also use Spectator mode, if you like, to check out the underground terrain, but it’s a good idea to avoid it for a true survival experience.
![]() The more time you spend near your mob farm, the better the drops become because the mobs are more likely to spawn with armor and weapons.
The more time you spend near your mob farm, the better the drops become because the mobs are more likely to spawn with armor and weapons.
![]() Building a mob farm in the sky, as described in the next section, will provide the most flexibility, and you can wait at ground level for the drops, thus getting around the problem that mobs won’t spawn if you’re closer than 24 blocks to the spawning ground.
Building a mob farm in the sky, as described in the next section, will provide the most flexibility, and you can wait at ground level for the drops, thus getting around the problem that mobs won’t spawn if you’re closer than 24 blocks to the spawning ground.
![]() Unless you specifically want them, and design for them, spiders can cause problems in spawners by blocking 1×1-wide channels. Dividing the spawning floor with raised blocks so that no flat area is larger than 2×2 will help prevent spiders from spawning, thus ensuring they won’t block any smaller channels in the spawner or grinder.
Unless you specifically want them, and design for them, spiders can cause problems in spawners by blocking 1×1-wide channels. Dividing the spawning floor with raised blocks so that no flat area is larger than 2×2 will help prevent spiders from spawning, thus ensuring they won’t block any smaller channels in the spawner or grinder.
![]() Although there is no way to craft them, mob spawners exist in dungeons, abandoned mineshafts, and the Nether region. Leaving them in position and building a mob grinder around them can make it easy to create a farm that works for just the type of mob created by that spawner. You can increase the light level with torches to prevent the spawner from spitting out hostiles at you while you build, and then reduce the level when ready to kick it off.
Although there is no way to craft them, mob spawners exist in dungeons, abandoned mineshafts, and the Nether region. Leaving them in position and building a mob grinder around them can make it easy to create a farm that works for just the type of mob created by that spawner. You can increase the light level with torches to prevent the spawner from spitting out hostiles at you while you build, and then reduce the level when ready to kick it off.
Tip: Go Superflat for the Highest Spawn Rates
A superflat world doesn’t have any caves, so it’s an ideal place in which to test and compare different mob farm designs without them being affected by additional spawn points located underground. This will result in the maximum possible number of spawns during the day, when there are no other spawn locations available, providing for an easy comparison of different layouts.
The spawner designs fall into several general categories, although as with almost anything built in Minecraft, there are a myriad of variations on the theme. The easiest to build, however, is a water-based farm. This is the most effective for the number of resources consumed, using streams of water to wash the mobs to a central 2×2 hole. The water can originate from a permanent source block, or, if you are feeling more sophisticated, from water dispensers containing buckets of water controlled via redstone. The spawning area is two blocks high, allowing all the Overworld’s hostile mobs to spawn, with the exception of Endermen, who teleport upon touching water.
If you do want to spawn Endermen, investigate a piston-based design where three-block-high corridors are crisscrossed with trip wires to trigger pistons to push the mobs off the platform.
For now, though, let’s start with a water-based farm and then build some grinders.
Building a Water-Based Mob Farm
The simplest design uses four water channels of eight blocks in length connected to a 2×2 hole in the middle of a platform. We’re going to build this in the air, and use height to our advantage to create a fall grinder. I recommend you build this as a test in a superflat world set to Creative mode because doing so in Survival will take much longer due to the constant risk of dropping off your precarious perch. Follow these steps:
1. The first stage will look like what’s shown in Figure 4.2. Start with a pillar 19 blocks high (see the “Mob Fall Damage” sidebar for more information on why I’m not using the usual 22 blocks) and then build channels out from the pillar for the water flow that extend every direction for eight blocks. Each channel should be two blocks wide so that spiders can be successfully swept down to the center drop. You can use any material as long as it’s opaque—generally speaking, that’s any of the standard building materials except glass. Now block off the outside of each channel to contain the water and pour a total of eight water buckets against those blocks.

FIGURE 4.2 Water channels will sweep hostile mobs to their doom.
2. Lay an extra layer of cobblestone along the top of each channel, creating a watercourse that is two blocks deep so the mobs can’t jump out after they’ve fallen in. Then connect that layer with a series of blocks along its circumference, as shown in Figure 4.3.

3. Fill in each of the four large spaces to create the spawning floor; then add a wall three blocks high around the edge, as shown in Figure 4.4.

FIGURE 4.4 The farm is now taking shape.
4. Finally, fill in the entire roof at the third level of the external wall, providing a spawning space two blocks high. Place some torches on top to prevent rooftop spawns that would sap from the total possible spawns, and feel free to remove the original support column (see Figure 4.5). Wait for daylight, or type /time set day, and you’ll start to see a constant stream of falling mobs after 20 or so seconds.

Grinding Mobs and Collecting Drops
Now that we have a mob spawner, it’s time to automate the grinding of the mobs and the collection of their drops.
There are several ways to deal with the mobs in a so-called grinder:
![]() Fatal falls—Drop them from a sufficient height and they’ll splat on the ground, instantly dying and dropping any goods they carry. Alternatively, as I’ll show later, you can let them fall onto hoppers that connect to a chest, ensuring the automatic collection of their drops. You can also set the height just right so that quite a few mobs survive, ready to be slaughtered with a one-punch hit so as to quickly gather experience points.
Fatal falls—Drop them from a sufficient height and they’ll splat on the ground, instantly dying and dropping any goods they carry. Alternatively, as I’ll show later, you can let them fall onto hoppers that connect to a chest, ensuring the automatic collection of their drops. You can also set the height just right so that quite a few mobs survive, ready to be slaughtered with a one-punch hit so as to quickly gather experience points.
![]() Lava blades—Wash them downstream toward a sliver of lava propped up at head height so that the lava kills the mob without destroying its items. Collect the drops in a hopper and chest.
Lava blades—Wash them downstream toward a sliver of lava propped up at head height so that the lava kills the mob without destroying its items. Collect the drops in a hopper and chest.
![]() Suffocation—Use pistons to push opaque blocks into the mobs, suffocating them to death.
Suffocation—Use pistons to push opaque blocks into the mobs, suffocating them to death.
![]() Drowning—Use water to trap the mobs in an area with no air pockets, causing them to die and drop their items.
Drowning—Use water to trap the mobs in an area with no air pockets, causing them to die and drop their items.
I’ll show you ways to build all four.
Collecting drops from a fall helps avoid the problem shown in Figure 4.6: a mass of item drops that will despawn if not collected in five minutes. (Items do persist if that chunk is unloaded from memory, which can occur if you travel a substantial distance away.)

FIGURE 4.6 Automatically collecting items provides a safe way to ensure they don’t despawn.
Hoppers, whether stationary or attached to a minecart, can sweep up dropped items, so there are two ways to organize the collection:
![]() Standard hopper—Arrange hoppers under the kill zone of your mob farm, each feeding into the next like a line of pipes until the dropped items finally make it to a chest. Start by placing the chest; then Shift-click to arrange the hopper pipelines, building out from the chest, with each hopper feeding into the one adjacent. You’ll need a substantial grid of hoppers, similar to that shown in Figure 4.7, which makes this a very costly setup on Survival because each hopper requires five iron ingots and one chest. If iron is in short supply, but you do have the six gold ingots required to create a set of powered rails, consider the next solution instead.
Standard hopper—Arrange hoppers under the kill zone of your mob farm, each feeding into the next like a line of pipes until the dropped items finally make it to a chest. Start by placing the chest; then Shift-click to arrange the hopper pipelines, building out from the chest, with each hopper feeding into the one adjacent. You’ll need a substantial grid of hoppers, similar to that shown in Figure 4.7, which makes this a very costly setup on Survival because each hopper requires five iron ingots and one chest. If iron is in short supply, but you do have the six gold ingots required to create a set of powered rails, consider the next solution instead.
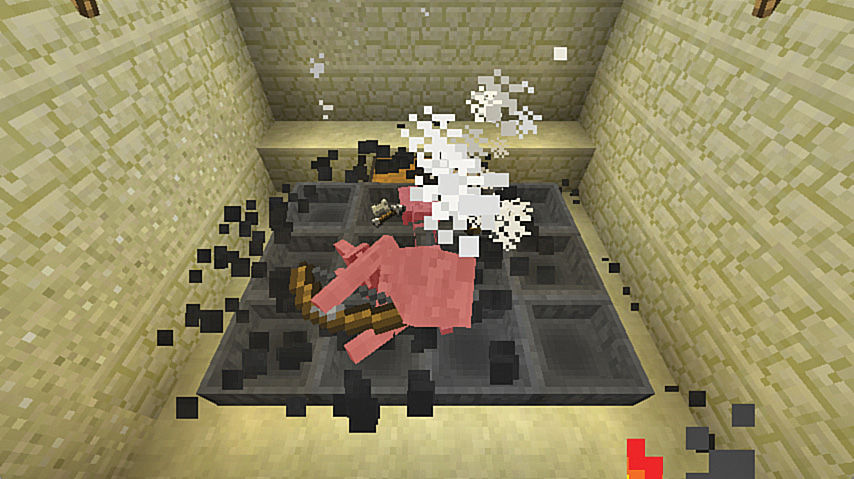
FIGURE 4.7 Hopping to it with a hopper grid to funnel drops from the kill zone into a chest.
![]() Minecart with hopper—Set up a snaking rail line such as the one shown in Figure 4.8 using a minecart with hopper to scoop fallen items off the track. This works best if you have arranged the fall so that all mobs die when they hit the ground because surviving mobs will block the movement of the minecart. Alternatively, use the lava blade to slice and dice the mobs so that you can be certain only items drop to the track. Although not shown, you can of course easily add a minecart unloading station (see Chapter 3, “Mining and Ore Generators”) to this layout at one end, so that the hopper periodically empties. Use another hopper to transfer the contents to a chest, or directly into another minecart with a chest to haul everything back to base.
Minecart with hopper—Set up a snaking rail line such as the one shown in Figure 4.8 using a minecart with hopper to scoop fallen items off the track. This works best if you have arranged the fall so that all mobs die when they hit the ground because surviving mobs will block the movement of the minecart. Alternatively, use the lava blade to slice and dice the mobs so that you can be certain only items drop to the track. Although not shown, you can of course easily add a minecart unloading station (see Chapter 3, “Mining and Ore Generators”) to this layout at one end, so that the hopper periodically empties. Use another hopper to transfer the contents to a chest, or directly into another minecart with a chest to haul everything back to base.
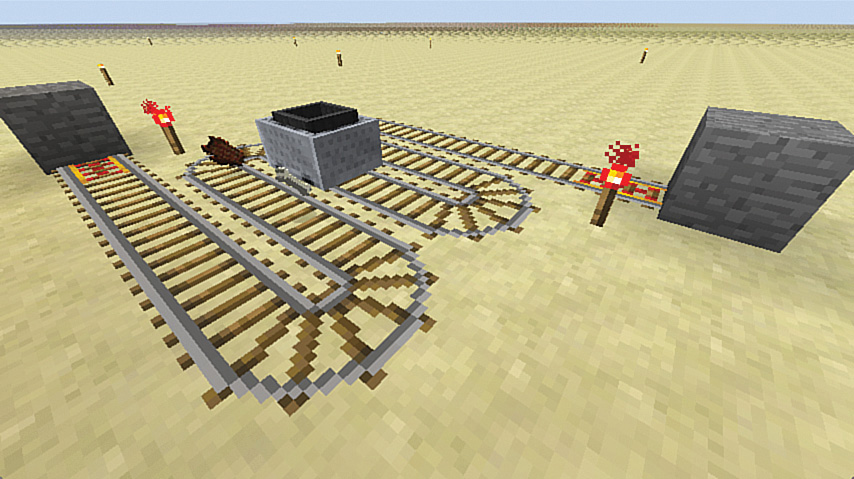
FIGURE 4.8 A single minecart with hopper and a snaking track can replace the hopper grid and is much less costly in resources.
Creating the lava blade requires some careful construction because you are, of course, dealing with lava, and you’ve probably already had that feeling of once burned, twice shy. Figure 4.9 shows the end result perched under the mob farm, but I’ll take you through it step by step, starting at ground level as a proof of concept:
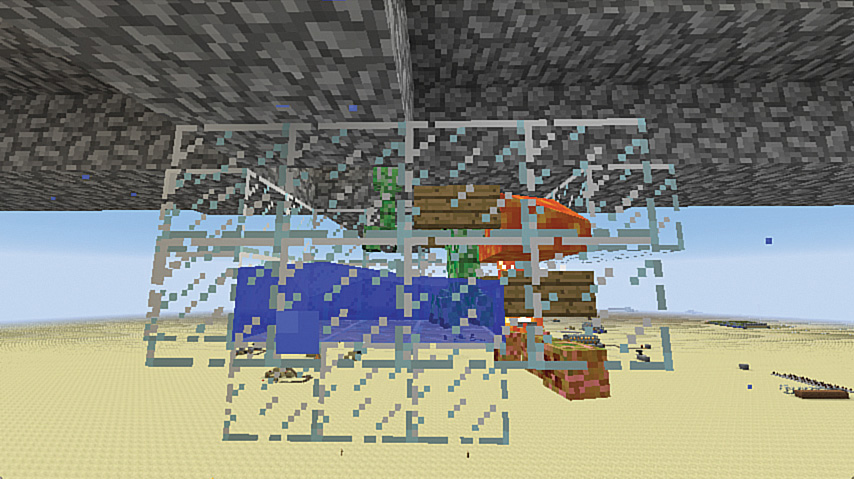
FIGURE 4.9 The lava blade is a simple, effective mob grinder.
1. Start with a two-block-wide water channel, eight blocks long, as shown in Figure 4.10, with walls two blocks high to provide sufficient height for passage of the mobs. In practice, you can get by with a channel not quite so long, but you may find some mobs glitching through, in particular witches whose high health may help them survive the initial lava burn. Position the channel so that the four blocks of water starting at the source are positioned directly under the 2×2 exit from the mob farm.

2. Referring to Figure 4.11, extend the walls of the channel a further four blocks, and place two signs or ladder segments immediately after the water flow ends. These will hold up the lava, creating the “blade” effect. It’s optional to have the second wall block on top of these sign blocks, hence the gap you can see in the walls. The lava needs to be positioned one block higher than the water, so also lay a further six blocks in the base of the lava channel as shown. (Note: I’ve also dug a 2×1 hole two blocks deep beneath the signs and positioned a chest. A couple of hoppers on top can feed all the drops into the chest, showing what will be a very compact version of a collection system.)

FIGURE 4.11 Finish the lava side of the blade design with a raised channel and signs or ladders to hold up the end of the lava flow.
3. Spill two buckets of lava at the far end of the lava channel so they flow toward the middle. You can see the final result in Figure 4.12 and the lava blade in action in Figure 4.13. If you’ve added the chest and hoppers, just dig an access tunnel in from the side to get to the chest’s contents. Test the grinder, if you like, by using spawn eggs from the Creative mode inventory to add mobs to the grinder.
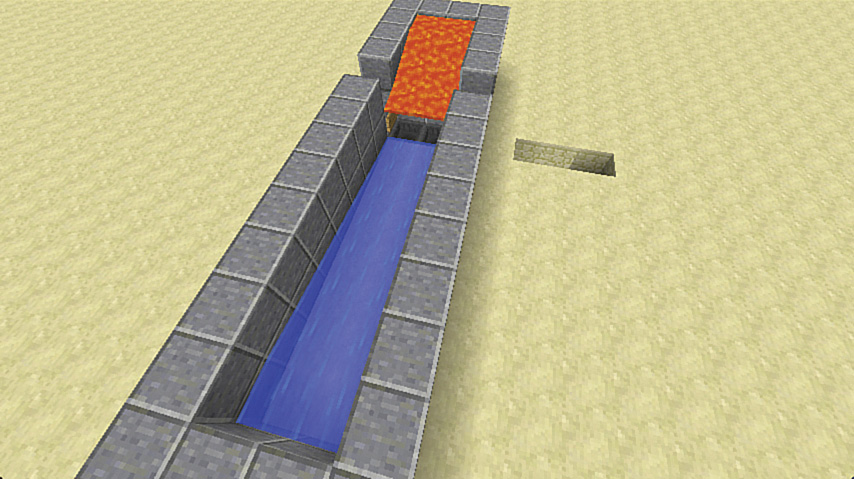
FIGURE 4.12 The final grinder. You may be able to spot the two hoppers at the end of the water channel, under the lava, that will direct any drops into the chest.

This type of lava blade is the most resource efficient, but if you build four more signs, you can also significantly reduce the footprint by cradling the lava between them. Follow these steps to build this design under the mob farm:
1. Start by attaching blocks to the underside of the mob farm in the pattern shown in Figure 4.14. I’m using glass for clarity, but you may prefer to use an opaque block so that the grinder helps prevent light seeping into the mob farm from below. Attach the two signs to the inside walls of the blocks. If you are using an opaque block, you can also use ladders instead of signs. (Attaching the grinder to the mob farm can be tricky in Survival—build a sizable platform underneath that hangs off the original pillar so you can build in safety.)
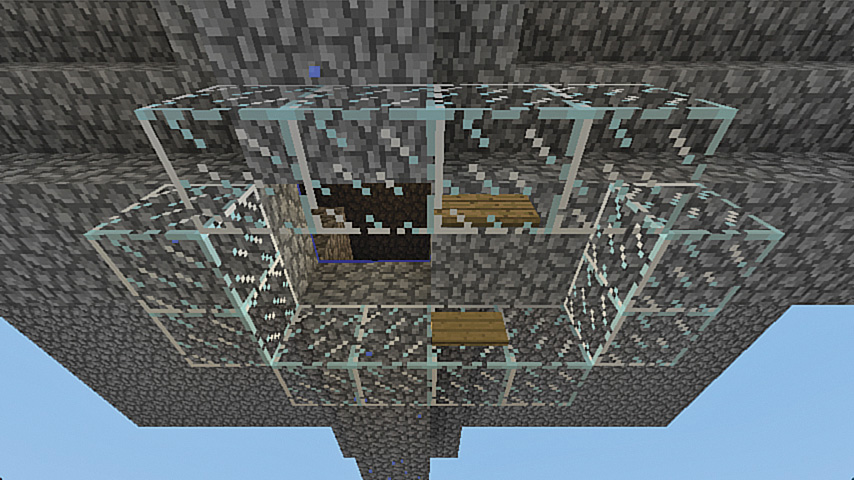
FIGURE 4.14 Adding the first layer of the lava grinder to the bottom of the farm. Don’t forget the signs!
2. Now add a second layer of blocks in the shape of a U, with the opening at the end where the lava will be. Figure 4.15 shows the result.
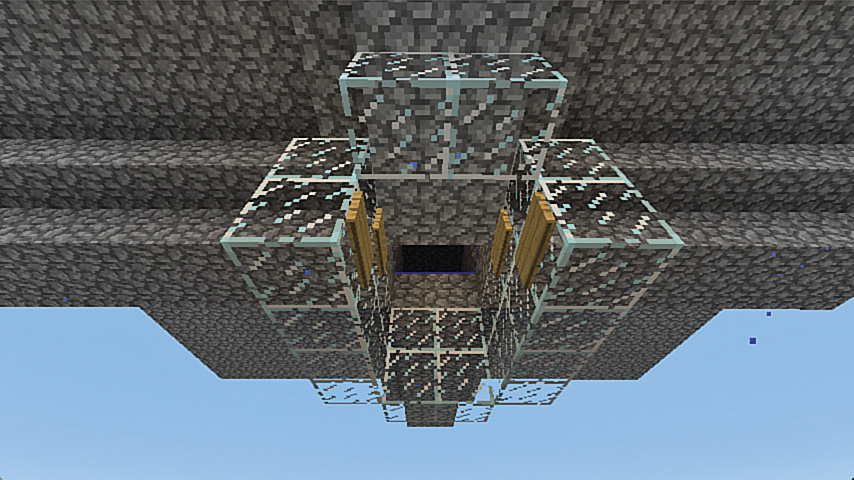
FIGURE 4.15 Completing the initial shape for the mob grinder.
3. Place a further six blocks one level down to fill in the base of the opening, starting under the farm’s outlet and then continuing three blocks until the base has extended under the first of the signs (see Figure 4.16).
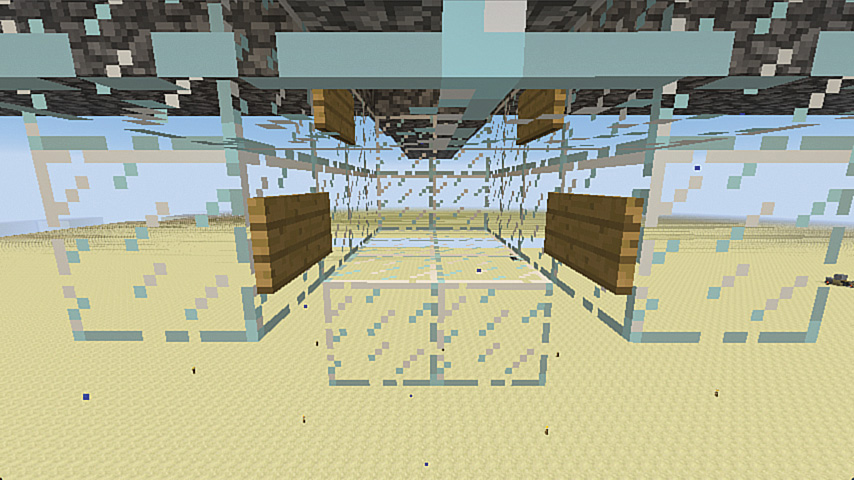
FIGURE 4.16 Create a base for the water flow.
4. Finally, move to the opening between the signs and place two buckets of water against the wall at the far end of the funnel so they originate under the farm’s outlet. Then point your crosshairs at one of the side blocks nestled between the upper and lower signs, back at the lava end, and place a lava source block (see Figure 4.17).
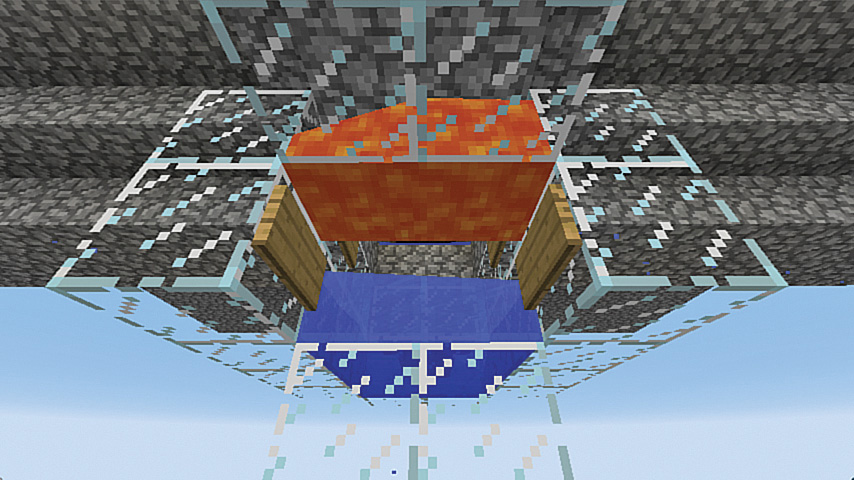
FIGURE 4.17 Pour water at the far end of the tunnel, and lava at the near end, between the signs.
You should now have the same grinder as was shown in Figure 4.9.
Trying to reduce the design even further by, for example, just placing a suspended pool of lava under the grinder outlet through which mobs can drop and catch fire on the way down won’t actually work because they’ll attempt to swim up in lava, causing all their items to also burn. The water moves them toward the lava where they can’t swim up due to the block above their head, but items nonetheless can drop out below.
One final tip: This design, although extremely compact, does have an issue with light from the lava leaking into the mob farm, somewhat reducing its spawn rate. You can solve this by extending the water course, even as far as a full eight blocks, so that the lava is set much further back from the farm’s opening.
Grinding for Experience
Before we leave mob grinders, or at least start to look at them in the context of defensive traps, I want to show you one more technique that provides a safe way to collect experience points. Going back to the hopper layout from earlier, dig out a channel two blocks deep around the hoppers, and place two water sources on either side of the chest. These will flow around the 12-hopper grid and meet on the other side, sweeping any mobs that do survive the drop toward a central point, as shown in Figure 4.18.
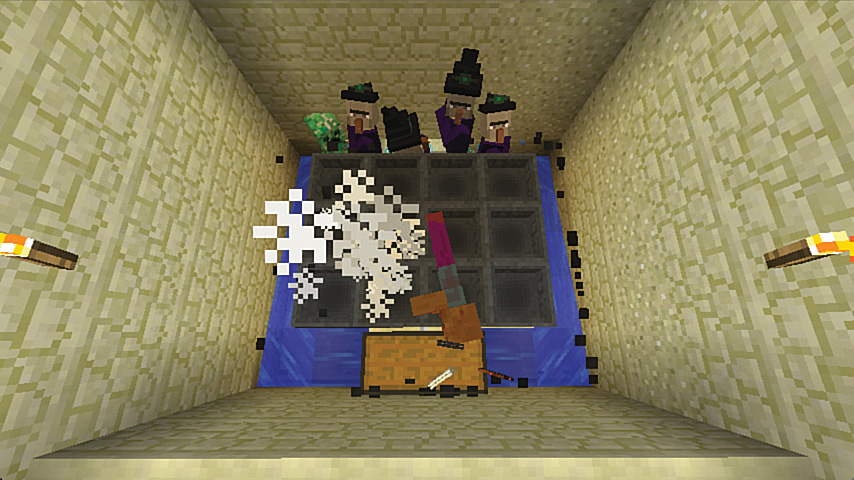
FIGURE 4.18 Add water flows around the hopper to sweep surviving mobs to your knee-knobbling access point.
Dig a single block out of the wall at the level of the water flow. (Or, if you are certain your drop is large enough that spiders can’t survive, make it two wide.) Both streams of water are already at their eight-block limit for flow, so they won’t fill the hole. Now dig an access path from above that leads to that removed block, finishing one block further down. This will allow you to attack any mobs that survive the fall, but they won’t attack you back because you are at the level of their knees, as shown in Figure 4.19. Their drops will also collect in the water stream. You can gather these automatically by adding hoppers under the blocks at the end of the stream, one connected to the other, and then placing a double chest underneath.
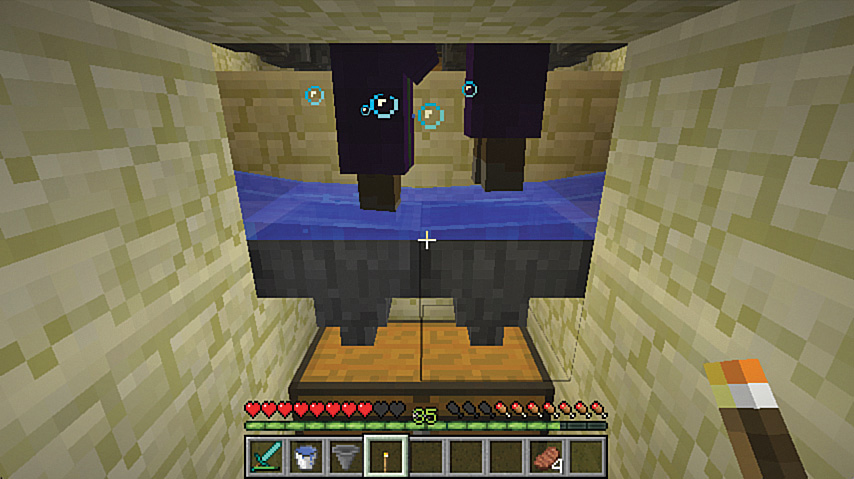
FIGURE 4.19 This is, perhaps, an unfair way to gain experience points, but it certainly is a fast way to go about it.
Caution: Look Out for Chicken Jockeys
The Chicken Jockey, usually a baby zombie riding or baby zombie pigman on the back of a chicken, is a relatively recent addition to Minecraft, first appearing in v1.7. It’s a rare spawn, but adds some danger to a mob farm where falls are used to deliver damage to the mobs. The chicken acts as the baby zombie’s feathered friend, flapping its wings and preventing fall damage. These unusual mobs can also run through a one-block-high space, making them a danger when you’re attacking mobs at leg height. You can ameliorate this by using slabs to create a half-block space through which you will still be able to attack mobs, but be safe from any crazed chickens trying to establish a new pecking order.
Dastardly Mob Traps
There are numerous ways to build mob traps in Minecraft, many with very cunning designs. Indeed, the fall and lava grinders described earlier are two worthy variants. However, think of a mob trap as being a defensive measure typically built up around your base. As with the grinders, they fall into the categories of those that seek to keep your base free of hostiles either by killing them outright or by corralling them somewhere for later killing at your leisure. You can use these other traps as replacement grinders, but they are primarily designed as a defensive measure. In fact, cactus is probably the closest Minecraft gets to a real-world tank trap!
Treacherous Trenches
The humble trench, two blocks deep, acts as one of the simplest mob traps available for creepers, skeletons, and zombies. A flow of water sweeps them down, or a river of lava can burn them up. Build some trenches around the perimeter of your dwelling, making them two blocks wide to also catch spiders, then add a transparent block on the inside top wall to prevent spiders climbing out, and you should be able to go about your business without too much worry. You can add onto this by sweeping them into a lava blade. Build a compact version with a second stream to collect the drops as follows:
1. Dig a perimeter trench at least two blocks deep and two blocks wide, although if you need to spill water more than eight blocks around your perimeter, you will need to ensure the water level drops no more than every seven blocks, so the grinder will end up deeper than that shown in Figure 4.20.
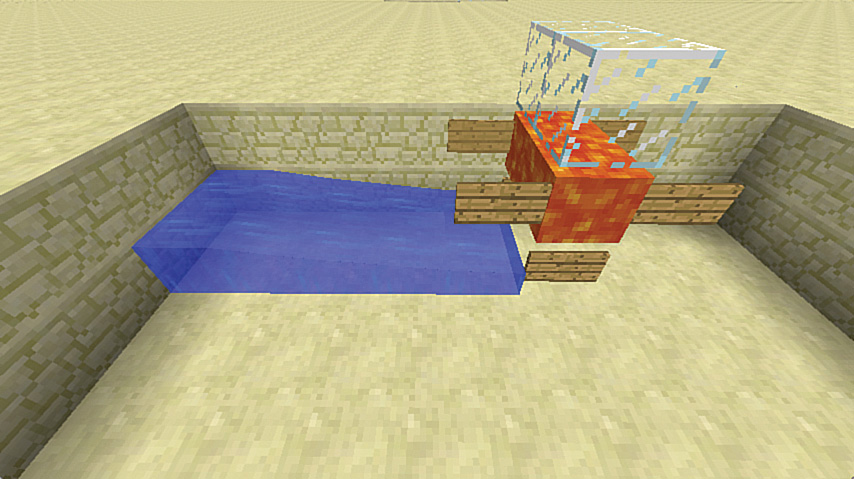
FIGURE 4.20 A short version of the initial watercourse. You can, of course, extend it as far as you need, around corners and so on.
2. Use the same approach as that for the farm, but use a V-shaped layout of signs or ladders to hold the lava in place, positioned one block above the end of the water. You can get by with a single lava bucket, although I’ve used two because I prefer the aesthetics of a still pool of lava rather than one flowing from one position to the next.
3. Position any kind of block on top of the lava to keep the mobs from trying to swim up the lava and thus burning their drops.
4. Now, as shown in Figure 4.21, dig an outlet trench one block below the lowest part of the V and extend it to the right. If you just plan to pick up drops as you go, it can be any length, but you can also collect the drops in hoppers by placing the hoppers below the level of a very truncated stream. You should be able to make out two hoppers under the water in the figure.
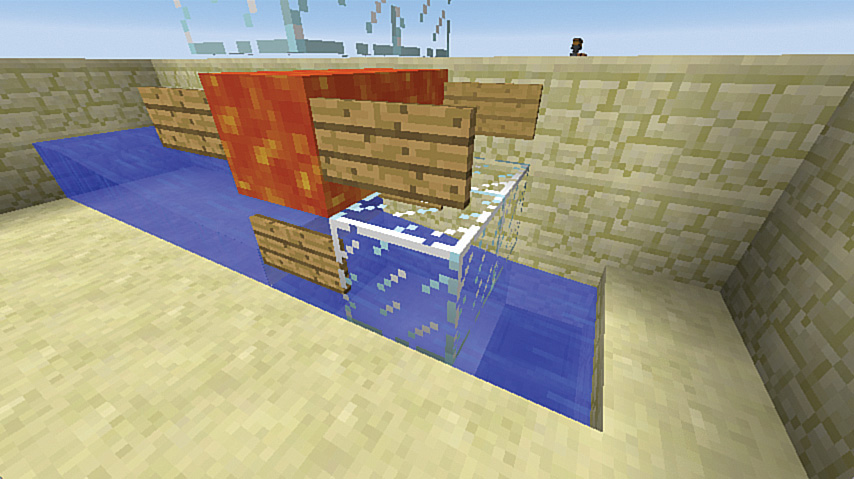
FIGURE 4.21 Although guarding the perimeter is always worthwhile, it makes sense to also collect any drops rather than letting them go to waste.
If lava is in short supply, use water blocks placed in the V pattern, as shown in Figure 4.22, to create a drowning pit. It will take longer for the mobs to expire, but given that an endless supply of water can be created by dropping just two buckets’ worth into the diagonally opposite corners of a 2×2 one-deep hole in the ground, this type of mob trap is incredibly efficient.
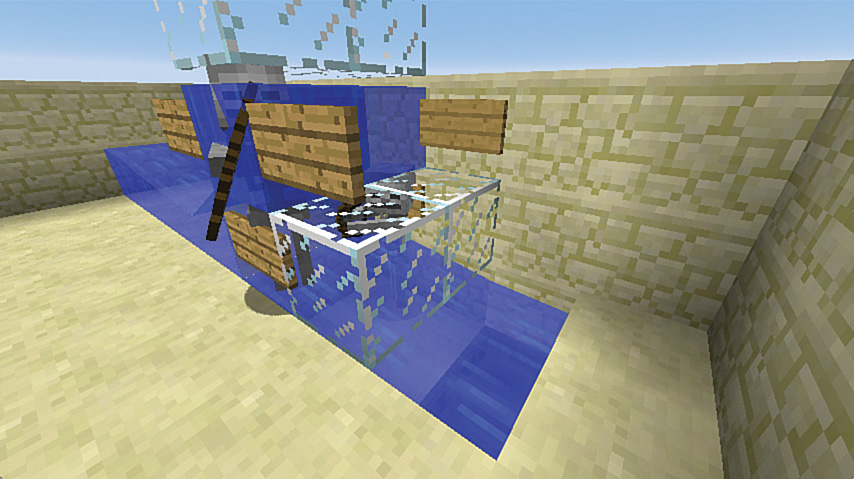
FIGURE 4.22 Save some trips to the lava pool by using water instead. It’s a little more painful on the ears because the mobs take longer to drown, but it’s just as effective in the long run.
Killer Cactus
The cactus is a prickly customer. It’s easy enough to grow, but any mobs or players touch its side immediately suffer half a heart (or one health point) of damage. This makes it one of the easiest-to-use elements in many types of traps. The only downside is that a cactus also destroys some of the items that are dropped, so it’s inefficient as a harvester for mob farms, but works just fine as a defensive strategy. The mob that gets swept into a cactus trap suffers a death of a thousand cuts, and although one wouldn’t wish this on anybody, the cactus does make for a very space-efficient grinder, with the advantage that there are at least some collectibles at the end.
Figure 4.23 shows the most elemental of cactus traps. Any mobs flowing into the water are swept toward the cactus, where they’ll bump up and down. The cactus should be at least two blocks tall to prevent mobs jumping over the top. A hopper in front of the cactus collects their drops, although, as mentioned, some items are destroyed in the process.
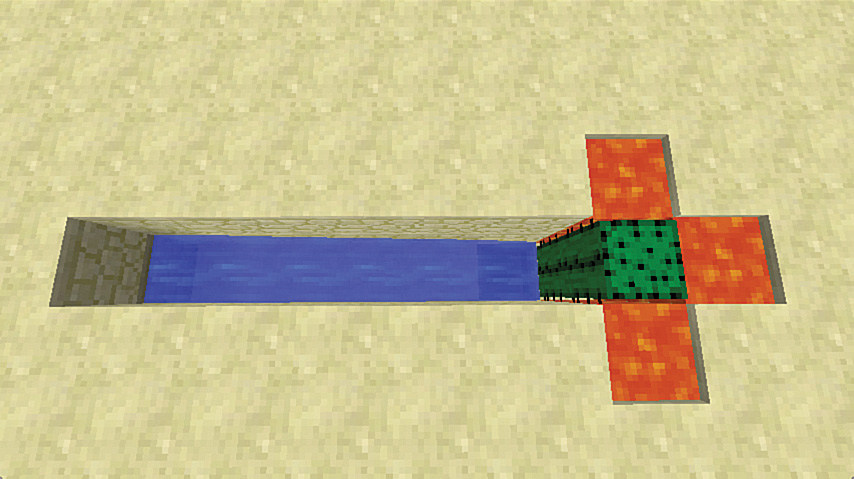
FIGURE 4.23 A basic cactus trap with a hopper to collect drops. Although not required, I’ve backfilled the three spaces around the cactus with lava.
Tip: Pound Sand
A cactus only grows on sand, so ensure you position that before you place the cactus. It also requires a transparent block on all four sides (air, water, or even lava will suffice).
Trapping spiders in a channel two blocks wide requires a minor change. The space requirements for cacti forces them into a diagonal placement, as shown in Figure 4.24.

FIGURE 4.24 A cactus-based spider grinder requires a diagonal pattern.
There are numerous potential designs. A pool 4×4 across, as shown in Figure 4.25, with two cactus in the middle, a couple of hoppers adjacent, and four buckets of lava poured into each corner will sweep any hapless mobs to the center and drop their items into the hoppers. Use feeder streams to feed the mobs into the pool, or just let them fall in from the top.

Switching to the real world, you might consider using the natural fall of terrain to create a lengthier sequence, as shown in Figure 4.26. Any mobs that stumble in are swept inexorably downstream, bouncing off the cactus as they go. This isn’t the most efficient design because mobs that drop in part way down will survive, but it’s a useful example. You could, of course, finish them off with a lava blade or drowner, but you could also run some water down to the drowner without the cactus in place. However, this type of design is useful even without water as a simple, thorny mob trap. The mobs will wander up and down, taking constant hits as they go, and will eventually just keel over. Planting cacti in any type of trench will therefore clear out mobs over time—simple, effective, and deadly.
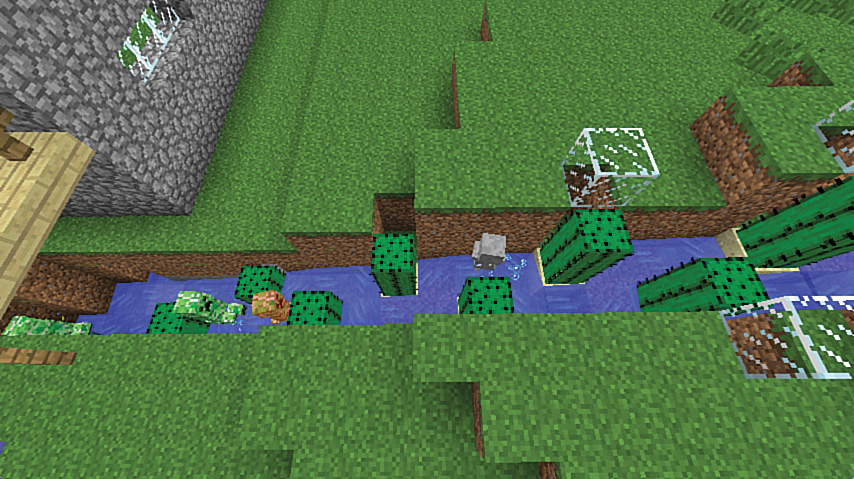
FIGURE 4.26 Using the terrain to flow water down through the trap saves digging a deep trench, and can deliver up item drops at the end.
Tip: Spider Spawners and Cacti
Spider spawners are an occupational hazard to anyone exploring abandoned mineshafts, dungeons, and the like. If you find one, consider partially blocking the entrance to the spawning room with cacti. Place a cactus on either side of the entrance, leaving just a single space between, and the spiders will rough themselves up against the cacti trying to reach you, until they eventually give up their lives and their string. Rig a redstone lamp inside connected to a lever on the outside so you can trip the spawner into a dormant state and collect the string.
Indispensible Dispensers
The dispenser is the highly malleable key component to many types of traps and defensive systems. It’s easy enough to craft, requiring just seven cobblestone blocks, a bow, and one piece of redstone, so making a lot of them probably won’t strain the resource budget. The most difficult part may be collecting the string (three pieces for each dispenser to create each bow), but this can quickly be acquired with a mob farm.
Although dispensers require a redstone pulse to fire, the wiring is quite simple compared to pistons and other devices. Instead of feeding the pulse directly into the dispenser, you can use any pulse running one block nearby to do the trick. This means you can line up a string of dispensers and fire them all at once by running one strand of redstone behind, at the same level as the top of the dispenser.
Note: Deadly Droppers? Not So Much
Droppers have their uses, in particular for quickly delivering items into your inventory. They also are the only tool in Minecraft that can transport items vertically. However, because they drop the item entity itself, the same as when you drop a held item, they are not much good for traps. All you’ll be doing is giving supplies to your enemy.
Dispensers have multiple uses:
![]() Arrows—Load a dispenser with arrows and it will fling a veritable fusillade with an almost 100% success rate if the mob is within one to five blocks. Unlike arrows fired by skeletons, you can pick up any arrows that miss their mark and hit the ground or embed themselves in other blocks, the same way you can pick up arrows you’ve fired yourself. However, you do need to pick them up yourself. You can’t, for example, flush them down to a collection point using water. Shoot the arrows through a block of lava to turn them into flaming arrows that will set mobs on fire, causing even more damage.
Arrows—Load a dispenser with arrows and it will fling a veritable fusillade with an almost 100% success rate if the mob is within one to five blocks. Unlike arrows fired by skeletons, you can pick up any arrows that miss their mark and hit the ground or embed themselves in other blocks, the same way you can pick up arrows you’ve fired yourself. However, you do need to pick them up yourself. You can’t, for example, flush them down to a collection point using water. Shoot the arrows through a block of lava to turn them into flaming arrows that will set mobs on fire, causing even more damage.
Take a look at Figure 4.27. The pressure plates are crafted from stone—don’t use wood because the fired arrows will force the plates on continuously—and create a redstone current while the mob is alive. The clock circuit to the right keeps a continuous pulse running that hits the other side of the AND gate so that when the pressure plates are fired, a pulse flows to the dispenser, which shoots arrows through the suspended lava. Allow the lava to flow into a one-block hole below the level of the pressure plates so it doesn’t spread down the tunnel. The stone button beside the clock circuit kicks off the first pulse and can be removed later.

FIGURE 4.27 An automatic flaming arrow dispenser. (Front wall of tunnel removed for clarity.)
You can improve on this design by also adding a piston to the entryway of the corridor to block it off until the mobs have passed on. This will ensure the knock back from the arrows doesn’t simply push them back out of harm’s way.
![]() Water and lava—Create a cascade of water, or burning hot lava, by placing the appropriate buckets inside the dispenser. As you probably know from Chapter 2, “Automated Produce Farms,” dispensers place the liquid’s source block in front of their outlet on their first trigger and then suck that source block back in again on the second trigger. The water or lava follows all the usual rules regarding flow.
Water and lava—Create a cascade of water, or burning hot lava, by placing the appropriate buckets inside the dispenser. As you probably know from Chapter 2, “Automated Produce Farms,” dispensers place the liquid’s source block in front of their outlet on their first trigger and then suck that source block back in again on the second trigger. The water or lava follows all the usual rules regarding flow.
![]() Fireballs—Firing a string of sizzling fireballs is a little extreme in Survival mode because they’re quite expensive to make, but if you have the gun powder, blaze powder from defeated Blaze mobs, coal or charcoal, and the inclination, you can load a dispenser with a stack of fire charges and let fly. Interestingly, fire charges, like arrows, can be fired off just as successfully from a dispenser located under or behind water.
Fireballs—Firing a string of sizzling fireballs is a little extreme in Survival mode because they’re quite expensive to make, but if you have the gun powder, blaze powder from defeated Blaze mobs, coal or charcoal, and the inclination, you can load a dispenser with a stack of fire charges and let fly. Interestingly, fire charges, like arrows, can be fired off just as successfully from a dispenser located under or behind water.
![]() Spawn eggs—If you are creating an adventure map, or in any other way using Creative mode, you can place mob spawn eggs in a dispenser and produce any of Minecraft’s mobs on demand. Want a player to trigger a wave of zombie attacks? No problem. Hit them with zombies, spiders, skeletons, ghasts, and so on.
Spawn eggs—If you are creating an adventure map, or in any other way using Creative mode, you can place mob spawn eggs in a dispenser and produce any of Minecraft’s mobs on demand. Want a player to trigger a wave of zombie attacks? No problem. Hit them with zombies, spiders, skeletons, ghasts, and so on.
![]() Wall of flame—I’m going to call this one “the toasty toes,” and it’s one of my favorite traps (see Figure 4.28). Place a flint and steel in an upward-facing dispenser and a pressure plate on an adjacent block, and the dispenser will shoot out flame, setting anything on top on fire. Remember to not use wooden fences near these traps because the fences will also go up in smoke, leaving you wide open. Stick to stone, although fence gates are, fortunately, fireproof. Flint and steel have a durability of 65 uses, so you may need to put several in each dispenser to ensure the longevity of this defense. Just remember to jump over the plate when you’re coming back in—or create a single lane path between two dispensers; in almost all cases the mobs will still hit the plates as they wander around. If the worst happens on ingress and you do catch on fire, jump into a pool of water such as that shown in Figure 4.28 to instantly quell the flames.
Wall of flame—I’m going to call this one “the toasty toes,” and it’s one of my favorite traps (see Figure 4.28). Place a flint and steel in an upward-facing dispenser and a pressure plate on an adjacent block, and the dispenser will shoot out flame, setting anything on top on fire. Remember to not use wooden fences near these traps because the fences will also go up in smoke, leaving you wide open. Stick to stone, although fence gates are, fortunately, fireproof. Flint and steel have a durability of 65 uses, so you may need to put several in each dispenser to ensure the longevity of this defense. Just remember to jump over the plate when you’re coming back in—or create a single lane path between two dispensers; in almost all cases the mobs will still hit the plates as they wander around. If the worst happens on ingress and you do catch on fire, jump into a pool of water such as that shown in Figure 4.28 to instantly quell the flames.
FIGURE 4.28 Overkill? Nah! Use upturned dispensers kitted out with flint, steel, and pressure plates to create the ultimate mob barbecue.
Dispensers emit a redstone signal through a comparator that reflects their inventory status. You could use this to automatically resupply them if they’re running low on their projectiles. However, it is easier to just place a funnel on top of the dispenser with a chest above that. To successfully resupply a line of dispensers, you’ll need to alternate the types of chests used so two singles don’t combine into a single large double that feeds just the one hopper. Switch between standard and trapped chests to achieve the result shown in Figure 4.29.

FIGURE 4.29 Alternate standard and trapped chests to create a massive stockpile of missiles on top of a line of justice-dealing dispensers.
Tip: Trapped Chests
Trapped chests provide something of a unique opportunity for creating traps that will fool other players—or, at least, noobs. They are almost indistinguishable from ordinary chests, except for a faint red tinge to the pattern that surrounds the latch. Placing a sign on the front with a suitably enticing message such as “Help yourself!” all but hides that from a furtively foraging adventurer. The chest emits a low redstone signal when open, so you’ll almost certainly need to place a repeater against the back or sides of the chest to amplify that for travel of any distance, but that single-strength signal just happens to be, by fortuitous design, sufficient to explode a block of TNT placed directly behind.
Pulverizing Pistons
There’s one other quite useful way to process errant mobs, both hostiles (except spiders) and players: the piston suffocation system. It’s quite easy to make, and quick to complete its task. Figure 4.30 shows an example where, as we’ve done before, mobs are pushed down to the pressure plate by the water. The redstone torches act as an amplifier, providing a circuit that requires minimal space and resources, firing the piston as soon as the mob triggers the pressure plate. The glass block prevents the mob escaping forward so that it is held in position until it dies and its items drop.

FIGURE 4.30 A basic mob suffocation system using pistons and a pressure plate.
The only issue with this design is that it lacks a collection system for the item drops. They’ll sit on the pressure plate until they despawn or you stop by to pick them up. We can, however, improve on this. Figure 4.31 shows a modified design, this time with a hopper positioned where you’d expect—at the same level as the end of the water flow—and a pressure plate placed on top. You can do this by Shift-clicking the hopper as you place the plate. (As an aside, it’s possible to put all the other partial-height redstone items on top of hoppers: Plates, torches, repeaters, comparators, and daylight detectors all allow items to fall through to the hopper.)
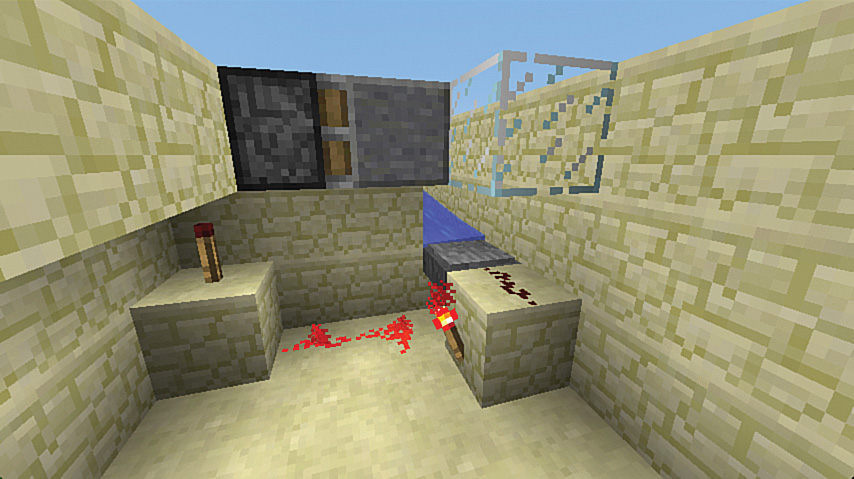
A slight change to the wiring is required to detect the output of the pressure plate from an adjacent block, and space constraints require it to be set in front, with the output running back and into the torch under the block behind the piston. However, other than that, this improvement needs little more in the way of resources than the iron and chest required for the hopper.
One final note: Tripwire is an excellent way to trigger pistons, but like wooden pressure plates, it fires with both mobs and dropped items, so it requires a manual override to retract the pistons and permit collection of the drops. The easiest way to do this is with an AND gate (something I covered in Chapter 2), but this time using a lever in place of one of the redstone torches that acts as the override. Figure 4.32 shows an example. There is one glaring issue with the piston design: It’s impossible to crush mobs that are one block tall because any piston placed on the same level as the tripwire or pressure plates will scrape those triggers off as it pushes forward.
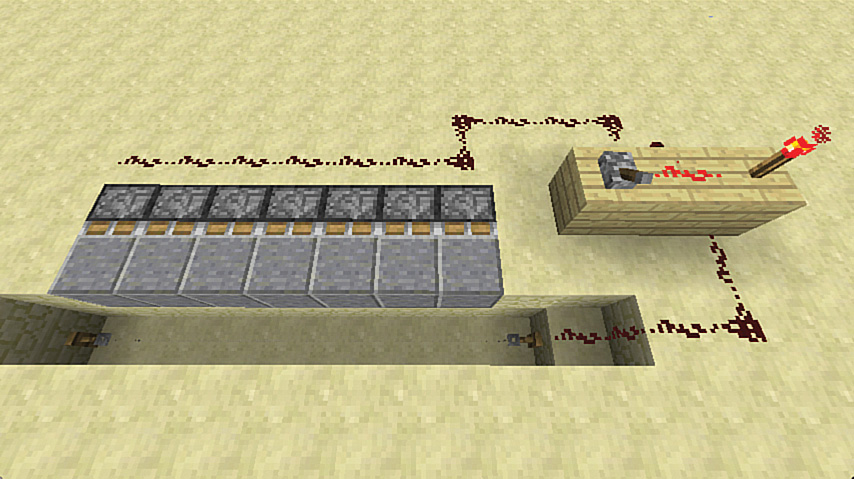
FIGURE 4.32 A tripwire and piston design using an AND gate to forcibly retract the pistons, providing access to any dropped items.
The Bottom Line
In this chapter I’ve provided an overview of mob farms and various types of grinders and traps. As fits the ethos of Minecraft, there is no singular or best way to create any of these. In many cases you’ll need to modify the designs to suit your own needs, and there are also numerous ways to combine, improve, and in other ways meld these to your specific requirements...or devious plans—and that is something I highly encourage.
Speaking of which, when planning a mob farm, remember to explore the area under and around the farm and light up any caves. It won’t suffice to simply block them off. A deep ocean biome makes this easier because, whereas the ground beneath the ocean’s floor can be as riddled with caves as anywhere else, there are no spawning areas within the parts actually filled with the wet stuff. In any case, filling in surrounding dark areas will always increase your farm’s spawning rate. However, mobs only spawn within a square area of 15×15 chunks, or 240 blocks per side, centered on the player, so you must stay fairly close to your farm for it to churn out mobs. On the other hand, mobs won’t spawn at any location that is closer than 24 blocks in spherical distance from any player, so keep a polite distance to allow them to go about their spawning in private. If you have more than one Minecraft license and a spare PC, you could share a game on a LAN and position one player next to the farm to keep things ticking along while you do other things, and the same goes for when you’re playing on other servers. Alternatively, install a mod such as Chicken Chunks that can keep chunks active at all times, no matter your own location. You can download it from http://www.chickenbones.craftsaddle.org/Pages/links.html.
Using mob farms and grinders is the single best way to gather enormous amounts of useful resources, so do delve in. You’ll find them to be a constant reward.