
7. Empire Building with BuildCraft
In This Chapter
![]() Create an automated sorter with pipes.
Create an automated sorter with pipes.
![]() Use engines to create a power system.
Use engines to create a power system.
![]() Dig huge automated quarries to gather numerous resources.
Dig huge automated quarries to gather numerous resources.
![]() Use pumps to shift liquid assets.
Use pumps to shift liquid assets.
![]() Refine oil into fuel to produce even more power.
Refine oil into fuel to produce even more power.
![]() Save and re-create structures using blueprints automatically.
Save and re-create structures using blueprints automatically.
BuildCraft adds numerous features to Minecraft. You can use it to create automated mining machines, transport fluids and blocks through pipes, control the pipes and associated engines with logic blocks that respond to a variety of events, and then perform a specific action. It vastly simplifies item sorting, can store structures as blueprints and replicate on demand, automatically craft items, and a whole lot more.
BuildCraft Core Concepts
The BuildCraft mod is available from http://www.mod-buildcraft.com/download/ (http://goo.gl/26jvFU). It requires Forge, and both are installed in the usual way (see Chapter 1, “Getting Started”), and at this writing has been updated to work with Minecraft v1.7.10, but check the download page regularly to find later versions.
As with all well-designed mods, you can craft from scratch every item in BuildCraft when playing on Survival. The items also appear under additional tabs in the Creative inventory and work perfectly well with the Not Enough Items (NEI) mod so you can easily discover each item’s crafting recipe, although you can also find those and more information on the BuildCraft Wiki at http://goo.gl/WEFz4S.
BuildCraft is composed of several key sections, a few of which are shown in Figure 7.1:
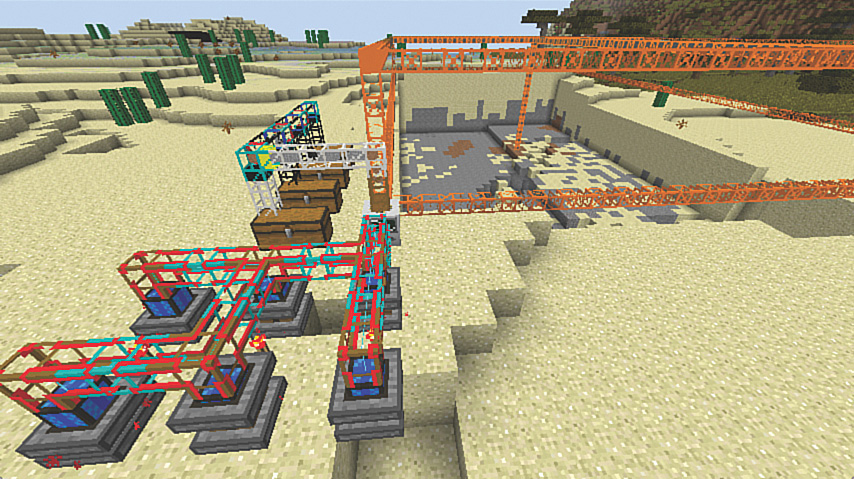
FIGURE 7.1 An automated BuildCraft quarry with engines and a sorting system.
![]() Block and Fluid Transport—Like in Project:Red (see Chapter 6, “More Power to You”), transport refers to moving objects between various inventories, tanks, and machines using pipes. See the section “Pipe Dreams” for more on this.
Block and Fluid Transport—Like in Project:Red (see Chapter 6, “More Power to You”), transport refers to moving objects between various inventories, tanks, and machines using pipes. See the section “Pipe Dreams” for more on this.
![]() Engines and Energy—BuildCraft uses engines to power pipes, factories, and other objects. There are three types of engine with varying fuel and cooling requirements, and different levels of energy output. Managing the energy produced from the two more powerful engines is an important part of the design of any automation system because failing to do so can result in a catastrophic explosion. Fortunately, energy management can be automated using BuildCraft’s logic gates.
Engines and Energy—BuildCraft uses engines to power pipes, factories, and other objects. There are three types of engine with varying fuel and cooling requirements, and different levels of energy output. Managing the energy produced from the two more powerful engines is an important part of the design of any automation system because failing to do so can result in a catastrophic explosion. Fortunately, energy management can be automated using BuildCraft’s logic gates.
![]() Factories—Think of factories as automated objects. They include crafting machines and mineral extraction via powered quarries and mining wells.
Factories—Think of factories as automated objects. They include crafting machines and mineral extraction via powered quarries and mining wells.
![]() Oil and Fluid Extraction—BuildCraft includes pumps that can extract lava, water, and oil from the landscape. You wouldn’t have seen oil previously. It’s a new type of fluid added to worlds generated with BuildCraft installed. The oil appears as pools on the ground and in the ocean, and also as oil springs that spurt high into the air.
Oil and Fluid Extraction—BuildCraft includes pumps that can extract lava, water, and oil from the landscape. You wouldn’t have seen oil previously. It’s a new type of fluid added to worlds generated with BuildCraft installed. The oil appears as pools on the ground and in the ocean, and also as oil springs that spurt high into the air.
![]() Automated Construction—Copy any set of blocks and convert them into a blueprint that can be reused over and over, and even shared with other players on the same server, sent via email, and so on. The mod also includes a builder system that can create 3D primitives such as pyramids, cylinders, hollow cubes, and other structures, or quickly flatten areas so you don’t need to remove blocks by hand.
Automated Construction—Copy any set of blocks and convert them into a blueprint that can be reused over and over, and even shared with other players on the same server, sent via email, and so on. The mod also includes a builder system that can create 3D primitives such as pyramids, cylinders, hollow cubes, and other structures, or quickly flatten areas so you don’t need to remove blocks by hand.
In addition, BuildCraft is undergoing constant development. New features in development and incremental releases add functionality such as a variety of robots that can fight mobs, plant and harvest farms, and produce passive mobs and trees.
There’s a lot in this mod: It’s one of the most complete mods available for Minecraft. Let’s start with some basic concepts and turn them into working machines.
Pipe Dreams
Much of BuildCraft is based on the idea of moving items, fluids, or energy through pipes, and then doing something useful with those resources at the other end.
Remember the rather complicated item sorting system from Chapter 6? Let’s take a look at how incredibly easy it is to replicate this functionality in BuildCraft. As with many of the other chapters, I recommend you try this in Creative mode and then build what you learn into a game played on Survival.
Follow these steps to create an item sorter:
1. Start by placing two chests three blocks apart (see Figure 7.2). Use the first to store the items you want sorted, and the second to receive them.

FIGURE 7.2 Creating the first BuildCraft transport pipe to shift objects from the chest on the left to the one on the right.
2. Open the Creative inventory (press E) and switch to the Buildcraft Pipes tab on Page 2 of the inventory menu.
3. Select the first item, Wooden Transport Pipe: Extraction Pipe. Also collect a Cobblestone Transport Pipe.
4. Switch to the Buildcraft Blocks tab and get a Redstone Engine.
5. Pick up a wrench from the Buildcraft Items tab. The wrench is used to change the orientation of engines if they don’t place the way you intended.
6. Pull a redstone lever from the inventory’s redstone tab.
7. Collect a few other items to place in the chest. I’m going to use a full stack (64 blocks) of sand and a full stack of cobblestone. You can collect a stack by holding down the Shift key as you click the item. Place the stacks in the leftmost chest.
8. Place the wooden transport pipe on the block to the right of the leftmost chest. The pipe will connect automatically to the chest. Wooden pipes are a unique type of pipe that, when powered, can extract items from a block’s inventory. However, they cannot connect to other wooden pipes, hence the need for the cobblestone pipe.
9. Place the cobblestone transport pipe in the block between the wooden pipe and the rightmost chest. It will connect to the wooden pipe and also to the chest. Cobblestone, like some of the other pipes, is used to transport items over long distances. It’s the slowest of the lot, but also the easiest to make on Survival. These pipes can place items directly into a block’s inventory, so you’ll see it attach directly to the chest using a slightly different texture from the wooden pipe.
10. Place the redstone engine on the block behind the wooden pipe. You’ll notice it orient itself correctly so that it directly faces the pipe. Engines always exhibit this behavior, although if there are multiple locations where the engine can attach, you may need to use the wrench to twist the engine around until it faces the correct pipe or device.
11. Place the redstone lever on the ground beside the engine, or attach it directly to the engine’s back panel. Redstone engines are the least powerful of the three in BuildCraft, but also the easiest to use. However, they can generally only be used to power pipes and other very low-energy tasks.
12. Pull the lever to switch on the engine, and you’ll start to see a stream of the blocks from the supply chest on the left move along the pipe into the second chest on the right.
Stop the lever after a few items have transferred and manually transfer the items from the second chest back to the first.
It’s time to get things sorted! We’ll do that with another type of pipe. Follow these steps while referring to Figure 7.3:
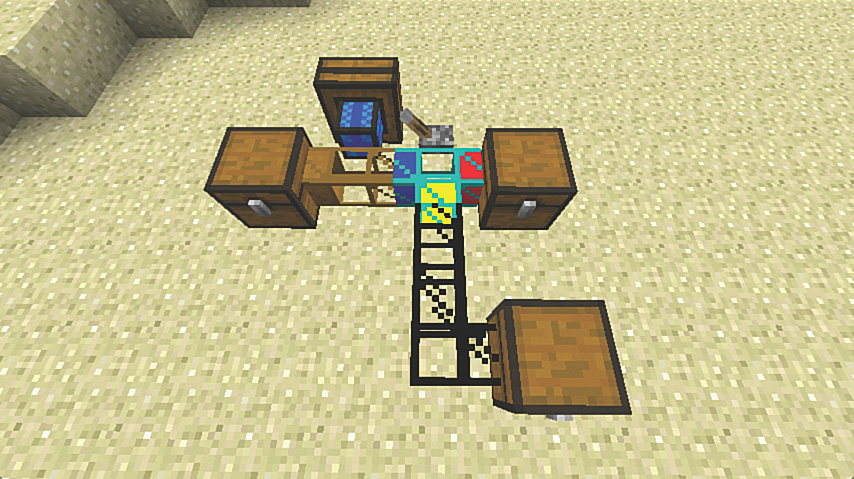
FIGURE 7.3 Pipes connect automatically, like redstone circuits, and some can implement a full range of logic control to the items passing through.
1. Add another chest in front of the second, with a space between so they don’t convert into a single large chest.
2. Run a loop of cobblestone pipe out the front of the first piece to the new chest, as shown in the figure. The T-junction and pipe elbow are added automatically.
3. Pick up a Diamond Transport Pipe from the inventory and remove the T-junction of the first pipe. Attach a piece of the diamond pipe in its place.
Diamond pipes act as sorters. When placed at a junction, they appear with different colored indicators for each of the six possible connections (left, right, top, bottom, front, and back). In Figure 7.3 you can see blue used for the pipe coming in from the supply chest, red for the one going into the chest to its right, and yellow for the branch leading to the new chest.
4. Grab any item besides a pipe and right-click the diamond T-junction to open the pipe’s configuration window, shown in Figure 7.4, and place a block from your inventory on the appropriate color. I’ve chosen to send sand to the second chest and cobblestone to the third.

FIGURE 7.4 Place the filter blocks onto the colors corresponding with the directions shown on the diamond T-junction.
Tip: Filter Fixes
Pipes configured into a T-junction will send objects down both paths, even when a filter such as the diamond pipe has been used. Remember to set a specific filter on each outlet of a diamond pipe to block the flow of unwanted items.
5. Restock the supply chest with sand and cobblestone and pull the lever to restart the pipe. You should see the items hit the sorter and flow in the correct direction toward their respective chests.
It’s easy to expand this sorting system and to use it instead of the automatic sorter described in Chapter 6. Figure 7.5 shows one example.
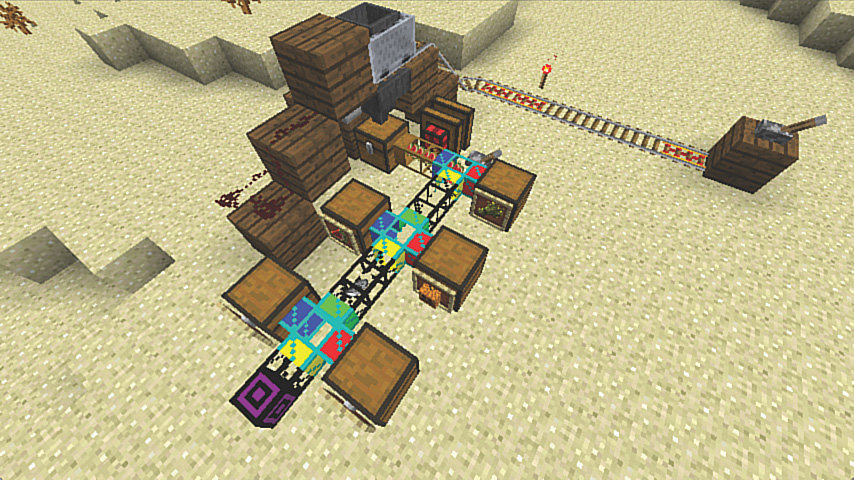
FIGURE 7.5 Automated produce sorter. The purple pipe at the end is a void pipe that will destroy any extraneous items that aren’t shuffled into the other chests.
BuildCraft provides a number of special-purpose pipes that can do everything but fold your laundry:
![]() Void pipe—As shown in Figure 7.5, this pipe destroys any items passed toward it.
Void pipe—As shown in Figure 7.5, this pipe destroys any items passed toward it.
![]() Emerald pipe—Similar to the wooden pipe, it can pull items from an object’s inventory; however, it also contains a filter system with nine positions. By default, the pipe will only pull items included in the filter, but it can also be set to an excluding mode using the middle filter setting to pull all items except those in the filter, and it can also be set to a round-robin mode where one of each item shown in the filter is pulled in turn, stopping when any particular item runs out. This is a useful way to send a batch of items to a crafting table (see Figure 7.6).
Emerald pipe—Similar to the wooden pipe, it can pull items from an object’s inventory; however, it also contains a filter system with nine positions. By default, the pipe will only pull items included in the filter, but it can also be set to an excluding mode using the middle filter setting to pull all items except those in the filter, and it can also be set to a round-robin mode where one of each item shown in the filter is pulled in turn, stopping when any particular item runs out. This is a useful way to send a batch of items to a crafting table (see Figure 7.6).

FIGURE 7.6 The emerald pipe’s filter set to round-robin mode will supply each item placed in the filter in turn until one of the resources runs out. In this case, it’s supplying sets of three cobblestone and two sticks for crafting a pickaxe.
![]() Stripes pipe—This pipe is very unusual. When powered, the end of the pipe will pick up any block placed in front of it. Figure 7.7 shows how this can be used to vacuum up the cobblestone created in a cobblestone generator and then feed the blocks through a cobblestone pipe directly into a chest. When unpowered it will either place or use items. For example, it will place torches, levers, or even plant seeds. Send a pickaxe through and it will break the block in front. A hoe will turn a grass block into tilled dirt ready for planting. This opens up some interesting ideas for creating automated farms. Finally, sending a regular piece of transport pipe through lengthens the pipe to which the stripes pipe is attached, although because there is no way to also reduce the length of the pipe, this has somewhat limited potential.
Stripes pipe—This pipe is very unusual. When powered, the end of the pipe will pick up any block placed in front of it. Figure 7.7 shows how this can be used to vacuum up the cobblestone created in a cobblestone generator and then feed the blocks through a cobblestone pipe directly into a chest. When unpowered it will either place or use items. For example, it will place torches, levers, or even plant seeds. Send a pickaxe through and it will break the block in front. A hoe will turn a grass block into tilled dirt ready for planting. This opens up some interesting ideas for creating automated farms. Finally, sending a regular piece of transport pipe through lengthens the pipe to which the stripes pipe is attached, although because there is no way to also reduce the length of the pipe, this has somewhat limited potential.
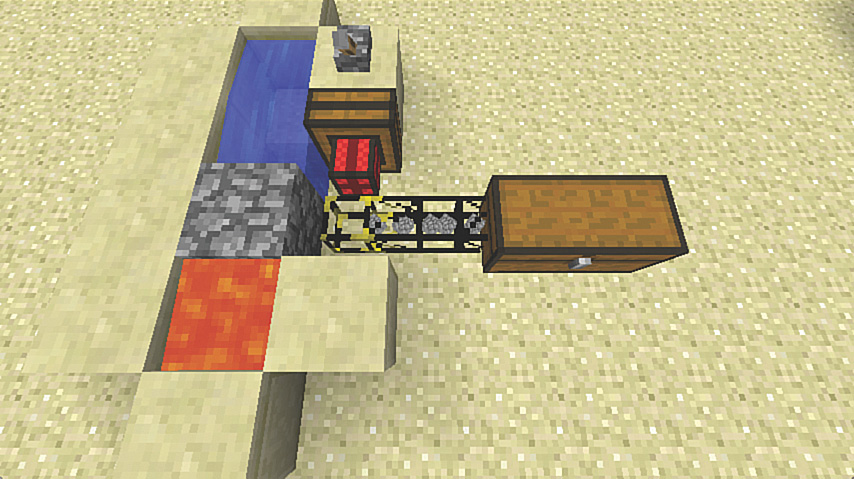
FIGURE 7.7 The stripes pipe will suck up blocks such as those created in this cobblestone generator.
![]() Obsidian pipe—These pipes, shown in Figure 7.8, suck up any loose items in front. Powering them with an engine increases the area’s effect. Use these instead of hoppers to funnel drops from a mob farm into a chest, and to pick up harvested produce.
Obsidian pipe—These pipes, shown in Figure 7.8, suck up any loose items in front. Powering them with an engine increases the area’s effect. Use these instead of hoppers to funnel drops from a mob farm into a chest, and to pick up harvested produce.

FIGURE 7.8 Obsidian pipes make it easy to collect item drops such as the wheat flowing down this stream.
There are also additional pipes for more complex transportation tasks, including the Emzuli pipe, which is used in conjunction with logic gates to paint items passing through for later routing.
Those are the basic concepts behind transportation pipes. Later on I take you on a tour of those that are used to transport fluids and power; you’ll need to route water to the combustion engine to keep it cool, and also provide fuel.
Engines
As I mentioned earlier, BuildCraft has three basic types of engine, as well as a fourth that can be useful when playing in Creative mode:
![]() Redstone engine—This is the simplest type of engine. As you’ve already seen, powering a redstone engine requires nothing more than a redstone torch. However, the power output is so low at 0.5 MJ/t that it isn’t useful for doing much at all except extracting objects from an inventory via the wooden extraction pipe.
Redstone engine—This is the simplest type of engine. As you’ve already seen, powering a redstone engine requires nothing more than a redstone torch. However, the power output is so low at 0.5 MJ/t that it isn’t useful for doing much at all except extracting objects from an inventory via the wooden extraction pipe.
![]() Stirling engine—This engine relies on a fuel source such as coal, charcoal, wood, sticks, or buckets of lava. It produces 1 MJ/t, sufficient for power mining wells and quarries.
Stirling engine—This engine relies on a fuel source such as coal, charcoal, wood, sticks, or buckets of lava. It produces 1 MJ/t, sufficient for power mining wells and quarries.
![]() Combustion engine—The combustion engine relies on oil (producing 3 MJ/t) or oil refined into fuel (producing 6 MJ/t).
Combustion engine—The combustion engine relies on oil (producing 3 MJ/t) or oil refined into fuel (producing 6 MJ/t).
![]() Creative engine—There is one other type of engine, the Creative engine, so called because it is available only in Creative mode. It makes it easy to provide varying amounts of power to devices and systems. Just right-click it with a spanner while holding down the Shift key to increase the power output.
Creative engine—There is one other type of engine, the Creative engine, so called because it is available only in Creative mode. It makes it easy to provide varying amounts of power to devices and systems. Just right-click it with a spanner while holding down the Shift key to increase the power output.
Note: Energy
BuildCraft has, at its core, a concept of power similar to the redstone system but with substantially more finesse. Engines provide power, measured in Minecraft Joules per tick (MJ/t). Machines consume power at varying rates. Engines also store power in an internal buffer, and all except the redstone engine can transfer power to other systems via kinesis pipes.
Engines connect directly to various BuildCraft machines, and also to each other to boost the total power produced. However, due to a certain amount of energy loss suffered when doing so, chaining is only effective when using stirling and combustion engines.
Stirling and combustion engines also pose a risk of explosion (a significant one that can take out a large section of construction) if not correctly managed. Both must have some sort of work to do that will drain the energy they are producing; otherwise, they will overheat and explode. The combustion engine also requires water for cooling, or the same thing can happen.
Because engines require substantial resources to build and manage on Survival, it’s a good idea to set them up as a small power station and then use kinesis pipes to distribute the energy where required. Let’s do that now.
Creating a Power Station
Power stations are used to deliver energy to machines from a centralized source.
Given that some machines, such as the quarry (discussed later), can use the power from nine combustion engines—and it takes care to set up and manage each combustion engine to prevent explosions—a single centralized power station makes sense.
Follow these steps to start creating your own. We’ll start with the stirling engine and then create a more advanced design for combustion engines:
1. Place two rows of three stirling engines, as shown in Figure 7.9. This will provide up to 6 MJ/t of energy.

FIGURE 7.9 Stirling engines are twice as powerful as the redstone engine, providing 1 MJ/t of energy.
2. Run a row of blocks between the engines with redstone dust on top and a lever at one end, as shown in Figure 7.10. All of the BuildCraft engines only operate when they receive a redstone signal, so this lever will become the station’s master switch.
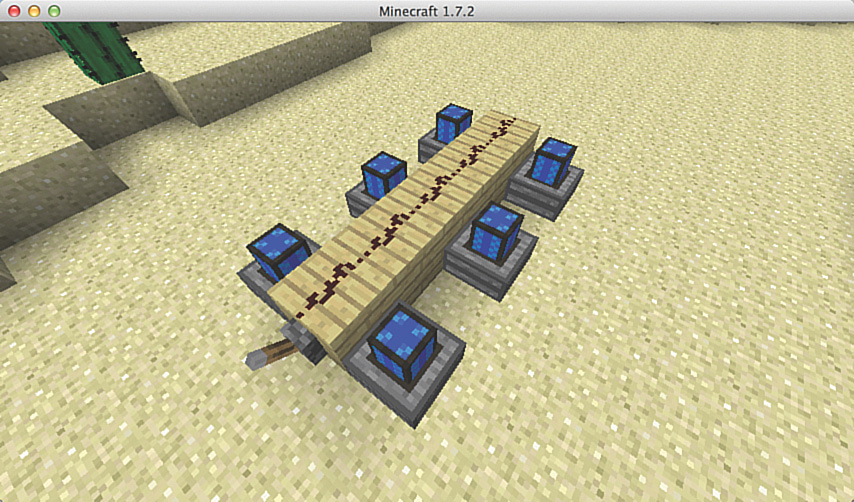
FIGURE 7.10 It’s important to deliver a redstone signal to each engine. Using a lever provides a master switch, but you could also use a signal from some other component in your design that requests energy only when required.
3. Energy is extracted from engines with the wooden kinesis pipe. Select this from the inventory and right-click to place a single section on top of each engine. You’ll notice from the tooltip in the inventory that each pipe section can handle a total energy throughput of 32 MJ/t—more than enough to handle the 1 MJ/t produced by each engine. However, these pipes are only used to connect to an energy producer and cannot connect to each other.
4. Select the cobblestone kinesis pipe from the inventory, right-click on top of each wooden section, and then place additional sections to link each engine to the one adjacent. You can do this in numerous ways. Figure 7.11 shows one example.
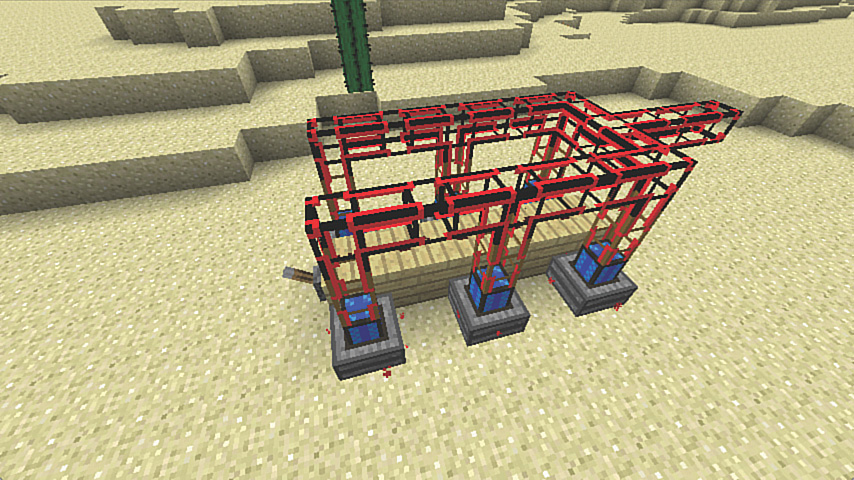
FIGURE 7.11 All of BuildCraft’s pipes connect automatically, so it takes just seconds to build up this entire framework. Energy from each row of engines is gathered at the T-junction located at the right of the structure, but connections can be made anywhere along the kinesis pipes.
5. Stirling engines can consume lava, coal, charcoal, and wood. Right-click each engine to open its interface and move a bucket of lava into the engine’s fuel slot. Then flick the lever to power the station.
At this point the power station is producing energy, but it’s not actually being used for anything. We’ll connect it to a few things shortly. Meanwhile, let’s ensure the station can fuel itself.
Although buckets of lava provide a long-lasting fuel source for stirling engines, they’re not renewable in the way that something such as coal is. Switch off the power station and follow these steps:
1. Place a chest at the back of the power station with one space between it and the end of the run of redstone. We’ll load this with coal.
2. Attach a wooden transport pipe to the back of the chest to pull out its contents and then place a redstone engine on top of the pipe (see Figure 7.12). It should automatically align itself so it’s facing down. The engine can draw power from the redstone used to turn on the engines.

FIGURE 7.12 Setting up an automatic fuel feeder from a chest to each engine.
3. Run a cobblestone transport pipe around the engines and ensure they are connected to form a complete loop. Make an arch at the front if you want easier access to the lever.
4. Right-click each engine and remove the empty bucket from its fuel source. This makes room for coal.
5. Place six or so full stacks of coal in the chest and switch on the power station. You’ll see the coal moving into the pipe, gradually making its way into the fueling stations of each engine. When the fuel stack of each engine is full, the coal will bypass it, and continue on its journey around the pipe until it finds a home.
Those are the basics of a stirling engine power station.
Combustion engines, especially those that rely on refined fuel, are significantly more complex. Let’s put this first station to work and then look at the next.
Mining Wells
Mining wells work very simply: Give them a source of power and they’ll quietly dig all the way to bedrock, only stopping if they hit lava on the way. Attach a chest or pipe to the side and they’ll feed it the results. They’ll even dig up diamonds, even though obsidian isn’t required to build the device. Also, once you have one, you can run it until it stops and then collect it up with an iron, gold, or diamond pickaxe and reuse it again and again.
Start by grabbing a mining well from the Creative inventory and place it somewhere close to the power station. Then run a cobblestone kinesis pipe from the kinesis pipe at the front of the station into the side of the well.
Place a chest adjacent to the well and turn on the power station. Figure 7.13 shows the end result.
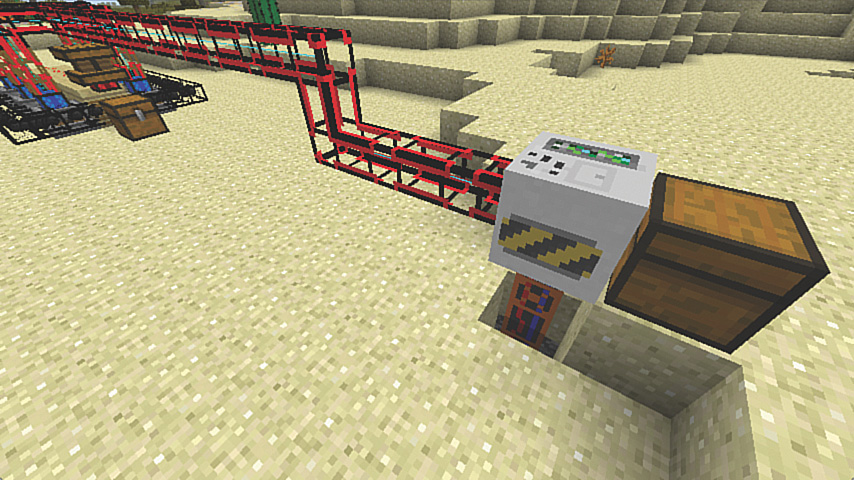
FIGURE 7.13 As soon as the mining well, or any device, starts drawing power, you’ll see a laser-like cyan line running through the kinesis pipes.
Note: Multiplying Mining Wells
Add more than one mining well in a row, feeding into chests via pipes, to dig out additional ore; however, keep in mind that this won’t increase the rate of ore recovery. The power from the station is evenly split between the wells, with each requiring an accumulation of 25 MJ to mine each block. Figure 7.14 shows a row of three wells. The one on the left side can deliver its results to a chest using one section of cobblestone pipe.
Tip: Managing Power
Kinesis pipes carry a limited amount of power. You can see the maximum value in the tooltips, with the different types ranging from just 8 MJ for the cobblestone kinesis pipe to a whopping 1,024 MJ for the diamond version. View the current power output of an engine by right-clicking to open its inventory window, and then hover the mouse over the icon off to the right. You also see a visual indication of the energy output through the thickness of the blue line running along the middle of the pipe when the engine is in use. This will ultimately turn red when overloaded.
Avoid this by using a segment of iron kinesis pipe. Right-click it with a wrench to limit the maximum power that can enter the subsequent kinesis pipe.
If you are playing on Survival, you’ll find that mining wells convert into pumps with the addition of a tank. We’re going to need these to run combustion engines and take the power generation to the next level.
Managing Combustion Engines
Combustion engines are the most powerful in BuildCraft, besides the Creative-only engine. They run on oil or fuel. Although you’ll find deposits of oil and even the occasional oil geyser in a world created with the BuildCraft mod installed, you’ll need to produce fuel by running oil through a refinery. Fuel tends to be far more efficient than oil, and produces more power.
Get started by locating an oil deposit. If you can’t find one nearby, you can cheat on Creative by getting the oil spring block from the inventory and placing ten or so in a suitable location. Oil spring blocks convert to oil springs on a random basis, but it should only take a minute or two for you to start to see the first springs appear. Note that oil does not spring eternal. Each block is the equivalent of a bucket, and these can be pumped quite quickly, so locating a large deposit is better. (When you find one, jump in to see how deep it is. Although black on the surface, oil appears like water when you’re submerged so you can easily see its extent.) You can also create your own deposit by repeatedly spilling the oil bucket into a depression in the ground.
Create a nearby source of water with the water spring block, or just dig a hole that is 3×3 in width and length, and 1 block deep, and fill it with water from buckets. (Although a 2×2 hole creates an infinite water source, it may not refill quickly enough to supply the engines with sufficient cooling, so the 3×3 choice is safer.)
We’ll create a power station composed of three combustion engines. Two stirling engines will power the pump to provide sufficient water, and the last one, just a regular redstone engine, will pump oil. If the engines run on oil, they’ll provide a total of 9 MJ/t, but when running on fuel this increases to 18 MJ/t, so we’ll also add a refinery later.
In Survival, pumps are crafted with a mining well and a tank, but stay in Creative for now.
This is a lengthy build, but if you follow these steps you’ll have your own power station complete with fuel refinement, water coolant, and a power outlet that can run more than a toaster or two:
1. Place three combustion engines in a row, with a space between each. Then place a pump above one edge of the water supply, and another at the edge of the oil deposit, as shown in Figure 7.15.
2. Use a stone fluid transport pipe to connect the oil pump to one side of each engine, and a gold fluid transport pipe to run water to the other side, as shown in Figure 7.16. I’m using gold for the water because it can transport four times as much liquid as stone, and it’s vital to ensure sufficient water reaches the engines. You may find in some cases that you need to connect an output pipe to two sides of the pump to increase the pump’s total capacity.
Incidentally, there’s no need to use a wooden fluid extraction pipe on pumps; they’ll push liquid on their own into any connected fluid pipe. If you’re building a more extensive power station, it can be important to ensure the same length of pipe reaches each engine from the water reservoir, thus ensuring each engine receives the same amount of fluid. Otherwise, the one at the end may not get enough and could overheat.

FIGURE 7.16 Running stone and gold pipes to the engines to provide coolant and oil.
3. As you did with the previous power station, place a wooden kinesis pipe segment on top of each engine, and link them across the top with a quartz kinesis pipe. Quartz kinesis pipes can carry up to 64 MJ/t, which will be sufficient for the power station’s total output of 18 MJ/t.
4. Combustion engines run a grave risk of exploding, so we’re going to add a logic gate that supplies the engine with a redstone signal only if it is in a blue or green condition. Any other power state indicates it is overheating, so it should be turned off to give it time to cool. Get an iron OR gate from the inventory and place it against each wooden kinesis pipe segment. You should end up with something like what’s shown in Figure 7.17.
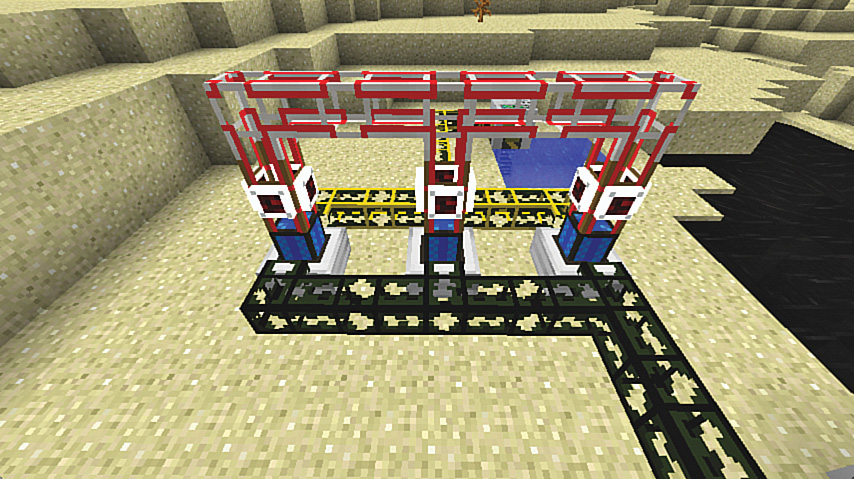
FIGURE 7.17 The station after the iron OR logic gate is added.
5. Right-click each gate to open its configuration window. Click the four boxes until you have the configuration shown in Figure 7.18. The gate’s logic says that when the engine is blue or green, supply a redstone signal to the surrounding blocks (which includes the engine), thus turning it on.

FIGURE 7.18 Configuring the iron OR gate.
6. Place a stirling engine behind the water pump and a redstone engine behind the oil pump. You can power them with levers or torches, or run redstone back to a central point, as shown in Figure 7.19.
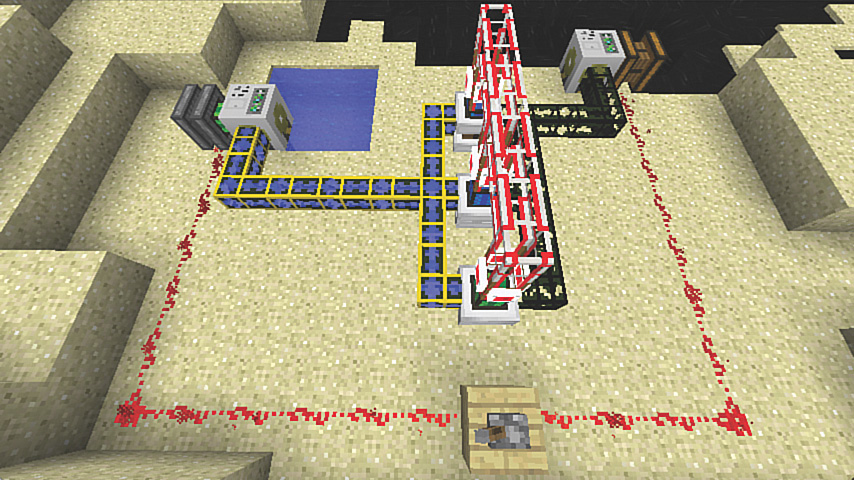
FIGURE 7.19 Combustion engine power station finalized.
Most pipes automatically connect to others, so running them in tight configurations can prove something of a challenge. You can use pipe plugs to prevent fluids from commingling. Just apply a plug or plugs to the surface of a pipe where it would otherwise connect and you’ll be able to run the other pipe safely alongside. Stone and cobblestone pipes don’t connect, so they provide a good option for running different fluids side by side.
Now that you have all that power, it’s time to do something with it. For a quick test, try extending the stone kinesis pipe to a mining well. You’ll see blocks flying out of the ground at a far greater rate than with the stirling power station.
However, you want to get even more power from this set up, and for that you need to create a refinery and then supply the engines with fuel. This doubles the power output.
Tip: Getting Pumped About Oil
Over time, power stations can deplete any but the largest oil reserves. Fortunately, you’ll more than likely find extensive reserves underground, especially after you dig out large sections using the quarry mining machine. You can bring these up with a pump. It actually doesn’t matter how deep they are: the pump will stretch down. Then either feed them directly into your current oil pipes or use the flood gate machine to spill the oil back into the main reserve.
Refining Oil
Refineries convert oil into fuel. Although only combustion engines use fuel, they produce twice as much power, and last five times as long, producing 250,000 MJ per bucket, lasting 40 minutes, compared to oil’s 25,000 MJ and 8 minutes of runtime.
Place a refinery on the oil side of the power station next to the current oil pipe. Then run a quartz kinesis pipe from the power station’s kinesis line to the refinery, as shown in Figure 7.20.

FIGURE 7.20 Refineries use energy to convert oil into the far more efficient fuel.
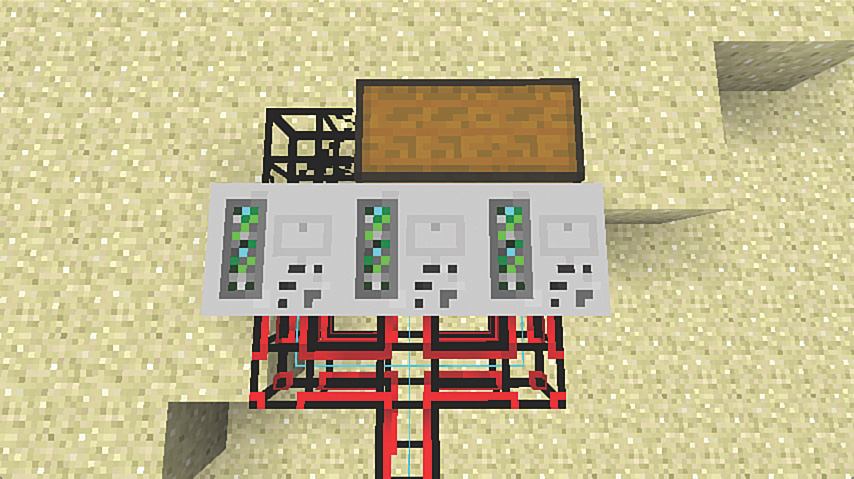
Refineries are composed of three tanks. Two hold oil while the last holds the fuel. The refinery will gradually fill up this last tank.
Let the refinery run for a few minutes to fill this up; then break the oil pipe running to the engines and replace it with a fresh stone pipe that connects to the front of the refinery with a wooden fluid extraction pipe.
Place a redstone engine beside the pipe and power it with a torch or by connecting it to the redstone line. See Figure 7.21 for my version.
When each engine has used up its oil, it will take in the fuel and increase its power output to 6 MJ/t.
And there you have it: a safe combustion power station.
Automated Quarries
Now that you have a solid source of power, let’s put it to good use.
The quarry is one of the most powerful features of BuildCraft. Think of it like the mining well on steroids.
In its standard mode it will dig a 9×9 hole in the ground all the way to bedrock or lava, whichever comes first, but by using landmarks (something I’ll introduce shortly), it’s possible to create a quarry up to an enormous 64×64 blocks.
Figure 7.22 shows the simplest possible quarry: the quarry block, a chest to collect the results, and a stirling engine. Placing the quarry block also creates the black-and-yellow-striped frame. The quarry first destroys any blocks inside the frame, as shown by the red blocks flying out of the machine. It then constructs a frame and will start to dig, as shown in Figure 7.23.


FIGURE 7.23 Stirling engines provide only minimal power to a quarry, so a setup such as this digs quite slowly.
Start your own quarry reasonably close to the power station so that you don’t need to run the power too far. Accessing the power from the station provides the quarry with sufficient power to run at a good trot. Follow these steps to create a custom-sized quarry:
1. BuildCraft’s landmark tool makes it easy to define a larger area. Place landmarks at each corner of the area you want to mine. They must be on the same level and aligned perfectly, but there’s an easy way to do this. Place the landmark in the first corner and then put a redstone torch beside it to make a set of handy guidelines appear, as shown in Figure 7.24.
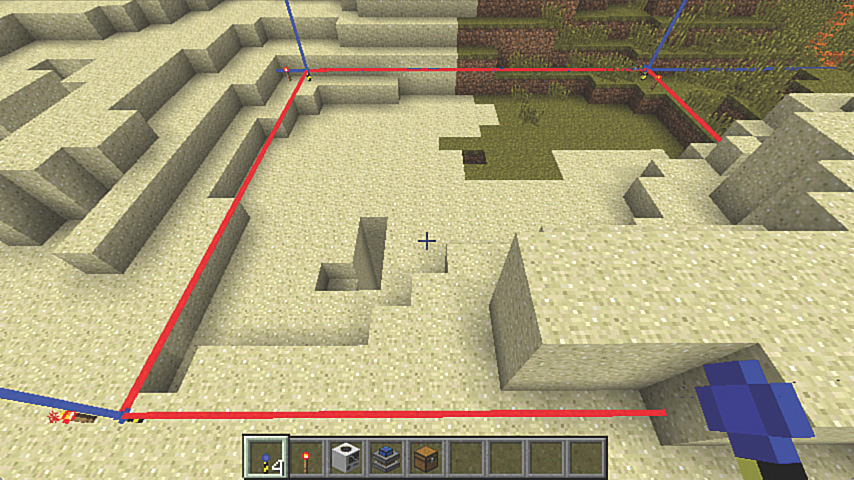
FIGURE 7.24 It doesn’t take any more resources to create a quarry machine that is much larger than the standard 9×9 square. Just use landmarks to define the size.
2. Follow the blue guidelines, placing landmarks at each corner along with another torch to form new guidelines. The guidelines can go through other blocks and appear on the other side. If you find an intended corner is underground, dig down and place the landmark once you see the intersection.
3. Right-click one of the landmarks to make the area active. You’ll see it change to a red square.
4. Place the quarry block directly behind the landmark that is nearest the power station. It shouldn’t be inside or resting on the red square. If you’ve done this correctly, the black-and-yellow-striped frame will appear, matching the dimensions of the red square.
6. Place a chest beside the quarry block to collect the results; then connect the quarry to the power station with quartz kinesis pipe and watch it spring into action (see Figure 7.25).

Quarries dig up a lot of material, and you may not want to save all that sand, dirt, and cobblestone. The easiest way to deal with this is to use stone transport pipes connected to chests. Use a diamond transport pipe at each junction to sort the items you do want to keep (even with multiple chests such as those shown in Figure 7.26), and then use a section of void transport pipe at the end to destroy the unwanted blocks. Remember to use actual diamonds, emeralds, redstone, and coal instead of their ore blocks in the filters because the quarry delivers the same results you get by mining. All other results are delivered as ore.
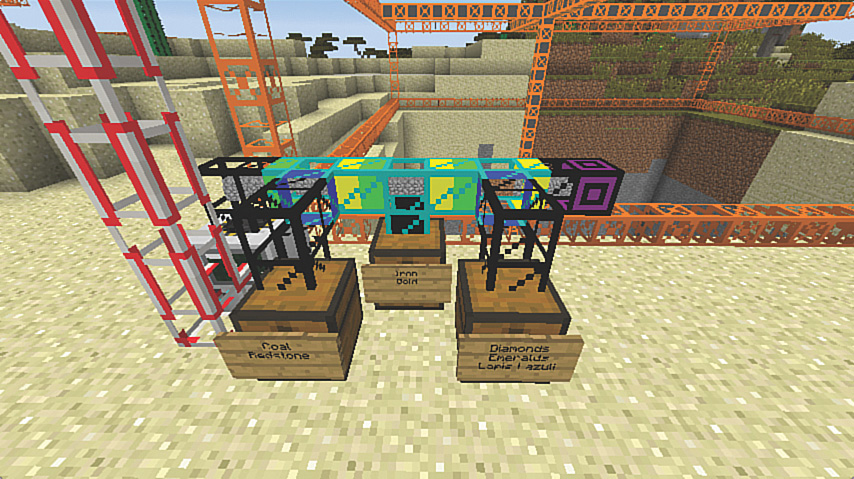
FIGURE 7.26 A diamond pipe sorting system to ensure the best results from the quarry are saved and the rest discarded.
The power station provides more than enough juice to run more than one quarry at a time. Place another beside the first, staking it out with landmarks, and use an iron routing pipe to connect it to the output of the first quarry. (Use the spanner tool if the pipe doesn’t orient correctly right away and blocks pop out.) Figure 7.27 shows an example.

FIGURE 7.27 Add a second quarry beside the first. Split the power before it reaches the first quarry to ensure both receive the same amount.
Blueprints, Building, and Templates
Ever built a house or other kind of structure and thought, that’s awesome, but making it again is going to be a serious pain? Or maybe you saw someone else’s house on a multiplayer server and figure you’d like to borrow the design for your own world?
With BuildCraft, this is astonishingly easy. On Survival it’s not a cheat as such: You’ll still need to gather all the required resources. However, it does vastly simplify the re-creation of structures. Actually, even most of the power plant is easily re-created almost in its entirety, although a few blocks are missing.
The design is stored as a blueprint or template and can be shared between players. See the upcoming tip “Sharing Is Caring” for more.
Here’s how it works:
1. Use landmarks to define the base of the area you want to copy.
2. Place a further landmark above one of the corners to define the height of the area. The landmarks can be placed vertically or against the side of a surface. If you need to, build a temporary pillar to gain height.
3. Right-click one of the base landmarks to form a rectangle; then do the same to the top landmark to turn the area into a three-dimensional box. In Figure 7.28, I’m copying the design of the village smithy’s workshop.
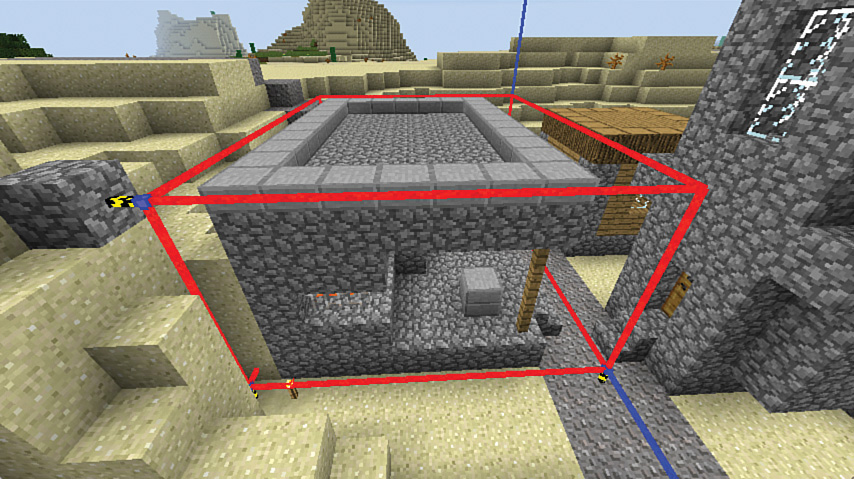
4. Place an architect table directly behind one of the landmarks to convert the area into the yellow-and-black frame you’ve seen previously with the quarry.
5. Right-click the table to open the window shown in Figure 7.29. Type in a name and then drop a blank blueprint or template into the input box. Blueprints store the specific object types required to re-create a design. Templates store just the shape, which can then be filled with any type of block from your inventory.

FIGURE 7.29 Creating a blueprint of the smithy workshop.
Because templates provide a way to copy any existing design and then replace the structure with blocks of your choice, you might as well have some fun. Try copying your current house into a template, move a safe distance away, place a builder machine, and then re-create it from TNT. How long can you resist setting it off with a flint and steel?
6. Take the printed blueprint and head to the area where you want to re-create the design.
7. Place a builder machine facing in the direction you want to build. It will build from the same corner the blueprint was created. Right-click it to open the window shown in Figure 7.30.
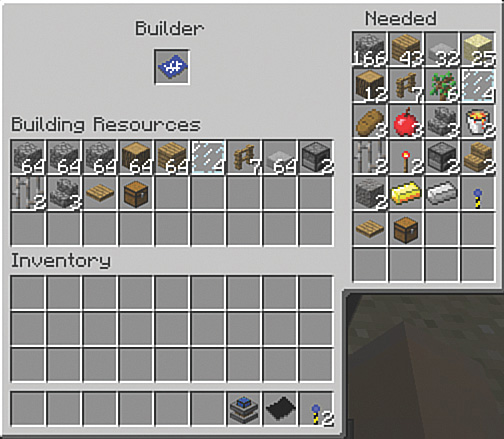
FIGURE 7.30 Matching the resources required by the blueprint. In Creative, you can actually just activate the builder without having the resources in place.
8. Drag the blueprint to the input box at the top and you’ll see all the resources required in the area to the right. Match these by dragging the resources from your inventory into the builder’s inventory. There’s no need to include items that you don’t require. For example, this blueprint has also taken a copy of all the items in the smithy’s chest, but I’ll just leave those behind. By the way, before you copy those in, you may want to exit the builder and check that the outline of the area that’s shown extending from the builder has the design positioned where you desire.
9. When you’re ready, place a stirling engine beside the builder and power it up. Presto! The builder will get to work re-creating the original design (see Figure 7.31).

FIGURE 7.31 The completed auto-constructo Smithy building.
Tip: Sharing Is Caring
The BuildCraft library is a special block that stores blueprints and templates for easy retrieval. Place a printed blueprint or template to permanently store it, and feed it a blank blueprint or template to take a copy of any stored design. BuildCraft libraries are a perfect way to share builds on multiplayer servers—everything from houses to decorative items (a fancy fountain or statue), to farms and even redstone machines. You’ll find a large collection of blueprints at http://www.mod-buildcraft.com. Download them as per usual and copy them to a folder called “blueprints,” stored under your Minecraft application. Restart Minecraft and place a library to access the files. (You’ll need to reload Minecraft each time you copy a new blueprint to the folder to see it appear in the library.)
More BuildCraft
There’s a lot more to BuildCraft besides what’s described in this chapter. Here are some of the more fascinating features:
![]() Advanced logic gates—Automatically shut down engines and machinery depending on the work required and available resources, or build complex routing logic. Autarchic gates replace the need for extraction pipes to be powered with engines. Gates are constructed with wire and chipsets, and all three can be crafted automatically on an assembly table powered by lasers. Yes, that’s right, lasers.
Advanced logic gates—Automatically shut down engines and machinery depending on the work required and available resources, or build complex routing logic. Autarchic gates replace the need for extraction pipes to be powered with engines. Gates are constructed with wire and chipsets, and all three can be crafted automatically on an assembly table powered by lasers. Yes, that’s right, lasers.
![]() Pipe wire—Each pipe segment can support up to four strands of wire to enable the transmission of signals. The wires won’t lattice like regular redstone, making it easy to route multiple signals and then respond to them with gates.
Pipe wire—Each pipe segment can support up to four strands of wire to enable the transmission of signals. The wires won’t lattice like regular redstone, making it easy to route multiple signals and then respond to them with gates.
![]() Pipe facades—Don’t want to look like you’re living in an oil refinery? Hide your pipes with facades that match the surrounding material. Phased facades can even switch between two materials depending on the status of an underlying pipe wire, thus providing a useful visual signal.
Pipe facades—Don’t want to look like you’re living in an oil refinery? Hide your pipes with facades that match the surrounding material. Phased facades can even switch between two materials depending on the status of an underlying pipe wire, thus providing a useful visual signal.
![]() Automatic crafting table—This table works like a regular crafting table but includes an inventory for storing item components. Connect pipes to the table to build items and move them elsewhere. Use multiple crafting tables linked in this way to build an assembly line, shuffling completed items from one table to the next so they become part of the next recipe. It’s a factory in a box. The advanced crafting table is similar, but provides an inventory for the output.
Automatic crafting table—This table works like a regular crafting table but includes an inventory for storing item components. Connect pipes to the table to build items and move them elsewhere. Use multiple crafting tables linked in this way to build an assembly line, shuffling completed items from one table to the next so they become part of the next recipe. It’s a factory in a box. The advanced crafting table is similar, but provides an inventory for the output.
![]() Filler machine—The filler creates prototypical shapes in a defined area using whatever materials are provided to its inventory. Build a giant pyramid or a hollow box for your next power station. Or just fill in those giant holes created by your quarries.
Filler machine—The filler creates prototypical shapes in a defined area using whatever materials are provided to its inventory. Build a giant pyramid or a hollow box for your next power station. Or just fill in those giant holes created by your quarries.
The Bottom Line
BuildCraft is a fabulous mod that changes the nature of the game. Played on Survival, there is a significant challenge in gathering the resources to create the various devices and supporting structures. It defines an ambitious series of goals. But even on Creative there is something deeply satisfying in creating a self-sustaining power station that doesn’t explode. In fact, something you can try now is to double the size of the current design to six combustion engines. You can run them in sequence or flip the design to mirror it on the other side of the current design.
Some information on BuildCraft is available online that will also help, although it isn’t necessarily up to date. Try these sites for more information:
![]() Visit the official website at http://www.mod-buildcraft.com.
Visit the official website at http://www.mod-buildcraft.com.
![]() If you’ve installed BuildCraft as part of the Tekkit mod pack, you can also find additional information at http://goo.gl/N1BXK7.
If you’ve installed BuildCraft as part of the Tekkit mod pack, you can also find additional information at http://goo.gl/N1BXK7.
![]() There’s also a handy, if somewhat dated, tutorial at http://goo.gl/DlAFRZ.
There’s also a handy, if somewhat dated, tutorial at http://goo.gl/DlAFRZ.
![]() A future version of BuildCraft already in development adds robots that can automatically chop wood, kill mobs, mine, plant, and much more. Check the official website at http://www.mod-buildcraft.com for more details.
A future version of BuildCraft already in development adds robots that can automatically chop wood, kill mobs, mine, plant, and much more. Check the official website at http://www.mod-buildcraft.com for more details.
In the next chapter we’re going to explore a mod that goes even deeper than BuildCraft in some very interesting ways (forget combustion—let’s go nuclear!). Like other mods such as the Forestry plug-in (http://forestry.sengir.net), it was designed for compatibility with BuildCraft, allowing pipes, energy, crafting tables, and other items to interact with its own systems.