
5. Advanced Construction
In This Chapter
![]() Choose a building style that inspires you.
Choose a building style that inspires you.
![]() Learn interior design tips to impress.
Learn interior design tips to impress.
![]() Create natural-looking terrain and trees.
Create natural-looking terrain and trees.
![]() Decorate with 2D pixel art.
Decorate with 2D pixel art.
![]() Build a 3D statue.
Build a 3D statue.
![]() Get cozy in the Nether and The End.
Get cozy in the Nether and The End.
Building in Minecraft is not only wonderfully addictive, it’s the perfect opportunity to unleash your creative genius. From a city of skyscrapers, luxury cruise ships, to perfect re-creations of your favorite film sets, Minecraft allows you to become, literally, the architect of your wildest dreams.
In Survival mode, a lot of mining is required to gain all the necessary resources for a large build. If you’re up to the challenge, then I recommend it—there’s nothing more satisfying than creating a monumental build while pitted against the challenges of hostile mobs and declining health. Just remember to build scaffolding around your build to prevent your untimely demise. Creative mode is the best option if you are planning a big build because you’ll have access to unlimited resources and easy (flying) access for high-builds and roofing (and screen captures!). Switch back into Survival to enjoy your new abode once complete.
Tip: Think Outside the Square!
Although it’s tempting to start with a rectangular floor plan and just build up, try to avoid it. Your house will look more authentic if it’s asymmetrical (that is, your left and right sides aren’t mirror images of each other). Use balconies, a split roof, covered walkways, sunken outdoor entertaining areas, gardens, and pillars to create a more inspired build.
Choosing a Building Style
Your building style is like your signature—uniquely you. The more you build, the more you’ll find that certain techniques and tools suit you best.
Just keep in mind that if you are joining a multiplayer server, you may find specific rules attached to established cities that you must follow for your own build, such as a requirement to build your house in the style of the world, whether it be Medieval, Victorian, or Elvish.
In single-player mode, each world you generate will have a specific biome that may be suited to certain types of dwellings and artistry. In this section, we will look at each of the main building styles, along with the blocks and resources most suited to them and the most appropriate biomes in which to situate them. (Note that this list is by no means exhaustive—for more ideas, try performing a Google search for “architectural styles” and take screenshots of real-life buildings you can re-create.)
Medieval Style
Construction Elements: Castles, moats, hedge maze, watch tower, turrets, markets, taverns, swordsmith, and stables.
Complementary Building Materials: Cobblestone, oak, birch, mossy stone, glowstone, bookcases, iron, lapis lazuli, gold, and stone.
Desirable Decorations: Cauldrons, book and quill, enchantment table, potion brewing stand, mushrooms, furnace, redstone lamp, spider webs, and crops.
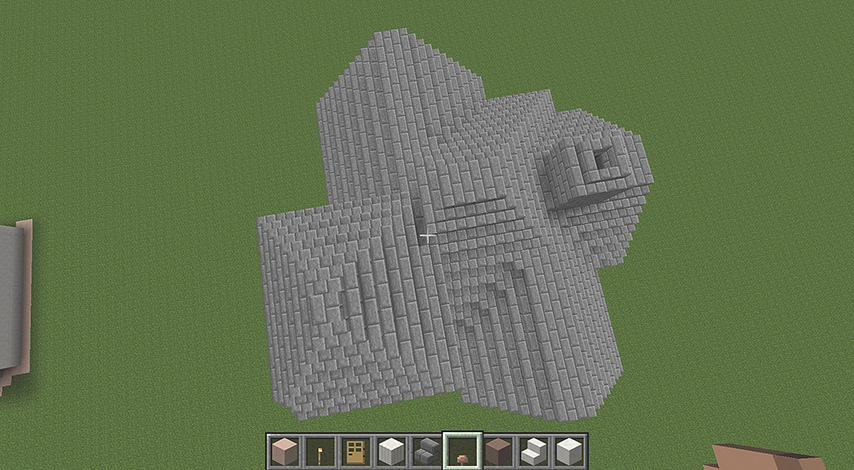
Arguably, medieval builds are one of the most popular, owing to the incredible scope for fantasy that Minecraft already entails—from potions to swords, armor, and dragon fighting. In this chapter, we’ll use the medieval style as our main example (see Figure 5.1) to discuss construction in a little more detail.

Your first step in any large build is planning. Clear an area of land large enough for the build and then lay out the foundations of your house using colored blocks (see Figure 5.2). Mark the doorways, walls, and individual room layouts for your ground floor. Keep in mind your aspect (which direction you want your house to be facing) and try to make use of any aspects of the landscape that may look great if incorporated into your build. Remember, it’s better to dedicate time to planning now than to knock down walls later to resize.

FIGURE 5.2 This medieval-styled home will be an ocean-view build with an upper-story deck, library, ballroom, a dungeon to house our Ender Portal and mine entrance, and a circular watchtower.
Up Go the Walls!
Because this build is multilevel with room to spare, our floor plan can be quite creative. Choose a primary color for your build and two or three complementary colors or textures to enhance your exterior. Carry those same tones inside for your carpets, wall art, and furniture.
Our medieval house example features a floor-to-ceiling bay window in the front ballroom to take advantage of the ocean views (see Figure 5.3). Your first story will usually include a living space and kitchen, amenities (bathrooms and toilet—superfluous, of course, but they add to the realism), and an entrance/hallway. Plan your internal staircase position to take up the least space possible (unless it is a deliberately grand affair!), and use the space underneath for storage or dungeon access.

FIGURE 5.3 Get creative with your flooring—the floor is your largest canvas and is often overlooked. Experiment with colored wool blocks to create patterns, and dig a little to vary the height of your floors.
The ceiling of your first level will become the flooring of your second, so go ahead and build up your internal walls, taking note of door and window positions. I recommend a minimum five-block-high ceiling to account for later interior design. Generally speaking, the higher the ceiling, the grander the home.
To keep with our medieval theme, a high tower is built next to our dungeon, fitted with an internal staircase (see Figure 5.4). This tower circle is based on a simple 8×8-block diameter. We’ll be looking at building circles, spheres, and arches in more detail later in this chapter.

FIGURE 5.4 A watchtower or turret is a medieval standard and adds an interesting contour to your build. Make sure it is properly lit with safe internal stairs to the top to avoid a fall at night.
Your second (and higher) levels offer the bonus of deck space (see Figure 5.5). Remember to bolster them with supporting beams or arches, which, although not strictly necessary, add to the realism of your build. In our example, the second floor fireplace has been positioned over the first floor fireplace using Netherbricks and iron bars. Keep wood at least two blocks away or it could burn.
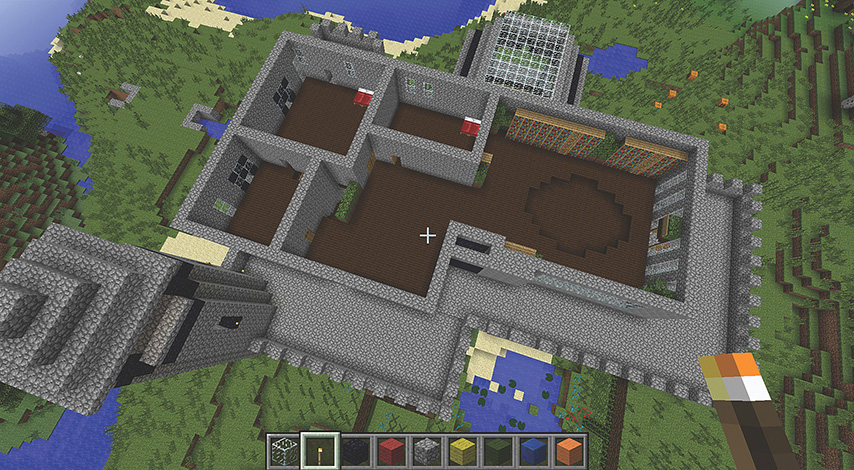
FIGURE 5.5 The second story floor plan usually accommodates bedrooms, bathrooms, library/study areas, and specialty rooms.
If You Like It, Put a Roof on It!
As simple or complex as you make it, the roof will be the standout feature of your build. Roofing styles vary depending on your build (domed, pitched, complex, arched, flat, and so on); however, we’ll cover a few of the main types in this chapter. The most common roof style you’ll use is a simple pitched roof (see Victorian style, next). To create the diagonally attached rooflines you’ll be using most often, add a temporary supporting block to attach your required block to. Once your desired block is placed, knock out the supporting block and continue your row (see Figure 5.6). You’ll be using this method a lot for general construction and will quickly become efficient at it.
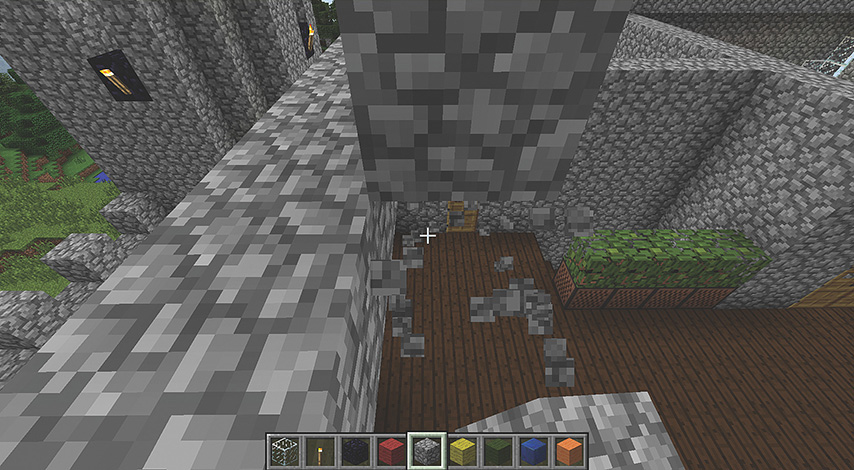
FIGURE 5.6 Create diagonally attached rows of blocks using a temporary supporting block. I’ve just knocked out the one below. Thereafter you can attach blocks to the face of the first.
Remember that your roof is valuable real estate within your house. Make good use of your attic space within a pitched roof, and add conversation features such as circular towers, chimneys, roof gardens, lookout platforms, covered walkways, solar panels (daylight sensors or pressure plates), and swimming pools. In Figure 5.7, we have a top view of our finished medieval house, complete with a semicircle lookout deck, covered walkway, glass-ceiling ballroom, and watchtower at the back.

FIGURE 5.7 Use different contours and stagger the floors up to the rooftop to add interest to the design.
Victorian Style
Construction Elements: Chandeliers, street lamps, pitched roof, landscaped gardens, elaborate rooflines with chimneys as well as bay windows and attic windows with decorative eaves.
Complementary Building Materials: Stone bricks and wood primary blocks with richly colored feature blocks above and below the windows and doorframes.
Desirable Decorations: A neat garden box surrounding the trees, a park bench, and window boxes for flowers and shrubs.
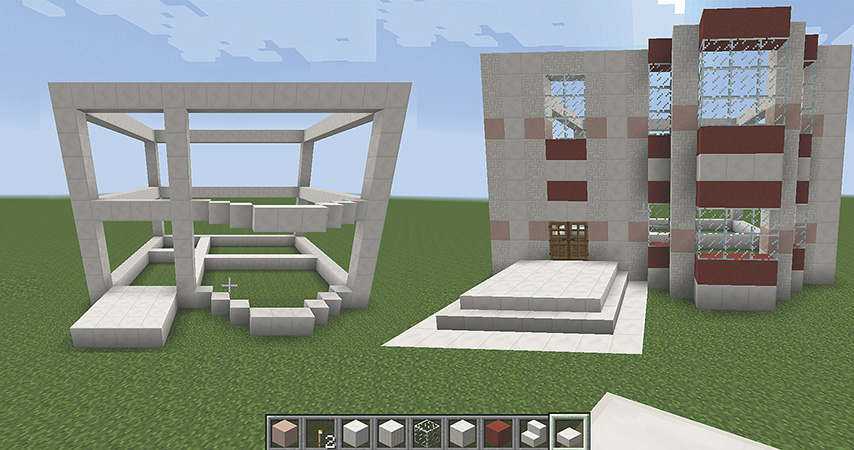
Victorian-styled houses are an early 1900’s ornate architectural style (see Figure 5.8). They generally feature a raised porch, large bay windows, and fairly symmetrical rooms. Begin with a square foundation but build high—two or three levels (see Figure 5.9).

FIGURE 5.8 The key to Victorian builds is the fine detail, such as awnings above all windows and doors, internal architraves and balconies, and chandeliers and lamps.
There are two main types of Victorian roof styles. You’ll find that these styles are also compatible with many other builds, particularly the pitched roof. Therefore, we’ll go into a bit more detail about roof construction here. Yes, you can handle the roof.
Pitched Roof
The pitched roof is your go-to roof. It provides plenty of attic space and a nice triangular facade. Here are some points to keep in mind when creating one:
![]() Extend your roof frame at least one block past your external walls to add depth to your house.
Extend your roof frame at least one block past your external walls to add depth to your house.
![]() Step your roof blocks up to a center point across the front and back edges of your roofline.
Step your roof blocks up to a center point across the front and back edges of your roofline.
![]() Create a feature point to your front and back facade—for example, an internal triangular shape beginning two-thirds across the length or an attic window with eaves. Overlay this line with stairs and remove your original pre-layer blocks (see Figure 5.10).
Create a feature point to your front and back facade—for example, an internal triangular shape beginning two-thirds across the length or an attic window with eaves. Overlay this line with stairs and remove your original pre-layer blocks (see Figure 5.10).

![]() Extend your horizontal roof blocks from front to back until they meet, and then overlay with stairs.
Extend your horizontal roof blocks from front to back until they meet, and then overlay with stairs.
![]() Remove the pre-layer blocks from the facade on the front and back roof faces, back to wall level; then fill in your facade with a complementary colored roof block to surround your feature window.
Remove the pre-layer blocks from the facade on the front and back roof faces, back to wall level; then fill in your facade with a complementary colored roof block to surround your feature window.
![]() Use attic windows and small balconies as an opportunity to individualize your roof shape (see Figures 5.11 and 5.12).
Use attic windows and small balconies as an opportunity to individualize your roof shape (see Figures 5.11 and 5.12).

FIGURE 5.11 Cover your attic window with its own A-frame awning to break up the empty space.

FIGURE 5.12 Try inset variations to add a decorative focal point. Keep the color scheme consistent with the front of the house.
Complex Roof
You can find some spectacular examples of complex Victorian rooflines online that provide plenty of inspiration. Meanwhile, here are some tips for achieving an authentic look.
Complex rooflines are essentially the result of connecting multiple roof features together. Although tricky at first, with a bit of practice you’ll create a masterpiece in no time.
![]() Extend your roof frame at least one block past your external walls to add depth to your house.
Extend your roof frame at least one block past your external walls to add depth to your house.
![]() Modify your roofline (and if possible your original house shape) to include interesting variations to the shape of your roof (for example, add a feature window, gables, a turret, or chimney). Use these variations in length of roof edges to create individual triangular peaks (using the standard step method) off your main roofline (see Figure 5.13). We will be following each of these smaller peak lines back into our roof and connecting them together.
Modify your roofline (and if possible your original house shape) to include interesting variations to the shape of your roof (for example, add a feature window, gables, a turret, or chimney). Use these variations in length of roof edges to create individual triangular peaks (using the standard step method) off your main roofline (see Figure 5.13). We will be following each of these smaller peak lines back into our roof and connecting them together.

FIGURE 5.13 Building variations into the shape of your floor plan gives you the opportunity to vary your roofline, too. Include sections of shorter wall, fireplace extrusions, and turrets to create smaller, individual peaks.
![]() Add a corner block each place different rooflines connect.
Add a corner block each place different rooflines connect.
![]() Cover all your roof blocks with matching stairs, following the same lines. As with your pitched roof, extend each row of roof blocks in turn—this time from the outside toward the center to their meeting points. Do it in sections, and try to keep your junctions at the same place for each level, thus producing a “step” effect, as shown in Figure 5.14.
Cover all your roof blocks with matching stairs, following the same lines. As with your pitched roof, extend each row of roof blocks in turn—this time from the outside toward the center to their meeting points. Do it in sections, and try to keep your junctions at the same place for each level, thus producing a “step” effect, as shown in Figure 5.14.
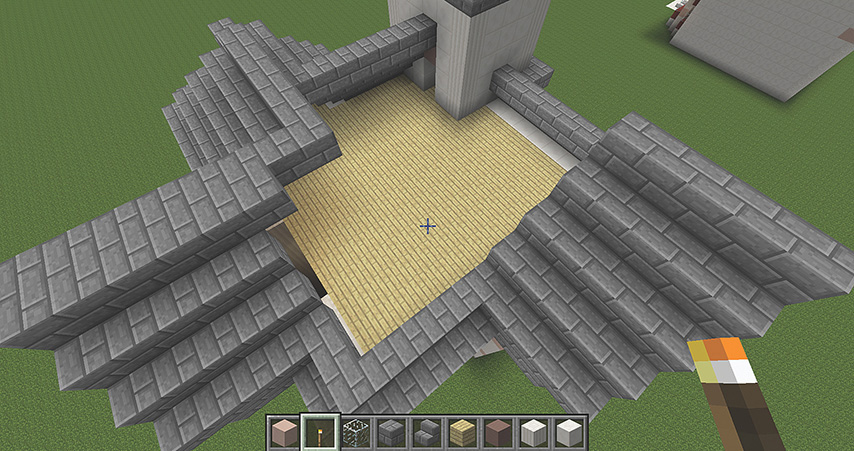
FIGURE 5.14 Cover completed block lines with steps that meet at the same points.
![]() On each of your smaller “feature” roof shapes, remove the pre-block layers back to wall level so your decorative steps are more visible.
On each of your smaller “feature” roof shapes, remove the pre-block layers back to wall level so your decorative steps are more visible.
![]() The finished roof should have a very “stepped” appearance, meeting at the highest points (see Figure 5.15).
The finished roof should have a very “stepped” appearance, meeting at the highest points (see Figure 5.15).
Japanese Style Building
Construction Elements: Simple, rectangular houses with a double overhanging roof. Cherry blossom trees using pink wool and birch logs. Miniature gardens with rock pools overhung with willow trees.
Complementary Building Materials: Cobblestone, white wool, dark logs, sugar cane, trap doors, and fence posts.
Desirable Decorations: Lily pads, hanging baskets, and lanterns.
Keep your buildings minimalist with dark wood poles and white wool walls. Traditional Japanese houses usually have rice paper sliding doors, so a standard door should be replaced with either a trap door or other light-colored material for an authentic look (see Figure 5.16), or you can build a piston-powered sliding door.

This style is deceptively tricky to accomplish, owing to the rather ornate roof. Follow these steps for a double-layered roof effect:
1. Use light-colored steps to frame the top of your wall and use a block to join each corner.
2. Extend the bottom step with a lowered, floating row of slabs. Place an additional slab on the corner diagonal to your corner blocks.
3. On the top of your roof blocks, use stairs pointing outward to add some height and, again, complete the corners with a slab.
4. Fill in your ceiling at the level of your original dark poles with a matching dark wood. Add another layer of slabs on top of your stair roof blocks; then extend these with another two rows of floating slabs to form a second canopy over the original roof (see Figure 5.17).

FIGURE 5.17 Slabs and inverted and upright stairs are the key to a multilayer roof.
5. On top of your roof, add an internal rectangle of dark wood blocks, then light wood on top of this. From the outside, encase in another row of inward-pointing stairs down each length, creating the height for your pitched roof. Leave the front and back clear for your decorative fill.
6. Add two more sets of floating stairs to bring your roof to a point and fill the triangular front and back facings with dark wood and white wool. Add a row of slabs along the pitch seam to finish it off.
Decorate your Japanese-styled house with slabs, hanging lanterns, and willow trees with long, hanging leaves. You can also make cherry blossoms from pink wool. Landscape with rock gardens, complete with rock pools, lily pads, and stone benches. Keep the interior furnishings simple with smooth textures, and use sugar cane to imitate bamboo screens separating your living areas.
Modern and Suburban Styles
Construction Elements: Media room, swimming pool, Jacuzzi, garage, billiard table, garden roof, solar panels (daylight sensors or pressure plates), driveways, and an outdoor entertaining area with a barbeque or fire pit.
Complementary Building Materials: Ice windows (opaque), smooth colored clay or quartz to simulate rendered walls, and sand, water, and bamboo for external window screens. For a more suburban look, try red bricks, light wood panels, and colored wool in complementary colors.
Desirable Decorations: Bamboo, flower pots, glass and sandstone water features, cauldrons for sinks and toilet, horizontal window panes, and bushes in a jukebox planter.
The sky is the limit with modern-looking builds; simply take a walk around your neighborhood for inspiration—from ultra-modern concept homes (see Figure 5.18) to classic suburban sprawl (see Figure 5.19).

FIGURE 5.18 Smooth clay and quartz make a realistic “rendered” look.

Keep the following points in mind when creating a modern build:
![]() Smooth, clean lines with long horizontal windows add to the feel. Choose a light base color for your primary block, layered by a complementary feature block (either colored or textured) to highlight the main entrance and break the monotony of the space with a trim.
Smooth, clean lines with long horizontal windows add to the feel. Choose a light base color for your primary block, layered by a complementary feature block (either colored or textured) to highlight the main entrance and break the monotony of the space with a trim.
![]() Make good use of height. Dropping your hallway down a block or two after your entrance allows for higher ceilings in your living space, giving modern homes a spacious feel.
Make good use of height. Dropping your hallway down a block or two after your entrance allows for higher ceilings in your living space, giving modern homes a spacious feel.
![]() Make good use of roof space for gardens. Use bone meal on your gardens for super-fast growth (see Figure 5.20).
Make good use of roof space for gardens. Use bone meal on your gardens for super-fast growth (see Figure 5.20).
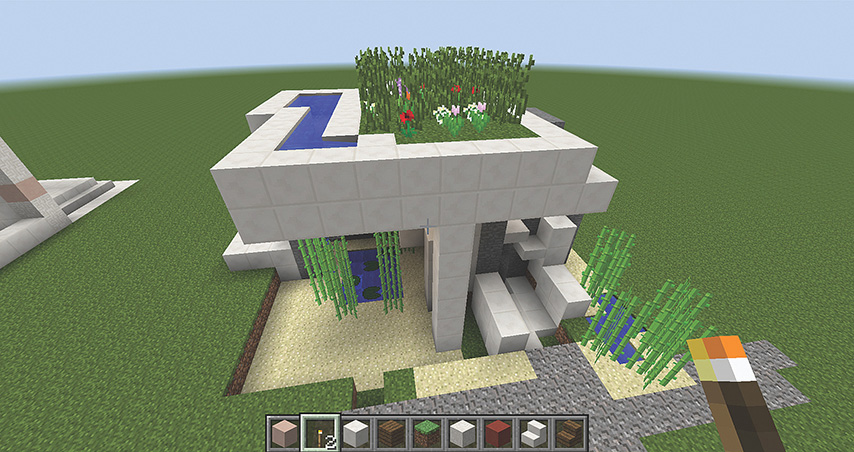
FIGURE 5.20 Utilize the space on your roof for solar panels, gardens, and water features—the perfect urban eco-retreat.
![]() Swimming pools add a great aesthetic element to the roof of a modern house; however, you’ll need to create a double-block reinforcement base to overcome internal leaking.
Swimming pools add a great aesthetic element to the roof of a modern house; however, you’ll need to create a double-block reinforcement base to overcome internal leaking.
![]() Multipurpose the space under your staircases for storage or continue them down into a basement.
Multipurpose the space under your staircases for storage or continue them down into a basement.
Residential Roads
Use this pattern to create a road for your city or residential streets:
![]() One black wool
One black wool
![]() One snow
One snow
![]() Three black wool
Three black wool
![]() One gold
One gold
Then repeat in reverse. Dig two blocks down so you can have one block higher for your sidewalk and one further step up to the grass level. Create your intermittent divider line as three gold blocks, then two black, three gold, and so forth (see Figure 5.21).

FIGURE 5.21 Take to the road and expand your horizons—why not build a city? Expand the number of lanes on either side of your divider to create a highway.
Tip: Give Your Exteriors Depth
Bring feature blocks, foundation pillars, and shaped walls out beyond your floor plan to create an interesting depth to your exterior. Extend roof blocks for an overhanging effect, and add garden boxes under your windows with shutters and eaves to draw attention to them. Remember, detail and depth are your friends—you’ll take your build from ordinary to extraordinary with a little extra creativity.
Viking Style
Construction Elements: Very steep roof, curved in the middle with decorative end pieces. A cozy, practical interior with a large fireplace as the focal point. Create a split-level interior so you can overlook your living areas from a bedroom alcove above. A longhouse (communal living and eating halls) has wooden frames and stone foundations. A ritual house (like a church) is a simple wooden building displaying weapons of defeated enemies, often highly decorated on the roof and at the entrance.
Complementary Building Materials: Oak and spruce, logs and panels for buildings with stone foundations. Ice, snow, clay, sand, and white wool for contrasting patterns. Dark wood paneling inside and out will stand out against a snowy landscape.
Desirable Decorations: Snow, snow, and more snow! Spruce trees, flower boxes, and shrubs. For interior design, use decorative shields and patterned wall hangings in frames.
Building a Viking house is a fun challenge, given their very interesting rooflines and decorative pieces. The outside of the house should look a little dark and intimidating (see Figure 5.22), but the inside should resonate with warmth and shared space. Lay out your house foundations using dark logs outside a rectangular floor plan. Extend your walls (either double or single level) in a light color wool or timber to your roofline.
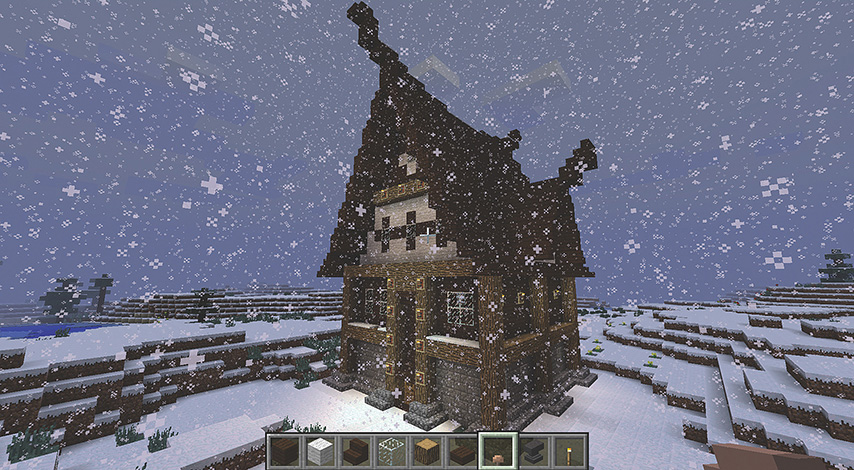
A Viking-style house is generally known for its very steep roof (to prevent the snow from piling up!) and the concave curve of the roof spine. Your roof will be long with a prominent single-length spine; however, if you’re keen to individualize the rooflines in your Viking village, you can incorporate an additional roof feature using the same method as the complex Victorian roof, discussed previously.
Using partly overlapping roof blocks or slabs, gradually curve the spine of your roof to a peak at each end. The end result will look similar to the bow shape of a boat.
Decorate each end (and any high window eaves) with a tall decorative end piece to emphasize the height of the roof—usually made from a combination of inverted stairs and slabs (see Figure 5.23). Experiment with stairs, blocks, and slabs to find your perfect match—just keep it steep.

FIGURE 5.23 A Viking-styled roof is tall and thin with a decorative concave spine. In this example, the roof was made by diagonally connecting an inverted stair underneath an upright stair.
Egyptian/Desert Style
Construction Elements: Geometric designs, pyramids, tombs, statues, markets, temples, residential areas of geometrically shaped sandstone buildings close together (think horizontal Tetris on a grand scale), outlying wheat farms, and a single majestic water feature for royalty.
Complementary Building Materials: Sandstone, sand, orange wool, gold, glowstone, and clay.
Desirable Decorations: Cactus, sugar cane, parchment, and tomb offerings such as empty flowerpots for canopic jars, seeds, wheat, flowers, and rotten flesh (or mummified, in this case!).
There’s nothing quite like the magnificence of a monolith. If you find yourself in a desert biome, make the most of it and turn the abundance of sand into something for which a pharaoh would move mountains. Building a pyramid (see Figure 5.24) or temple is quite easy using our pitched roof technique (see Figure 5.25). If you’re feeling a little more ambitious and want a sphinx to keep you company, consider experimenting with 3D modeling software (we’ll get to that later in this chapter).

FIGURE 5.24 The majesty of an Egyptian pyramid is just the beginning. Take your build underground in a maze of tombs, tunnels, and redstone booby traps.

Steampunk Style
Construction Elements: Ships and steam-powered machines, Victorian-era buildings with dark, gothic decorations, airships, floating islands, crooked architecture, and wooden furniture.
Complementary Building Materials: Dark oak blocks, cobblestone, fence posts, iron bars, dispensers, posts and lanterns, steel, and colored wool.
Desirable Decorations: Robotic contraptions, levers, gears, misshapen furniture, spider webs, steel bars, wooden architraves, complex rooflines, and lots of internal stairs and cupboards.
Steampunk is an eclectic mix of old and new—combine modern ideas with old-fashioned technology and you can’t go wrong. Mechanical objects should be steam powered and manually intensive, but with a whimsical element of fantasy behind the design. Figure 5.26 illustrates a 3D steampunk schematic imported from Minecraft-Schematics.com. Get online for some incredible builds in this style that will blow your mind.
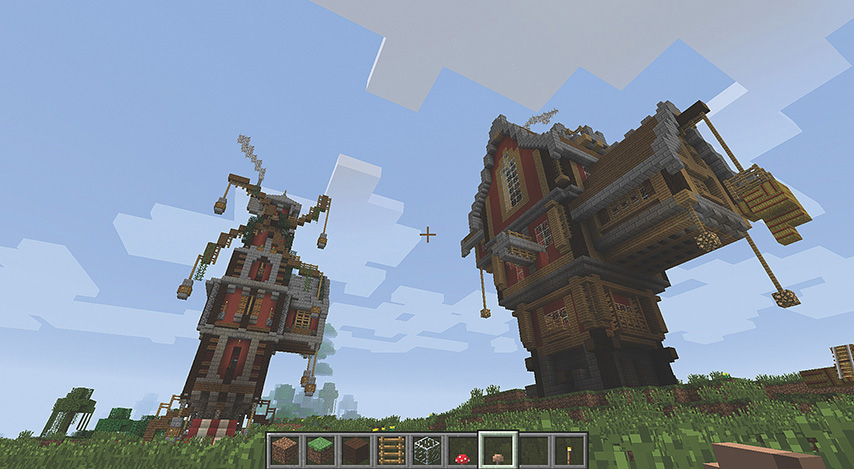
FIGURE 5.26 This steampunk house and windmill 3D model imported from Minecraft-Schematics.com illustrates the fanciful style.
Elven/Fairy Style
Construction Elements: Tree houses, aerial walkways, glowstone lights hanging from trees, and waterfalls. Create a central meeting point (large waterfall/garden) surrounded by hanging leaf houses. Build spiral stairs within or outside the trunk of an enormous tree to create a multilayered tree house (see creating natural terrain and trees for more detail).
Complementary Building Materials: Moss stone, jungle leaves, jungle wood blocks, meandering paths made of cobblestone or intermittent sunken logs, ladders, and glowstone.
Desirable Decorations: Lily pads, sunflowers, vines, mushrooms, and spider webs. Create nature-worship sculptures to hide throughout your forest.
To create monstrous trees for your jungle tree house or fantasy theme, plant four jungle tree saplings in each block of a 2×2-block space. Make sure that all surrounding blocks are plain dirt and there are no obstacles within a radius as high as the sapling. Add bone meal to convert them to a large jungle tree of 2×2 blocks, complete with vines, instantly.
Clear some more blocks for dirt next to it, repeat the process and your tree will expand accordingly. If you’re looking for epic height, create a “nest” in the top of your tree to lay another four dirt blocks (preferably hidden from view) and repeat the process.
Build an Igloo
If you’ve been dumped in the freezing grip of a snow biome, why not make the most of it and build an igloo to keep yourself safe and warm, like the one illustrated in Figure 5.27. If you’re in Creative mode, go ahead and use ice blocks to follow the basic pattern shown here. If you’re in Survival mode, you’ll need to mold your ice and wait for each layer to freeze, which I detail in the following steps:
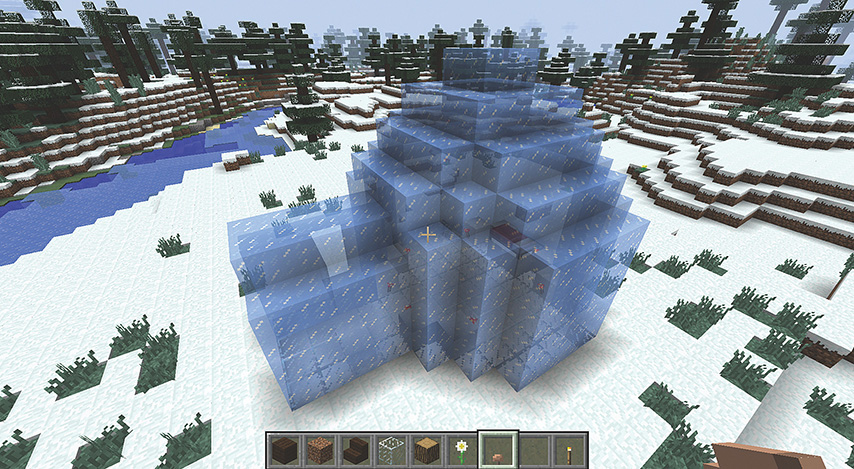
FIGURE 5.27 Fight off the winter chill in a redstone torch igloo.
1. Dig a circular pattern on the snowy ground. Keep in mind that each layer needs to freeze independently—bigger igloos take time.
2. Dig the center two blocks deep and then refill the bottom layer with the snow you removed. Fill the ground layer with glass blocks to prevent mobs spawning (see Figure 5.28).

FIGURE 5.28 A glass floor will stop mobs spawning inside.
3. Build a mold of dirt blocks on either side of your outer circle ring as a mold. Once in place, fill the inner core with water and wait for it to freeze.
4. You’ll need a two- or three-block entrance (with snow and glass floor). Using the same “mold” method as before, create a dirt tunnel (in case you haven’t guessed yet, the mold is temporary). Mold walls to your tunnel using dirt blocks one space further out and then block the end. Fill with water and let it freeze, as shown in Figure 5.29.

FIGURE 5.29 Use dirt blocks as a temporary mold while your water freezes.
5. Repeat this process a number of times, giving your igloo some height. Just increase your mold each interval while the top-most layer of blocks are freezing.
6. After a two-block-height tunnel has been frozen for your entrance, block off all external edges to create a tunnel ceiling and allow it to freeze. Your entrance tunnel should be lower than the igloo interior.
7. Once you have achieved the wall height you desire, you need to create a dome. Cover your top ice ring with dirt blocks to create the external wall of your mold. Leave an internal block empty (for water) and create a second dirt-block ring as the internal wall of your mold. Fill with water.
8. When the water is frozen, repeat this process, bringing your water ring in consecutive layers inward, until you close off your ceiling using a small square on a base of dirt (see Figure 5.30).

9. Once your roof has frozen, dig away all your dirt blocks, including the ice blocks blocking your entrance tunnel, leaving an ice shell.
10. Add a door to the inside of your entrance by replacing the floor block with snow. Decorate with redstone torches inside (don’t build a fireplace!) and fit out with some home comforts.
Advanced Decoration Techniques
Designing your home, inside and out, is largely a matter of personal taste. However, do make sure that you are consistent throughout your build, using a set of complementary materials and colors that will carry through both your exterior features and decorative furniture.
Don’t try to incorporate too many elements in a single structure—you’ll end with a jumble-sale effect of mismatched colors and textures.
For example, door frames, eaves, and foundation pillars in a secondary color can be carried through to your fireplace, bedding, feature walls, and furniture for a consistent theme.
Generally speaking, a modern house will use smoother surfaces, spacious rooms, and clean lines; whereas dark, raw woods, cobblestone, and iron doors suit medieval- and rustic-style builds.
Note: There’s More Online
There are hundreds of incredible texture packs available for download online to enhance your Minecraft builds. You can search these by category, resolution, and popularity to find the most suitable. Visit http://www.planetminecraft.com/resources/texture_packs/ to rummage through literally thousands of packs.
Here are some interior concepts to get you started:
Windows
![]() Use glass planes to create a pattern in glass block windows for detail without obscuring the view.
Use glass planes to create a pattern in glass block windows for detail without obscuring the view.
![]() Create your own stained glass window mosaic for a stunning effect seen from inside and out.
Create your own stained glass window mosaic for a stunning effect seen from inside and out.
![]() Enhance your windows and doors with eaves, shutters, and sills to complement your primary block color.
Enhance your windows and doors with eaves, shutters, and sills to complement your primary block color.
Bathrooms
![]() Use a half-slab floor in the bathroom so your toilet and bath sit lower.
Use a half-slab floor in the bathroom so your toilet and bath sit lower.
![]() To create a toilet, fill a cauldron with water and pop a hatch on the top for the open-close lid. A quartz block behind with a button on the top acts as a cistern.
To create a toilet, fill a cauldron with water and pop a hatch on the top for the open-close lid. A quartz block behind with a button on the top acts as a cistern.
![]() Try building an exact replica of your bathroom on the other side of your ice “mirror” panes to create a realistic reflection.
Try building an exact replica of your bathroom on the other side of your ice “mirror” panes to create a realistic reflection.
Walls
![]() Line your doors with the external wall for a more aesthetic house silhouette.
Line your doors with the external wall for a more aesthetic house silhouette.
![]() Experiment with room dividers and internal walls to include shelves (inverted stairs), glass mosaic features, and split-pattern feature walls.
Experiment with room dividers and internal walls to include shelves (inverted stairs), glass mosaic features, and split-pattern feature walls.
![]() Line the bottom row of your walls to base window height with a feature brick, log, or texture to liven up large areas.
Line the bottom row of your walls to base window height with a feature brick, log, or texture to liven up large areas.
![]() Sugar cane makes a bright, sophisticated room divider. Plant it in sand with an adjacent row of water as a feature point.
Sugar cane makes a bright, sophisticated room divider. Plant it in sand with an adjacent row of water as a feature point.
Flooring
![]() The topsides of pistons and furnaces make fantastic patterned floors.
The topsides of pistons and furnaces make fantastic patterned floors.
![]() Use slabs to create a stepped flooring pattern, similar to Figure 5.31 from our medieval build library.
Use slabs to create a stepped flooring pattern, similar to Figure 5.31 from our medieval build library.

![]() Sandstone and Netherbrick create a stunning checkerboard combination—inside and out. (Giant garden chess, anyone?)
Sandstone and Netherbrick create a stunning checkerboard combination—inside and out. (Giant garden chess, anyone?)
![]() Try using a leaf block in your flooring pattern for a neat look.
Try using a leaf block in your flooring pattern for a neat look.
![]() Sink crafting tables into the ground for a fantastic gothic-look floor.
Sink crafting tables into the ground for a fantastic gothic-look floor.
Kitchen
![]() Pressure plates on top of your oven and crafting bench make a nifty kitchen counter.
Pressure plates on top of your oven and crafting bench make a nifty kitchen counter.
![]() Place a few redstone torches under pistons for a kitchen table.
Place a few redstone torches under pistons for a kitchen table.
![]() To make a fridge, place a snow block with a side button on top of a dispenser filled with food (see Figure 5.32). Add an iron door to the front panels. Push the button and, voila, dinner time!
To make a fridge, place a snow block with a side button on top of a dispenser filled with food (see Figure 5.32). Add an iron door to the front panels. Push the button and, voila, dinner time!

FIGURE 5.32 A dispenser in your fridge means fast food!
![]() Place colored wool behind your chair backs to create cushions.
Place colored wool behind your chair backs to create cushions.
![]() Build your armchair around a minecart on a single powered rail for a chair you can actually sit in.
Build your armchair around a minecart on a single powered rail for a chair you can actually sit in.
![]() Create a television by placing two black wool blocks on two bookshelves with a painting attached to one face. Add a lever to the top for an old-school antenna.
Create a television by placing two black wool blocks on two bookshelves with a painting attached to one face. Add a lever to the top for an old-school antenna.
![]() Place a small painting on the front of a half slab with a pressure plate flat on the table in front, and you have a laptop ready for use!
Place a small painting on the front of a half slab with a pressure plate flat on the table in front, and you have a laptop ready for use!
![]() Build bunk beds by placing a bed on top of two rows of logs; remove the logs underneath and add a second bed in their place.
Build bunk beds by placing a bed on top of two rows of logs; remove the logs underneath and add a second bed in their place.
![]() A bookshelf base with a fence post holding a glowstone (add trapdoors to the sides) makes a soft glowing lounge lamp.
A bookshelf base with a fence post holding a glowstone (add trapdoors to the sides) makes a soft glowing lounge lamp.
![]() Add a layer of carpet to the end of your bed as a throw.
Add a layer of carpet to the end of your bed as a throw.
![]() A layer of ice blocks surrounding plants with a wooden base and top make for an extravagant aquarium room divider.
A layer of ice blocks surrounding plants with a wooden base and top make for an extravagant aquarium room divider.
Lighting
![]() Place an anvil in an item frame and then attach a torch (aim for the block behind) for a feature look.
Place an anvil in an item frame and then attach a torch (aim for the block behind) for a feature look.
![]() Use black wool walls to absorb light for deliberately dark rooms.
Use black wool walls to absorb light for deliberately dark rooms.
![]() For rooms with a six-plus-block-high ceiling, add a chandelier. Hang a glowstone block from a fence post mid-ceiling and place a torch on each face. Knock away the block and replace it to remove the connecting post arms (see Figure 5.33).
For rooms with a six-plus-block-high ceiling, add a chandelier. Hang a glowstone block from a fence post mid-ceiling and place a torch on each face. Knock away the block and replace it to remove the connecting post arms (see Figure 5.33).
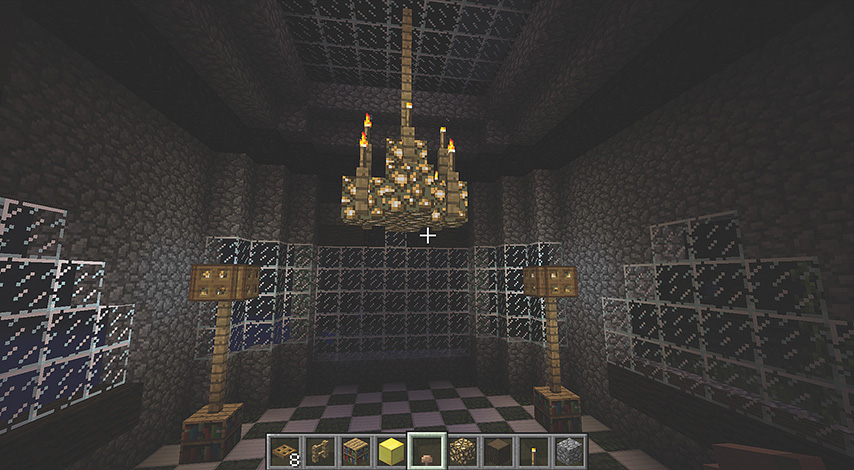
FIGURE 5.33 A chandelier adds elegance to the high ceiling of the ballroom.
![]() Create a boat dock behind your house and dig an underground river tunnel to the sea.
Create a boat dock behind your house and dig an underground river tunnel to the sea.
![]() Dot white wool from your chimney as smoke for that cozy, “lived-in” look.
Dot white wool from your chimney as smoke for that cozy, “lived-in” look.
![]() Use the chandelier technique to create a lamppost; simply overhang your light source from a tall post connected to a fence at the top.
Use the chandelier technique to create a lamppost; simply overhang your light source from a tall post connected to a fence at the top.
![]() If your modern house boasts a swimming pool, use slabs to create a diving board.
If your modern house boasts a swimming pool, use slabs to create a diving board.
![]() A hedge maze made of jungle leaf blocks is a fun addition to any medieval build—place a reward in the center for your guests!
A hedge maze made of jungle leaf blocks is a fun addition to any medieval build—place a reward in the center for your guests!
![]() Create an ever-burning outdoor barbeque using flint and steel or fire-charges on Netherbrick over a cobblestone grill, surrounded by red bricks.
Create an ever-burning outdoor barbeque using flint and steel or fire-charges on Netherbrick over a cobblestone grill, surrounded by red bricks.
Creating Natural Terrain and Trees
If you’re keen to make your build as natural and realistic as possible, you’ll achieve the best effect by using your existing environment to your advantage. Build around it, using all the curves, imperfections, and oddities you come across as opportunities to individualize your home.
Of course, there are times when you seed into a super-flat world or wish to create a natural environment around an existing build.
Mods such as MCEdit (www.mcedit.net), WorldEdit (http://minecraft-mp.com/plugin/worldedit/), and VoxelSniper (http://dev.bukkit.org/bukkit-plugins/voxelsniper/) are powerful tools for creating large-scale changes in your environment. These are open-source software packages running on multiplayer servers online or available for offline single-player use, and are not associated with Mojang. (See Chapter 1, “Getting Started,” for more on installing mods.)
Essentially, these programs have long-range mapping tools that allow you to make epic terraforming changes to your environment, in game. You can use different brush types to make detailed edits to individual blocks from a distance, or you can execute mass changes to grouped objects and place new objects. For example, one style of brush will build raised terrain such as mountains and hills, whereas another will “scoop” blocks (effectively replacing dirt with air) to create oceans, trenches, valleys, and canyons.
“Naturalize” your new sculptures by typing a command to cover them in grass blocks, as well as place trees and other objects on the surface. All programs also allow you to change the blocks within a connected mass (for example, a mountain of sand to dirt, or a valley floor from stone to clay). You can also set the radius of a brush to the size area of blocks you wish to convert per click, and start painting the landscape.
Additional plug-ins and mods can generate a forest around your house; however, sometimes the hands-on approach gives you more control over your environment. The most important thing to remember when creating natural terrain and trees by hand or mod is to lose the symmetry. Use unpredictable sizes and skewed shapes. Nature isn’t perfect, and that’s part of its charm.
Drawing 2D Pixel Art
Re-creating your favorite image in Minecraft is not too difficult; however, you’ll need an image editor. Windows comes with the Paint program installed, which will suit your purposes. Alternatively, you can get free software from www.pixlr.com or www.getpaint.net or a 30-day Photoshop trial from www.adobe.com.
In the following example, we’ll repaint a vintage classic, Astro Boy, into our pixelated sky. To begin, load your image into the software. If the image has too many colors and details, convert it to a 16-bit format to minimize the colors (see Figure 5.34).
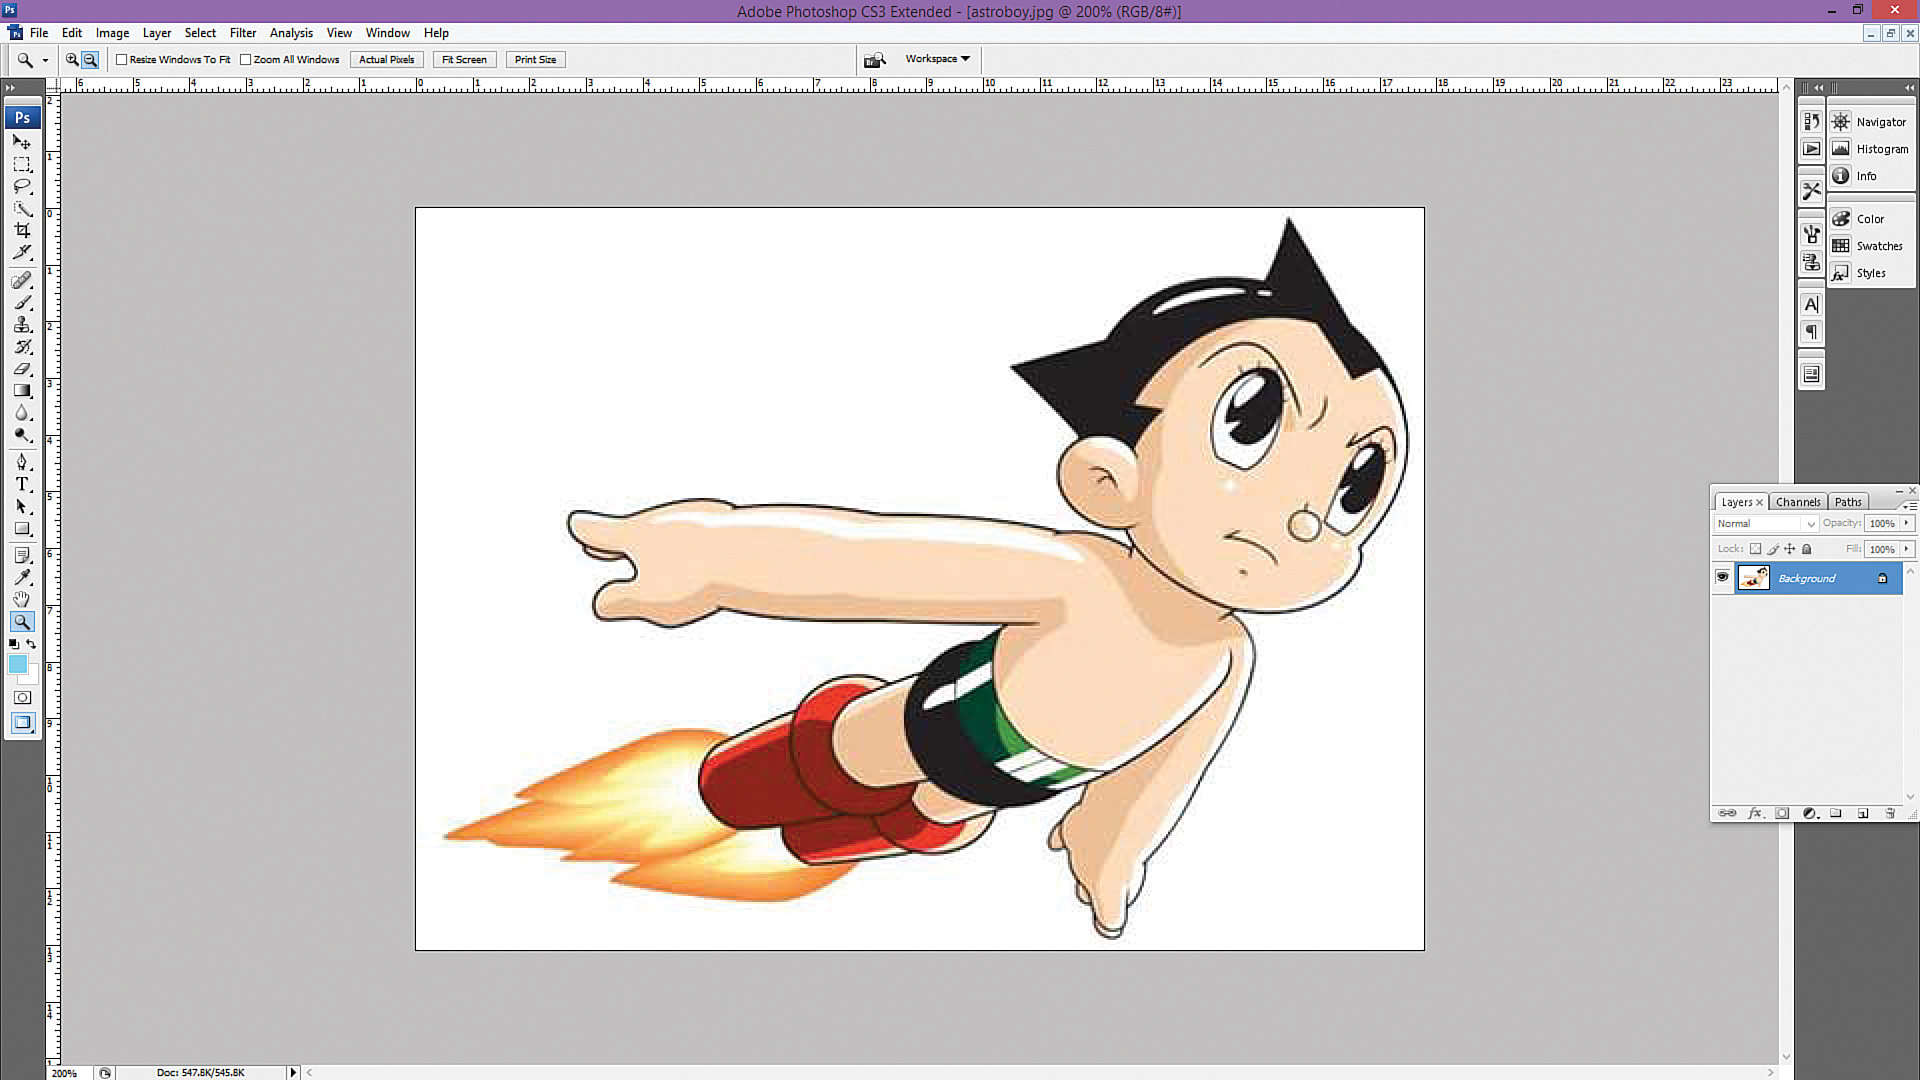
FIGURE 5.34 Load the image into the software.
Reduce the image size until your picture is pixelated to the point that you can easily replicate it using Minecraft blocks—one colored block per pixel. The larger the image size (and hence higher number of pixels), the longer the build will take. Next, lay gridlines over your image to easily differentiate between individual pixels (see Figure 5.35).

Finally, use this schematic to copy your image, line by line, into Minecraft using colored blocks that match your image colors the closest (see Figure 5.36).
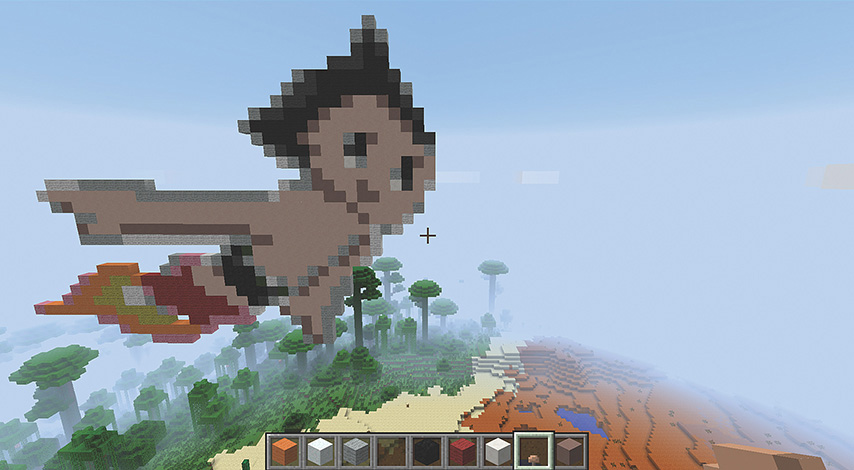
FIGURE 5.36 The image copied line by line into Minecraft.
Sculpting a 3D Statue
Creating a statue can be extremely challenging, but is equally worthwhile. Let’s look at a few methods that work really well.
The most manually intensive way involves the patient artistry of chipping away at a megalith, block by block, until you reveal a masterpiece. It’s best to have a well-thought-out concept to guide you, and then channel your inner Michelangelo to completion!
The second way involves an extension of your 2D pixel art to include the depth of the image as well. Some brilliant freeware solutions can convert any 3D image into a schematic that you can use for your build. As with creating 2D pixel art, you’ll need to have image-editing software installed.
If you’re looking for an existing 3D model to hone your skills, try visiting a site such as Qblock (http://kyucon.com/qblock), where users have built models of a wide variety of objects, shapes, and anime characters for online sharing. You can edit colors and block placement and spin the model 360 degrees. View each separate layer in the schematic, page by page, and follow the pattern onscreen to replicate it with colored blocks in your Minecraft world, as I have demonstrated in Figure 5.37.

FIGURE 5.37 Re-create your statue, layer by layer, using schematics created yourself from a 3D conversion program or using a freeware solution such as the Ghostbusters no-ghost sign from Qblock.
To create your own 3D model, you’ll need to access a content-creation program such as Blender (http://blender.org) or SketchUp (www.sketchup.com). The latter has a convenient library of millions of models available from small pieces to giant castles, although they do need to be remade in Minecraft.
If you have an existing 3D model that you wish to convert to pixelated form (called voxelization), try a conversion program such as Binvox (http://www.patrickmin.com/minecraft). Once your file is in a Minecraft-compatible format (.schematic), you can import it into Minecraft using an open-source world editor such as MCEdit (see Figure 5.38).

MCEdit allows you to alter the physical attributes of your Minecraft world by adding 3D shapes, changing the components of your landscape and the size of individual attributes, flattening, deleting, or expanding sections, and even changing the appearance and placement of mobs and other resources. In this example, we are downloading a large house build into our existing world (see Figures 5.39 and 5.40). An extensive collection of builds is available for download at Minecraft-Schematics.com, including this Steampunk House created by user Mad_Mr_Potato.

FIGURE 5.39 Importing a .schematic file into your Minecraft world using MCEdit gives you the ability to add large structures in minutes.

FIGURE 5.40 Once you have imported your own .schematic 3D file, the object will appear in the same position in your Minecraft world, ready for use.
Creating Spheres, Circles, and Arches
Some brilliant, free online conversion programs make it easy to plot circles or spheres. Simply enter your block radius to generate a pattern that you can build in Minecraft. Have a look at these great sites to get started: www.mineconics.net and www.plotz.co.uk. The Filler Machine in Buildcraft can also achieve this in game (see Chapter 7, “Empire Building with BuildCraft.”)
If you need to build an exceptionally large circular structure, dome, or sphere and want to save (a lot) of time, you could, of course, jump into a mod to alter your world behind the scenes. Try using the time-saving filter at http://sethbling.com/createrotatedsolid to build your monolith, using a single slice as the cross-section of your anticipated whole. The slice will rotate 360 degrees around its center point to build a solid object. Remember to back up your existing build first, and make sure you create the object in a space far clear of other structures to prevent an override.
If you prefer the Michelangelo approach (blood, sweat, and tears), you can create an impressive build armed with only your pickaxe and plunder. In the following example, I’ve used different colored rings, corresponding to the circular pattern in Figure 5.41, to demonstrate the manual creation of a spherical home in the sky (see Figure 5.43):
1. Create a vertical circle following the pattern that best suits the size of the sphere you need. Each quarter segment must be identical.
2. If you’re planning a floating sphere, pillar-jump high enough to begin and then knock it away.
3. Create a second circle intersecting at the center-top and -bottom blocks of the original circle.
4. Follow your blocks out in a radial pattern until each forms a complete ring, as per Figure 5.42. Add an additional block in arm’s length as you progress closer to the center, which should be the widest point on your circle.

FIGURE 5.41 Keep each quarter pattern identical.
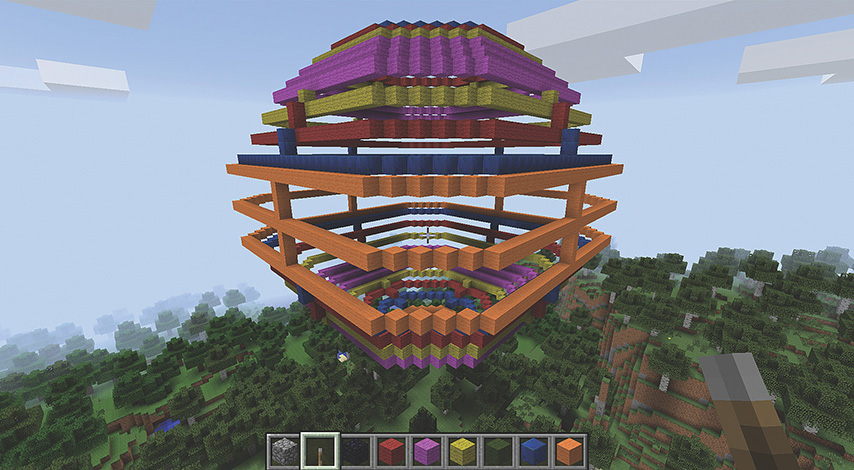
FIGURE 5.42 As you progress, check that your rings are symmetrical.

FIGURE 5.43 A floating retreat—time to begin interior design.
5. Once your rings are in place, fill in the gaps from the inside—you don’t want to change the exterior shape of your rings.
Building in the Nether and End Regions
Construction Elements: Build a high fortress using cobblestone or Netherbrick—make sure your mining tunnels are covered by glass. A tree farm (BYO dirt) will provide resources for tools, torches, charcoal, and building.
Complementary Building Materials: Magma cubes, Netherbrick, end stone, Nether quartz, obsidian, gravel, and Netherrack.
Desirable Decorations: Ender crystals, obsidian, dragon eggs, glowstone, and soul sand.
As unappealing as the Nether can be, you can build impressive farms, forests, and homes in the underworld and alter your environment significantly—but plan ahead to make sure you don’t waste precious resources.
Cobblestone and glass are your main building materials in the Nether. Before you head underground, mine a large quantity of sand to smelt into glass in your furnace. In the Nether, cobblestone has similar properties to obsidian, which makes it a durable resource for building. It’s relatively easy to find in the Overworld, so chances are you’ve got a fair bit stashed in your inventory already.
In the Nether, take advantage of the height of natural formations of Netherrack to give you an eagle’s-eye view of the landscape. Begin by building a high, enclosed safety room with 360-degree glass windows—no nasty surprises. A strong defensive base is especially important if you’re tackling a multiplayer server game or playing in Survival.
Try climbing up wall ladders and throwing an Ender Pearl into the bedrock (or placing a hatch) to use as a base. It’s a great place to stash your chests in PvP mode—but take enough materials to build back down so it’s not a one-way trip! Also keep in mind that if you build a Nether Portal in the bedrock to escape back into the Overworld, it won’t serve as an entry into the Nether at your original position, so take your map so you can find your way back home in the Overworld.
Connect your living areas, mining tunnels, and observation decks with glass to protect yourself from ghasts. You don’t want your hard work blown apart.
Hide multiple entrances to your Nether base in case you need a quick escape to safety. Make sure they have doors (and perhaps a hidden lever) to keep the nasties out.
If you’re after a more natural habitat, smelt Netherrack to create Netherbrick and then repair and fortify an abandoned Nether Fortress by crafting walls, stairs, slabs, and fences.
Build a tree farm so you don’t have to keep returning to the Overworld to harvest wood. Don’t attempt to fast-grow a tree unless you’re sure you have enough space; otherwise, your bone meal will be wasted. Of course, empty growing space means ghasts, too, so place glowstone and glass within your tree farm in an efficient pattern to prevent spawning, as well as providing your saplings with necessary light. If you’re crop farming, in the absence of water, tilled land must be planted immediately to prevent it reverting to dirt. Plants will grow slightly slower than normal in the Nether.
If building in The End is more your style, or you’re planning an Enderman farm to harvest Ender Pearls, a semi-permanent residence to house your portal can be an advantage. Keep your house mob proof by creating a moat around it so Endermen can’t teleport in. You’ll need to bring in any building materials from the Overworld (or Nether Fortress) because there is nothing to mine in The End but the yellow-green abyss of End Stone and the odd obsidian column.
The Bottom Line
The best way to improve your build is, of course, to build. The more you expand on your existing ideas and try new techniques, the more quickly your expertise will develop. Brilliant software programs are now available that give you unprecedented control over your landscape and modeling, so take advantage of the wealth of creative license to which you have access. If you want to take complex builds to a whole new level, also be sure to check out Digital Engineering With Minecraft by James Floyd Kelly.
Construction can take time, but the satisfaction of seeing your creation come to pixelated life is well worth the effort. Whatever you do, don’t give up on your ideas! If you get stuck, simply search for inspiration from your community of fellow Minecraft architects and get back to it—remember, Minecraft Rome wasn’t built in a day (apparently it took five months!). You can download the entire project from http://www.planetminecraft.com/project/roman-city-download/ (http://goo.gl/E8Nqdn).