Chapter 14
Taken for Granted (Skills Every Actor is Expected to Know)
We are what we repeatedly do. Excellence then is not an act, but a habit.
Aristotle
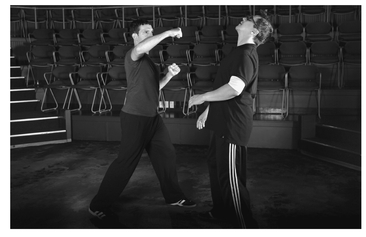
"I'm going to ask you for something and feel free to say no if you're not comfortable with it but ... can you fall backwards?" The director of the commercial I was auditioning for asked me this intently with an inflection that suggested he had requested the impossible. I had performed two falls for him, the casting director, and the producer on the other side of the table already, both landing on the blue mat face first. The first time I fell I made such a loud noise hitting the mat that the casting director jumped a bit from her chair. Falls landing face first are always a bit more strenuous than falls on the back since the reverb from hitting the ground causes the spine to curve away from the floor. Since the spine naturally curves towards the anterior or front of the human body this makes falling backwards preferable especially when performing the fall repeatedly. I know this. The director apparently does not.
I furrowed my brow and returned the director's gaze and slowly nodded my head. I took three paces onto the blue mat again, kicked my feet up going horizontal a few feet above the ground, and landed flat on the mat with a smack. I got up as if nothing had happened. The director came over and shook my hand. I booked the job on the spot and with it my SAG card.
I was lucky that the part required a skill that I had been practicing for years. All of the martial arts I had taken had helped me develop a sense of how to go to the floor. However, it was not until I had taken stage combat in graduate school that I truly discovered how to go to the floor consistently without injuring myself while making maximum sound. This is a very specific skill set that is particular to performers. The techniques that follow are staples of the acting trade. They might not always be the ones that land you the job. But they will certainly be the ones that directors, producers, and other trained actors will expect you to be familiar with when doing professional work.
Going to the Ground
Going from a standing position to a position on the floor is one indispensable skill for an actor to possess. Every actor should be able to do a controlled fall from standing to the ground in either the supine (face up) or prone (face down) position in a variety of situations, whether from a push, a punch, a gunshot, or even fainting. There are a variety of techniques that can work depending on the abilities and physique of a given actor. However, any technique used should be capable of being performed at nearly any tempo, be easily adaptable in a variety of dramatic or comedic situations, and be repeatable to a degree that any chance of injury is virtually eliminated.
We used to fall all the time as toddlers. When attempting to walk we would struggle to get up and typically go right back to the ground again. As we have matured and started to socialize, the embarrassment attached to falling down becomes ever more present. Only the young and inexperienced fall since they are not in control of their bodies. One of the marks of adulthood is to be able to stand and be in control. But in this quest for adult control we have lost the sensibility of how to take care of ourselves when a fall inevitably happens. Falling from a standing position because of any kind of imbalance can be scary but it does not have to be so. If we allow our bodies to remember how to handle to impact, the fall will no longer cause so much panic.
This following exercise is also a good one for helping the performer explore his or her attitudes towards falling. Most people are scared of falling. And why not? Falling is seldom associated with good images. Usually people get hurt or worse from falling. However, the act of falling in and of itself will not injure a human body. The impact, or more precisely the sudden deceleration, of the human body is the cause of injury. The fall will and can cause a lot of anxiety especially if the fall is from a great height (a common guideline for determining whether or not a descent counts as a "high fall" is to multiply the height of the person by 3 or any fall that measures 15 feet from the point of where the feet are on the platform to the ground). Unless you are performing for a stunt show or Cirque du Soleil, chances are slim that you will have to deal with a high fall during a show. However, falls from the standing position are quite common no matter what the production. Here the issue of injury becomes not really about sudden deceleration (although we must always be aware of the fact conceptually) but rather how the performer can disperse the energy of impact so that the possibility of injury is minimized. The most important thing, as usual, is to relax and use only the muscles necessary to efficiently disperse energy after a fall. Remember, it's not falling that hurts. It's all the things that we do to keep from falling that cause problems.
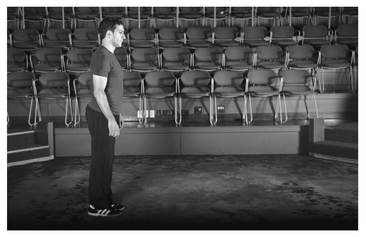
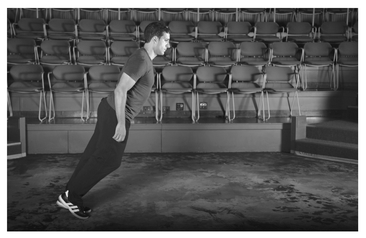
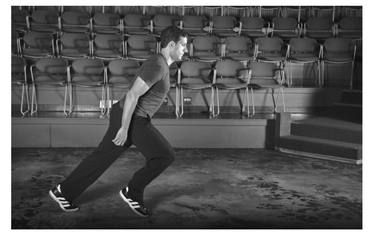
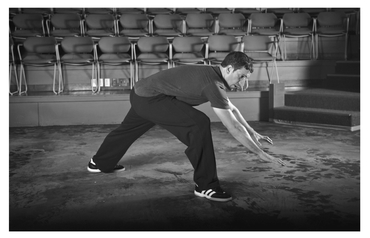
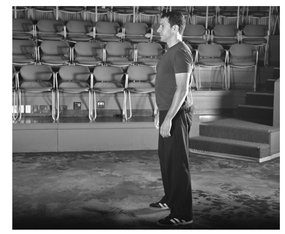
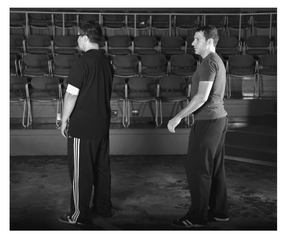
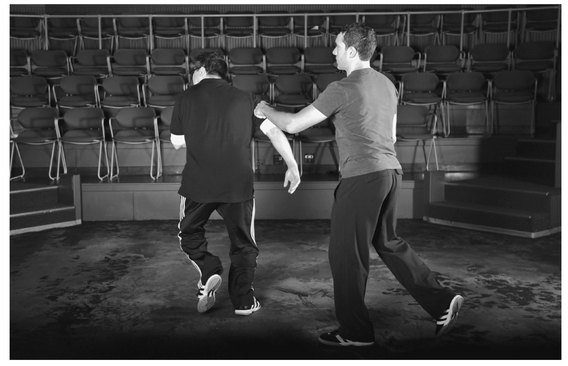
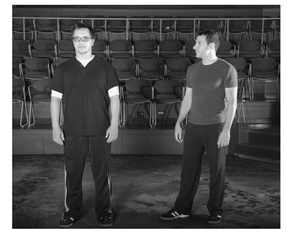
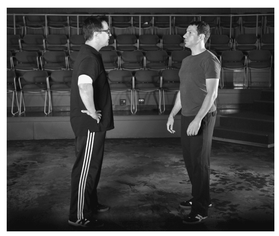
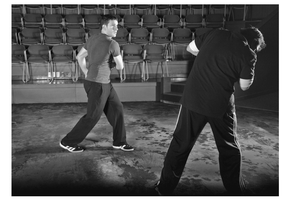
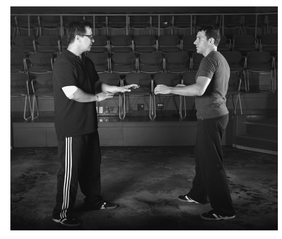
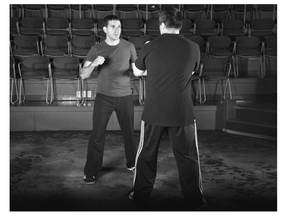
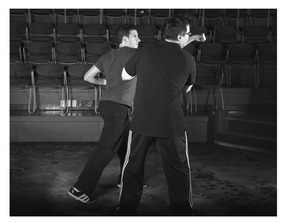
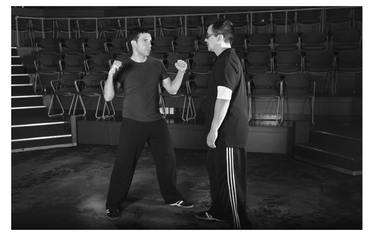
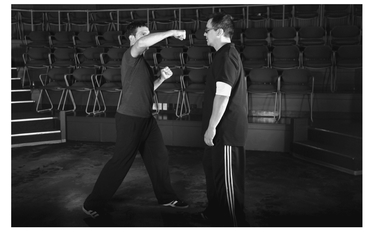
To begin to understand what is involved in the act of falling one should investigate what it is like for the human body to be imbalanced. This kind of investigation can be easily made with a simple exercise. Begin by standing in a relaxed position with the knees bent and the feet parallel. Slowly rock forward onto the balls of the feet and then back on the heels. Feel the distribution of weight as it shifts forward back. Now rock from side to side on the inside and outside of the feet. Get a feel for where your center of gravity is and how you can manipulate it given the position of your feet. Now begin to lean forward to test the limits of your balance in that direction. When you feel that you are about to fall allow yourself to keep leaning forward until you must catch yourself by making a big step forward with either the left or right leg (Figures 14.1-14.6). You can also perform this exercise in any direction (backwards, to the side on a 90-degree angle, or on diagonal angles) to further explore how you can perceive and handle imbalances in the body.

14.2
14.3

14.5

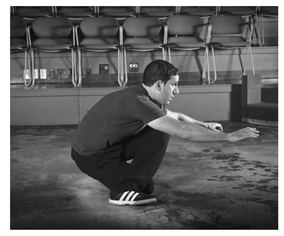
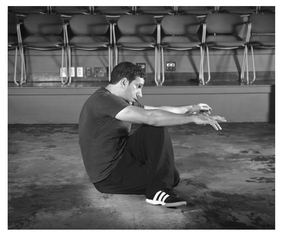
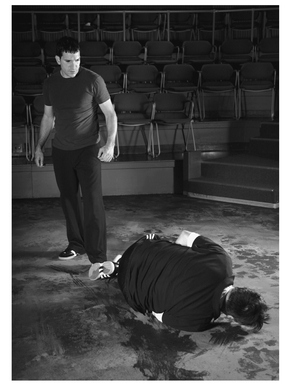
Return to the imbalance moving forward in the big step. In order to fall forward we can use the beginning of this one big step to access the first technique. When you catch yourself with the big step or lunge see if you can keep your balance there. Alter the position of your front foot so that the width distance between your front and back foot is not too narrow. It should almost feel as though you are lunging slightly to the side while keeping a fair amount of space between your legs. Now reach out with both hands in the space between your feet and turn your head to look in the direction of your bent knee that is forward. As your center lowers to the ground, contact the floor with your hands and bend at the elbows as though the arms were shock absorbers on a car. This will be useful in controlling your descent to the floor (think of it as though you were going to do a push-up). Make sure that every part of the anterior of the body arrives at the same time, taking special care to not knock hips and knees on the floor. The initial position on the floor should look as though you were crawling across the floor for an instant. When the entire body reaches the floor relax the arms and legs to assume whatever prone position is most appropriate for that moment (Figures 14.7-14.11). This is commonly referred to as the front fall.

14.8

14.9
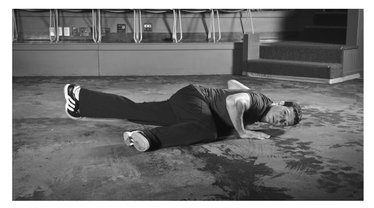

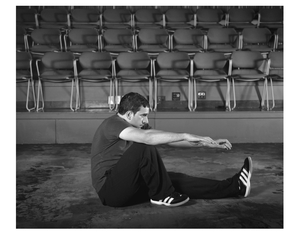
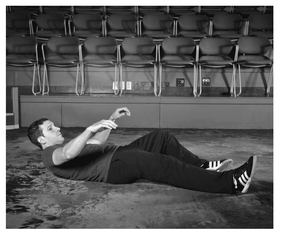
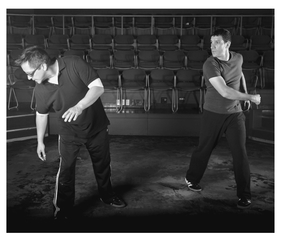
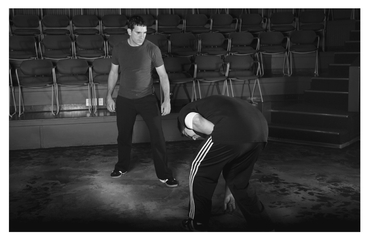
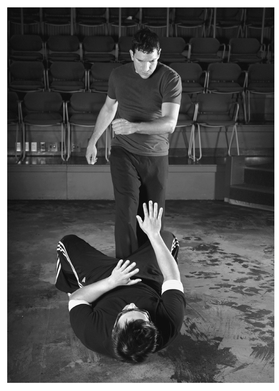
To fall backwards (back fall or sit fall) requires some slight alterations to this technique since the direction of the fall has obviously changed. (Look at the Drunken Sailor exercise in Chapter 9 Games to warm up on the mechanics of this technique.) From the standing position take a big step with either the right or left foot but this time step backwards. You will find yourself in a similar lunge position to that used in the front fall. The position of the feet should allow for room to exist between the legs so as to maintain lateral stability through the technique. Reach out the arms to counter balance the weight that is travelling backwards (these arms can also be used to splay out for dramatic effect once the technique is proficient). Now relax the knees and roll through the legs while making a smooth, diagonal descent to the floor (Figures 14.12-14.17).
It should be noted that at no time should the amis reach back to assist in "catching" the fall. All too often this is the human reaction to falling backwards. It is one of the few human instincts that actually does us no good. The arms are meant to articulate towards the anterior of the body. Once the shoulders rotate the arms towards the posterior, that mobility is severely limited. As a result, any "catching" of the fall that occurs when falling backwards usually happens with the amis in a locked position. Any force that is received by the arms at this point will transfer to the weakest most delicate points of the arm – the joints. The probability of sustaining a joint injury in the wrist, elbows, or shoulder skyrockets if the arms are not reaching up and away during this technique. A good reminder to ensure that the arms reach forward and not back is to reach towards the thing or person who was the cause of the fall.


14.13
14.14
14.15

14.16

14.18

14.19

14.20
Sometimes one needs to fall to the ground in a confined area. Here it is impossible to take a big step either forward or backward to do the above techniques. In this instance the performer can execute a twist fall. The performer begins with the feet shoulder width apart and parallel to one another. The body rotates at the point of contact from the force that causes the fall. As this twist initiates, there is a corkscrewing motion of the body as the hips lower to the floor. The knees should bend and the knees end up crossing like a pretzel as the hips meet the floor. When the backside meets the floor the performer then rolls through the spine in much the same way as the back fall and extends the energy out of the legs to end up in the supine position. The filial position on the floor is typically facing 180 degrees in the opposite direction of when the twist fall had begun. However, depending on the needs of staging, force of the blow leading into the fall, and the flexibility of the performer the final position can be adjusted to any desired orientation (Figures 14.21-14.24).
14.22

14.23

Assassin
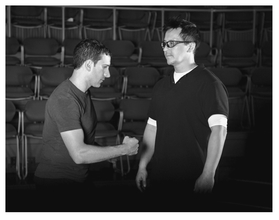
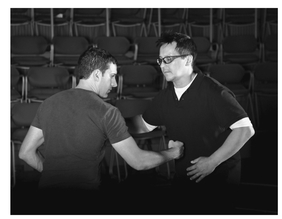
This is a game to reinforce the techniques of going to the ground. It is modeled on the classic game by the same name. One person in a group is silently chosen to be the assassin. Once the game begins everyone in the group walks about the space and greets anyone they come in proximity to. This is done with a handshake (in some versions of the game it is simply with eye contact). If the assassin shakes hands with a person in the group the assassin has a choice of either letting the person go or touching the person's wrist with the forefinger of the right hand. If the latter happens the person has been "marked" and must shake at least two other peoples' hands before dying. The person who dies must go to the ground using one of the techniques listed above. If someone has a notion of whom the assassin is then that person must say, "J'accuse!" If the accuser is right then they win and get to choose the next assassin for the next game. If they are wrong then they must go to jail and observe the game for the rest of the round and cannot be the assassin for the next game. The assassin wins when the entirety of the group is either dead or in jail.
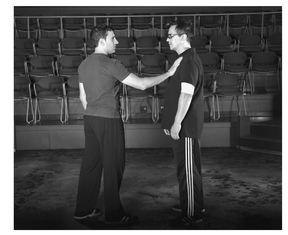
Controlling Actions
Something typically required of actors in many scenes is to physically control the other actor. That may be an action to keep someone in the room by grabbing them, dislodge them from the space by pushing them, or trying to make them submit by causing pain such as grabbing of the hair or choking. All of these moves have their own advantages and challenges as techniques. Above all, each one requires close enough proximity between the actors so that actual contact can be made. In fact, the closer the performers are to one another during these techniques the more playable the moments become and also the less likely the chances for injury. To review the concepts at work in these techniques refer to Chapter 13 Contact Violence.
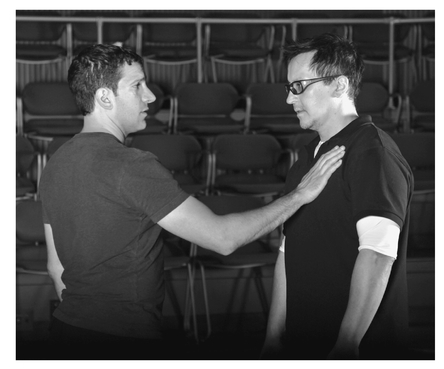
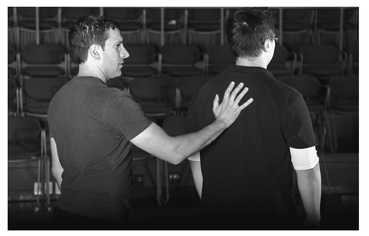
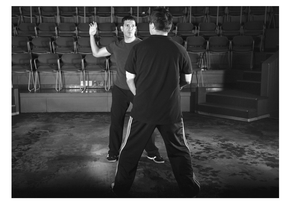
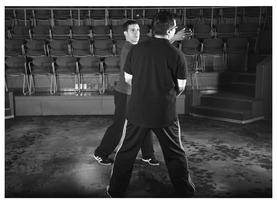
Pushing
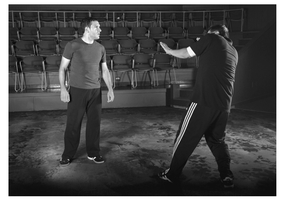
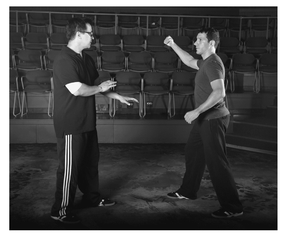
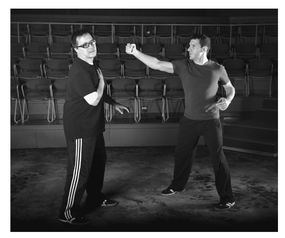
The push is perhaps the most basic and most misinterpreted move in enacting violence for theatre. The pitfalls here are that the performers who rush into the push do not bother to match either the force or timing of the push. Both must be mutually agreed upon by both performers for the push to be visually sound and affecting for the audience. Pushes can happen from anywhere on the operator's body to anywhere on the receiver's body really. The optimal and most likely combination of places is when the hand or hands of the operator are placed on the torso of the receiver. The force created from this particular combination creates an imbalance in the receiver that is playable for a scene with violent conflict.
The optimal locations to place one or both hands on the torso are the upper pectorals below the collarbone. This location satisfies the guidelines for making contact with a large muscle group and still gives the operator the solid structure of the thoracic region to push against (Figures 14.25-14.27). Make certain that the push does not migrate up towards the collarbone or out towards the shoulder joints as putting too much force on these less supported structures can lead to bruising and injury. Another viable location for the push would be placing the hand or hands on the major muscles of the upper back such as the trapezius or rhomboids between the shoulder blades and spine. Both of these locations provide good contact for both performers to have playable transfer of energy without increasing the risk of injury to bones, joints, or soft tissue if the force is increased (Figures 14.28-14.30). Also, the push can be executed from a variety of staging options depending on if the operator of the push is placed in front or behind of the receiver. The deltoid or shoulder muscle on the upper arms is another location where the push can be located. This is a good variation to practice since both performers can execute the technique while standing next to each other in a scene (Figures 14.31—14.33). Here since the deltoid is located between the shoulder and elbow joints extra care should be taken to avoid these structures as additional force here has a higher likelihood of resulting in discomfort or injury.
A push from the front, one handed:

14.26


14.29

14.32

A push from the front, two handed:
14.34

14.35
14.36

14.37

14.38
The receiver should respond only to the amount of force that the operator has given. Experiment with different levels of force using the 1-10 scale to see which amount of force is most comfortable for the performers and most appropriate for the interaction of the characters.
Grabbing
Usually when a person grabs onto another person it is done circumferentially around a limb such as the arm or leg (controlling grabs can be done around the neck as well but this is covered more specifically later on when describing choking techniques). All of the fingers wrap around a limb creating a controlling circle to complete the grab. While grabbing in this way will prove effective the problem becomes possible discomfort through point pressure transferred to the receiver of the action. There are admittedly other techniques out there such as the "bracelet hold" (which makes a circle around the limb but does not squeeze the limb) as well as others that rely on quality of touch to guard against transferring too much pressure to the receiver. However, I have found that in the heat of performance, no matter what the level of training or technique, it is next to impossible not to grab another human being without some transference of force, particularly when the performer is really intent on and connected to the action. If this is done with the fingers and thumb in a traditional position for a grab then the change of point pressure and bruising to musculature and soft tissue of the receiver increases dramatically.
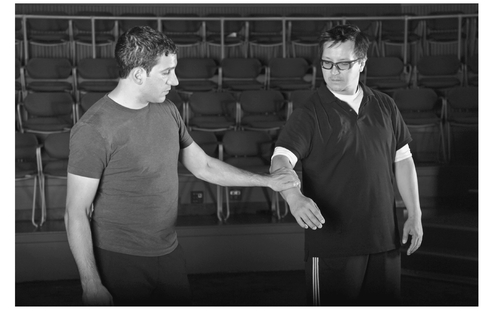


Rather than use the thumb to grab on stage, wed the thumb to the other four fingers and think about using the hand as a "slap bracelet." As the hand contacts the area to be grabbed, say the wrist, the fingers wrap around the wrist but do not connect to the thumb since it is alongside the fingers (Figures 14.39—14.40). This allows the receiver to break free at any time. Of course this could cause a problem to the violent interaction since the receiver is actually not being controlled in this moment. To make the grab effective, the receiver must actually pull in the direction of the palm of the operator, not in the direction of the space (Figure 14.41). While the specific body part, usually the forearm or upper arm, moves in the direction of the grabbing palm, the rest of the body must move in the opposite direction of the grab (Figure 14.42). This dynamic tension will create the visual picture that the person being grabbed does not want to be grabbed. This gives both performers a moment of real, playable opposition through the grab.
In order to "break" the hold, the receiver simply changes the direction of the force being put into the grabbing palm to just outside the fingertips of that palm. This will allow the receiver to "escape" the hold easily. However, the receiver should not simply slip out of the hold without effort. When the direction of the force is changed the receiver can give a pulse to the action as though he or she were breaking free from the grab. The operator can then extend the grabbing arm to follow the receiver's motion as though the receiver actually broke the hold. This will give the illusion that effort was expended in escaping the hold.
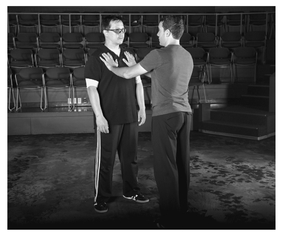
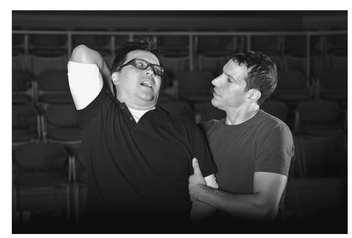
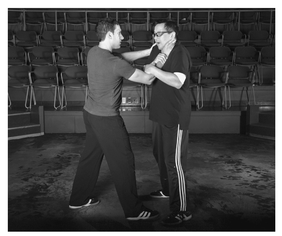
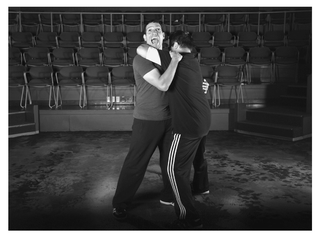
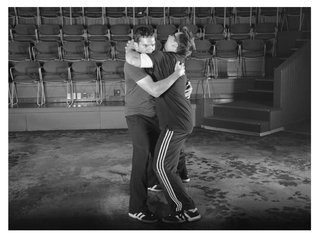
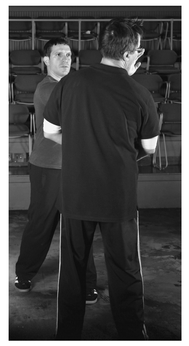
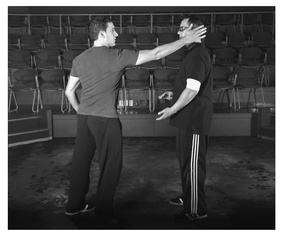
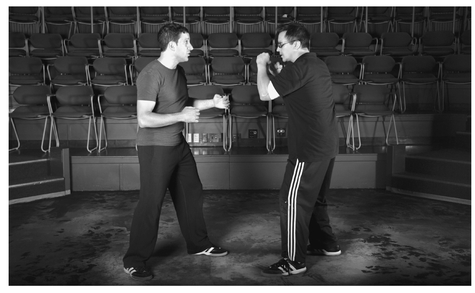
Restraining
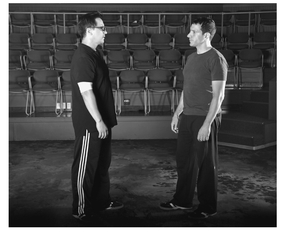
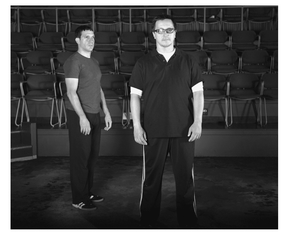
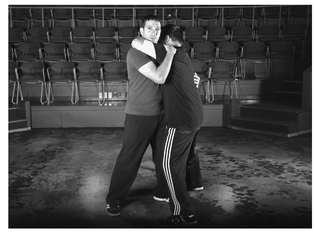
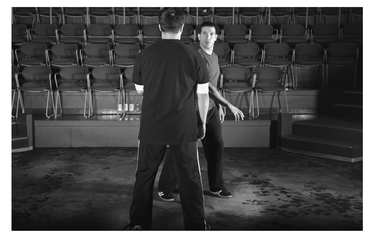
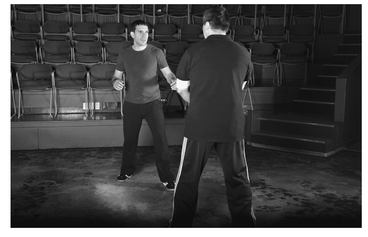
In order to restrain a performer it is important to first position yourself in front of the actor to be restrained. Too many actors try to intercept their friends from behind before going into the restraint. This is not only ineffective but it is also probably not connected to the true intent of the scene. Once the performer to be restrained makes a move to leave, or threatens someone else on stage, the person to do the restraining must move his or her feet and get in front of the person to be restrained. Only then can the operator use his or her body to physically impede the receiver and move into the rest of the technique.
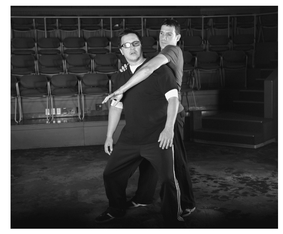
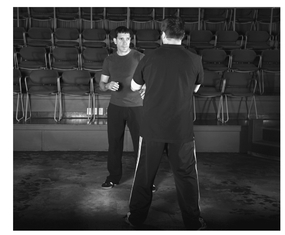
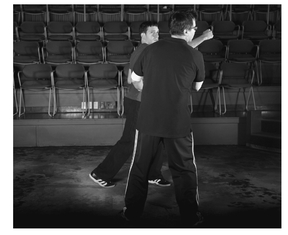
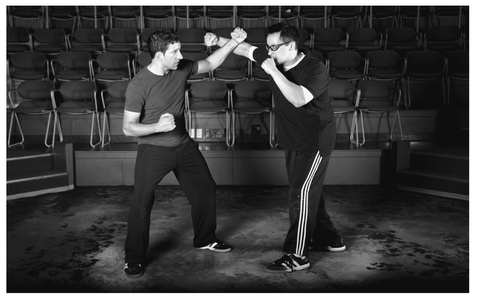
- Grab the receiver by the bicep with the slap bracelet hold (Figure 14.43).
- Step into the receiver so that the hips of the two partners are touching. There should be no space between the hips. This is important to allow good kinesthetic response between the two actors if there is to be a struggle during the restraining.
- The non-grabbing hand of the operator should be active and grab the opposing shoulder or bicep of the receiver's other arm (Figure 14.44).
- Snake the initial grabbing ami between the bicep and the back of the receiver to increase the connection.
- Struggle as necessary. Keep in mind not to be bogus about it. Any struggling should be with as much force and energy as both performers are comfortable using. Also, the force being used should have a specific intent: to keep someone in the room, to escape to safety, etc.


14.45
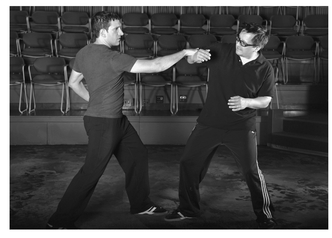
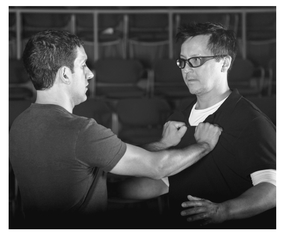
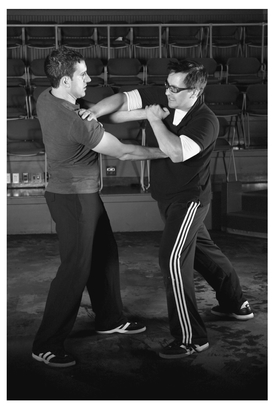
Clothing Grab
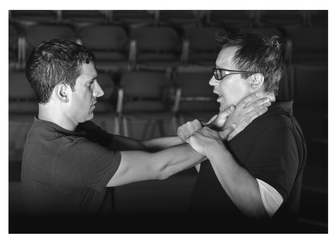
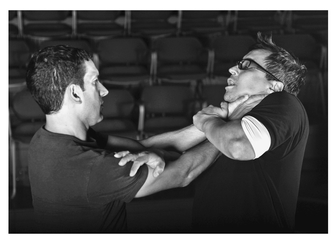
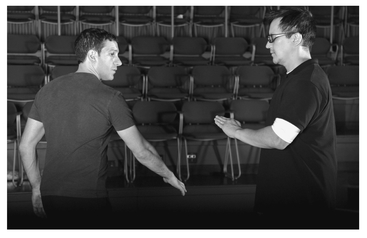
The entry for this technique is similar to the first part of the technique for pushing. The palm of the hand or hands seeks out the upper pectorals (Figure 14.46). Make certain that the entering palm is flat as possible upon contact. The clothing underneath the palm is collected between the thumb and forefinger of the operator's hand (Figure 14.47). The rest of the hand closes into a fist collecting additional fabric along the way (Figure 14.48). The position of the fist echoes the positions appropriate for striking. Only flat surfaces should be used to rest against the chest of the receiver. If the knuckles are grinding into the pectorals then readjust the position of the fists until the point pressure disappears (Figures 14.49-14.52).


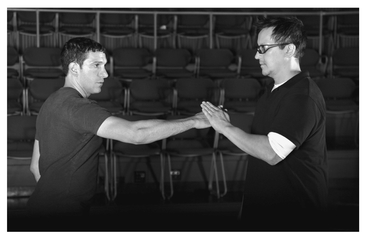
When the operator has fully grasped the material the receiver should grab the operator's forearms (see grabbing above for appropriate technique). This grab should be done in such a way that the fists of the operator are brought into the chest of the receiver thereby creating solid contact between the two. The performers should feel as though the fists are sealed or suction cupped to the pectorals in such a way that if the bodies move then the fists remain exactly in place on the upper chest.

14.50

14.51

Obviously, shirts with a bit more material and with a heavier more resilient fabric are ideal for grabbing in this way. Jackets with lapels are ideal. This move should be executed with care when tight fitting shirts or tops with delicate material are involved. If this is the case then another controlling technique should be employed to minimize the risk of damaging the costume.
14.53
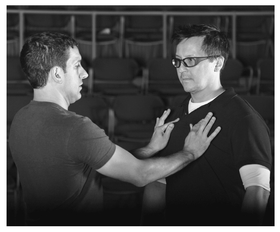
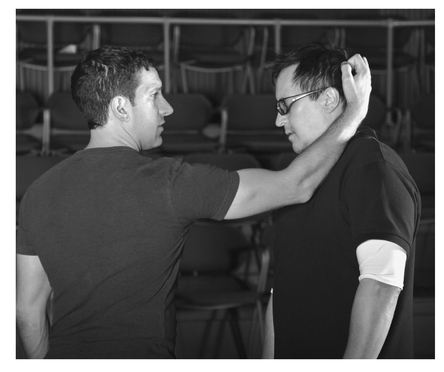
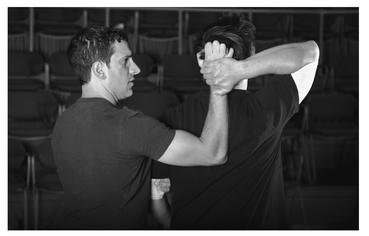
Hair Grab
Of all the stage combat techniques this one is probably the most popular and the most infamous. Oftentimes what happens when hair is about to be pulled in a scene, the operator makes a fist and places it on top of the receiver's head. The receiver then grabs on to the operator's fist thereby attaching it to the head. Then the receiver starts flailing around. This manifestation of the technique has always been disappointing to watch since there is little physical connectivity where the actors can effectively kinesthetically respond to one another. Also this version of the technique is so far from the reality of grabbing hair it borders on the absurd. Most people have their thickest portion of hair near the back of the head, not at the top. If someone were really intent on controlling another person by the hair they would most likely go for the region of the head that has the most hair to latch on to.
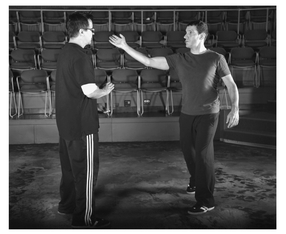
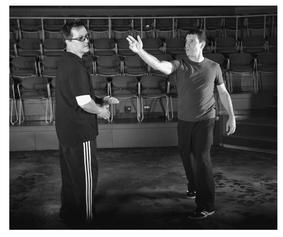
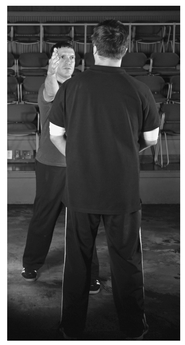
- For a hair pull when approaching from the front contact the upper pectorals with an open palm. Slide up the chest and over the shoulder while supinating the hand with the palm up. The back of the forearm of the operator should be nestled comfortably and solidly on the upper pectoral of the receiver. This contact should remain consistent throughout the technique (Figures 14.54-14.57).

14.55
14.56


14.59
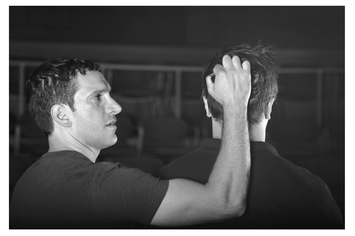
- For a hair pull from the rear contact the upper back with the same open palm. Slide the hand up the back to the crown of the head. The front of the forearm of the operator should be placed comfortably and solidly on the upper back of the receiver. This contact should remain consistent throughout the technique (Figures 14.58-14.60).
- Have the hand move to the back of the head while crooking the hand to gather some hair between the fingers. At this point some hair should be visible between the fingers to show that the hair is actually being collected in the hand (Figure 14.61).
- Use the other hand to hold on to the receiver's arm or waist for further control.
- When marking a moment where the "grab" turns into a "pull" simply pulse the arm involved in the hair grab. The receiver should feel this pulse and respond with a sharp upward motion in the direction of the hair accompanied by a sharp yelp.
- Please do not simply thrash around during the hair pull. The receiver should not move until the operator gives the pulse. Both performers should remember to keep the heads and torsos upright so that any spoken text can be more easily heard (Figure 14.62).
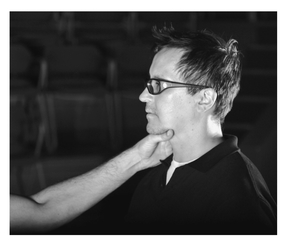
Choking
Of all of the techniques available to a performer, the act of choking or being choked is one of the most playable and dramatically affecting for both the actors and the audience. The close proximity of the characters required during the technique helps make this an intensely intimate moment. Also the experience of having lost the capacity to breathe is one that is immediately accessible for any observer. The viewer may not have a direct experience of being choked or choking someone but everyone has had the experience of having difficulty breathing whether from illness, being underwater for too long, or having pressure on any part of the respiratory system. Also, while few people may have had the actual experience of wrapping hands or arms around another human being's airway I have found that when someone has posed the question of if they have ever thought about choking someone a lot of people have admitted to having that dark thought even fleetingly at one time or another. While the physical reality of following through with this intent is not as common the emotional and psychological understanding of the motivation behind it is something most people seem to connect to.
For the actor, the psychological barriers inherent in performing this technique may be very strong, and with good cause. The neck is an extremely sensitive and personal area with many vital structures imperative to breathing, circulation, mobility, and sensation. The trachea (or windpipe) at the front of the throat needs to stay intact for normal breathing to occur. The carotid arteries on the sides of the neck bring oxygenated blood from the heart to the brain. The spinal cord in the back of the neck acts as what F. Matthais Alexander (creator of the famed Alexander Technique widely used to great effect by artists to find ease in their work through removing habitual patterns of moving and thinking) called the "primary control." This portion of the spinal column is involved in enervating the rest of the body. There are many possibilities for injury when directing force towards the neck. Both performers must be rigorous and mindful when practicing and performing any technique that involves choking for stage.


14.66
- For the front choke the first entry point for this technique is like those that have come before — flat palms against the upper pectoral. This allows the operator of the choke to put more energy into the beginning of the move as opposed to going straight for the soft tissue of the throat, which cannot take as much force as the solid structure of the torso (Figure 14.63—14.64).
- The hands should start to change shape as shown in Figure 14.67. The four fingers come together and should fan out to form a "C." As the hands slide up to the neck, the pinky side of the hand and heels of the palms should rest on the upper torso of the receiver while the ridge created by the index finger and thumb provides a shelf on which the receiver can rest his or her mandible (jaw) (Figures 14.67-14.68).


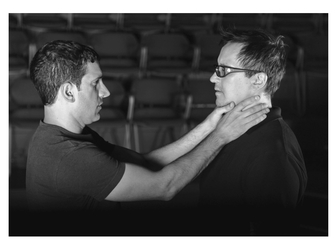
- One hand or both hands may be used for this technique. If one hand is used, the space shown in Figure 14.68 should be placed on the upstage side of the audience so as not to show any space between the operator's hand and the receiver's throat. If both hands are used (Figure 14.69) then the thumb of one hand should overlap the large knuckle of the index finger of the opposite hand, as in Figure 14.70. The other thumb should disappear underneath the large knuckle of the index finger of the first hand. The shape made by both hands should look like a "V." At no time should the thumbs infringe on the space in front of the throat.
- As the operator is arriving in this position the receiver should be animating his or her body and hands to demonstrate that he or she presumably does not want to be choked. Even though the gesture with the hands should suggest this, in actuality the actor can use this gesture to initiate contact with the operator in order to comfortably position the hands for the choke. The receiver gasps the forearms of the operator and tucks the chin to create a good seal between the jaw and the ridge of the hands and also between the pinky side of the hands and the upper torso.
- It should be noted that maintaining tight, consistent contact between performers on this move is of paramount importance. Tight contact not only allows the illusion that the hands are tightly wound around the throat to continue it also allows those hands to serve as a stabilizing device for
- the neck of the receiver. This keeps the cervical spine in line and minimizes the chance of injury when more energy is put into the technique.
- Energy is and should be put into the technique. The energy does not and should not go into the soft tissue of the neck. The fingers can be curled to simulate this but extra care should be taken that point pressure is not used on any portion of the neck. Any and all energy of this move should be directed through the heel of the palms of the operator. The heel of the palms should be flush against the chest of the receiver. Pulses can be used against the chest in such a way to show energy being transferred through the action. The receiver then takes that energy and translates it through manipulating breath and sound to give the illusion of being choked.
- Different hand positions for the receiver can be used as well in this technique (Figures 14.71—14.72). No matter what the changing position through the struggle of the choke one hand or arm should always be able to keep the seal between the hands, jaw, and chest tight. This allows more mobility for both performers during the technique and even allows the performers the ability to take the action to the ground if necessary. If this does happen it should be rehearsed in a way that both performers are balanced at every moment through the transition to the floor. At no time should the performers feel as though either one is falling to the ground during this technique.
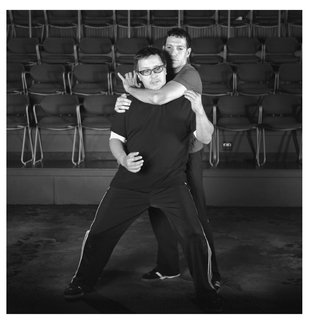
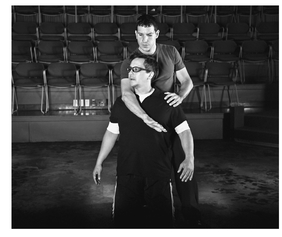
- Performing a back choke or rear choke has many similarities to the front choke. The entry this time is from behind the receiver (Figure 14.73). The non-choking hand of the operator is placed on the shoulder of the receiver as a preparatory beat to make certain the receiver is ready (Figure 14.74). The hand of the choking arm is placed on the upper back on the opposite side and slid over the opposing shoulder, across the chest, and to the same shoulder where the non-choking hand originally made contact (Figures 14.75—14.76).


- During this action, the hips and torso of both performers should come together with one leg of the operator between the legs of the receiver. This leg should be bent slightly so as to allow a ledge on which the receiver may sit and balance (Figure 14.77).
- The receiver animates his or her arms in a similar fashion as with the front choke to help place the arm in a comfortable position on the upper torso. The elbow of the choking arm should ideally be under the receiver's chin creating a "V" with the arm similar to the "V" created by the hands in the front choke. However, for some actors with broader shoulders this may be an impossible position to achieve. In this case simply placing the forearm across the upper chest will suffice. Extra care should then be taken not to place the forearm directly against the trachea (Figure 14.78).
- The receiver should then tuck the chin and make sure the same tight seal is created between the jaw, arm, and upper torso.
- Any struggling that happens here should occur through pulses directed down and into the sternum of the receiver. Make sure not to flex the muscles of the arm too much around the neck as that will turn this stage combat technique into a real choking technique and interrupt the blood flow through the carotid arteries to the brain. Constant verbal communication between partners during rehearsal should be practiced at all times.
- The hips of both performers should be in contact at all times. If the receiver should buck out the hips at any time this will put undue extension force on the cervical spine and possibly result in a major injury. Keep the hips together!

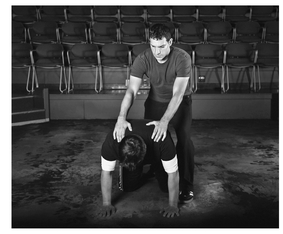
- For those performers who are very tall and need to be choked by a shorter partner, starting from a kneeling position is also a good way to perform this technique. Here the whole body of the shorter performer acts as a backstop against which the taller receiver can struggle.
14.79

14.80
14.81

14.82
- Remember during the choke the receiver is trying to breathe. Many people choose to cough while performing this technique. This breath pattern is actually the body clearing the airway. Here the performer should explore making breath sounds in a rhythm and fashion that suggest a restricted airway. Gasping and an interrupted, staccato breath pattern is more in line with exploring the reality of this technique.
Biting
Biting is a less often used technique but can be very effective when the fight calls for a more scrappy quality. Even though the teeth are not used in this technique, the best location for the bite is to a clothed muscle group on the receiver. Less muscled or bare areas of the body tend to have less cushioning for the jaws to settle comfortably. Clothing also acts as a barrier for any slobber that might result from the technique.
- At the most closely available muscled area on the receiver (in the case Figure 14.83, the upper arm) the operator opens his or her mouth wide to bare the teeth (Figure 14.84). This is an important part of the technique as it demonstrates clearly the intent of the operator to bite the receiver. Without this moment before the bite it leaves the audience to surmise what occurred through solely the reaction of the receiver. Baring the teeth initially completes the lines of action for the audience to clearly follow.
- As the mouth is brought closer to the area in one swift action the operator covers the teeth with his or her lips to prevent him or herself from actually placing the teeth on the body of the receiver. The operator must be sensitive to his or her own lips so as not to apply too much force and bite his or her own lips (Figure 14.85).
- The receiver should respond vocally to the bite (typically with a vocalization using the higher register) but stay in contact with the operator for at least 2 seconds. If the receiver pulls away too soon the dramatic effect of the bite is typically not as great.
Striking
Slaps
The slap is quite possibly the most underestimated technique in all of stagecraft. It appears in countless shows whether written expressly by the playwright or added into the staging by the director or the actors. While the emotional concept of the slap is immediately recognized by nearly anyone, the physical realities are often greatly misunderstood. A true slap is a strike to the head and as such carries with it the same dangers as any other mode of force being transferred to the head. Additionally, there are other concerns for the receiver such as fingers clipping the eyes, nose, or mouth. Also, an open palm contacting the ear with force creates a rush of air within the ear canal that will likely damage the eardrum either temporarily or permanently leading to partial or total hearing loss in that ear. Distance, timing, and accurate targeting are of paramount importance in the execution of this technique.
Forehand Slap (performance angle shown)
14.86
14.87
14.88
14.89
- While this technique can be done at a variety of distances between partners the best results typically occur when the actors are far enough away from each other that at the moment of greatest extension of the operator's slapping arm the fingers of that hand are approximately 6 inches from the tip of the receiver's nose. This distance gives the operator a greater sense of freedom of movement without endangering the receiver. From this position the receiver can more freely alter the speed and force of the swing to find more nuance and accuracy for the moment of the strike. Of course, the distance can be lessened between the performers and the hit still be valid. However, this shortening of the distance requires the operator to bend the hitting arm. In my experience, this shortening of the arm leads to a more controlled swing since both operator and receiver feel the proximity more acutely. A more controlled swing leads to less freedom of movement and not as much availability to adjust speed and force during the hit (Figures 14.90-14.93 – open angle).

14.91
14.92

- The operator and the receiver should position themselves in the offset position and not be stacked – the operator lined up with the receiver's left shoulder for a right-handed forehand slap or lined up with the receiver's right shoulder for a left-handed forehand slap.
- The striking hand should be open and relaxed, not rigid. As the motion is initiated the hand should travel in a straight line on a horizontal plane in front of the nose of the receiver. This necessitates the hand being raised up first rather than throwing the hand up from the hip.
- The target of the slap should always travel through the space directly in front of the tip of the receiver's nose. This may seem like it is a bit too high since the intended target should be the cheek. However, when the cheek is targeted the audience typically views the hit as connecting more with the neck than the face. To adjust this difference in perception the target for slaps, punches, and most non-contact strikes to the head should be targeted with the tip of the nose as the center point.
- The action of the arm and hand should have the feeling of a free and easy swing. However, since we are attempting to create the illusion of the hand striking a solid object there must also be an interruption in the path of the technique. If this does not occur it may seem as though the hand simply passes through thin air thereby breaking the illusion of violence. A way to add in the impression of contact is to add a pulse at the moment where the fingers pass in front of the nose. This pulse is similar to the pulses referred to in previous techniques. It is a momentary activation of the muscles of the arm and hand. This distance that allows full extension of this technique also enables the operator to more easily add in the pulse. Some images that may assist in adding in the pulse are shaking or flicking water off the ends of the fingers into the face of the receiver. Or as a former student suggested, imagine you have all the anger associated with the technique in a flame in your hand. The moment of impact is when you "throw the fire."
- The moment of the pulse is when the receiver should turn his or her head in the appropriate direction of the strike with a reaction that matches the force of the operator's action. This is also when the knap occurs.
- It is important that as many audience members see the beginning, middle, and end of the strike as possible. After the moment of the strike and knap the operator must continue the line of the strike for as long as is naturally possible. This extension of the line of the strike will enable the strike to read as a hit to as many audience perspectives as possible.
- Not all strikes need be horizontal. Some can be ascending diagonally or descending diagonally. Each of these particular changes in direction of the action must be accompanied by a change in reaction by the receiver (see artist renderings of different head reactions, Figure 14.94). A change in direction of the strike will change the intent of the violence. Both operator and receiver should agree on the direction of the strike so that the action and reaction can be accurately executed. Watch the videos on the companion website to see how an observer may get a different idea about the relationship between the two characters based on the different directions of the slaps.
- As always make sure to open up the picture after the slap has occurred.


14.96

Backhand Slap
- The backhand slap can be done in a nearly identical way to the forehand slap. This time since the contacting surface should be the back of the hand, the operator must line up over the receiver's right shoulder. The direction of the strike may be horizontal, ascending diagonal, or descending diagonal travelling through the space in front of the tip of the nose and extending the line for as long as is naturally possible. The receiver makes a clap knap and reacts in a way that is commensurate with the force of the attack. Figures 14.95-14.97 show an ascending backhand slap at performance angle.
- Another variation of the backhand slap involves a shared knap rather than a clap knap. For the shared knap backhand the best direction of the strike to ensure a solid knap is in the ascending diagonal direction. At this angle the back of the hand of the operator can meet the palm of the receiver perpendicularly to achieve maximum sound for the knap. Once again the line of the backhand must be extended for the hit to read. The reaction of the receiver should be up and away in the direction of the ascending diagonal (in the case of a right-handed backhand the receiver would react up and to the left). Figures 14.98-14.100 show an ascending shared backhand slap at open angle.
14.99

In-the-round Slap or V-slap (performance angle)

14.101
14.102
14.103

14.104
This slap is necessary for any actor who works in non-proscenium spaces where the audience can be on multiple sides of the playing space, particularly in-the-round or thrust spaces. It is also useful for slaps that for staging purposes must be done with the characters in profile to the audience. This technique will feel very unnatural and non-impulsive in practice since the path of the hand does not follow one path but rather two. However, with dedicated rehearsal time this technique can become a powerful tool to make a slap read with any kind of staging.

14.105
14.106

14.107

14.108
- As with the forehand slap this technique will begin with the performers standing in the offset position. The performers will be in distance for this technique, close enough for the operator to completely rest his or her hand on the left shoulder of the receiver.
- For a right-handed slap the hand should be raised to the level of the intended target, i.e. the receiver's left cheek. The right elbow should be at least parallel with the floor at a 90-degree angle (or even a little higher) with the palm of the hand facing out and in front of the operator.
- The first action path of the hand is not across but rather straight out to a place in space over the point of the left shoulder of the receiver. The palm should rotate through this path to face the cheek of the receiver with the fingers pointed past the receiver's shoulder at the moment of greatest extension for the operator. From the profile view the hand should completely disappear behind the head of the receiver or completely cover the side of the receiver's face. This part of the technique covers the target from the profile view (Figures 14.109-14.112 show performance angle).
- After the moment of greatest extension (which should include the pulse mentioned previously) the operator will then drop the right elbow to allow the right palm to rotate so that the fingers point up to the ceiling. The path of the hand should travel on an acute angle to the initial direction of the technique making a "V" or check-mark like path to completion. This part of the technique covers the target from other audience angles.


14.110


- For the second part of the "V" path the hand of the operator should cross the centerline of the receiver right in front of the tip of the nose. The palm should be towards the face of the receiver with the fingers pointing up to the ceiling. Make certain not to point the fingertips across the face of the receiver. Being in distance this might put the receiver in danger of being scratched or worse.
- Finally, the hand of the operator should end past his or her own left shoulder with the palm facing out.
It should be noted that with this technique the accent of the action should be after the moment of greatest extension by the arm of the operator. Just after this moment, the operator should slightly increase the velocity of the pullback to complete the illusion of this slap. Also note that this slap cannot be performed as a backhand. The mechanics of the arms simply won't allow it.
Punches
It will be the rare (and perhaps wonderfully lucky) occasion where an actor will play a character that is a trained fighter. As a result, most of the punches used in theatre and film will require an untrained quality to them. However, this does not mean that the shape or action of the punch can be sloppy. Every punching technique still must be precise in shape and trajectory in order to communicate that this strike, unlike the slap, is meant to cause damage. (For a description of how to properly shape the fist for these punching techniques refer to Chapter 13 Contact Violence.)
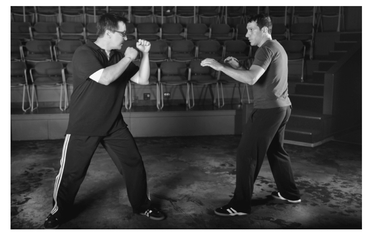
The Roundhouse Punch or Haymaker
This is the bread-and-butter punch for any situation of violence that calls for an untrained yet powerful and emotional hit. The name of this punch is derived from the motion that it makes. The fist will travel in a semicircular fashion around the space in between the performers that also mimics the action of cutting hay with a scythe. The wide arcing action of the punch enables the technique to cover many angles and also enables the performer to fully commit to a large, wild motion (Figure 14.113).

As with the forehand slap this technique will begin with the performers standing in the offset position. The rest of the technique is identical to the steps outlined for the forehand slap. All of the notes on distance, targeting, pulsing, etc. apply to this technique as well. The only differences to this technique are the following:
- The hand of the operator is now in the shape of a fist instead of an open palm.
- The receiver will more likely make a body knap instead of a clap knap to differentiate the sound of a punch from a slap. There are of course always exceptions to this. If the receiver is heavily clothed in such a way that muffles any possible sound for the body knap then a clap knap should be used. Also, clap knaps tend to carry more in larger playing spaces because of the high quality of the pitch generated. If the body knap is too soft, a clap knap should be used for maximum theatrical effect.

14.115
14.116

- In order to communicate to the audience that the operator has delivered a more powerful strike, the rotation of the hips in the direction of the motion of the punch will aid in this. Make sure that when the hips are rotated in this way that the torso remains upright. Bending at the waist will diminish the perceived power of the strike, It will also diminish the higher status of the operator who successfully punched the receiver. And finally, it will prohibit the audience from seeing the face of the operator since he or she will most likely be facing the floor as a result.
- Since punches are usually delivered with more powerful intent, the receiver must react in a more forcefully commensurate way from this action. A good knap and a sharp reaction will go a long way here to complete the illusion. Figures 14.114-14.117 show the roundhouse performance angle.
Like the forehand slap the roundhouse punch can be delivered from multiple angles depending on the difference in height of the two performers or the intended effect of the punch. This punch can also be delivered in the same fashion as the non-contact backhand slap, hi this case the punch would then be referred to as a backfist. Figures 14.118-14.121 show the open angle.
14.119
14.120
The Cross or Straight Punch
This punch is most commonly used as an alternative to the roundhouse punch when the character doing the punching needs to demonstrate skill. The cross or straight right derives its name from the path it takes through space. It is delivered from the rear hand in such a way that it travels across the body of the operator and the target of the receiver hi a straight line. The main difference in this technique to the roundhouse is that the cross or straight punch travels in a linear path parallel to the target (the head of the receiver). This change in the flight path of the strike from a semicircle to a straight line communicates a focused directionality of the strike. This focus in a linear direction will help an audience believe that the operator has some skill in striking with the fist (Figure 14.122).

- As with the forehand slap and roundhouse punch this technique will begin with the performers standing in the offset position. Here it is important for the operator to step slightly forward with the foot on the same side of the hand doing the strike (the right foot for a right cross, the left foot for a left cross). This orientation of the feet allows the hips to release in the direction of the strike. This allows for more articulation of the body to deliver power and extend the line to cover the target for multiple angles. To do this the operator must pivot on the ball of the right foot (in much the same way for the twisting of the body at the beginning of the warm-up) and allow the hips to turn in the intended direction of the strike.
- The fist should be raised in such a way that it is at the same level as the head of the receiver. The knuckles of the fist should not be pointed towards the receiver's head Rather the knuckles of the fist should be pointed on a track through space parallel to the head of the receiver. This path should shoot the fist and arm like an arrow parallel to the head of the receiver passing through the space 6 inches from the tip of the receiver's nose (Figures 14.123-14.126 – performance angle).

14.124
14.125

- If there is a major difference in height of the performers the receiver can lower his or her head by rounding the shoulders and hunching the back or naturally bending the knees so that the level of the entire body drops. Also, the operator can change to a slightly ascending angle of the cross if the target is still too high to naturally make the punch horizontal. If this is the case then the receiver must react in the direction that is commensurate with the angle of the punch.
- The line of the punch must be extended in such a way so that the fist appears on the other side of the receiver's head. This long line to the cross not only demonstrates a stronger intent but it also covers the target for a wider angle of audience perspective (Figures 14.127-14.130 – open angle).
- At the end of the punch, keep the body upright and simply relax the arm down as the receiver vacates the area. Do not snap the arm and fist back the same way it just travelled. This action may break the illusion of the technique.
- Like the roundhouse punch, the receiver should use a body knap and react with the vigour of being clocked in the face.


14.128

14.129

One of the marvelous benefits of this particular technique is that it can be performed equally well with the receiver being downstage or upstage of the operator. If the receiver is unable to knap or the staging requires the receiver to be upstage then this technique is very conducive to allowing the operator to both punch and knap at the same time. This is known as a self knap. This is achieved by following the steps listed above almost identically. During the set-up of the punch the left hand of the operator should reach out naturally as though to counter balance the motion of preparing the punch. When the operator turns the hips in the direction of the strike, the shoulders should follow suit. As the fist travels through the path parallel to the target, the left hand should be travelling towards the right pectoral muscle of the operator. The operator should time the sound of the knap when the fist is directly in front of the nose of the receiver. After the strike is complete the knap hand should relax back into a fist to a position away from the location of the knap so as not to draw attention to where the knap was performed. This is a versatile technique that when mastered can be used in multiple situations or performer orientations.
The Jab
This technique is another example of a punch that can be thrown with the receiver in the upstage position. The jab is traditionally a punch that is thrown off of the lead hand. It is a sharp, quick punch that usually stuns an opponent but lacks the power of the roundhouse or cross. For this technique it is the quality of the jab that is referenced rather than the accurate physical definition since here the jab will be thrown with the rear hand.

14.131


- Set up in the offset position except this time if the jab is to be thrown with the right hand the operator should be in line with the receiver's right, not the left shoulder as in previous techniques. Also, the operator's left foot should be placed slightly ahead of his or her right foot.
- It is very important that the head or target of the receiver should be clearly visible to the center mass of the audience. If using this technique for film the face of the receiver should be in clear view of the camera (Figures 14.132-14.133 – performance angle).
- Keeping a bent arm with the elbow at an approximate 90-degree angle, the operator should shrug the right shoulder into the punch and place the fist in a quick, sharp motion at a point 6 inches in front of the receiver's face. The arm should never be fully extended in this technique.
- At the moment the fist reaches that position in space the operator performs a self knap in the same fashion as one may do for the cross.
- The fist should have a quality of bouncing off of the head as the fist returns to the relaxed original position (Figures 14.134-14.135 – open angle).
- The reaction of the receiver should be simple and stunned. Since the direction of this strike is straight into the face, the reaction of the head is down and in, not up. A head reaction that travels up should be reserved for rising roundhouses or crosses. The reaction to the jab should be akin to nodding the head upon hearing the knap. (Think of it as your inner monologue response to the action, "Yes, you just popped me in the face.")
- Since this technique is on-line directly to the receiver's face it is of the utmost importance that the operator never gets any closer than 6 inches. With this particular set-up the operator should have a clear view of the space in between when the punch is placed and the receiver's face (Figures 14.136-14.137 – open angle).
The jab is quick and can have a nice sudden effect but it is difficult to master. The most difficult part is finding exactly the right placement for the fist in front of the face to cover the target from a variety of angles. Depending on the placement on stage for the actors, the exact placement of the punch should change. For actor orientations situated center stage, the mouth should be the target. For orientations stage right, the left cheek should be the target. For orientations stage left, the right cheek should be the target. For proper placement have a colleague view the action to make sure that the fist is covering the target of the face for any given angle.

The Contact Punch
The main concepts and process used for executing this punch can be found in Chapter 13 Contact Violence. Playing the Floating Palm / Floating Fist game is a very good introduction to the technique for two performers who are getting used to contacting each other through strikes. The process outlined for the contact slap is a nearly identical process for the contact punch. The only difference here is that the punch never goes to the head but rather to one of the major muscle groups identified previously (abdominals, latissimus dorsi, etc.). Also, the operator uses a loose fist to make the contact instead of an open palm. All of the steps detailed for the contact slap should be repeated for the contact punch in order to explore the full possibilities of the technique. As always, the operator should focus on going to the target rather than through it. The more the body is animated and the hips are rotated during the action of the punch the more forceful the punch will look without actually transferring force into the target of the receiver. The reaction of the receiver should naturally be commensurate to the perceived force of the operator (Figures 14.138—14.141).

14.139
14.140

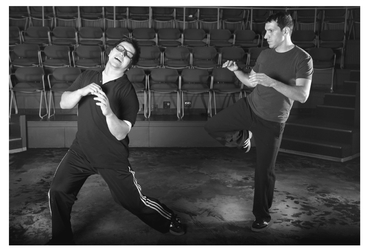
Kicks
Using the feet to strike can actually be a more common occurrence than one may think. Usually these attacks are ones of opportunity when the target we wish to attack is closer to the feet than any other part of the body. Kicking someone in the legs or while that person is on the ground can add an unexpected element to a scene of violence. Since the legs are larger limbs the perceived force transferred from the strike will seem greater to a viewing audience. However, because the legs are larger and most people outside of trained martial artists are not used to striking with the feet, extra practice and care must be taken with kicking techniques. The principles of distance, timing, and appropriate force must be in place for the kick to read and for the receiver to be comfortable in dealing with the blow.
For those performers with flexibility in the legs, any martial kick can be used to great effect on stage if the principles of both contact and non-contact violence are kept in mind. Roundhouse kicks, front kicks, hook kicks, wheel kicks, axe kicks, all are possible on stage. Since kicks require more space and more bodily movement to execute they can be wonderfully exciting theatrical techniques to employ, particularly in larger venues. The challenge becomes how does one justify the use of an axe kick in the context of a particular scene? It would make little sense for a character to throw a studied kick if there were no reference in either word or deed to the fact that the character has experience with such kicks. The use of these and any technique must be commensurate and logical in relation to the character, story, and style of the production.


It should be noted that for every kick it is important to chamber the kick before the knee before extending the leg (Figures 14.142 and 14.143). Chambering is the act of bending the leg at the knee before the leg is extended for the kick. This allows for more control and precision of placement for the kick. It also helps with balancing on one leg for the duration of the kick. Additionally, any contact kick should be made using only the flattest surfaces on the foot or shoe. The tops of the laces or the flat of the sole are the most likely places to make contact for these kicks. However, with enough control and sensitivity to force, the instep and outside of the foot can be used as contact surfaces as well. As mentioned before, the types of kicks that end up having more utility in the context of the scene are those that target the lower extremities when the receiver is standing or on the ground. We will take a look first at those techniques that require contact between the operator and receiver and then adjust those techniques where contact does not occur.
Front Kick

This kick can be used in a variety of instances and orientations on stage. One of the most effective, however, is when the performers are in the operator upstage/receiver downstage offset position with the receiver facing upstage.
- If kicking with the right foot, the operator should line up in a slightly more offset position than the hand techniques to allow extra distance for the kick to develop.
- The operator chambers the knee straight up and in the direction of the intended target (Figure 14.145 – performance angle).
- As the operator chambers the knee, the receiver brings the hands well out in front of his or her body, into a variation of a shared knap: the cage knap. This knap is made by placing the hands flat (like karate chop hands) one on top of the other in a perpendicular orientation. The fingers of each hand should
- be side by side and not loose or separated. The palms should be facing the incoming striking object (in this case the foot). This knap should be placed out in front of the receiver enough so that when the tops of the laces strike the hands there is enough clearance between the body of the receiver and the toe of the operator.
- The operator will extend the leg from the chambered position and strike the prepared cage-knapped hands of the receiver with the foot pointed. There should be a good solid sound to the shared knap upon contact.
- The operator returns through the chambered position to keep balance. Do not infringe on the receiver's reaction space.
- The most likely reaction of the receiver for this technique is to act as though he or she had been kicked in the gut or groin. If the receiver is slightly doubled over or kneeling to start and the operator has a flexible, high kick then this technique can also be sold as a kick to the face. Each of these reactions has distinct physical and vocal reactions for the receiver. The location of the strike and its effect should be carefully determined depending on the intended effect (Figures 14.144-14.148 – performance angle).

14.146

14.147
This kick can be easily converted to a non-contact technique by simply removing the cage knap. Of course, this deprives the technique of the actual sound of the foot striking a solid object. If, however, it is impossible to make the knap in this way then the receiver may execute either a body or vocal knap.
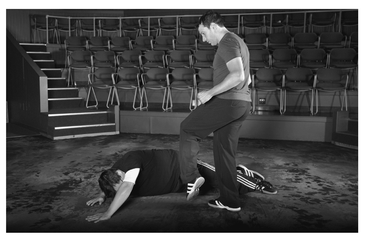
The front kick can also be used to great effect when the receiver is on the ground. Two such techniques target both the abdominals and groin respectively. Both of these techniques require contact and are typically used to end a confrontation and have a clear victor. To target both the abdominals and the groin follow the same process for making contact during a technique. It is important for the operator to remain balanced throughout the kick and to point the toes. Do not flex the foot (Figure 14.149) during these contact kicks as that will increase the likelihood of injury to both operator and receiver.

The body positions for the receiver on each of these techniques is very precise so as to minimize the chance for injury and also give the audience the best possible view of the power of the kick.
Abdominal Kick (on the Ground)
- The operator should find his or her distance to make sure that the tops of the laces contact the abdominals of the receiver in a place that is comfortable. Make sure that the location of the kick is placed squarely between the ribs and the hipbones on the abdominal sheath.
- The receiver should be positioned in such a way that the body is in an extended position supported by the arms and legs. Extending the body will elongate the abdominal sheath and create a larger target. Do not attempt this technique in a tabletop or hands-and-knees position. This position will increase the likelihood of making the spine concave and as a result bring the ribs and hipbones closer together. This increases the chance of hitting bone rather than muscle, which should be avoided at any cost.
- The body of the receiver should not be parallel or flat to the floor but rather lifted up from the floor with the body positioned at approximately a 45-degree angle towards the incoming foot of the operator. The exact angle should be judged by the operator so as to make the best fit for the foot to contact the stomach (Figure 14.155).

14.150
14.151
14.152

14.154

- If done right, there should be an appreciable sound upon contact between the shoe and the abdominals. After the sound of contact the receiver should make an appropriate vocalization while contracting the spine.
- Since this is a contact move the position can be in full view of the audience. The head of the receiver can be positioning either stage left or right. The operator may kick with whichever foot is more comfortable.
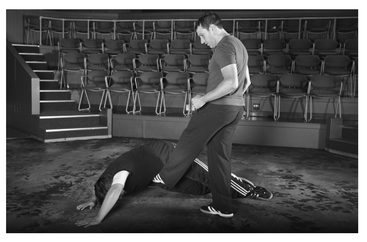
Groin Kick (on the Ground)
- The operator makes the same adjustments for distance, balance, foot position, and quality of contact as before.
- The receiver lies on his or her back with his or her head facing downstage towards the audience.
- As the operator comes forward the receiver initiates a slight back bridge by posting off of the upper back against the floor and lifting the hips off the floor to allow enough clearance for the operator's foot. This action should be done in time with the operator's approach as though the receiver were trying to get away from the kick when in fact the receiver is presenting the unobstructed target to the operator (Figures 14.156-14.158).


14.157 &


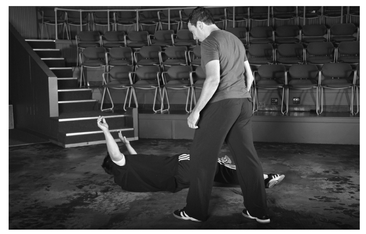
- The actual target for this technique is the gluteal muscles (Figure 14.161). Since the action of the kick usually wants to travel diagonally across the body the operator must be very precise with the tracking action of the kick. If the operator is right-footed then the target should be the right gluteal. If the operator is left-footed then the target should be the left gluteal. This specific targeting will minimize the foot from travelling to the sensitive area in the center of the hips.
- Once again, if performed well, there should be the sound of shoe on flesh upon contact. Then the receiver should make an appropriate vocalization and fold inward at the point of contact. The operator must make sure to retract the foot and leg completely from between the receiver's legs so as not to get the legs tangled during the reaction (Figures 14.159-14.160).
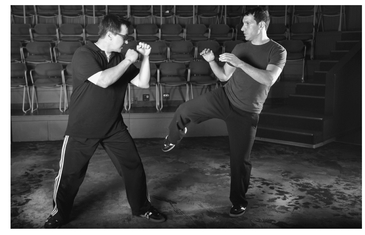
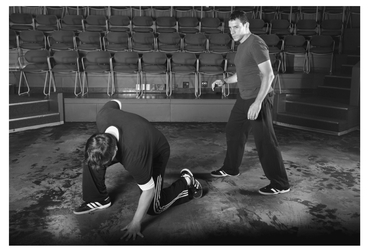
The Roundhouse Kick
The roundhouse kick also uses a chambering action, only this time the chamber happens with the knee pointing in towards the target and not straight up (Figure 14.162). The leg is then extended in such a way that the foot travels from the outside in towards the intended target (Figure 14.163). The motion is similar to the roundhouse punch described earlier.


14.165

14.166
While it may be possible for some flexible performers to kick high for this technique, the most useful targets to attack with this kick are the lower extremities. We can use our knowledge of contact hits to use the roundhouse kick to strike the back of the leg at the major muscle group of the hamstring.
- The operator should find a suitable distance where he or she can contact the hamstring of the receiver with the tops of the shoe at the laces. Make certain not to place the contact too close to the receiver's knee.
- When the proper distance is determined the roundhouse is performed with the chambering action described previously. Make certain that during the chamber the knee does not go past the line of the intended target. Positioning the knee past the line of the intended target increases the likelihood of the energy of the contact blow travelling through the target instead of to the target. At the moment of greatest extension for the leg the foot should just make enough contact with the hamstring to get a good sound but not transfer so much energy to the receiver that causes discomfort or damage.
- The contact should be made with the top of the laces while the foot is pointed.
- The receiver should react to this strike as though the initial damage was caused at the point of contact. A sharp, voluntary knee bend and pivot on the ball of the foot is a good way to accent the reaction to this strike (Figures 14.167—14.168). Oftentimes performers react to lower extremity strikes by moving the upper body or head first, which only distracts from the reality of the intended target and specificity of the moment.
This type of kick is a useful technique to have at the ready especially when one character must be rendered slightly immobile or somehow be forced to the ground. For those performers with flexible kicks and more developed musculature it is possible to target different areas of the body such as the abdominals or the latissimus dorsi. Wherever the contact is made, be sure to follow the process of initiating contact for such a move. Communication between partners is essential to be in agreement about the precise target and quality of contact.
Avoidances
So far all of the moments of violence we have examined have had intentions that have come to fruition. That is to say every violent instance has involved successfully realized actions. However, oftentimes most actions in a fight do not reach their intended target fully or at all. If the character receiving the violence is aware of what is happening then it makes sense he or she would do anything in his or her power to avoid that violence. The more invested the character is in avoiding the violence the higher the stakes will become for the scene. Additionally, by adding in avoidances we can create a feeling of uncertainty in the audience of not knowing when a certain given attack may be successful. As a result, the audience pays more attention to the conflict move by move.
In order to successfully avoid an incoming attack one tiling must always be crystal clear: what is the intended target. Even if the performers know that a strike will not land they both must be invested enough in the action and the reaction so that the audience believes it would have landed had the receiver not moved out of the way. If this element is not firmly in place then the action of the operator and the reaction of the receiver will look disconnected and general.
Take, for example, a roundhouse punch to the face, or to be more exact, the left cheekbone (see Figures 14.169—14.171). The performers must establish a distance where it is likely that the operator could possibly strike the receiver after moving the whole body forward. Attacks that miss still require the operator to pursue the receiver. This gives the action a sense of


directed motion that obliges the receiver to move out of the way. If we recall from Chapter 3 Seeking Safety the principle of ARC (Action-Reaction-Completion) we find that the order of events outlined there provides us with a guide in sequencing this action in particular. The attack must happen first. The receiver then responds to the intent and physical nature of that attack with the appropriate reaction. Of course, if for whatever reason the receiver does not react by moving out of the way then the operator knows not to complete the action and put the receiver at risk. Once the receiver initiates the action then both operator and receiver can finish that particular moment by completing the ARC. The consequences of even a missed attack can be as terrifying as a successful one. Two characters who have had a loving relationship would have a tectonic shift to that relationship if one person started throwing fists at the other. That relationship will have changed irrevocably; nothing would be the same moving forward. Avoiding the danger allows the characters and the audience the opportunity to process violent intent in real time. Do not short shrift the importance and the power of these unsuccessful moves, Failure often reveals more about life than success.
Blocks
Responding to a character's intent regardless of whether violence is involved or not is of vital importance to any scene. It keeps the energy between the performers flowing in such a way that the audience knows exactly what is occurring moment by moment. Avoidances help engage with this element in performance quite well during moments of violence. Sometimes, however, the character cannot escape the path of an incoming attack fast enough to completely avoid it. In this instance the character must intercept the strike with a block to avoid the consequences of a more severe injury. Including blocks in a violent moment increases the chance of getting more theatrical mileage out of a moment as well. By showing that the performers are actually making contact with each other even in the form of the block the likelihood of the audience engaging with the physical reality of the moment is increased. Adding blocks gives the performers an opportunity to demonstrate the relative skill level of the characters they are playing. In the two techniques described below we will examine how to block with the upper extremities (arms and hands) to see how certain strikes can be blocked and how these blocks can denote a level of skill for the character. Since there is a quality of touch that must be adhered to for these blocks the guidelines for making contact outlined earlier should be followed for these techniques as well.
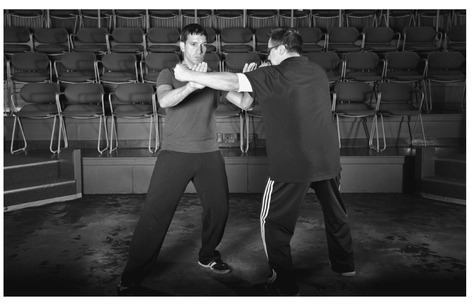
Palm Blocks
The palms of the hands are one of the most dramatically versatile and effective ways to block an incoming attack. Palm blocks are typically used for incoming punches but can be used to intercept kicks, elbows, and knees as well. The palms not only provide a flat surface to meet the strike, but also increase the possibility of getting sound from the block. This may be considered a shared knap but unlike the knaps detailed before this one does not simulate a hit resulting in damage. Both blocks will be of a roundhouse punch from different angles.
- The operator finds the appropriate distance where contact can actually occur between the performers and attacks with a roundhouse punch that swings in horizontally to the target of the receiver's chin. It is very important that the operator still tracks the strike to a specific target. This way even when the block is performed the audience can clearly see that the receiver would have been struck had the block not been successful (Figure 14.172),
- As the strike is moving towards the target the receiver should adjust his or her feet and hips in such a way to face the incoming strike. Movement of the feet away from the strike is preferable to allow the strike to develop and leave room for the block. Adding a slight avoidance also imbues the moment with more danger as it shows that the receiver is actually concerned about getting hit and does not take the block for granted (Figure 14.173).


- Do not anticipate the block. If the palms are placed in the spot to meet the block before the strike is even thrown the sequence of ARC is broken. The reaction cannot be complete before the action. They must meet in the same time signature together. Both performers are responsible for finding out exactly how this timing should be for a particular interaction.
- After the avoidance in the body and facing the strike, the receiver should raise the palms up to meet the incoming strike. The palms should be relaxed but not too cupped with the fingers pointed up. The optimal placement for the palms at the moment of contact is one hand at the middle of the forearm and one hand in the middle of the upper arm. If the operator has a long enough forearm then both palms could be placed at an equal spacing on the forearm. Avoid contacting the operator on the elbow as making contact on the joints should always be avoided (Figure 14.174).
- After the moment of contact has occurred both the attack and the block should be relaxed naturally so that the scene can continue. Try not to push the strike out of the way or grab the arm unless there is an express reason for it choreographically or in the context of the scene. Like strikes, blocks should not be lingered on but rather moved through to help connect action and reaction and create a through-line of intent for each character.
- To play with how different characters might respond one can differentiate the block gesturally. Very flat palms with a sharp movement might denote a more skilled or confident receiver. A larger movement of the arms with slightly more relaxed or "sloppy" hands might demonstrate a less skilled or more frightened receiver. Think of the block as a gesture and experiment with which the quality of block is right for the moment without sacrificing the technique.
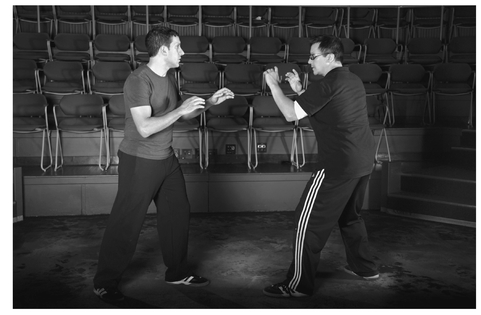
Forearm Blocks
- The operator will find the appropriate distance for contact once again and attack with a roundhouse punch. This block is most successful when meeting a roundhouse punch that is travelling at an angle on the downward diagonal. A good target for the operator would be the temple of the receiver. The block can also be used against an incoming horizontal roundhouse as well (Figure 14.175).

- As the attack moves forward the receiver should adjust the feet and hips to initiate a slight avoidance. By dropping the hips and moving the head away from the incoming strike the receiver will increase the perceived danger of the strike and also allow more space for the block to develop (Figure 14.176).
- The outside forearm of the receiver should meet the inside forearm of the operator at the point of greatest musculature for each. Make certain that the hands of each arm are positioned in such a way that the bones of the forearms do not collide (Figure 14.177).
- As always do not anticipate the block!
- Relax the arms after the block has occurred to move forward with the scene or to the next move.
- Blocks with the forearm will typically demonstrate that the receiver has more training as a fighter than the typical palm block. However, like any block, the forearm block can also be treated as a gesture to reveal something additional about the character. If the hand of the blocking arm is closed into a fist it may suggest that the character is blocking as a trained response and looking to punch back. If the hand of the blocking arm is open and extended it could suggest that the receiver is not as skilled and is blocking out of pure instinct.
Playing Pain
Pain is never added to pain. It multiplies.
Anonymous
Regardless of technique, any violent moment will never be wholly woven into the fabric of the story if there is no reaction to the direct and immediate consequence of that action. Quite simply, someone must experience pain. Pain humanizes the characters. Of course, the magnitude of that pain is entirely dependent on the direction of the story and how that story changes as a result of the violence. One of the most egregious sins an actor can make in performing violence theatrically is not to react painfully to physical damage. If no pain is experienced after a moment of violence then the stakes of the scene diminish dramatically. If the actor does not engage with the experience of being hurt then there is no reason for anyone to expect that the audience will care about the well-being of the characters. The performers can only make the audience care by reacting truthfully to the violent circumstance and its consequences.
No matter what the nature of the violence breathing and vocal quality must be as carefully attended to in every aspect for volume, rhythm, and quality. This aspect of the work must be commensurate with the physical interaction between characters. Once the possible breath and vocalization are explored then the performer can start to more accurately and realistically communicate the one aspect of violence of which everyone has intimate knowledge: the knowledge of human suffering and pain.
Playing pain in performance is a tricky business. When in graduate school, two classmates of mine were rehearsing a scene where a young woman was attending the bedside of an old king who was sick. The scene was essentially about the young woman saying that she could heal the old king of his infirmity in exchange for some favor. My classmates seemed to miss their stride in the scene. There was no real reason for the old king who lay in bed to grant such favor to the young lady. Our teacher mentioned that since we could not see how much the king's infirmity affected him, there was no real need to listen to the young woman. They tried the scene again. This time the actor playing the old king was in an enormous amount of pain, wailing and screwing his face up on every other line to show how much pain he was in. This, however, did not improve the scene. Rather it presented a new problem. The scene became so much about the pain one character was experiencing that every other possible moment of connection between these two characters was lost. The pain trumped every other possible avenue of connection between the two characters.
Incorporating pain into a moment of violence in performance is absolutely necessary to make the audience care and believe that there is actually something at stake. Once proper vocalizations are explored as mentioned in the previous section based on location of the pain, then the performer can begin to further explore the exact quality of the pain. Quality of pain can be deduced if one knows the type of injury sustained. The following is a basic list of injuries that could be sustained in a violent unarmed altercation, which have distinct effects on the human body and therefore alter the quality of pain being experienced:
- Crushing. This type of damage causes bruising to soft tissue or muscle, breaking of bones, or even rupturing of organs if the blow is forceful enough. Think of the effect of a large hammer the size of a fist hitting any given area.
- Penetrating. This type of damage is invasive by breaking the skin and entering the body. The object tears and disrupts the internal structure upon entry. Think of a thumb being shoved and twisted into the eye socket.
- Choking. This type of damage specifically targets the systems that supply oxygen to the body. Typically the location of this kind of damage is targeted at the neck. Chokes can either deprive the receiver of oxygen by interrupting the exchange of air through crushing the trachea (windpipe) or interrupt the flow of oxygenated blood to the brain by collapsing the carotid arteries on the side of the neck.
Before the quality of the pain being experienced can be fully explored and expressed, two basic questions must be answered: what has injured me? And what type of injury from the above list does this object produce physiologically in the body? The games listed below help the performer answer such questions.
The Exotic Death Game or Circle of Destruction
This is a group game where the players all stand in a wide circle. There are no props to this game only the body and the imagination. One player begins by creating out of thin air a weapon of personal destruction. It could be anything – a knife, a sword, a rifle, a bazooka, an attack dog, a poison dart. But this weapon must be created using actions with the body and sound effects only. The player should not simply raise both arms and say, "It's a bazooka!" The player must act as though he or she had just locked and loaded a bazooka and is taking aim at a target. The target in this case is another player in the circle whom the player with the bazooka has chosen to destroy. The player with the weapon uses it in the way that particular weapon should be used (in this case, the bazookateer must launch the round toward the target), When the weapon is used on the player who is the receiver, that player must die in a fashion appropriate to being affected by that weapon. In the case of the bazooka, one or many limbs might be blown off from the torso. When the player experiences the trauma he or she must take a full 20 seconds to experience the particular pain of that trauma before expiring. This must be done outlandishly using the full limits of the body and the voice. On a reaction scale of 1-10 where 10 is the highest level, all of the death reactions should be at a 10. (It should be mentioned here that since this game relies on the players stretching their limits physically and vocally it should only be played after a thorough vocal and physical warm-up.) At about the 15-second mark, the player about to expire then creates his or her own weapon to use on another player. With the last ounce of strength, that player then targets another person in the circle who must go through the same throes of death and continue the circle of destruction. Once players have expired they should remain on the ground and observe the different and exotic items of destruction that are created and how each player responds to a particular weapon. The player who begins the game should be the last one to die.
This is a very fun game especially when the players try to out-imagine each other with ever increasingly outlandish weapons. (I once saw one player kill another with a pack of faeries. That's right. A pack of faeries. One of them was Tinkerbell.) Be sure not to short shrift the amount of time the players take to experience the pain of the trauma. Often players will want to scream once or twice and then create their weapon. If a player short changes his or her own agony the rest of the players should be encouraged to shout at that player "Keep dying!" to make sure the player investigates that particular trauma to its fullest vocally and physically.
The Pain Game
This game is an extension of the Circle of Destruction. The first time I ever played this game was at the Philly Cheesesteak Workshop in a class taught by SAFD Fight Master J. David Brimmer. It is a deceptively simple game but one that at the time opened my eyes to the reality that representing violence in performance is a necessary and practicable skill.
This game is best played after Circle of Destruction since that game is a good warm-up to the concepts of pain, death, and dying. It also introduces the concept of linking pain to the instrument that caused it. Start by throwing a small ball around the circle. Usually a tennis ball or any ball of comparable size and weight will do. The players can throw underhand or overhand as long as the ball reaches the target. After a few minutes when the group becomes comfortable throwing and receiving an object swap the tennis ball with a lacrosse ball. The size is roughly the same but the weight is very different. The introduction of a ball with more substantial weight should focus the group more to make good throws and catches. The players should find that it takes more full body attention to receive the energy of the lacrosse ball. After a few minutes with the lacrosse ball put the ball down but continue throwing the ball as if it were there. This imaginary ball should be thrown in the same way as the lacrosse ball with the throwers putting effort into accurate throws and the catchers putting their whole body into receiving the energy of the toss.
After a few more moments of this pass-around with the imaginary ball, the nature of the ball changes. The ball becomes like a lead shot put. Except this shot put is very special. It has infinite mass. It is the heaviest, densest object in the universe. This would naturally mean that no one could lift it. But now in the game every player has developed infinite strength. So everyone can now pick up and throw the ball. However, there is one problem. No one is invincible. So now when the players with infinite strength throw the ball with infinite mass it travels so fast that no one can catch it. So the ball ends up doing damage to wherever it happens to strike the receiver. The game begins in the same way as Circle of Destruction with one player throwing the ball, in this case the weapon, towards a very specific location on the body of another player standing in the circle. The location of the damage will be dictated by the aim and eye focus of the player throwing the ball. The damage done to the receiver is blunt force trauma. Crushing damage. When a player is struck, he or she will experience the pain caused by the damage physically and vocally for a full 30 seconds. The scale here varies slightly from Circle of Destruction in that the pain here may ebb and flow depending on the damage caused. However, even though the range of the pain experienced has increased, the players should nonetheless still be investigating the physical, emotional, and psychological pain produced by the damage fully and deeply through their inner and outer senses.
If possible, the instructor or knowledgeable member of the group can side coach the player experiencing the pain about what physiologically may be happening depending on the location of the trauma. For example, if a player has been struck in the shoulder I may say that the shoulder has been dislocated and needs to be put back in the socket. I will describe the ligaments tearing on the inside causing such pain that any movement of that arm is impossible. Then I'll ask if the person writes with that hand. If the answer is yes then I will suggest that it might not be possible to use that arm ever again and that all of the skills that person was good at with that arm must now be relearned with the other arm. Another example might be trauma to the torso. I may suggest that the strike has caused a pneumothorax and that the lung is collapsing and that it is more and more difficult to breathe. I may complicate this by saying that the ribs have also been broken and that one of the fractured ribs has punctured the lung and the lung is now filling up with blood. These images, while unsettling, are useful in giving the players concrete images of what could be happening to their physical bodies as a result of a specific trauma. This takes what was a general notion of pain and focuses their experience to a specific physical response.
The physical images may bring up emotional or psychological responses as well when they investigate the severity of the trauma and the possible imagined consequences. It should be suggested that the damage caused might affect the player's ability to operate normally on a daily basis, or prohibit advancement in a certain profession because of a new physical handicap, or even change the player's relationship to a loved one because of a disfigurement. Not everyone in the group need go through the same checklist of elements to consider. But all should be considered as possible when addressing the consequences of a specific injury and the particular pain associated with it. This will give the group a wide variety of experiences on which to draw.
Another element of this game to consider is the role of the other players who are witnessing a particular player actively experiencing the pain caused by the particular damage done. This aspect of the game is very important to consider for two reasons. First, it gives the other players an idea of how they may react physically and emotionally when playing a character who must witness the pain or death of another character. And second, it also gives the group a sense of how an audience may respond to viewing another human being in pain or about to die. This kind of information is vitally important to any performer. A scene where a character experiences pain or is about to die is probably the most intimate moments of a character's journey in the course of a play. How that character responds to hardship, pain, or the end of life is the kind of stuff that people pay to see in performance. Giving a moment like that short shrift denies the performer and the audience of what should be a moment that is full, vital, and human. Investigating how observers respond to moments like these will inform an actor's choices for how he or she approaches this aspect of the work.
Finally, it should be said that after the game is played the players will feel spent. This game tends to cause physical and emotional exhaustion for some more than others. Make sure to leave some time, at least 10 minutes, for a debriefing session where everyone can talk freely about what sensations, emotions, desires, and images they experienced during the game.
There are two very simple guidelines to follow when responding to an injury in performance that can show the audience exactly where the character has been hurt.
- ouch the location of the pain. This should be apparent to anyone who has received an injury however insignificant. When the body recognizes pain the hands typically seek out the location as quickly as possible. The hands hold on to the body part, rub it, and prod it. The hands get as much information as possible about the extent of the injury, especially if the injury is not immediately visible. If the hurt is extensive the hands will want to hold on to the affected area for a longer duration if possible. This is the body's way to apply pressure to an injury. This also provides a quick remedy to help reduce swelling at the site of the injury.
- rap the body around the pain. This idea may be a little odd in the phrasing. It is not that the body is actually attempting to embrace the pain physically (unless that is a particular character choice). Rather, the body attempts to isolate the source of the pain by removing the precise area that is struck. This is not dissimilar to the body's reaction to an incoming threat, hi order not to be injured the body would remove the threatened target. Even though the injury occurs after the body can successfully remove the target from danger, the mechanics are the same. If one were to imagine a ball the size of the imagined injury, the performer should attempt to curve the body in some way around that space while removing the rest of the body as far from that space as possible. The performer can accentuate this movement with good limb and joint articulation, particularly with the spine. If one thinks of a punch to the stomach, the most appropriate reaction would be to contract the abdominals and curve the spine around that trauma. This particular instance involves a curvature of the spine in a specific region relative to the location of the blow. It is not a general reaction of bending at the waist and doubling over, That is far too general of a reaction for any injury to the midsection. Also, the act of doubling over and looking at the floor deprives the audience of a clear view of the performer's face. For storytelling and character purposes, the head should remain up with the face visible. This will allow the performer to clearly express how the character feels about that injury in the moment to the audience and to any other characters who may witness the injury – particularly the character that just inflicted the damage!
Discovering the quality and effect of pain on the human body for every possible circumstance is an indispensable component of the art of unarmed stage combat. Without it the actors cease to be characters that can be changed and affected by actions. Rather, they become performers who are demonstrating a physical routine with some sounds after which everyone will get back to the business of the rest of the play. Nothing can more quickly take an audience out of the transporting nature of theatre or cinema than a performer who is unaffected by things that happen to him or her in during the course of the story. By being bold, differentiating, and exact in the presentation of pain during moments of violence the performer can exploit yet another avenue to vitally connect with an audience. Don't miss that opportunity.
For videos demonstrating the techniques from this chapter, please visit the companion website at www.focalpress.com/cw/najarian or scan the following code:
