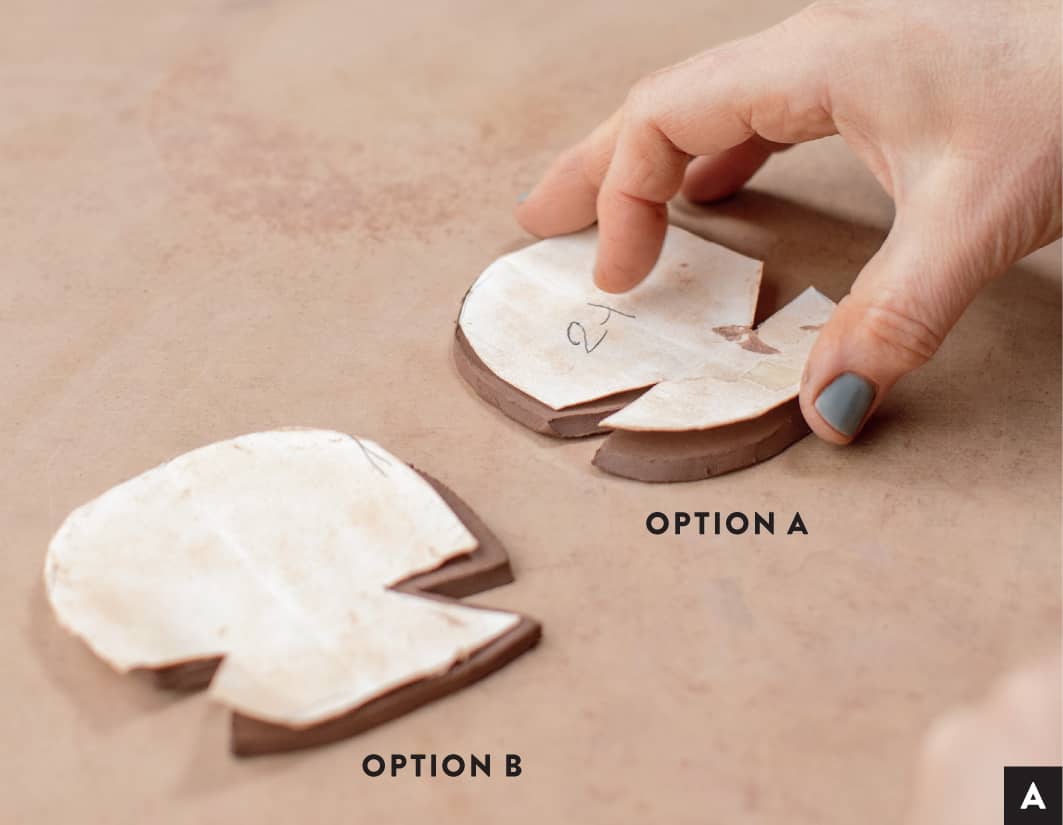
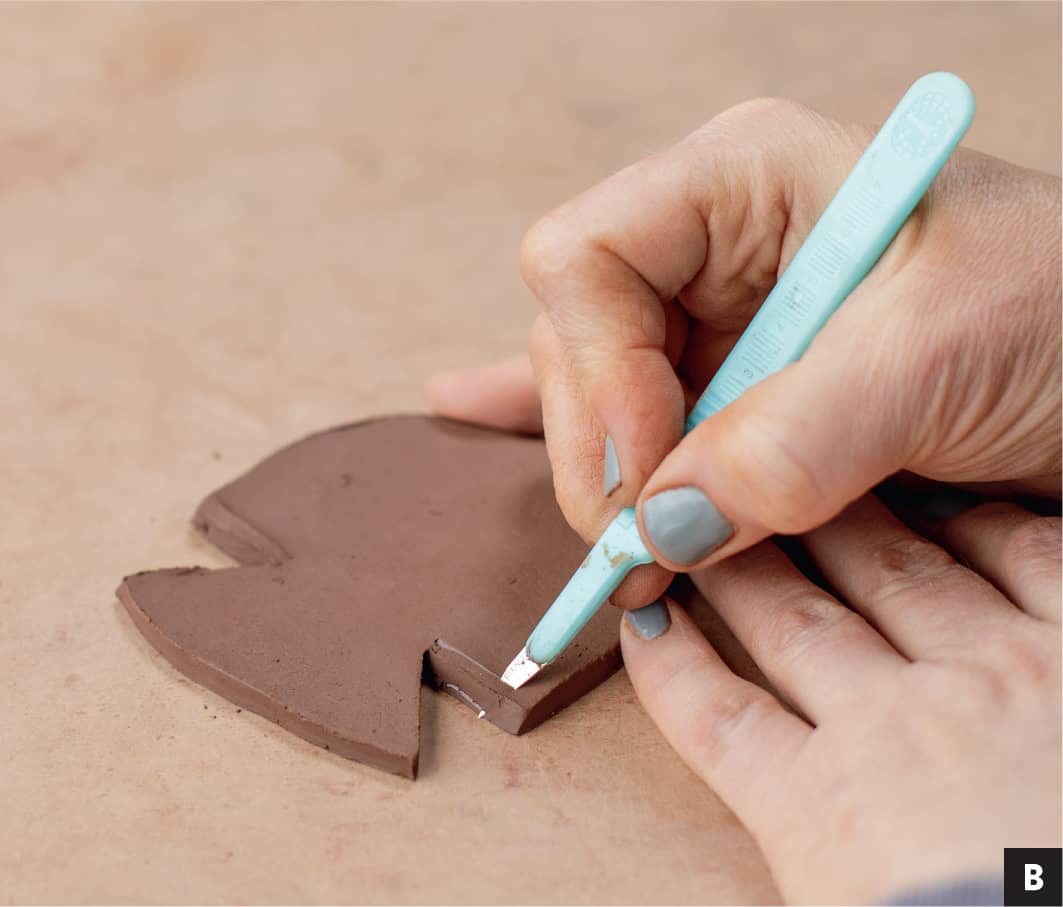
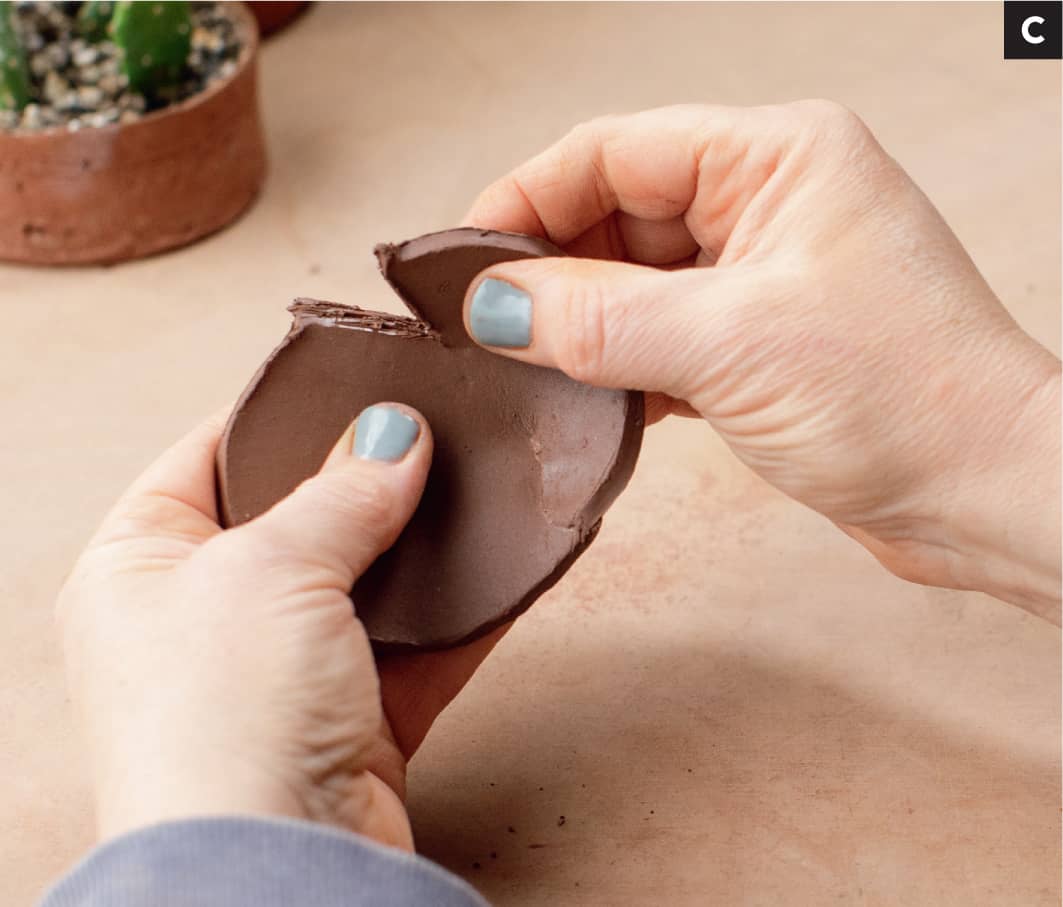
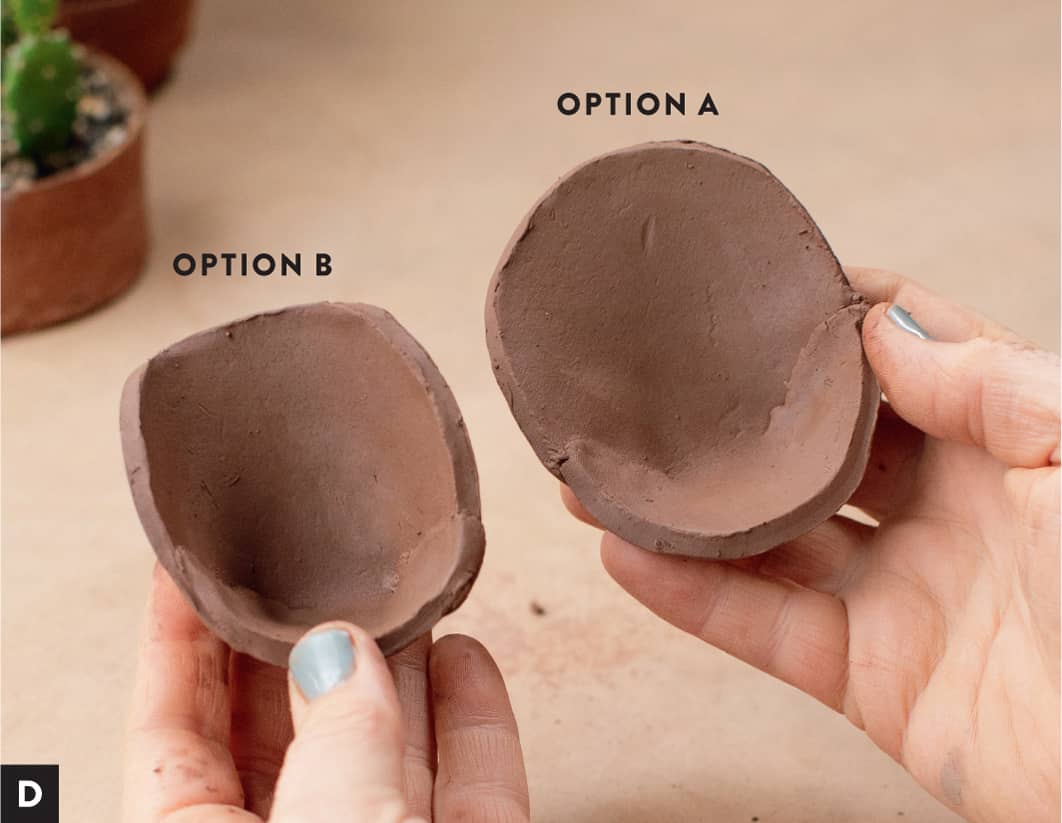
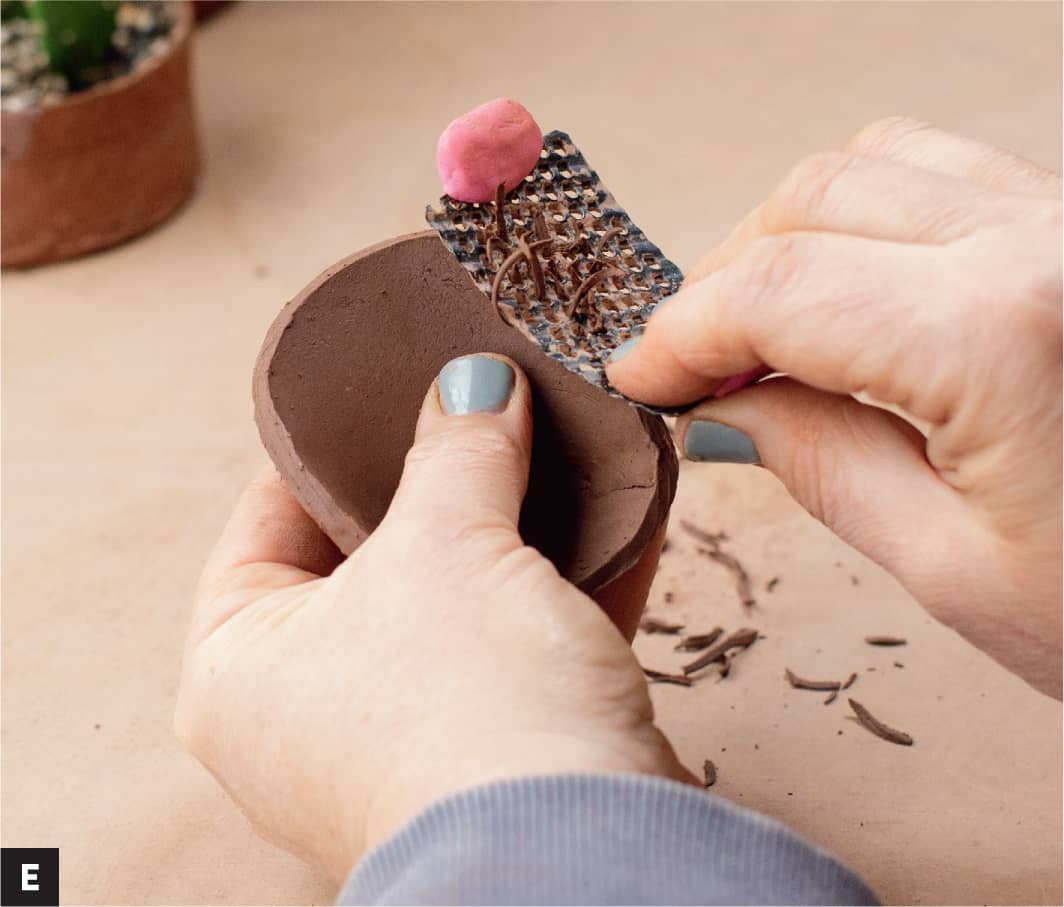
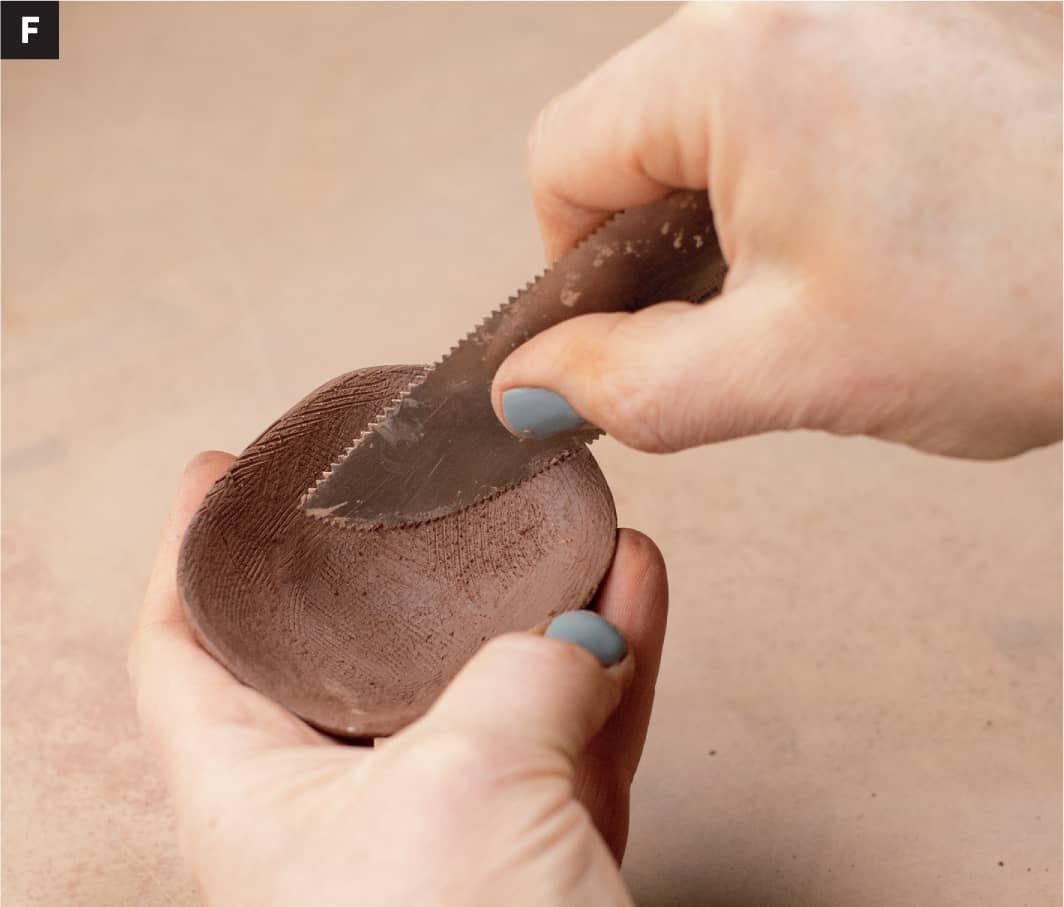
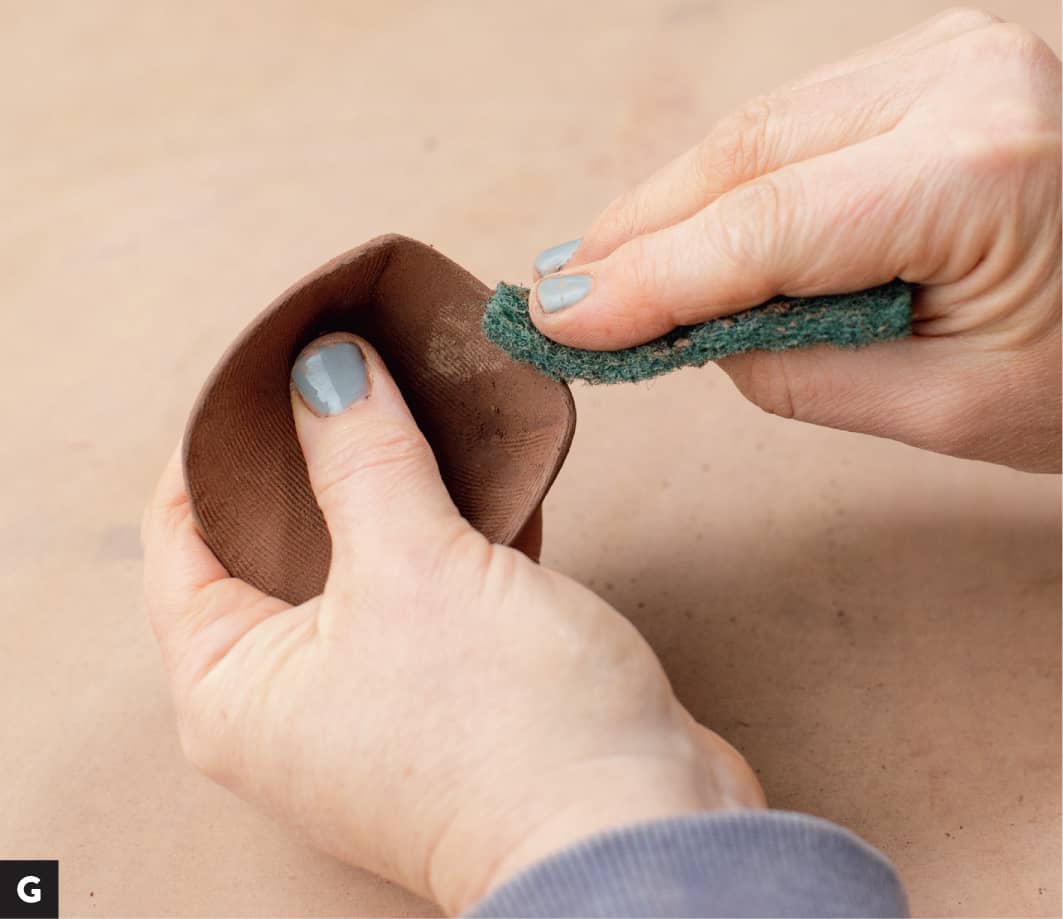
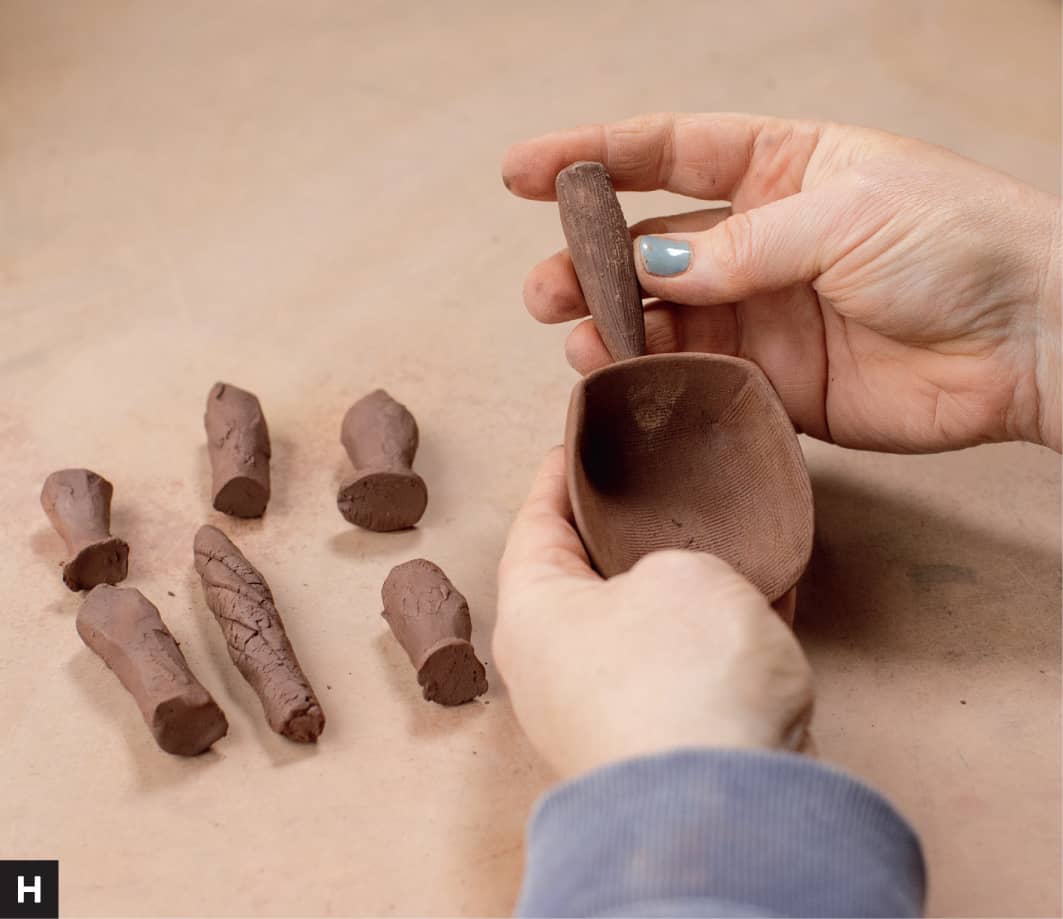
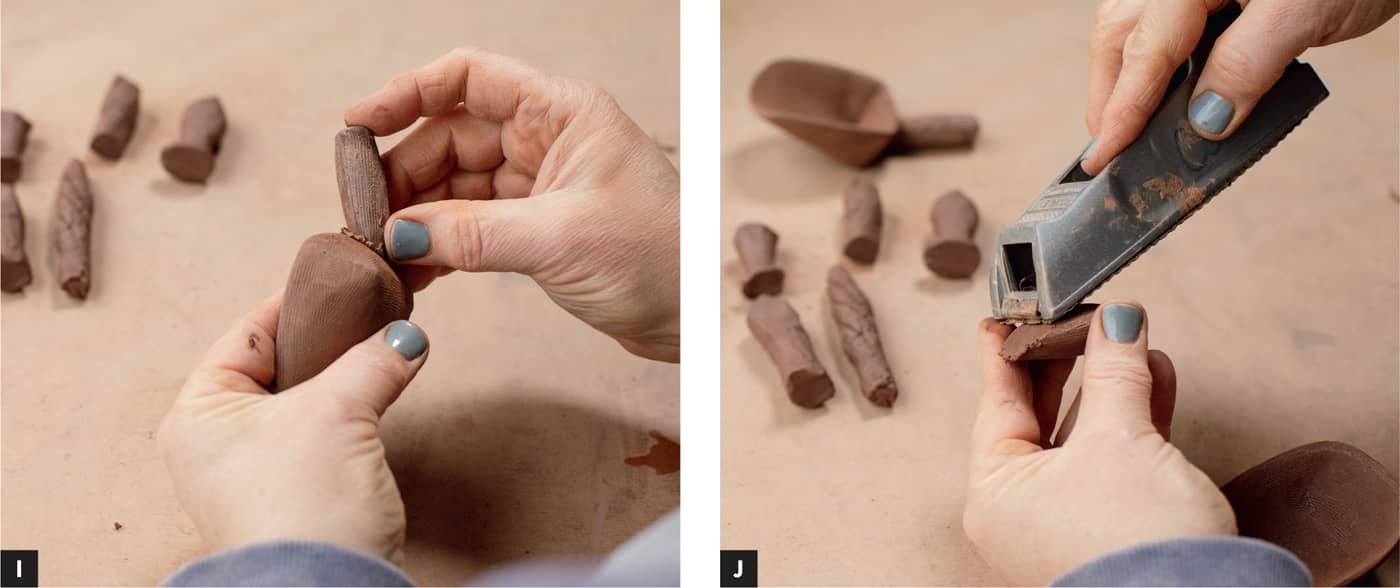
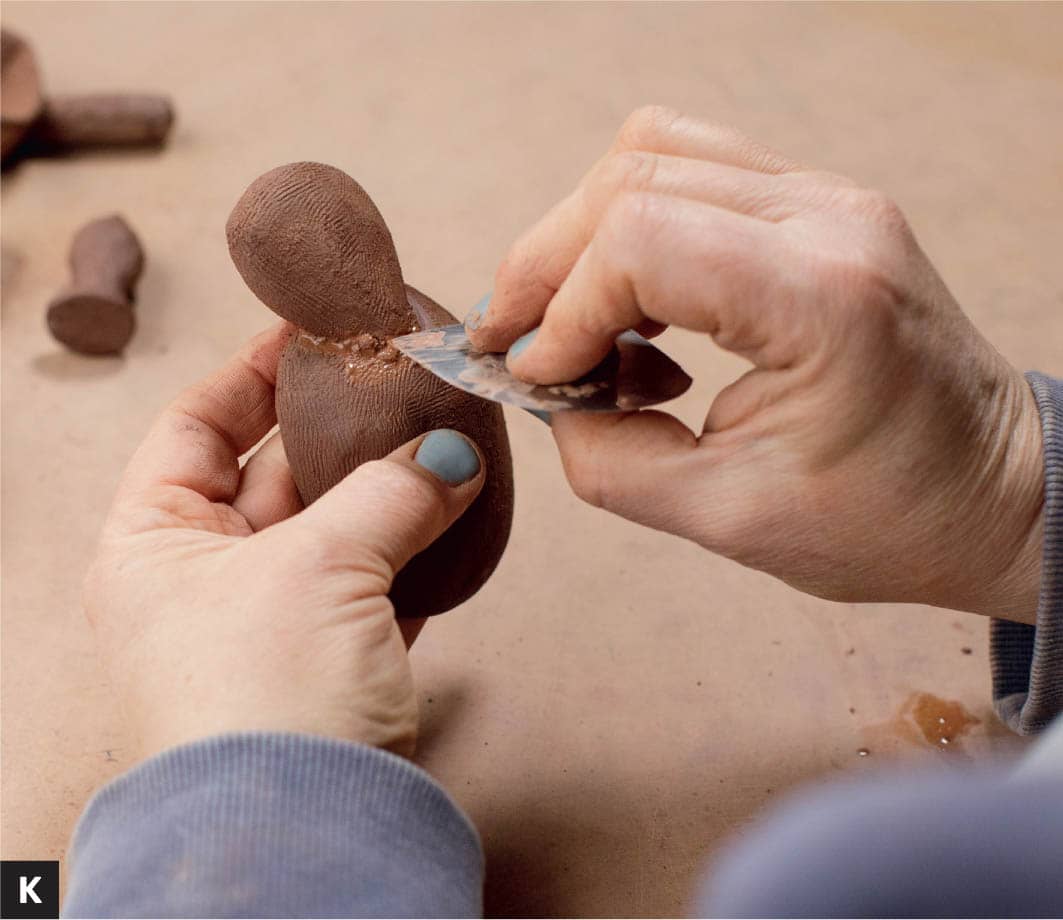
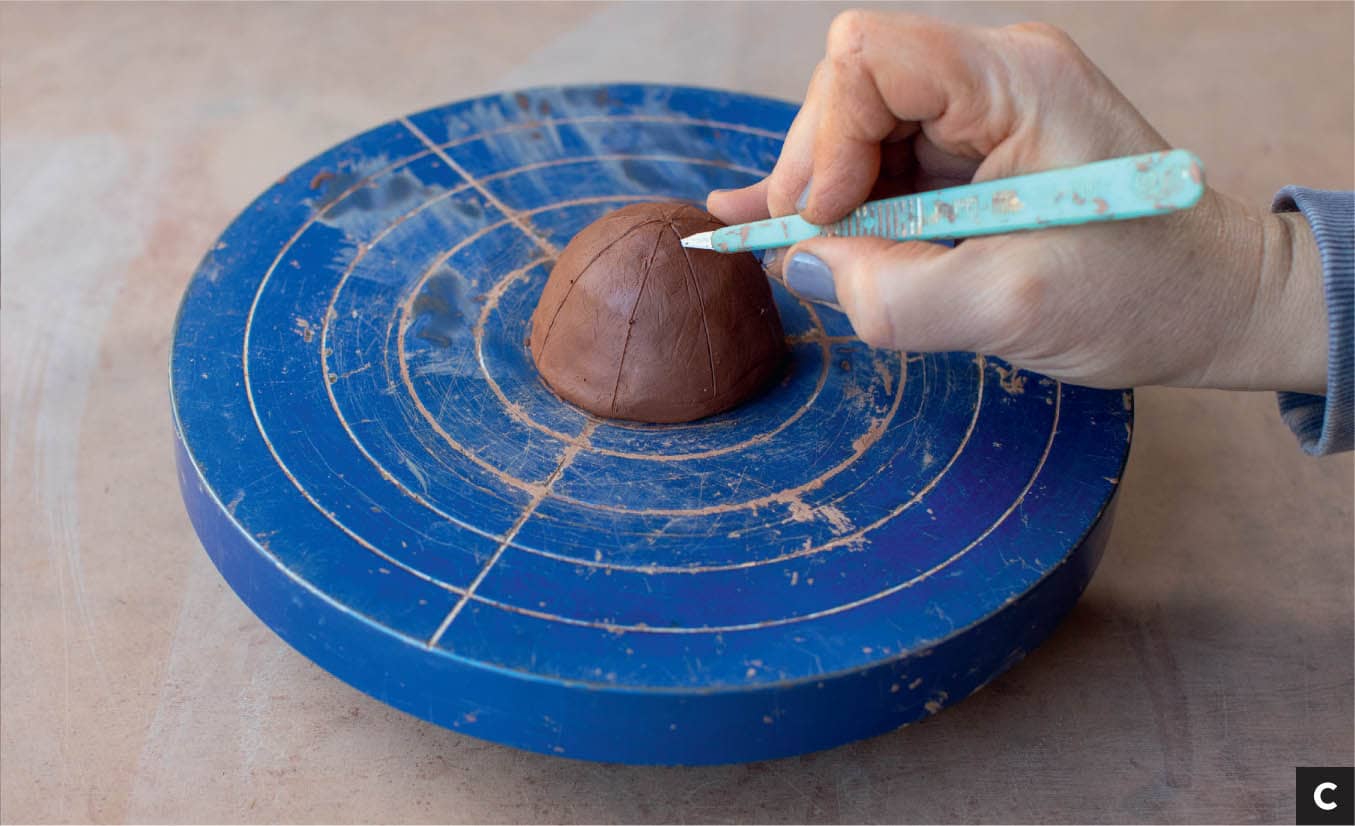
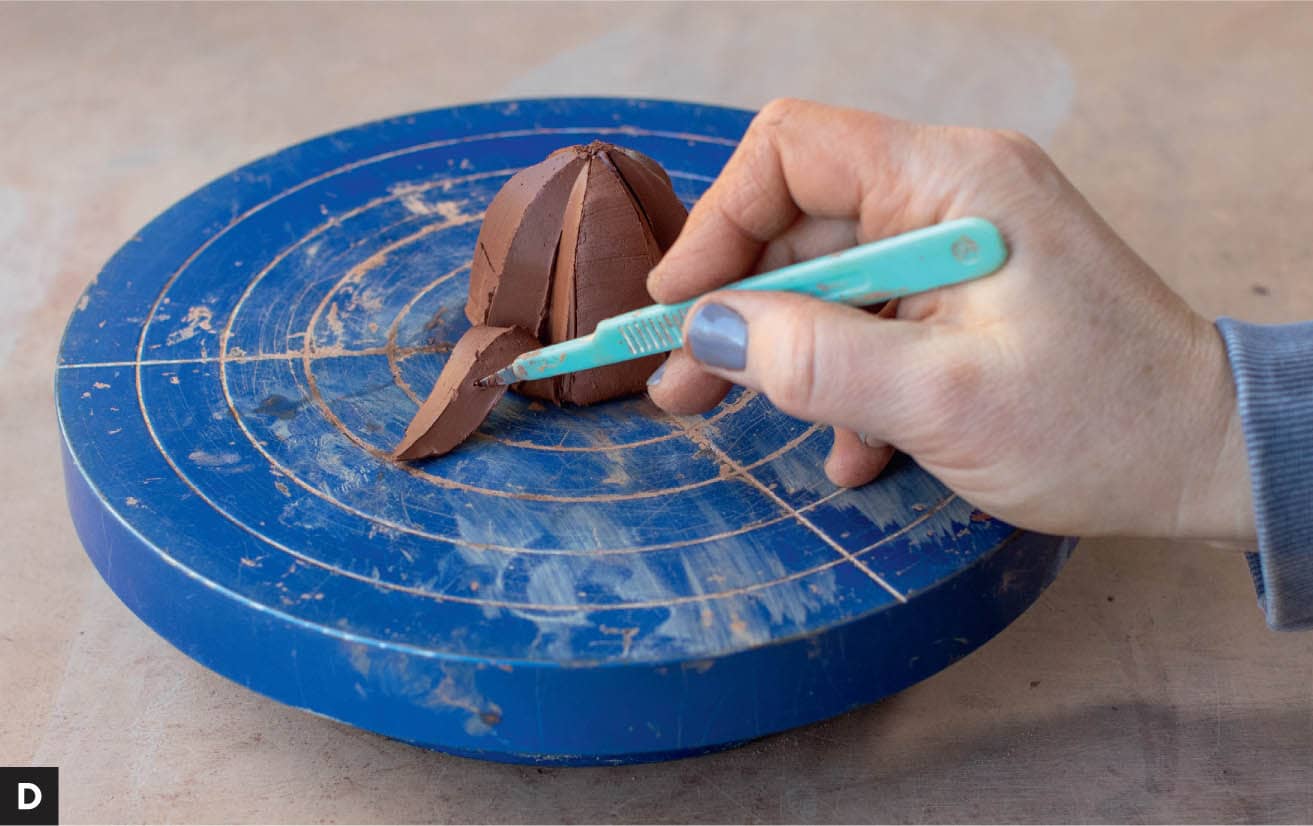
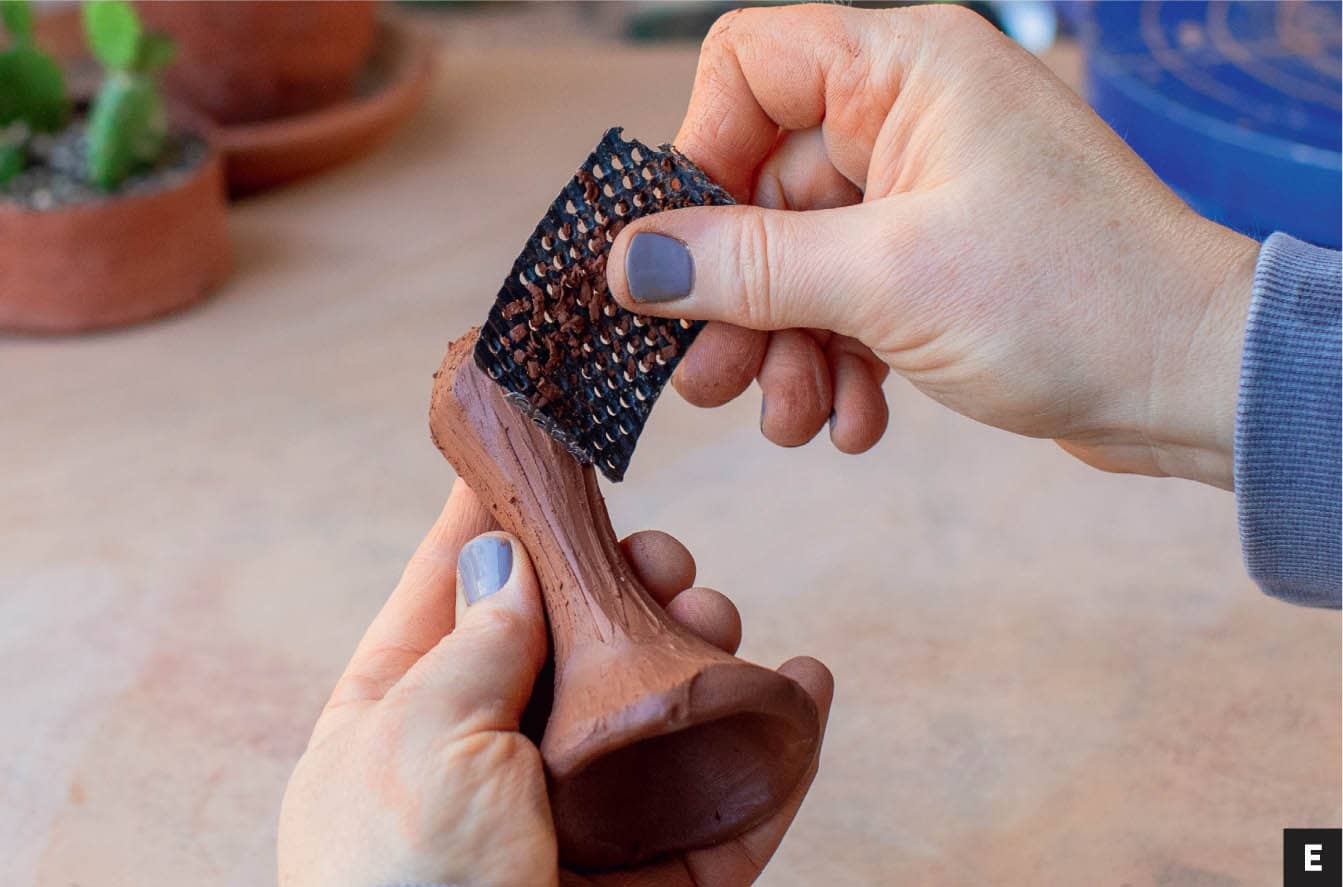
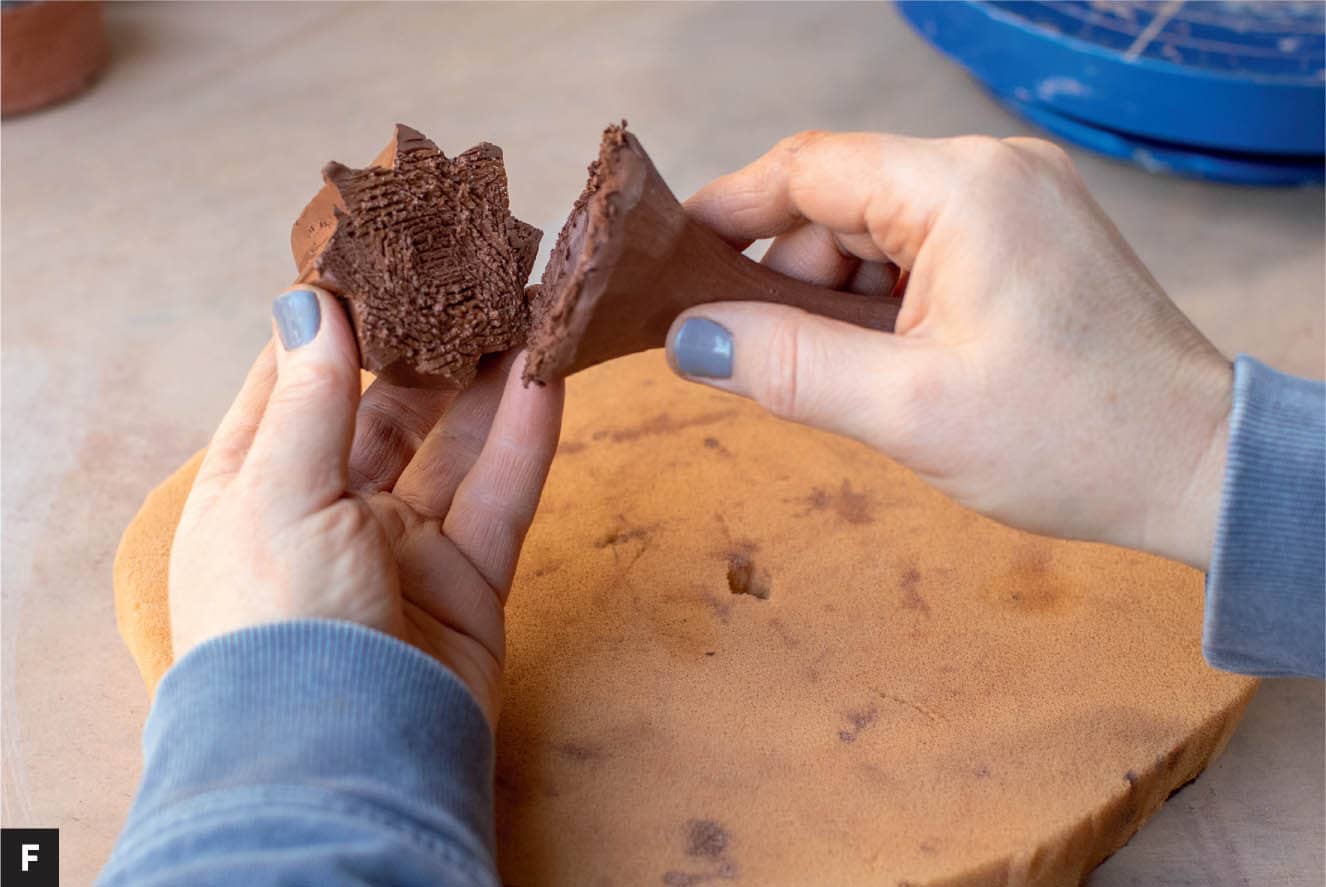
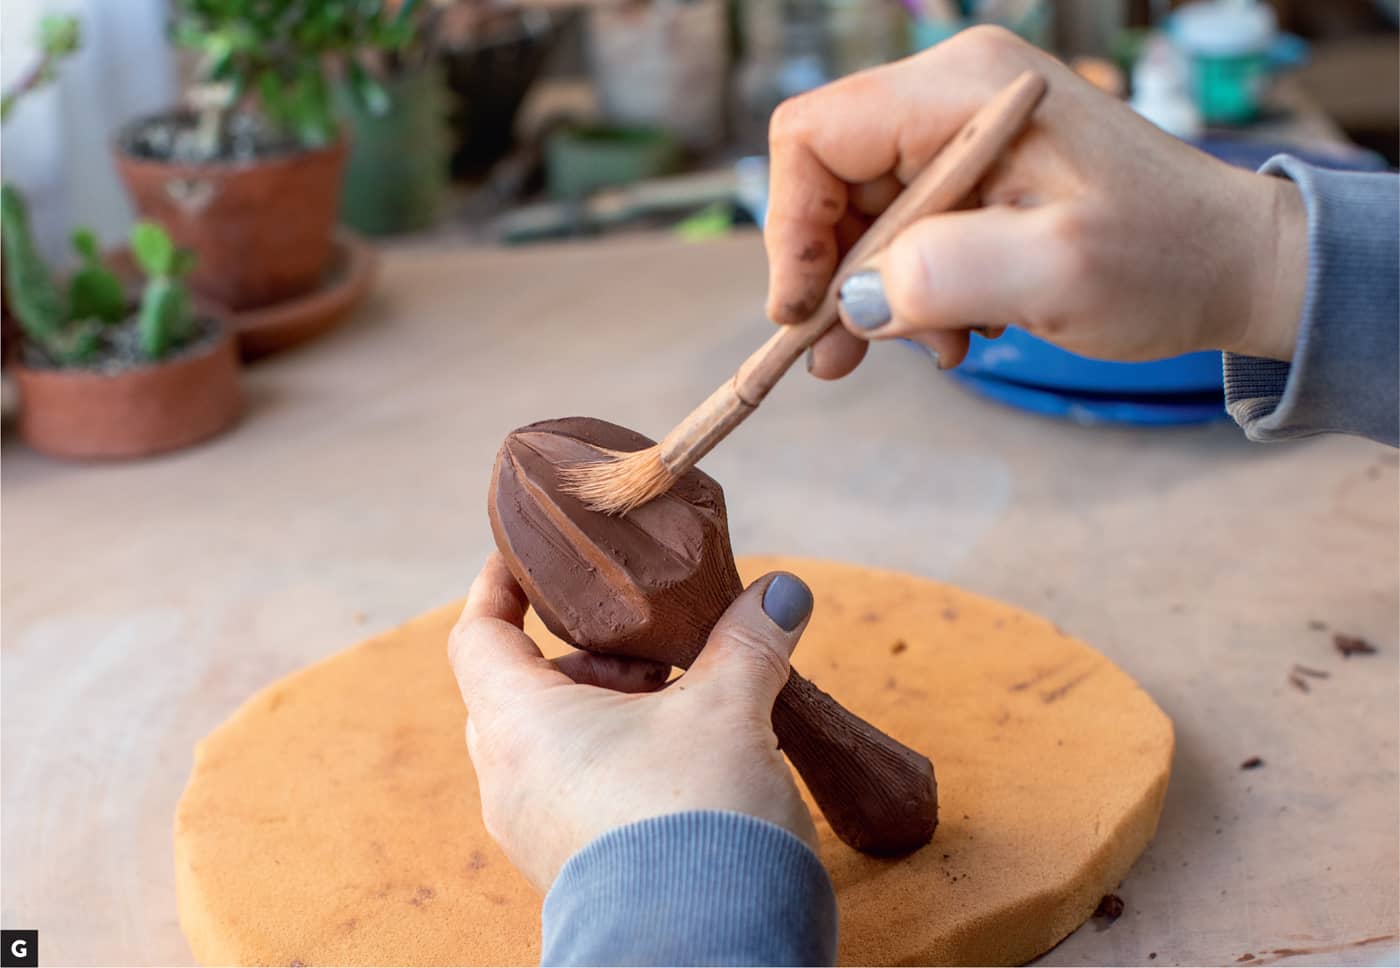
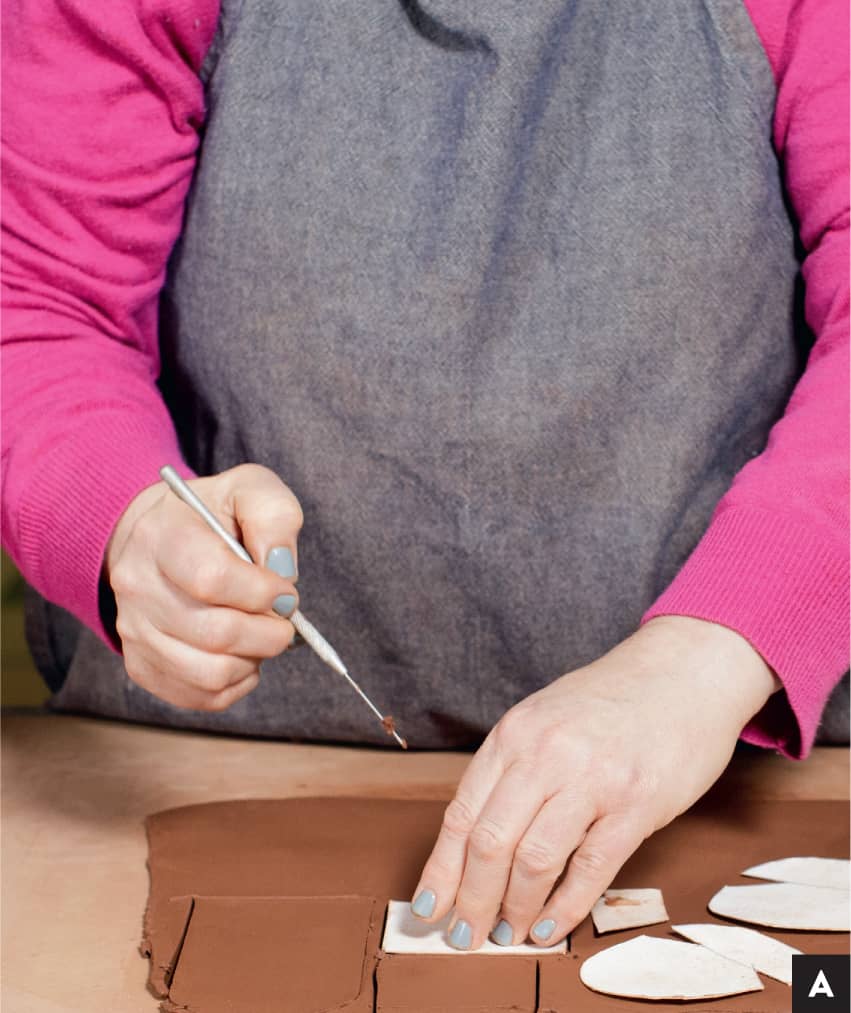
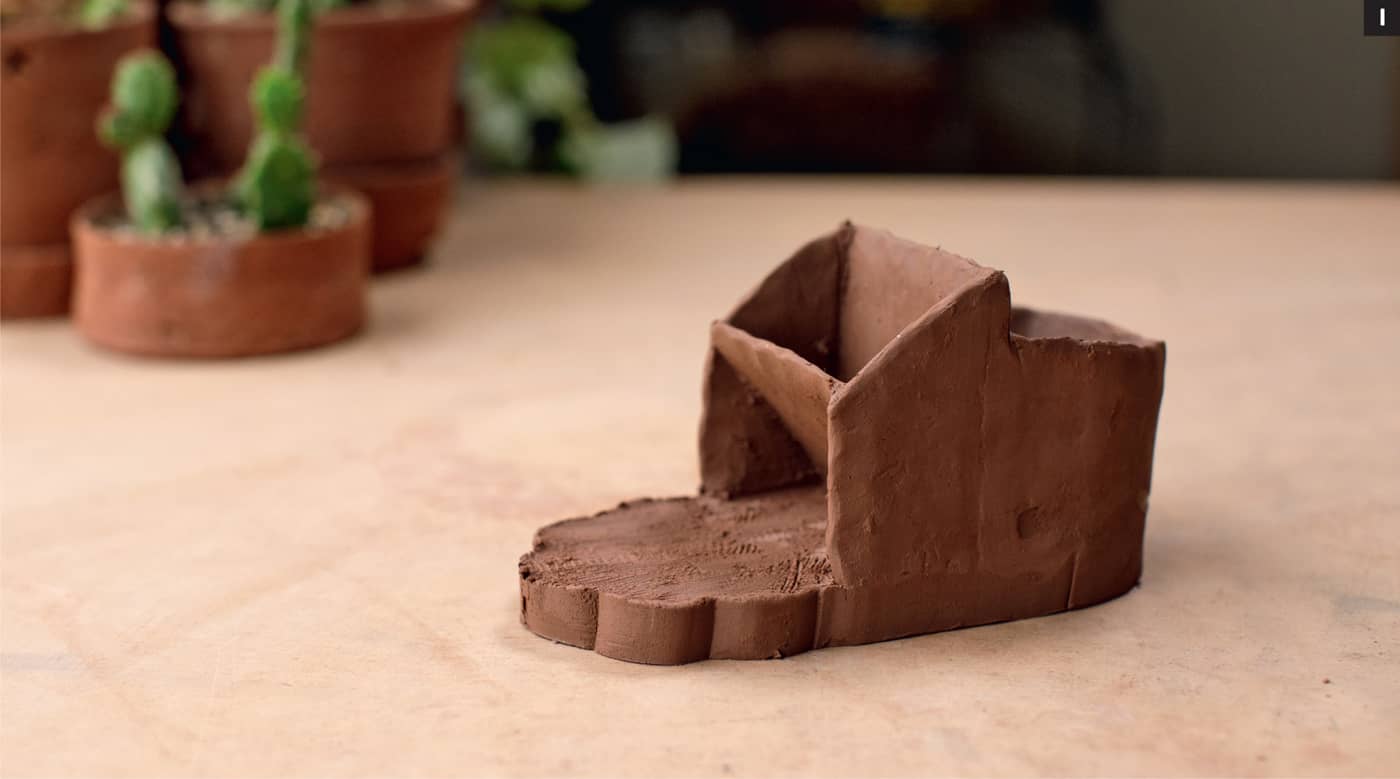
CONE 5, red clay, white slip, celadon style commercial glaze Roll out a slab just under ¼" (.63 cm) thick and large enough to cut multiples of your scoop template shapes. This form requires some intense handling while making, so choose a clay you are comfortable with. This form may also be subject to some amount of warping if overly thin. Using a needle tool, cut out as many of the shapes as you can fit. Put the excess clay back in your bag. It is always a good idea to make in a series. Your third attempt is always better than your first, I promise! [A] TIPDon’t let the paper template sit on wet clay; peel it off your cutouts as soon as you are finished. This will extend the life of your template. It is important to this particular form to have a flat, clean cutout of the template shape to start with. If it got a little mangled when pulling the shape off the cutting board, just lay it flat, rib gently, and use the template again to recut the shape. The ribbing and recutting reenforce the form so it “remembers” and hopefully warps very little. Now to make a scoop! There are two options. I recommend option A to get started, and then option B once you have an understanding of the assembly process. Bevel the pie-shaped cutouts with a scalpel to increase the surface area of this connection. Score each side, wet one side, and pull the edges to slightly overlap and attach the seam. Pulling the edges together will cause the form to curve into a scoop shape. [C] [D] Compress the connections with a rib and clean up your seams. Make sure any seam in the area inside the scoop is very neat and tidy, with no gaps that might trap food or be sharp to the touch. Gently set aside on a piece of foam or a bat in a fashion that will help retain the shape you just formed—open bowl side down. [D] Let it set up to a medium leather hard. Assemble the rest of the shapes. By the time you get to your last, check on the first one you made. If it’s ready, move on to the next step. It’s time to refine and shape the scoop. Use a surform to shape the outside edge of the scoop and be especially careful at the seam attachment. If present, take away any excess overlap on the seam (option B). [E] Cup the form in your hand and grab your serrated rib. Gently start scraping the inside of the scoop. This will thin out the form and give some texture and definition to the scoop. Be mindful of the seams; they are the most fragile section. Texture as much as you want. I used several different gauges of serrated ribs, working first with the larger tooth and then moving to the smaller-toothed ribs. Creating texture is 100 percent an aesthetic choice once you have taken care of the technical construction and shape of the scoop. [F] Begin the edge work. Depending on your hand skills, you may be more comfortable using tools, versus your fingers, for the edgework. Pinched edge: Using your fingers and thumb, gently compress the edge of the scoop, working your way slowly around the entire form. You may need to do several slow passes to get a uniform appearance. Tooled edge: Using the serrated rib, gently scrape the edge until you have created a bevel on the edge of the scoop. Do not make the edge into a sharp point, this can make it prone to chipping. On the back side of the scoop, take off the sharper edges of slab. I really like a small piece of dry-wall sandpaper or a green scrubby for this job. Gently work your way around the edge, rounding and smoothing the lip of the scoop. The goal is to take away any hard/sharp lines and leave a refined, tapered edge. [G] Now hopefully you followed my advice and have a few scoop bodies made. Keep the scoops in a damp box or under plastic while you work on the handles. Don’t let them dry out. There are two handle options. Both involve sculpting using a reductive process, one with soft clay and the other carved and shaped from leather-hard clay. Both result in a solidly built form. For either option, make a couple of handles for each scoop you assemble. That way, if you mess one up, you have a backup. Try the different techniques and a variety of styles (e.g., tight vs. loose). You might surprise yourself with what you are drawn to. [H] Slow throwing: Using a banding wheel, take a golf ball-sized chunk of soft clay and center it on the wheel head. (The size can vary depending on your scoop size.) Using your fingers and hand, gently work the clay into a shape a little bigger than the handle size you want. Spin the banding wheel slowly and use a small metal rib to take away clay to reveal your handle. Give it more shape and definition as you work your way around. (This will take some practice and probably several attempts. Keep it simple at first; you can get more elaborate as your skill grows.) Using a cutoff wire, take the handle off the banding wheel and set it aside to set up, aiming for a similar temperature as the scoop. Leather-hard carving: This method requires a bit more patience but may be more to your liking, as it’s less reactive than the soft, wet clay. Take approximately the amount of clay you think you may need for your handle in relation to your scoop, plus a little extra. Remember, you may be cutting a little away to make the right angle to attach to your scoop. Rough out a few different shapes. Make several with different variations (volumes and shapes). Let them firm up to a medium leather hard. Use your surform to refine the shape. The goal is to have a symmetrical form that is comfortable to handle and has a bit of extra length on one end to attach to the scoop. Keep refining until you are happy with the shape. Once the shaping is done, use a combination of drywall sandpaper, a green scrubby, or a red rib to smooth out the surface. Attach the handle. Take both your scoop and handle options out. Match a couple that you like and hold them up together. Pick the combos you like best, keeping the rest under plastic. While holding up your pieces, look for the angle at which they should be attached. [I] This is up to you and what you think is comfortable and functional. Make a preliminary cut with your fettling knife or use your surform to create the angle at the end of the handle that will be attached to the scoop. This may take a couple of cuts, so be a little cautious. (You do have backups if you make a mistake.) [J] Once you have made your adjustments and have the angle right for the attachment, center the handle on the scoop and trace around the handle onto the scoop if necessary. (You can always eyeball it, if you prefer). Score both areas, wet one side, and attach. [K] Clean up the attachment and make any final adjustments. Gently drape with plastic so the scoops dry slowly and evenly. Voila! You have yourself some scoops.
Use the template of reamer head shapes (here) and tape them together according to the pattern. These will give you an idea of the shapes you will rough out in clay. You are welcome to scale the size up or down. Using your preferred clay, rough out the reamer head shapes. Make several (you will mess up a few!) and let these firm up to a solid leather hard. You want the form to be as symmetrical as possible; once it is set up, you will be refining and carving it. Make sure you have plenty of clay to work with, and if you have difficulty making a symmetrical form using just your hands, use your banding wheel and a rib to help. [A] Design and rough out the handle shape. I didn’t include any pattern for this, as this shape is open to interpretation. You may want to sketch out a few ideas to get started. Remember, this is meant to fit your hand and provide enough handle to sufficiently get into your citrus. It should match at the connection of the base of the reamer head, creating a strong connection point. There will be lots of torque on the connection—make sure it won’t snap off. The object should be both utilitarian and visually pleasing. Let these set up until leather hard. [B] Next, shape the reamer and handle. Use your surform to start making the shapes symmetrical (the handles may be asymmetrical). If the clay starts to feel tacky and gums up the surform, stop and let the clay firm up some more. You want a really clean pass with the surform, like you are grating a hard cheese; the clay should easily fall away. Place the reamer head in the center of your circle guide. (There is an example in the tools section on this page. It’s very simple to make one of your own; these are very handy if you are going to play around with the number of ridges.) Make a small mark to denote the center (peak) of your shape. With a ruler and a needle tool, make lines to the peak in the center of the form. These lines will be the high points of your ridges. This example has six ridges. This is a curved shape—try your best to keep the line straight while adjusting for depth. [C] Cut the ridges. (This is where your extra tools may come in handy.) Using a scalpel or utility knife, bevel cut to the center of the ridges, changing the depth as you move from the top down. Go slowly and steadily, working in one direction, and then the other to help with consistency. [D] Let these sit and harden up. You have exposed some clay that is a bit softer, and it will be easier to refine once it is a consistent hardness. Using a wooden knife, compress the valleys. Once they are set up and easier to handle, use your fingers or tools to gently clean up, refine the shape, and compress the reamer head. Place in a damp box or under plastic. Shape the handle. Remember, you generally want the shape to fit in your hand and have a flared base that will be scored and attached to the reamer head. Use a surform to refine the general shape. Don’t worry about the marks left from the process; we will deal with them in the next step. Once you have gotten closer to your finished shape, you may need to move to a serrated rib to start a shallower reductive refinement/shaping process. [E] This process can be a little hypnotic, and one can easily take away too much clay. Be mindful of your shape goal and keep checking in with your sketches or the image of the finished reamer image to stay on target. Once you have finished refining your shape, it’s time to smooth out any surfaces that seem too rough. Starting with a metal rib held at an angle yields more compression than scraping. Start smoothing. After you have gone over the form a few times, use a soft red rib to really get a smooth surface. This process will help compress the small particles of clay back into the form. Sometimes during shaping, we expose a lot of rough, groggy, or sandy particles in the clay, and compressing with the rib ensures a smoother finish, which is a nicer surface to handle, and the glaze will go over it more smoothly. Before you attach the two pieces, double-check that the reamer base and handle match in size where they will be attached. Address any fit issues now by adding or taking away clay. (It is easiest to adjust the handle side.) Score each of the attachment points. [F] This form will benefit from some slip on one side, which will help equalize the attachment of the two leather-hard pieces. Clean up the attachment zone as needed and set up a space for it to dry. I recommend a soft foam surface to avoid flattening out any of your points. Done! [G]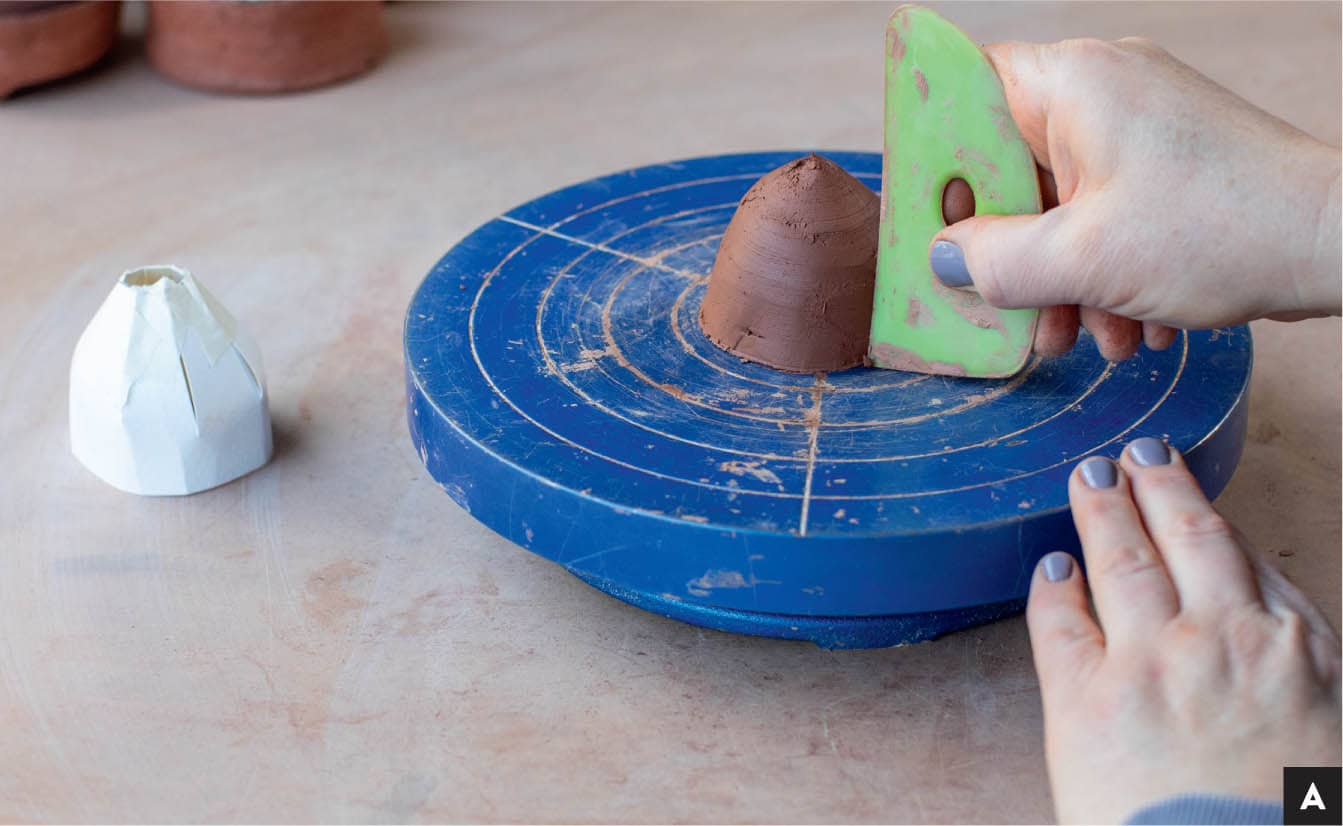
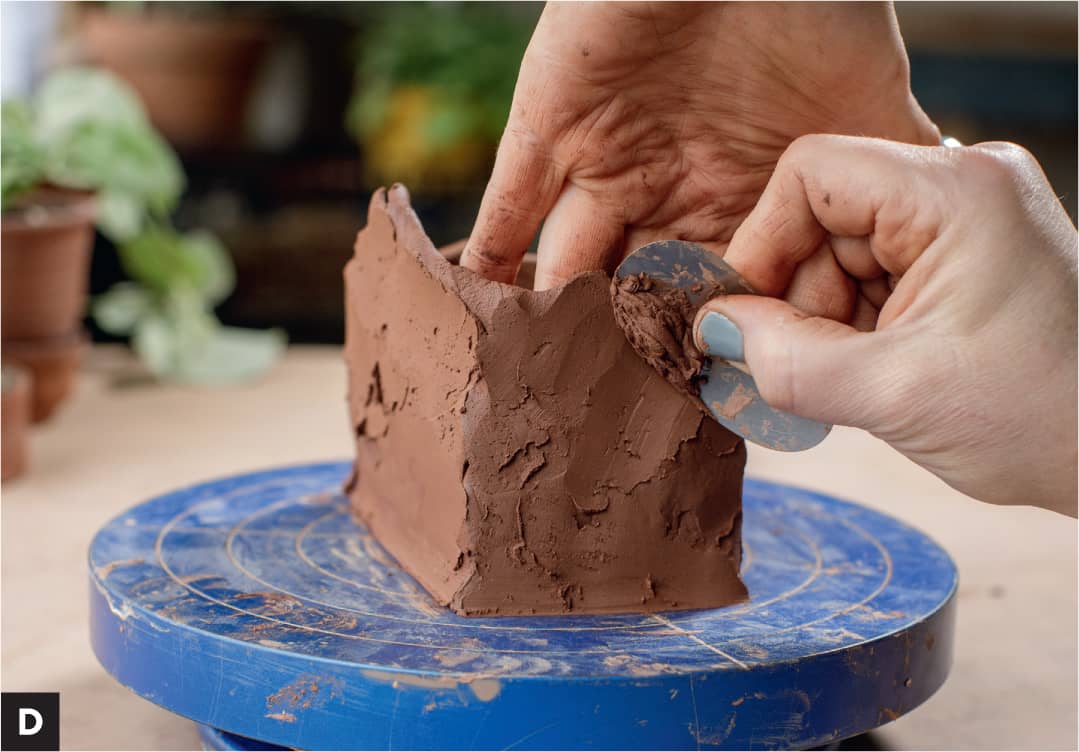
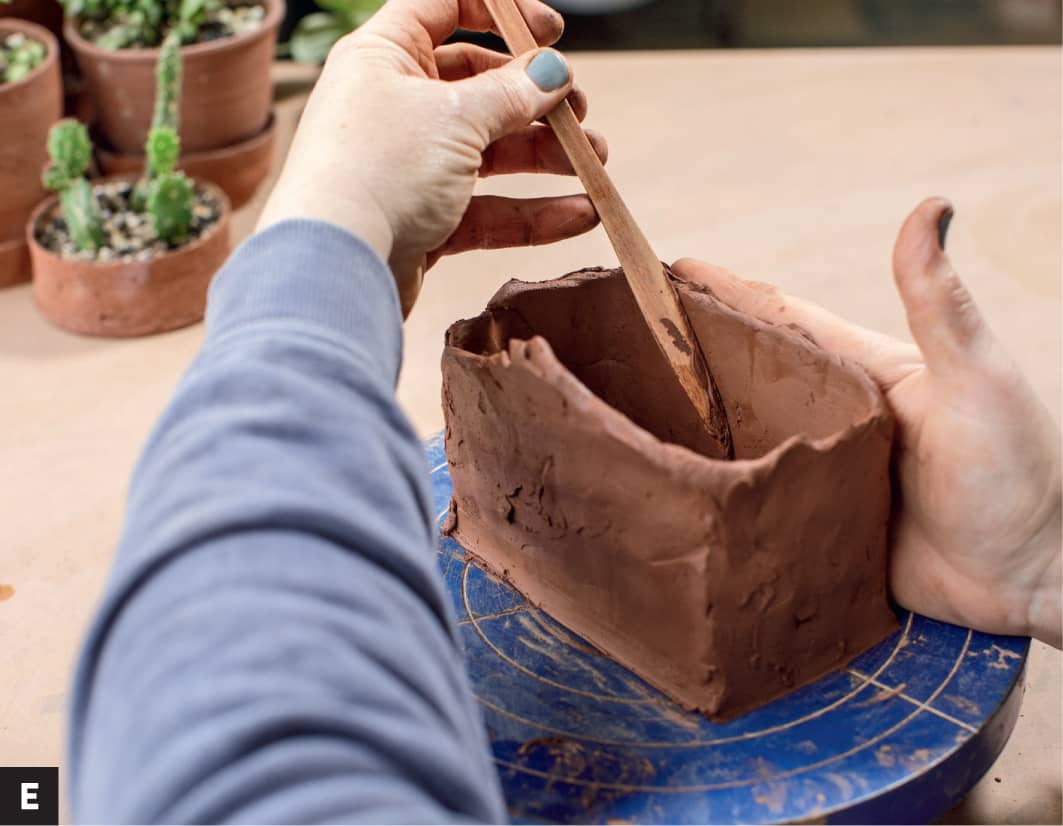
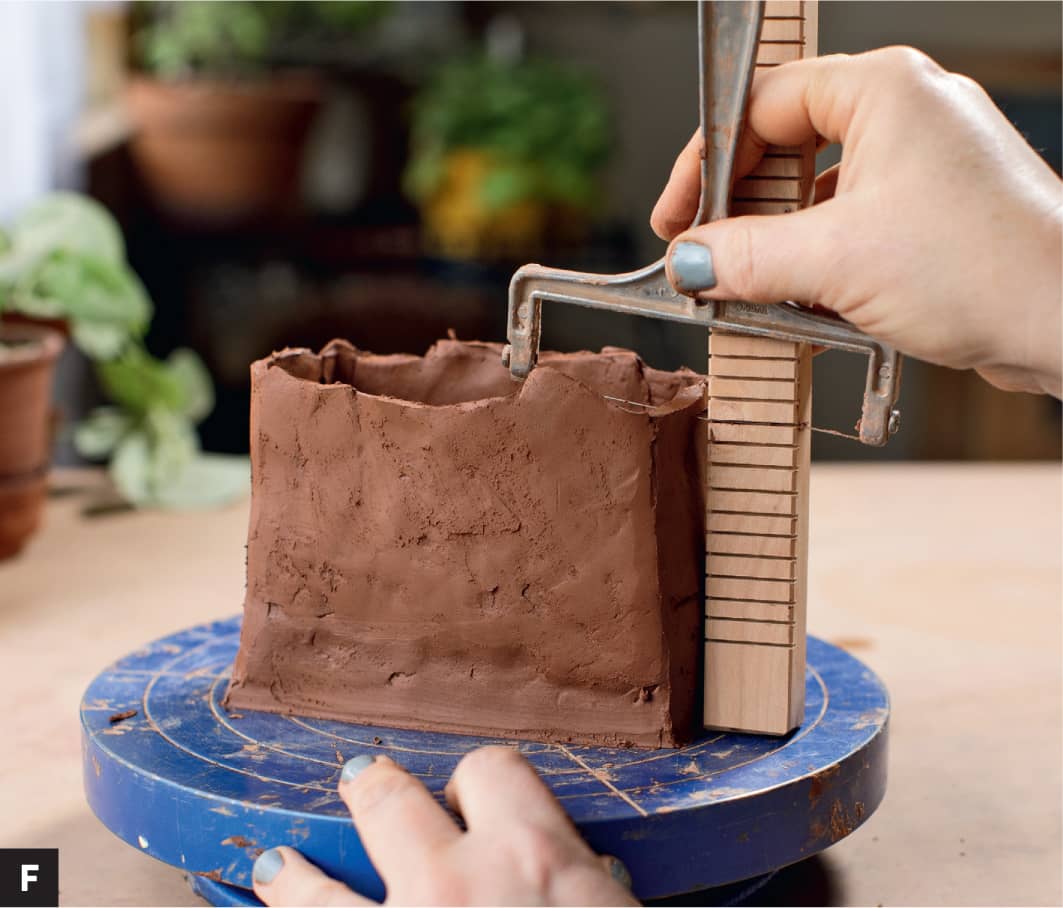
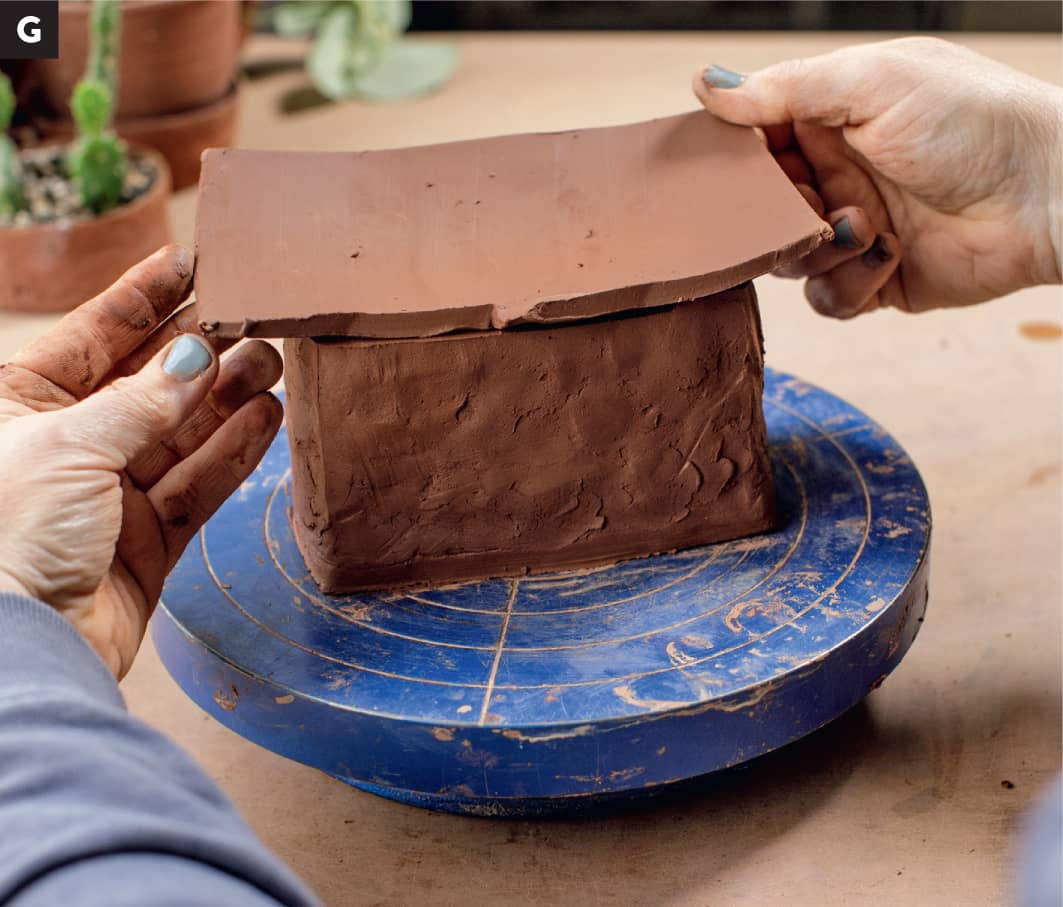
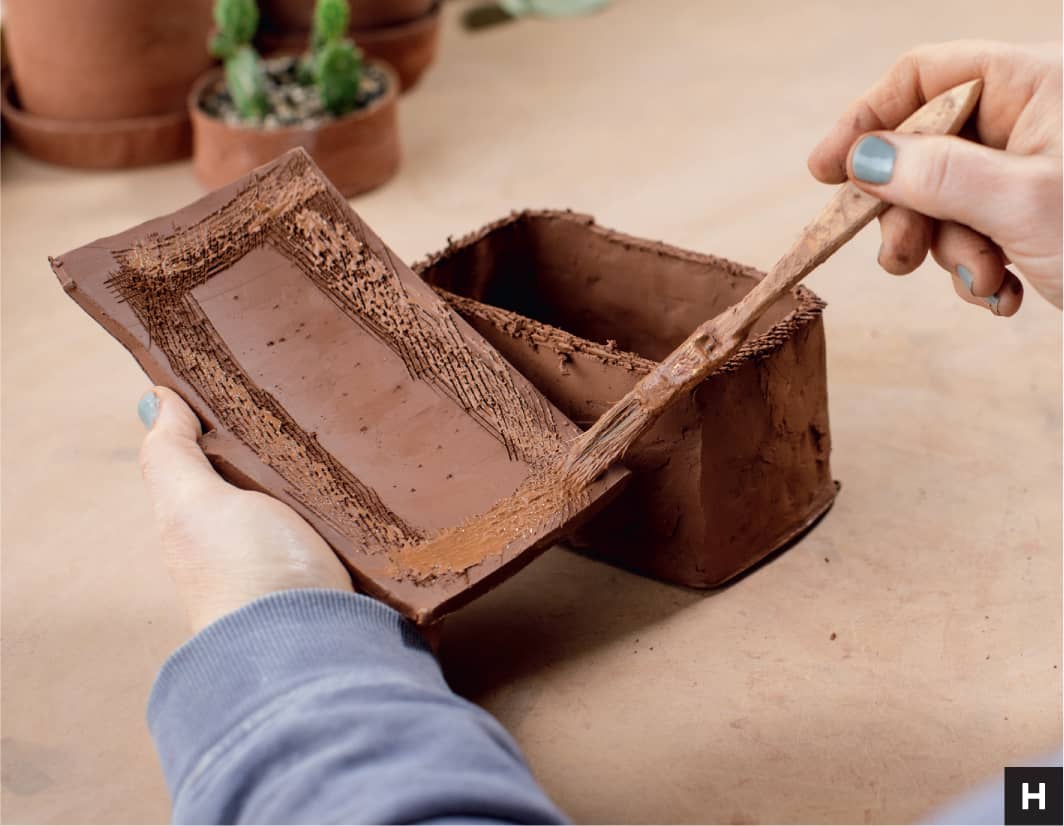
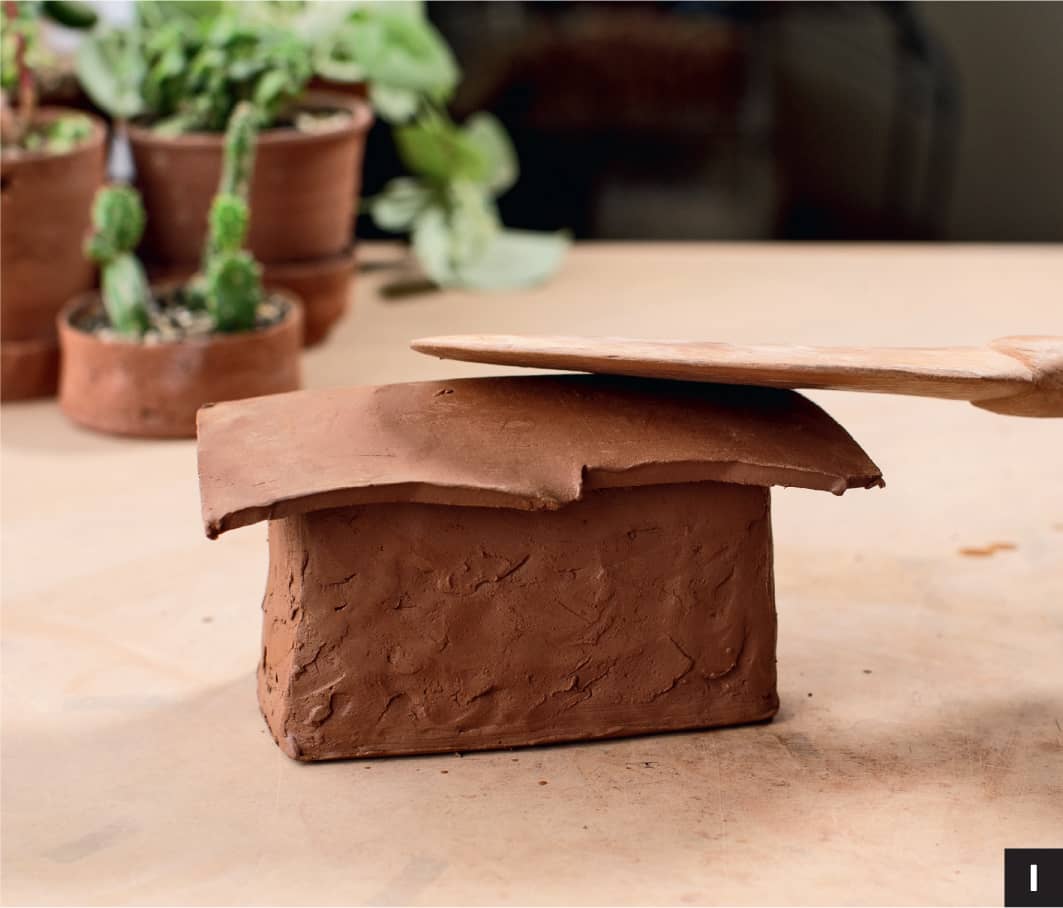
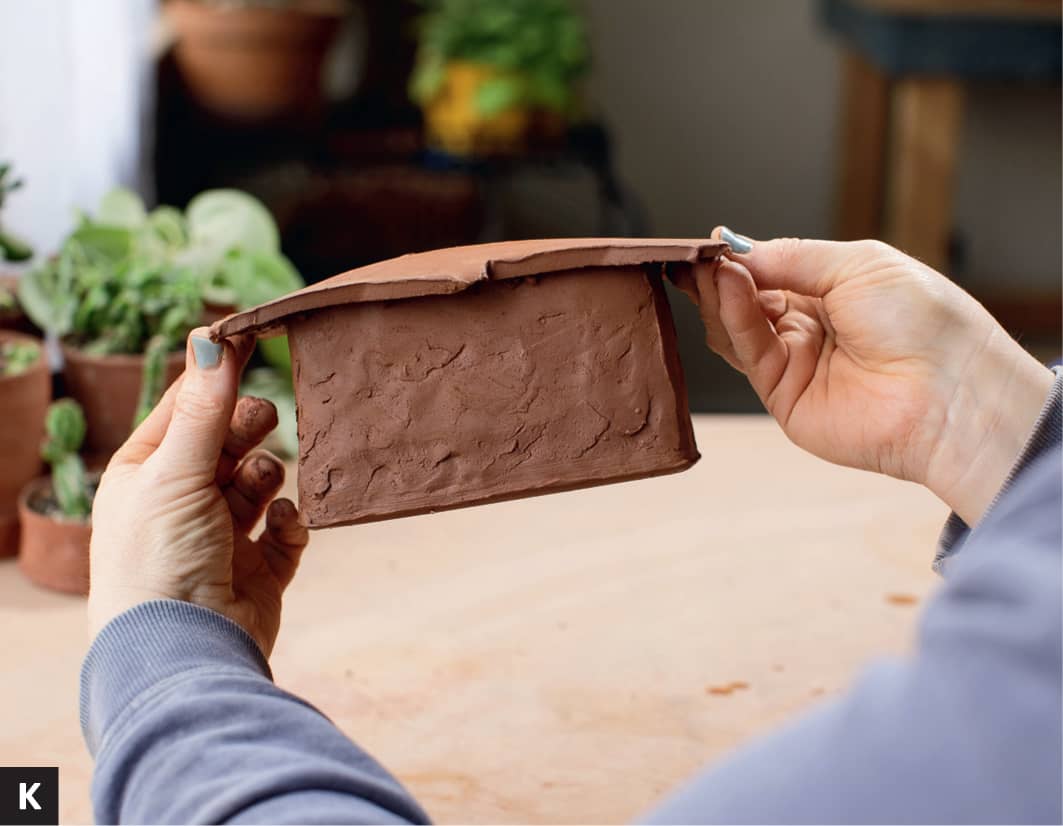
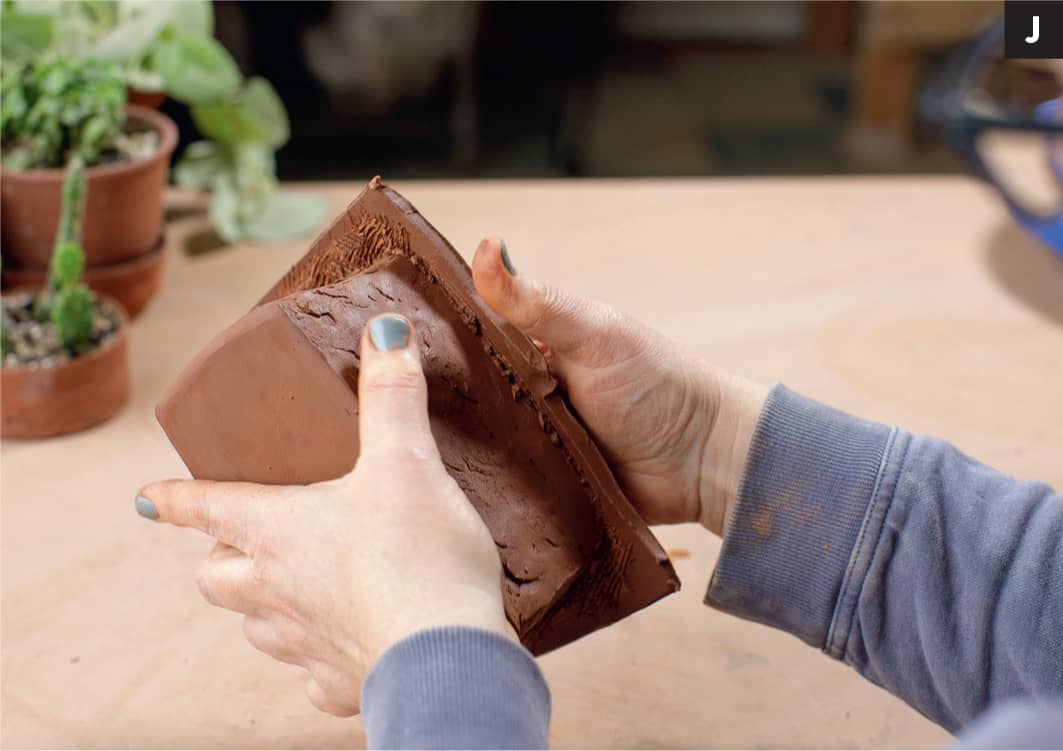
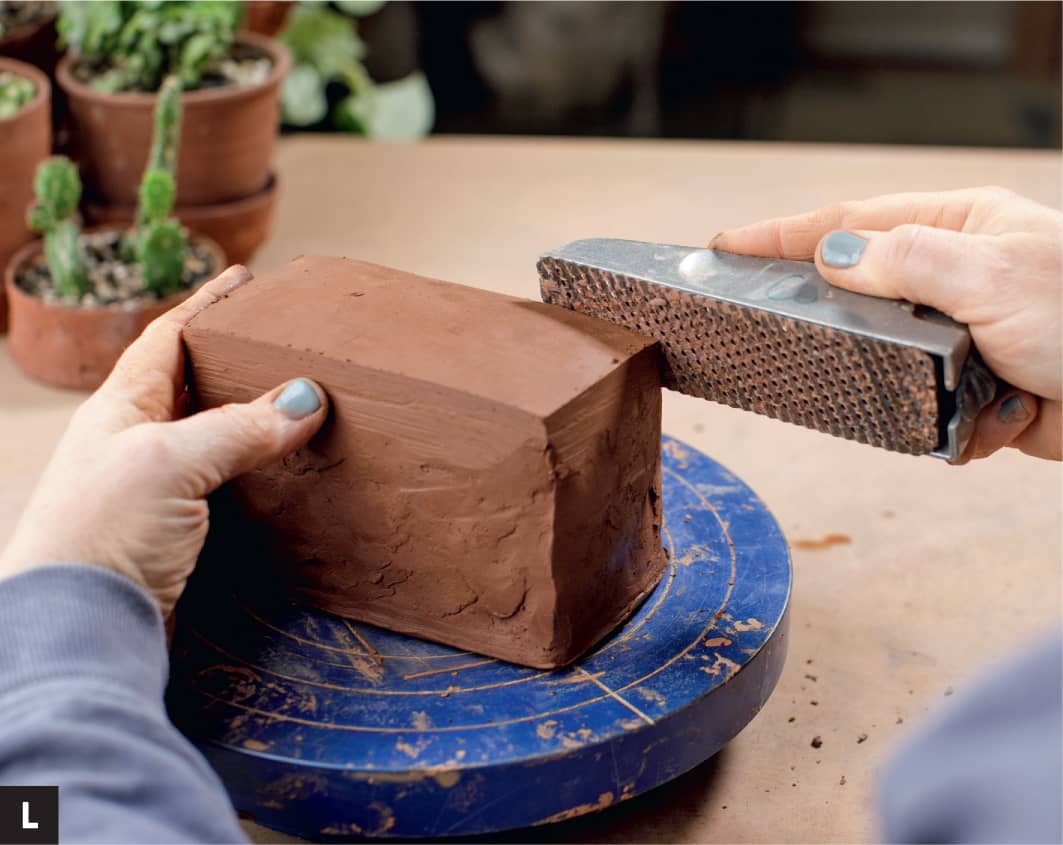
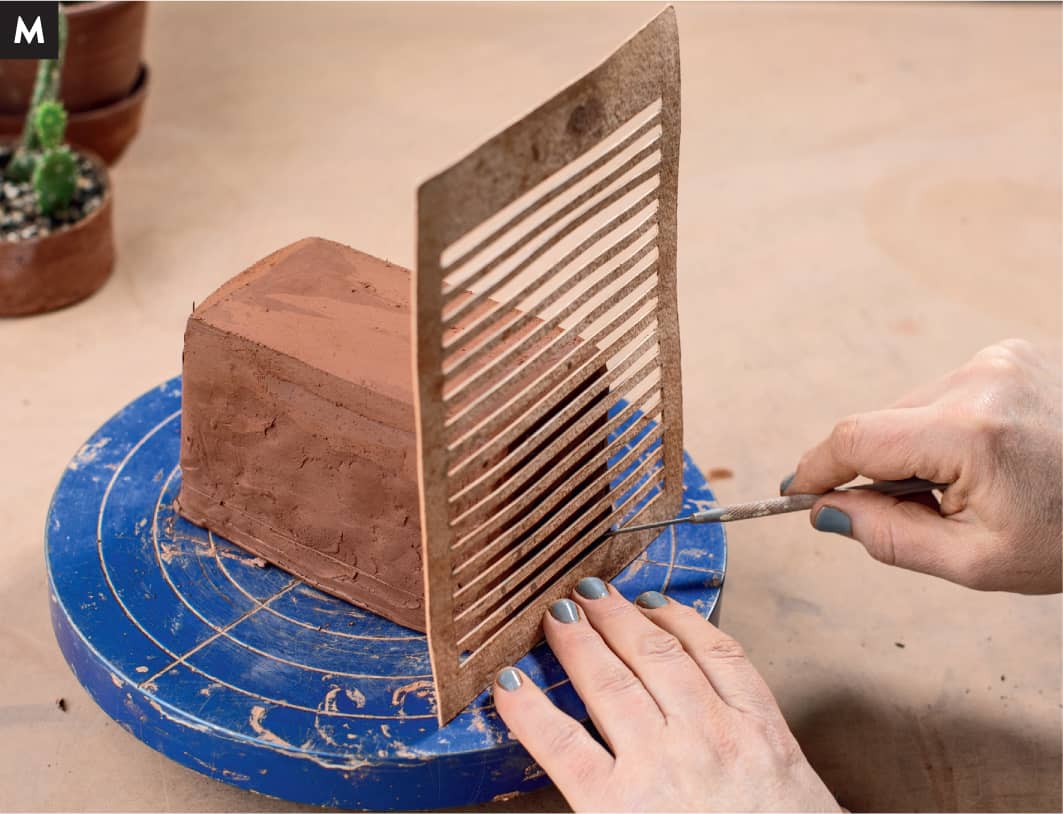
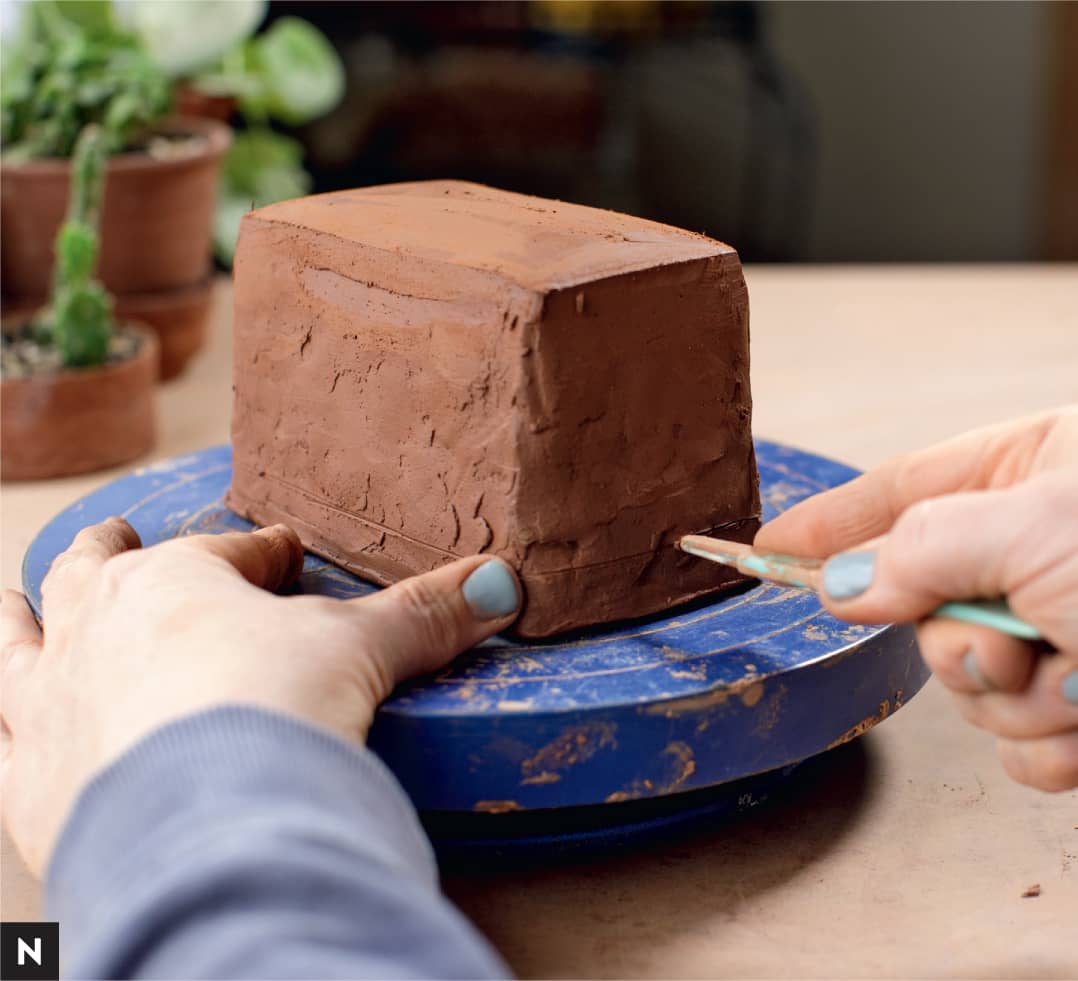
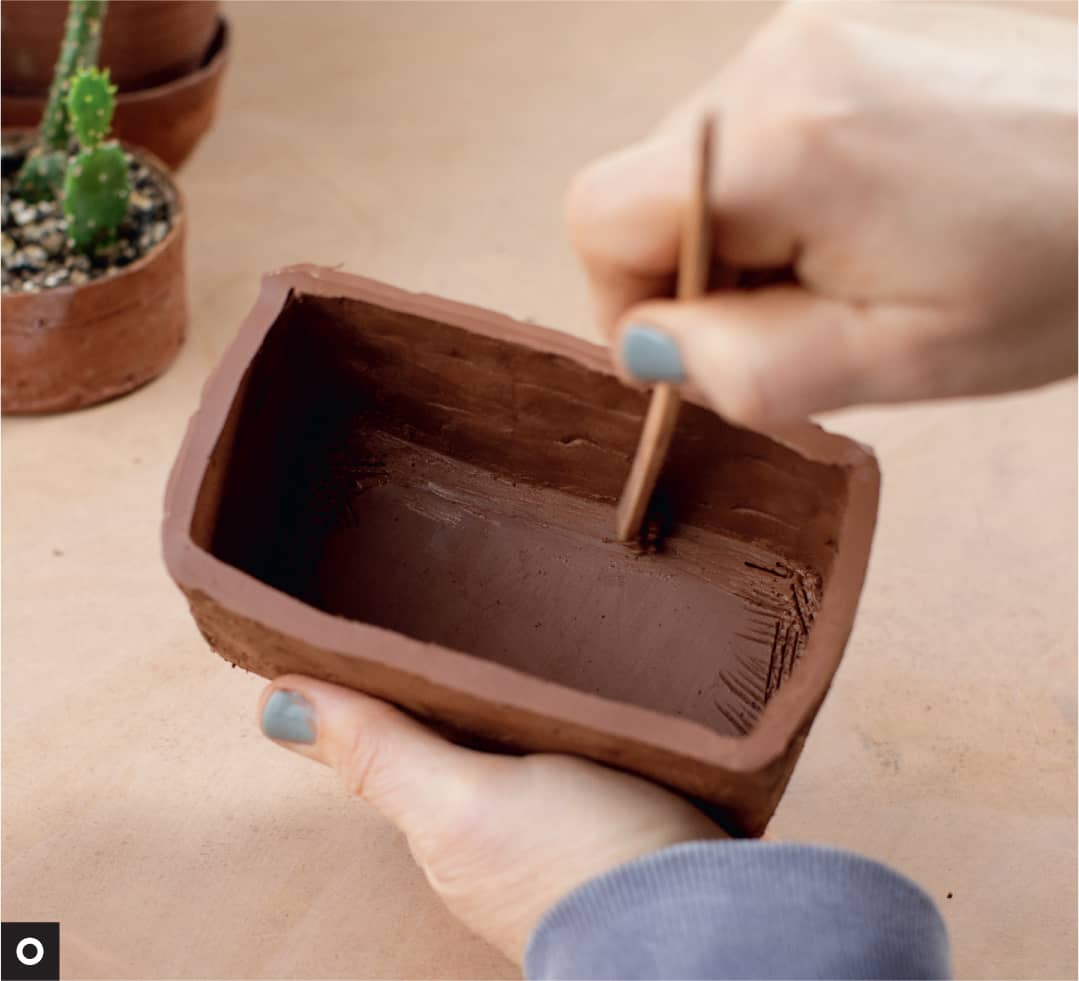
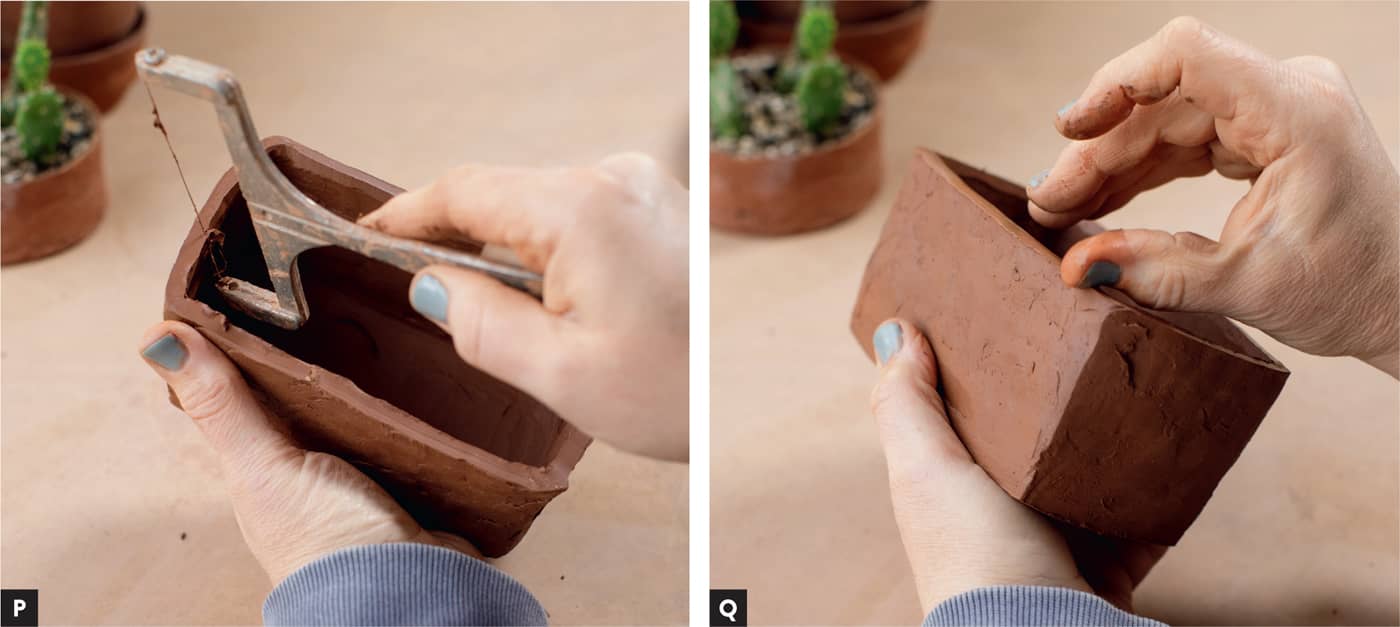
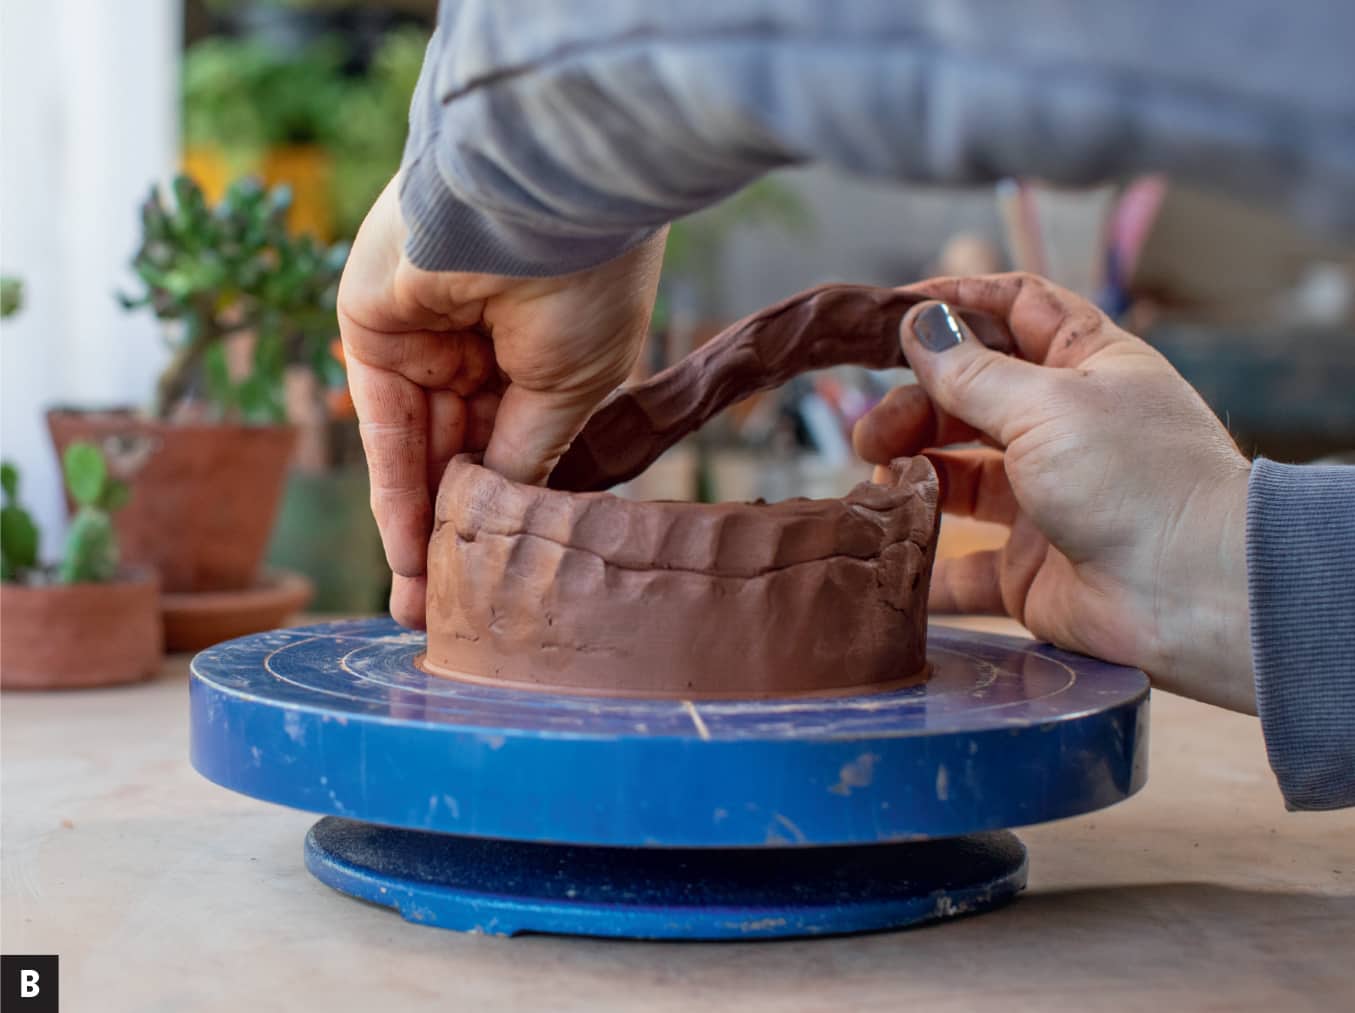
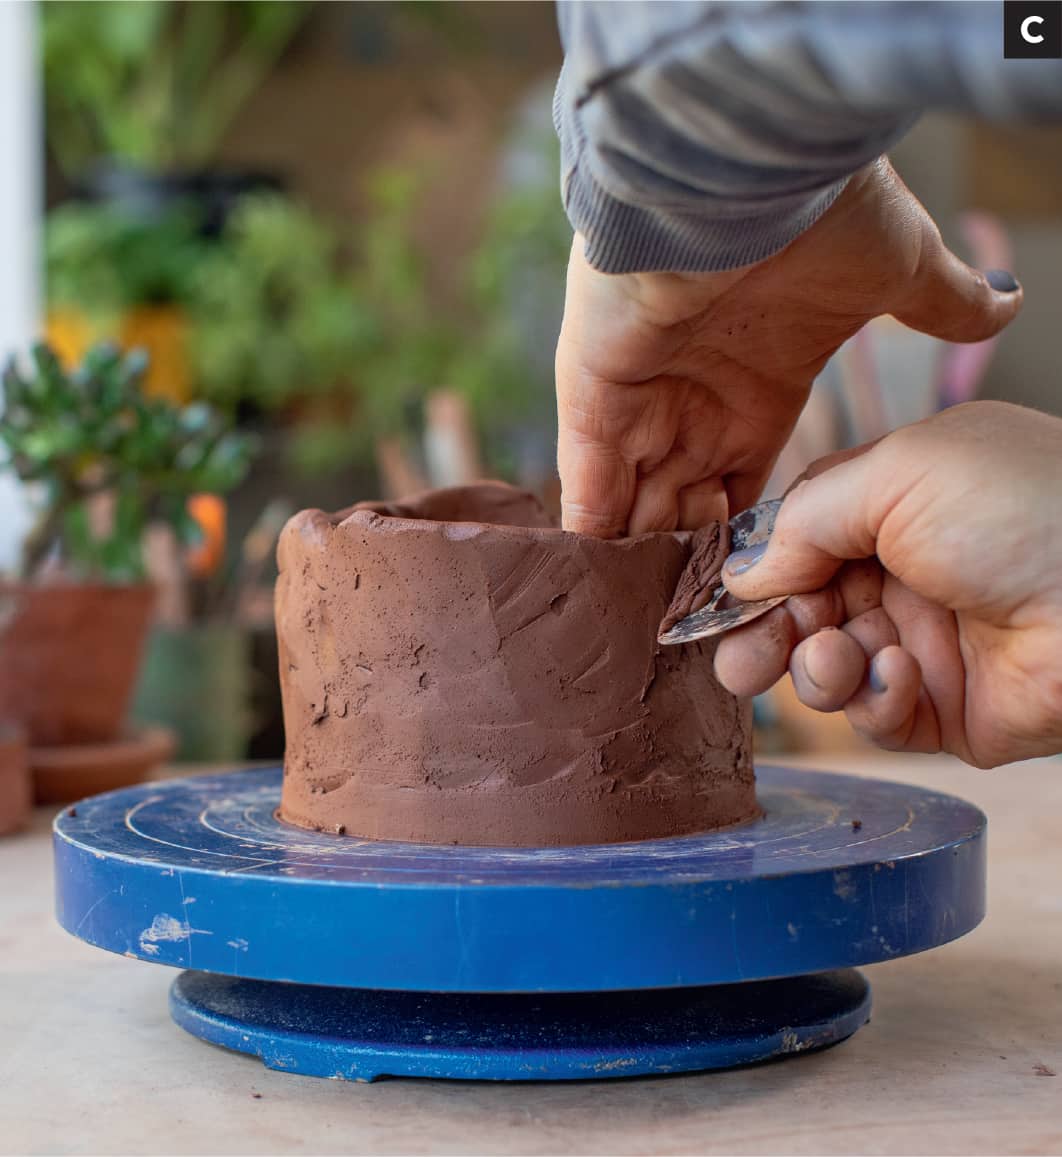
CONE 3, exposed clay and commercial glaze Roll out a ¼" (.63)- thick slab for your footprint. Using a ruler, cut out your footprint. I am using the measurements of 3.5" (8.9 cm) wide and 5.5" (14 cm) long. NOTEYou might be wondering why I don’t have a template for this project. I don’t want you to be limited to the templates at the back of the book! They are just a starting point for your ideas. We can sometimes lean on those templates for longer than they suit our ideas. Making your own templates and determining your own footprints is a step into making an object your own interpretation. It is as simple as getting out your ruler, paper, pencil, and scissors to get started. Plus, maybe your butter won’t fit in my ideal measurements! Taper your footprint. Anytime I make something with corners, square or rectangular, I taper the outside of the footprint. This helps the form seem squarer and more architectural looking once built. I found if I built on true square shapes, the form always seemed bulgy and clumsy looking. To taper your footprint, find the center on the long side. On the short sides, mark ¼" (.63 cm) up from each edge. Line the ruler up at the center to your marks on the side, and cut off the extra. Do that for all four corners. Repeat the process for the short sides as well. In all you will make eight cuts to the shape. (If you like this project, make yourself a template with your perfect measurements plus the taper to save time in the future.) Score the top edge of your footprint and your coil. Pick someplace mid-wall to begin attaching the coil and work the coil all the way around the form, breaking off the excess when you come to your starting point. Make sure not to overshoot your footprint. Your footprint is your foundation and should be used to keep your form as square as possible. [A] [B] NOTEOur inclination is to start in the corner of a squared form, but your corners will be harder to compress and result in weaker wall strength if you begin and end a coil there. Using a right-angled rib, clean up the connection and wall thickness, and define your corners, inside and out. [C] Continue with your next coil and then move on to ribbing and definition. Taper the walls slightly toward the center. [D] If you have trouble with your form flaring out, use the darting method (see here) to get the form under control. Remember, one coil at a time, rib for thickness, attach, and define, inside and out, and then move on to the next coil. This takes roughly three passes around the pot inside and out. [E] For detailed instruction on coil building, see the Foundational Skills section (here). Cut the form off evenly at 3.5" (34.3 cm) tall. Let it set up until it becomes a soft leather hard. [F] Roll out a fresh slab. The thickness should be similar to your wall thickness and the same shape and size of your footprint with an extra ½" to 1" (1.3 to 2.5 cm) around the entire slab. It’s easier if the slab is a soft leather hard for this next step. Using your object as a drape mold, gently drape the slab into the form, letting the sides pop up evenly around the edges—like putting a soft corn tortilla over the top, you want to gently bend the slab into the form and allow the edges to come up. Do not rib the slab into the form. Let the pieces rest together until leather hard, so the curve in the slab will hold its shape. [G] Once your slab and object are leather hard, it’s time to join the pieces. Flip the slab over and center it on the form; there should be overhang, like the eaves on a house. Using a needle tool, trace around the form onto the slab. You will score on the inside of those marks on the underside of the slab. [H] Score the top edge of the box form, scoring toward the outside edge. This will help the curve of the top slab fit better. Wet one side and attach. Use a paddle or wood spoon to gently compress around the form. [I] Now for the lift test—your slab and box should be a medium to firm leather hard at this point. Lift the object up by the excess overhang. Just an inch or two (2.5 cm to 5 cm) off the tabletop will suffice. [K] If it all stays connected, congratulations—you have connection. If, however, the top slab lifts off in spots or altogether (eek!), rescore and attach and do the lift test again. [J] This connection point is super important, and you want to make sure it is attached all the way around the form. Once complete attachment is achieved, use a cheese cutter and the vertical wall as your guide to cut off the excess slab. The edge of the slab becomes part of the vertical wall. [L] Using a rib, clean up the connection point and smooth the top of the box, if needed. Let it rest wrapped up in plastic overnight. All the elements should become the same consistency and be ready to work the following day. For this next step, your box should be a consistent leather hard; this will help keep the form from losing shape or possible warping later. Use a ruler to mark ¾" (1.9 cm) up from the tabletop around the form. Use your ruler and a needle tool to make a line. [M] Next, using a scalpel tool, insert on the line and cut horizontally around the form. Start cutting someplace mid-wall, in case you need to correct your cut—this is easier to do if you can see it coming versus hitting a corner and being off by ¼" (.63 cm). [N] Before you lift the top off, make marks on the lid and the bottom that line up so you have a reference on how the lid should fit together. It will fit only one way (in theory!). Now that the pieces are apart, cradle the lid in your hand and use the blunt end of a wooden knife or a right-angled rib to clean up the inside score marks and corner. Leave no gaps, and be careful not to distort the shape. [O] Using a cheese cutter or scalpel, trim the interior wall edge. [P] To finish the outside edge of the wall, use the back of your thumbnail and a little water and gently roll the corner up. [Q] Set aside. Now, for the bottom section, again use the back of your thumbnail and a little water and gently roll the outside corner down. This will create a relationship with the lid and a stronger edge less likely to chip. Make a coil roughly the length of the interior circumference of your footprint. Using a rolling pin or a brayer, make the coil into a long narrow ¼" (.63 cm) slab. Use a ruler to make the slab 1" (2.5 cm) wide and keep the length.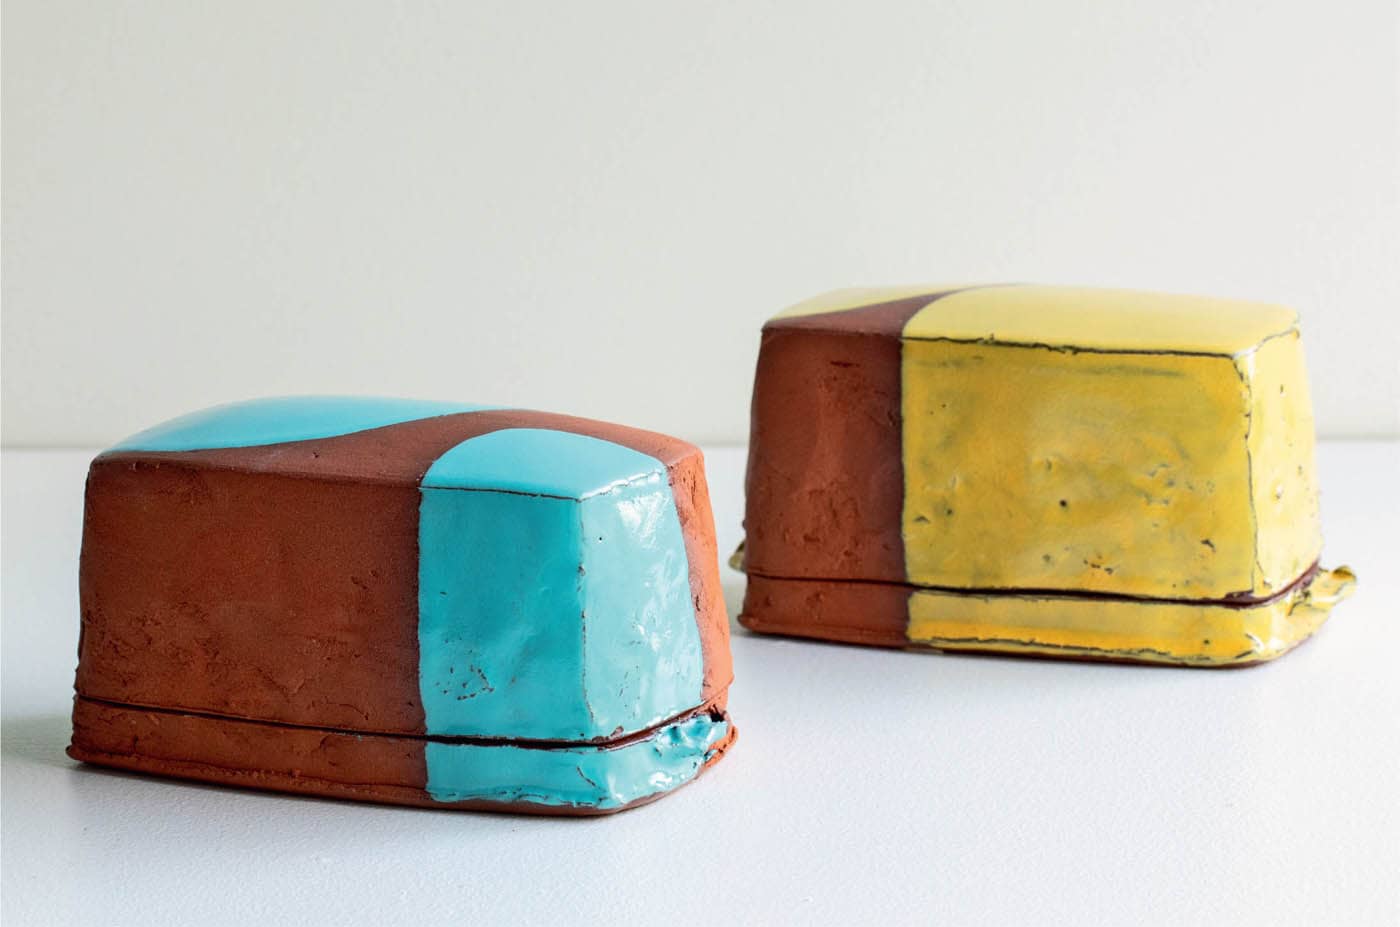
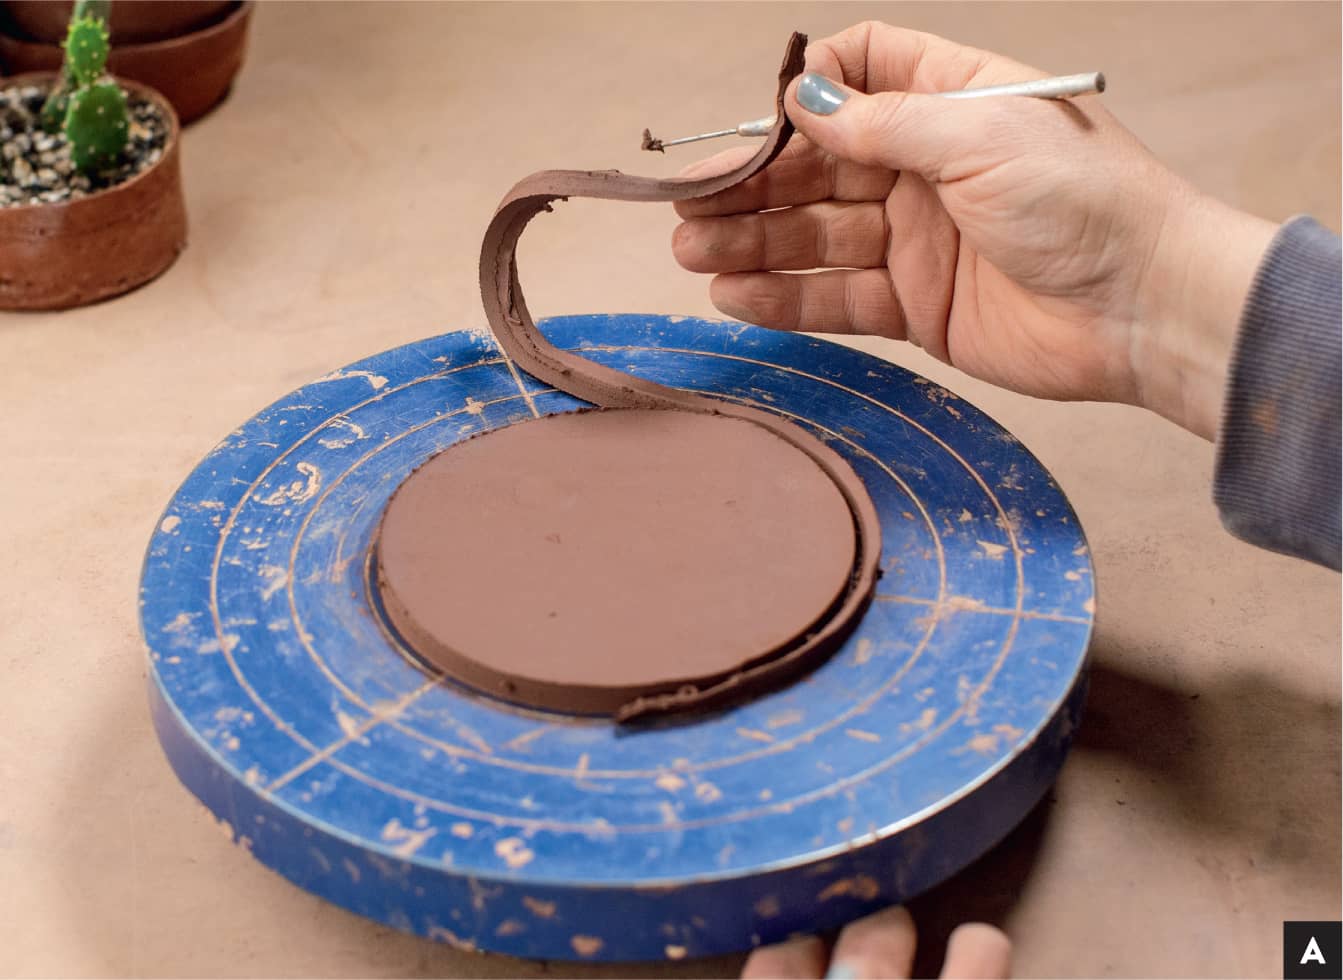
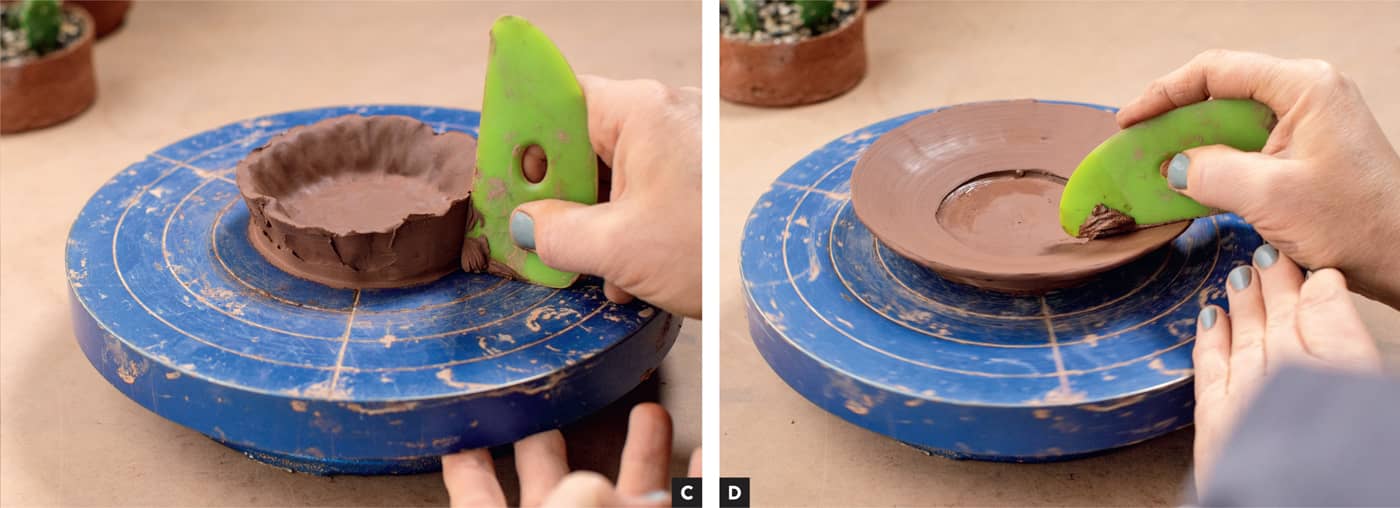
CONE 5 red clay, white slip, celadon style commercial glaze Measure out a few bits of clay roughly the size of a walnut or small tangerine up to the size of an orange. Play around with scale on this project. You may need more clay to manipulate than you think to get the desired plate size. Roll the clay bits into a little ball. Gently flatten the ball on your work surface and pull it off the tabletop. It is always a good idea to get a little air between the table and the clay. (It can be difficult to a get a piece of clay off the working surface the longer it sits attached.) Using a rolling pin or a brayer (small roller device), roll the flattened ball into a more recognizably shaped slab. Aim for a circular or oval shape with consistent thickness, just under ½" (1.3 cm) thick. You want the slab to be about 1" to 1½" (2.5 to 3.8 cm) wider than the desired bottom (foot) of the dish. If the shape doesn’t resemble a circle or oval, trim it with your needle tool. (You can always place the slab of clay on your banding wheel, spin, and use a needle tool to make a perfect circle.) [A] Place the slab in the center of your banding wheel. Using your fingers and thumb, gently work the edge in a more vertical position. Apply more pressure with your fingers or thumb positioned on the outside of the form. Continue working your way around the form, moving the clay up to create a small wall around the piece. [B] Use a rib or your hands to gently shape/pinch the wall to resemble a bowl or small plate lip. Reaffirm (compress) the shape with several passes of your rib. [C] [D] The form will have a memory of being more vertical and may bounce back during the drying and firing process. Make sure not to skip the compression process of this step; it will help keep the desired shape. If the lip of the plate is not big enough, you may want to add a coil to the top edge. Your object should be soft enough for you to take a bit of clay out of the bag, make a small coil, and attach it to the top edge. Overlap the attachment, rib the wall inside and out for consistency, and then cut off to the desired height and finish the edge (described in the previous step). [E] [F] Now that the shape is where you want it, it is time to finish the top/outside edge. Your pot may have a perfect edge, but often the top edge is more uneven than desired. Use a cutoff tool (Sunshine Stick and cheese cutter) to even up the top, finding your lowest edge point and using that as your guide. Soften the sharp edge with your fingers, pinching the edge between your finger and thumb to compress and define it. There should be a relationship between the lip and the texture of the whole pot. Add handles. Take a small bit of clay (about the size of a swollen quarter), roll into a ball, and flatten gently. Then cut it in half. Using a scalpel, slice down the center of the cut side, spread open, and sandwich on the edge of the plate. Gently squish and shape into a soft half-moon. [G] Repeat for the other handle, and place it directly across from the attached handle. Once both are in place and shaped, use your scalpel to cut the edge of the half-moon shape to even out any size discrepancy. Gently pinch the edges to soften and finish them. Remove the plate from the wheel head—you may need to use a cutoff wire. Let the form get to a leather-hard state. Create a foot. You may notice that the pot has “lifted” on the bottom outside edge, and become a bit wobbly, which is never a great sign for a plate! To solve this, use a surform or serrated rib to gently take a bit of clay from the center bottom of the plate. Gently give the plate a hint of a foot ring (around the outside edge) and make sure it sits flat. One way to see if the plate is sitting evenly is to gently rub the plate on your working table, and then look at the bottom. Are the scratch marks or burnishing even? Is it scratching only in the center? Time to work the serrated rib or surform across the surface if so. [H] [I]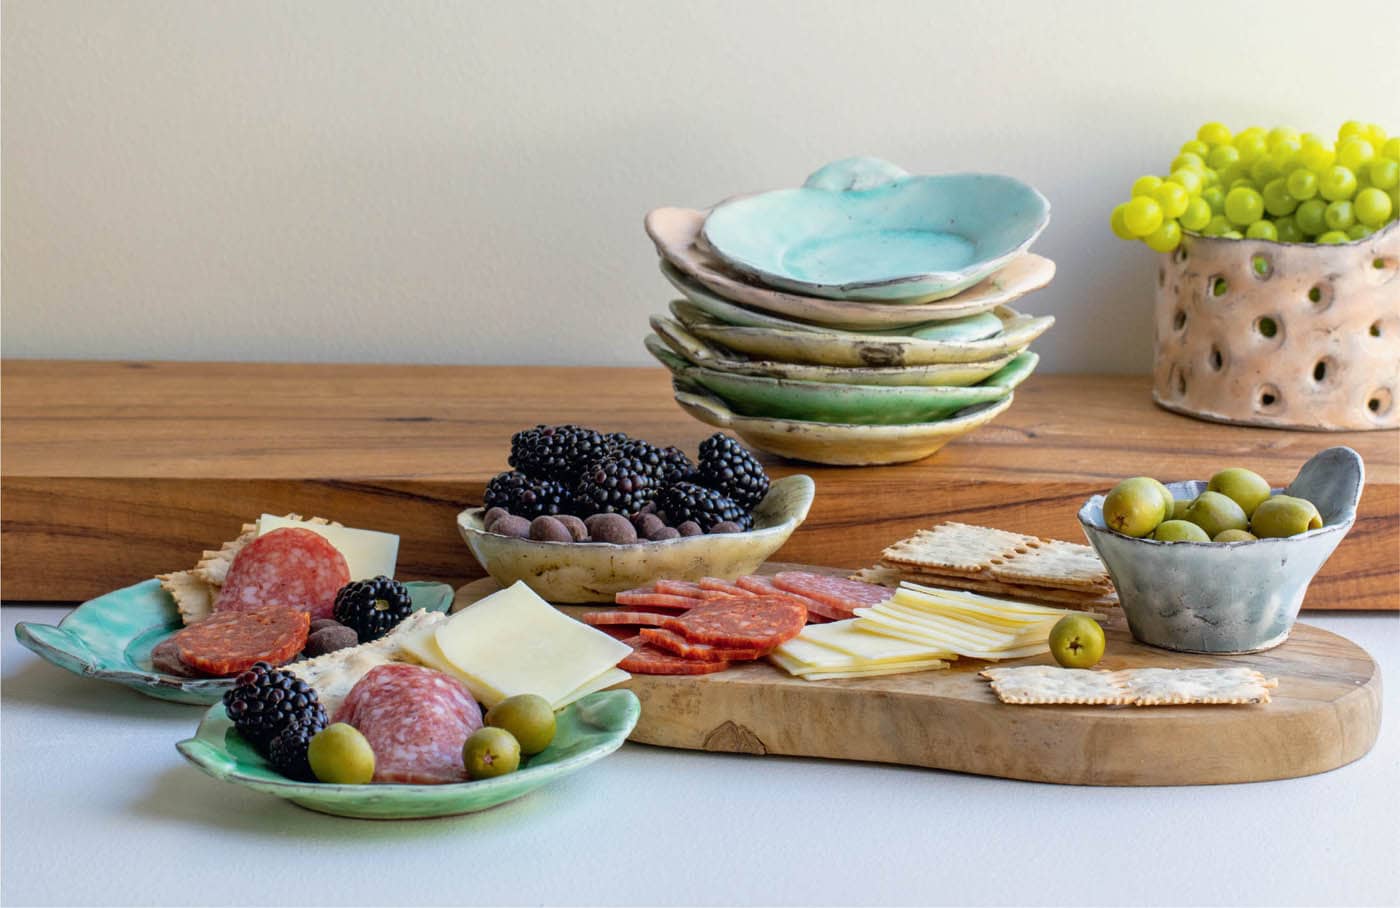

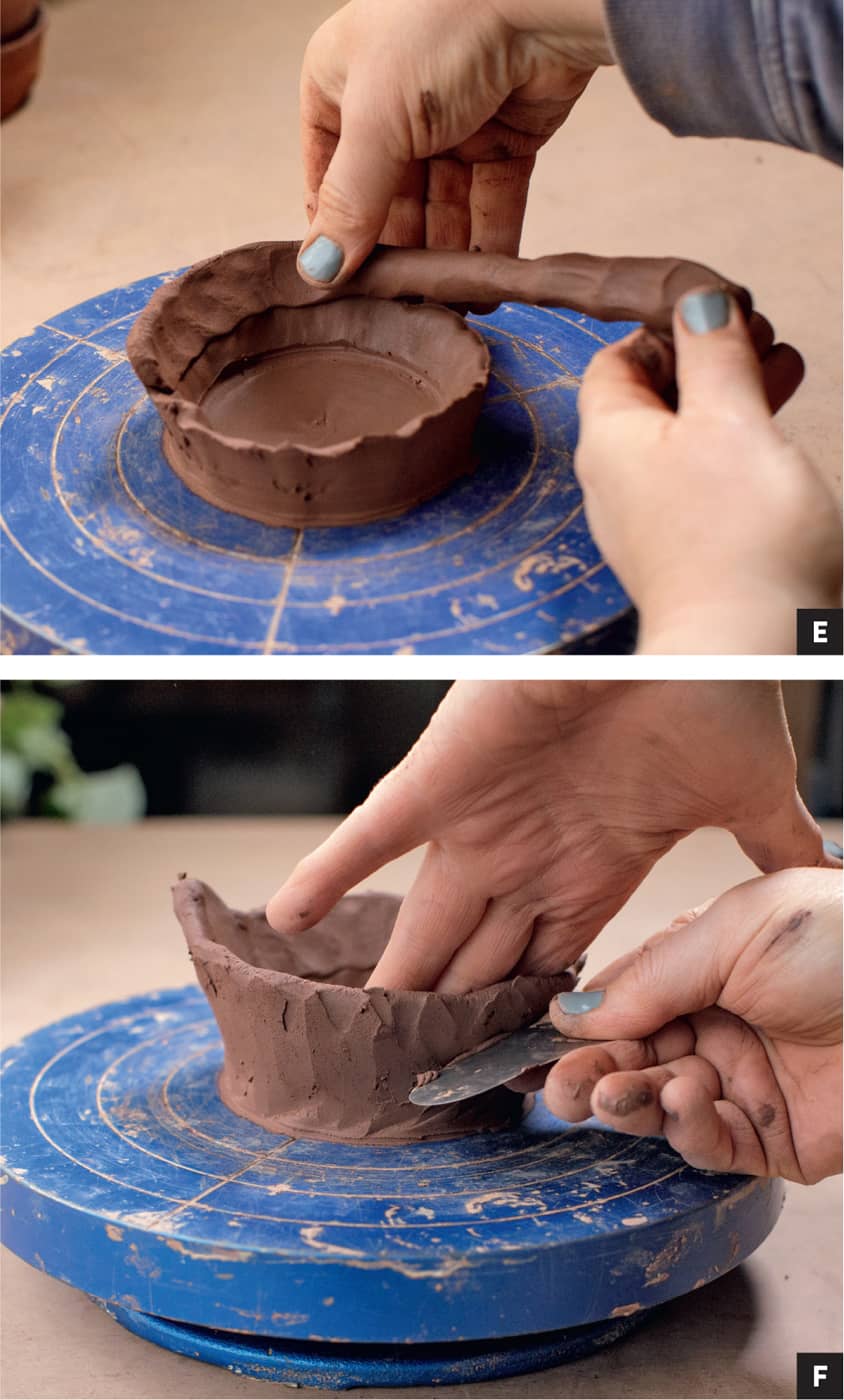
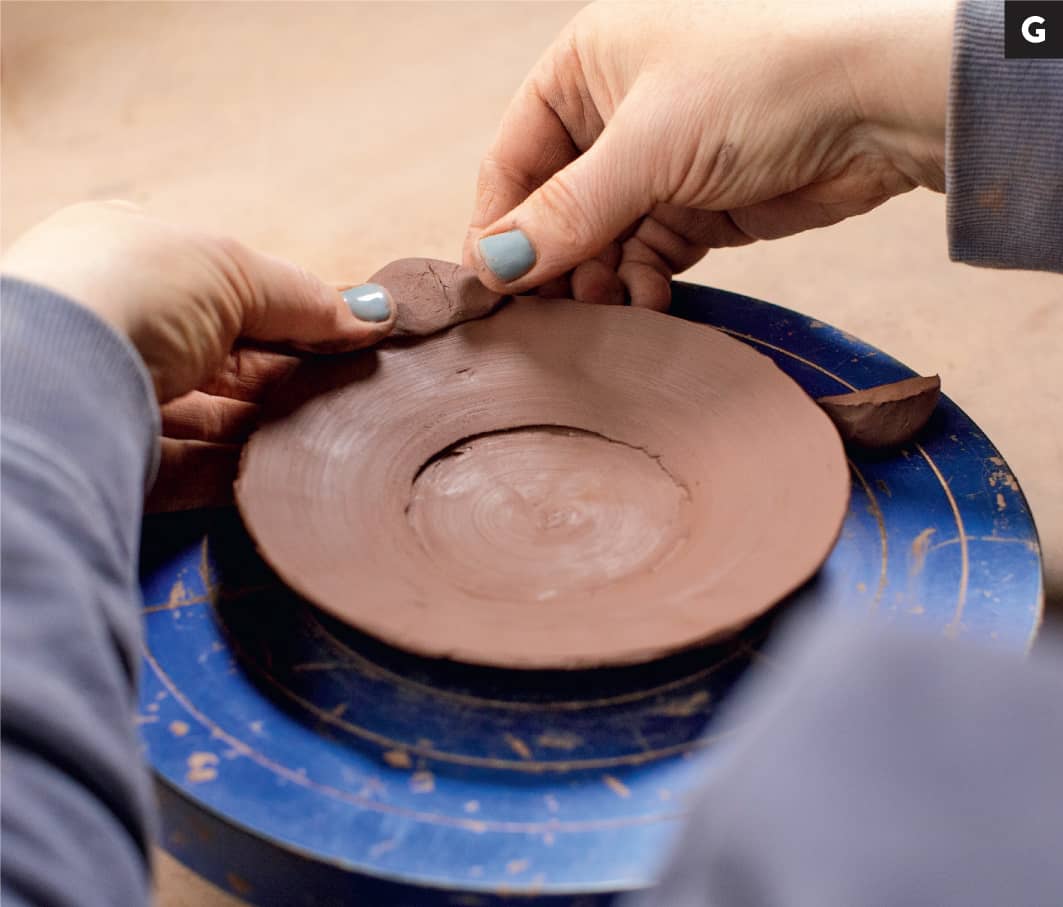

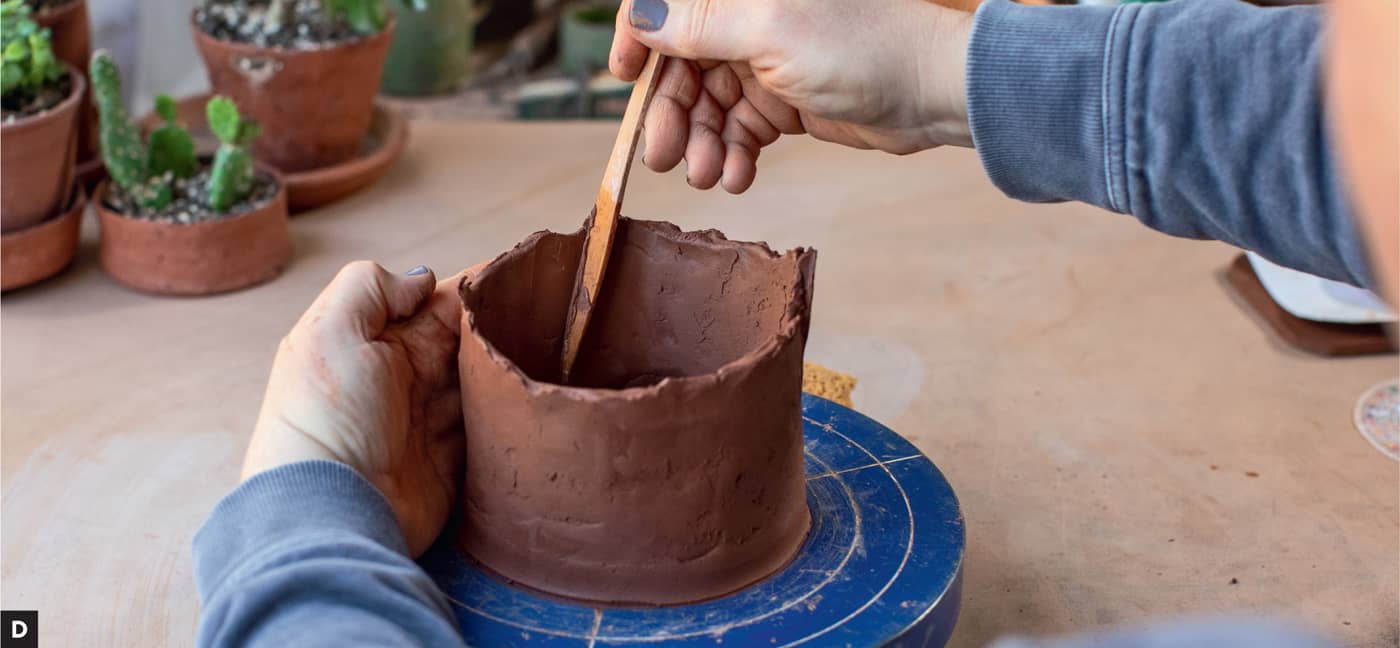
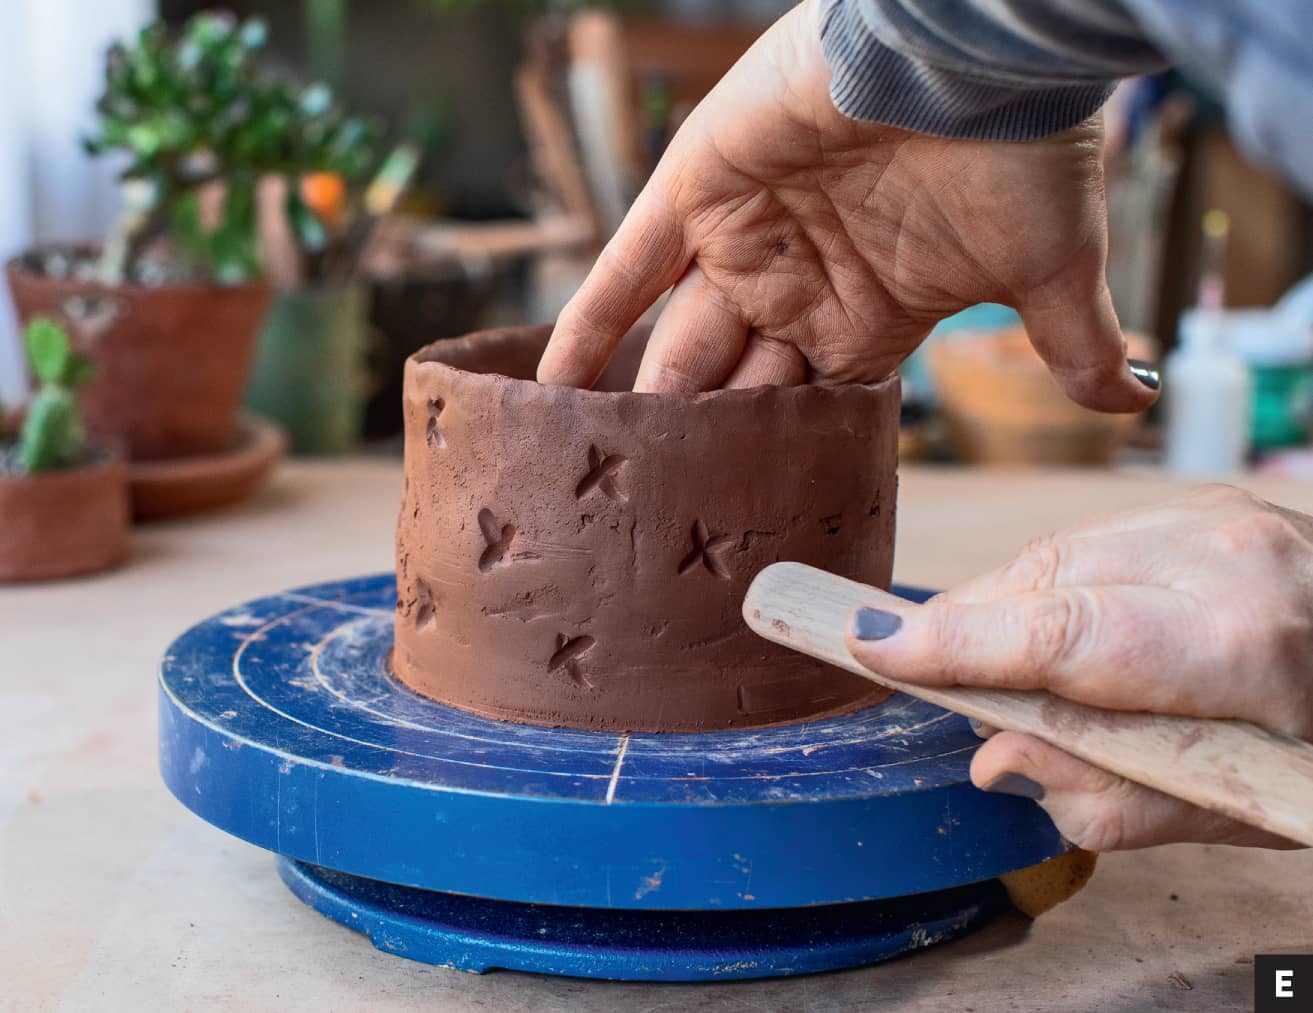
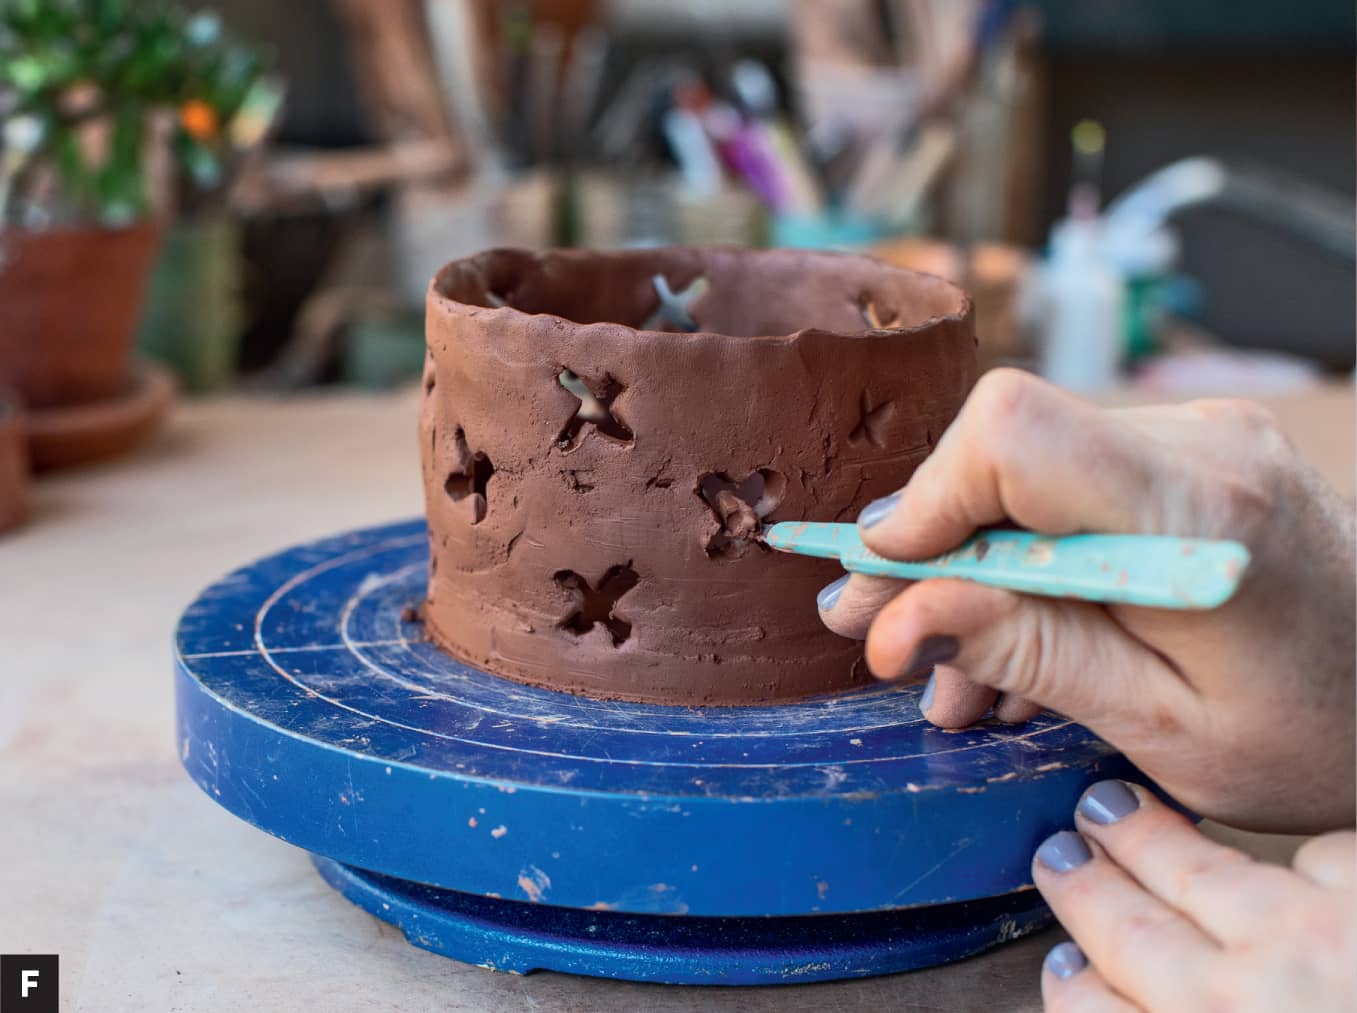
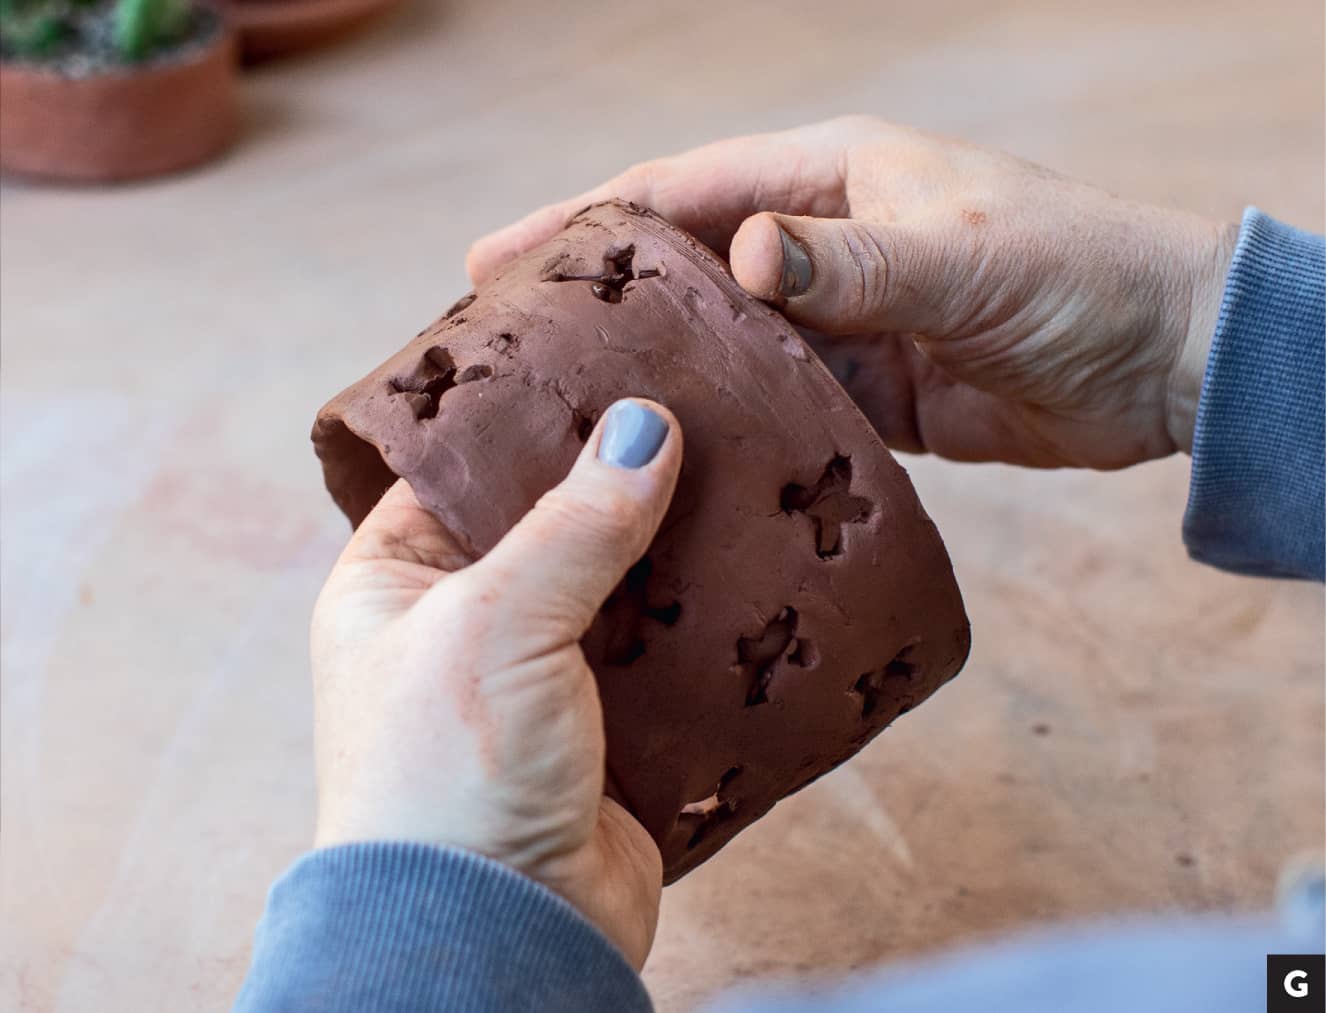
Two different finishes: Roll out a ¼" (.63)- thick slab for the footprint of your basket. Use the template on this page and cut out the shape. As always, you are free to make your own template. My only advice is to avoid any sharp corners to begin with. Remember, we will be creating a piercing pattern that works its way all around the form, and sharp corners can be hard to deal with. Score around the top outside edge of your footprint and start coil building. See the Foundational Skills section for images and tips if needed (here). The thickness of your wall should be about ¼" (.63 cm). If it’s much thicker, it will be more difficult to pierce. [A] [B] [C] When you reach 4" (10.1 cm) in height, use a cutoff tool to make the wall even to 3.5" (8.9 cm). This should give you a consistent edge and wall thickness. Your entire form should be stable but soft to the touch. Handle it carefully. Using your fingers, softly pinch your way around the top edge to give the lip a soft finished edge. (No sharp edges on functional forms is a good guideline to remember.) In this case, the way you will finish the pierced areas will have a relationship to the lip. (Always look for parts of the pot to relate to each other! This is very important for a “finished” feel to an object. Also, those relationships can help you make choices on a form you when you are unsure how to proceed.) Now is also your last chance to “shape” your basket. Look at your pot. Is it wonky? Is it too straight up and down? Does it not look like the images? Use a rib or a wooden knife to shape your pot. From the inside area you can use these tools to “swell” the walls and give it a tad more volume. From the outside, try to tame it and collar it in. Look up the section on darting on this page if your form needs serious altering. [D] If you don’t like the shape, keep trying, and make it like the image pictured. If it isn’t the one here, is it the one in your head? Once you are satisfied, let the pot set up to a medium leather hard state. TIPTake that image and make it a reality. Often folks give up too early and live with a form that isn’t satisfying for them. At this moment you can always add more coils and reshape the pot to fit your image. Keep at it, even if you destroy the form. You will learn a lot and this is a really quick project to replicate and try again. Part of what you are learning right now is to make with your hands and clay what your eyes and brain are interpreting. Like with any new skill, you get better when you practice. Roll up the bottom edge. Using your finger and a little water, gently roll the sharp edge where the pot meets the tabletop, making several passes so as to not fold over the edge. Now that your form is finished, it’s on to designing the piercing pattern. This pattern will wrap around the entire form. The bottom will also have a pierced element so the basket can function as a colander. The best tools for this part are a bendy clear ruler and a needle tool. Gently, but visibly, make a grid on the pot. Using the wide end of your needle tool or the blunt end of your wood knife, move vertically to make a mark at every other intersection. Do the same on the next row, but start at the intersection one up, so you have an alternating pattern. [E] Make these marks, even if you’re a pro at piercing. I have learned the hard way (too many times to mention) to mark out my pattern. Thinking you will remember the pattern (because how could you forget) but then getting caught up in piercing and making a small pattern mistake can completely ruin your design and pot. Also, making these marks will give you an idea on how the pattern will look and whether you want to change the layout of the design. All you have to do is take a rib and scrape away your marks and lay out a different grid. Don’t forget the bottom! TIPMake sure you account for the wall and floor thickness when gridding and piercing. With the grid in place, marks made, and design approved, make your cuts. Using a scalpel, cut out small circles or X’s, like in the example, at the marks. [F] Cut a couple and then gently pinch the circle between your fingers. Do not mash it . . . remember, no sharp edges. You want to close in the hole slightly and soften the cut marks. This is the finished edge of the cutouts. [G] Depending on the thickness of your clay and the size of your cutout, the hole might be nonexistent. Adjust your cutout size accordingly. This might also affect your pattern, so do a few samples before you cut out all your marks. Remember, it is easy to take away clay but adding it is more challenging, so err on the smaller side and then move on to larger holes if needed. Once all your cutouts are done, pinch them in. You may need to recut some holes or adjust the final look with your scalpel. Remember, you are compressing these piercings with your fingers from both sides. So make sure you are doing that for the bottom as well. (No squishing against the work surface!) TIPCompressing these cutouts will help reduce possible cracking. But with any cutout, there is a risk of cracking. So don’t sweat it too much in the beginning and just practice and see where the piercing exploration takes you. Avoid sharp corner cutouts and cutouts spaced close together in the beginning. Give your piece the once over, and check in on the lip and make sure you haven’t scuffed it up while piercing. Your piece may still be soft to the touch, so handle and clean it up gently. When it looks good, set it on the shelf to dry slowly (draped under plastic is a good idea).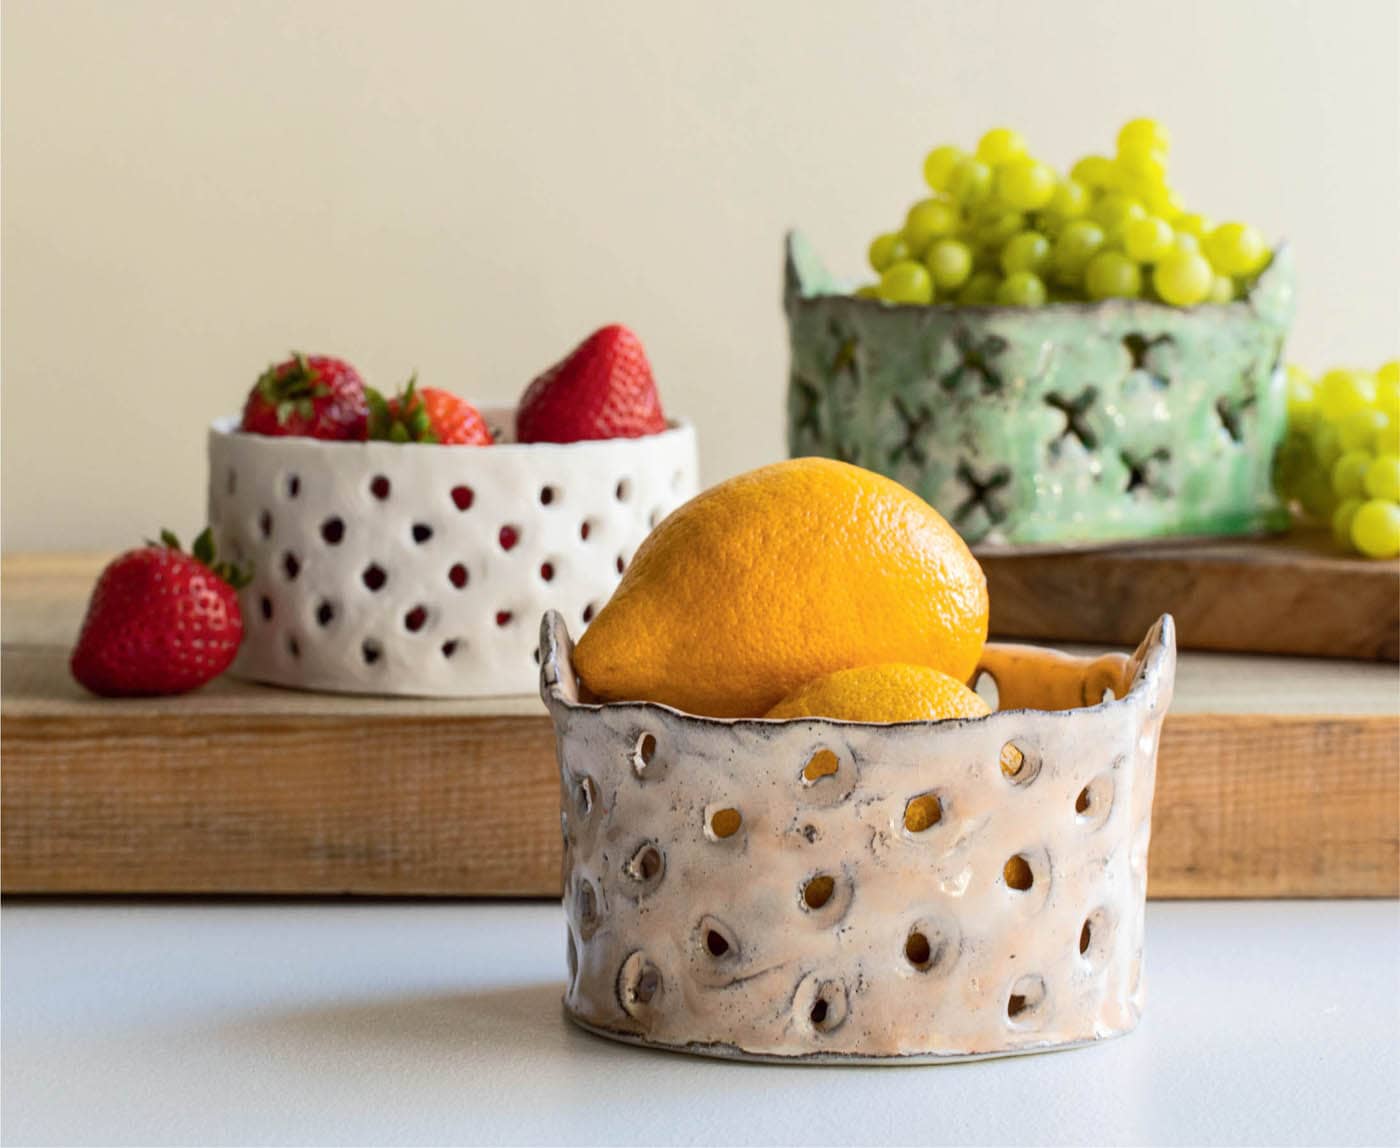
1. CONE 5, red clay, white slip, celadon style commercial glaze
2. CONE 5, exposed porcelain clay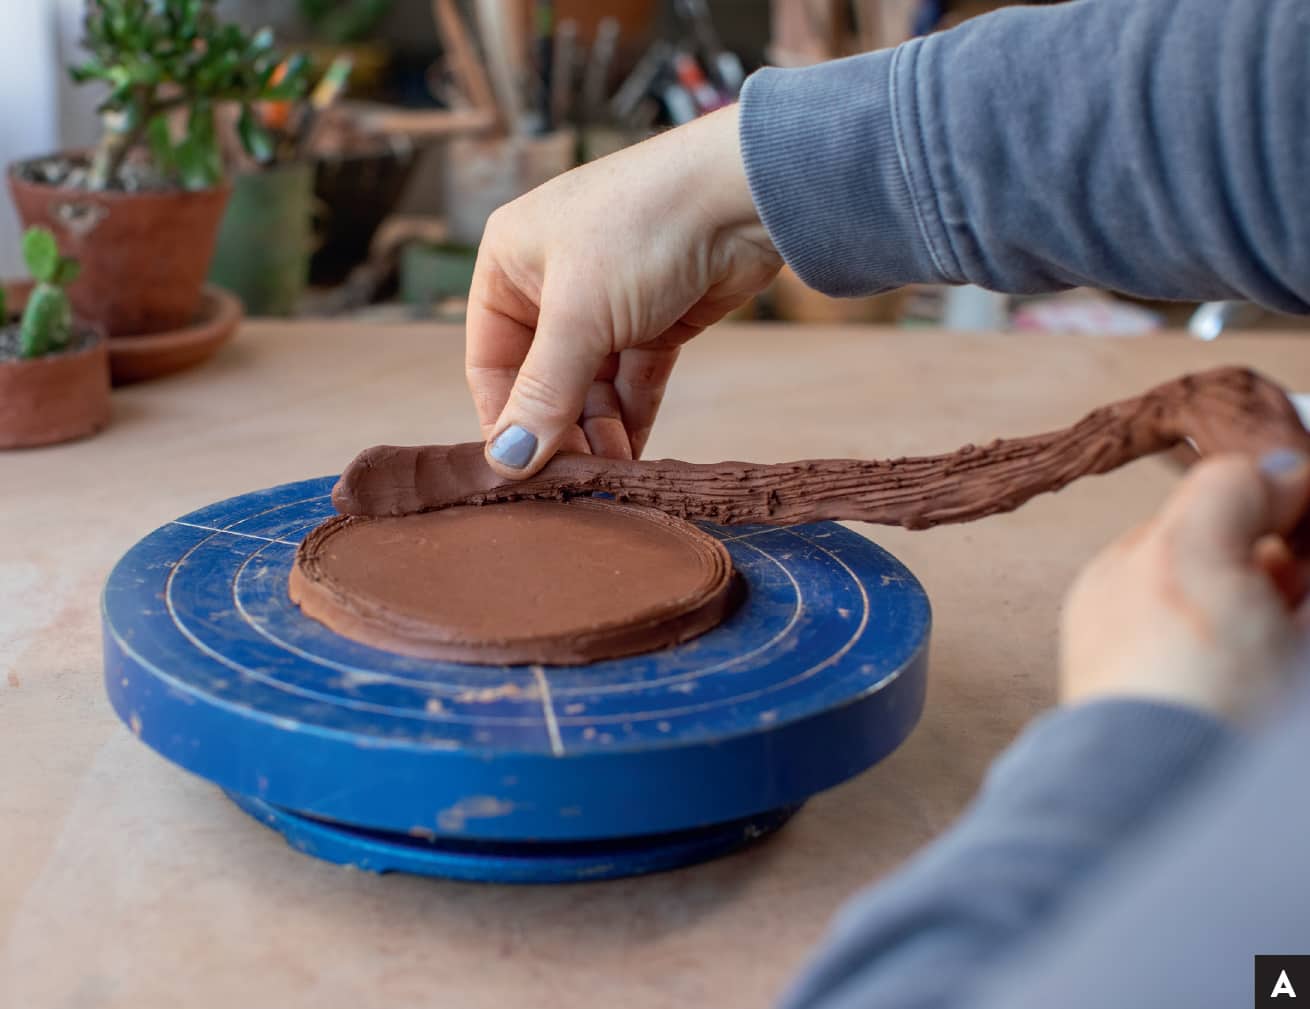
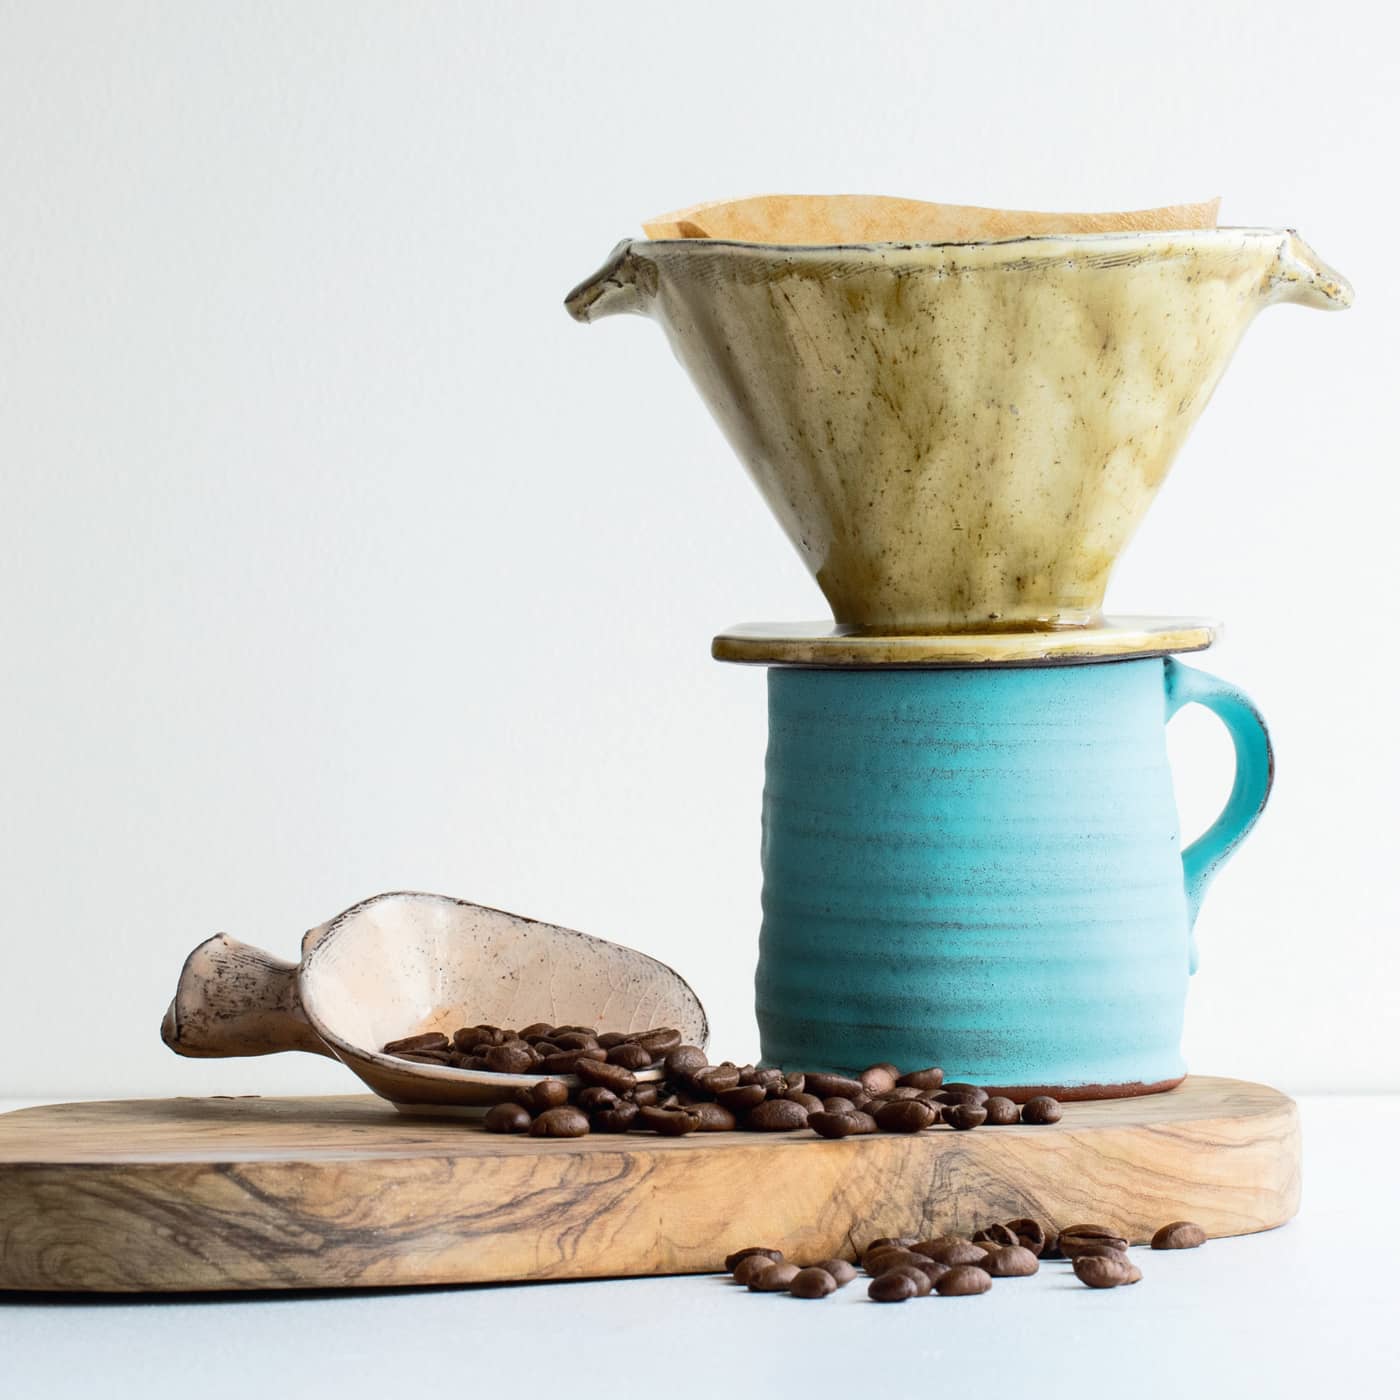
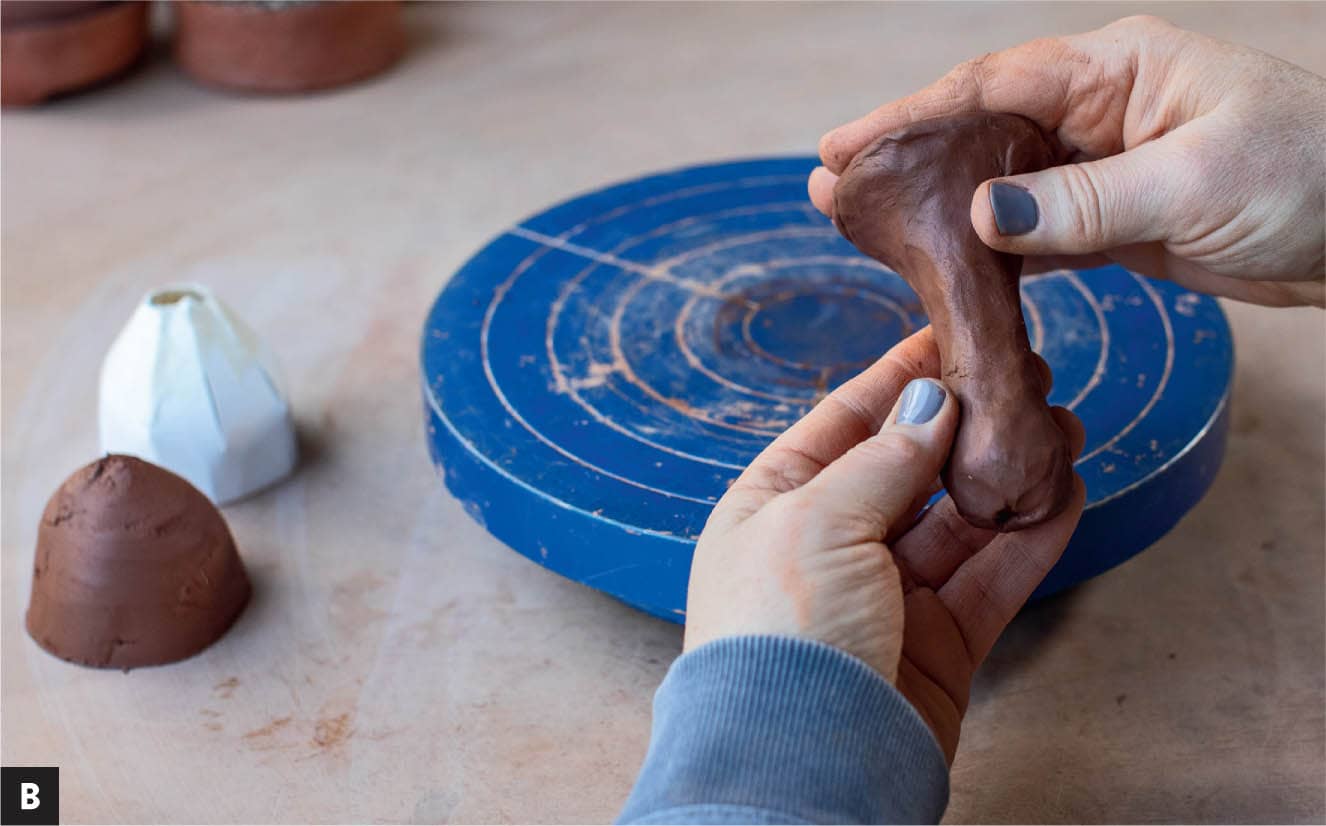
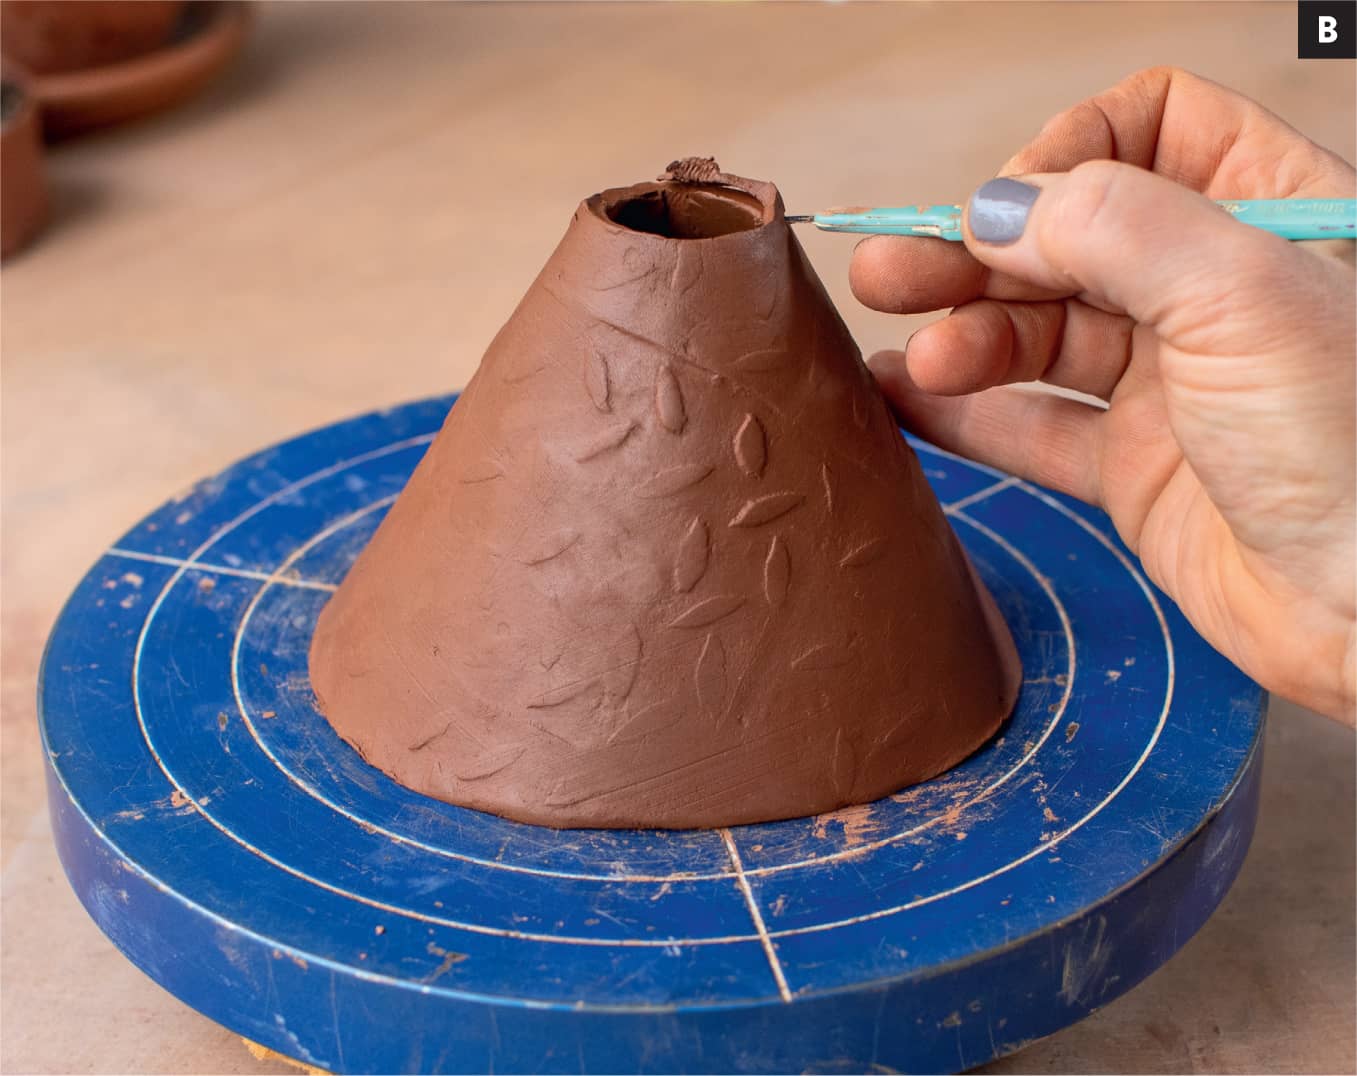
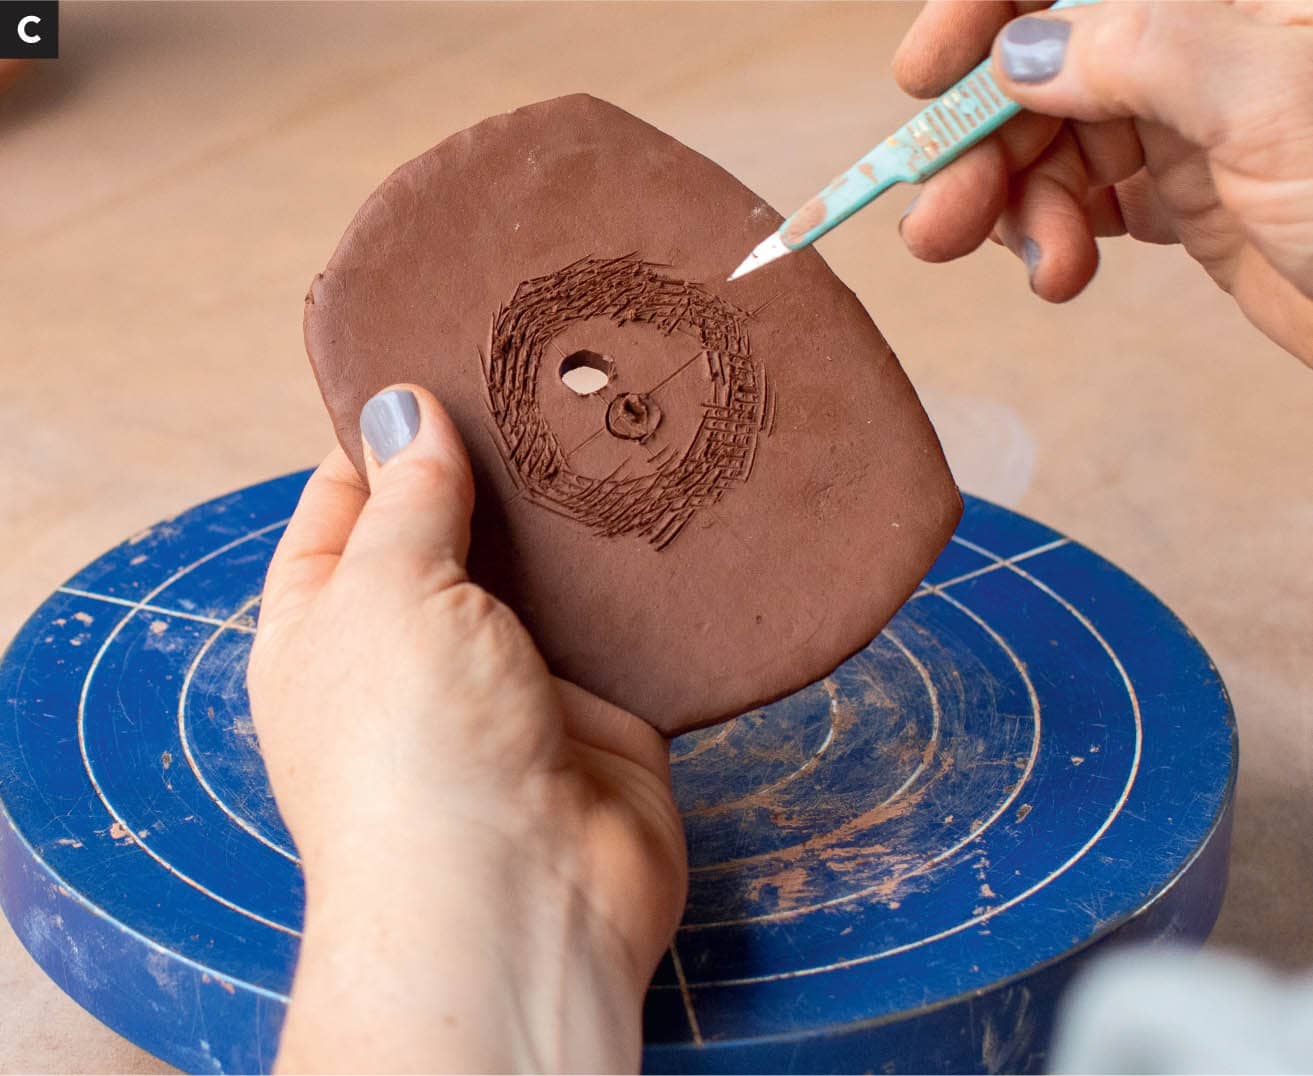
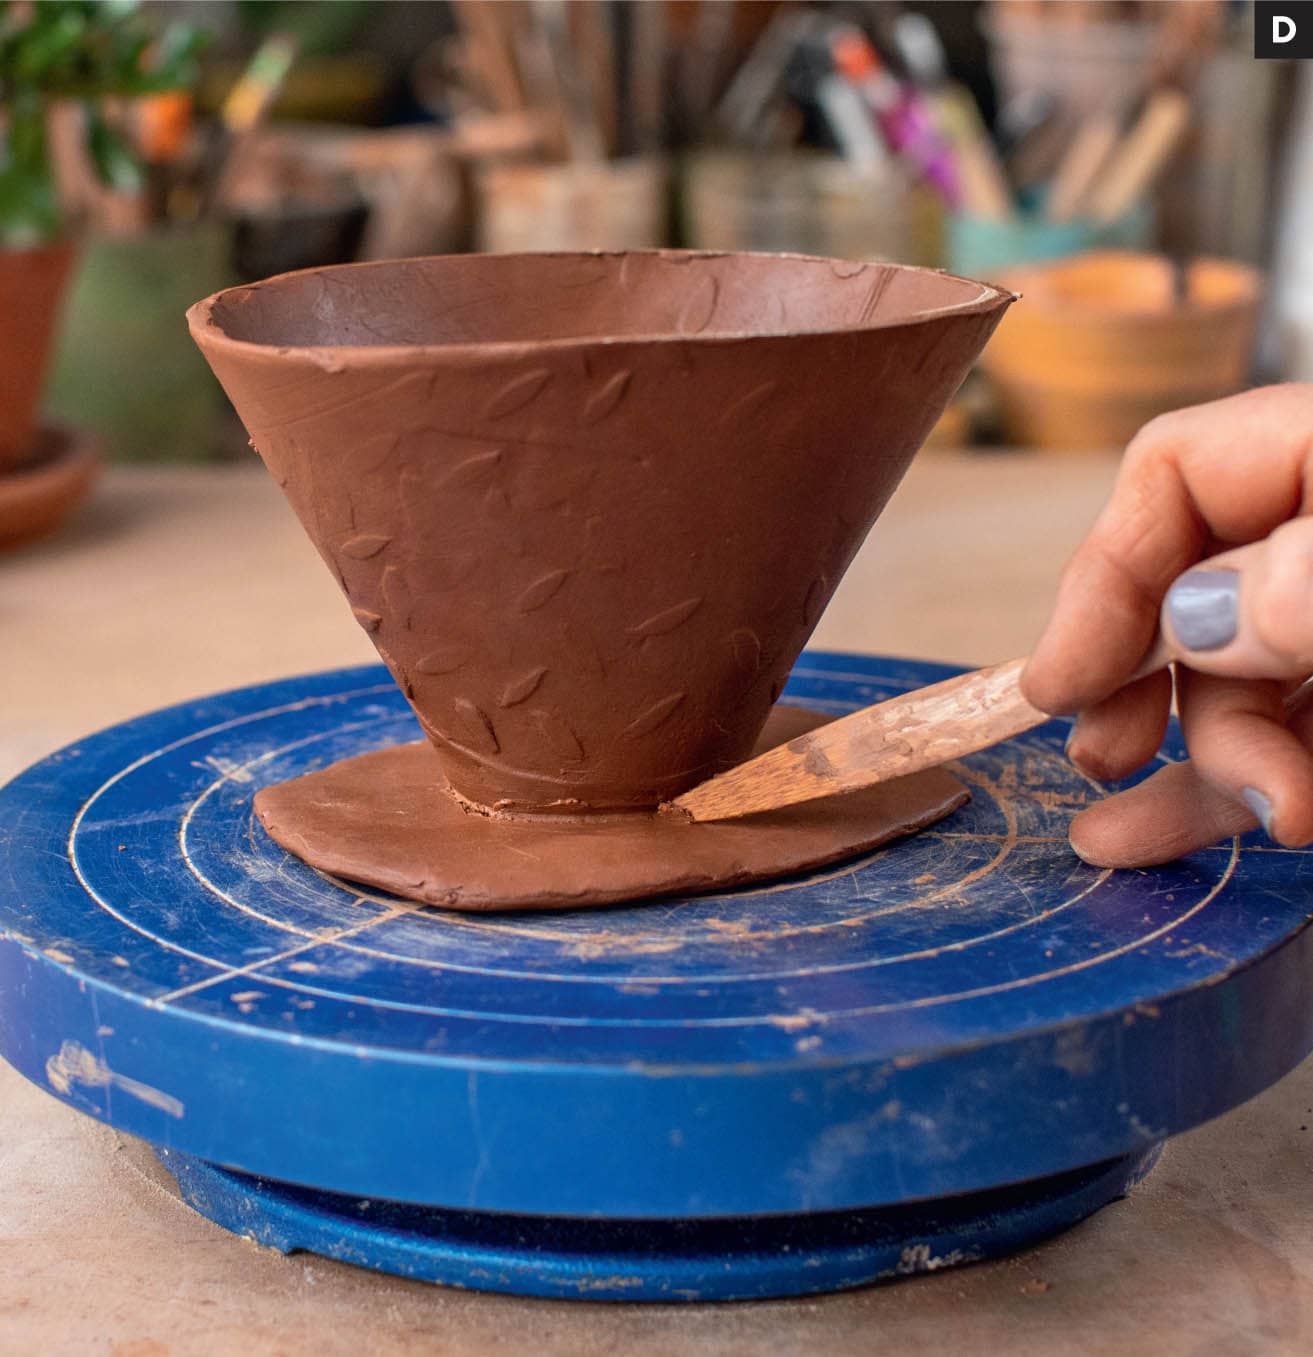
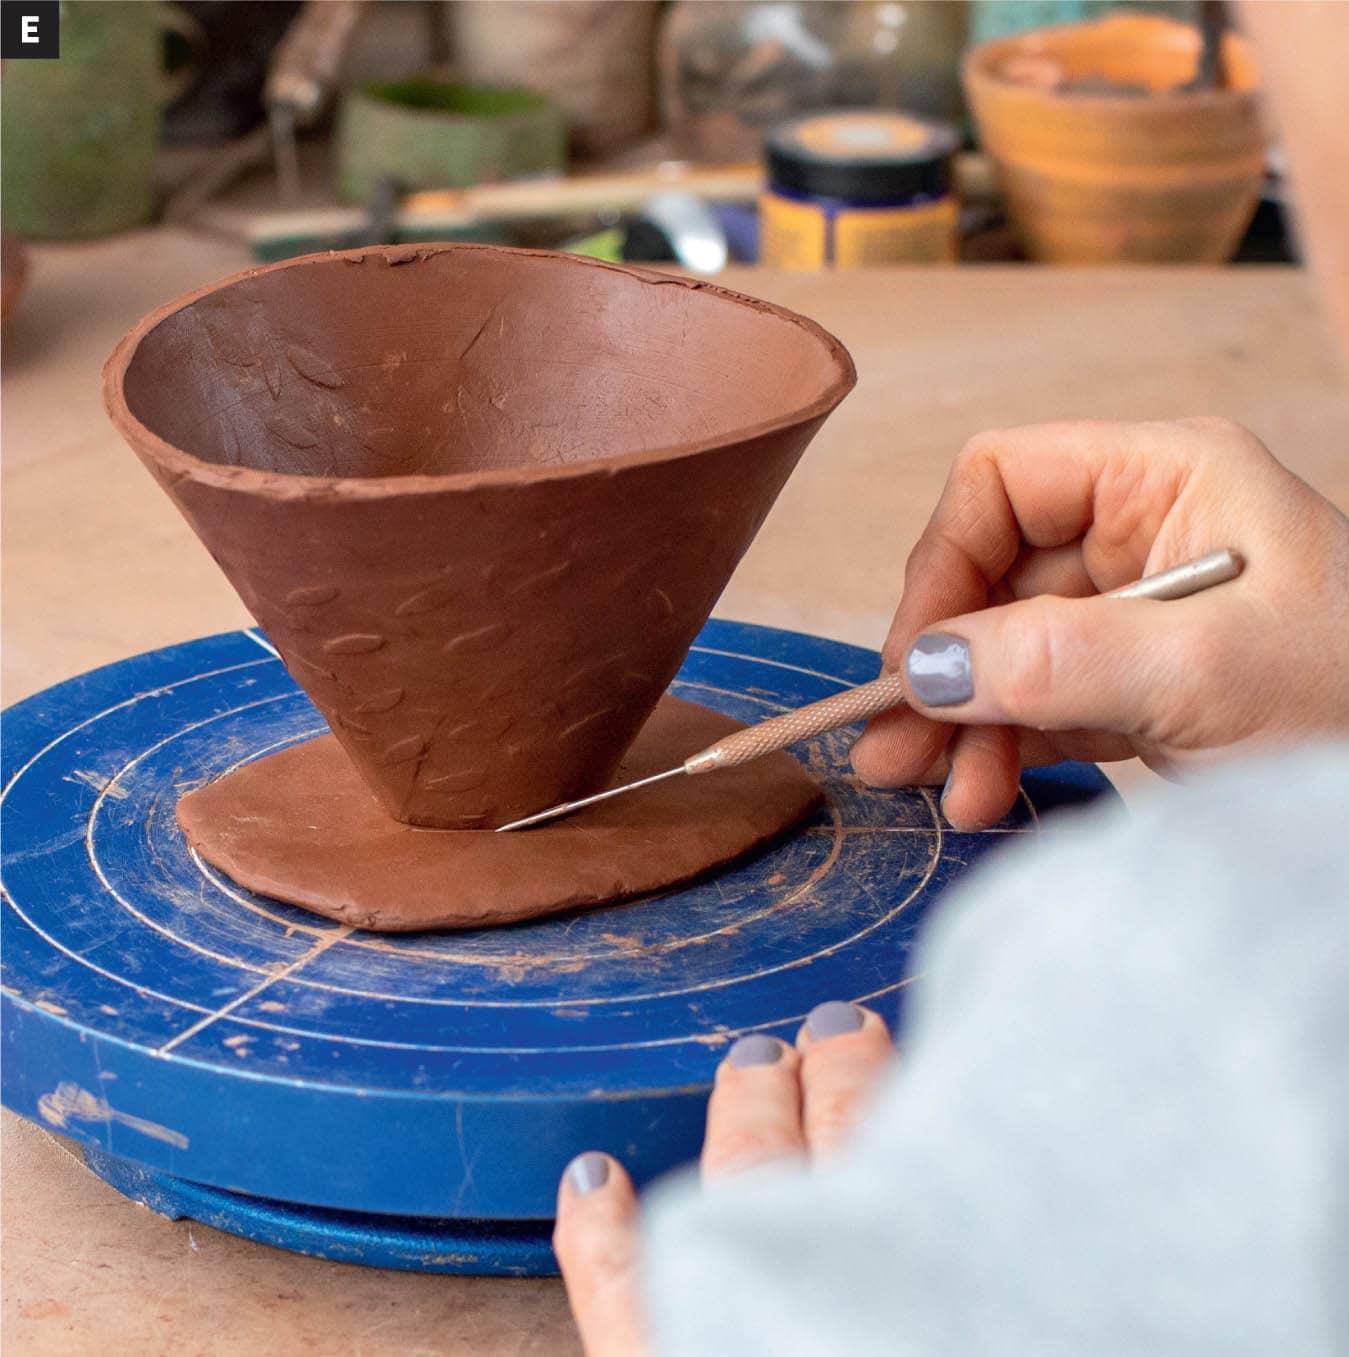
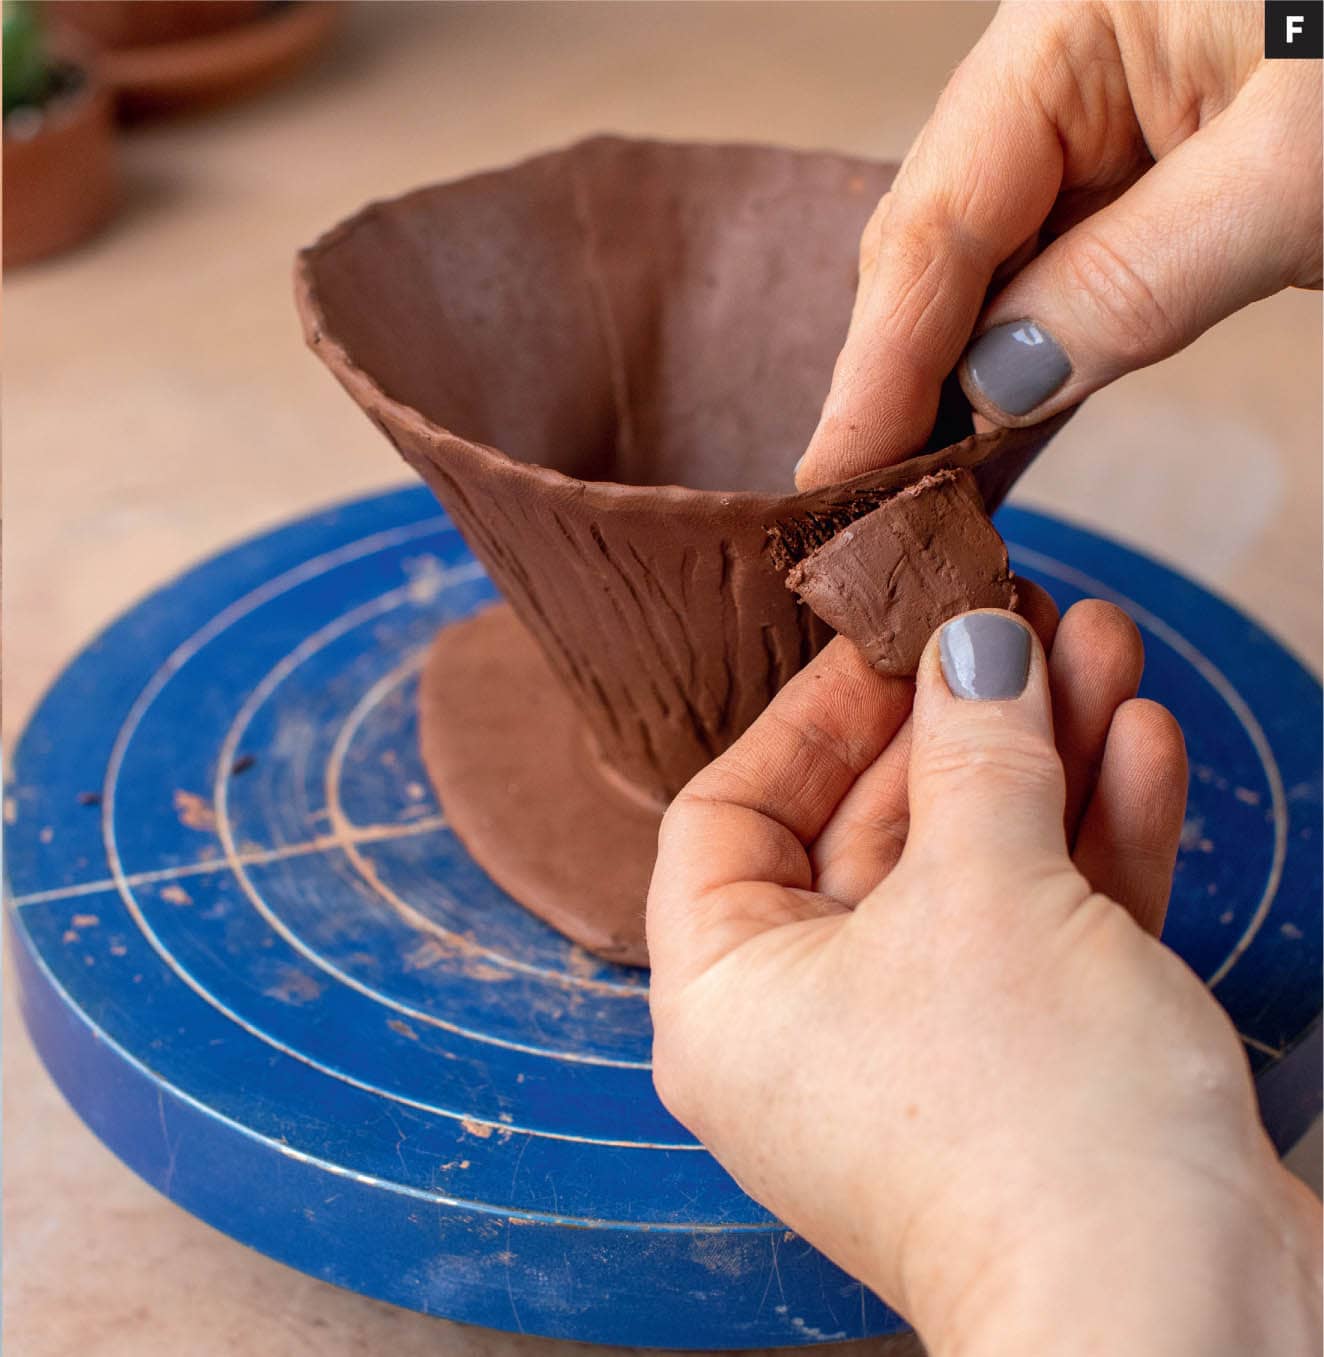
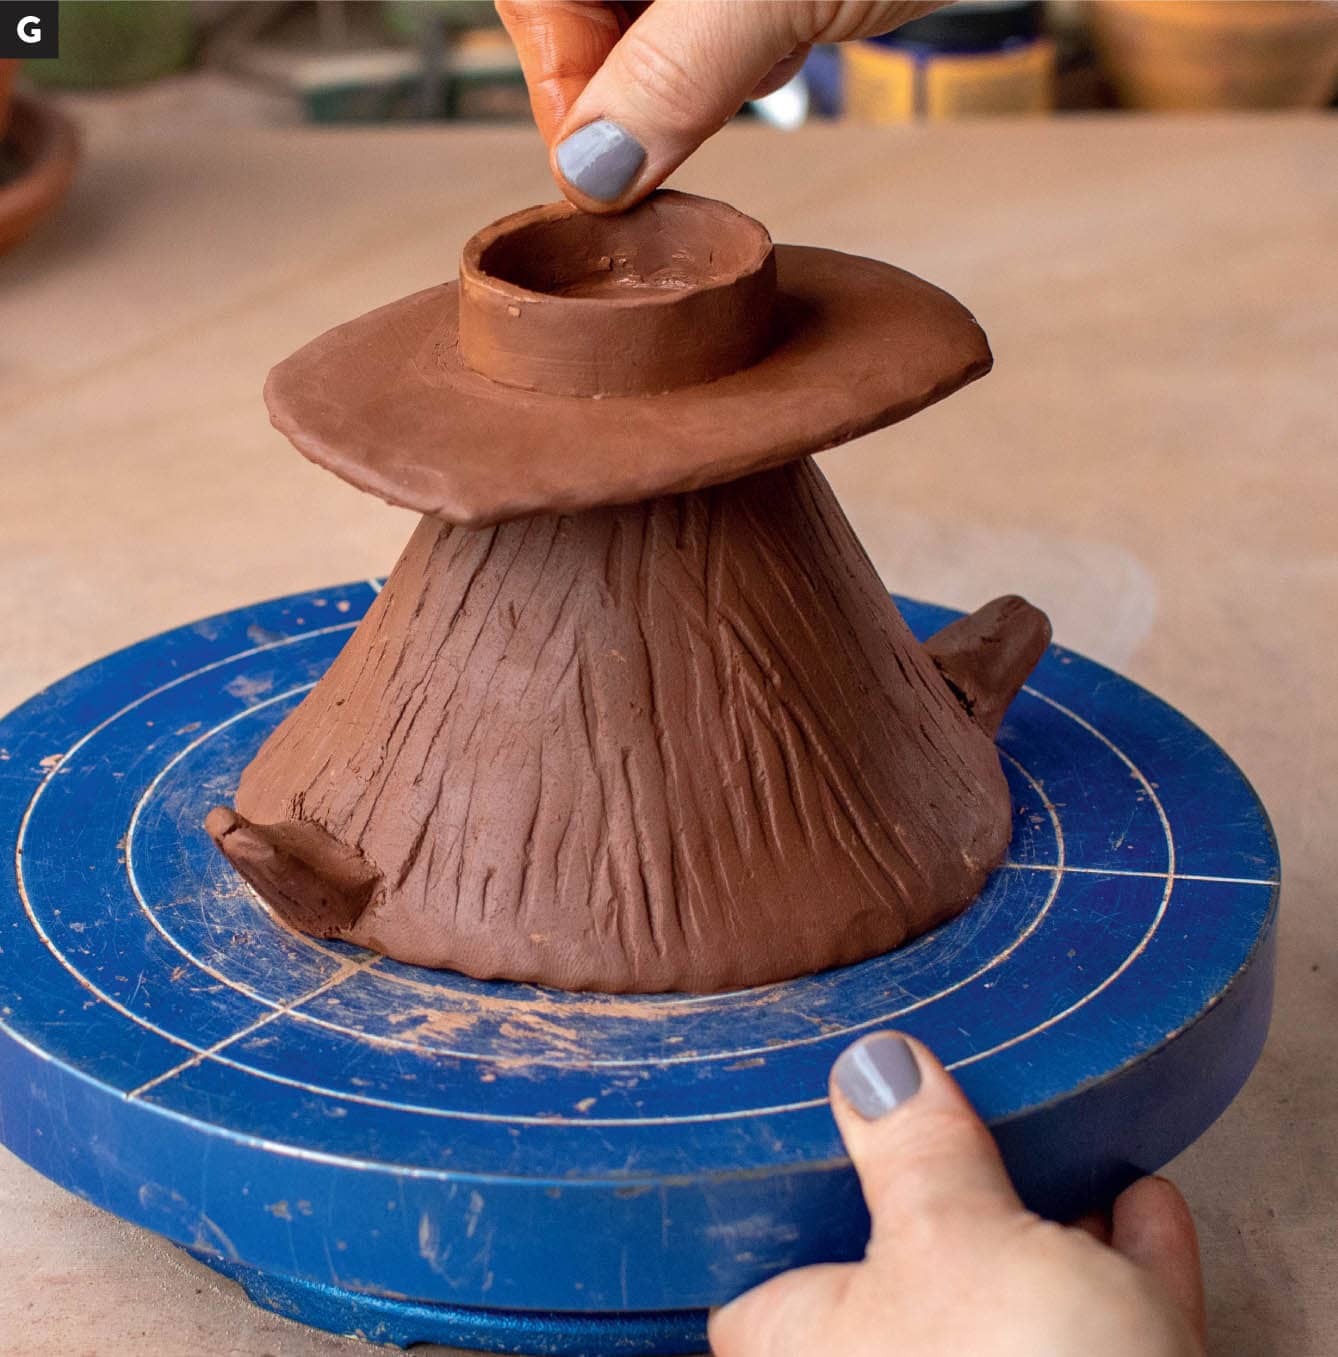
1. Pour-Over. CONE 5 red clay, white slip and celadon style commercial glaze Roll out a ¼" (.63 cm)-thick slab, aiming for about 10" to 12" (25.4 to 30.5 cm) squared. Lay the templates from here out on the slab and cut them out with a needle tool. Allow the slabs to stiffen up to a soft leather-hard state. This will make assembly a tad easier than working with super soft slabs. OPTIONALWhile waiting for the slab to firm up, make a small dish for the pour-over to rest on. Cut out the circle from your slab roughly 3" (7.6 cm) across, and a 1½" (⅜ cm)-wide strip, roughly 8" (20.3 cm) long. Bevel the outside of the circle and the bottom edge of the strip. Score each side and transpose one of the scored surfaces. Place it on a bat or piece of paper to limit the need to peel the piece off your working surface when finished. Attach the beveled edges together, keeping the wall as vertical as possible. When the wall edges come together, bevel the edges, score, and attach. Clean up the outside and inside attachments with a right-angled rib. If the top edge needs evening, use a cutoff tool and then finish the edge. For this example, I used the cheese cutter to take off the inside and outside edge of the top lip. Set aside and leave to firm up. Assemble the large cone. Work wide-side down. Bevel and score the vertical edge of the slab, wet one side, and attach. Gently clean up the attachment using a metal rib or wooden knife to make the seam disappear inside and out. Let the cone set up, and rest the cone with the large side down on the tabletop/bat. Your edges may be uneven, but that is okay for now. That will be addressed after the form has been allowed to set up and rest for a bit. This “resting” allows for the seam to adhere. [A] Using a rib, compress both sides of the disc shape; it should be the most set up of all your pieces. Using a brayer or rib, compress the edge of the disc shape. Then, using a green scrubby/soft red rib/drywall sandpaper, work round the edge and take away any sharp spots. This is the part of the pour-over that will get the most abuse, so it’s important to make sure it is strong. Maintain a flat disc shape and avoid bending or excessive thinness on the edge. Use a surform or scalpel to level off the narrow section of the large cone. Proceed gently and with caution near the attachment point. Work around the form in a circular motion and level it off as flat as possible. You want the opening to remain about 1" to 1½" (2.5 to 3.8 cm) across. [B] Using a scalpel or drill bit, cut out holes in the bottom of the disc. They can be small or large, but use the inside of the cone as your reference point for how much space you have to pierce. (This may take some experimenting with and research to know what will work for the brewing of coffee.) Clean up the cutout section and address/finish the top edge of the cone. [C] Allow it to rest right side up on the disc, especially if the disc isn’t leather hard yet. Before you move to the final steps, there should be no bend whatsoever in that disc. Turn the cone right side up (narrow end on the worksurface), and make sure it isn’t leaning in any direction. The cone should be stable and centered. Work firmly but gently; you don’t want to distort the shape of the cone. [D] This small coil will increase the surface area of the attachment and add a bit of strength at this narrow connection point. Grab the disc and center the cone, narrow side down. Using a needle tool, trace around the outside and inside of the cone onto the disc. [E] This will give you an idea of where to score. Score both the bottom of the cone and the disc (inside the circle). Be generous with your scoring— this attachment point is important. Wet one side and attach. Use a rib and wooden knife to clean up the attachment. If there are gaps or unevenness in the attachment, make a very tiny coil, backfill the outside attachment, and compress with your fingers and then with a tool. Now it’s time to make and attach the handle. This can be a more traditional-style handle, like on a mug, or a nub off the top. It depends on what you would like. The piece needs something to hold on to that is removed from the heat of the steeping area. I made a couple of small nubbin handles across from each other. [F] Once the piece has set up, meaning all the attachments are firm and the handles are set, you are ready to attach the last bit. Gently flip the cone over and set it on a soft work surface, such as a piece of foam, to protect the lip of the cone. Using a ½" (1.3 cm) strip of clay, make a circle roughly 2.5" (6.3 cm) across (it needs to fit inside your resting dish and a mug), bevel, and attach the ends. Center on the disc, score, and attach. Clean up the seams. [G] Allow to dry upside down.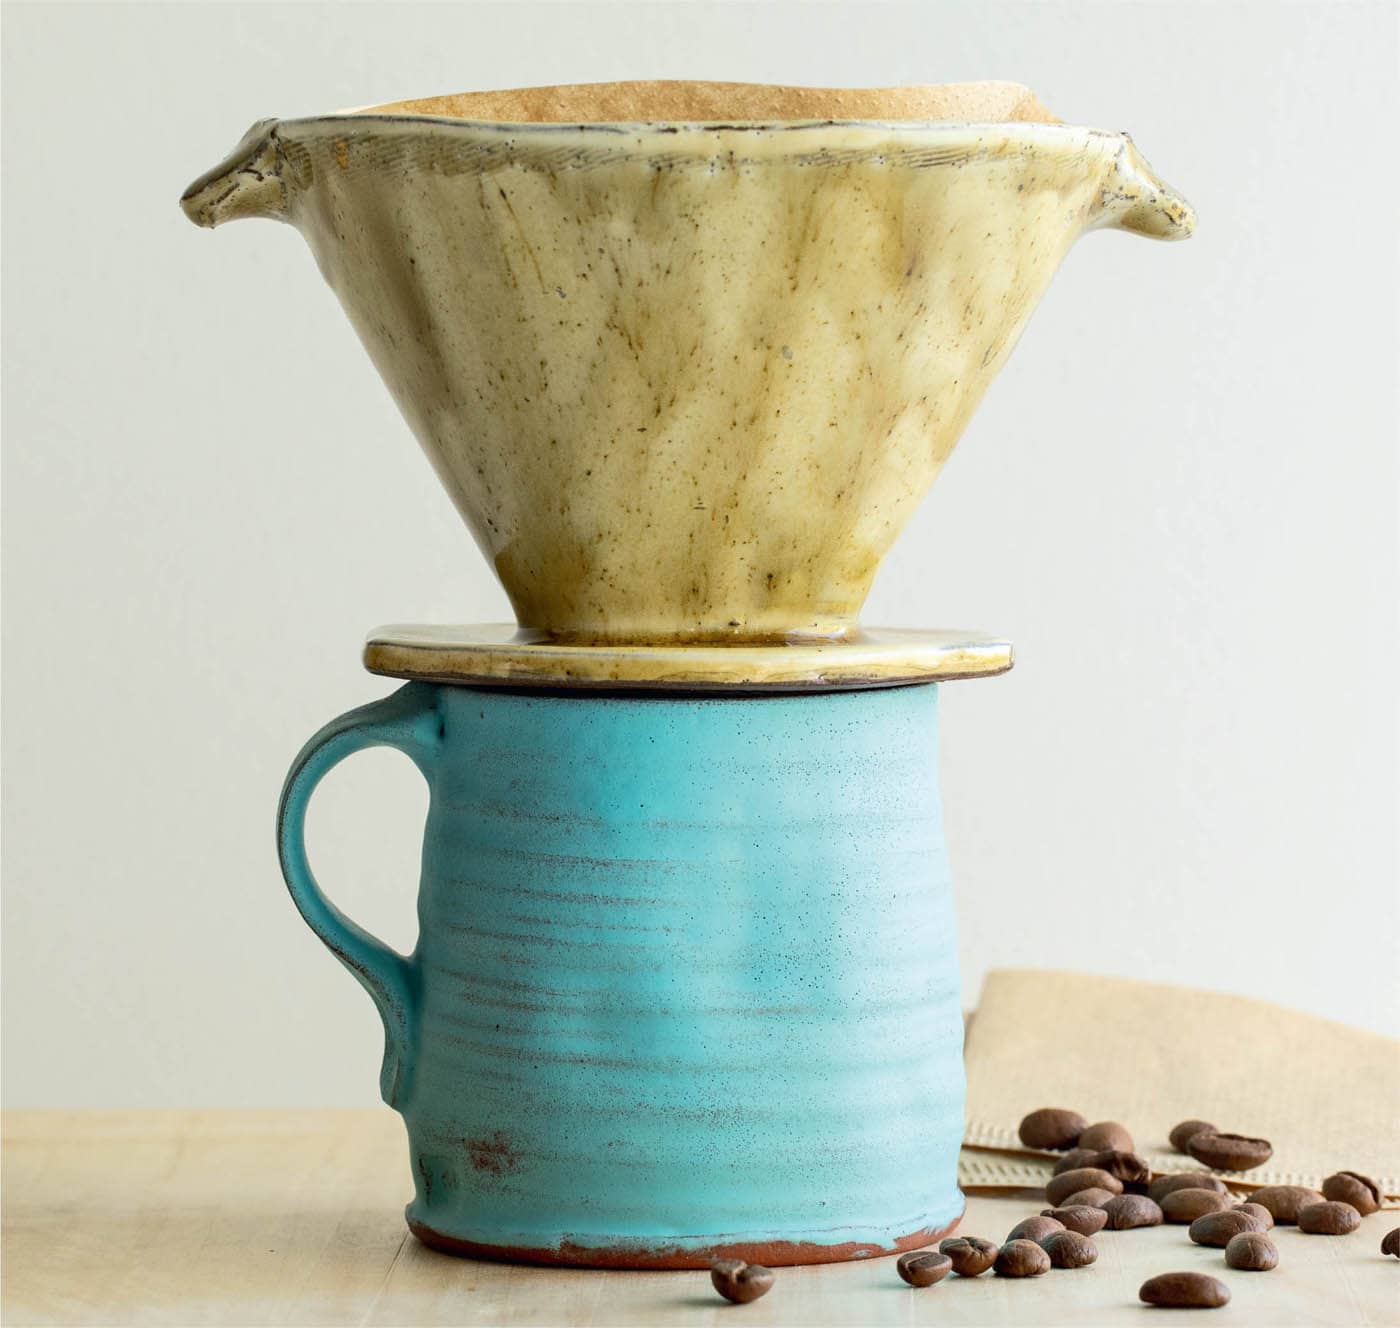
2. Mug, wheel thrown by author. CONE 3 red clay, commercial glaze, sandblasted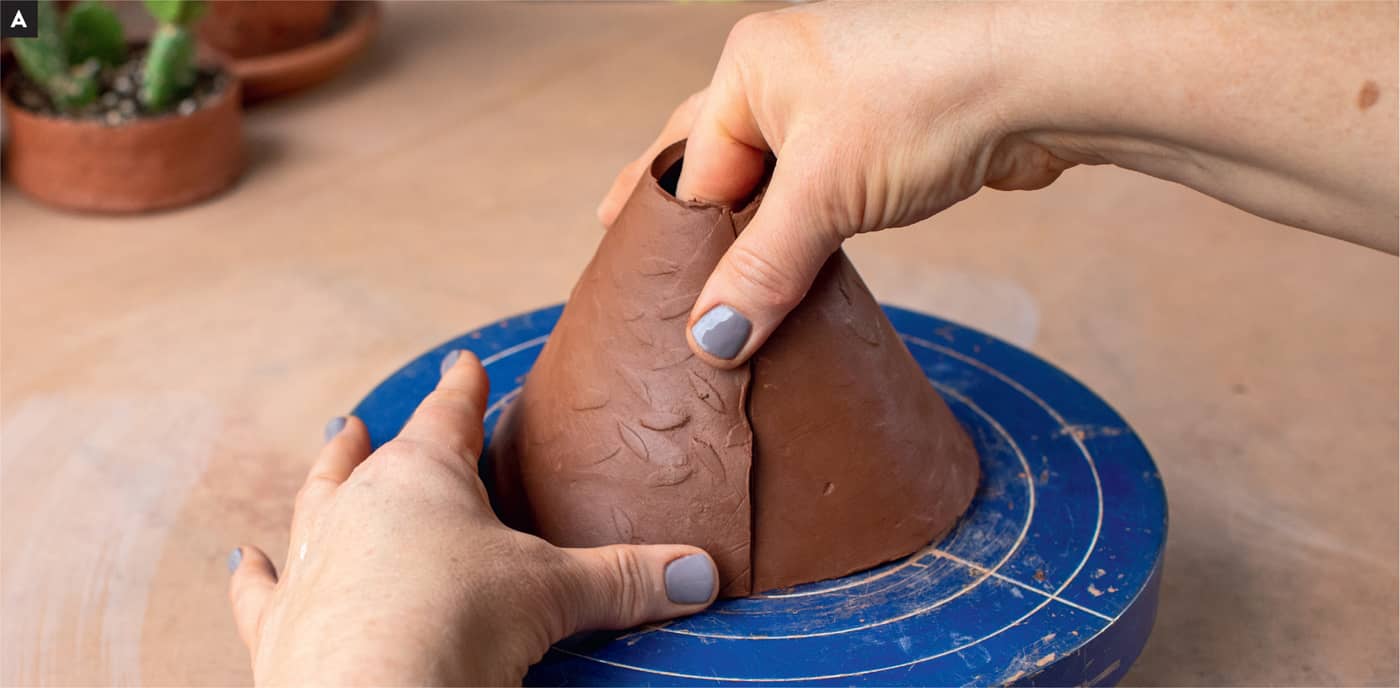
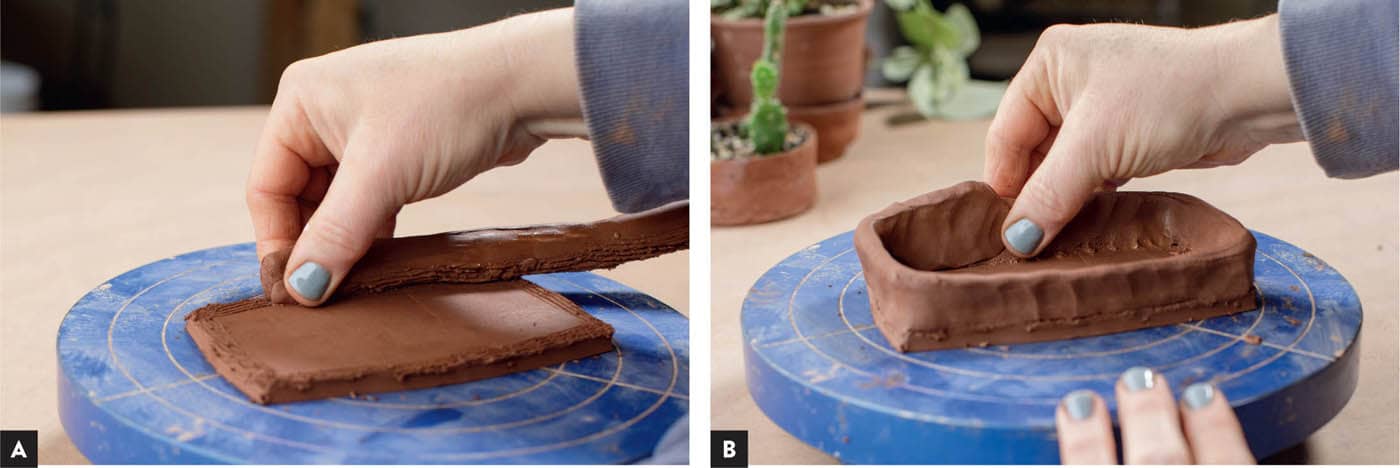
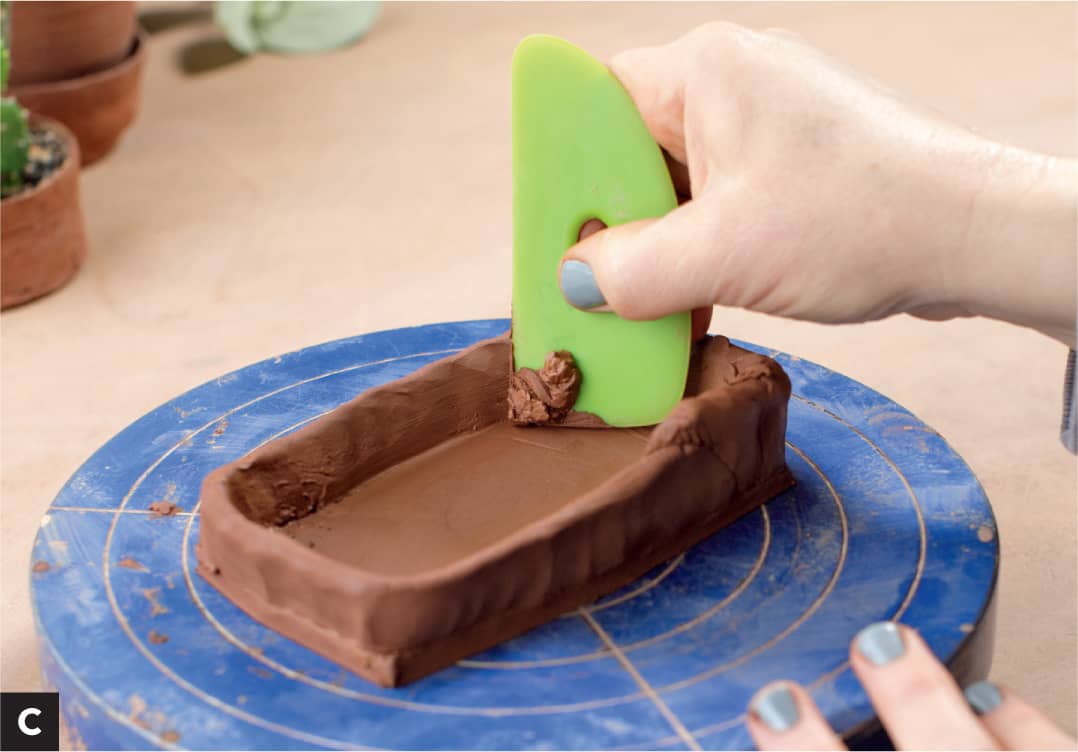
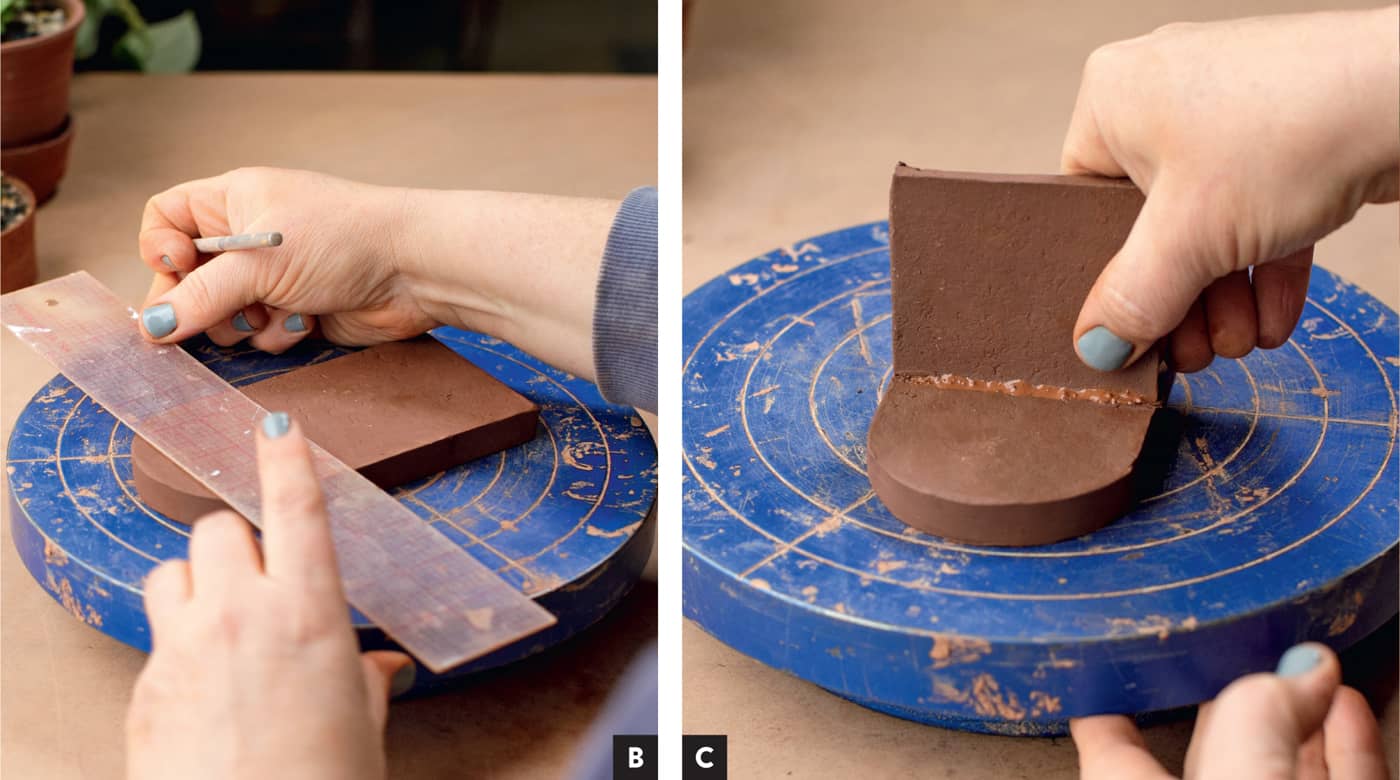
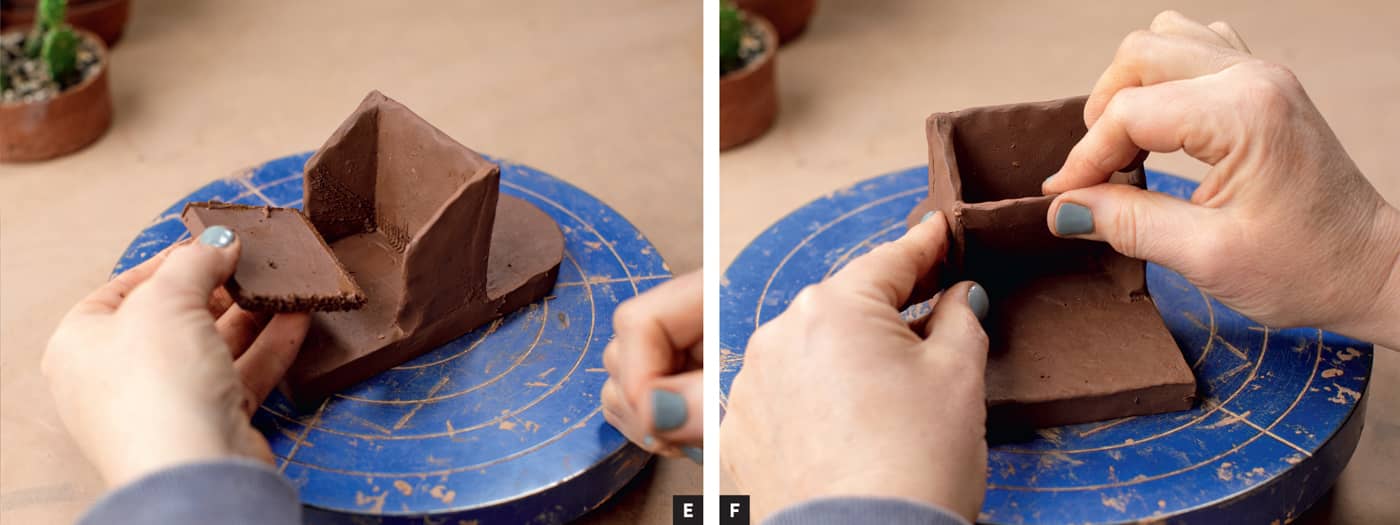
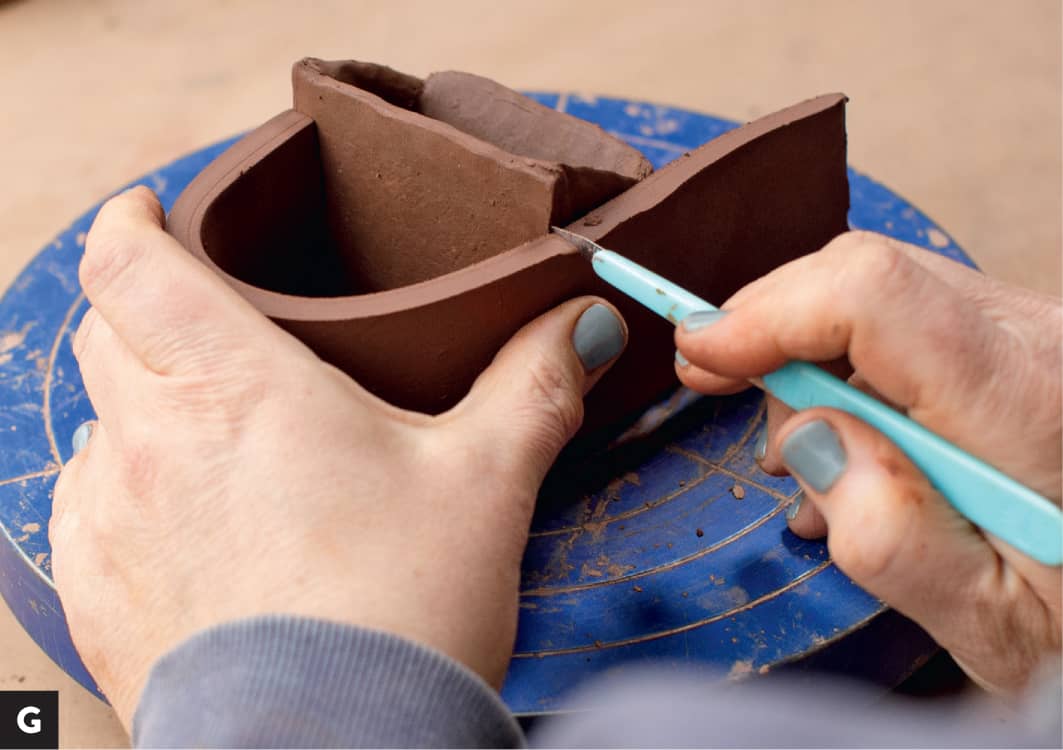
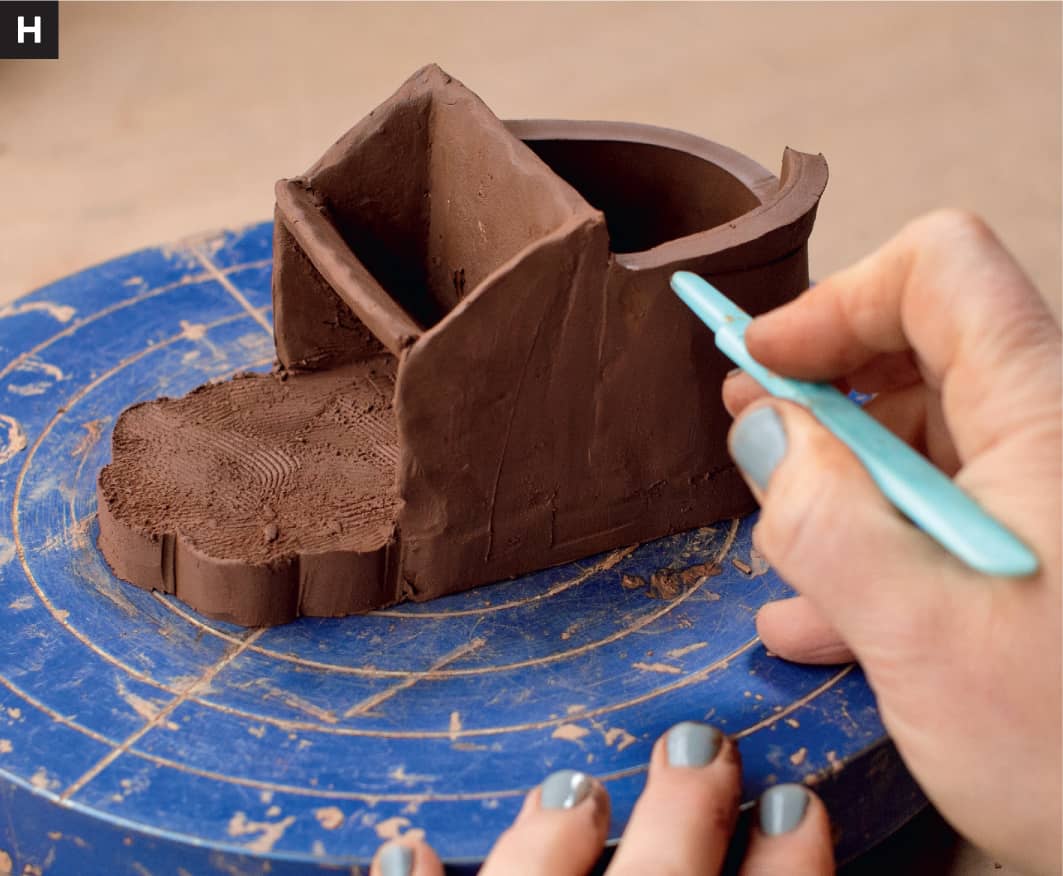
CONE 3, exposed raw clay and commercial glaze Roll out a ¼" (.63 cm)-thick slab. (If you want to roll two slabs, the bottom footprint can be thicker, but for the walls I recommend the ¼" [.63 cm] slab.) Cut out the template pieces from here, five in total, and let them firm up to leather hard. [A] You are now ready to assemble the pieces. On your working surface, place the footprint, the largest piece. Measure 2.5" (6.3 cm) from the curved edge, making a straight line with your needle tool. Score along this line. [B] Take the largest square template piece and score the bottom edge. (You can hold it up to the footprint to double-check whether it fits.) Attach the pieces. [C] Find the two matching side pieces (they have the sloped cut). Score the long edge and the bottom, score the wall and the footprint, wet one side of the attachment, and assemble. Clean up and make sure the pieces are vertical and even with the footprint. [D] Using the last template piece, cut it down to fit in between the two side pieces. [E] Assemble on the diagonal, bevel the bottom edge to rest against the wall, and line up the slab to reach just past the corners of the sloped pieces. Use your needle tool to trace where you need to score. Score and attach and clean up the seams. [F] Roll out a fresh slab ¼" (.63 cm) thick, 3" (7.6 cm) wide and roughly 6" to 8" (15.2 to 20.3 cm) long. Bevel the curved edge of the footprint. Bevel the bottom edge of the slab to match. Score both sides and up the front outside edge of the wall. Cut slab to fit, score the edges, and attach to the footprint and wall. Clean up the interior and exterior seams, using a rib and wooden knife. [G] Using a scalpel, find the center of the dish and make a ½" (1.3) cut straight down. Cut from there to the top of the slab attachment at an angle, and repeat for the other side. This will create a roughly symmetrical sloped wall. Use your knife or surform to even this if it is way off. (This takes a bit of practice.) [H] Take a serrated rib and texture the match strike area. This area will remain unglazed and needs to be rough enough to light a strike-anywhere match. After you have applied the texture, finish the edge. I made a quick paper cutout of a semantical scalloped shape that fit the strike plate and used a scalpel to cut the edge, rolling the edges to soften the cut. OPTIONALUse your fingers to gently pinch all the edges of the pot to soften those lines. (This may be difficult if your pieces are getting closer to a bone-dry state. You want there to be a little bit of give to the wall edge.) Finishing an edge is the last personal touch, so play around and see what works for you. [I]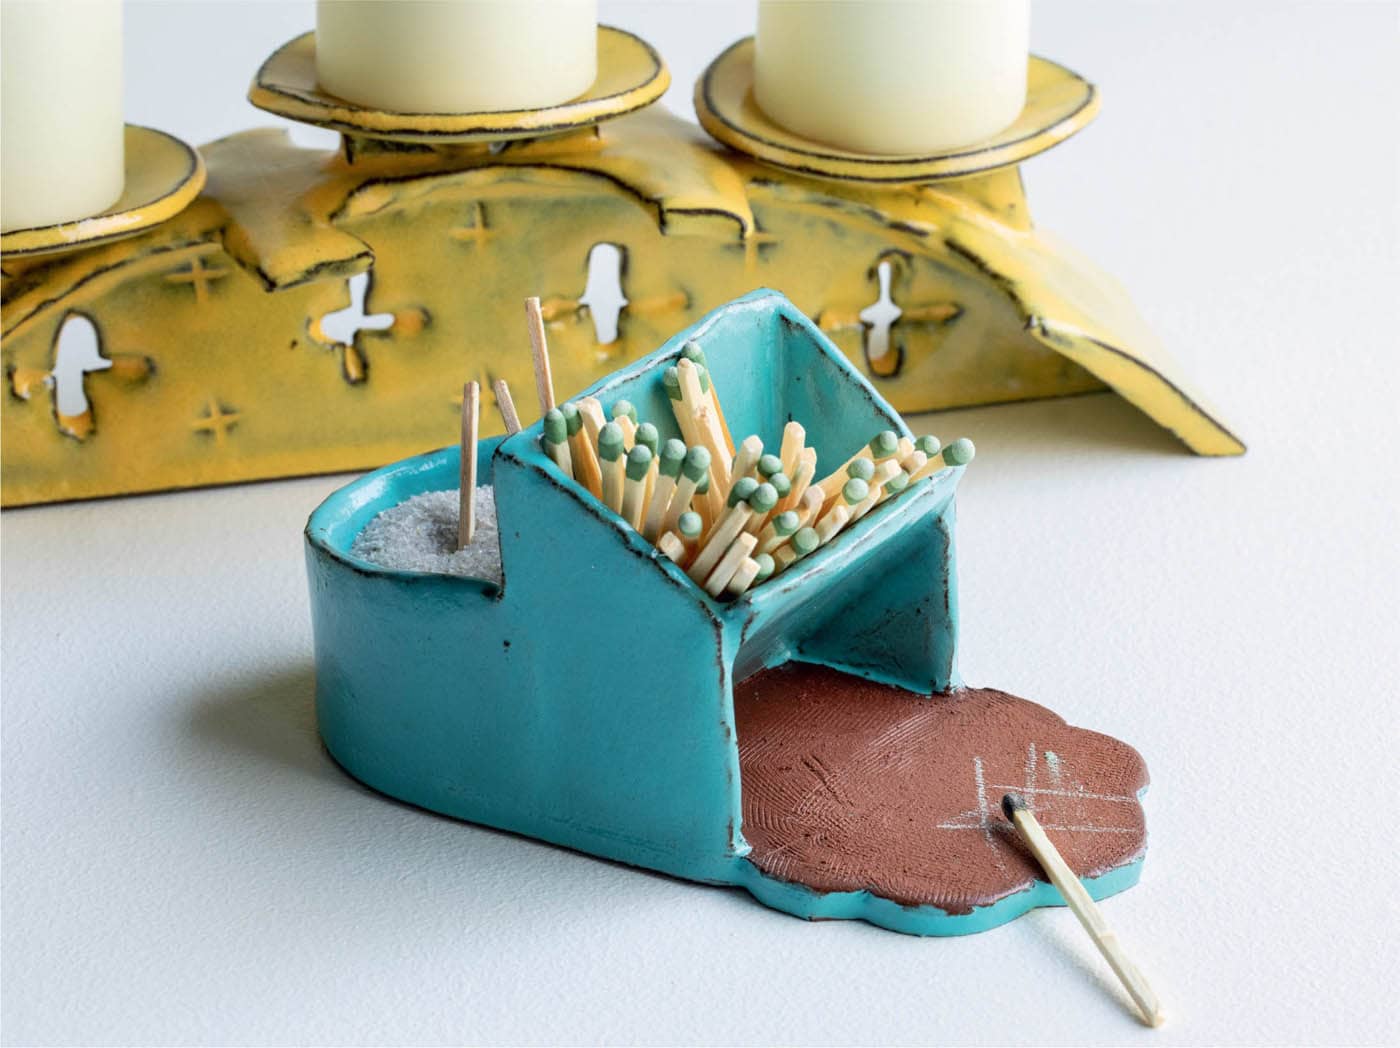

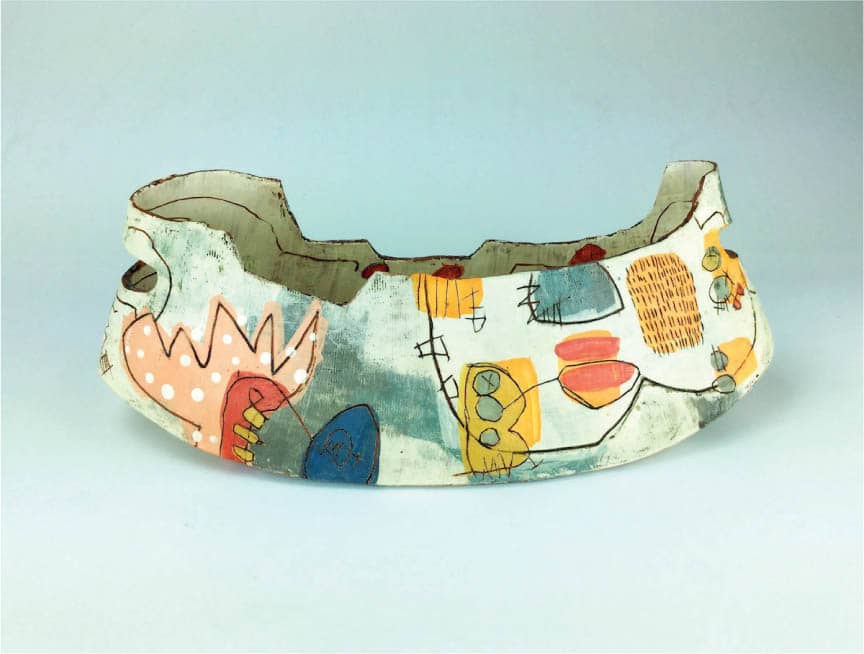
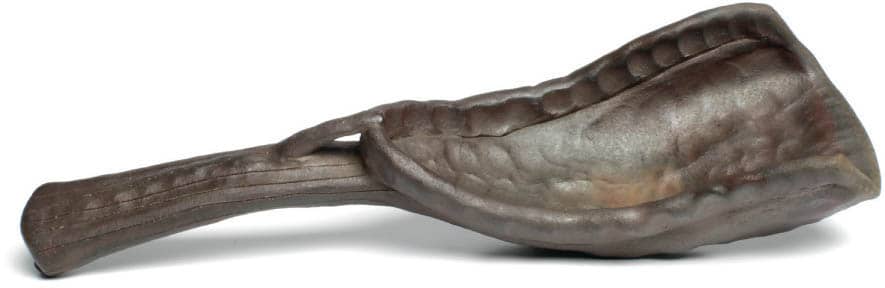
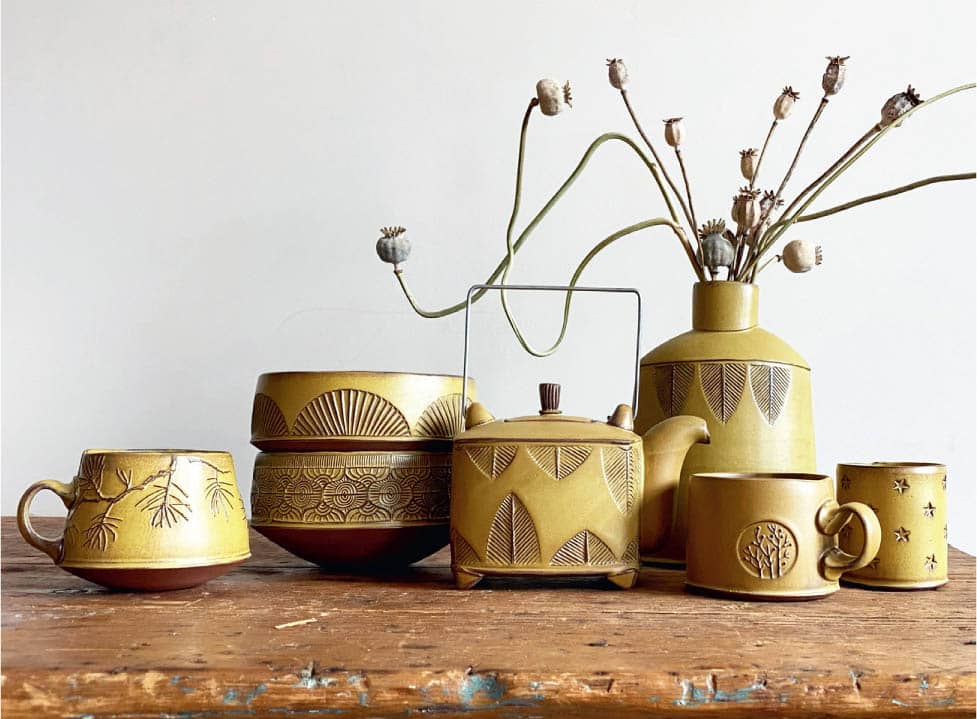
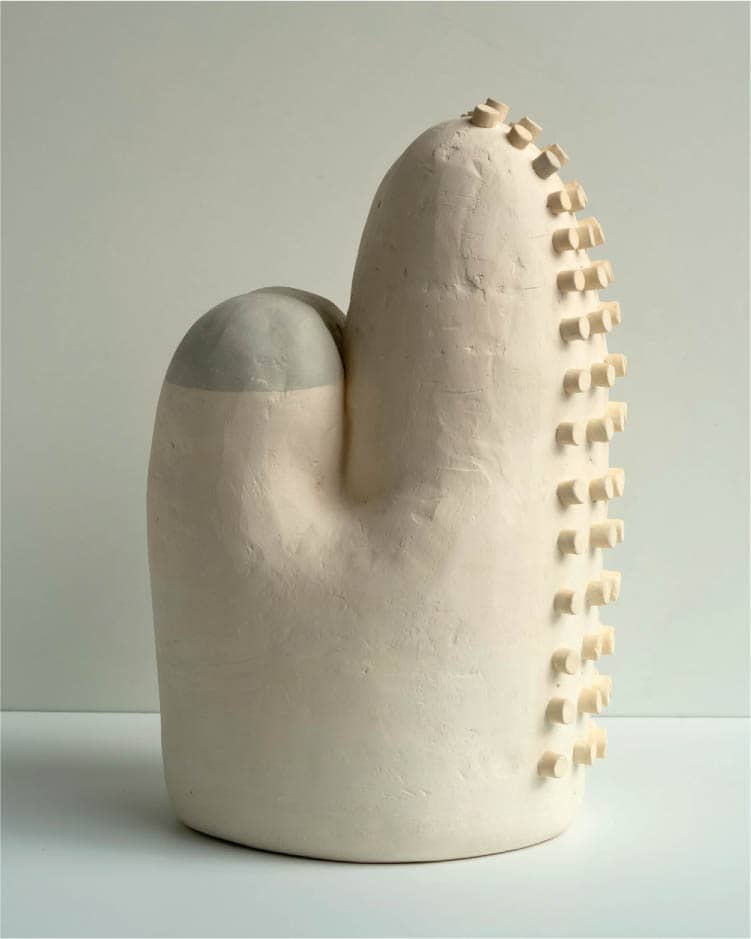
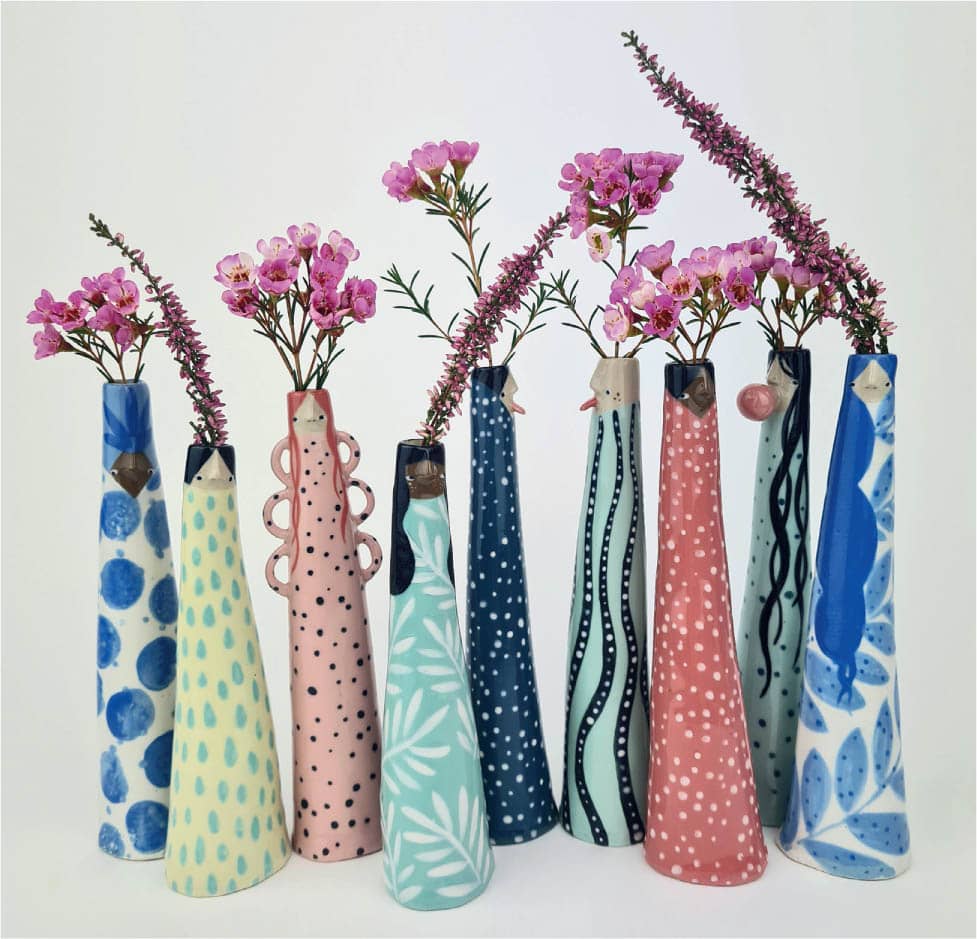
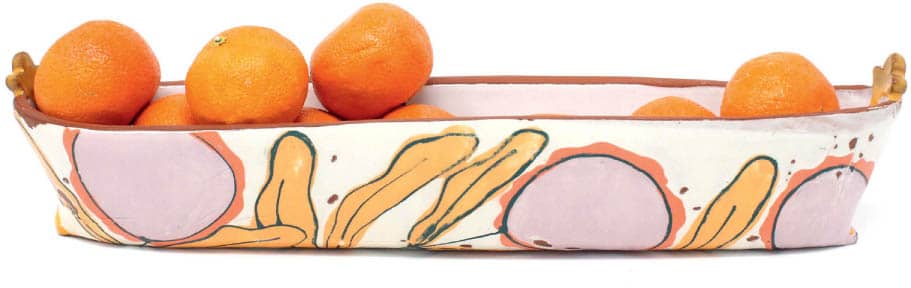
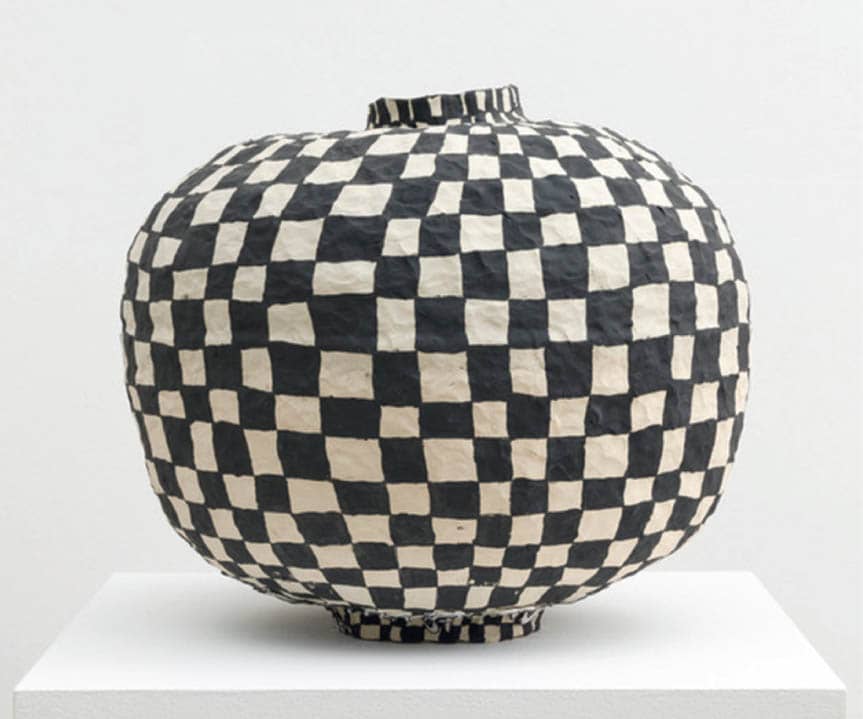
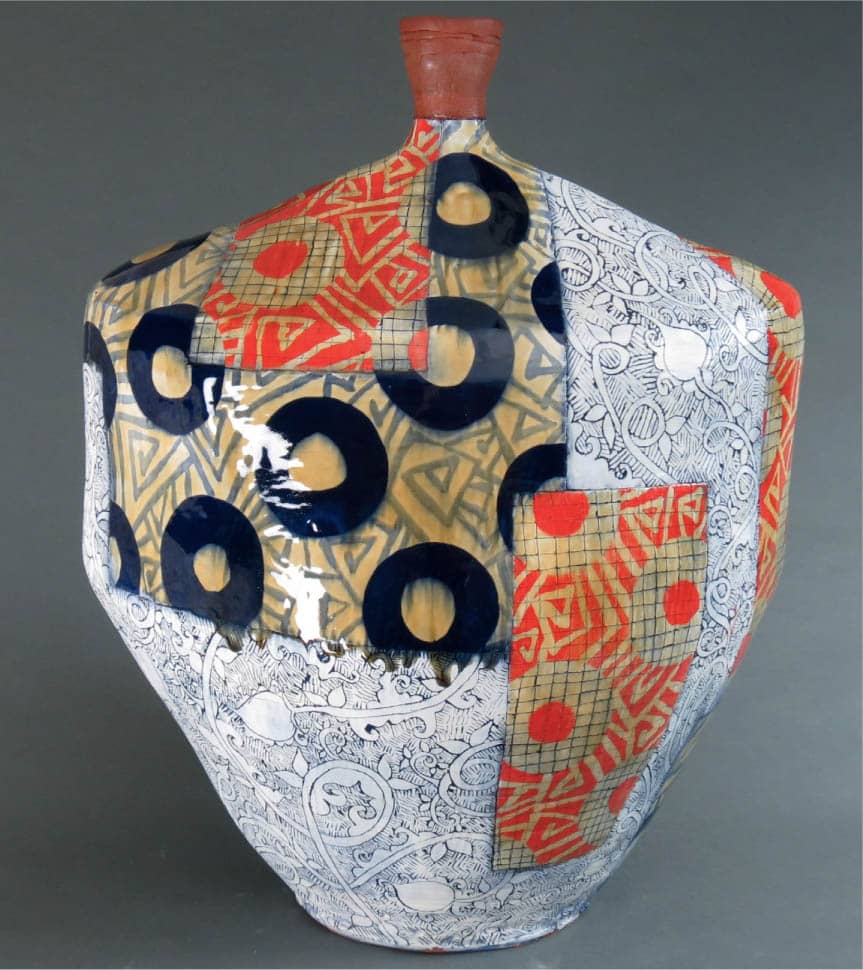
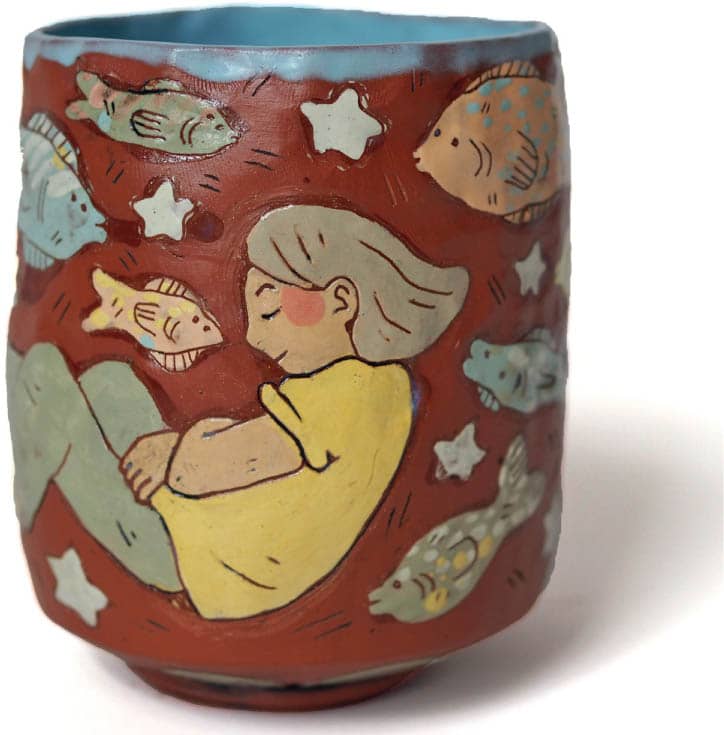
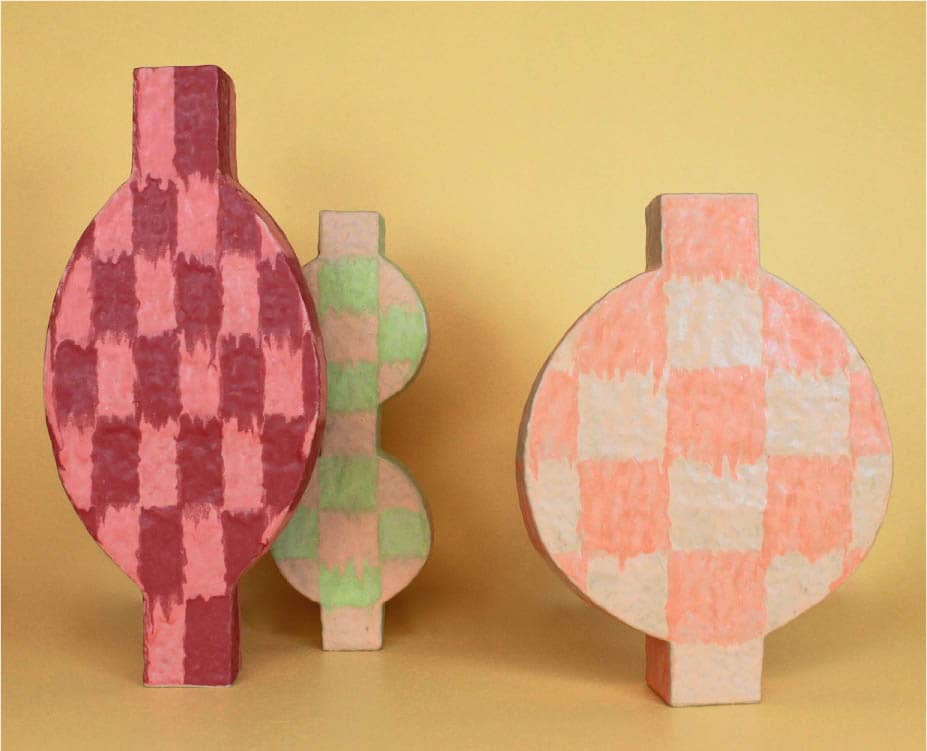
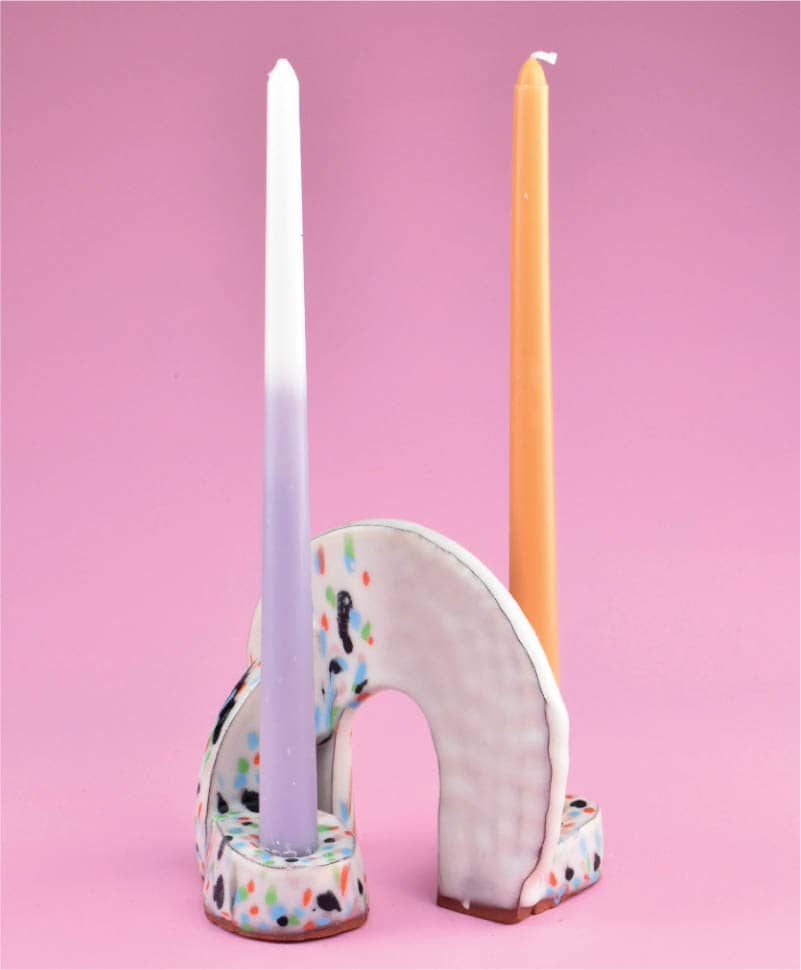
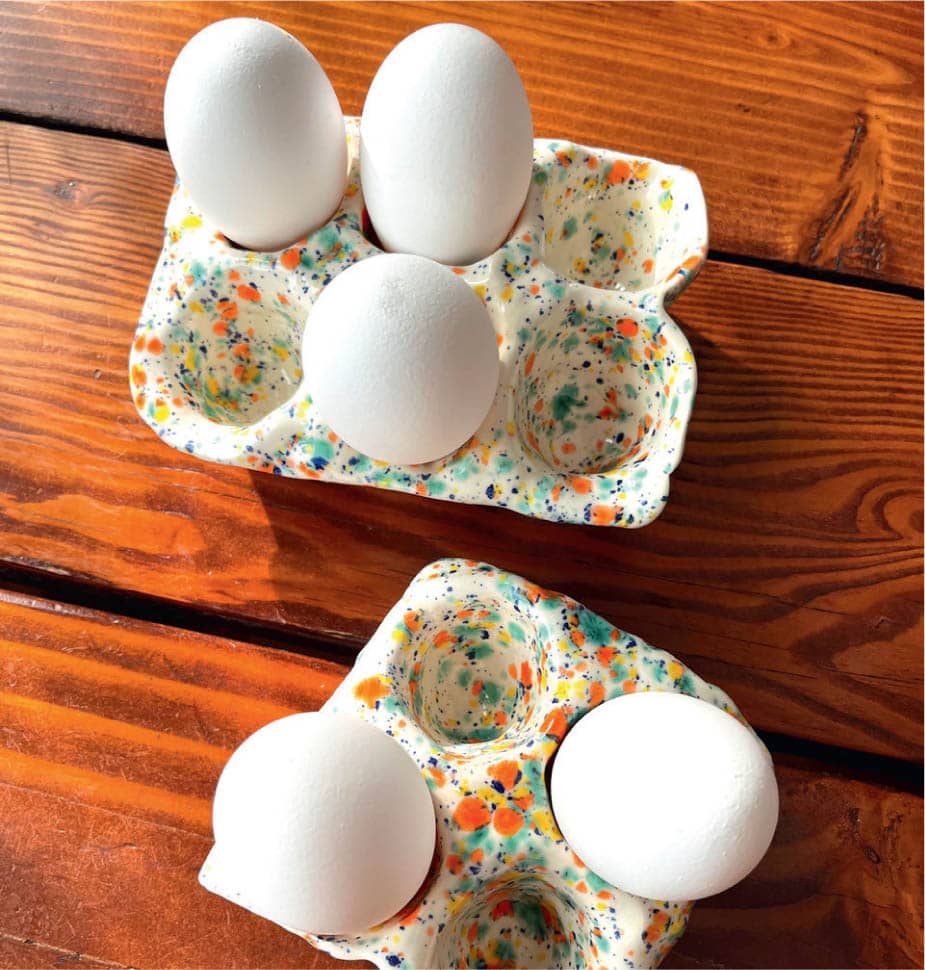
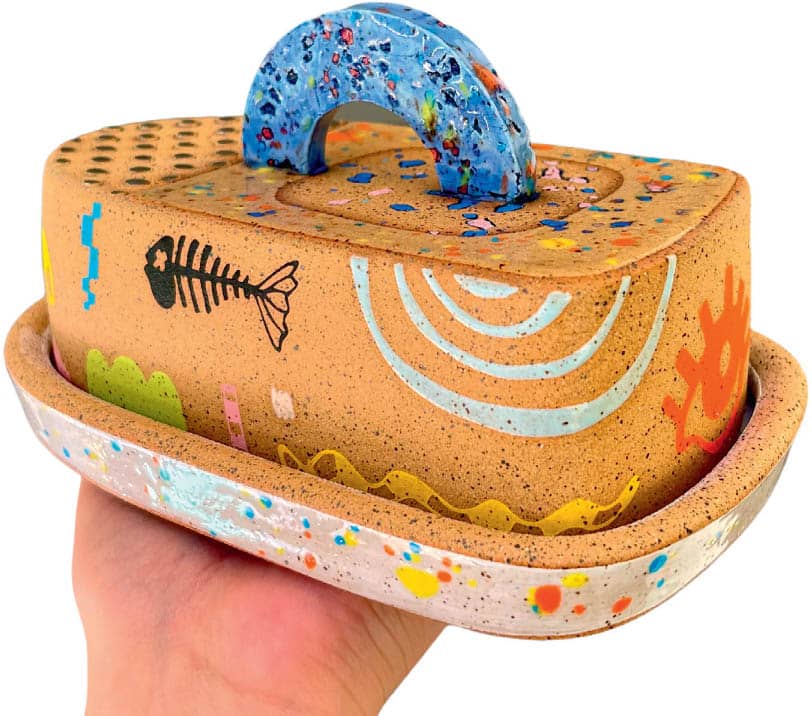
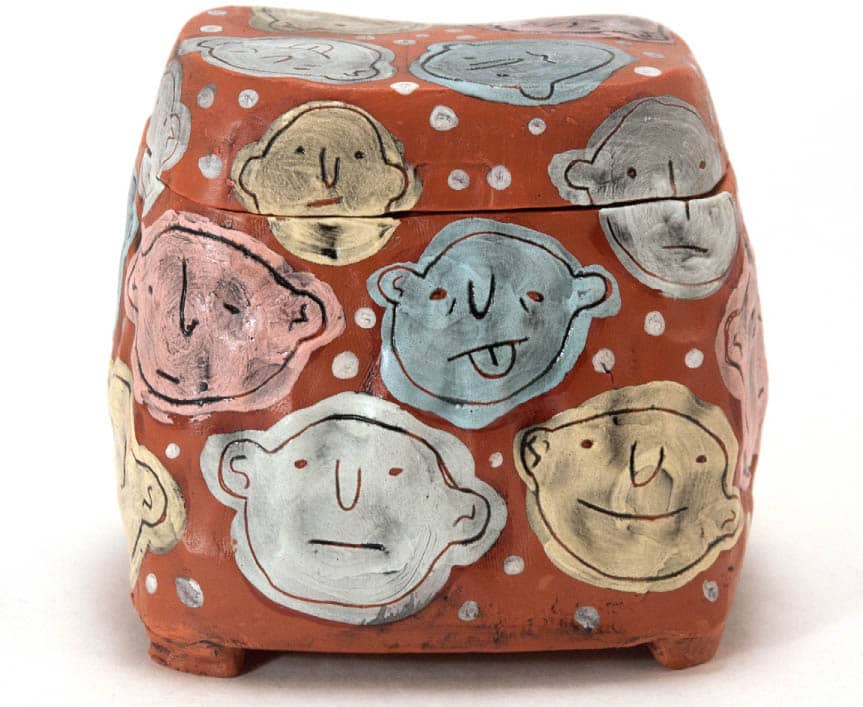
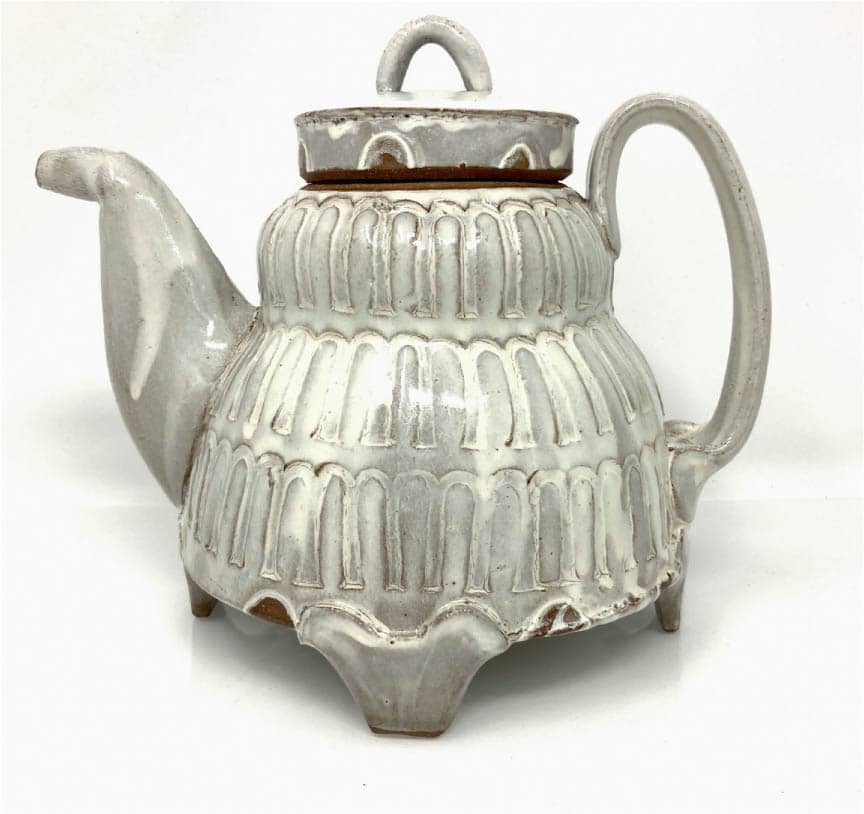
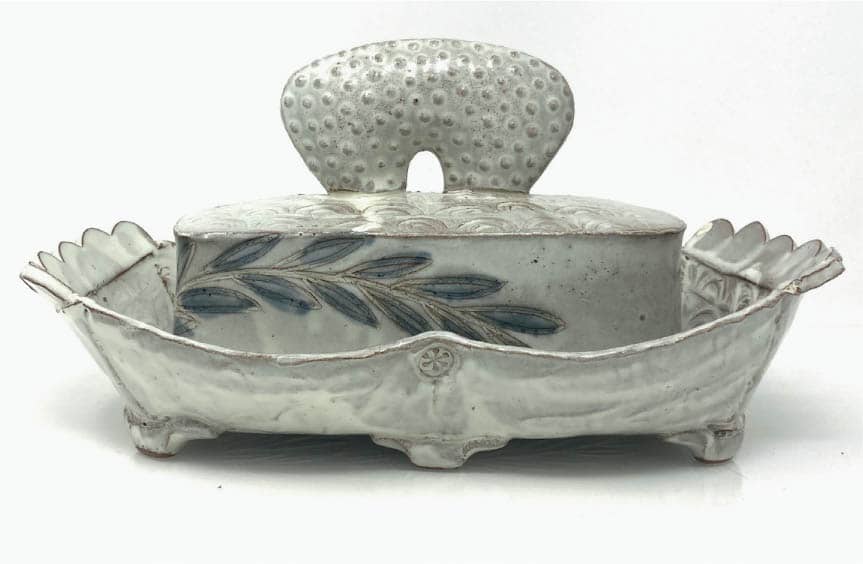
Rebecca Zweibel,Boat. Photo Courtesy of the Artist Liz Vukelich,Scoop, slab built. Photo Courtesy of the Artist Liz Zlot Summerfield,Butter Dish, slab built. Photo Courtesy of the Artist Lynne Hobaica,Three Headed Vase, coil built. Photo Courtesy of the Artist Adrienne Eliades,Butter Box, slab built. Photo Courtesy of the Artist Sarah Pike,Pike Pots on a Table, slab built and stamped. Photo Courtesy of the Artist Alyce Carrier,Mitten, coil built. Photo Courtesy of the Artist Sandra Apperloo,Vases, slab built. Photo Courtesy of the Artist Catie Miller,Boat Tray, slab and pinch. Photo Courtesy of the Artist Brittany Mojo,Vessel, coil built. Photo Courtesy of the Artist and The Pit, Los Angeles. Photograph by Jeff McLane. Maria Baleva,Soap Dishes, slab built. Photo Courtesy of the Artist Adero Willard,Embodiments. Photo Courtesy of the Artist Laura Casas,Pet Fish Dream, coil built. Photo Courtesy of the Artist Kelsie Rudolph,Vessels, pinch and slab. Photo Courtesy of the Artist Brian Jones,Candleholder, slab built. Photo Courtesy of the Artist Jasika Nicole,Egg Carton, slab and pinched. Photo Courtesy of the Artist Didem Mert,Bling Collage Butter Get Some, slab and coil built. Photo Courtesy of the Artist Laura Casas,Face Box, coil built. Photo Courtesy of the Artist Jennifer Allen,Teapot, slab built. Photo Courtesy of the Artist Jennifer Allen,Butter Dish, slab built. Photo Courtesy of the ArtistGALLERY