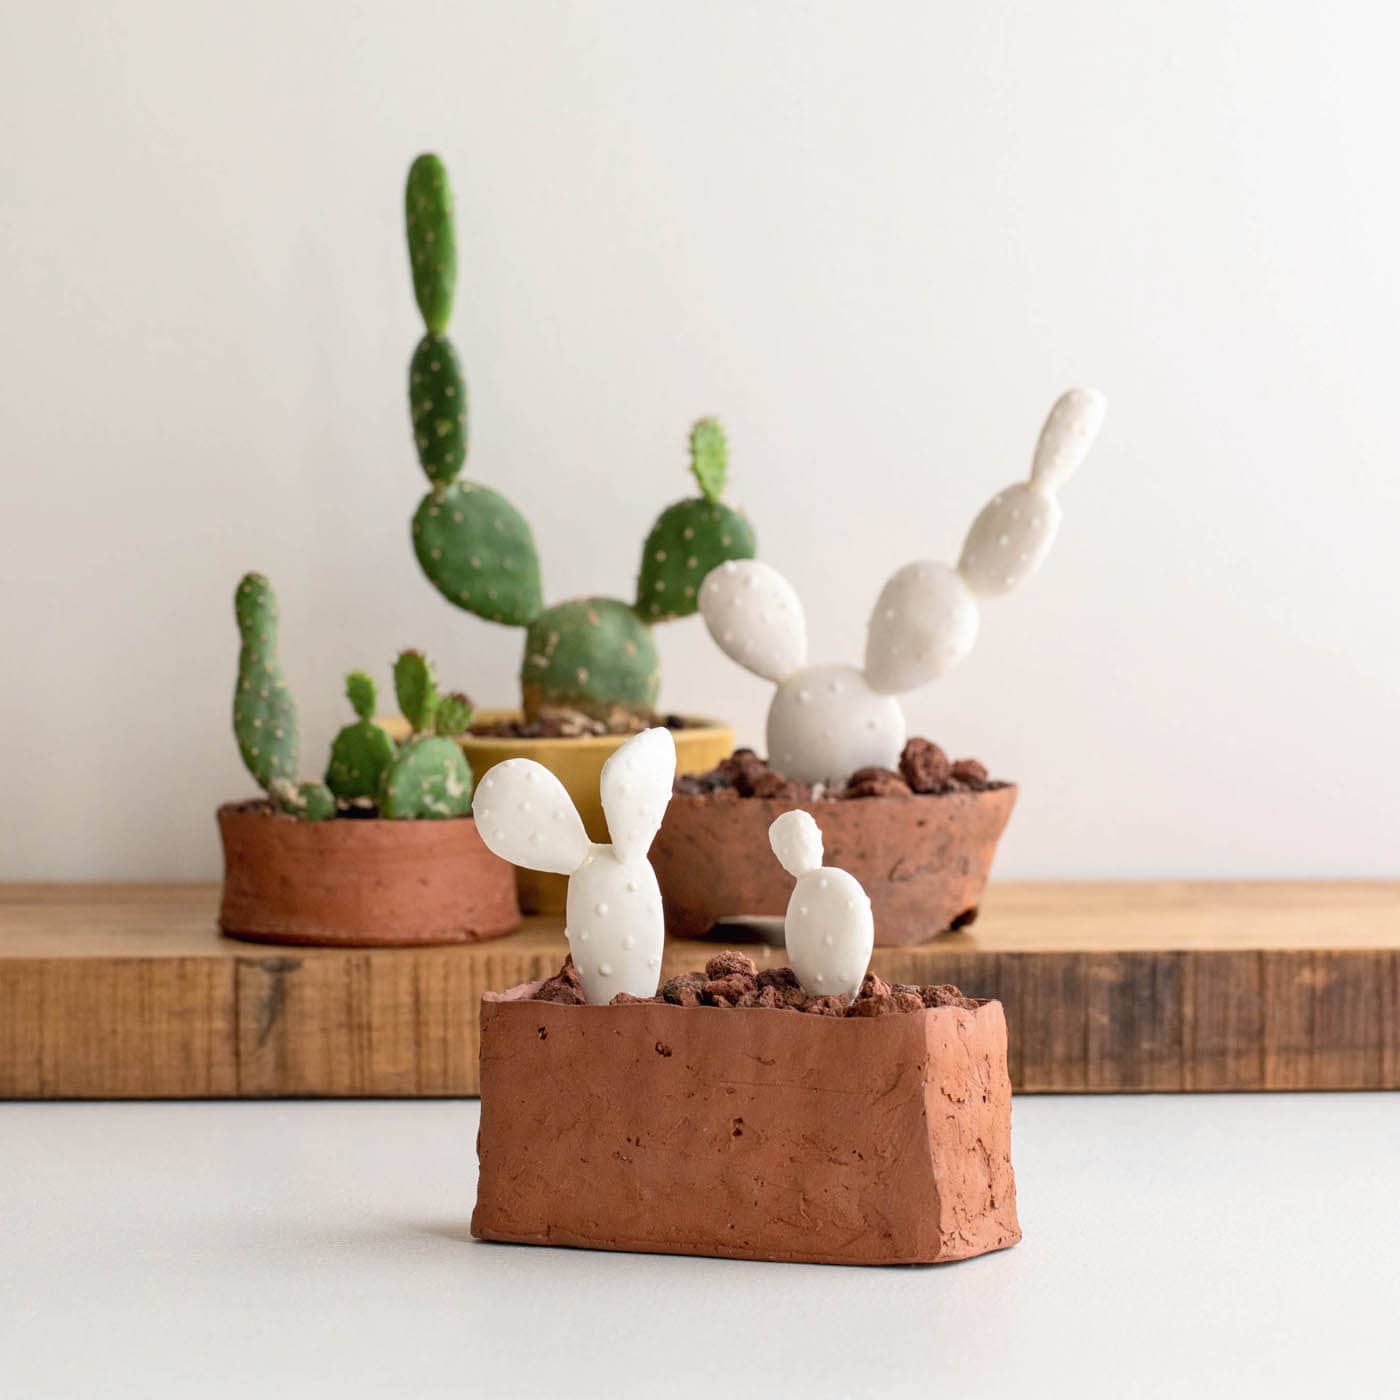
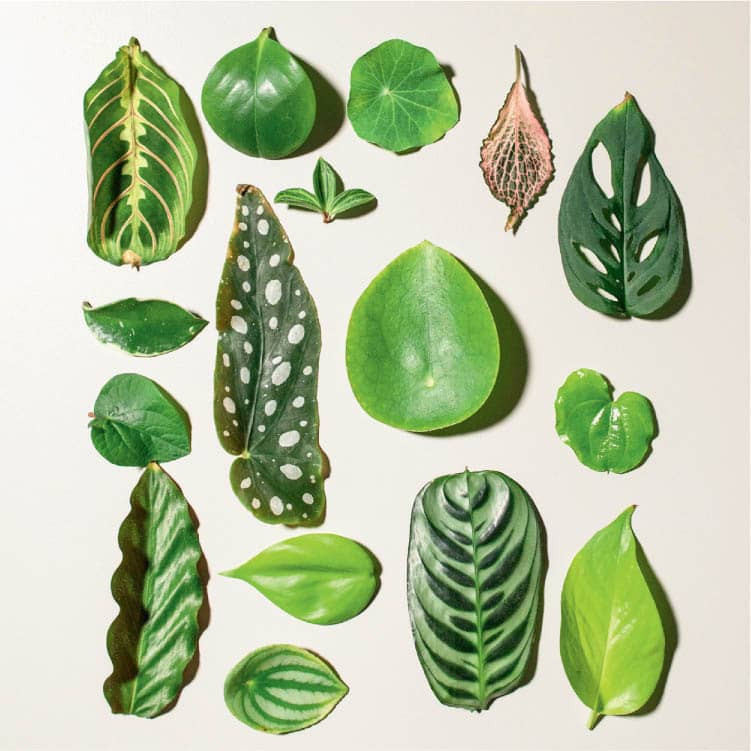
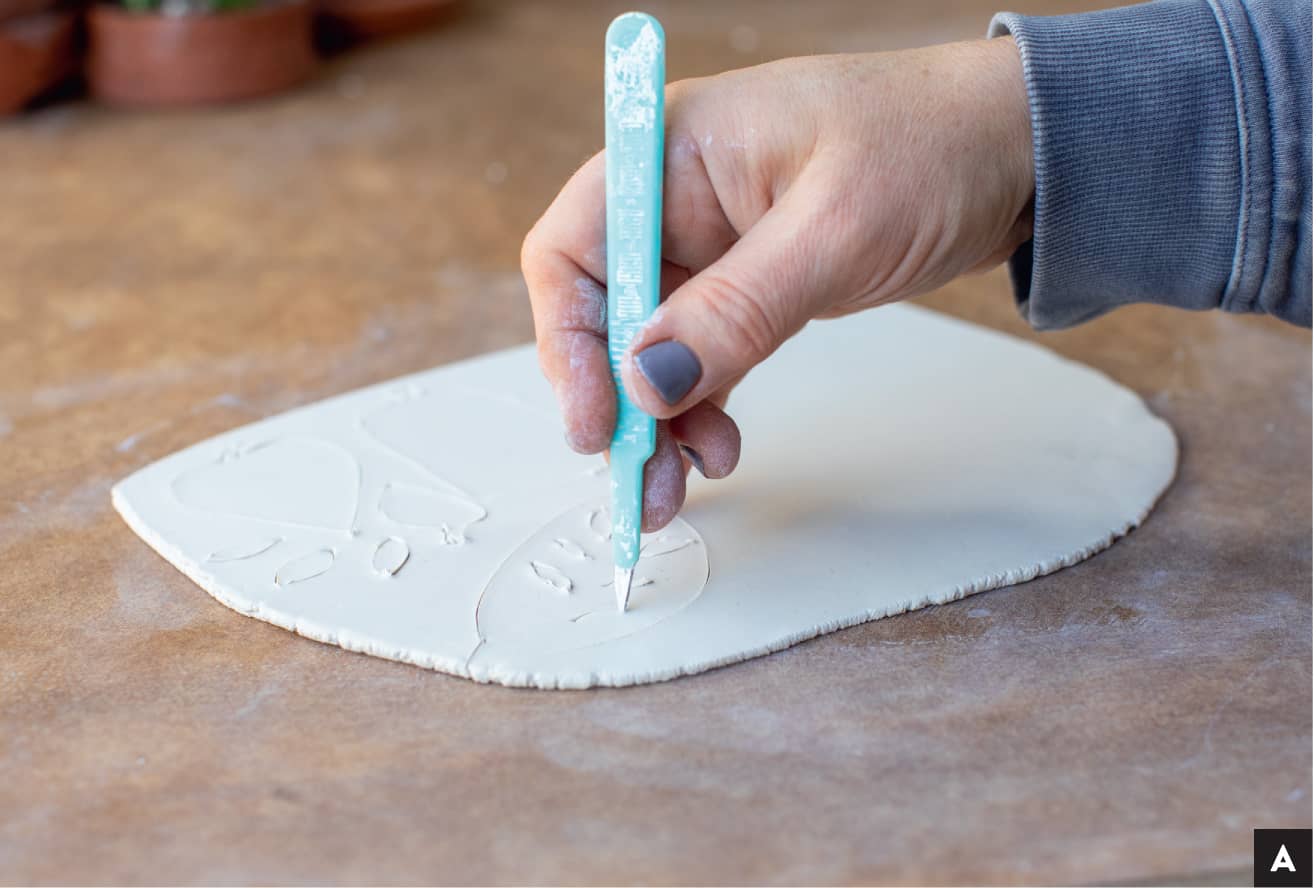
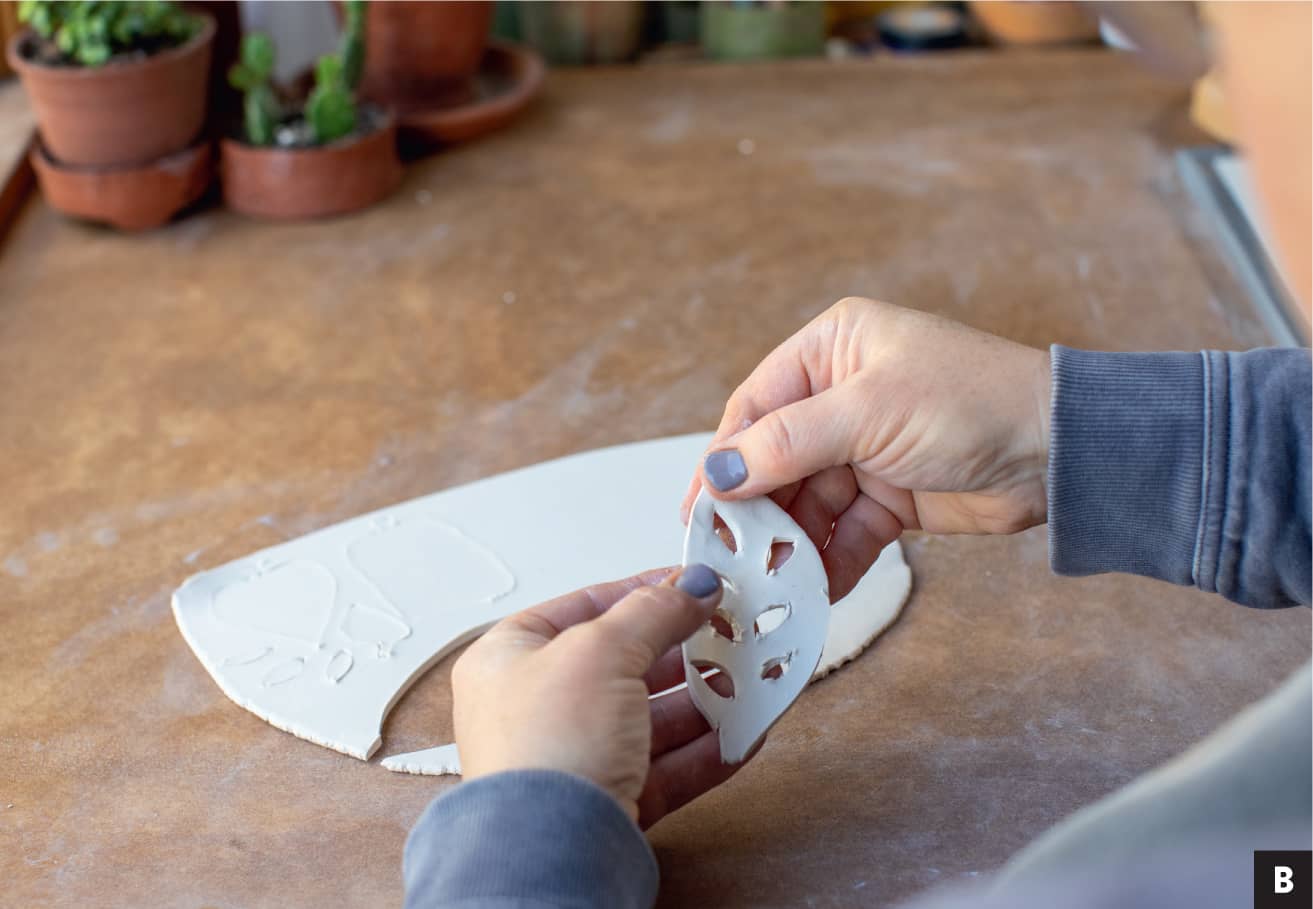
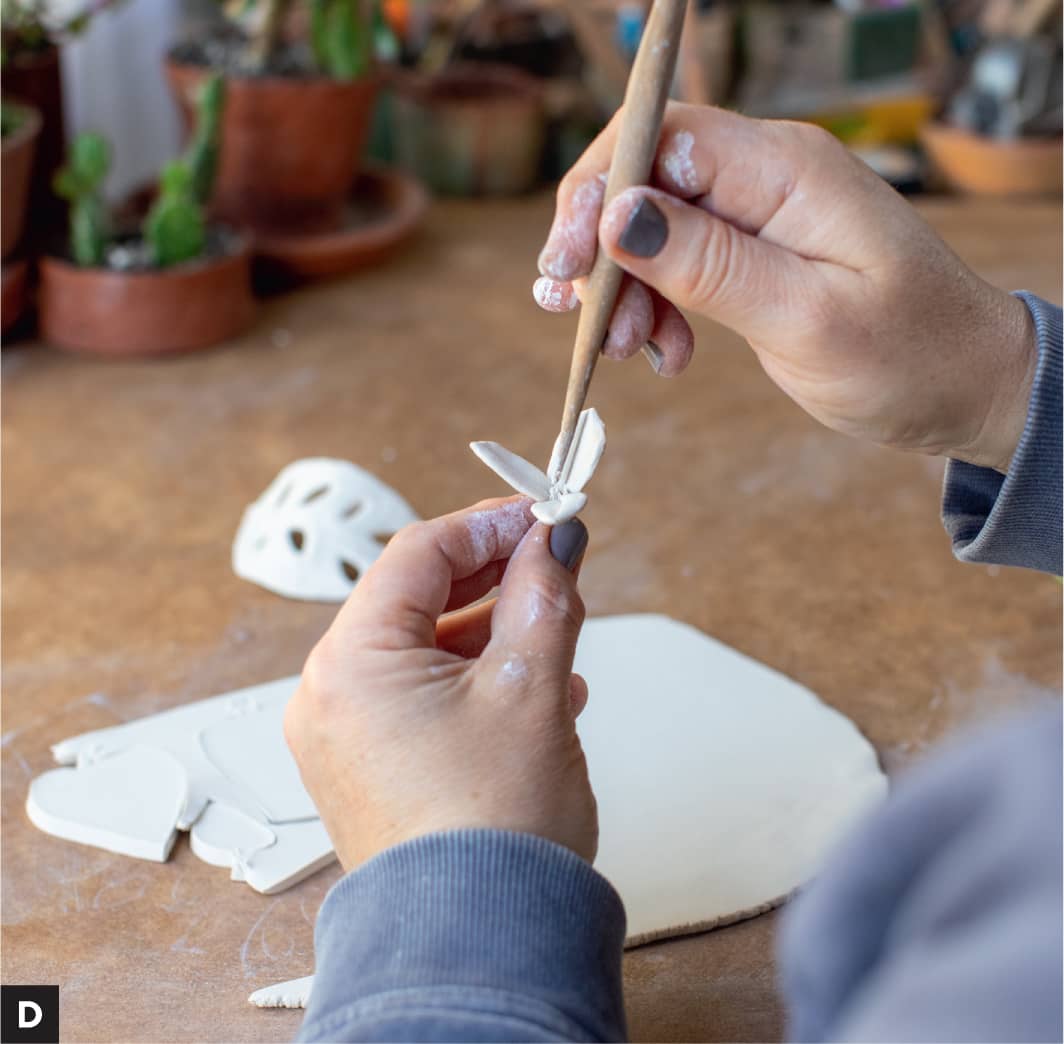
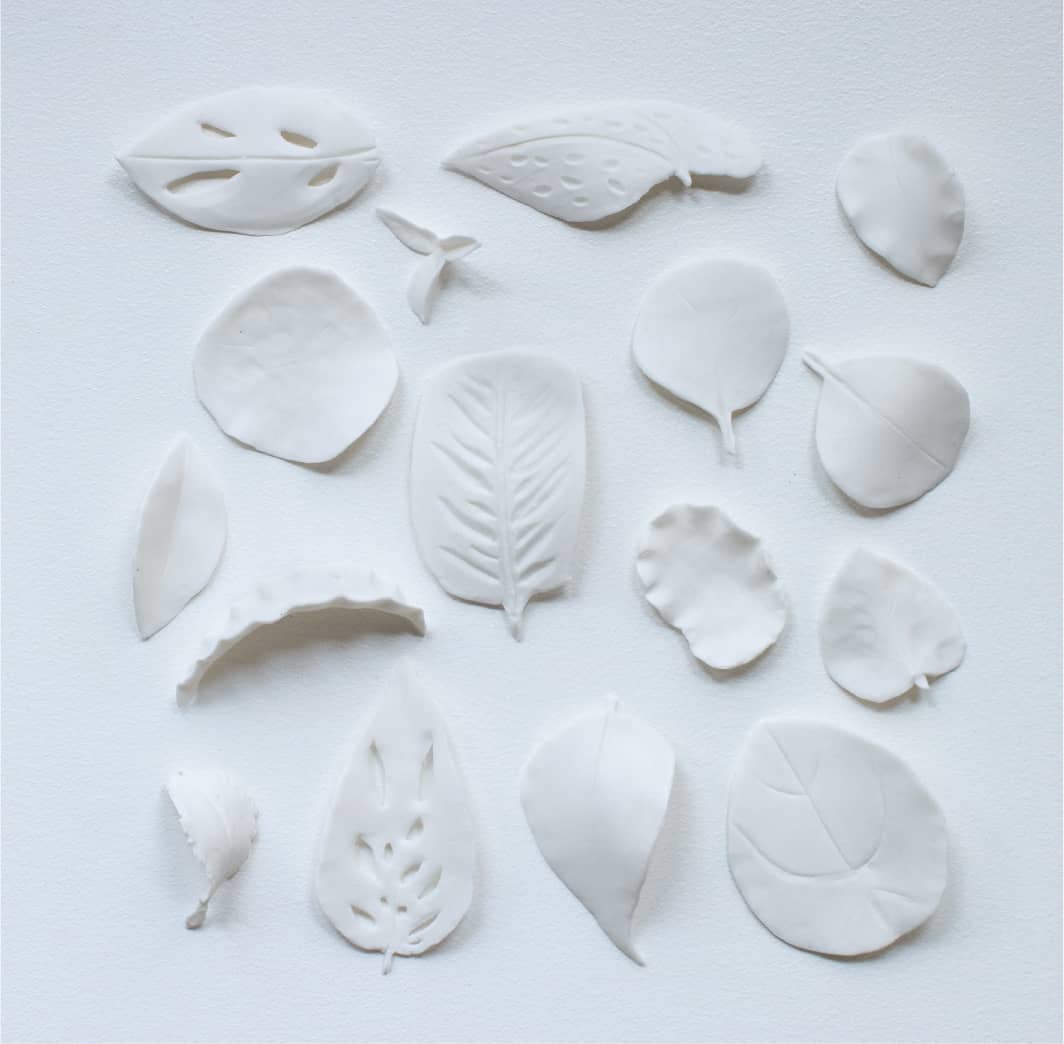
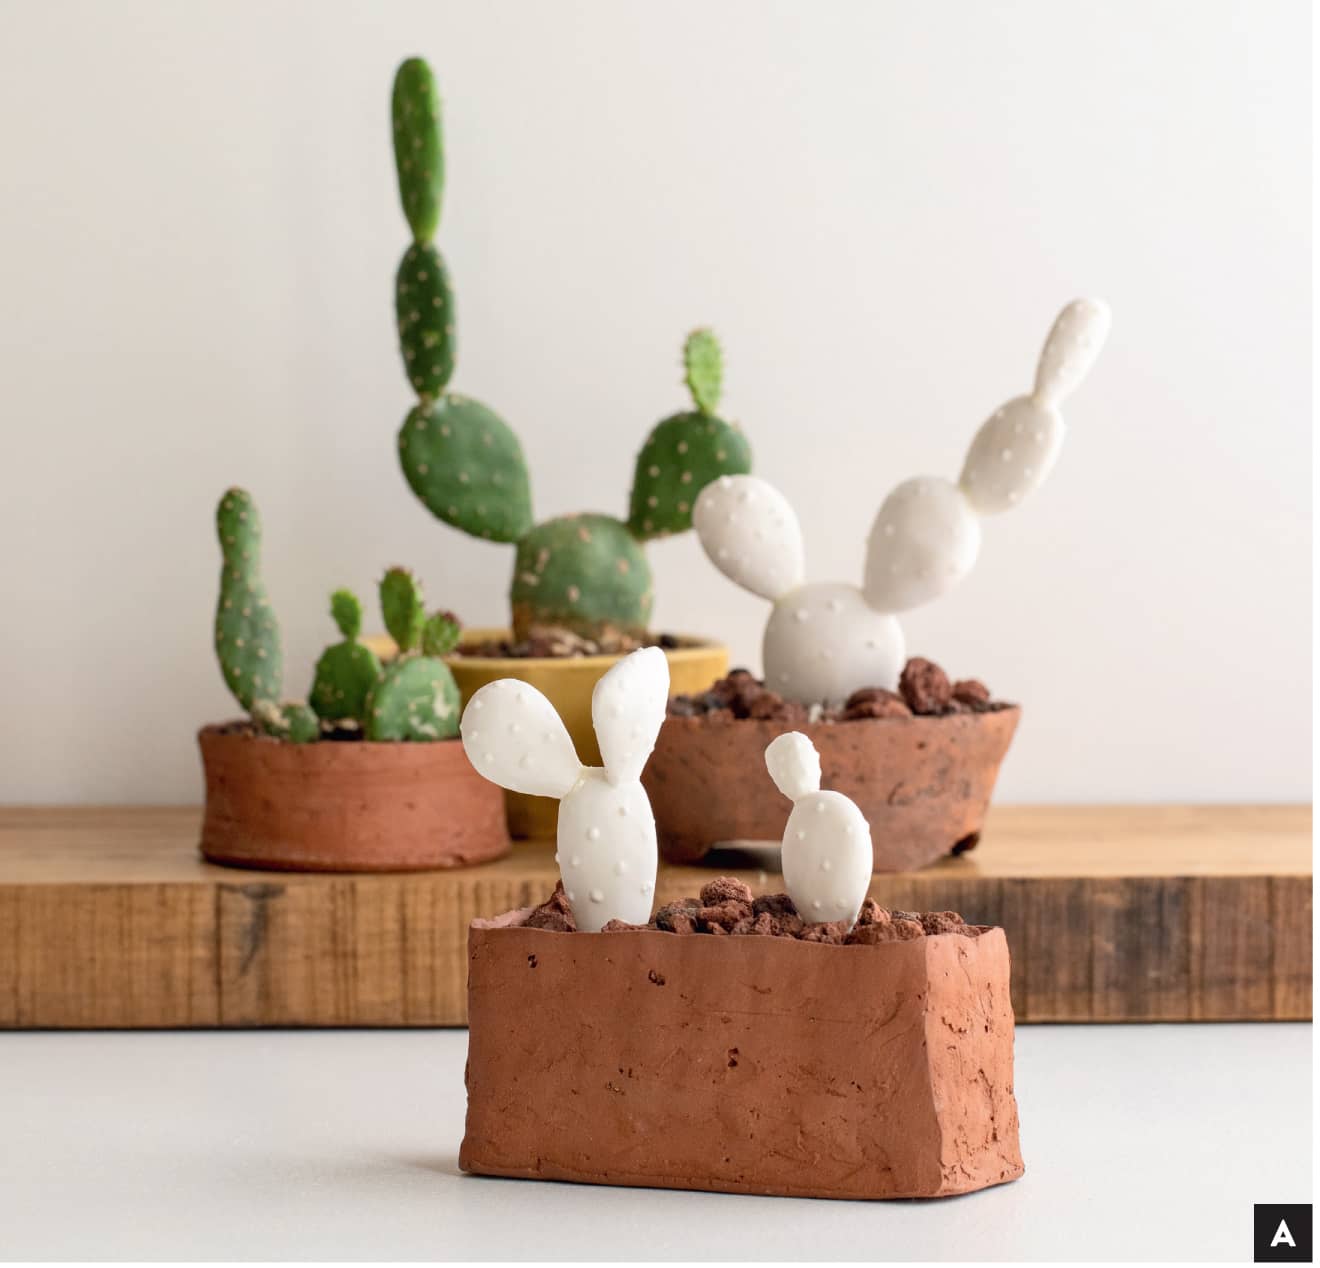
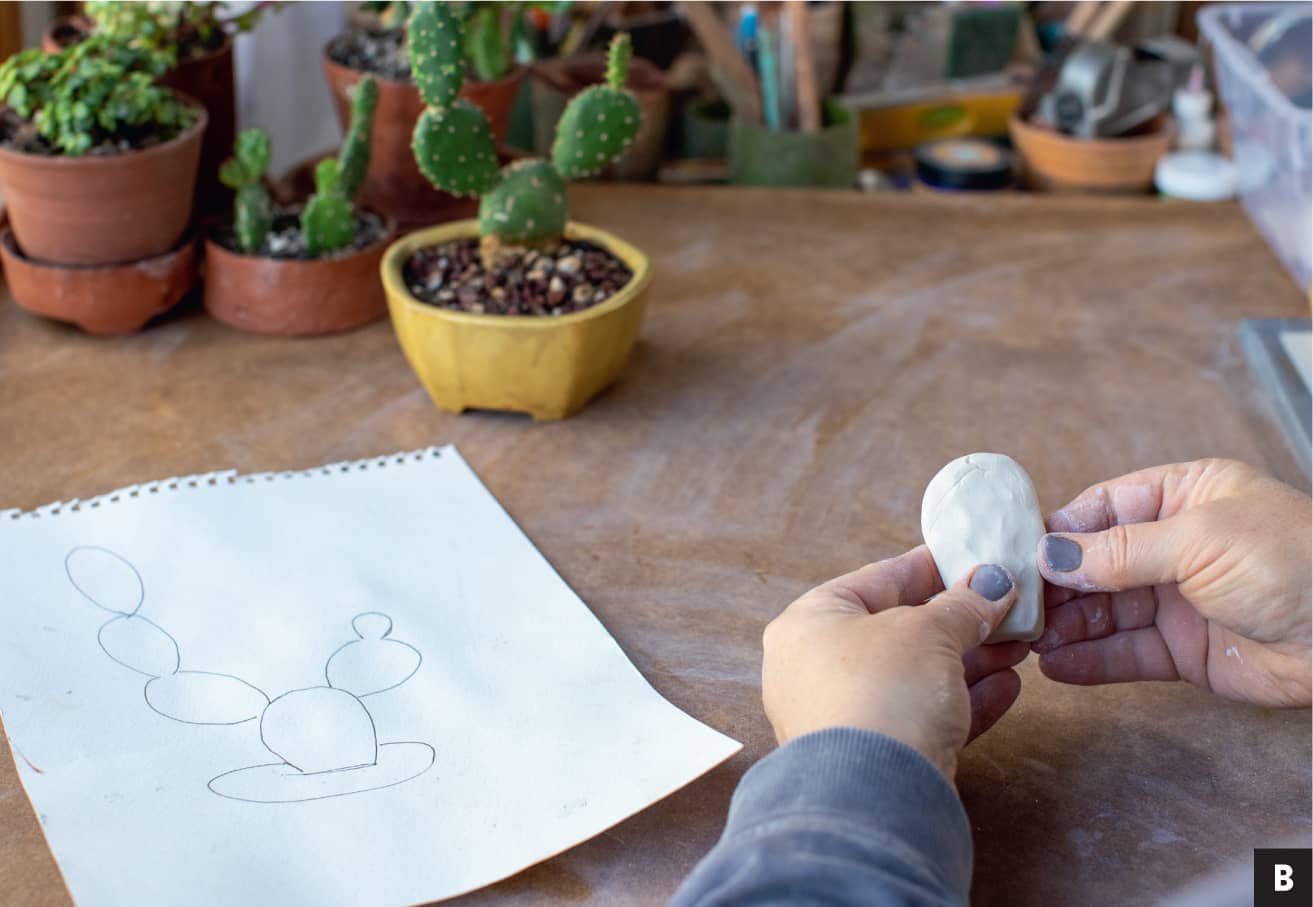
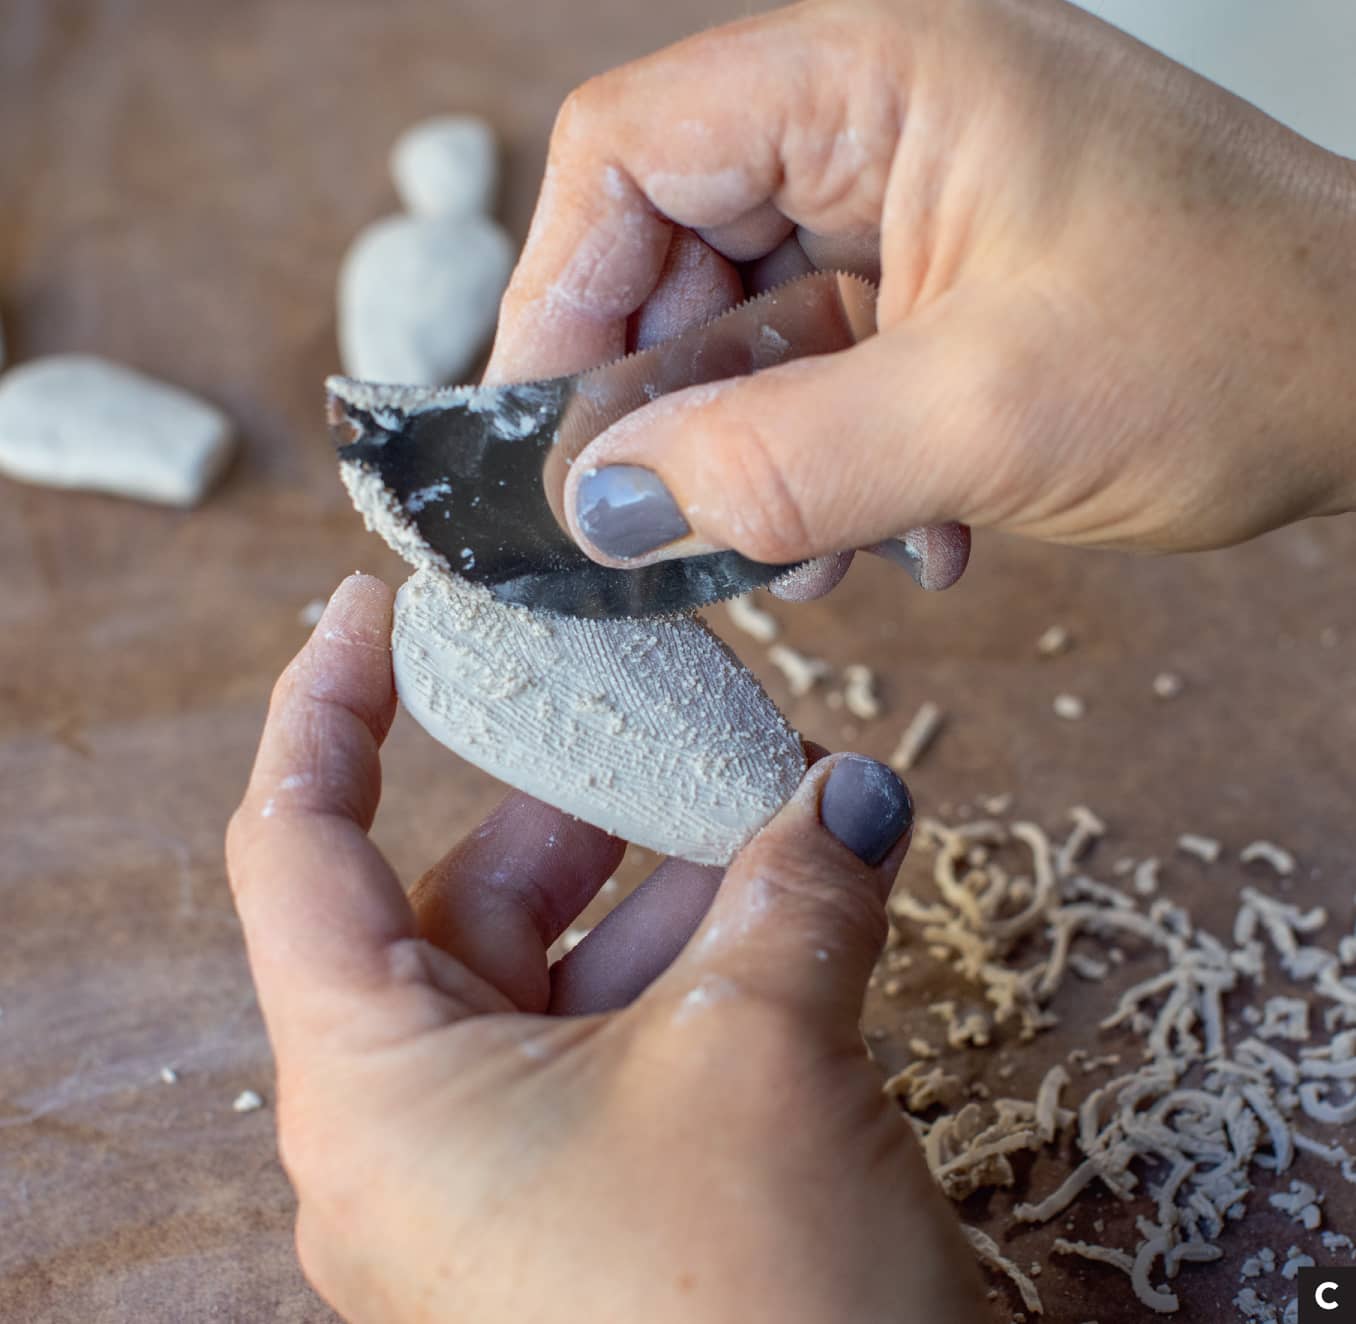
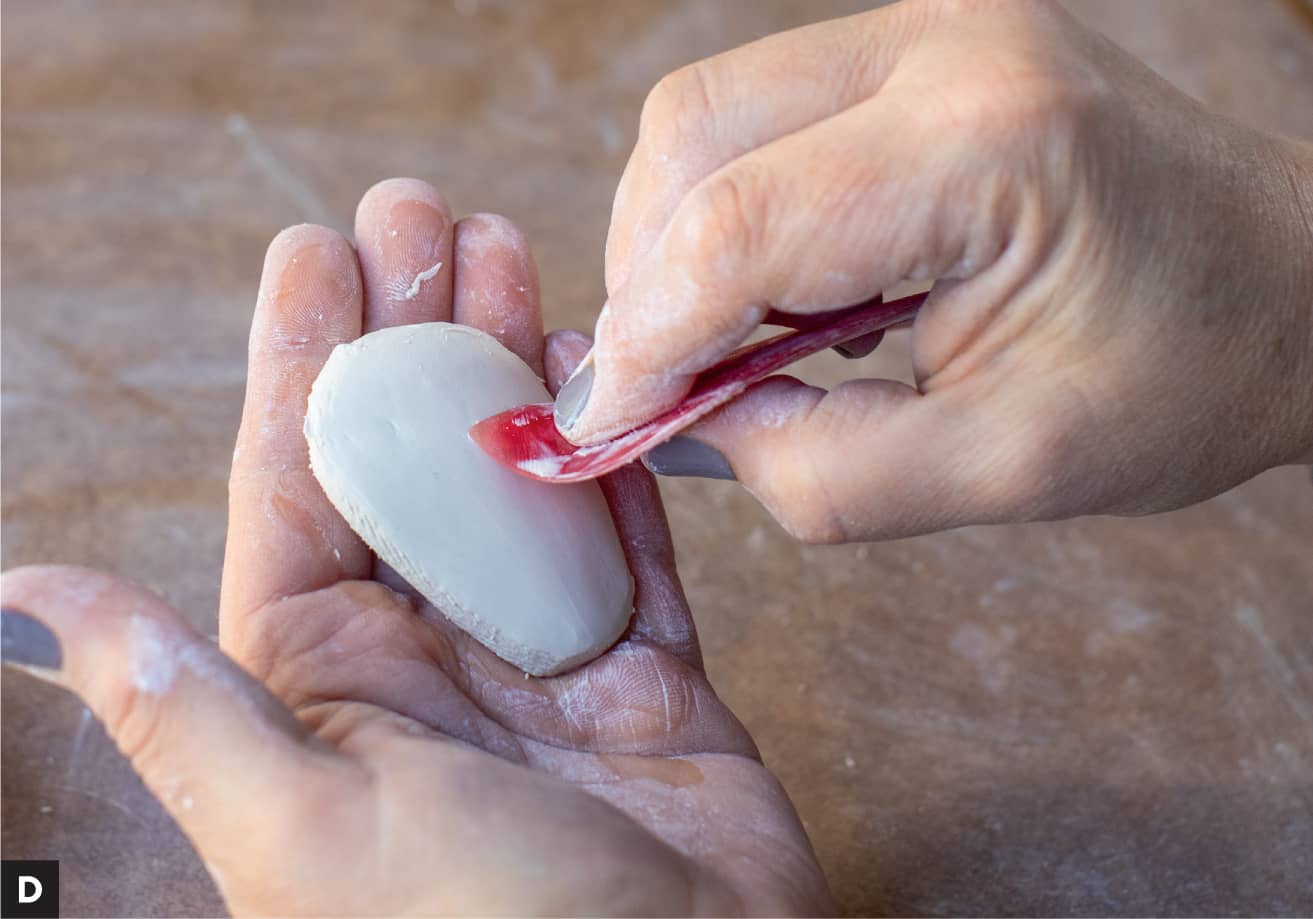
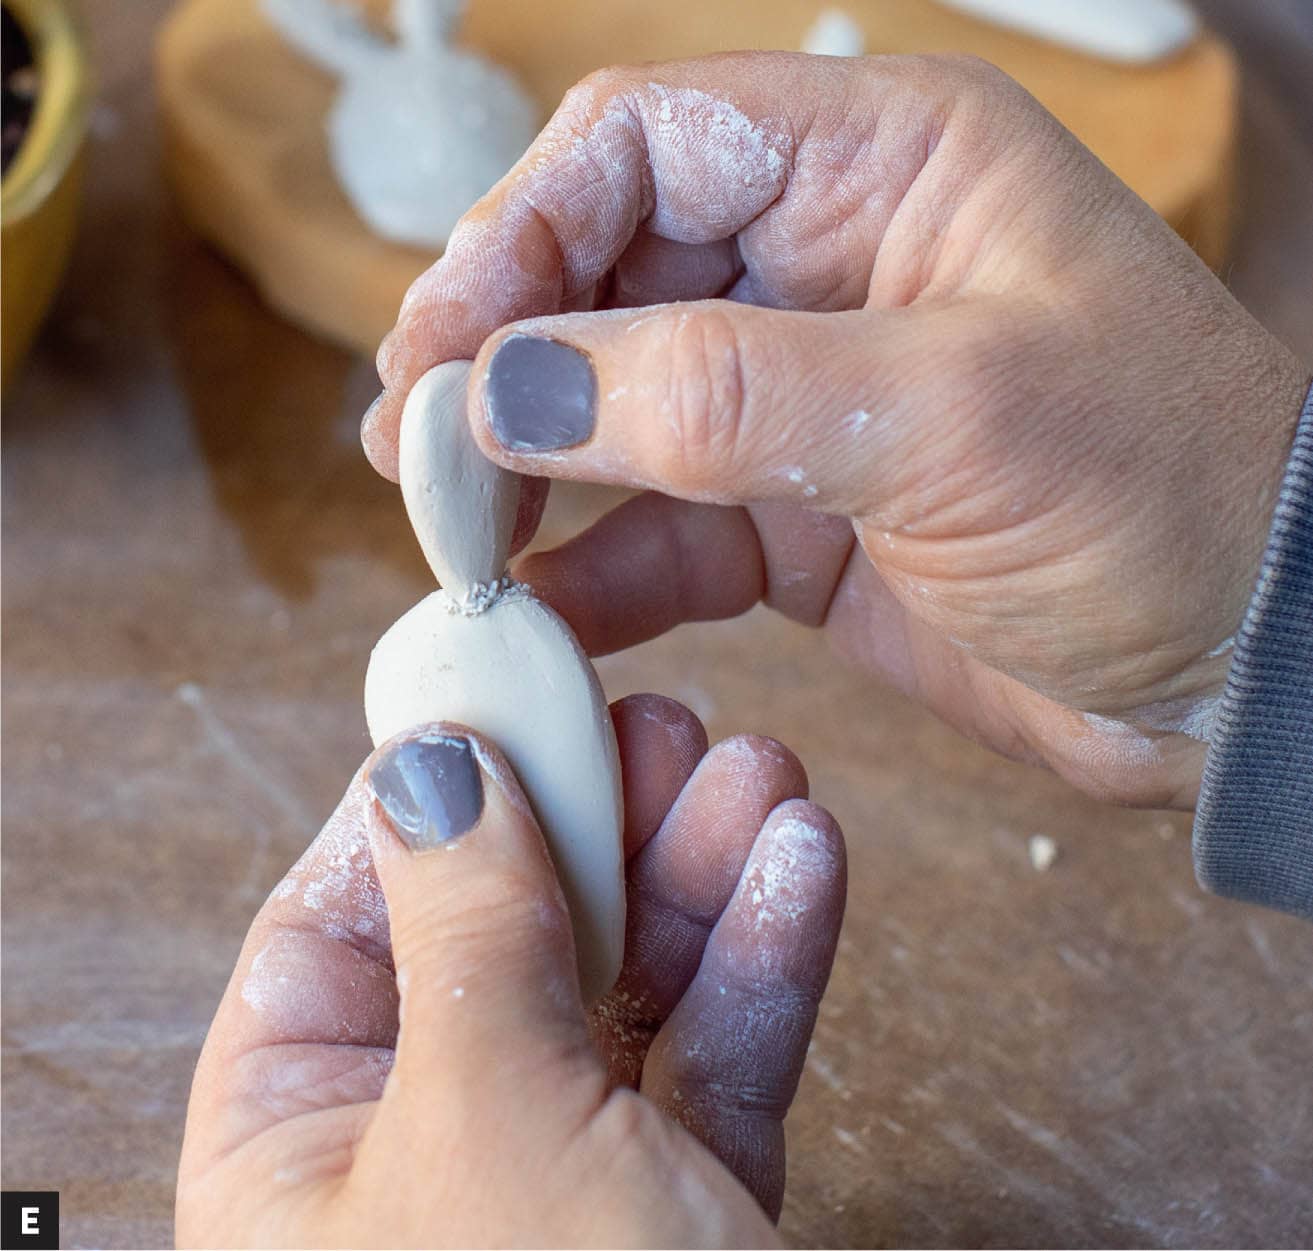
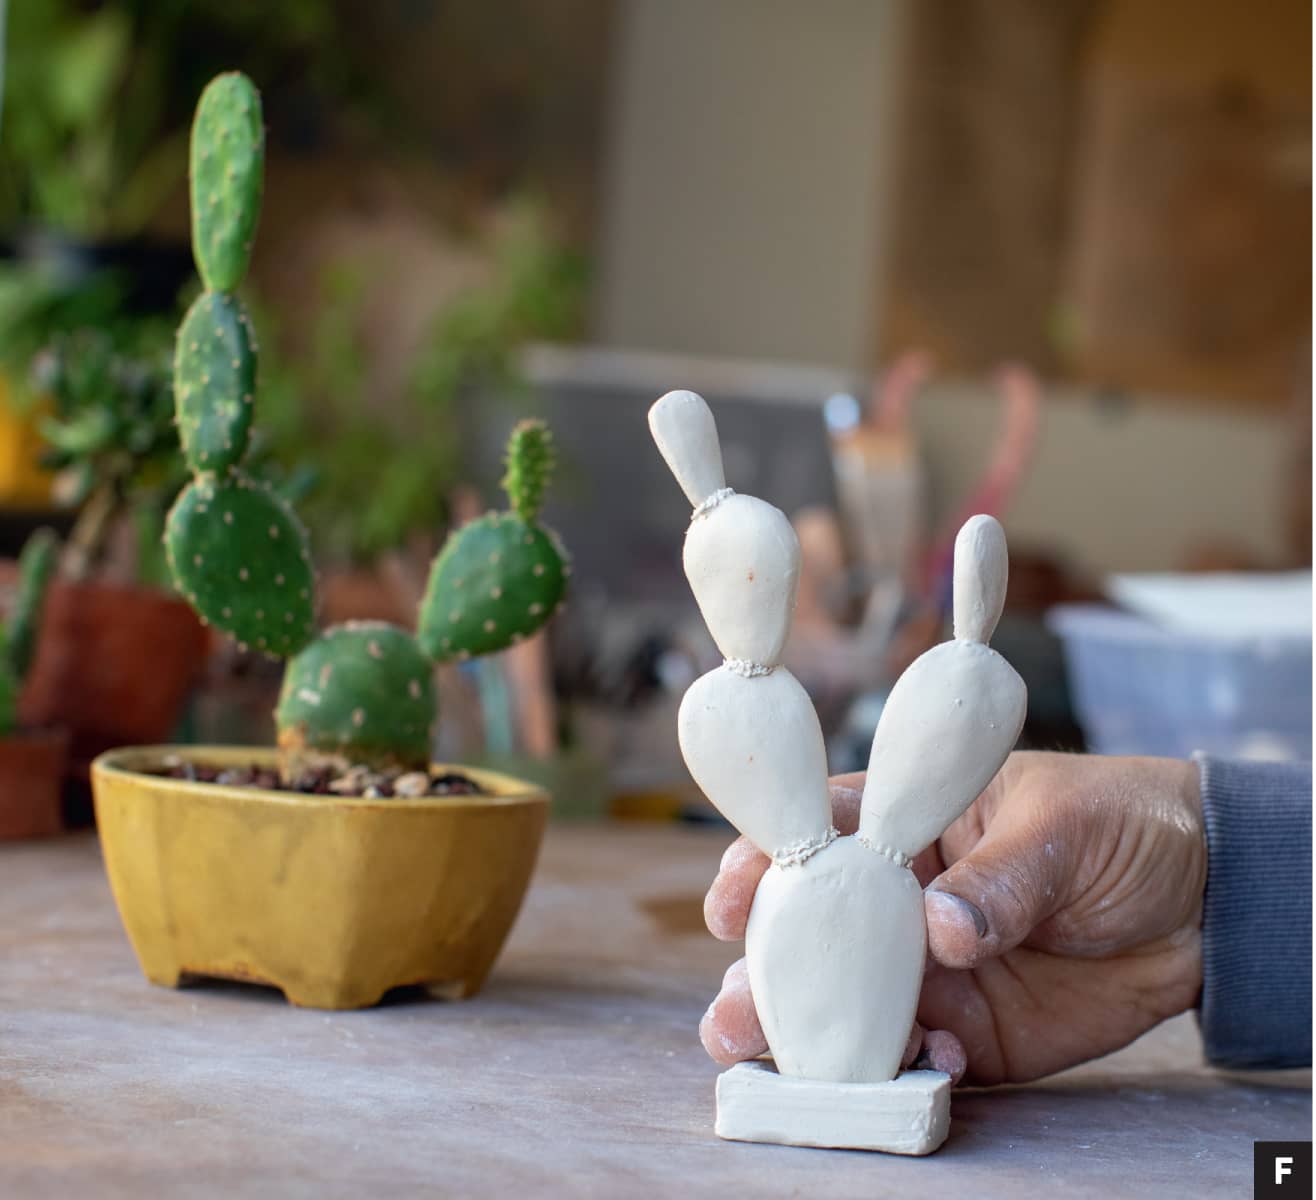
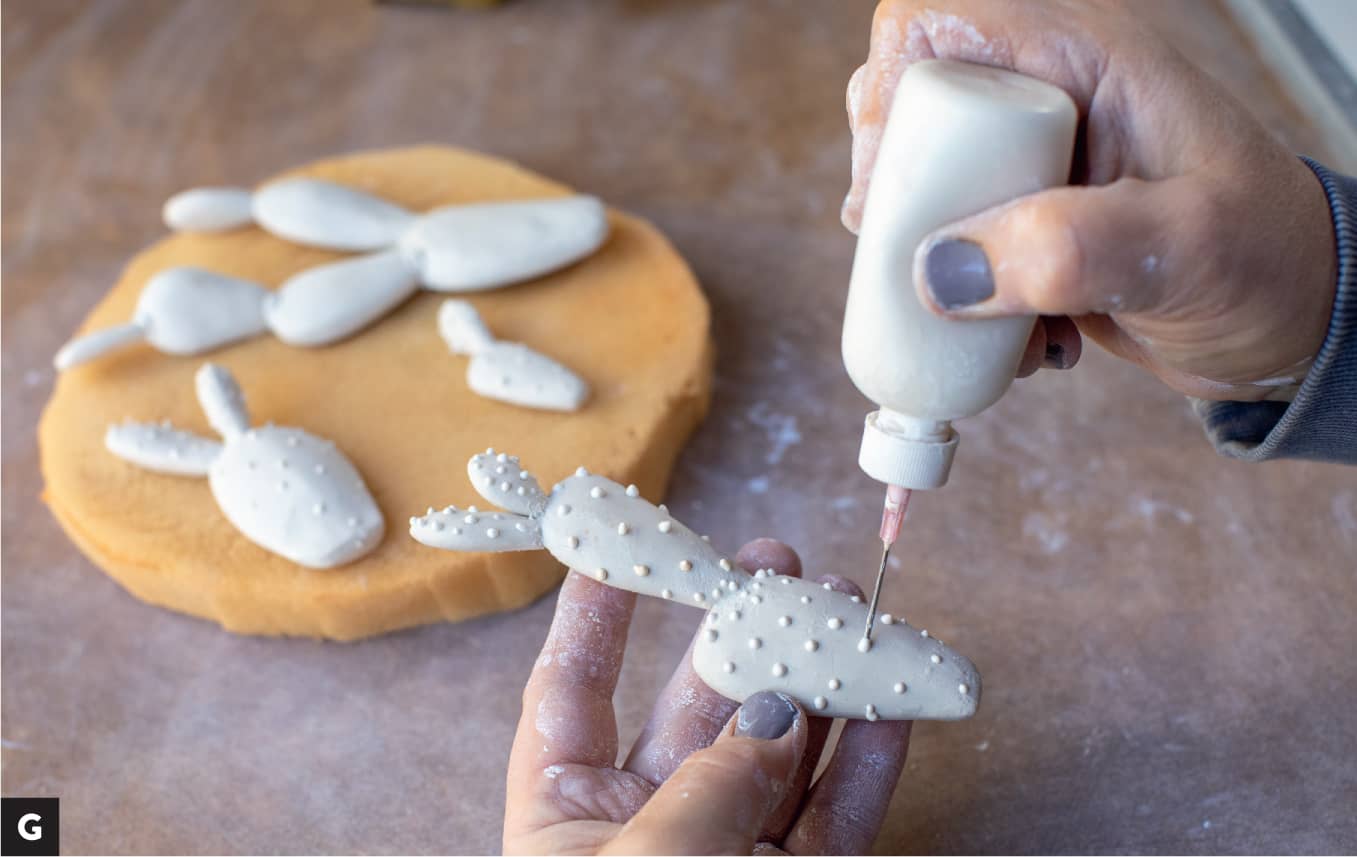
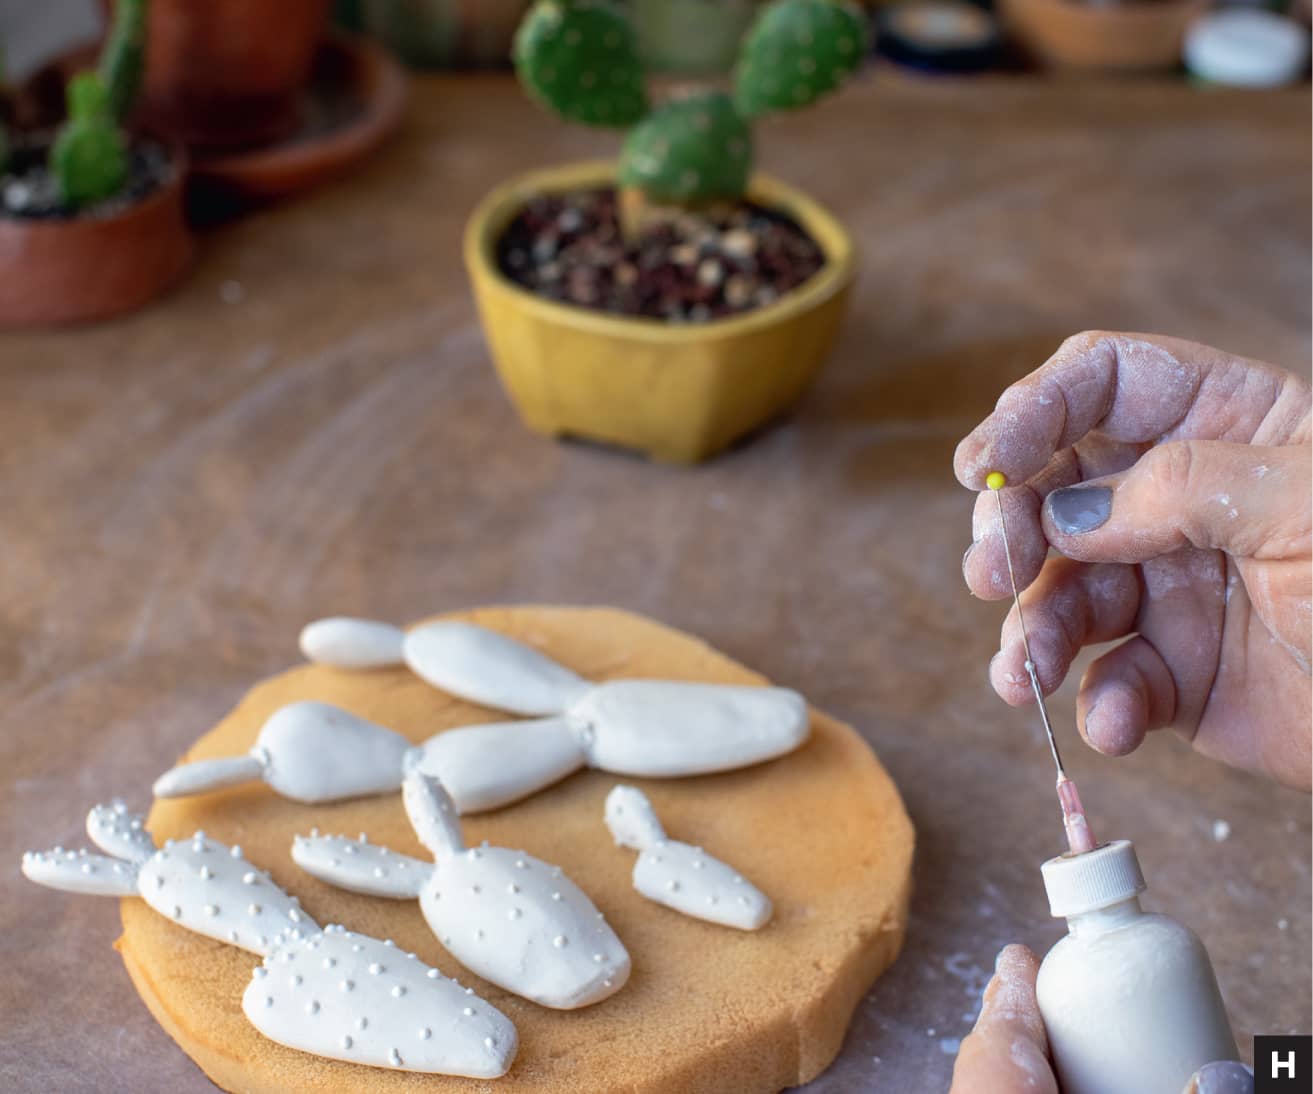
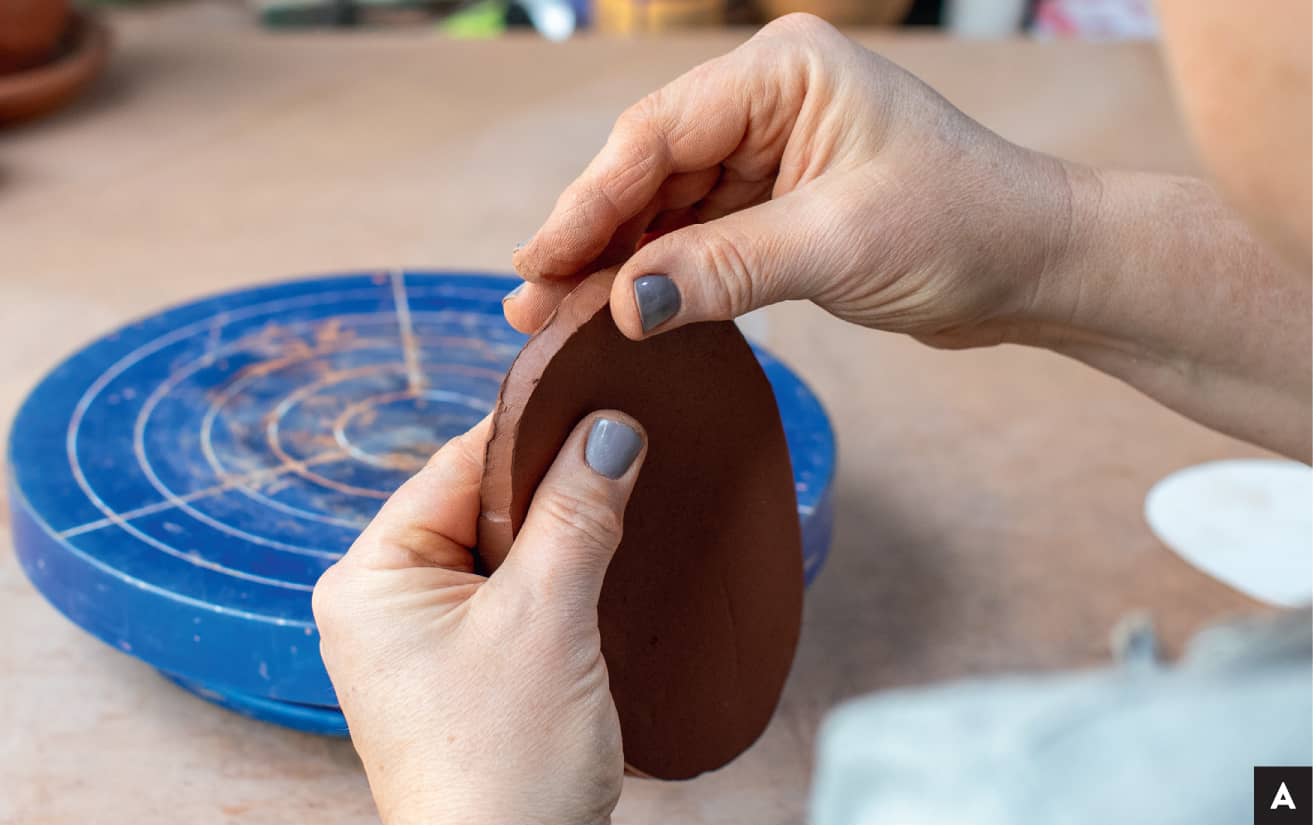
CONE 5, raw porcelain clay, with added black mason stain NoteThe clay for this project is a cone 5 porcelain that fires bone white. For some variation you can add mason stain to the clay to develop different colored clay. (Start with small percentages of stain and do some test firings.) Make a quick template from your own research. NOTESome projects have traceable templates starting on this page. However, for this project, the purpose of a template is to create a representation of a leaf shape you would like to replicate. Creating a template is important, more so than tracing a leaf or drawing one freehand on the clay, because you can re-use the template if you like the results. (Make sure to write the name of the leaf on the template if that is important to you.) Roll a small slab of clay to less than ¼" (.63 cm) thick, and using a needle tool or scalpel, cut out five to ten shapes, tracing along the template to get started. [A] Pull the excess clay up off your working surface and place it back in your bag for another project. Using your fingertips, begin to shape your leaf. Leave the center thicker and taper toward the edge. For this leaf, you want the edge to be papery thin. If you are struggling to get the desired shape, you might have too much clay; a couple options are to cut away the excess or roll the slab again a bit thinner this time, recut the shapes, and start again. Working with thin clay takes some practice. Go slowly and work in stages. [B] Once you have the initial shape roughed out, work on the finer details. This is where some more tools and your reference images come into play. Use a hard-edged tool such as a stiff plastic rib or old credit card to crease and define the spine of the leaf. [C] Now let that the form rest and set up. Repeat the process until you have at least five leaves to this stage. Now work on refinement. The details are where the beauty of the delicate little petals/leaves come to life. When the forms have set up (medium leather hard), start to make some detail marks. Explore the whole range of minimal decoration to extravagance and see where you are pleased with the results. [D] NOTEUse an assortment of tools: needle tool, mechanical pencil, soft rubber modeling tool, or ribs. Try them all—find what works for you. Some will feel clumsy or leave marks that are too deep, some will feel right in your hand, and others may need some practice using. Your touch will determine which tool will work for this project and your developing skill level. Spend some time defining the marks you sketched out. This process is slow and steady—use the reference images regularly and take breaks if the clay needs to set up to be easier to work on. Through this process you will find a range of dryness or temperatures that you are comfortable working in. Sometimes you need to work with clay that is too soft or too hard to know where your range of workability lies. I recommend placing your working pieces on a soft piece of foam draped under plastic—this will prevent any marks from getting on the hard surface, and the draped plastic will prevent from the work from drying too quickly. NOTEThese thin little leaves will dry out very quickly and in a bone-dry state will be very easy to break. Look over the pieces and clean up any burrs or last details. You might be wondering “What do I do with these?” or “Is that it?” Yes, that is it for the moment. This project is about you working with your hands and developing your eye for details, seeing something and then trying to replicate it. Explore your environment—what sparks your interest? You now have a general idea of what is possible with just a little clay and a couple of tools. Make as many as you want. I’ll be saving mine to incorporate into another project in this section. (Hint: You may be interested in checking out the Wall Tile project on this page!) CONE 5, raw (or exposed) porcelain Think about the old books of illustrations that skillfully captured flora and fauna before we had cameras, the beautiful drawings of a single stem of a plant. That is what you are going to create in 3D. Again, focus on developing shape and texture with only the clay as your building and decorative material. We are not relying on glaze or other colored surface treatments to inform our audience what the object is. This project is designed to be part of a larger installation of a planter and simulated soil. [A] Referring to the reference images for this project, sketch out the general shapes with just a pencil and paper. [B] Don’t be scared: this is for you to have a generalized understanding of the scale, positioning, and shape of the pieces of the cactus form. Working with solid, roughed out shapes, use your drawing to get the shape and scale as close as you can. Remember you are working in 3D; these shapes have a weight and fullness about them. Let them set up to leather hard. Make a small slab base, ½" (1.3 cm) thick and roughly 2" (5 cm) across, with a hole cut in the center large enough to allow the sculpture to rest inside the shape. This will be fired with the form and attached after the final firing using epoxy. Clean up your base. Once it is stiff enough to hold without bending, use a green scrubby to soften the edges. This part of the object will not be seen in the final presentation of the piece, but it is good practice to make sure all edges are “finished.” Shape the cactus pieces with a surform and a serrated rib and then smooth the surface with a soft red rib or even a little water on your finger. [C] [D] Now the fun part, putting it together. Be patient and put it together in stages. Attach the foundational (largest) segment to the next piece. You can work from a drawing or start holding up the pieces to see where you think they should attach. Remember that gravity exists and you need to work with it! Pick your placement of the next segment attachment. Score and prep both sides of the attachment points. Pick out small groupings to put together and let the attachments rest and firm up. [E] Then attach the groupings to the larger piece. Be sure and support the already attached segments. The attachment points are fragile and should be given time to set before cleaning and refining. Rest the objects horizontally on a piece of foam to let them come together. Once the sculpture is complete, drape plastic over it to allow the entire piece to come to the same temperature again, and then do your last refinements. [F] Use the reference images [G] to create the details on the surface of the cactus where the spines protrude from. Use a slip trailer or a fine tip brush and slip made of the same clay to make the marks. This method will require time to let the slip dry before you can manipulate the pieces. One side at a time. [H] NOTETo make slip using your clay, use the shaving or dried parts that have been taken away during this process and put them in a small, Tupperware-style container. Add a bit of water to reconstitute the clay into a soft slurry. If you don’t have a lot of shavings, take a bit of your clay from the bag and put it in the container and add some water and mix until it is liquid enough to use with a slip trailer. SLIP TRAILER: The name is somewhat self-explanatory, but it is a tool used primarily in applying slip decoration. Slips can be made in many different colors and are usually applied to leather hard work before the bisque firing.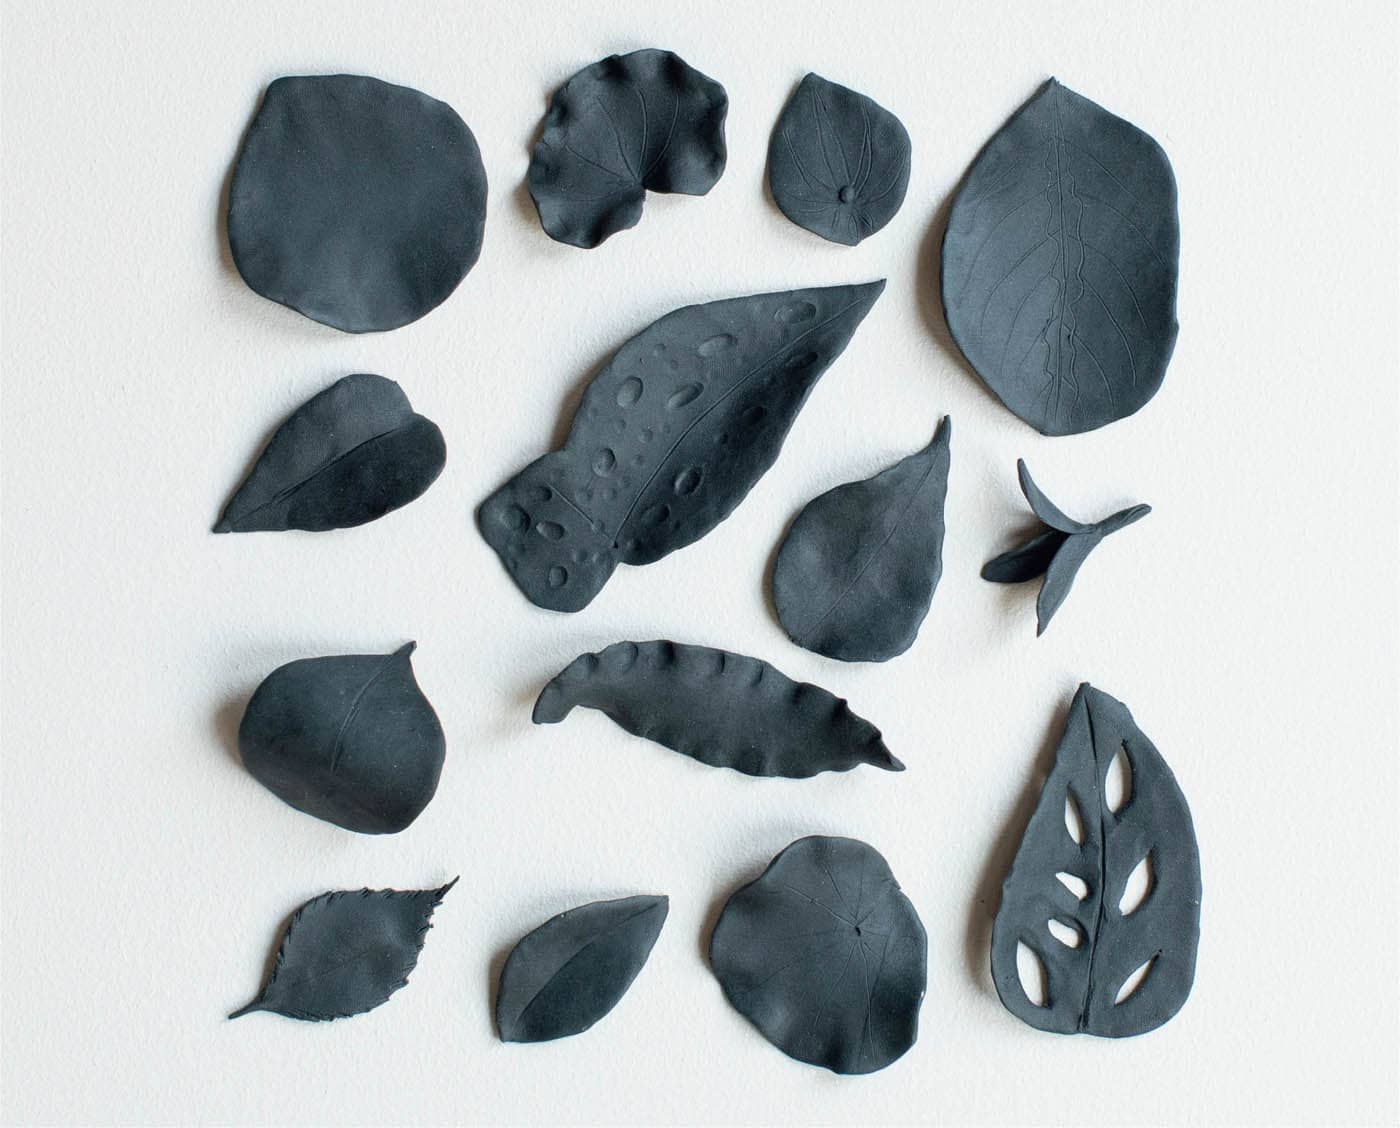
Part One: Leaf/Petal

Part 2: Specimen
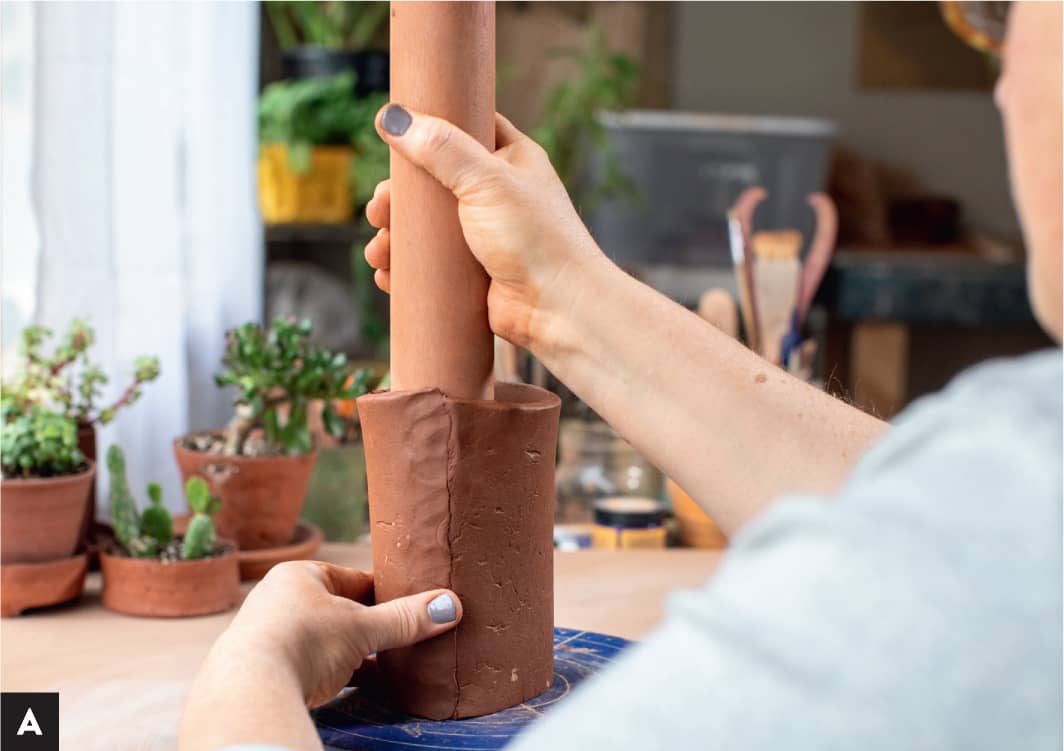
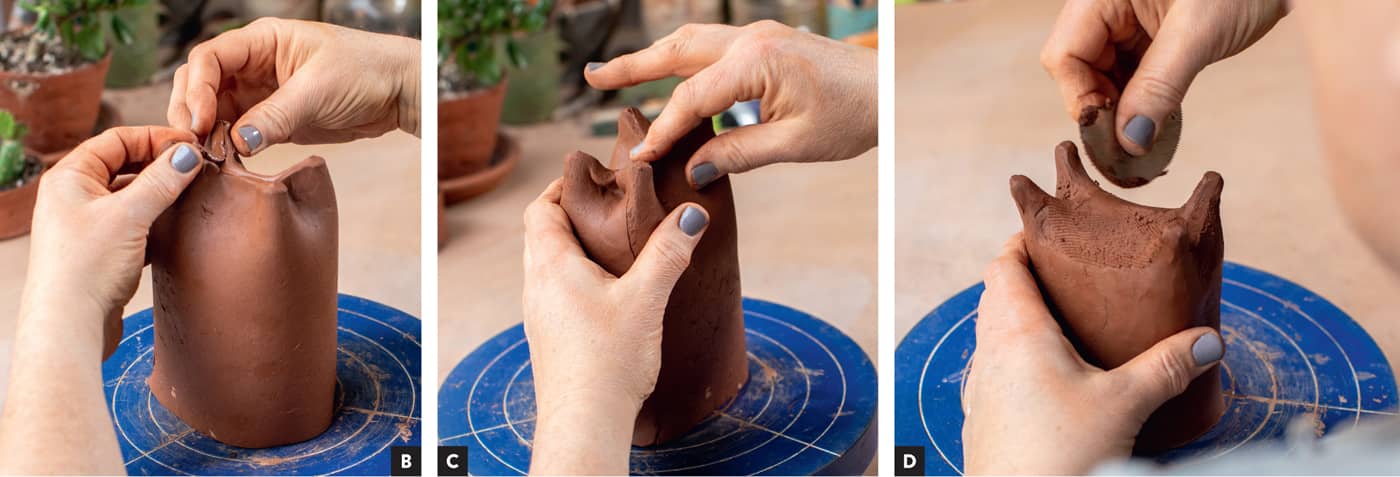
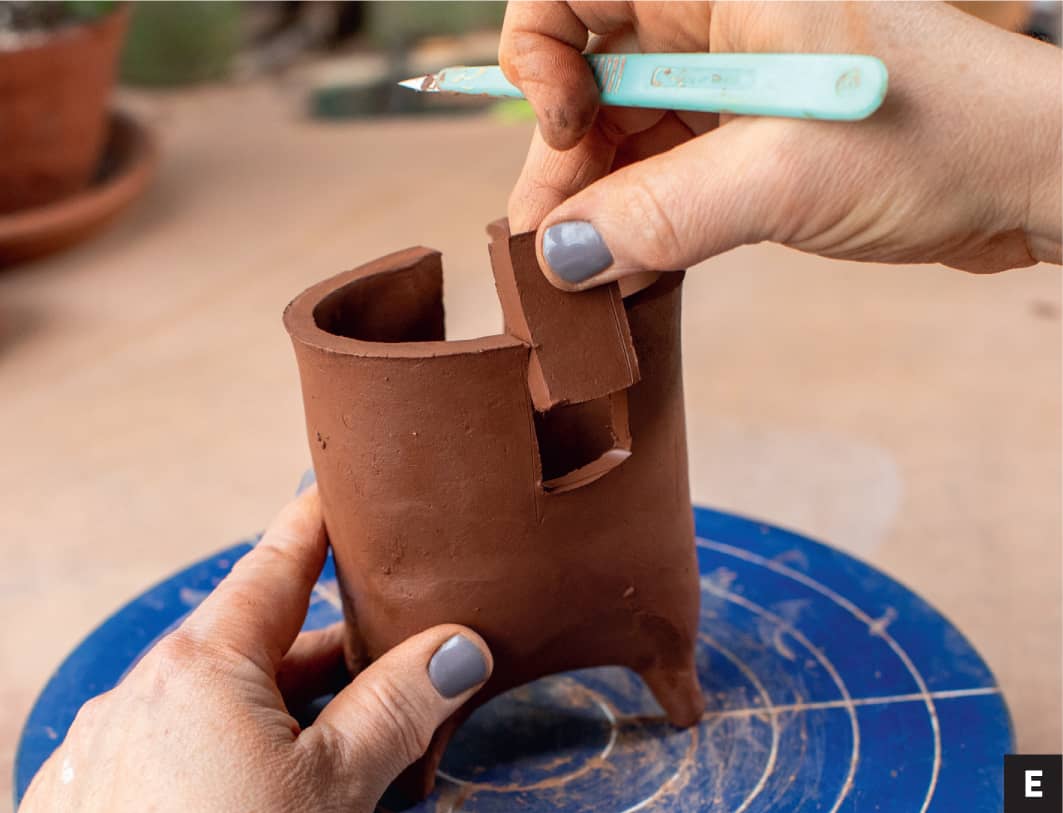
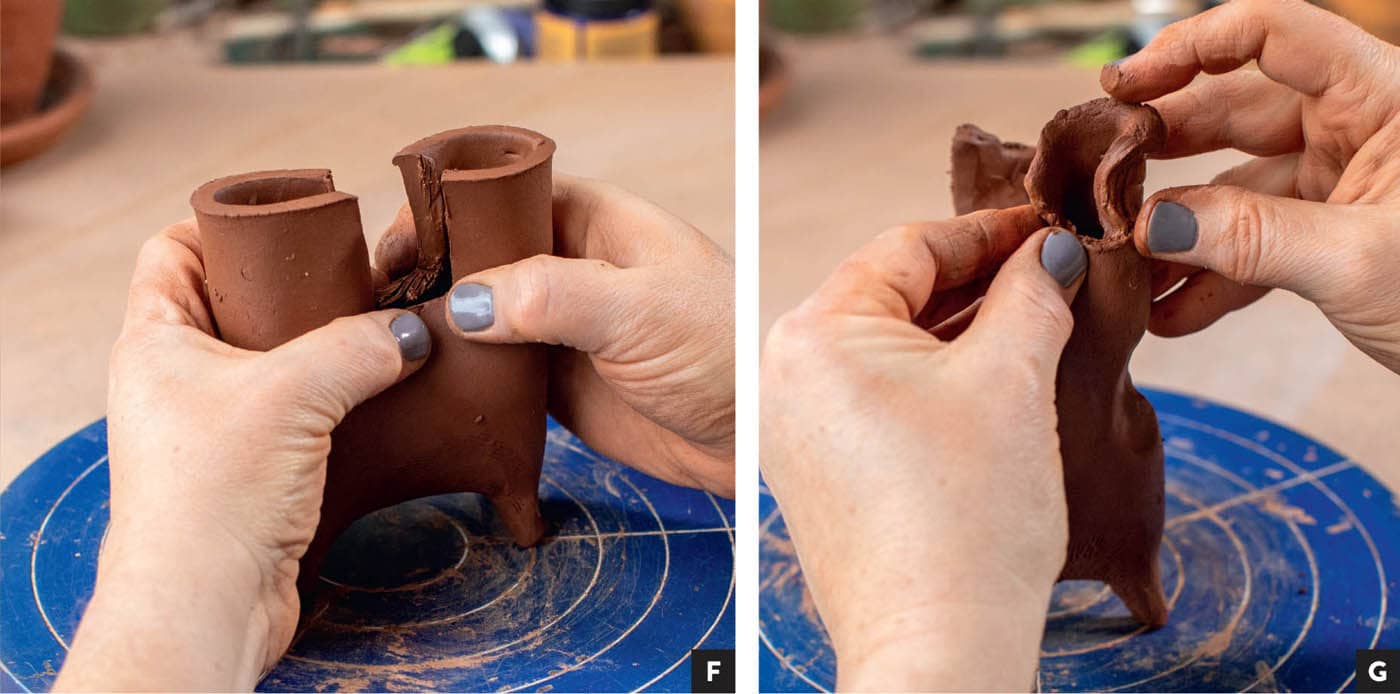
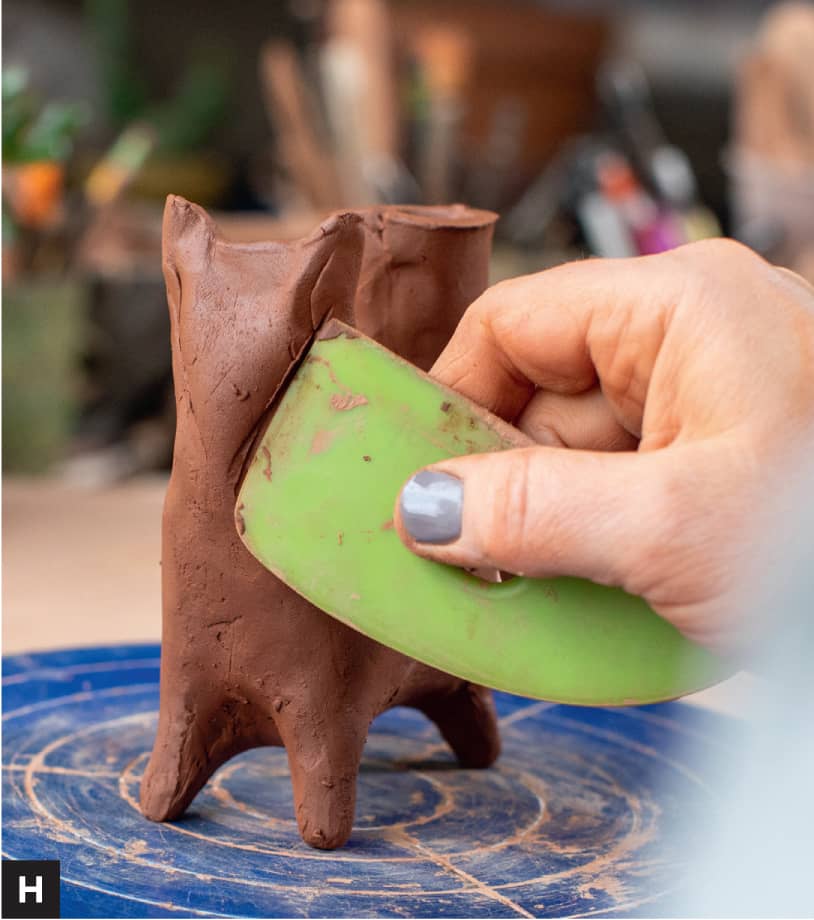
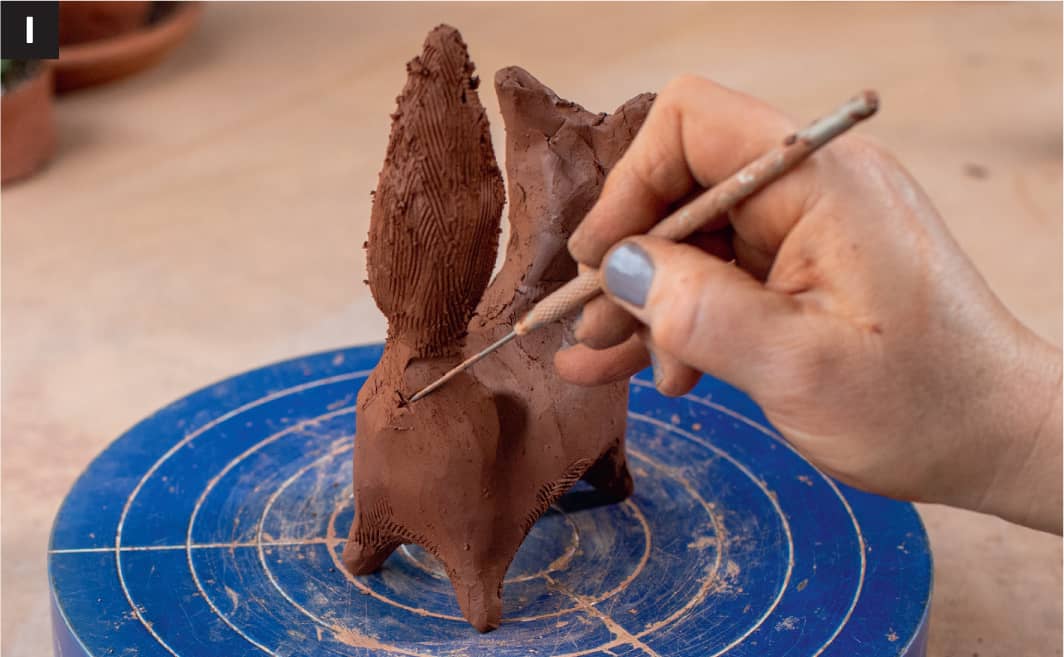
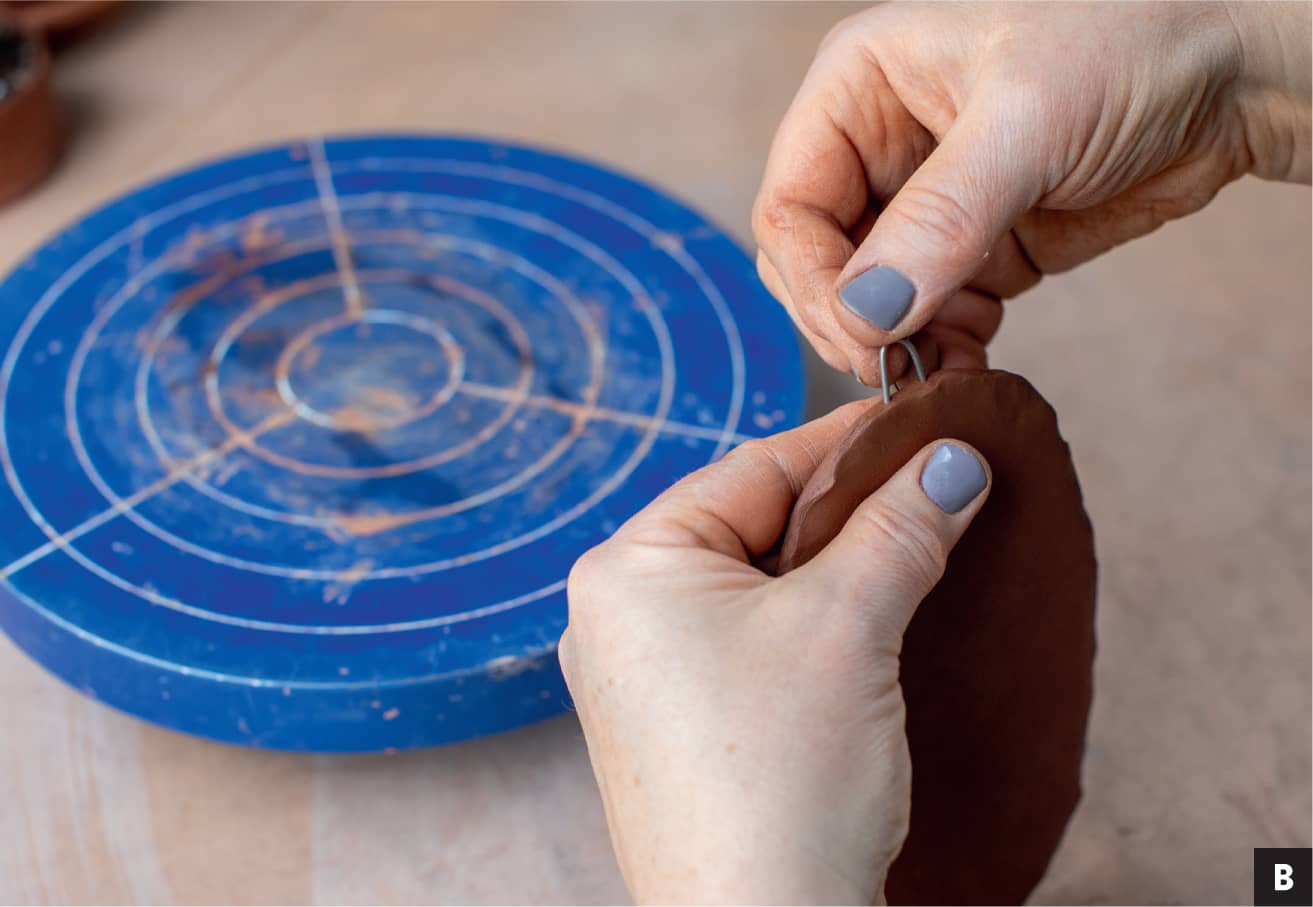
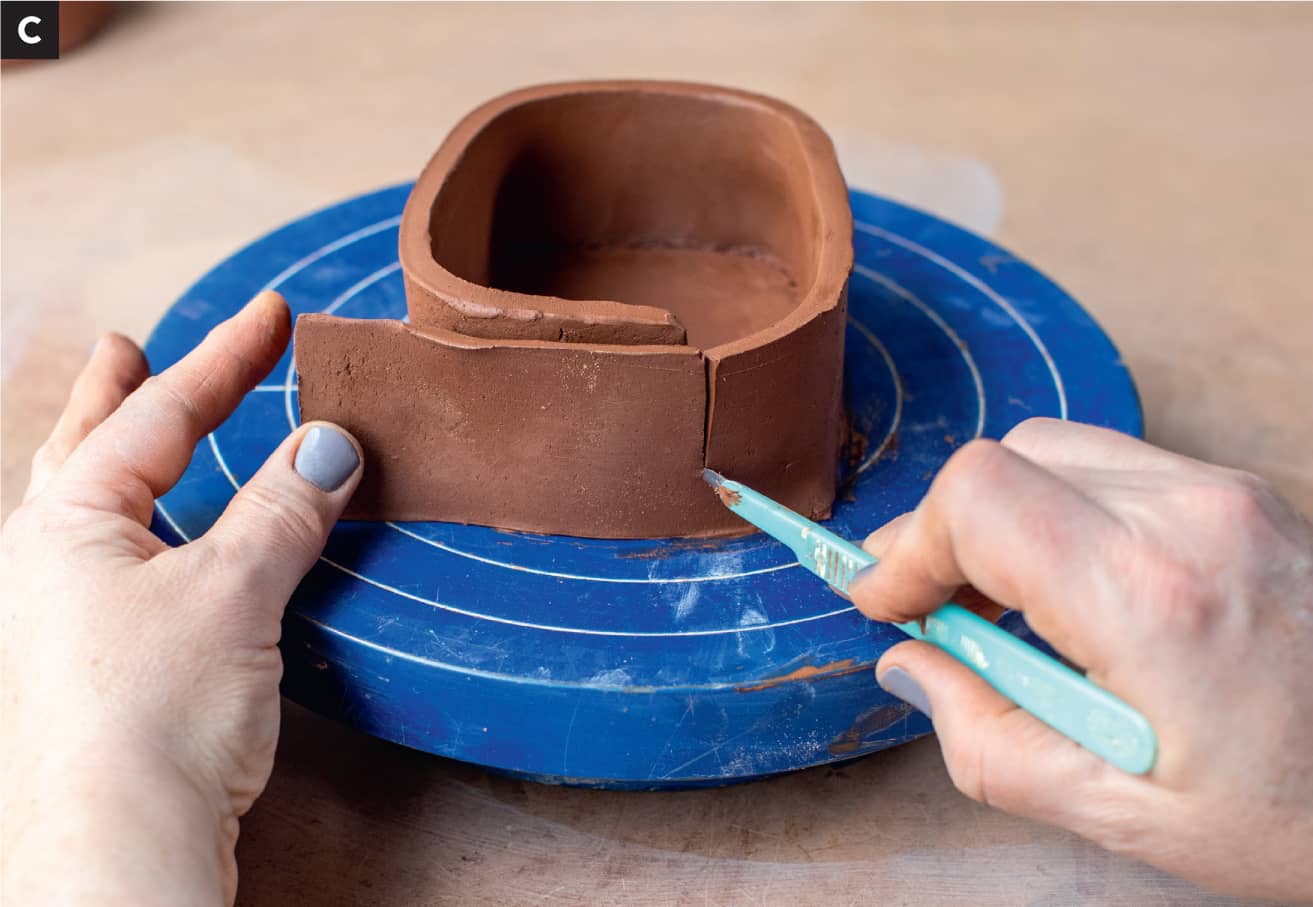
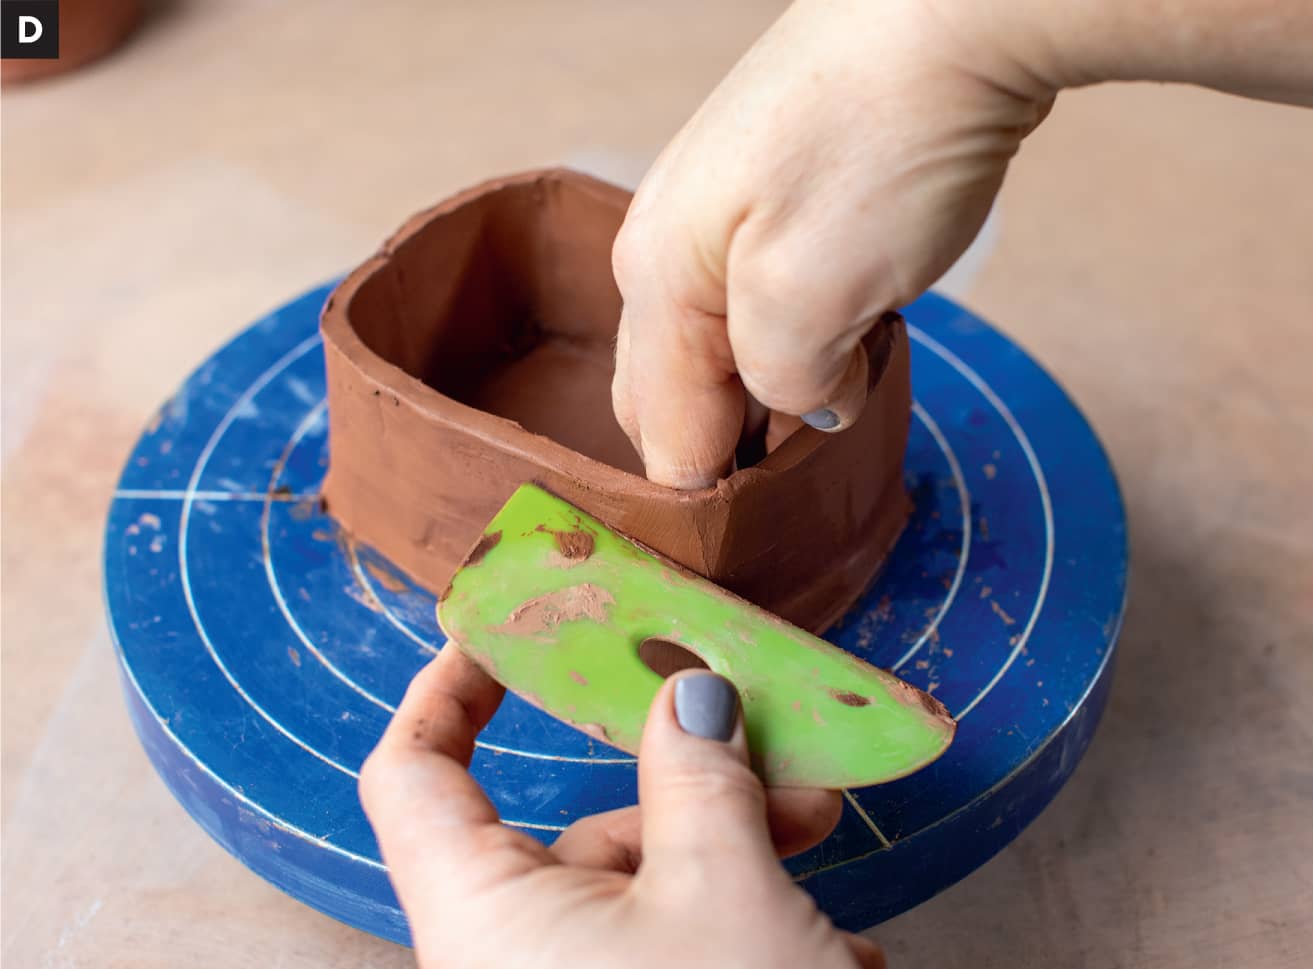
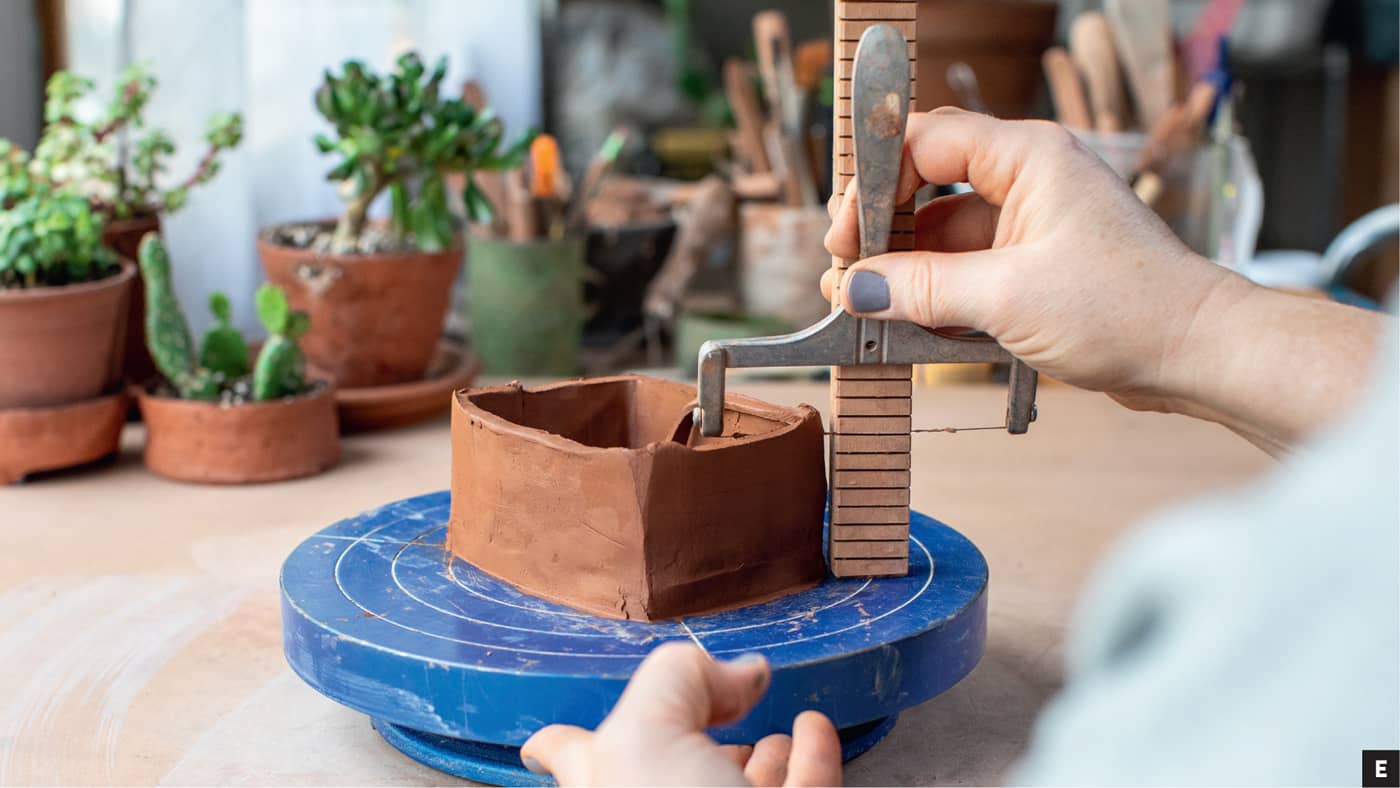
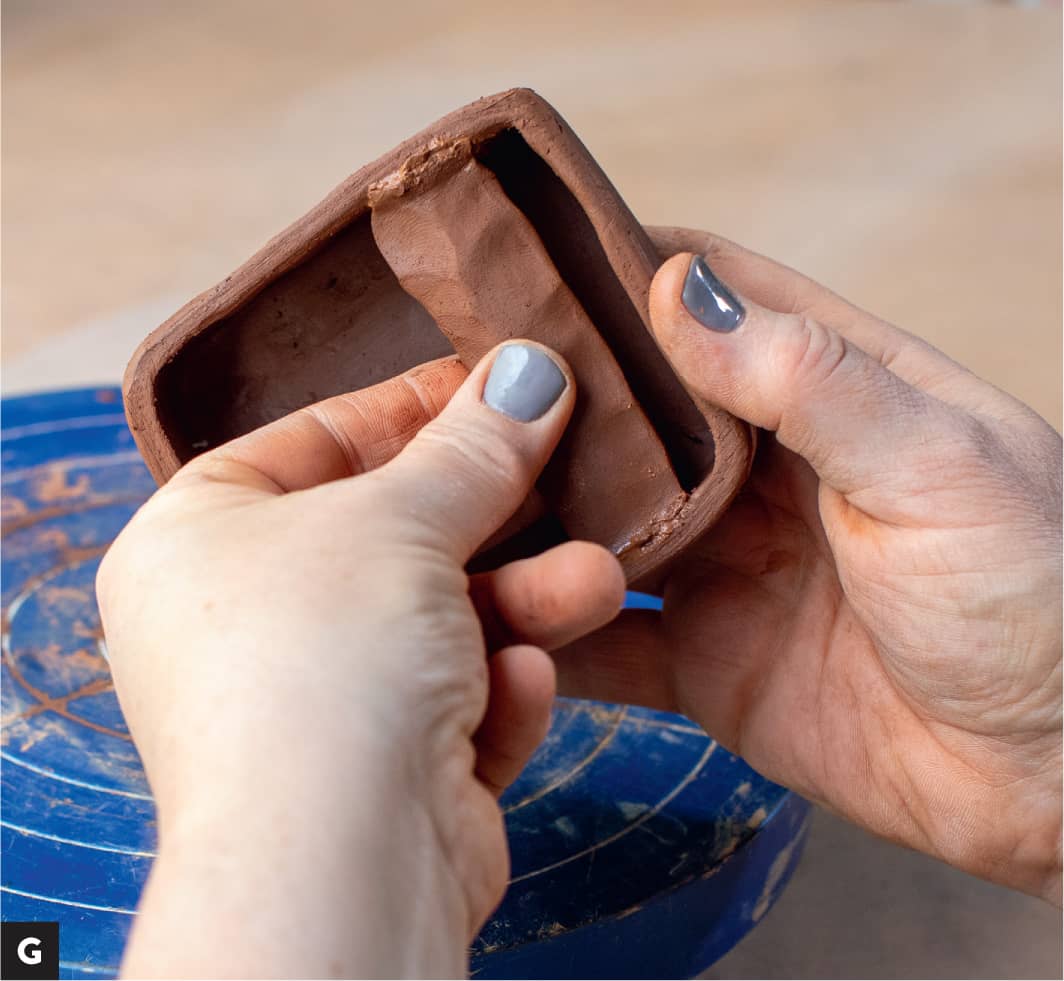
CONE 5, exposed clay and commercial underglaze glazes (two separate applications at bisque temperatures) Roll out a ¼" (.63 cm)- to ½" (1.3 cm)-thick slab. Make it large enough that you can cut out a rectangle 8" (20.3 cm) tall x 6" (15.2 cm) wide. (When rolling out a fresh slab of clay, use about 1½" [3.8 cm] of clay from the end of your clay bag; this should give you the right size of finished slab to complete most projects.) Bevel both the short edges, so they will overlap. Score and wet one side. Using both hands, stand the slab up gently and bring together and attach the beveled/scored edges, making a wide tube shape. [A] Clean up and compress the seam, inside and out. Square up the tube into more of a rectangle. The seam should be in the middle of one of the shorter walls. Start to squish the four corners into legs and bring the center together. Score and overlap the center seam. Continue using both the forefinger and thumb on both hands to work the corners slowly into the shape of a stout leg. When the corners get close to closing in, use a little water or slip to create a seal, if needed. [B] [C] [D] Once the feet are formed, turn the object right side up in your hand and, using a wood tool, rib, or the end of a rolling pin, compress and clean up the inside seams. Make sure to support the outside seam with your hand. Set the piece down gently on a flat work surface. Measuring from the front (which will be the head), mark 1.5" (3.8 cm) and then leave a horizontal gap of 2" (5 cm) and make the same mark again. Do this for the other side as well. The marks should line up. In this tab section, measure down 1.5" (3.8 cm) and make a line between the two vertical marks. Repeat for the other side. Using a scalpel, start at the low point of the intersecting lines and cut straight up on the marks. Cut across the horizontal line, pull the tab of clay out, and put it back in your clay bag. [E] Slip and score the edges, if needed, and bring together the tail section, back, and head of the creature. Make sure your seams are well-connected and then use a tool or your finger to shape the tail and head. You may need to add a small slab to the tail to give it extra height. [F] [G] Use a wooden knife or rib to start roughing out the haunches, feet, belly, and tail. Refer to your photos. If your form doesn’t have much volume or you want more than is present, use a scalpel to cut a hole in the very center of the underbelly section, big enough to slip a narrow tool or your finger inside without damaging how the form will sit on a tabletop. (You will need a hole in the form anyway, so don’t worry about making one now to help yourself.) [H] Once the shape is generally formed, define and refine the details of the animal. Differentiate limbs, fur texture, and facial features. Now is also the time to add any additional clay elements. Be sure to slip and score and let the attachments rest to become closer to the same temperature. This project is wonderful for practicing greenware surface treatment: try different mark-making tools at different stages of dryness to get an idea of what kind of mark making is needed. Be sure to let the form rest when needed and keep it wrapped up if you plan to work in stages. Make sure you poke a hole to release trapped air. It’s smart to look for an overhang or natural crevice in the surface to use your needle tool or scalpel to make your puncture. I used my needle tool to puncture the little X on the backside of my little fox. [I]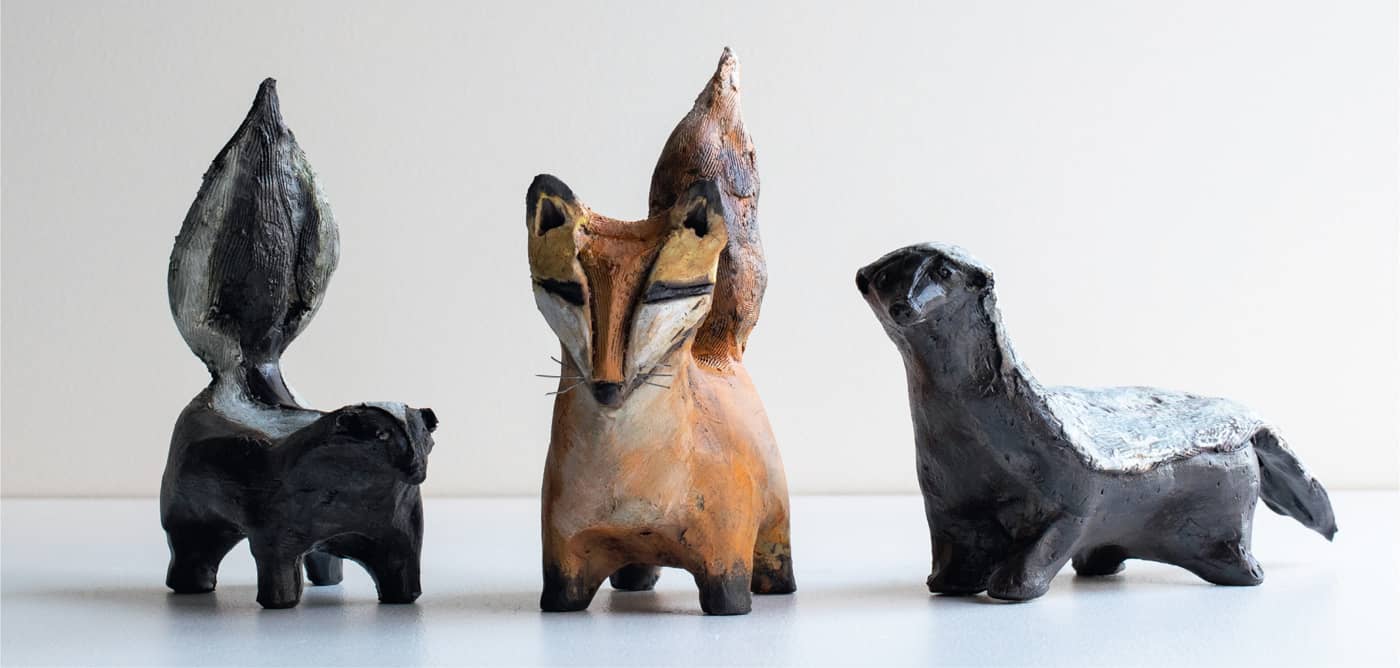
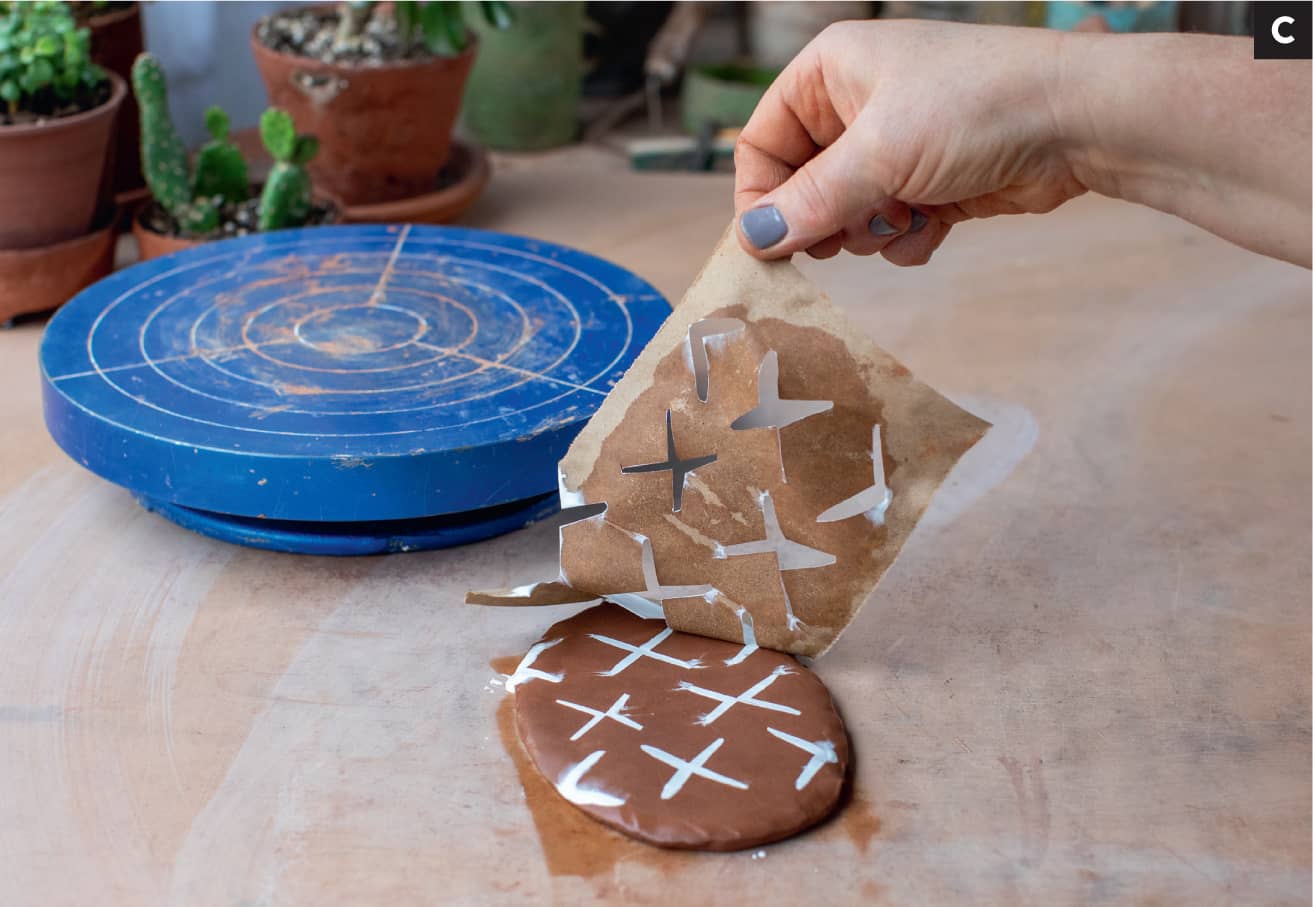
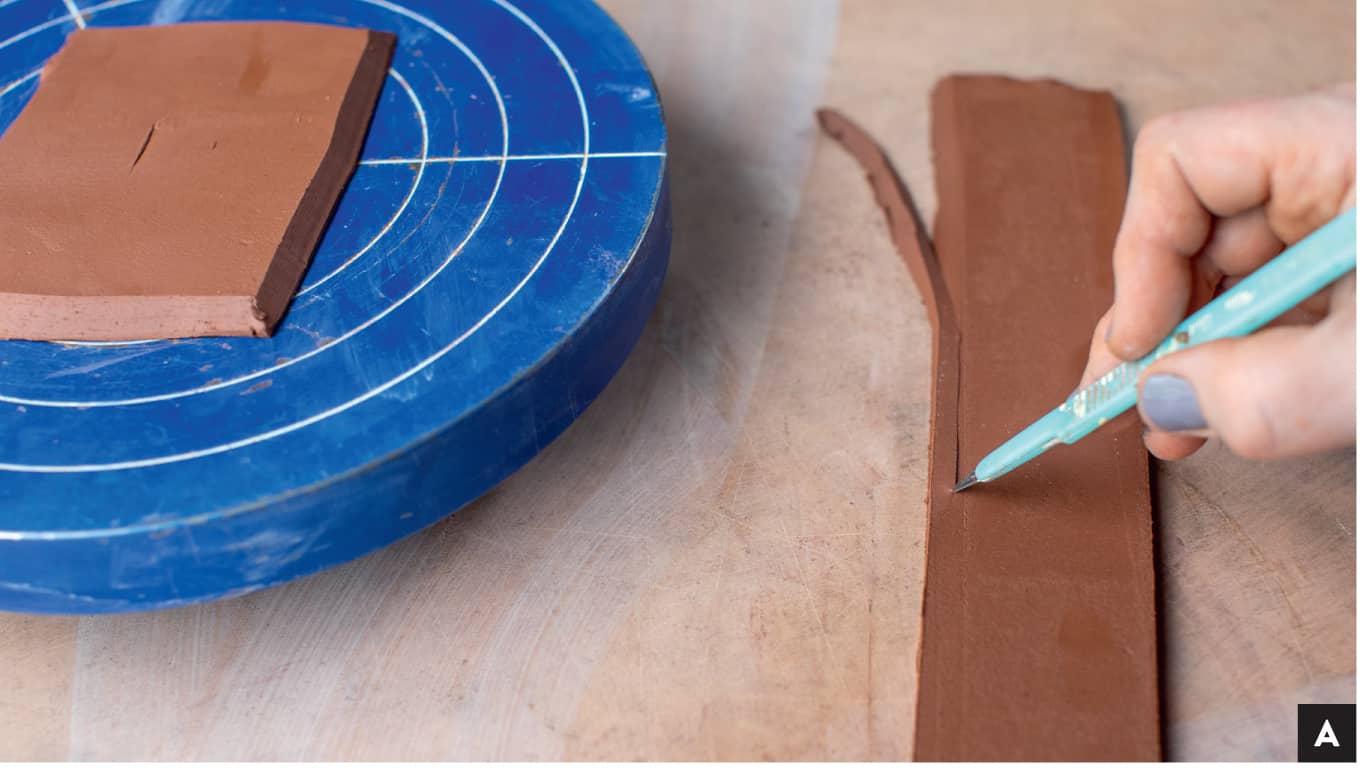
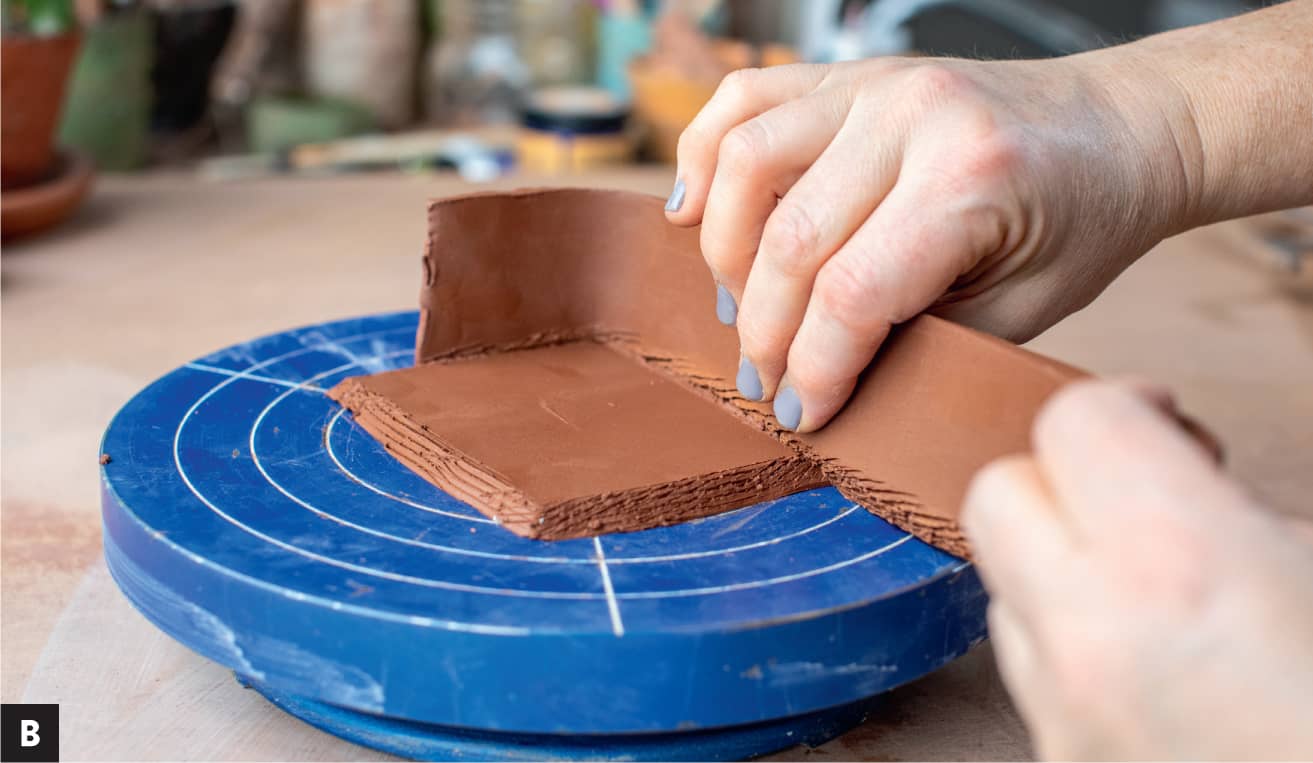
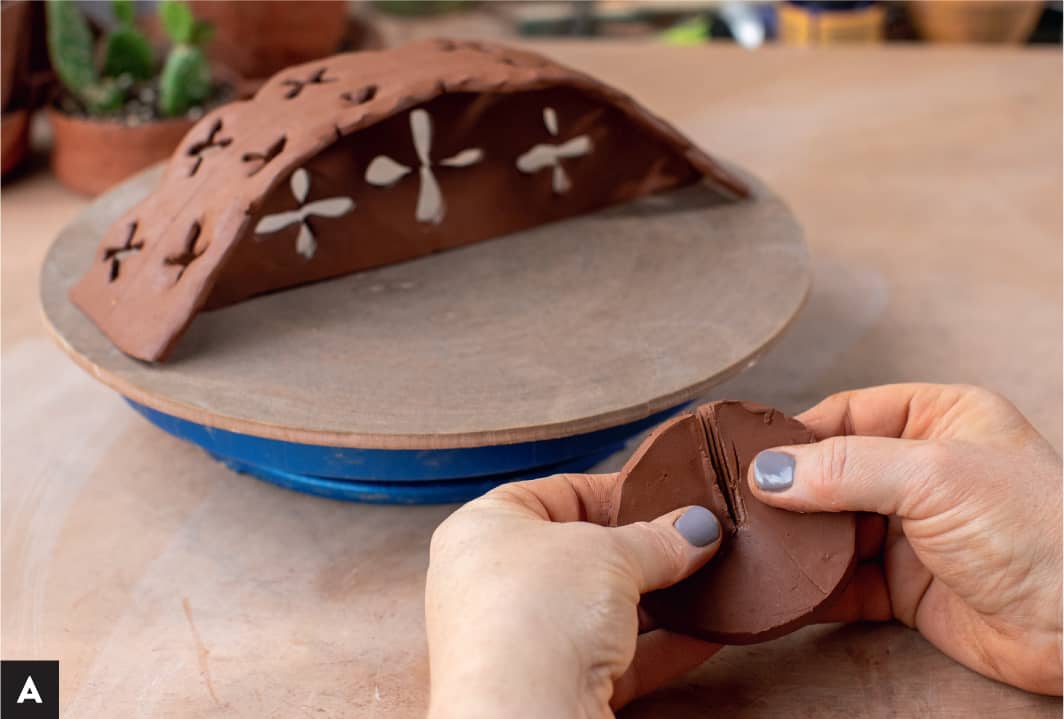
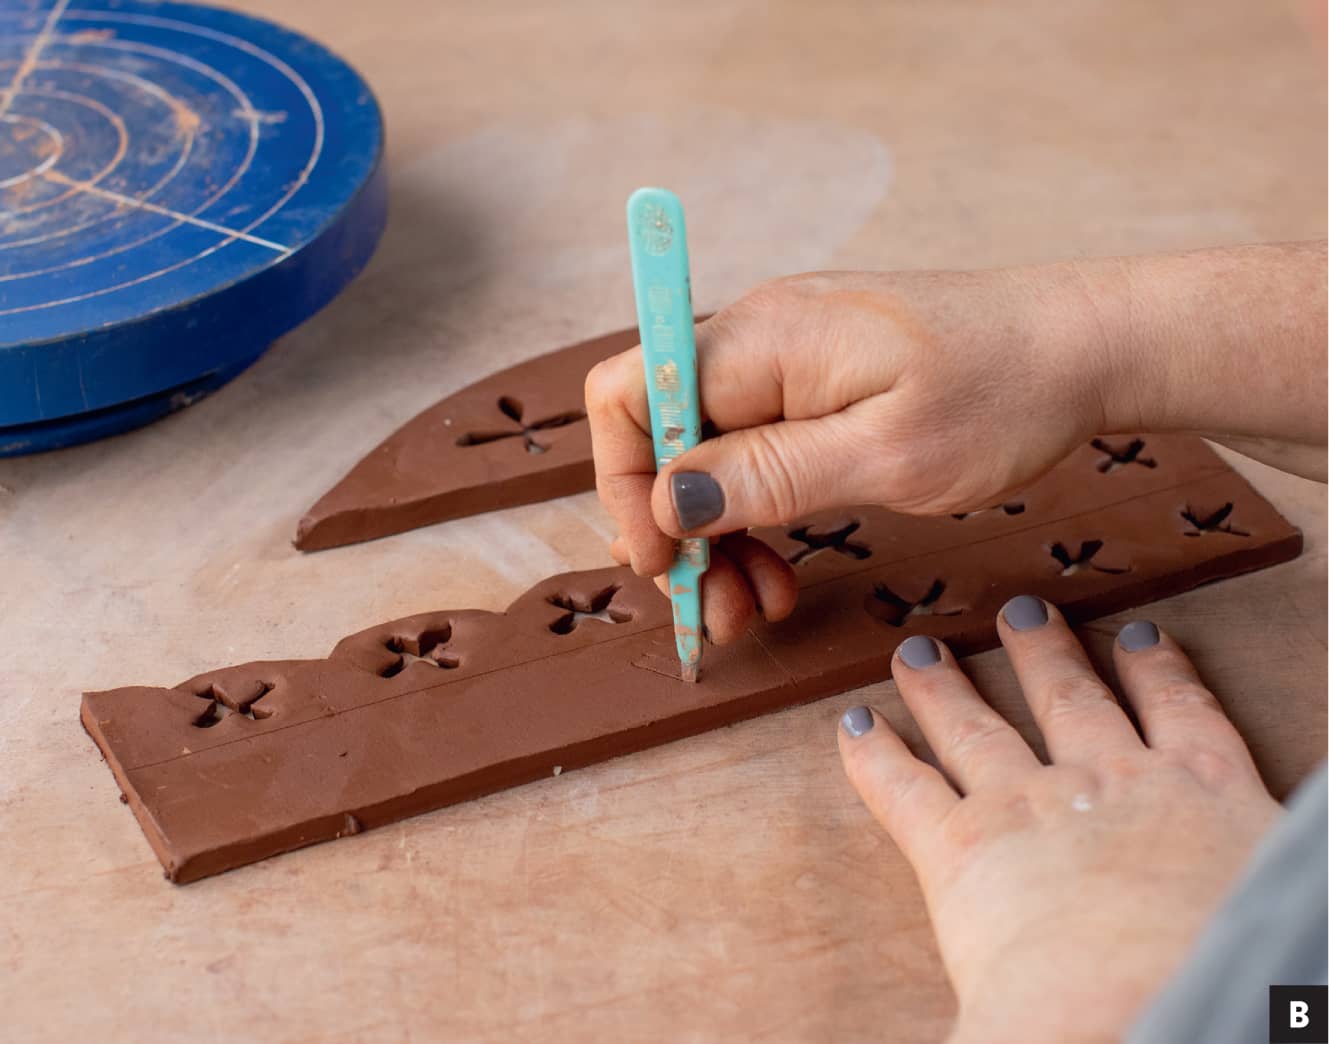
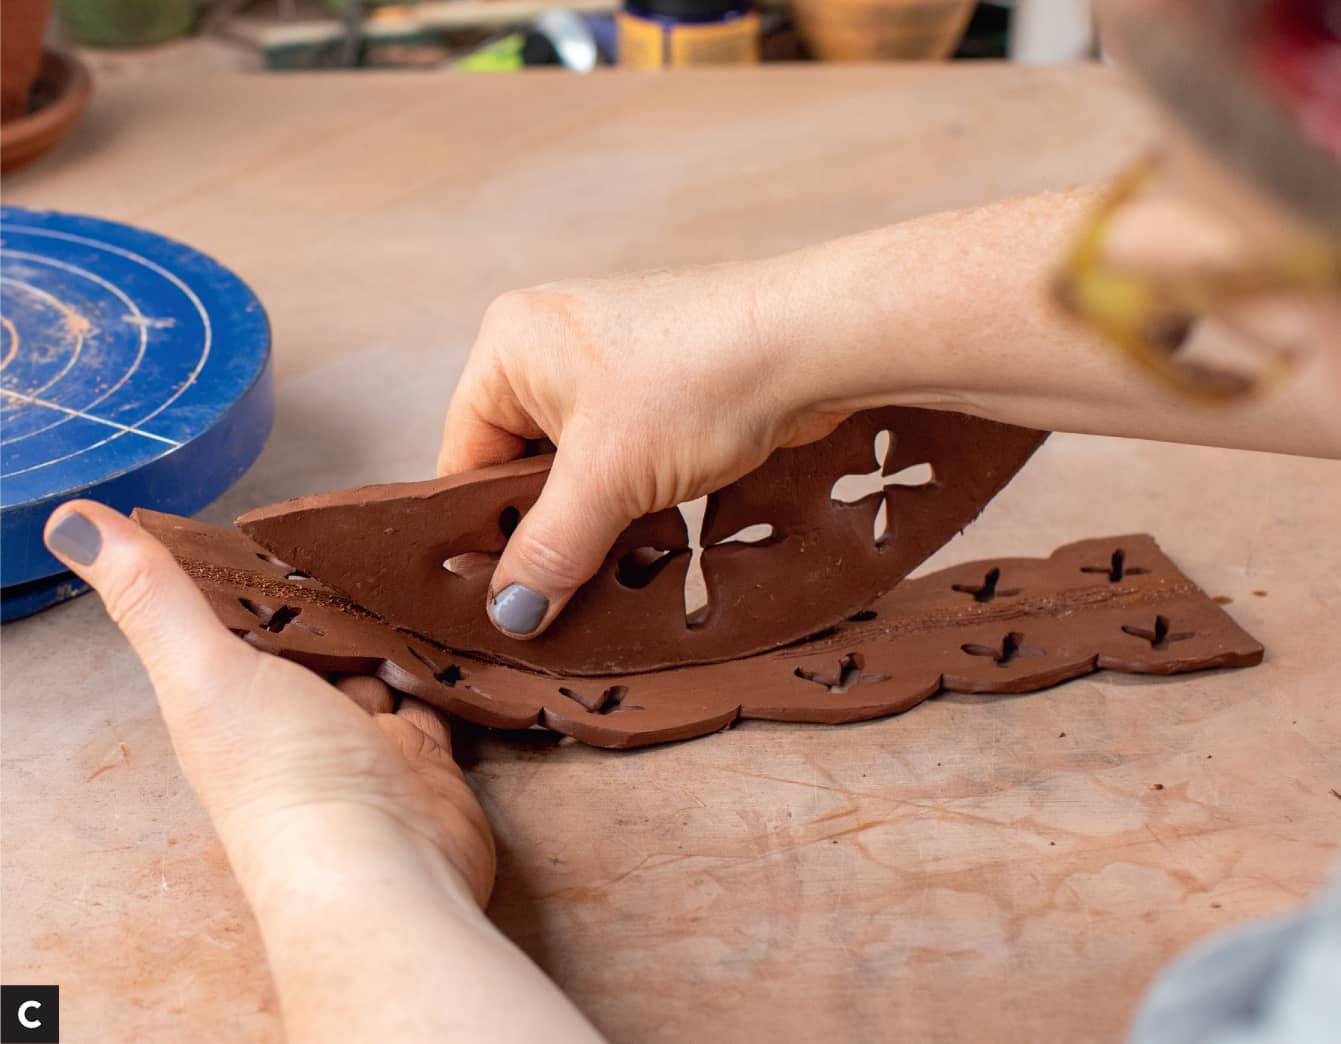
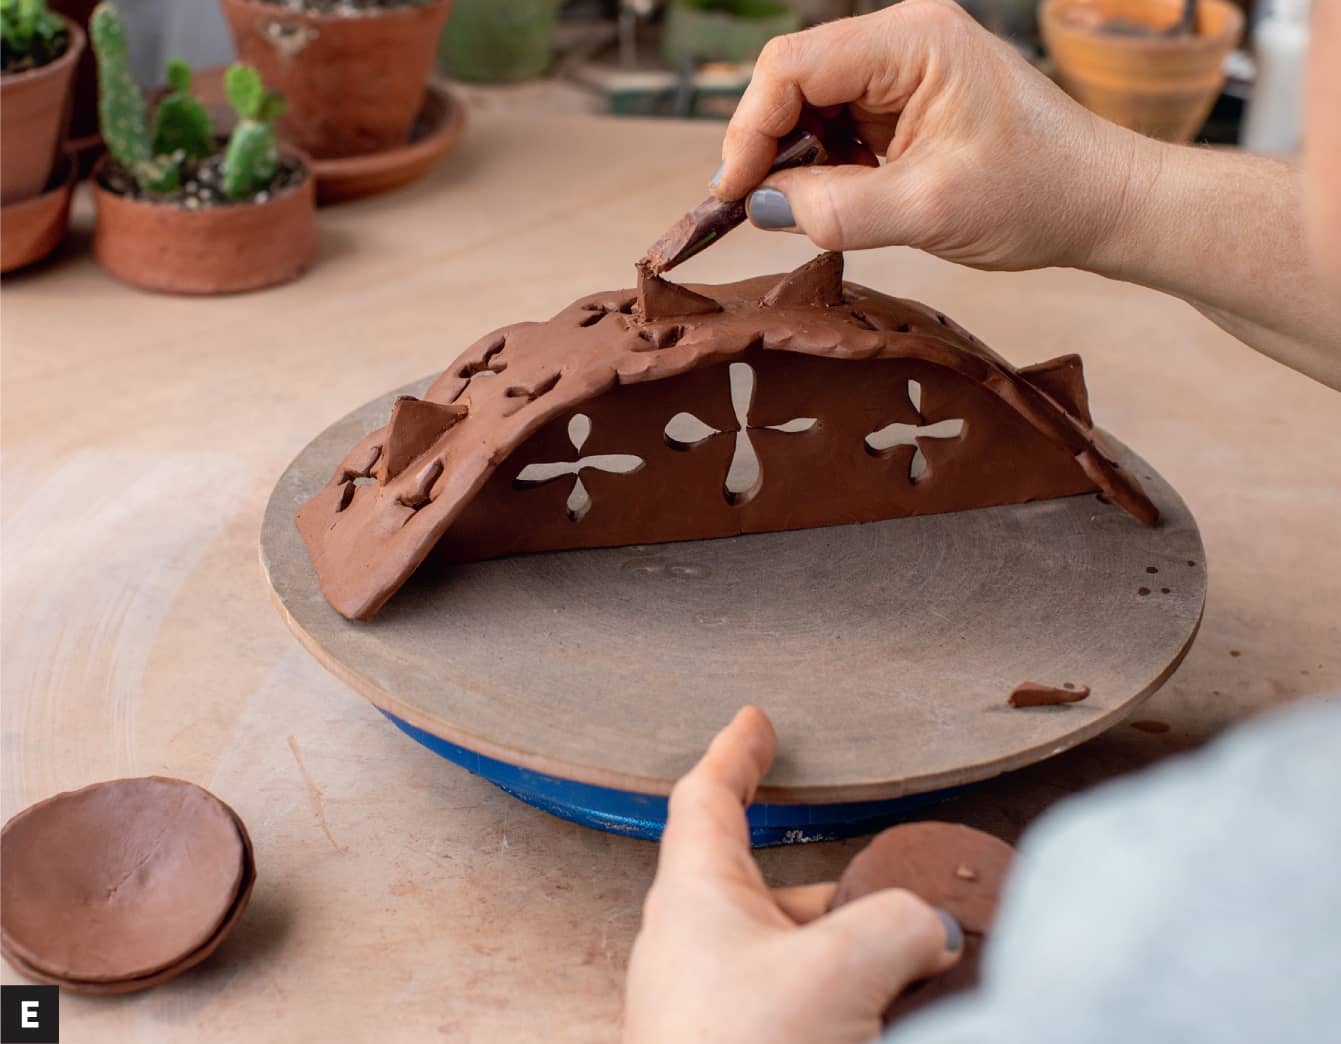
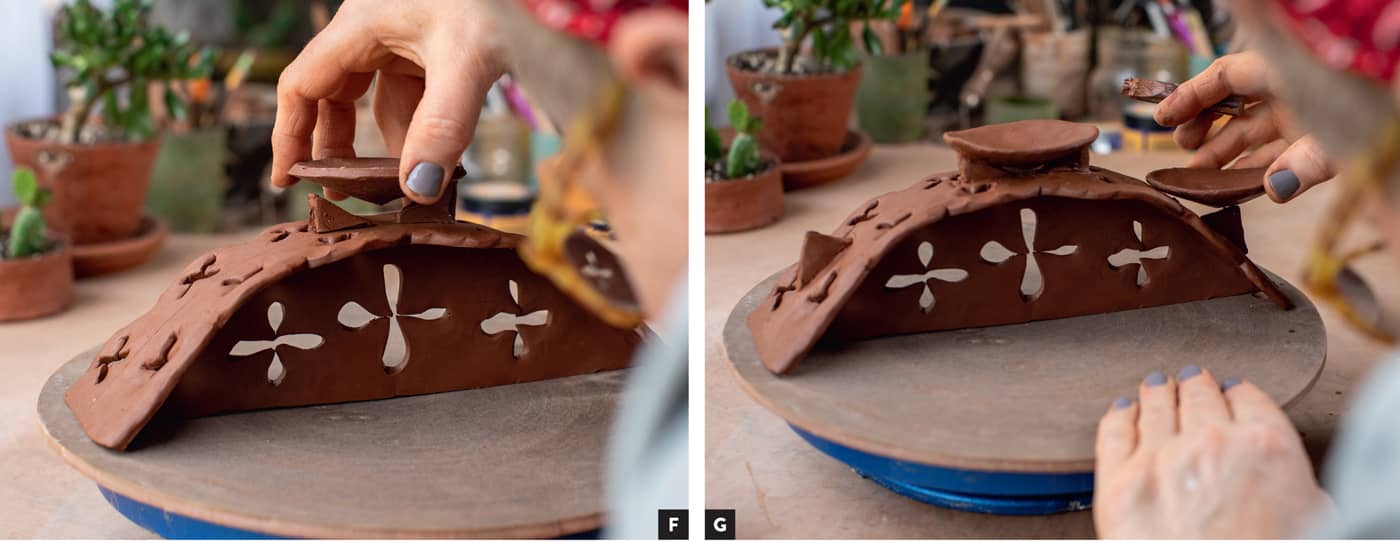
CONE 5 RED CLAY, white slip, celadon style commercial glaze Roll out a ½" (1.3 cm)-thick slab a bit bigger than your desired shape. Cut out your shape (pictured is a 4" x 6" [10 x 15.2 cm] rectangle). Move it to a flat, clean bat or ware board. Compress with a rib and clean up the edges. [A] Cut a ¾" to 1" (1.9 to 2.5 cm) section of Kanthal wire, and then bend it evenly with your pliers. Leave it slightly flared open. If your tile is soft clay, gently push the wire about ¼" to ½" (.63 to 1.3 cm) deep, leaving the bent ½" (1.3 cm) loop extending from the top. [B] If your clay is more leather hard, use a drill bit about the same thickness as your wire to drill two starter holes on the top edge of your tile about ½" (1.3 cm) apart from each other. This will help alleviate cracking issues. Clean up the edges and loop area. Let the clay rest between two boards to a leather-hard state and then decorate to your heart’s content. The demonstration piece pictured is decorated using colored slips layered with paper stencils. [C] Roll out a ½" (1.3 cm) thick slab: a roughly 12" x 12" (30.5 x 30.5 cm) square should be large enough. Cut a 4" x 4" (10.2 x 10.2 cm) tile, and two strips that are 1½" (3.8 cm) wide and the length of your prepped slab. Move the 4" x 4" (10.2 x 10.2 cm) tile to a working surface, such as a bat or ware board. Bevel and score around the top outside edge of the square. [A] Using the 1½" (3.8 cm)-wide strip, bevel, score, and slip the bottom edge and begin to attach it to the footprint of the tile. Start some place mid-wall, as connecting the seam here is easier and will be stronger than in a corner. One strip may get you around the entire shape; if not, use the second strip, making sure to bevel, score, and slip the connection points. [B] [C] Using a right-angled rib, clean up the interior and exterior attachment areas. [D] NOTENow is when you can take a little coil of clay to backfill any areas that seem problematic. This is optional and you can skip it if you feel like the attachments are strong. If you are just starting out, use your best judgement: try both methods and see what works for you. Make sure your walls are vertical and not swollen out anywhere, and that all your seams are compressed, and you can’t see any dark shadows in the corners or at the connection points. Let the form set up. When the form is a soft leather hard, use a surform or cut-off tool to even off any discrepancy in height. [E] Let the form equalize and meld together before moving it off your working surface. What follows are three different options for finishing this wall hanging. Choose one and execute before moving on to decoration. Trace the square of the form you just made onto the remaining slab. Cut out the square. The 4" (10.2 cm) tile section should be leather hard on both sides. Avoid letting the slab droop into the form. (This could cause warping and cracking.) Score the edges of the wall and square, wet one side, and attach. Clean up the edges using a right-angled rib. Use a ruler to measure and mark 1" (2.5 cm) down from the top edge and 2" (5 cm) from the side—this should be the center. Mark first, and then cut a 1" x ½" (2.5 x 1.3 cm) slit out of the center. Slightly bevel the interior top edge. Use a green scrubby or drywall paper to soften the edge. [NOT PICTURED] Make a thin 2.5" (6.3 cm)-long coil. Cut into two equal sections. Drape the coils evenly over the handle end of a needle tool. Gently flatten the outside edges of each coil, leaving the loop form. Let them rest while you deal with the box. On the interior of the box wall tile, measure down 1" (2.5 cm) from the top edge on both sides of the form. Score both sides of the flattened loop, hold up to your mark on the box interior, and score so they line up, loop facing toward the center and just below the edge of the wall. Attach and repeat for the other side. Get as close to the same placement as you can. Clean up. After the form is fired, you can add picture hanging wire to hang the tile. [F] Make a medium-sized 2" (5 cm)-long coil in the shape of a triangle. Depending on which direction you want the tile to hang, score the sides, top, or possibly a corner. Score the coil accordingly and attach. When attaching the coil, line up toward the outside edge, but take care not to over shadow on the far edge of the tile. Gently give inward direction to the pinched coil. Use a rib to clean up and make sure the coil is flush with the wall. Use a green scrubby or drywall paper to soften the edge of the coil. [G]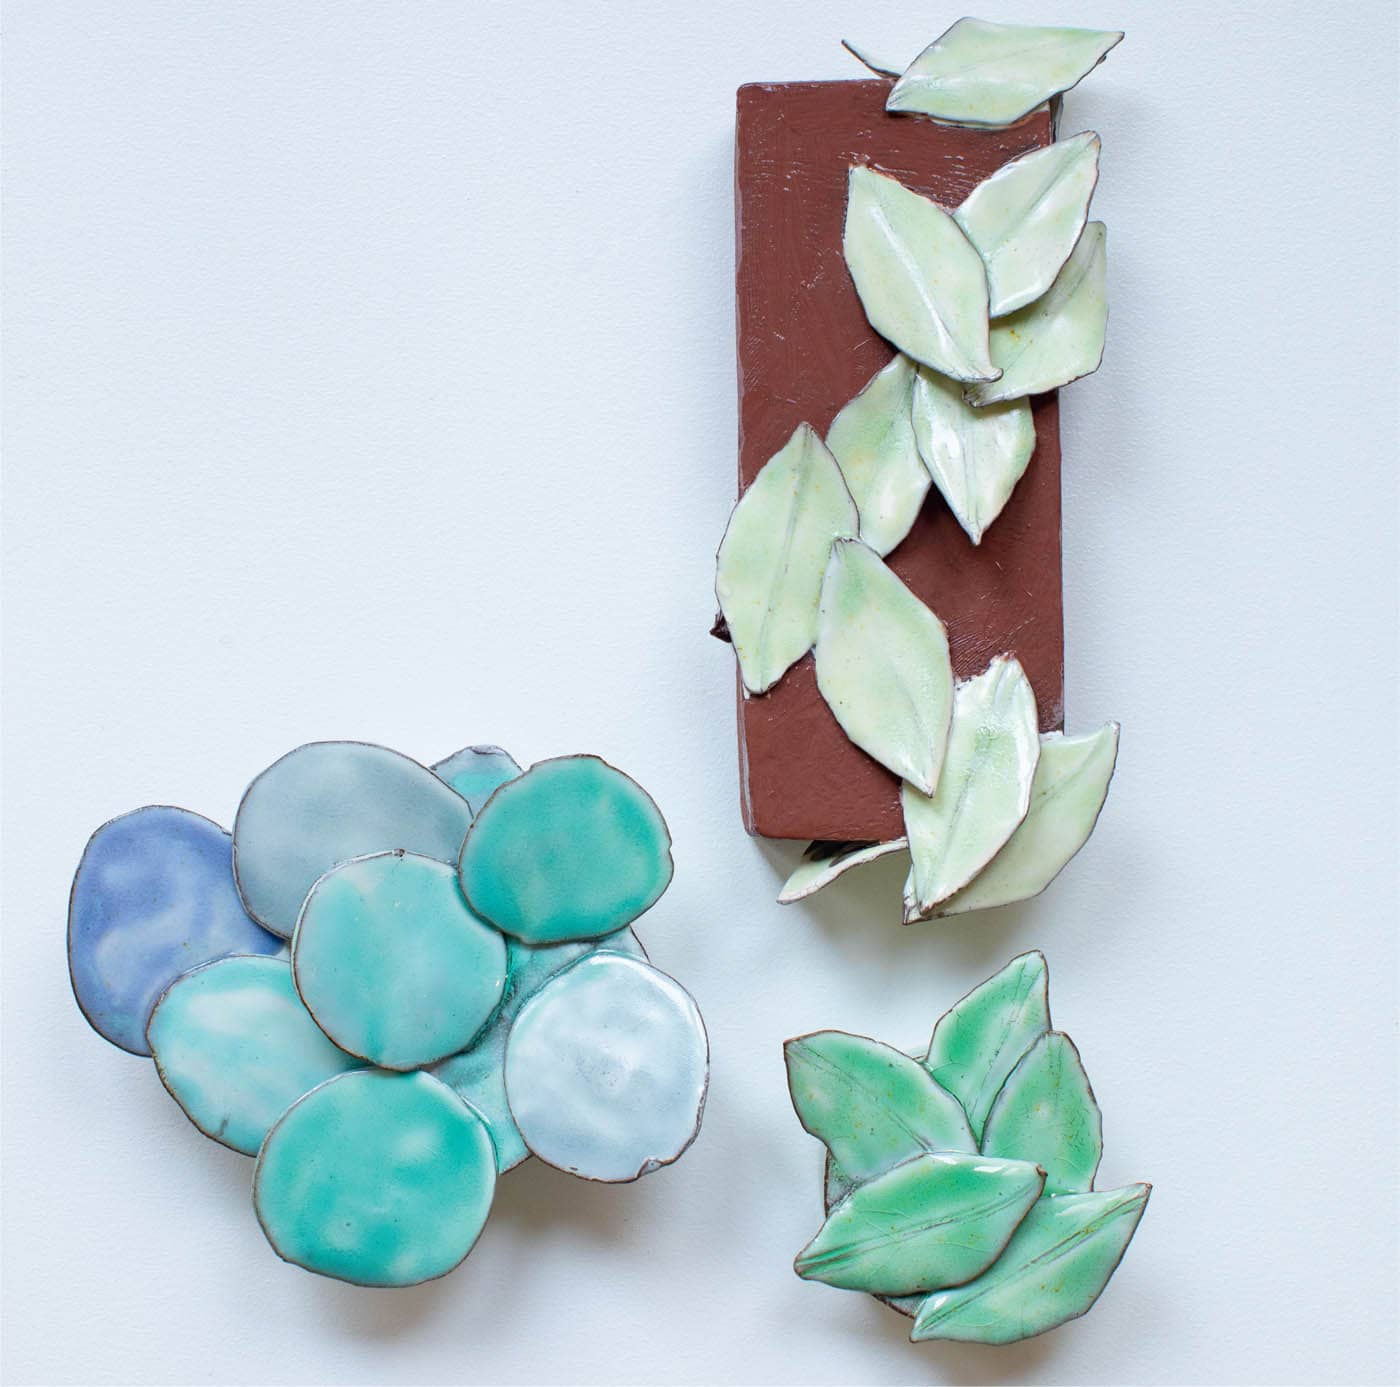
Wall Tile 1
Wall Tile 2
Finishing Options
OPTION 1
OPTION 2

OPTION 3
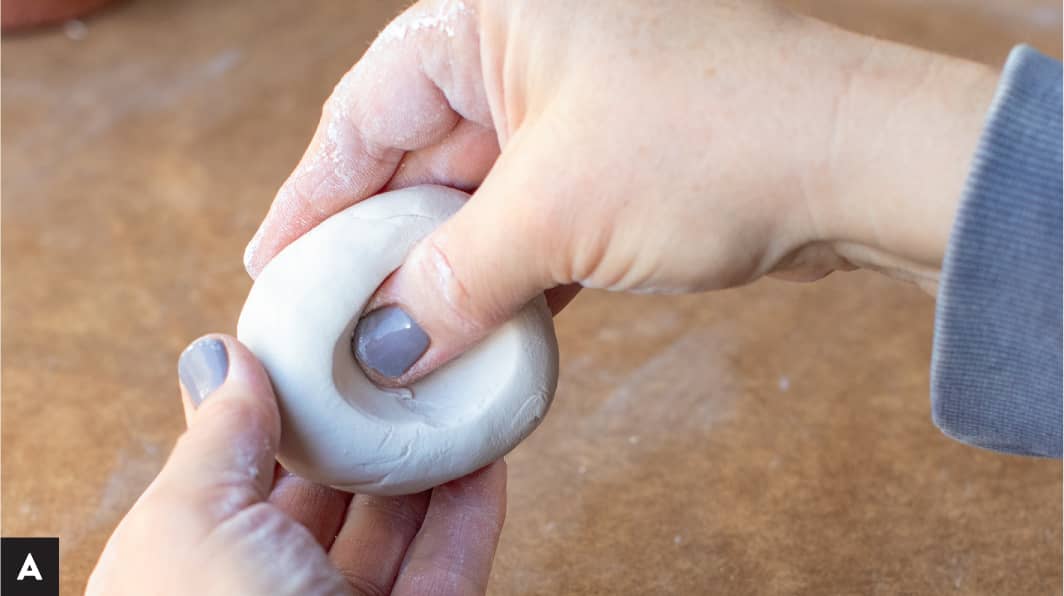
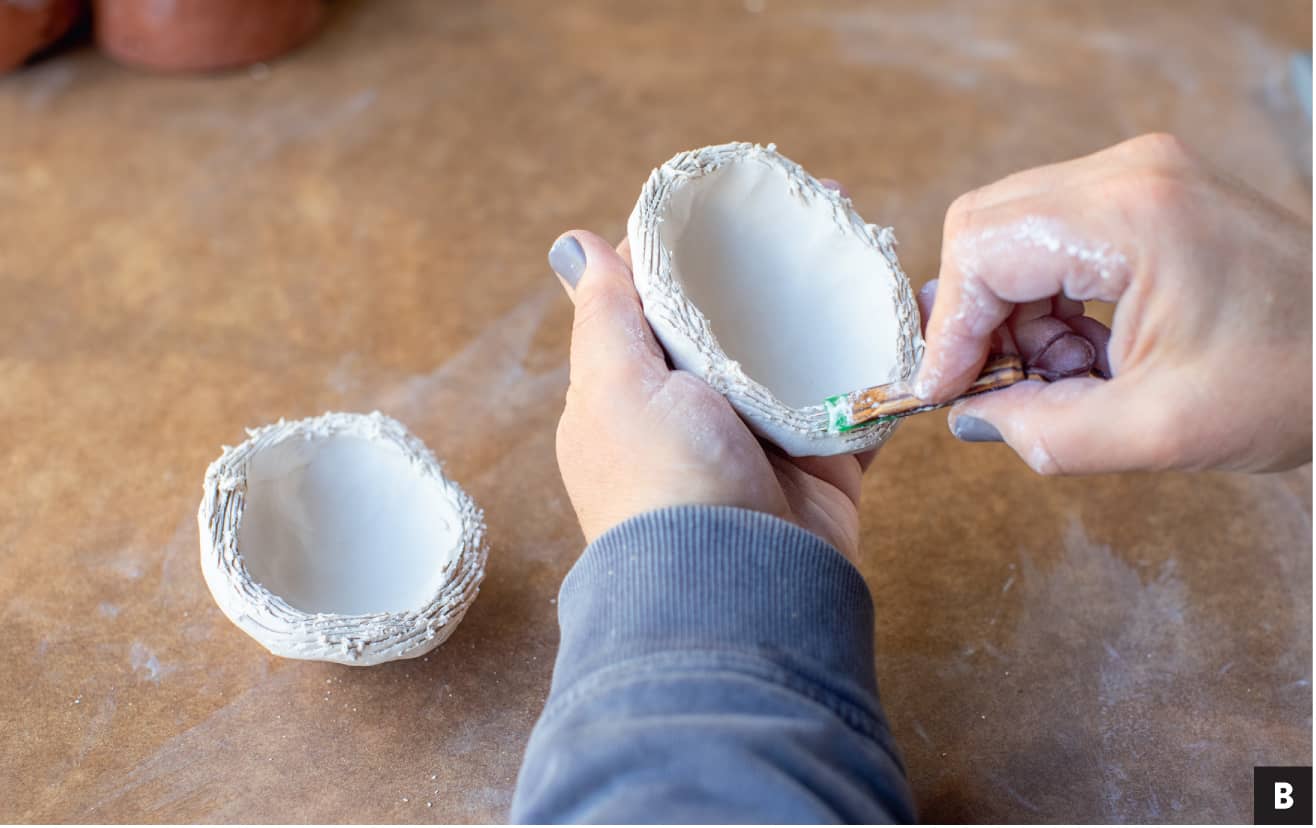
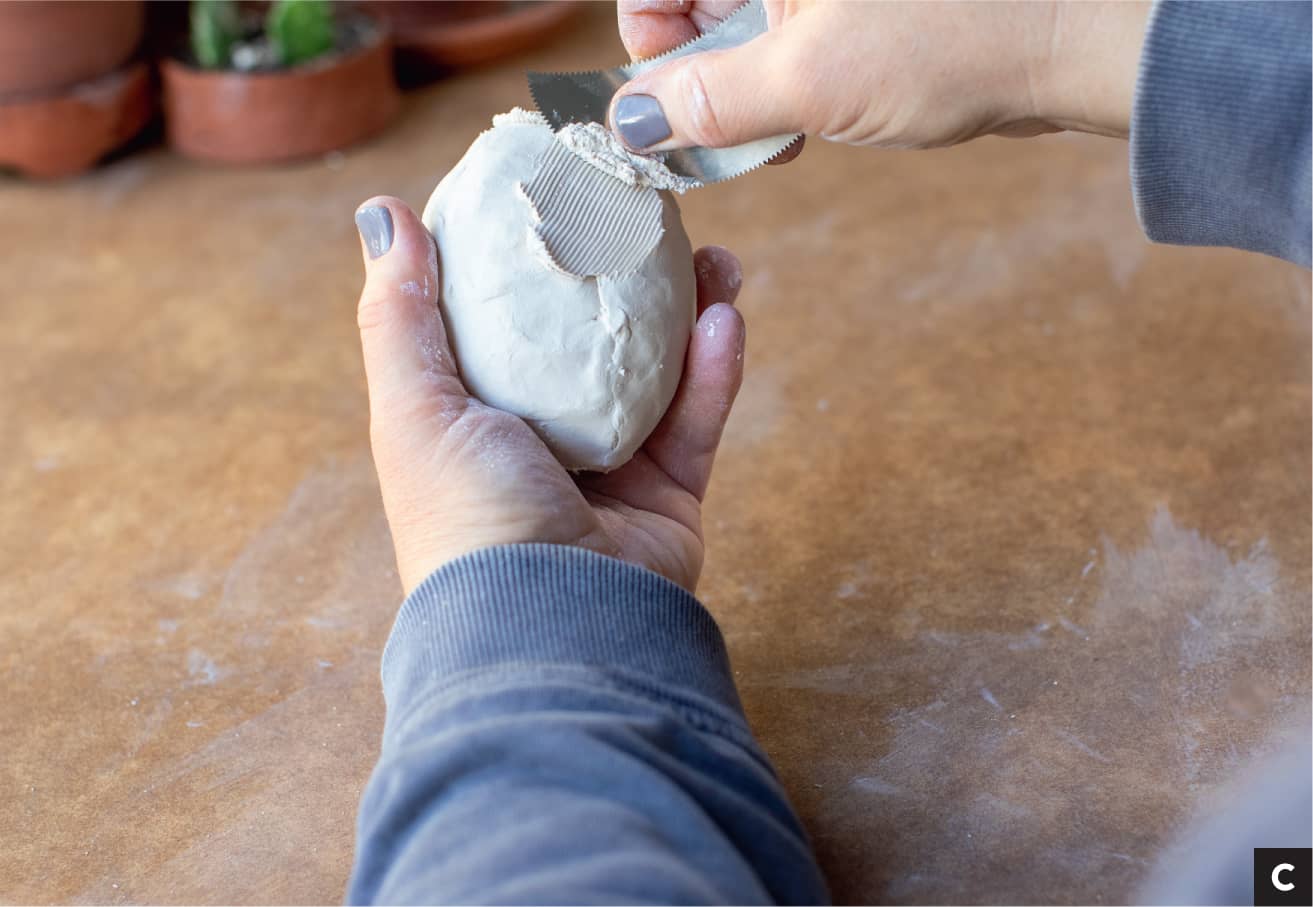
CONE 5 PORCELAIN, celadon style commercial glaze Cut about 1 lb. (.45 kg) of clay from your bag. Visually aim for a large handful, about the size of a large orange. Separate into two roughly equal sections. Cup one of the sections in your left hand and place the thumb of your right hand in the center of the piece and begin to “pinch” or, more accurately, compress, the clay. Work in a circular motion from the center out to the edge. [A] Work until the piece has grown in size, roughly ½" (1.3 cm) thick from the center to the edge, aiming for a wide bowl shape. Repeat for the other section. Aim for each piece to be similar in outer edge circumference; this will make attaching them easier. Attach the two halves. Score the outside edges, wet one side, and attach. It may take a bit of finagling to get them together. Be patient and try to get as much of the wall edge to attach to the other as you can. [B] Clean up the seam. I like using a serrated rib to work the edge together. This will take practice, and you will get better at it over time. [C] Let this ball rest for about five minutes, just so that seam is 100 percent together. Now that the form has rested for a bit, it should still be very soft and workable. Using a wooden knife or a rib, begin shaping your cloud. Go slowly and be careful not to press so hard you bust the seam or cut into the object. The trapped air will give you a bit of pushback that should allow you to maintain the volume of the form. [D] You may need to pause and let the form firm up from time to time in the shaping. Have a soft piece of foam or a towel handy to let it rest. If you rest it on a flat, hard surface, you will find you have a flat spot on your cloud. Make a few forms while you wait, so you can practice and vary scale and thinness to flex your pinching muscles. When you have a general shape of a form you are happy with, use a serrated rib and begin texturing the cloud; the goal is not to take clay away but to give the surface some movement and directionality. Fluff! [E] Once your shaping is complete, it is imperative that you make a hole someplace inconspicuous on the form. With no hole, the trapped air in this object is enough to make it hazardous to fire in a kiln. It is much easier and safer to make a hole before you put it on the shelf to dry. It is too easy to forget this step! [F] NOTEAir, when heated, expands. If clay is trapping that air, the object could explode in the kiln, making a huge mess and destroying your object. As a somewhat thicker form with damp air on the inside, this project may take some time to dry out. NOTEYou may want to think about how you are going to display the object. If you’re using it for a mobile project, or maybe an ornament, you may want to add a hanging catch with Kanthal wire, or possibly just a drilled hole at the top so you can add something post-firing. This will also solve your trapped-air problem. [G]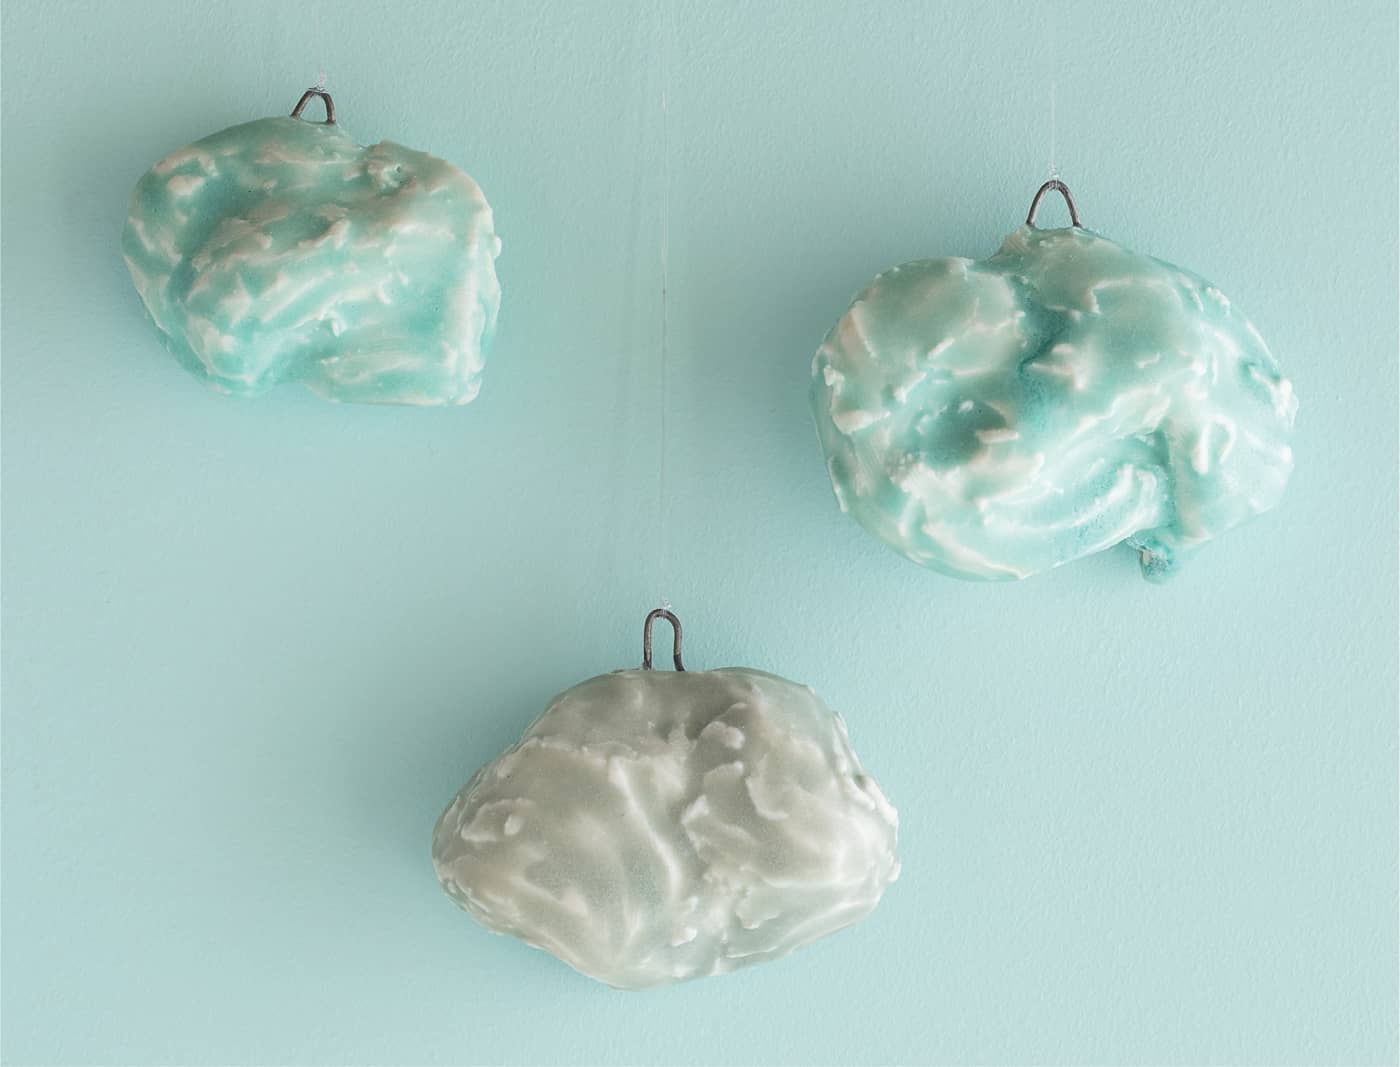
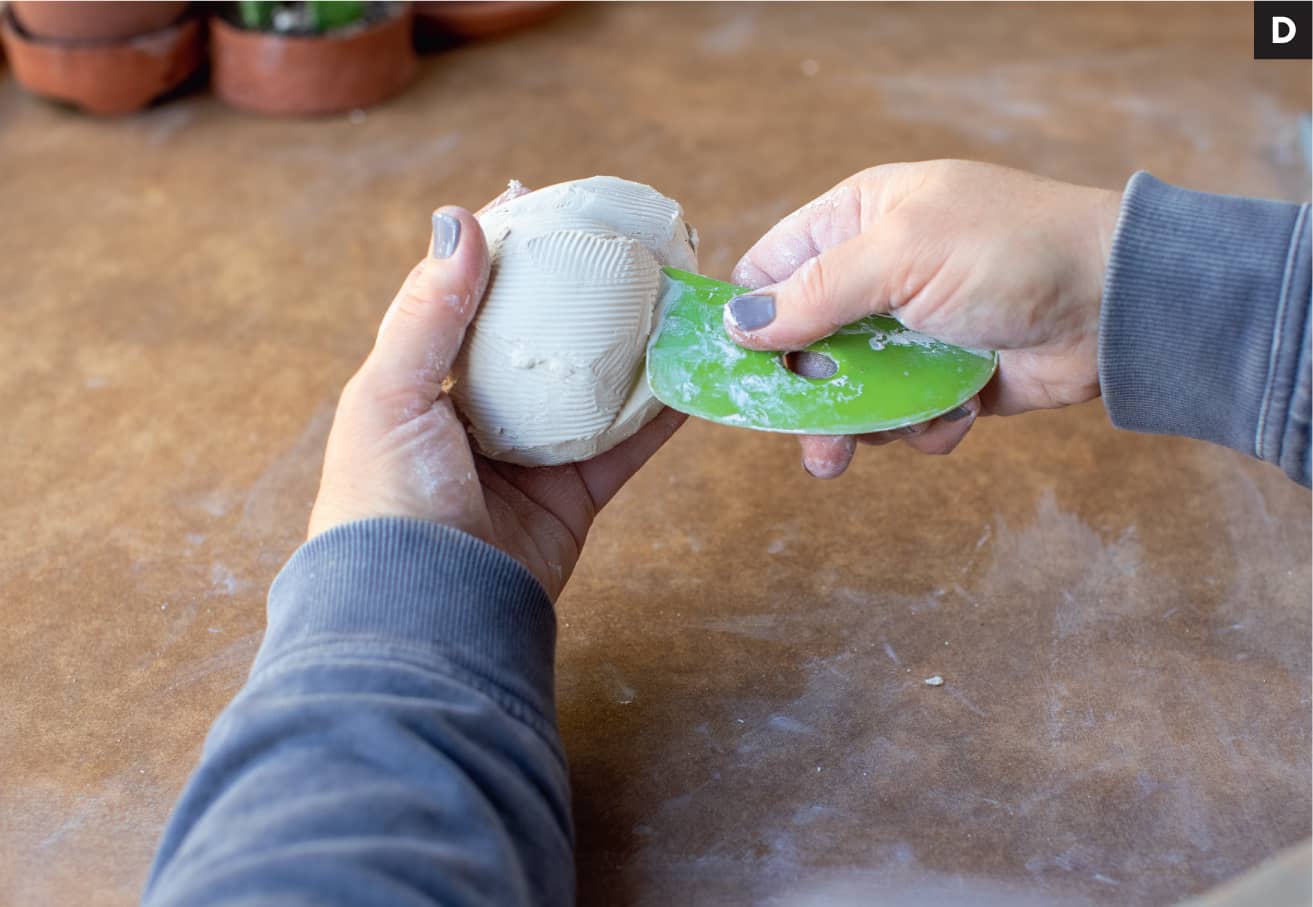

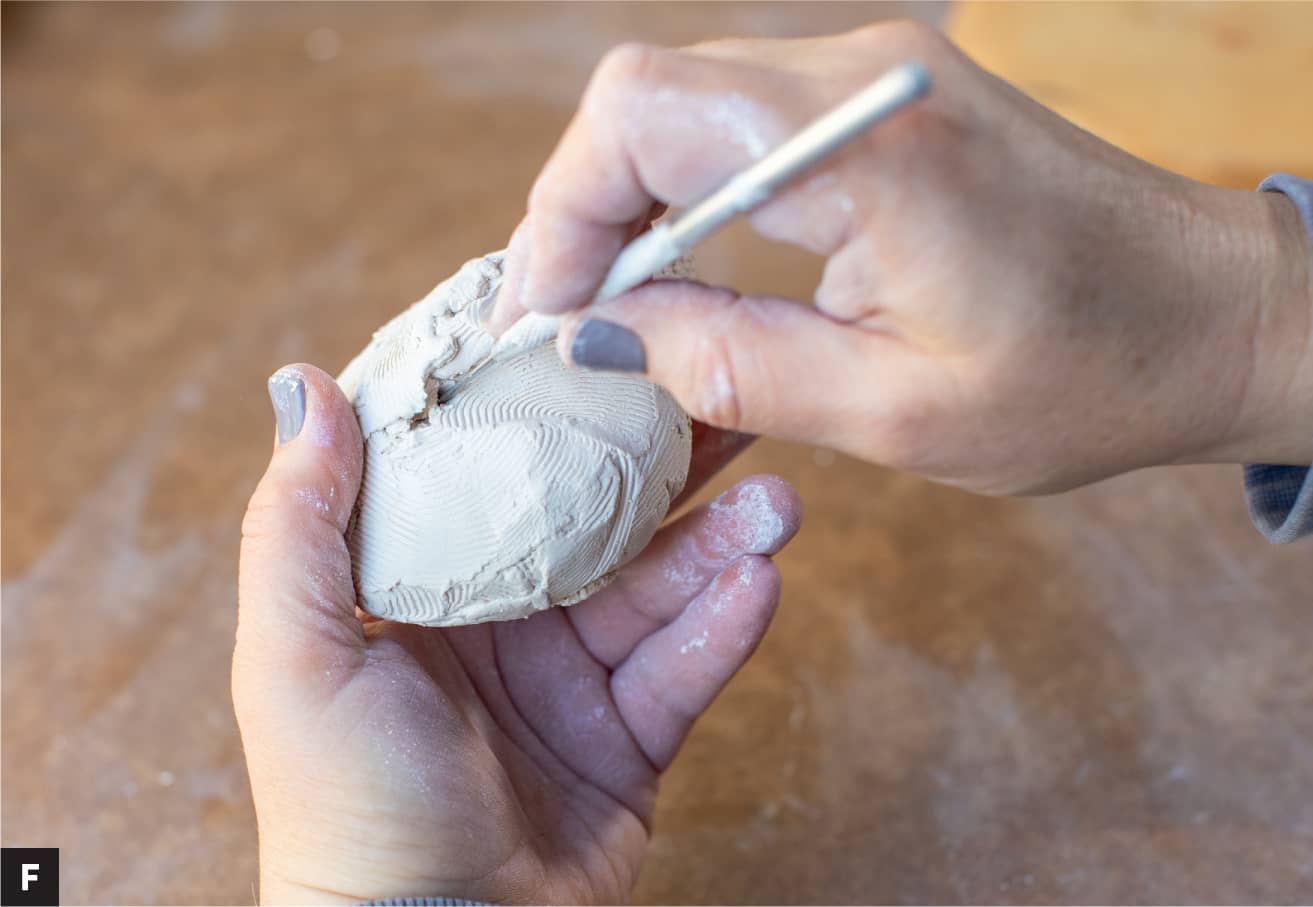
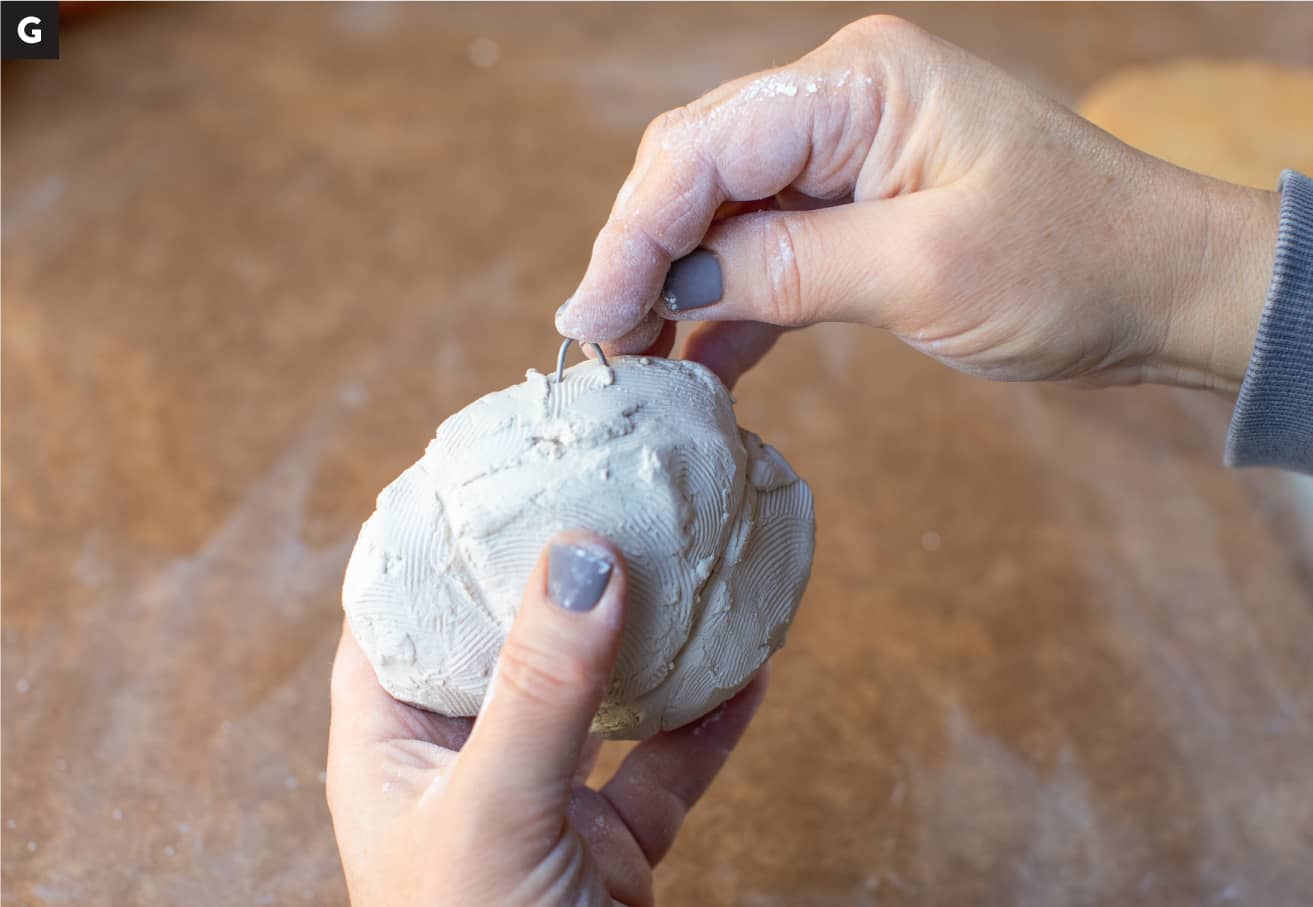
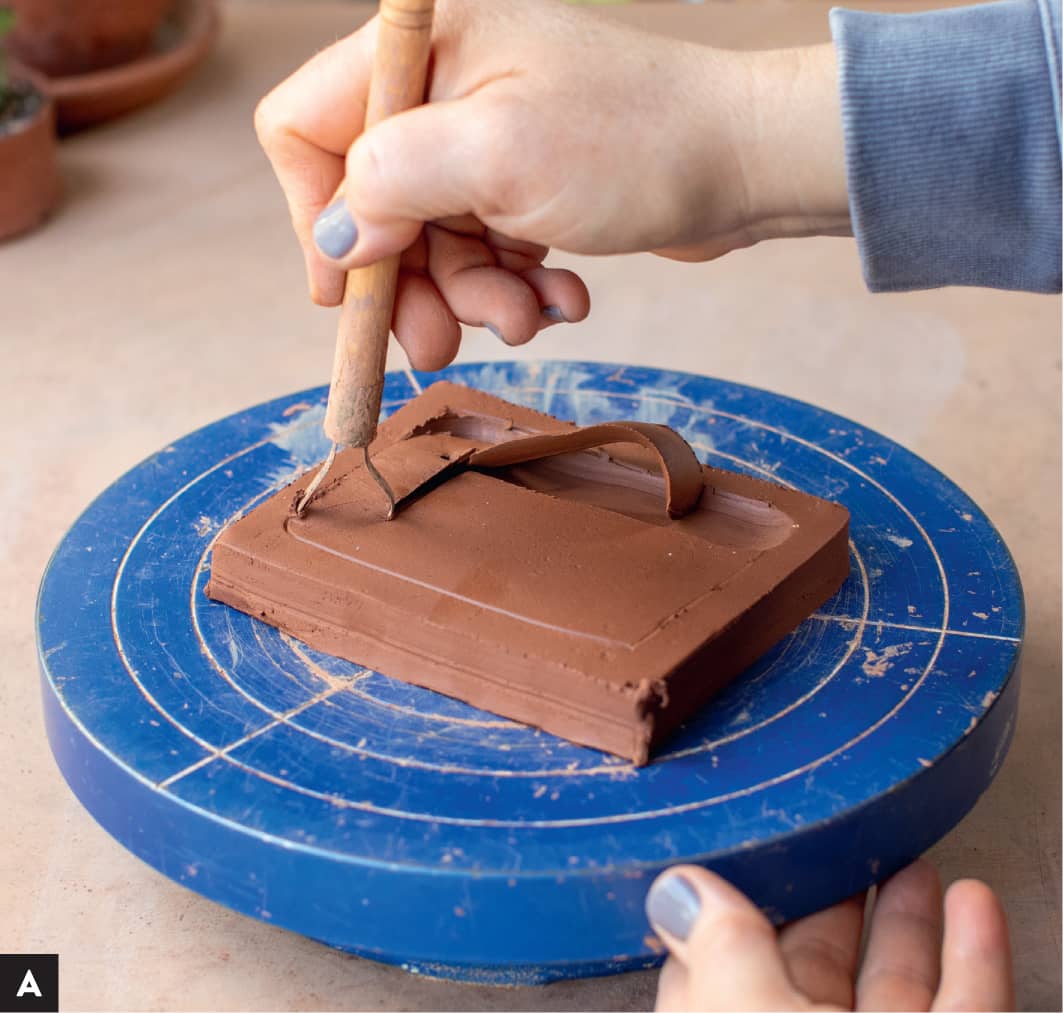
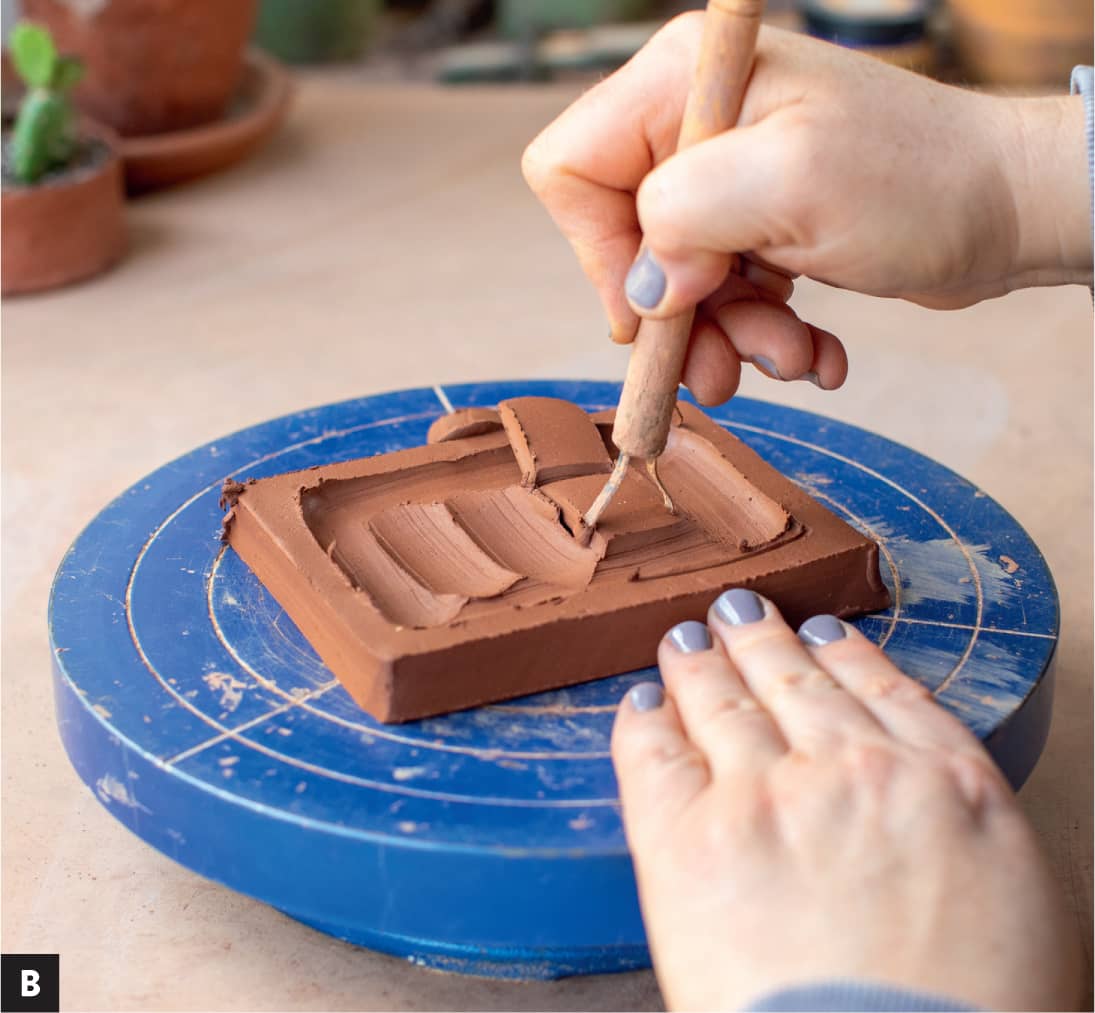
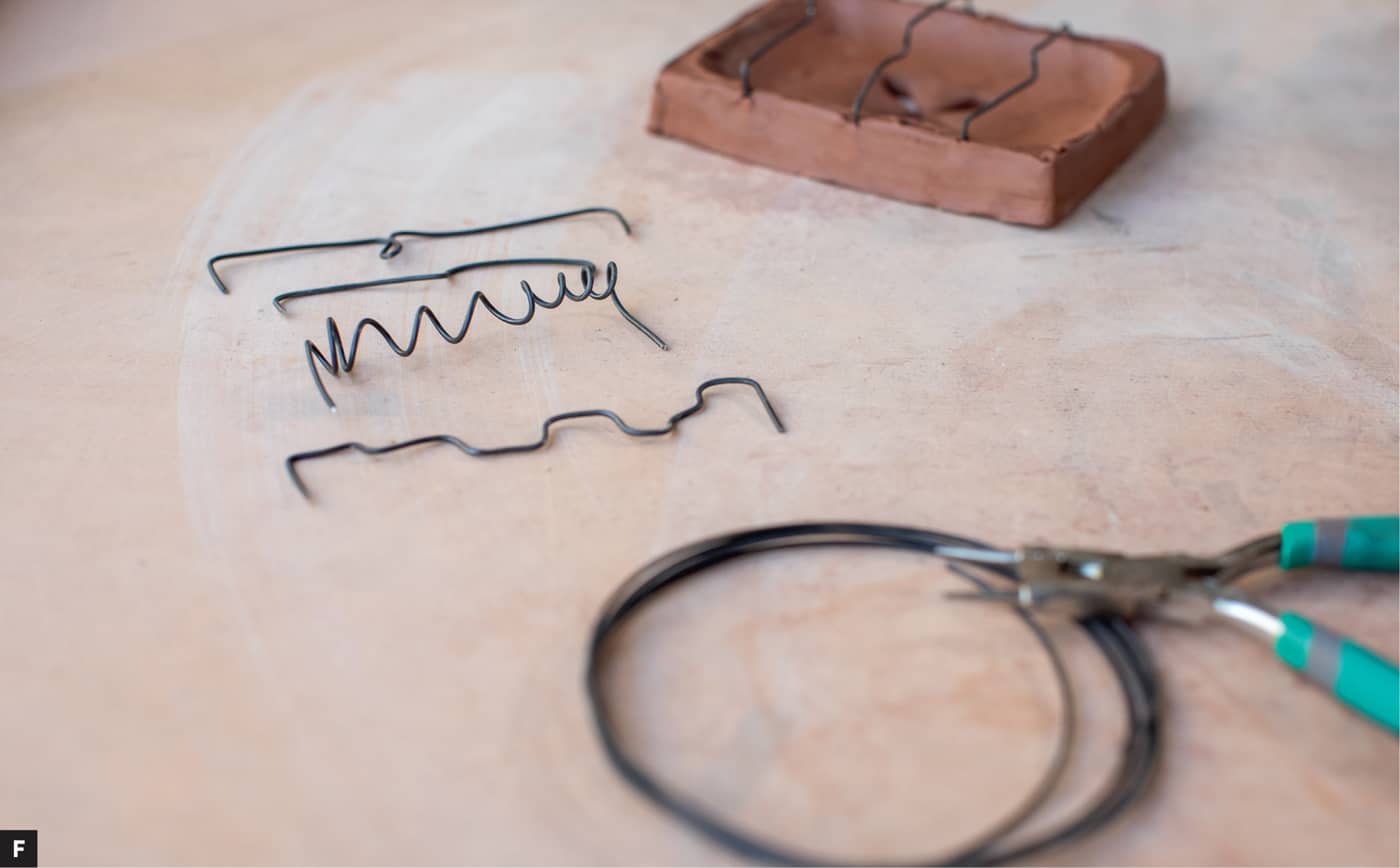
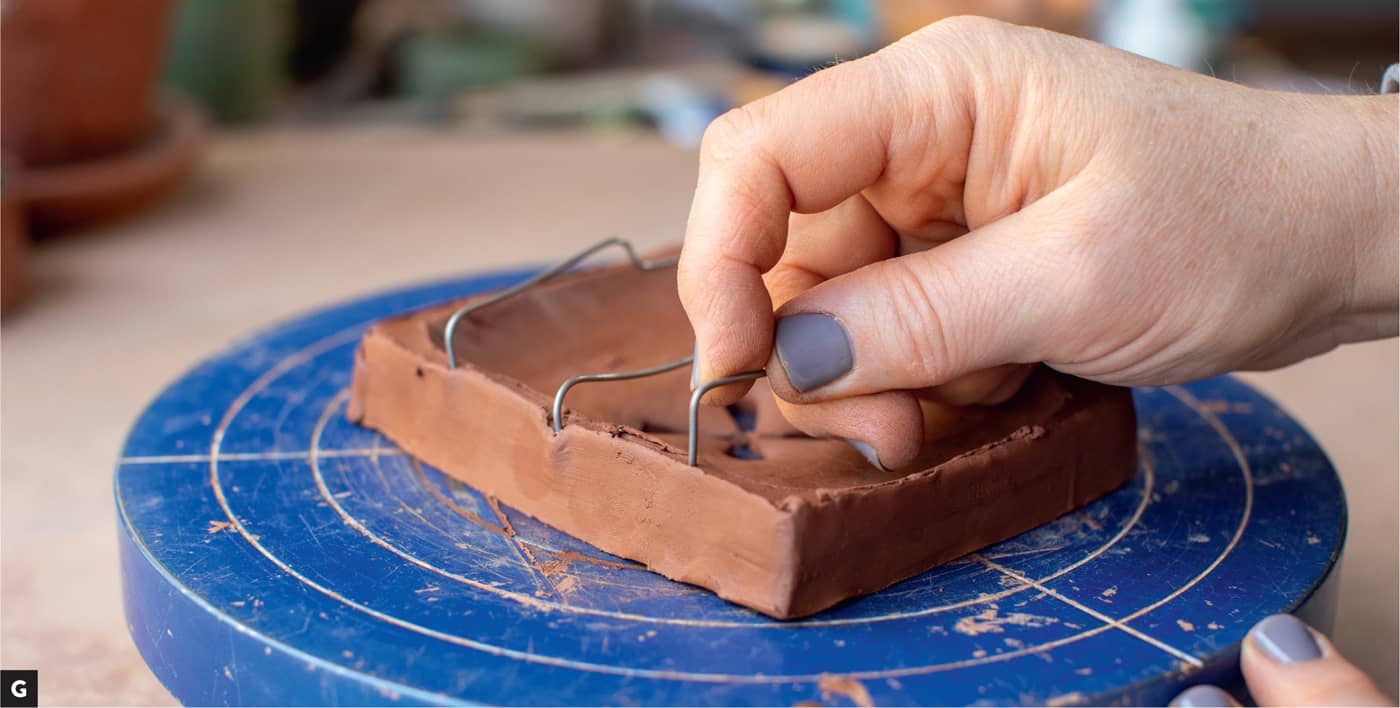
CONE 5, porcelain clay, celadon style commercial glaze Using a ruler, measure out a shape 4" (10 cm) long and 3" (7.6 cm) wide on a piece of paper, and cut it out with scissors. Congratulations—you just made a template! It is that easy. This is the template for the soap dish. Roll out a small thick slab, about ¾" (1.9 cm) to 1" (2.5 cm) thick and a bit bigger than the shape of your footprint/ template. Use your template as a guide to cut out the shape. (Use a fettling knife or a needle tool for the thicker clay.) Try to keep the edges crisp. Once you’re done, let the slab dry on a flat surface, firming up until it’s soft leather hard. Using a needle tool, make a line about ½" (1.3 cm) from the edge all around the top. This will be your guide when using a trim tool to cut into and dig out a shallow dish. [A] This part can be a bit tricky; start someplace mid-wall and gently dig in about ⅛" (.32 cm) to ¼" (.63 cm) deep and make a shallow “dish.” After you are done carving out the dish, use a metal rib to clean up the interior. Work until you have a nice shallow dish and make sure you clean up and soften the edges. Let it firm up again to a soft leather hard. [B] [C] Let’s make some holes for drainage. Using the blunt end of a wood knife, make an X in the center of the dish. Use a scalpel to cut around the edge of the X shape. Remove the cutout and gently squish the X shape to soften the edges. This is a quick method and can be done without waiting for the clay to get super firm. [D] [E] VARIATIONYou are welcome to cut out any shape you like. I also play with using drill bits to make holes. Your form should be close to medium leather hard. Use a ruler to create grid a pattern and use a medium-sized drill bit to create holes at the intersection of the grid. You can attach the drill bits to an actual drill or use your fingers to twist the drill bit into the clay. To create successful, clean drill holes, I have a few tips. You want your clay a perfect (medium) leather hard. If it’s too dry, you run the risk of cracking the clay and punching through to the backside, with no way to clean that up. If it’s too wet, you will get gummy and mushy clay around the holes, and the result is a poorly defined drain. Let your form firm up, and try different stages of dryness. (Make a slab to practice on if this confuses you.) For any burrs that happen, let the clay dry a little and then can use a dry paintbrush to clean up the holes. This is where this soap dish gets a little funky. Get out the Kanthal wire and your wire snips and a pair of needle-nose pliers (helpful for shaping, depending on wire gauge), and have some fun! [F] In the image above, there are a variety of patterns and ideas for shapes easy to achieve with your wire and pliers. I suggest testing new materials so you understand how they will react with your clay and glaze and firing method. (For this soap dish, the form is glazed and the wire is not.) Cut some wire and try bending it. (I used bailing wire to practice making a variety of shapes before I moved onto the Kanthal wire, as it’s inexpensive and usually found at the local hardware store.) As with anything, it takes some practice to create consistent bends and shapes. Remember that your ends will go about ¼" (.63 cm) to ½" (1.3 cm) into the clay, so make sure you leave your ends a bit longer to have some ease of assembly. TIPS ON USING THIS HIGH-FIRE WIRE.It survives the firing well, but it can become a bit brittle, and maybe a bit flaky. Spanning long distances is not recommended. (A heavier gauge will hold up better; in the beginning, try to keep it under a 3" [7.6 cm] span.) Your clay will shrink around the wire as it dries and fires, so small cracks can occur, as well as possible breakage. Don’t panic—there are always risks when combining materials, but the more you practice and understand what occurs, the more you will be able to compensate and have successful outcomes. Cut out pieces of wire and shape, using the shapes to grid out where you want your wire props. Just press down gently to get an indention where the holes need to go. [G] Count and make enough shapes to finish your form. Make sure they are all close to the same size, width, and height. NOTEFor this project, I decided to use wire as my rest perch, where I intend to rest a nail brush and a small bar of soap. My goal with the wires is that as the soap shrinks through use, it will be able to sit easily on the bed of props. Using a tiny drill bit, create a series of small holes where the wires will slide into. Or, if your clay is soft enough, gently press the wires into the appropriate holes. If your holes are a little bigger than the wire, I recommend dipping your wire into some thick slip, which will fill in any gaps in the assembly. If your drill holes feel tight, be careful and press in gently. There is more chance of cracking, as the holes will get tighter around the wires. (Clay shrinks, but wire does not.) If it feels like too tight a squeeze, gauge up your drill bit, re-drill the holes, and insert a bit of slip. The wetter the clay, the easier it is to insert the wire, but the clay shrinks more. If the clay is leather hard, it has already shrunk a bit. Drilling the holes will help ease any cracking. Clean up any sharp corners of the form, and use a soft, damp brush to clean up any stray slip or burrs.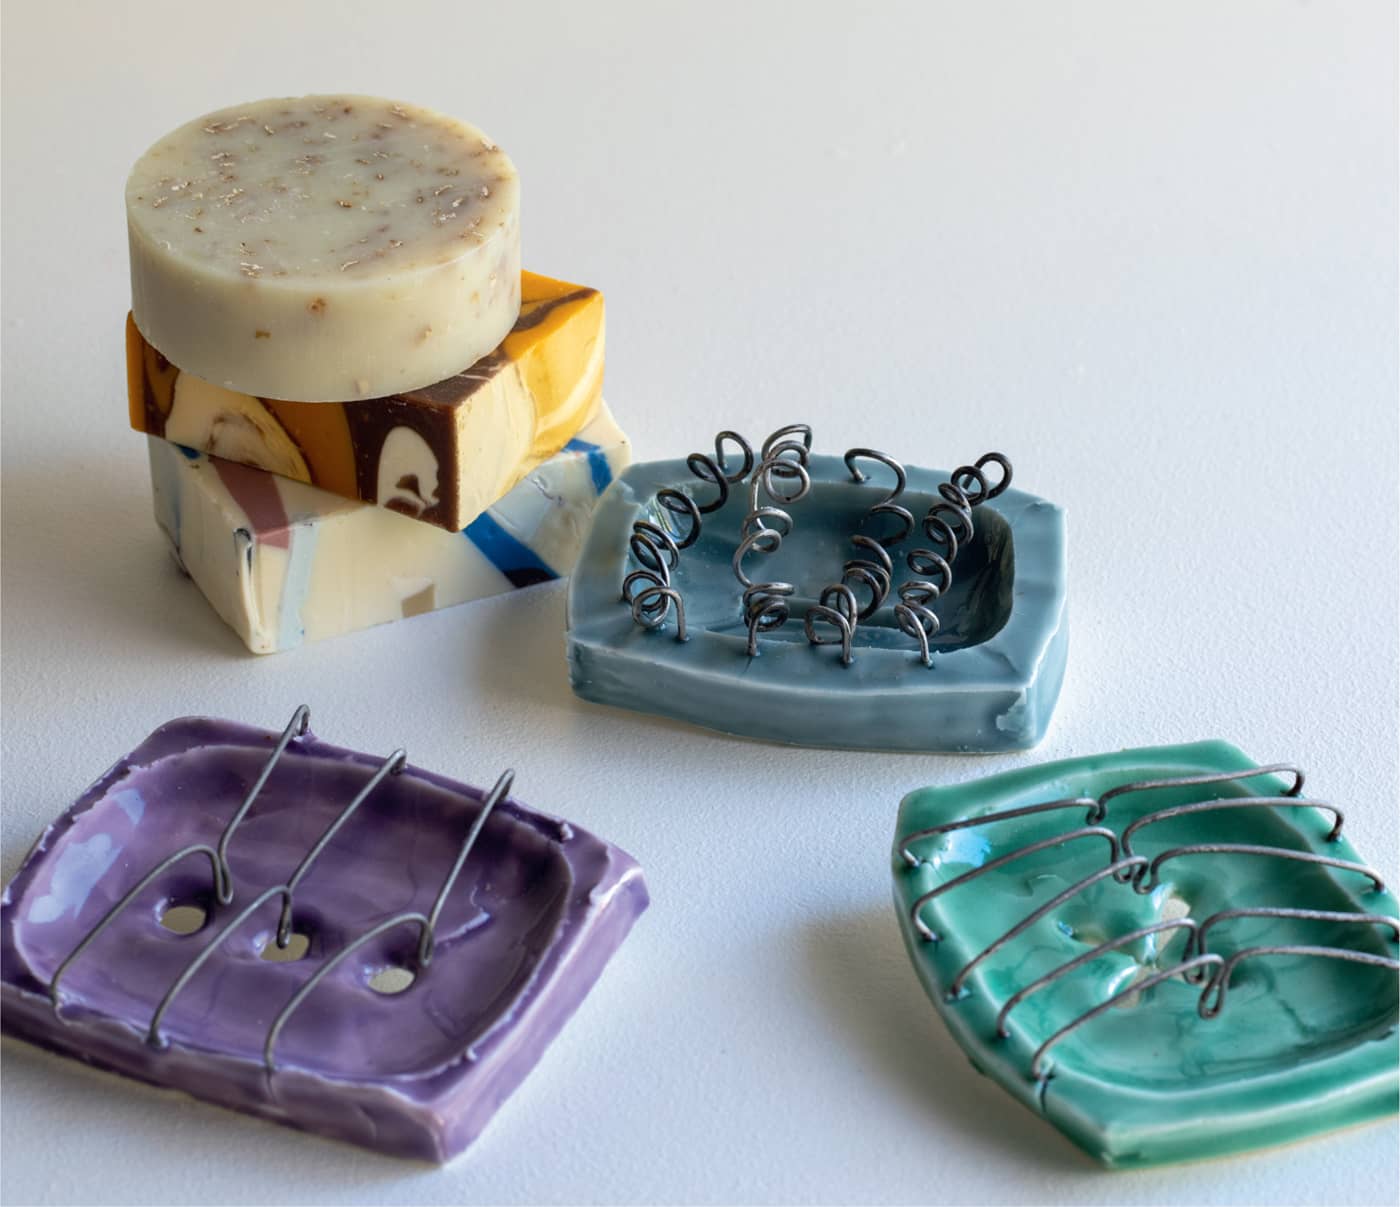


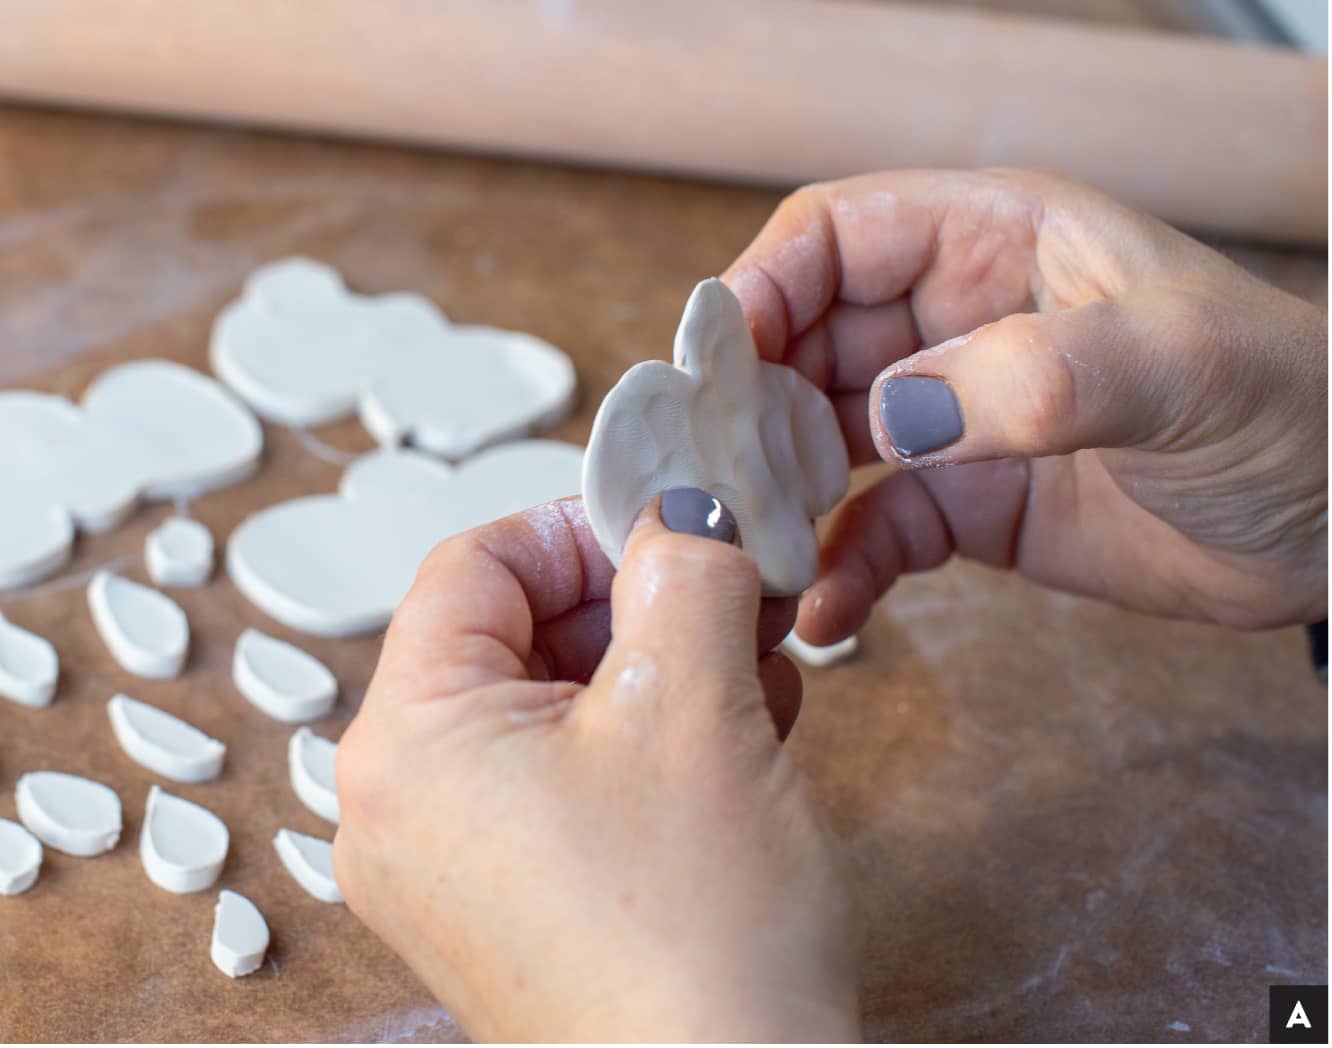
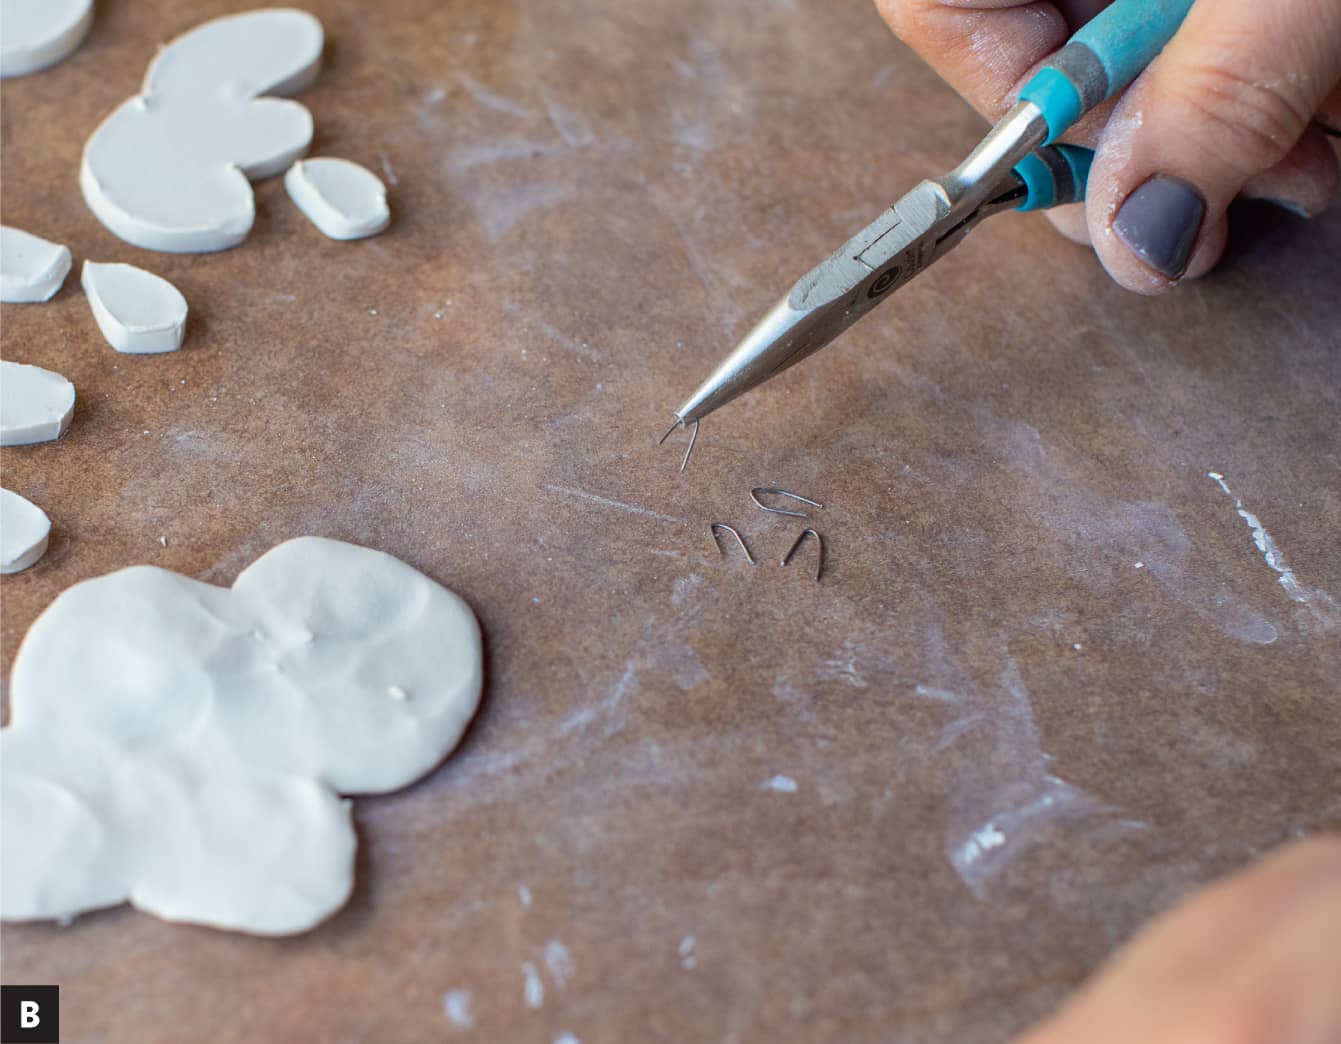
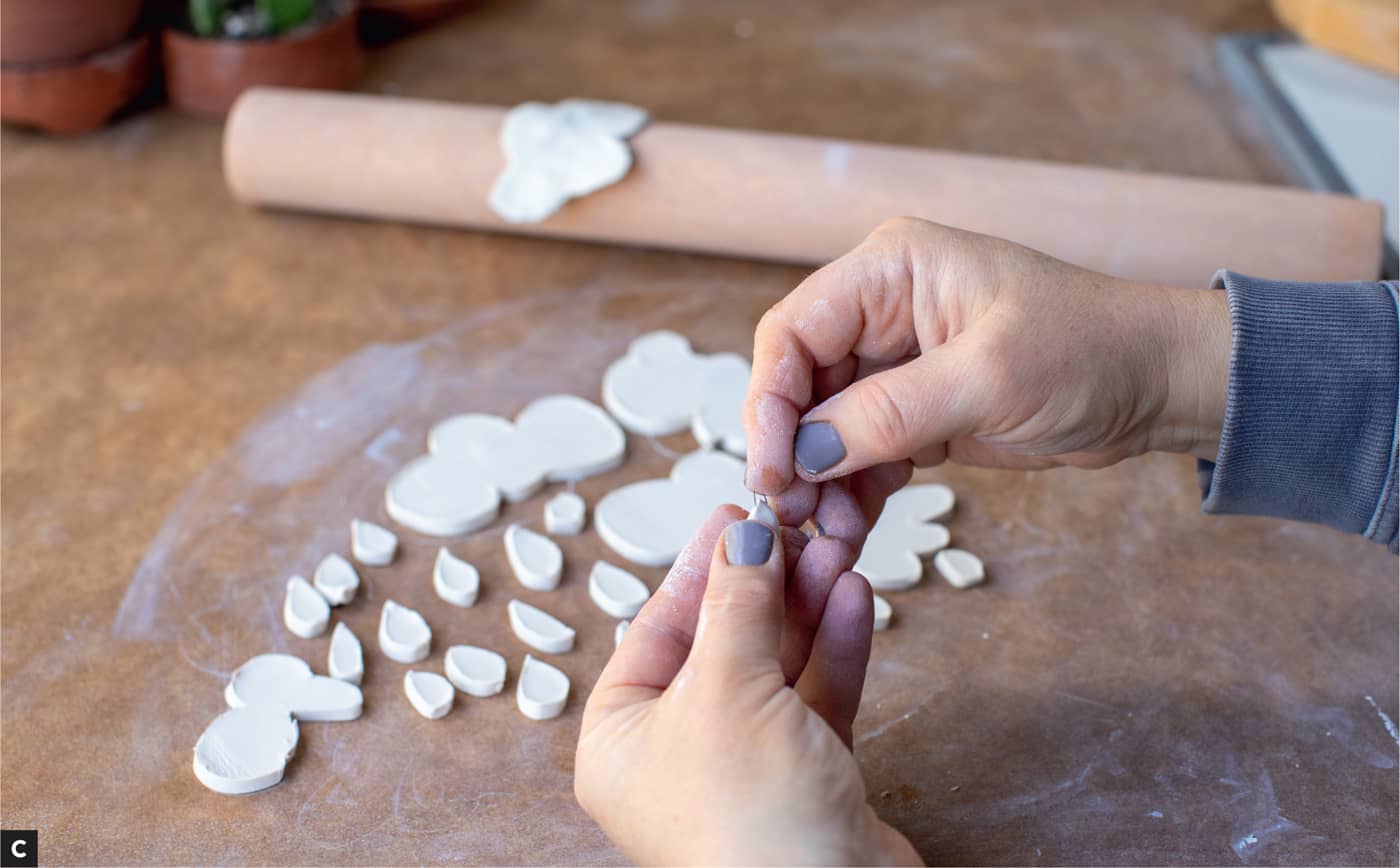
CONE 5, exposed porcelain clay and celadon style commercial glaze Roll out a 1' (30.5 cm) square slab, roughly ⅜" (.98 cm) thick. The thinner you can work with, the better. (Keeping the overall weight low can be important.) Also keep in mind you want to be able to handle and manipulate the clay and still get a small Kanthal wire hook inserted. Using a scalpel, cut out your shapes. I chose freehand cutouts of clouds and raindrops for this project. Make the cutouts a bit smaller than you think is the prefect size. You will be pinching and manipulating, so the shape will grow a bit. Remove the excess clay and put it back in your bag. Begin to pinch and shape the pieces. Work from the center out. I chose a translucent porcelain for this project, so the thinner the clay, the more translucent it gets. But any clay will work. Focus on creating soft, billowy textures and forms for the clouds and raindrops. This process takes longer than you think . . . slow down and enjoy the texture and feel of the clay. Refine your hand skills. [A] Once all your shapes are done, cover them with plastic, keeping them as soft as you can until you insert the wire. For the wire hangers, use pliers and a thin-gauge Kanthal wire to make lots of small U shapes. Mine are roughly ½" to ¾" (1.3 to 1.9 cm) long, bent in the center. The process goes quicker if you cut out a bunch and have them at the ready. [B] Insert the wire. Do this when the clay is still very soft. I suggest laying out the pieces according to how you envision the mobile going together, and then inserting the wires. Play around, make extras, and give yourself some possible alternative choices. [C] NOTEIf you can’t find Kanthal wire or find this part too challenging, add wire or some kind of hanging device after the firing. There are lots of choices at your local hardware or craft store, such as epoxy or hot glue. Experiment with materials and find what works for you. In my example, I glazed some pieces and left others raw to play round with hints of color. You do what you think is best! Once you have the pieces out of the kiln, experiment with assembly. I used bailing wire (found at the hardware store) and a fine fishing line to assemble the mobile. NOTEAgain, play around with materials that you find work for you and to which you have access. Remember, if you don’t like how it turns out, take it apart and reassemble. Nothing is finished until you decide it is. Enjoy!
CONE 5, red clay, white slip, commercial glaze Roll out a 6" (15.2 cm)-square slab about ¼" to ½" (.63 to 1.3 cm) thick. Using the template for the candle cup (here), cut out three of the shapes. This template can be scaled up or down depending on your preferred candle size. Bevel and score along the pie-shaped cutout. Repeat for all the cups, then set aside. [A] While you are waiting for the candle cups to firm up to a soft leather hard, prepare another slab, closer to ½" (1.3 cm) thick. From this piece, you will cut the half-circle template (10" [25.4 cm] long by 3" [7.6 cm] wide) and a rectangle 12.5" (31.7 cm) long by 3" (7.6 cm) wide. These will need to firm up to a soft leather hard. You can design a cutout pattern or apply texture to the pieces at this stage. (Save some of your scraps for a few steps from now by wrapping them in plastic.) [B] Refine and clean up the candle cups, address the edges, and “finish” the cups. I do this with a surform around the outside and a serrated rib to give some texture to the inside and outside of the cups, and then gently compress the edge. Set aside under plastic. Assemble the base. With a needle tool and a ruler, mark a center line down the rectangular slab and score a ½" (1.3 cm) swath down the length. On the half-circle piece, score the curved top edge. With the rectangular piece flat on the table, center the half-circle piece on top, matching the scored sections. Press down firmly, but don’t distort the shape. Once it is secure, bring up the sides of the rectangle to meet the shape at the score marks. [C] There should be a bit of overhang at the ends. Using a scalpel or a surform, cut the ends down to match or cut them just a little extra off the center brace. [D] Flip the object right side up. Check how it sits; you may need to address some of the supports with a surform to make sure the form doesn’t wobble. Another solution is to give the form feet at the ends and surform down the center brace a bit. Attach the candle cups. Using some leftover bits of your leather-hard slabs, cut out two rectangles ½" (1.3 cm) tall by ¾" (1.9 cm) wide. Cut those in half on the diagonal. These are the braces to attach your candle cups. Find the center on your base and set the small triangles, long side down, about an inch (2.5 cm) apart from each other along the center line, with the tall corner of the triangle toward the outside. Center your candle cup and step back and take a look: make adjustments to make sure your cup sits level. Score and attach the triangles to the base. Then score and attach the cup to the triangle supports. [E] Remember that the side cups will hang off the base a bit (refer to finished candelabra image on this page), so your remaining triangles will act as a perch. Place the triangles long side down, with the tall side toward the outside, about 1½" (3.8 cm) up from the tabletop. Place your candle cup on the perch and make sure your cups don’t overlap with the center cup. They can be close, but you want them to be apart from each other. Adjust if needed, and then score and attach the triangle first and then the cup. Part of the side cups will attach to the base as well as the attached triangle. Repeat for the other side. [F] [G] Clean up all your attachments, make sure the form is still stable, and then let dry slowly under plastic. MAKE A SHRINK SLAB (OF THE SAME WORKING CLAY).Make a slab ¼" (.63 cm) thick, 3" (7.6 cm) wide, and 10" to 11" (25.4 to 27.9 cm) long. Big enough for the candelabra to sit on and not hang over. Let the two pieces dry together and then fire the candelabra and the shrink slab together for the bisque and the final firing. (Do not glaze the bottom footprint of the candelabra.) This will help prevent any shrinkage cracks during the firing process. As the clay fires, it shrinks and drags across the kiln shelf, which can put stress on longer, heavier forms—a shrink (or waster slab) can save your piece. Discard the shrink slab after the final glaze firing.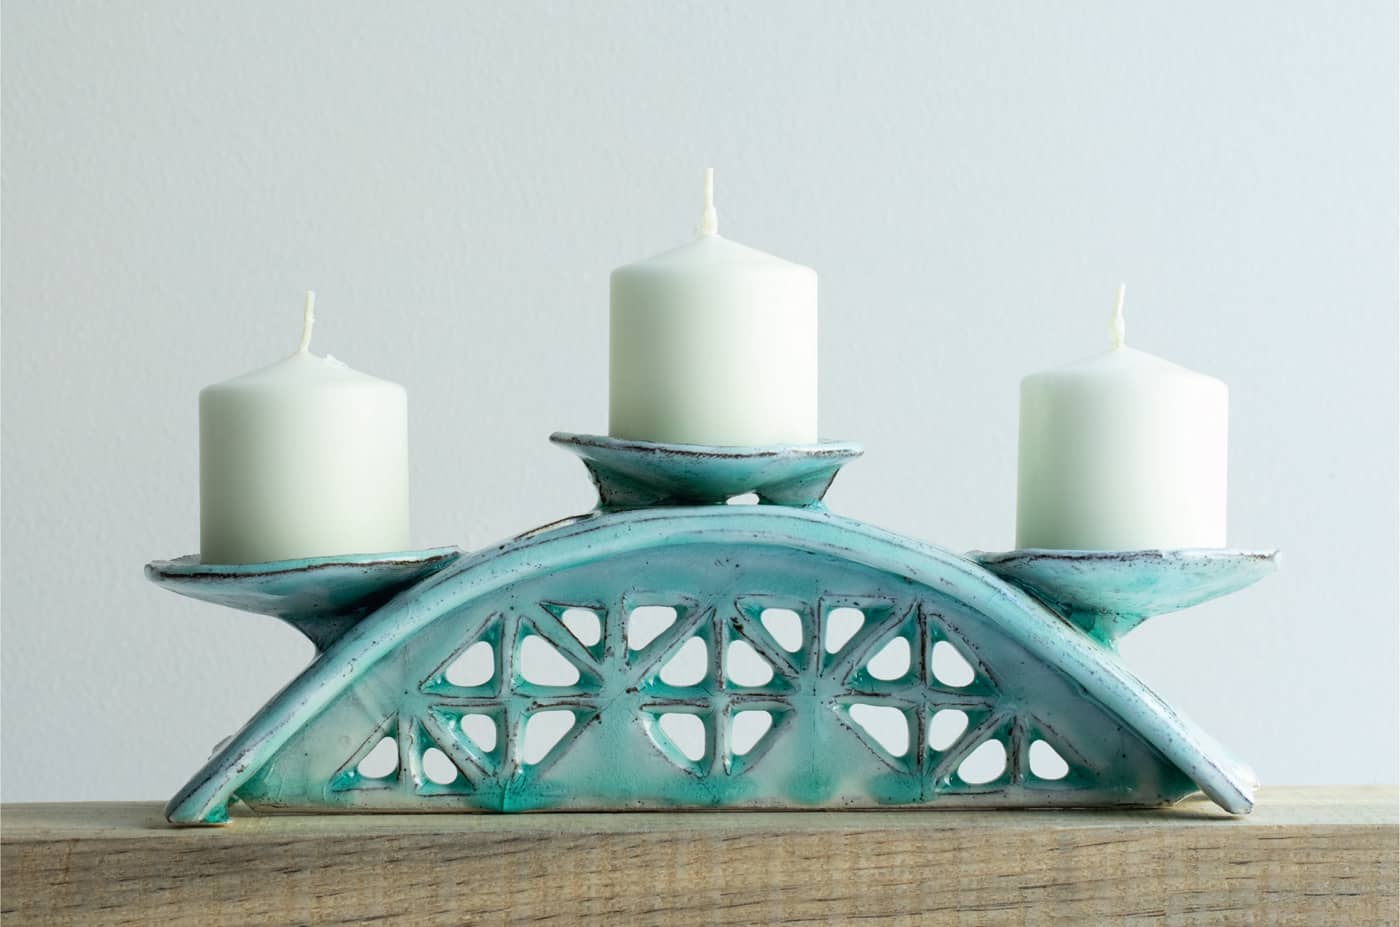

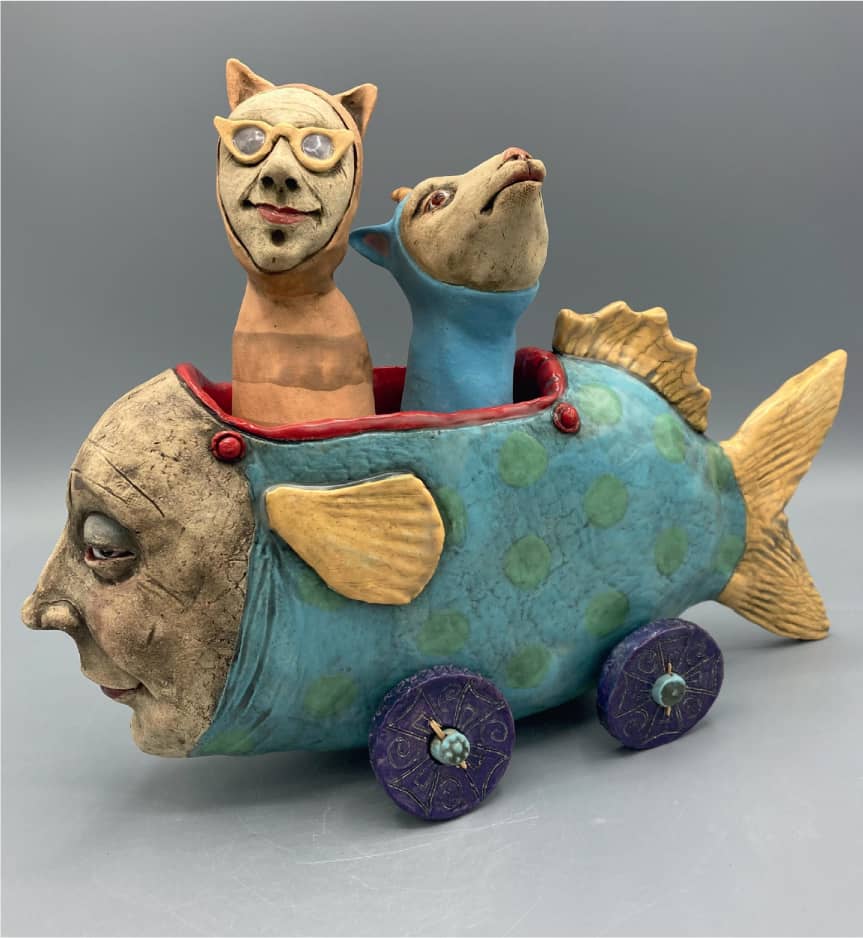
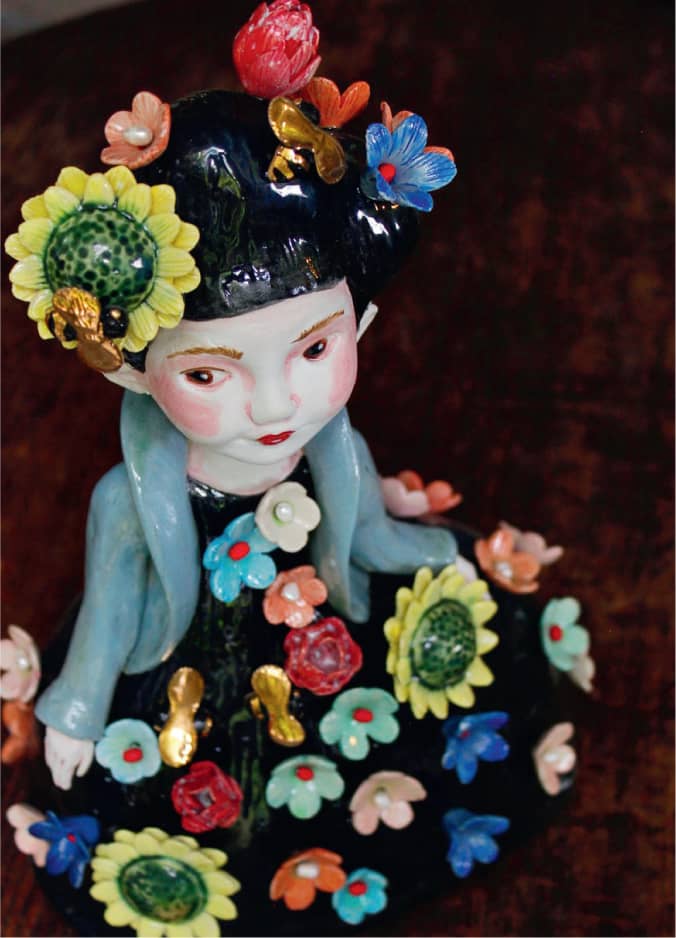
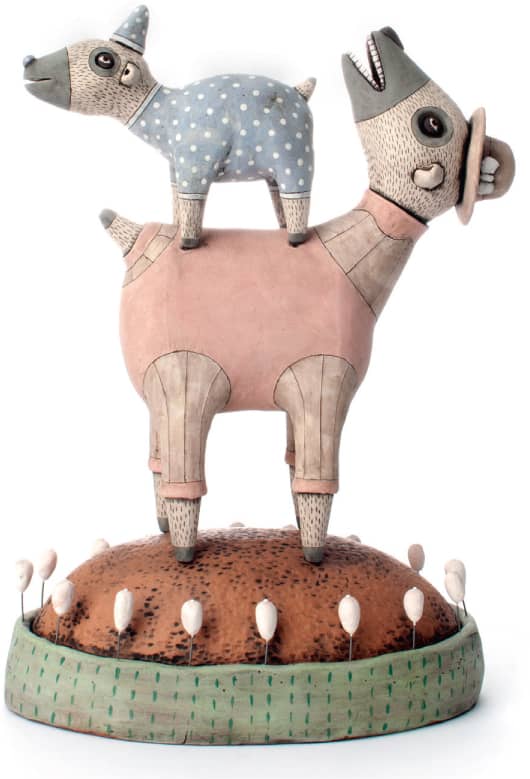
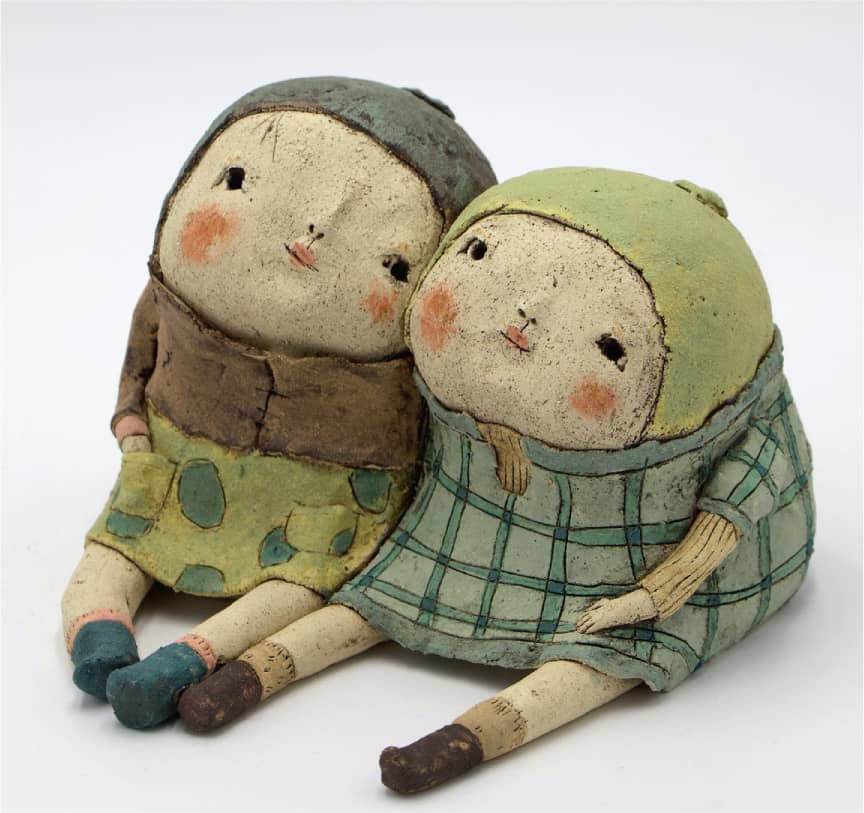
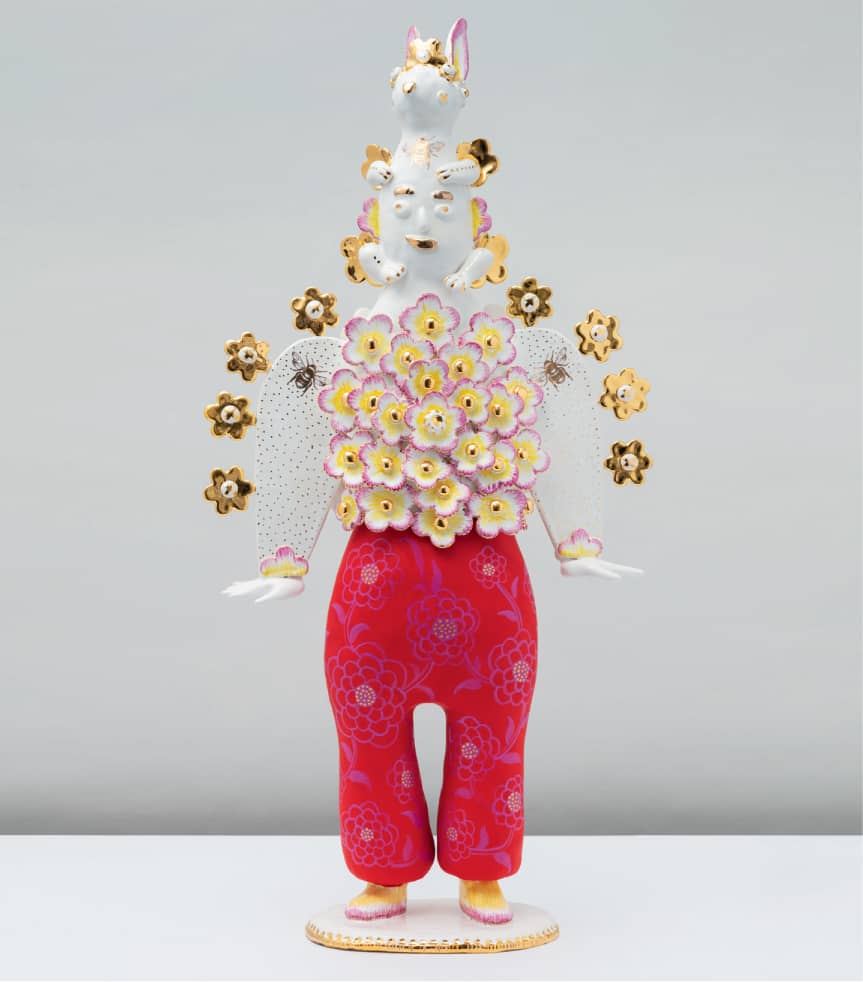
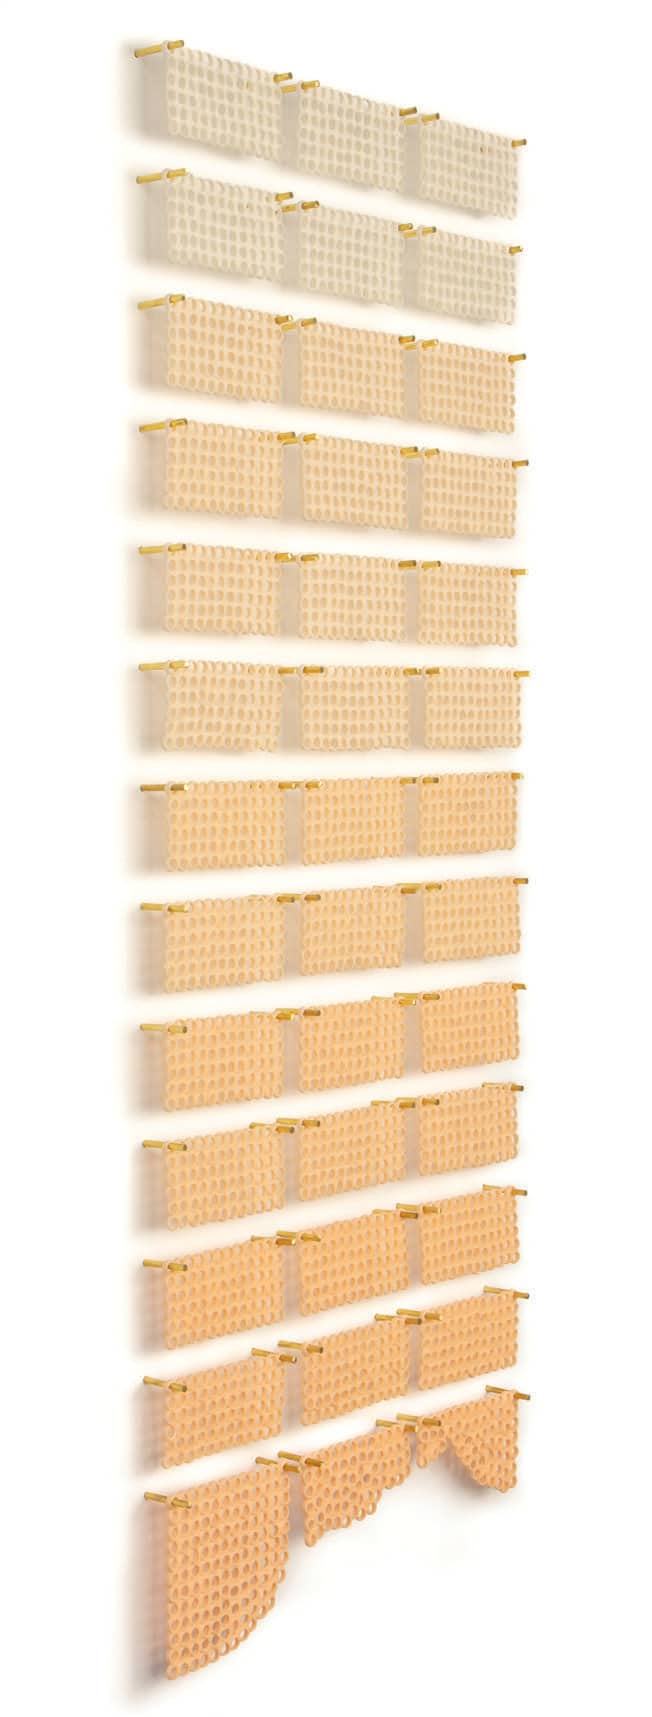
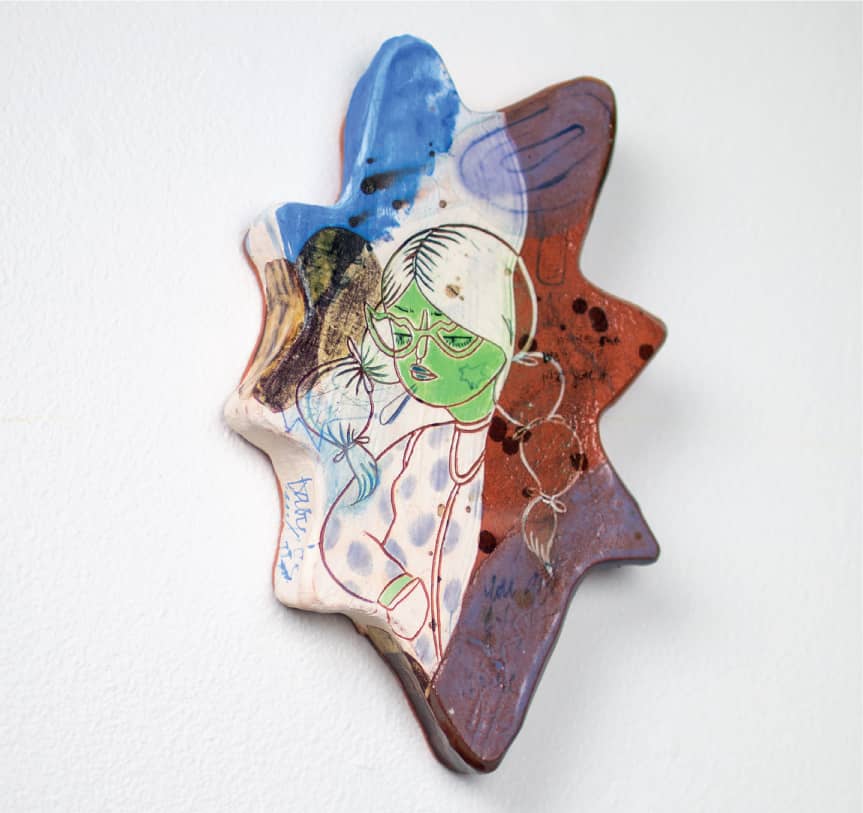
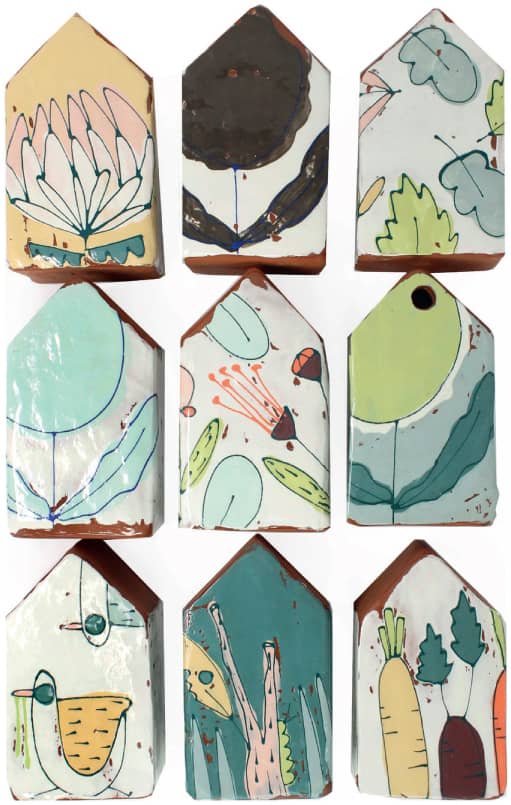
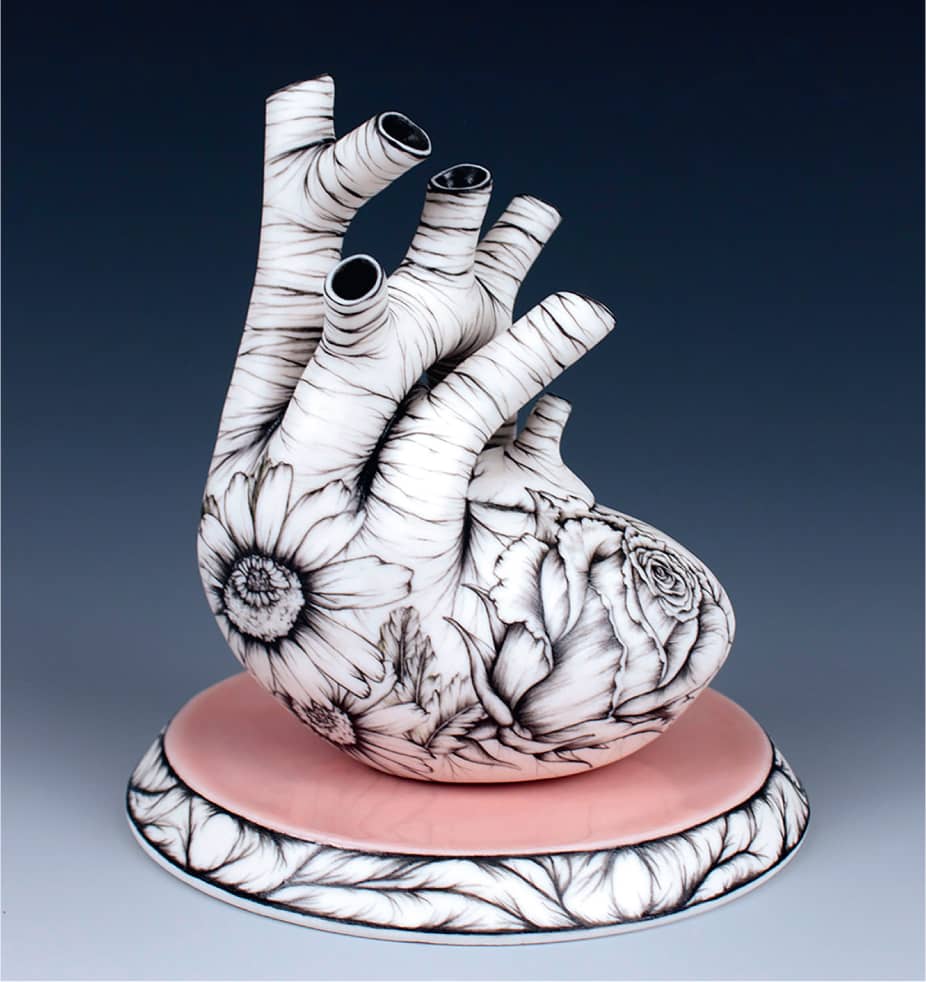
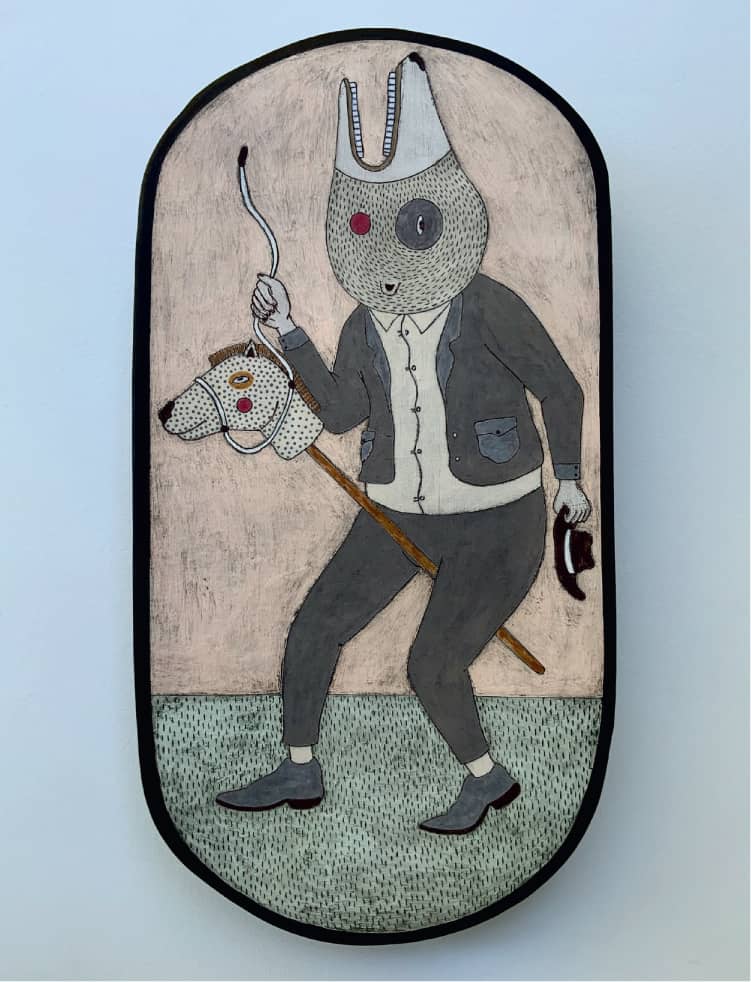
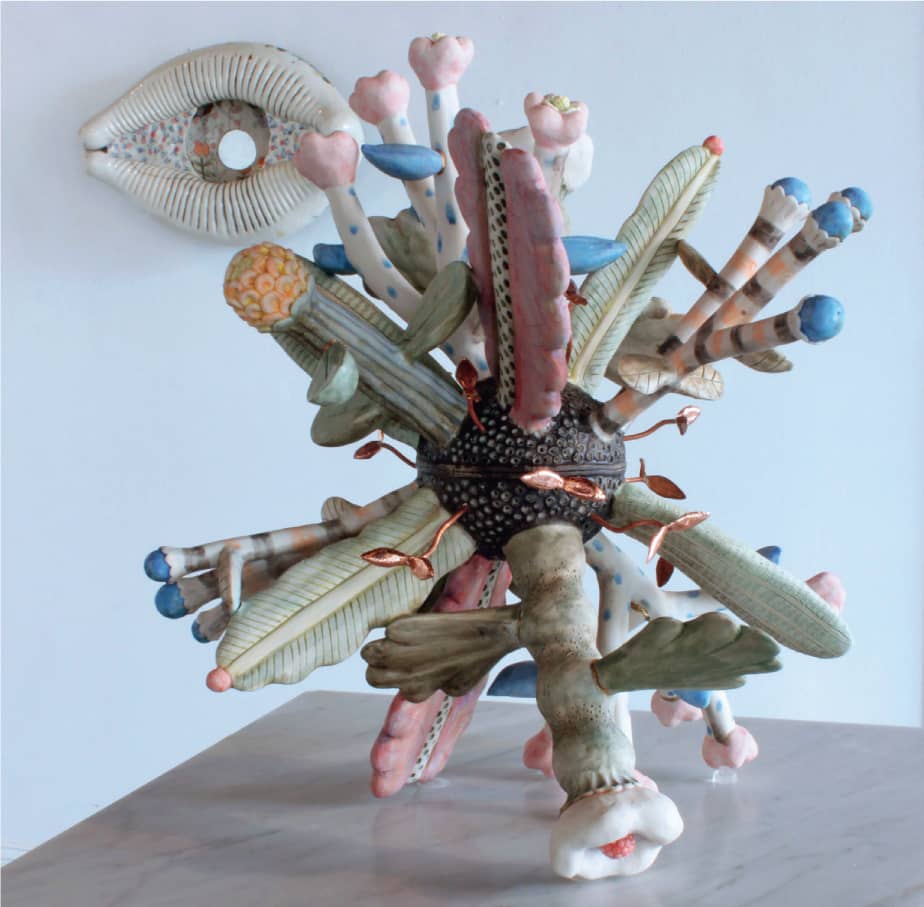
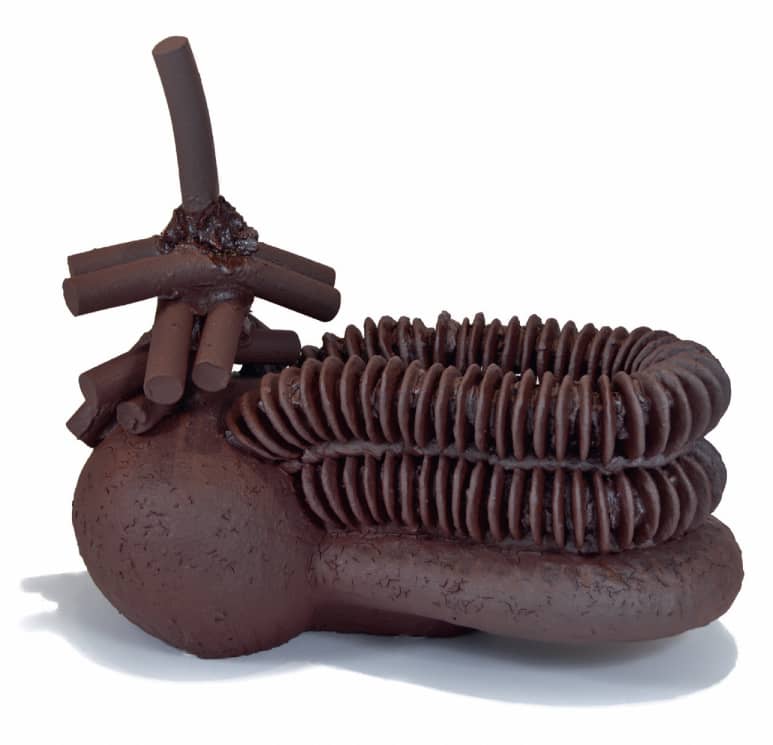
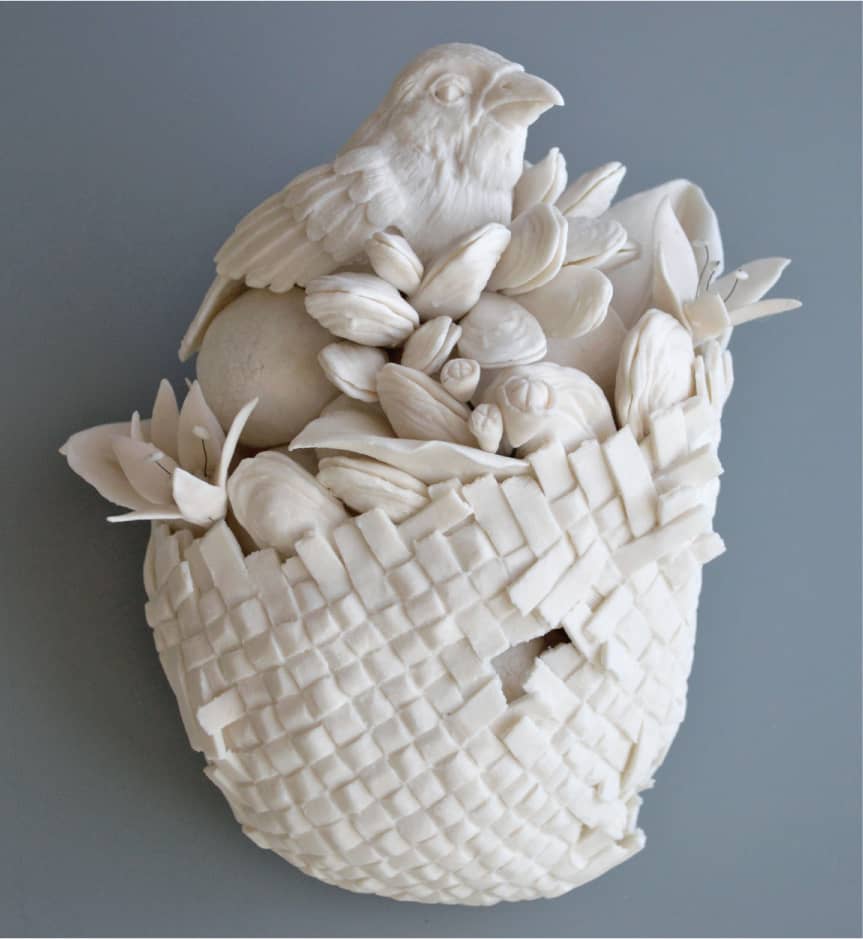
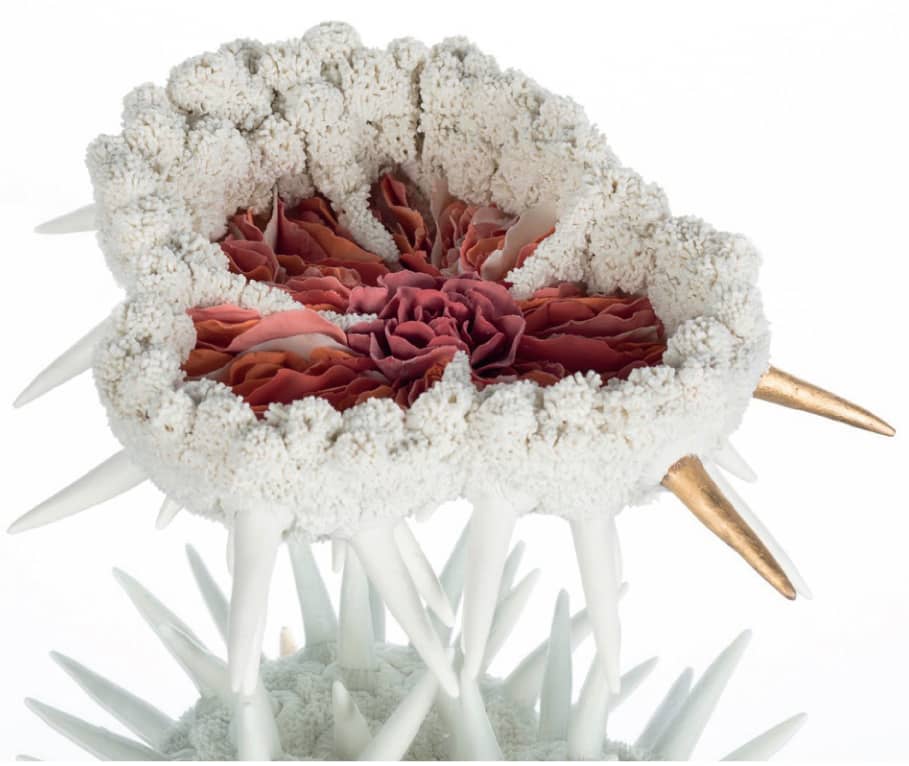
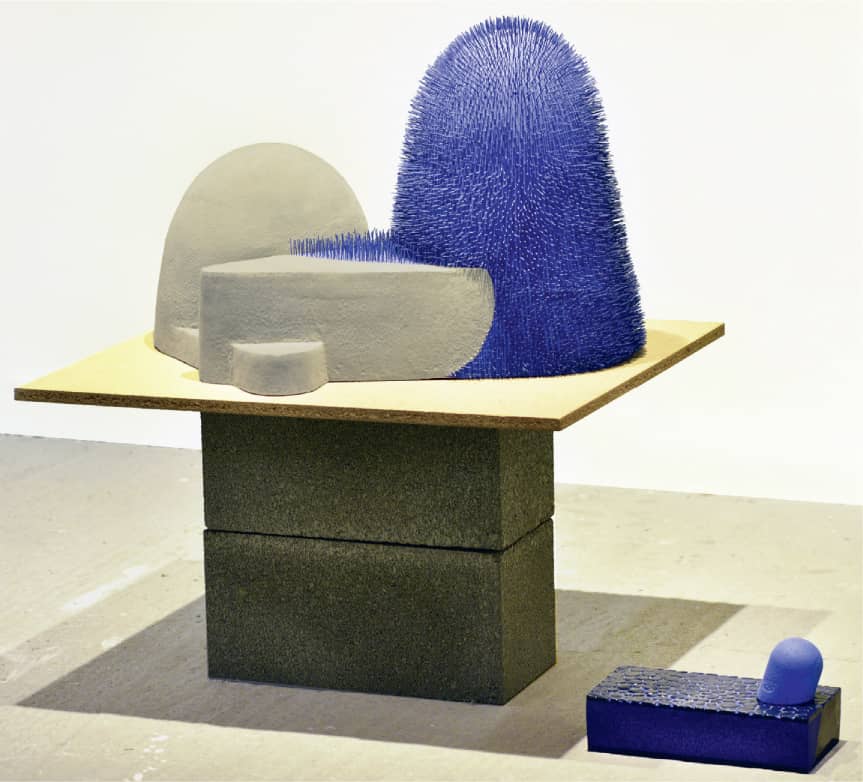
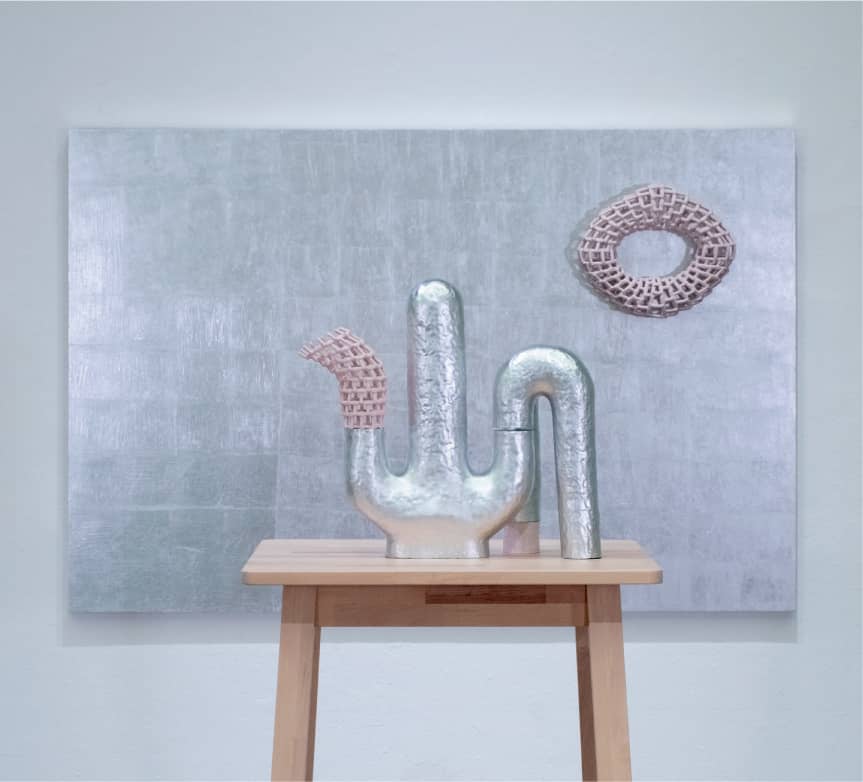
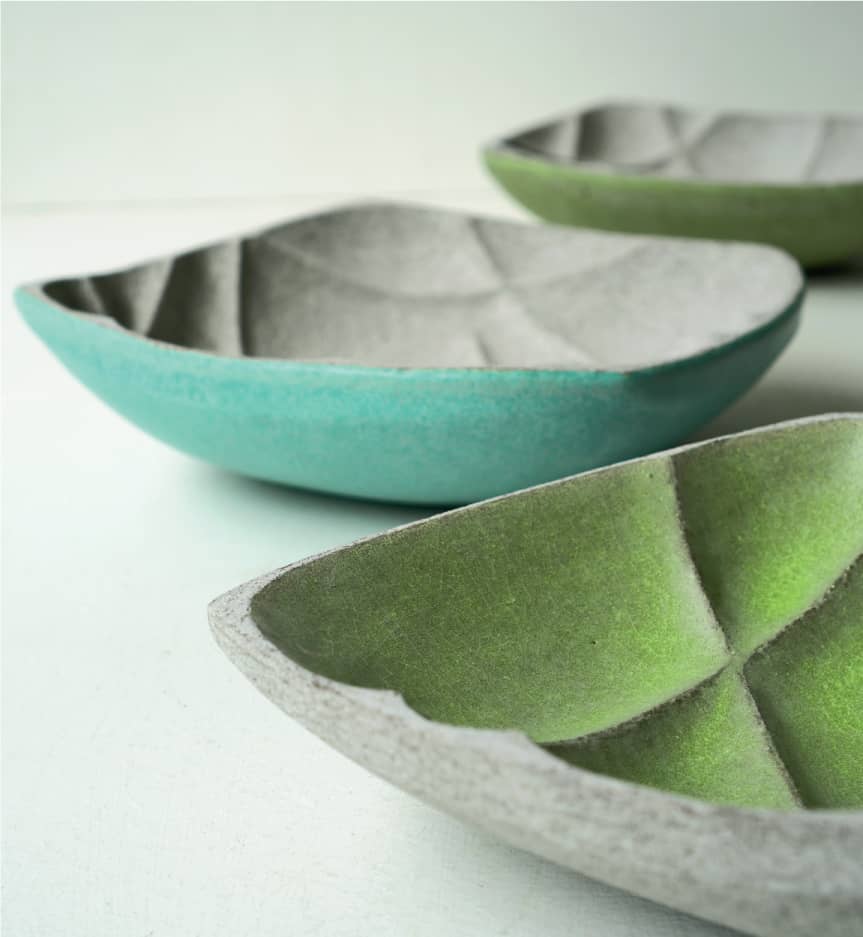
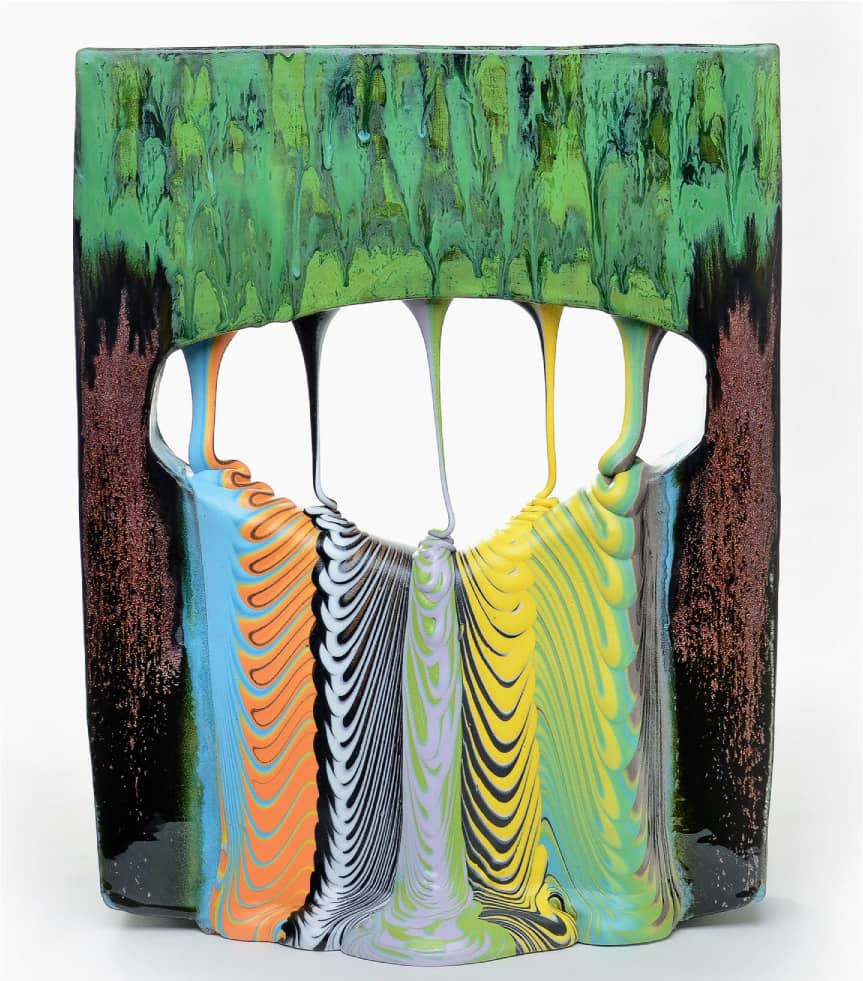
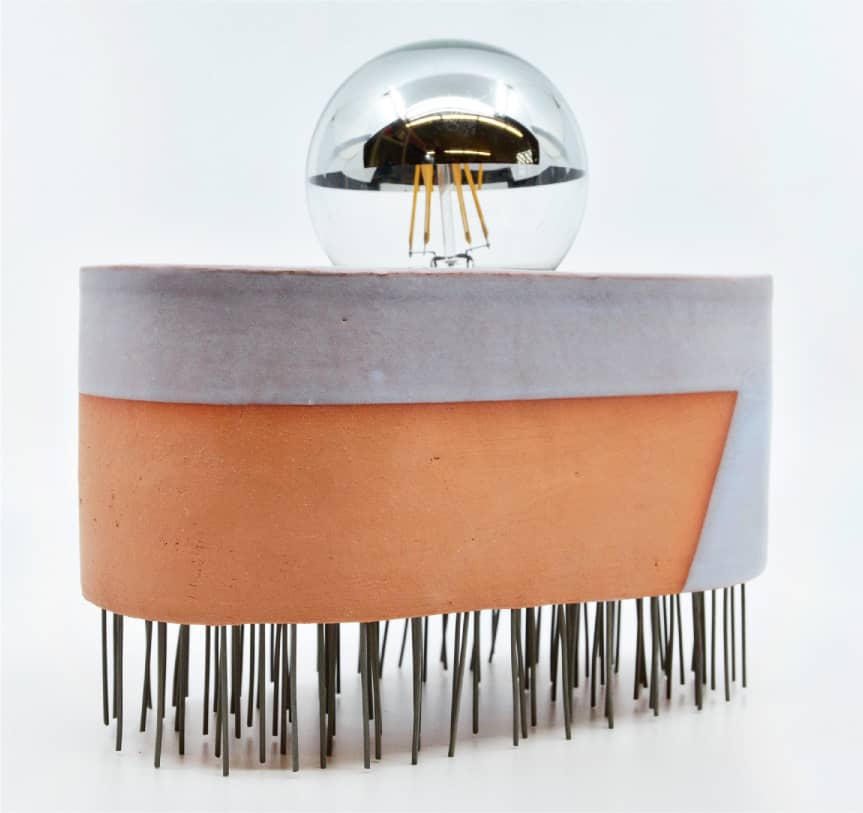
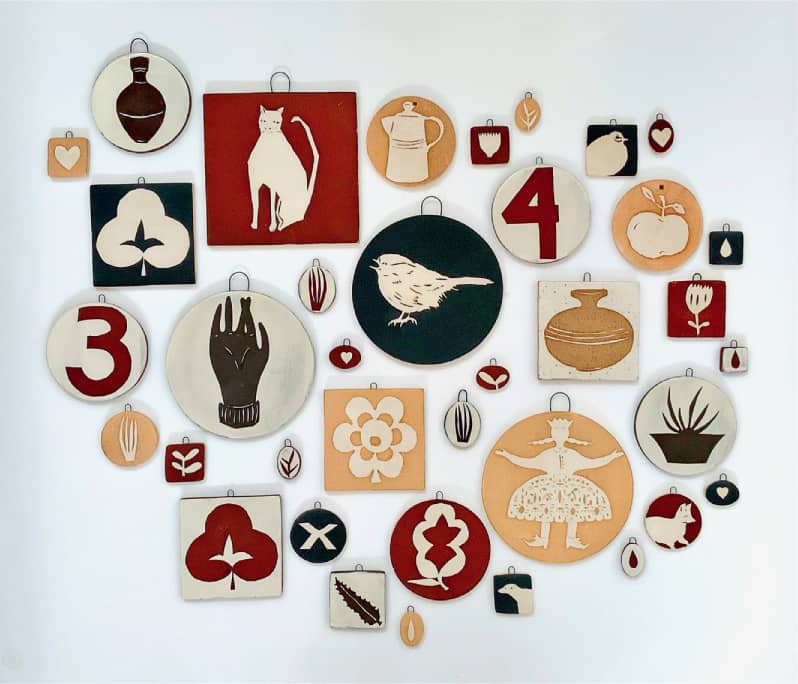
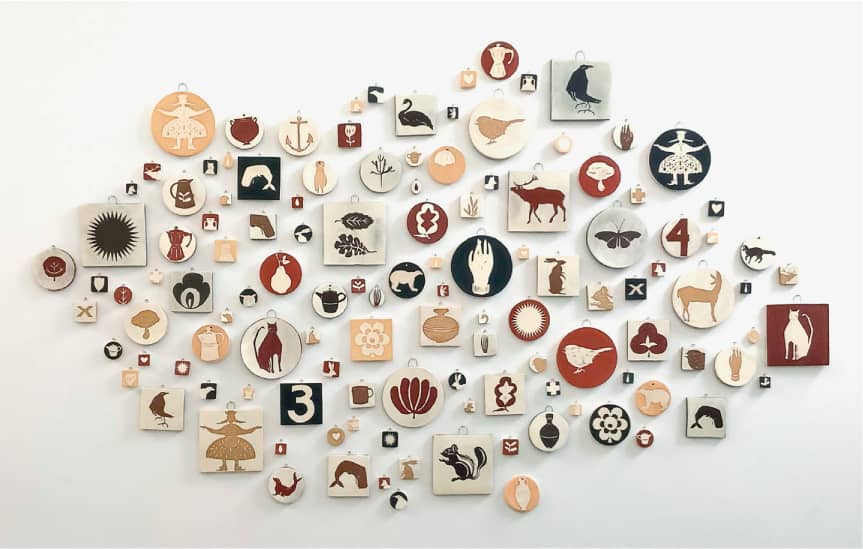
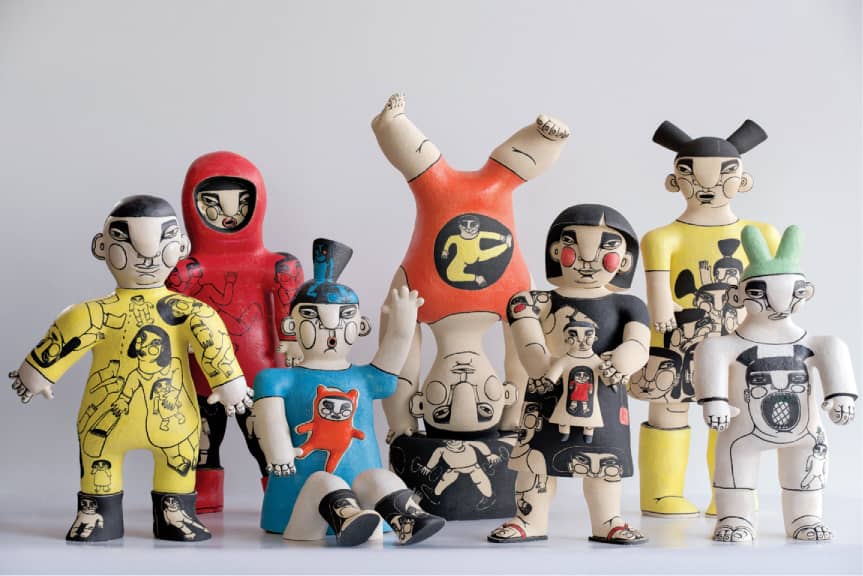
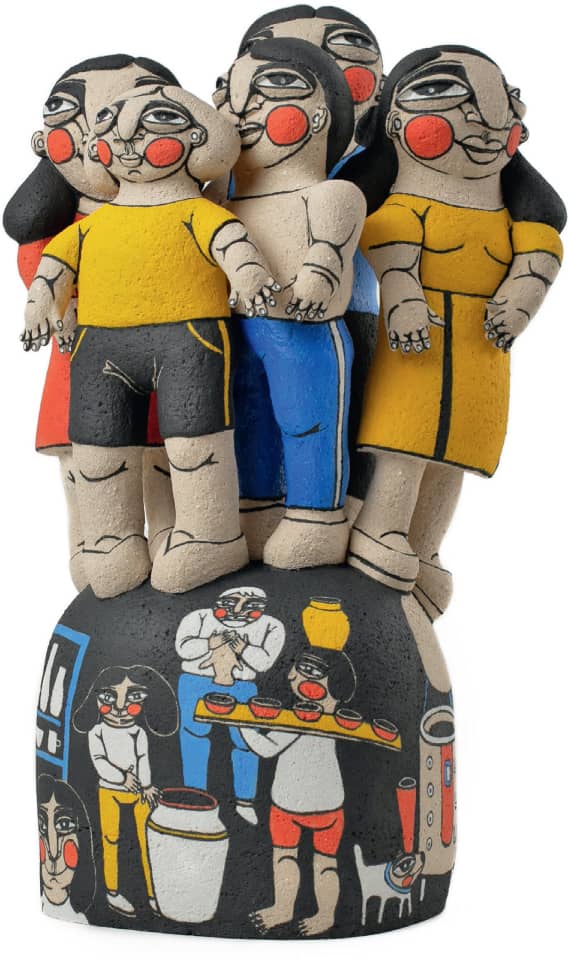
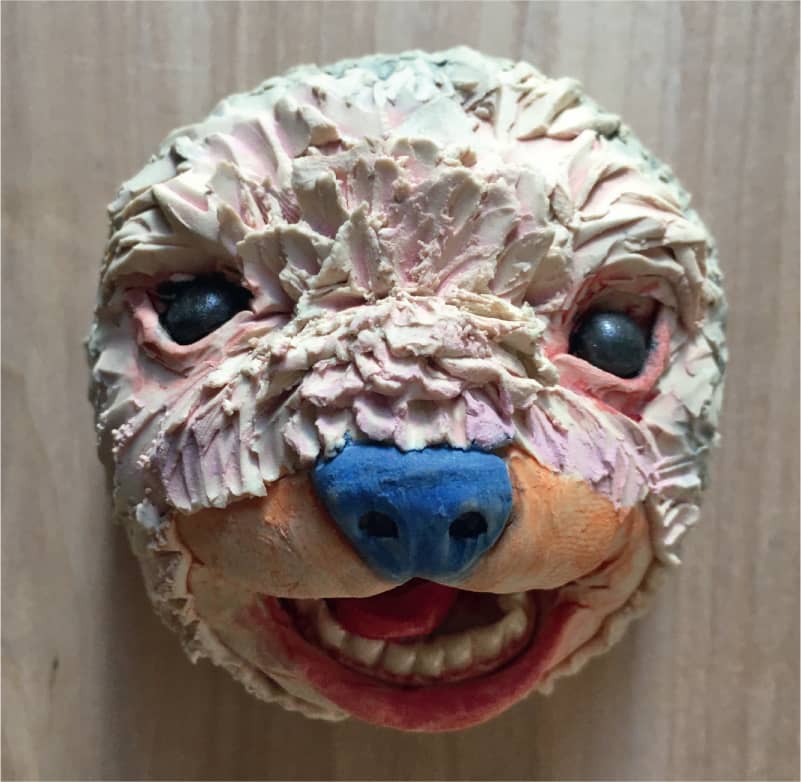
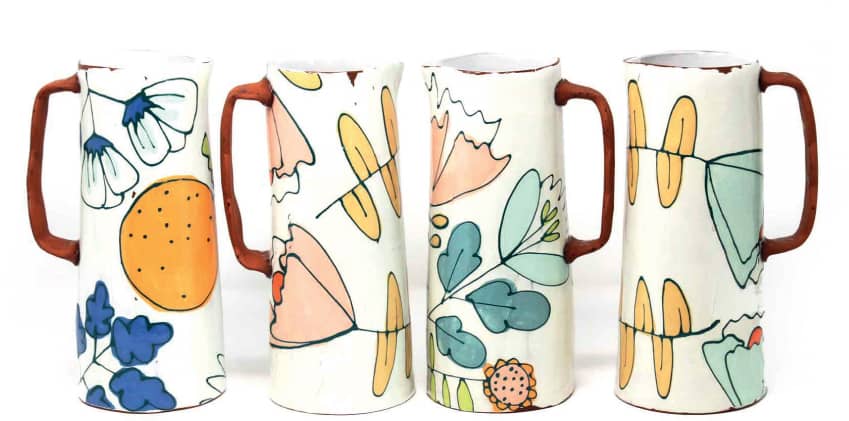
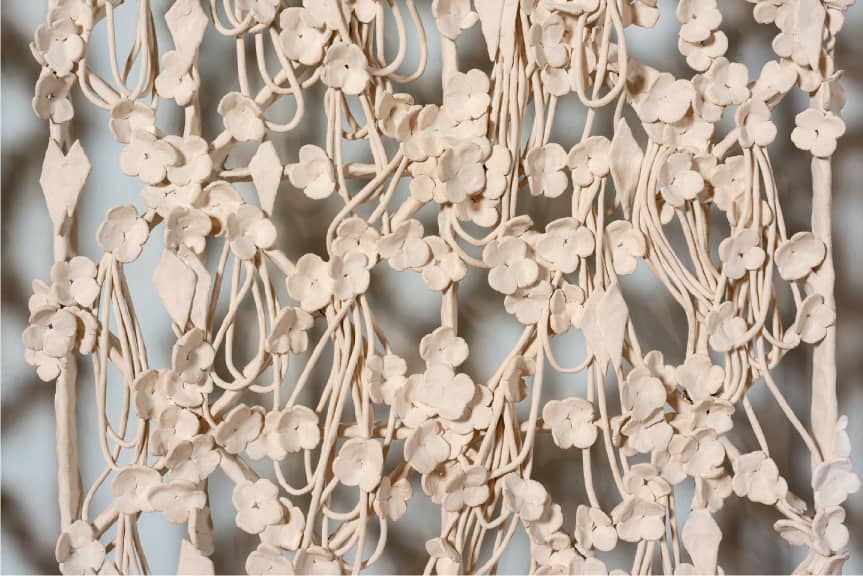
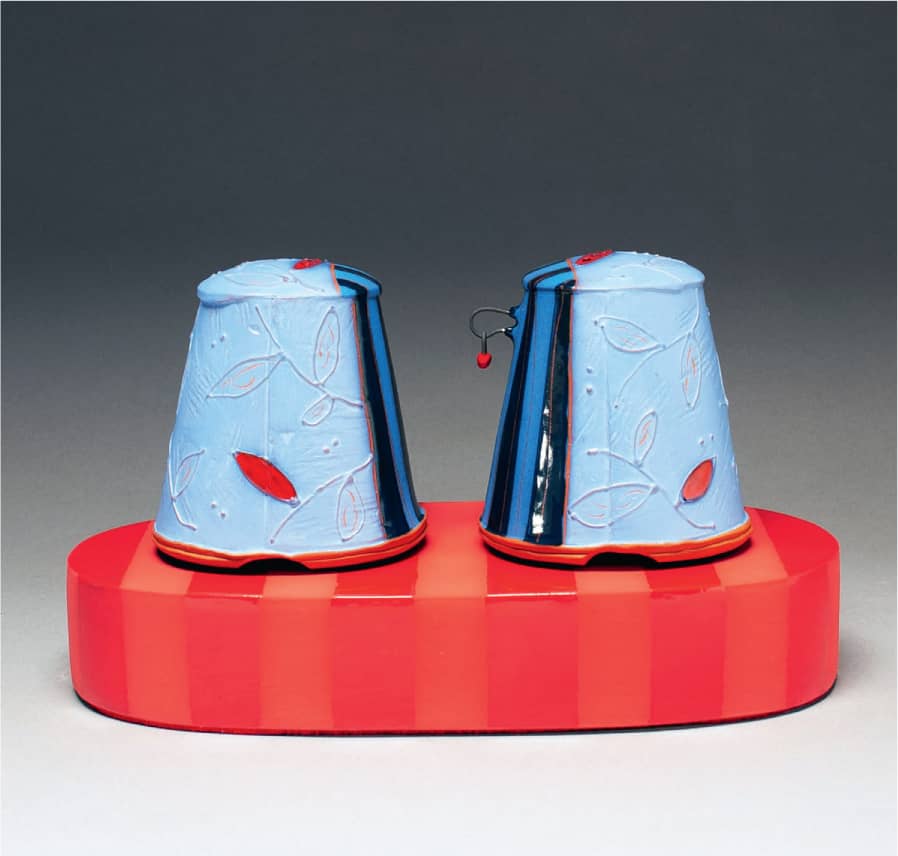
Jeanine Pennell,Blue Fish Car, slab and pinched. Photo Courtesy of the Artist Clairy Laurence,Serendipity, pinch built. Photo Courtesy of the Artist Rickie Barnett,Mother May I?, slab and pinch. Photo Courtesy of the Artist Anne-Sophie Gilloen,une belle aventure, coil built. Photo Courtesy of the Artist Vipoo Srivilasa,My Sunshine Doesn’t Come from the Sky, pinch and coil. Photo Courtesy of the Artist Amanda Salov,Mount Constance, pinch and assemblage. Photo Courtesy of the Artist Kristy Moreno,Wall Tile, slab built. Photo Courtesy of the Artist Catie Miller,Houses, slab built. Photo Courtesy of the Artist Mallory Wetherell,Burst, hand-built porcelain, hollowed out forms. Photo Courtesy of the Artist Rickie Barnett,We’re All Fools, slab-built wall tile. Photo Courtesy of the Artist Momoko Usami,Diversity Seed, pinch and coil. Photo Courtesy of the Artist Colby Charpentier,Disc Vessel, assembled from coiled and pinched parts. Photo Courtesy of the Artist Malia Landis,Apapane with Citrus Nest, hand-built porcelain. Photo Courtesy of the Artist Erum Aamir,Pollinis III, rolled, pinch, coil. Photo Courtesy of the Artist Iva Haas,Yugoslavia, slab and pinched. Photo Courtesy of the Artist Iren Tete,Phosphene Memory, coil, slab, and pinch. Photo Courtesy of the Artist Michele Bianco,Fracture Bowls, slab built, hand carved. Photo Courtesy of the Artist Lauren Mabry,Glazescape (Green Shade). Photo Courtesy of the Artist Iva Haas,Lavender Lamp, slab built. Photo Courtesy of the Artist Leah Kaplan,Piecework Dome, layered slab assembly. Photo Courtesy of the Artist Diana Fayt,A Day In The Life, Stoneware clay, slip, glaze, nichrome wire. Photo Courtesy of the Artist Diana Fayt,Wishing Wall, Stoneware clay, slip, glaze, nichrome wire. Photo Courtesy of the Artist Janina Myronova,Taiwanese Children, Chamotte clay, underglaze, high firing glaze. Hand forming and painting. Photo Courtesy of Ma Kang Li Janina Myronova,Ceramic Family, Chamotte clay, underglaze. Hand forming and painting. Photo Courtesy of Dzikie Studio Magda Gluszek,Blue Nosed Sloth. Photo Courtesy of the Artist Catie Miller,Pitchers, slab built. Photo Courtesy of the Artist Joanna Poag,Installation Detail, pinch, coil, assemblage. Photo Courtesy of the Artist Liz Zlot Summerfield,Salt and Pepper, slab built. Photo Courtesy of the ArtistGALLERY