
Making App Marketplaces Work for You
At this point, we assume that you have written your application, tested it, and found that things are looking great. Now it is time for your app to join the more than 700,000 apps already available for Android. How can you make your app stand out? How can you best compete for the attention of the more than 500 million Android users in the world? Let’s find out.
Uploading to an App Store
In this chapter, we present everything you need to know about getting your application on Google Play and other app stores. We are going to assume that your application is running without error, which is necessary to get it on the Google Play. Other app stores might have stricter requirements. I’m sure that you have discovered that getting the application to run without errors is just the beginning. You might find that your application does exactly what you programmed it to do, but still not what you want it to do. They can be two different things.
Eventually, you have to meet your launch date deadline, and if you can’t get the application to be perfect, you should at least have it running smoothly. If you don’t get everything you want on your application, relax! You can always update it later.
As discussed in Chapter 1, submitting to Google Play is easier than the Apple App Store because there isn’t any approval process, which means that you don’t have to sit around and wait for Google to get back to you. It also means that shortly after you finish all the steps in this chapter, your application will be ready for downloading by Android users around the globe.
This is where it gets pretty exciting because you are about to have a grand opening for your application. The potential for users and profits awaits, and your application will be available for review on Google Play. You had better make certain that it is worthy of five stars!
How Refined Is Your Android Application?
If the answer is “not very,” you might want to hold off on your marketing. Marketing is all about showing people your best product so people fall in love with it and want it for their own. If your product is mediocre, the relationship could be over before it even starts. Android users are a fickle bunch; even for free apps, they expect things to work well. If you are selling a paid app, even the smallest issue can alienate your potential customers. Furthermore, many app stores simply won’t accept your app unless it works well.
This was the case for Mark’s first application. He knew that he wanted it out by a certain time and he released it even though it wasn’t completely ready. Mark added a disclaimer on the splash screen that read, “This application is still under construction. More features are coming soon. Please do not review yet.”
Even though that disclaimer is somewhat unprofessional, it was necessary. The last thing you want is a one-star review for your application because you haven’t finish it properly.
Eventually, Mark could make the updates necessary to alter the application, and when all the activities worked, he felt that he could take down his “pardon our dust” disclaimer. He didn’t turn up the marketing until he had something to brag about.
You have to shift gears, as far as marketing is concerned, as you go from pre-release buzz to post-release buzz. That is something that we will go into detail about in the next chapter, but now we want to briefly address those who are entering the marketplace for the first time.
What to Do Before You Submit to an App Market
Here is what you want to have sorted out in advance on your application before you submit it to the Android Market:
- The application should run without any bugs. This may sound obvious, but it is sometimes difficult to find them. The last thing you need is an application that has even one Force Close window. If this kind of error happens even once, your users could give your application a one-star rating. Before you submit to an Android Market, you should test every button, feature, and activity to make certain that it runs without a problem. Ideally, you have followed best practices for debugging—including unit testing—that we discussed in Chapter 5. You also might want to do a round of beta testing, also discussed in Chapter 5.
- Test your app layout in portrait and landscape mode. Your application might look awesome, but you had better make certain that it looks just as awesome when you turn your Android device sideways. Auto-landscape is a great built-in feature for Android, but it may inadvertently distort your application’s look. It is possible for a developer to turn off this feature; the emulator can show you what your application looks like in both views. Similarly, your application might look great on your phone, but what will it look like on an older low-res phone or on a tablet with a giant screen? Make certain that you get a good look at your application on a few actual Android devices and Android versions before you do an official release. You can also change the screen resolution on the emulator when testing layouts for different devices. Note that it is possible to have entirely different layouts in portrait and landscape mode. Simply make a directory called layout-land under your application’s res directory, and those layout files will be preferentially selected when your phone is in its landscape orientation.
- Make it easy for someone to give you a review. If you have a good application and you think it is worthy of five stars, make certain that the user can easily give you the rating that you feel you richly deserve. You can set up the application to prompt the user to give you a review.
Although it isn’t possible to go directly to the ratings page in Google Play, it is possible to bring up your app in the marketplace. The basic code to do so looks like this:
Uri marketUri = Uri.parse("market://details?id=" + getPackageName());Intent intent=new
Intent(Intent.ACTION_VIEW);
Intent.setData(marketUri);
startActivity(intent);
Add enough logic so that your request for ratings doesn’t annoy your user. Fortunately, others have built libraries to accomplish exactly what is needed. AppRate is a jar file that does nearly everything you could want. You can learn more here: https://github.com/TimotheeJeannin/AppRate
Alternatively, this little code snippet also gets the job done: http://www.androidsnippets.com/prompt-engaged-users-to-rate-your-app-in-the-android-market-appirater
If you and your company have other applications that you want to sell, you can link to those apps in the store from within your application. The technique is very similar to what we just described, except YOUR_OTHER_APP is a String set to your other app’s package name, as declared in the manifest:
Uri marketUri = Uri.parse("market://details?id=" + YOUR_OTHER_APP);
startActivity((new Intent(Intent.ACTION_VIEW)).setData(marketUri));
Set up your ads. If you want to maximize your profits, make sure that those ads are in place with AdMob, Mobclix, or whatever ad method you decide to go with. See Chapter 6 for how to set that up.
If you plan to promote other applications within your own application or plan to put a market within your application, set up your in-app billing (see Chapter 7 for how to set it up). Remember that each marketplace can use its own in-app billing solution, and they are generally not compatible with each other. If you need in-app billing, you either need to stick with only one app store or build logic into your application to handle in-app purchases differently, depending on which store the app was purchased from.
Have a good description set up. Your Android application is required to have a description that is fewer than 4,000 characters. It is wise to have one that is well thought out, rather than one that sounds like you winged it. Remember that your description is a critical marketing tool. Don’t be afraid to sell your app in the description.
The Screen Shot
Part of the process of submitting to a market includes taking screen shots of your app. Although app marketplaces have different rules about how many screen shots you can use, assume that you will need at least three, and typically more is better. Your screen shots should tell the story behind your app. Ideally, a potential user should be able to piece together the purpose of your app merely by glancing at your screen shots. Also, you should have a video ready (we discuss how to make a video in Chapter 9). When it comes to screen shots, you do not want to use anything that isn’t pulled off the screen of the application. You need to show potential users precisely what they will be getting when they download your application.
Grabbing a screen shot is easy if you are using the official Android IDE. Simply switch your application into DDMS mode (Window ➤ Open Perspective ➤ DDMS) and run your app. At the top of the Devices pane, you’ll see an icon of a camera. Pressing this button takes a screen shot for you. You can then save this screen shot to the location of your choice—you will then have a perfect shot of what is on the screen of the Android device at that given moment.
Selecting the Proper Screen Shot
We all know the old cliché about how a picture is worth a thousand words, and most Android users “read” the pictures of your application on the Android Market rather than reading the description. It is important for developers to put their best photos forward when it comes to screen shots.
In other words, don’t just go through your application and take screen shots of the main menu screen. Your aim is to try and find the best visual example of your application in action. For this reason, you might not want to use the menu screen because the menu screen is usually a motionless layout of buttons. What you are looking for are screen shots that show your application in motion. If you have a gaming application, you want to show a very exciting level. The key is to tell a story with your screen shots.
For example, BPM Detector uses four screen shots to illustrate its capabilities. The first screen shot shows the default skin in action (see Figure 8-1). You can tell at a glance that the app is detecting beats per minute (BPMs) in a range between 60 and 120, and the current BPM is 60.
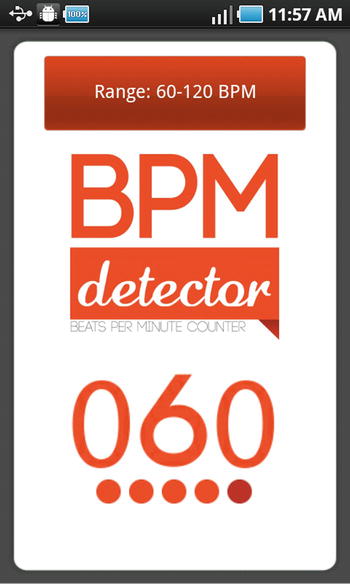
Figure 8-1. A screen shot from BPM Detector
The next screen illustrates largely the same thing using another skin, except the BPM range is empty (see Figure 8-2). Now it’s clear that the app supports multiple skins.

Figure 8-2. Another screen shot for BPM Detector
The third screen illustrates “nerd mode,” which displays a spectrogram of the sound data. This is yet another screen in action (see Figure 8-3).

Figure 8-3. Another screen shot of BPM Detector
Finally, the fourth screen shows the preferences dialog box, which explains how you to select between all these modes (see Figure 8-4).

Figure 8-4. A screen shot of BPM Detector to use as a screen shot to demonstrate the preferences option
In general, you should think about which features you are boasting about and find a screen shot that exemplifies them. For example, if you are selling a document scanner that uses the Android device’s camera, use a screen shot showing the camera view of a document being scanned, with the text “Click camera to scan the document.”
Notice that you might have to alter the programming code a bit in order get a decent screen shot. Sometimes this is necessary so you don’t have a screen shot that looks dull and boring. When your application is on the Android Market, you want screen shots that are visually compelling. You want a user to look at them and say, “Oh, I see what it is; I have to download that.”
You also need to ensure that your screen shots are the proper dimensions and file format. The Android Market specifies 320×480, 480×800, 480×854, or 1280×800 in 24-bit PNG or JPEG. The Android IDE captures screen shots in your phone’s native resolution. We plugged our Droid X in when running the IDE and got an instant 480×854 screen shot. If your phone uses a nonstandard screen resolution, you need to adjust your screen shot dimensions with a program such as Microsoft Picture Viewer. You can also use the emulator to capture screen shots and, of course, you can set it to any screen resolution you like. Unfortunately, for some applications, the emulator does not render graphics fast enough, and the screen shot smears.
Application Description
Other than your screen shots, your application description is the primary way users learn about your application. The best place to start is by analyzing your competitors’ descriptions. See what you think works and endeavor to do a better job than they have.
You might want to explicitly mention why you’re better than the competition. Be sure and work in any keywords that you think will help people find your app when they’re searching.
If you’ve been lucky enough to win any awards, be sure and include them. If not, you can still work in a few quotes from happy users.
At some point, you should include a feature list, so that people know exactly what they’re getting.
If your users could benefit from instructions on how to use your app, you can also include that in the description, but it should probably be near the bottom.
Many app stores don’t allow fancy formatting codes in the description, so you might have to stick with plain text. Google Play is known to support basic emphasis tags such as <b>, <i>, and <u>. Embedded links don’t seem to be supported.
The Icon
There used to be a dandruff shampoo that had the slogan, “You never get a second chance to make a first impression.” Both in the marketplace and installed on a phone, your app makes its first impression with its icon. Remember, app marketplaces do not take kindly to flakes. Let’s say that someone is browsing through an app marketplace and has found your application. What is it that they will see? Along with the name of your application, design company, rating, and cost, there is the first impression in visual form: the icon. Even though “you can’t judge a book by its cover,” the fact is that most people do. Not only that, they look to the icon and hope to get some idea about what the application does. That icon is more than just the square that the user taps to access your application; it is the symbol of your application. Countries have flags, companies have logos, and apps have icons.
Your chosen icon should epitomize the functionality of your application. Take the icon from the company Waze, for example (see Figure 8-5). Note the happy face, which is so well known, it is, for lack of a better word, iconic. You’ll then notice that the smiley face isn’t on a yellow circle, but a dialog balloon, like the type in most comic panels. You’ll then notice that the dialog balloon has wheels. You may even notice the curvy lines beside the balloon, which is an international indicator that it is getting a signal. The sun is also out, which signifies a nice day outside. Also notice that its smile isn’t a mouth, but something that you might see on a U-Turn sign.

Figure 8-5. The Waze icon, a picture that says a thousand words
What does a first-time user glean from this simple drawing? This happy dialog balloon is taking a leisurely trip—but it is not alone; it is connected. It conjures up the culture that Waze is selling: it is “a free social traffic and navigation app that uses real-time road reports from drivers nearby to save commuting time and improve your everyday driving.” Even though this description (based on its actual description on the Android Market) isn’t completely conveyed by the picture, it is enough to give a potential user a hint of what it actually is.
The Waze icon represents a creative approach to describing the function of the underlying app. However, most applications are so simple that a more direct approach will work fine. For example, if you are creating a gaming application called Zombie Baseball, just have a picture of a zombie holding a baseball bat. You can decide whether it is better to see the full zombie body at bat or just a skeletal hand clutching a bat. There is an actual application from Halfbrick known as Age of Zombies that uses the icon in Figure 8-6.
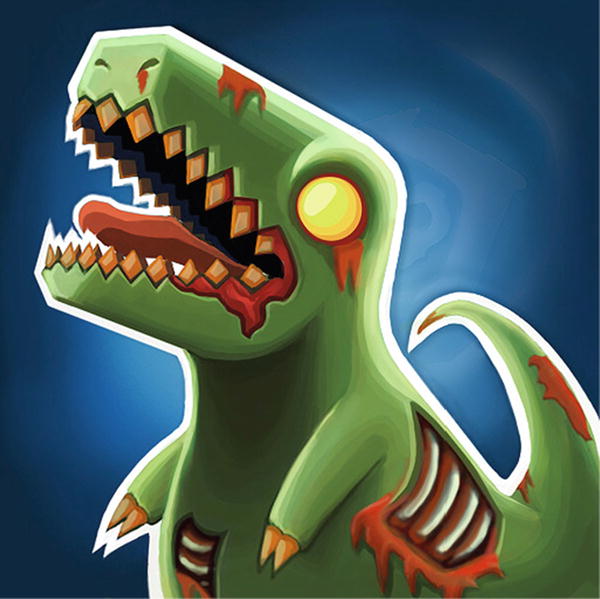
Figure 8-6. The icon for the Age of Zombies
As you can see, this dinosaur is partly skeletal, which means he is a zombie dinosaur. This means that you are facing a game with zombie dinosaur enemies, which are quite unusual video game foes.
Chances are, you’ll probably come up with several ideas for an icon and have to narrow it down to just one.
Figure 8-7 is another example of an obvious icon. It comes from a gaming application known as Alchemy, which is a very addictive app. The game involves mixing elements (which appear to the user as icons) together to form new things. Considering the obvious association between alchemy and the use of potions, why wouldn’t you use a beaker like this for an icon?
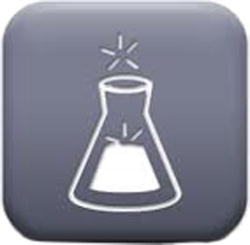
Figure 8-7. The icon for the popular app Alchemy
When deciding on a look for your icon, it helps to look at what your competition is doing. Please note that you don’t want to imitate what your competitors are doing; instead, always try to figure out what they have not thought of yet. You definitely don’t want to reproduce copyrighted or trademarked images because doing so could lead to a lawsuit. You want to create something as new as possible and to study your competition to make certain that your icon doesn’t bear too much resemblance to theirs. One thing you should certainly try to do is to match the style of your icon to the overall style of your application. For example, if you choose red and black for the colors of your icon, you should probably feature those colors predominantly in your app. Having a unified style also helps when designing your logo, and you should put a lot of thought into such “trivial details” as your logo.
Google requires that your high-resolution icon have a resolution of 512x512 pixels in 32-bit PNG format with an alpha channel. You can use most graphics-editing software to output this format. Other app stores might require other resolutions.
Other Graphics Resources
Many app stores, including Google Play, optionally allow a promotional graphic and a feature graphic. You should strongly consider including these graphic resources if you can.
Video
Your video should show what your application will do as well as highlight all its nifty features. Unfortunately, it is difficult to make a video about your application when you don’t really have much to show yet, unless you can work up some sort of teaser/trailer.
If you haven’t done so already, set up an account on YouTube. You need a place in which you can put all your footage about your application, so you might as well do it on the most popular video-sharing site.
Making a video can be tricky, and putting up a video of low quality can tarnish the reputation of your application. If you can get a video camera that can shoot high-definition video, you should be able to mount it on a tripod and lock it into one position so you can get some shots of your application on an Android device. One good example of a company that did this is PlayOn. The video is simply one person showing how the application works on an Android device. Not surprisingly, this is the best type of demo there is to show on video. You can watch this video at http://www.youtube.com/watch?v=Ei1otuNk8oM .
Certain smartphones, such as the Samsung Galaxy S series, support video out. By recording this video out, you can make a video screen grab for use in place of or in addition to your externally shot video.
Many video-editing packages exist to help you produce a polished finished product. Feel free to use your favorite. If you are new to video editing, Microsoft Movie Maker is free, easy to use, and more than adequate for new movie makers. You can download it here:
http://www.microsoft.com/en-us/download/details.aspx?id=34#Overview
Multiple Marketplaces
Even though Google Play has the largest marketplace, there are many reasons to put your application in other stores. For example, you can go to the Amazon Appstore, which will give you access to a worldwide audience. The Amazon Appstore is smaller, but is growing fast. In fact, it supposedly generates far more revenue per daily user. On the other hand, there are far fewer daily users on Amazon. The Kindle Fire is a very popular device and is responsible for a lot of downloads per day, but it can’t hope to match the size of the overall Android user base. Amazon is currently waiving its $99 annual developer fee, and as long as that remains true, it’s probably worth giving it a go. Consider, however, that the Amazon app approval process is much slower than for Google Play. Also, the Amazon team write their own description for your app. Like Google Play, Amazon developers keep 70 percent of their app’s sale price.
If you are developing an app for tablets, you should consider that between Amazon’s app store and Barnes and Noble’s Nook app store, over 40 percent of tablet users exclusively use app stores other than Google Play. You would do well to consider placing your tablet app in those stores.
There are other app stores worth considering as well:
- GetJar is the largest independent cross-platform app store and is also well-known for operating the largest virtual currency on Google Play (GetJar Gold, available to more than 100 million users). Like the other app stores, GetJar gives developers 70 percent of the sales price of its apps. You can learn more here: http://developer.getjar.com
- SlideME powers more than 140 original equipment manufacturers (OEMs) preloaded with the SlideME market. It supports a variety of payment processors, including Amazon and PayPal. Developers typically keep 80 percent of the purchase price of the app, minus a 10 cent payment. Its developer site is here: http://slideme.org/developers
- As the number one smartphone brand, Samsung offers a large market for Android applications, with support in more than 60 countries. Independent developers currently keep 100 percent of their sales revenue. That number will drop to 80 percent after their app has been listed for 6 months, and then to 70 percent after March 2015. Developers can learn more here: http://developer.samsung.com/distribute/app-submission-guide
- Android apps can be repackaged for the BlackBerry 10 and BlackBerry Tablet operating system (OS). Use of the BlackBerry market assumes that you have ported your app to the BlackBerry platform using the BlackBerry Runtime for Android. BlackBerry developers keep 70 percent of their sales revenue. You can find more information here: http://appworld.blackberry.com
In most cases, you should place your app in Google Play and then consider what other app stores might be worth your time. Once you have developed your app and have all your graphics resources ready, placing your app in multiple stores is actually pretty easy, as long as you don’t need in-app purchasing.
If you have your own web site, there’s another reason to submit your app to multiple app stores: search visibility. Each app store usually allows you to link back to your official web site, which results in higher rankings on most search engines.
General Issues with Marketplaces
Think about how your app will appear in the listing and how it will attract users. Most applications are found because the user actively searches for them using keywords. Make sure that your description uses a variety of keywords, but be sure that you don’t simply list the keywords. Google in particular penalizes pages that simply list keywords. Work important words into your description in a natural way. If you aren’t sure which keywords you should use, ask your friends to describe your app without any input from you. They might describe it in an unexpected way. After your app starts getting reviews, you can see which keywords users utilize to describe your app. Make sure to revise your description to include those keywords. It is important to pick the appropriate names as well as descriptions, and this can go a long way toward growing your user base.
Your app description is autotranslated in Google Play to every region you opt to market to. In your description, you should be careful to avoid idiomatic expressions that will not translate well and would put-off potential users in these markets. For other app stores, your text might not be autotranslated, but non-English-speaking users can still benefit from the simplified language.
Issues Specific to Google Play
The first 167 characters of your app description are the most important and should contain keywords that describe explicitly the function of your Android app. When a user performs a search on Google Play website, a 167-character description accompanies the app icon and is your second chance (after the app icon) to grab a user’s attention. On a mobile device, the Google Play description is composed of the app’s tagline and the remaining 4,000 characters, but before the user presses More, only 6 lines are displayed (approximately 257 characters).
Google requires that product descriptions not be misleading or loaded with keywords in an attempt to manipulate ranking or relevancy in the store’s search results. Be sure you follow Google’s requirements, or else you could find yourself banned from the app store.
In general, give priority to the first 257 characters of the app description because they appear prominently in the Google Market (this is what you see when you run the Google Play app on your phone).
- Also concentrate relevant keywords into the 167 characters because they are the characters seen on the Android Market web site.
- Google recommends that the rest of your description area outline the main features of the app in an easy-to-read bulleted list.
For additional help, you might want to head to the Android Asset Studio for icon generators ( http://android-ui-utils.googlecode.com/hg/asset-studio/dist/index.html ), which allows users to quickly and easily generate icons from existing images, clip art, or text. Be sure to select the Generate Web Icon option to get the high resolution icon that is needed.
Issues Specific to the Amazon App Store
Much like Google Play, the Amazon App store requires icons and screen shots. Videos are optional. When browsing the Amazon App store, the description is not visible until after a user clicks your icon. In fact, before clicking your app’s icon, all the user sees is the icon, title of the app, the author, and the rating. Make sure that icon sends the right message!
A small icon image (114x114 pixels) is required, along with a larger 512x512 thumbnail image of the same image. The image must be stored in PNG format.
At least three screen shots are required, although you may use as many as ten. Screen shots must be either 1024x600 pixels or 800x480 pixels, and may be taken in either landscape or portrait mode. The image format for screen shots may be either JPG or PNG.
A promotional image (not a screen shot) that includes your app’s name is required. This image should be legible after being scaled down to 300x146 pixels and should be designed to be displayed in landscape mode. The promotional image’s size should be 1024x500 and must be either PNG or JPG format. All text should be at least 50 pixels from the edge. The promotional image should not contain pricing information, screen shots, descriptive text, ratings, or any other content that is presented elsewhere other than the app’s title.
Up to five videos can be placed on the product detail page. Each should be at least 720 pixels wide and no more than 5 megabytes in size. Supported video formats are MPEG-2, WMV, Quicktime, FLV, AVI, and H.264 MPEG-4.
The approval process for Amazon is generally quite a bit slower than that of Google Play, and Amazon is known to be more selective. You can find the additional information here: https://developer.amazon.com/help/faq.html
Issues Specific to the SlideME Store
It is very easy to get started with the SlideME store. First, you must create an account and then you will be given the option to upload your application. You need to set a price, list your keywords (to help SlideME users find your app), and select a category for your app.
Like other app stores, you will need to include a description. SlideME asks for both a short and long description. The short description is limited to 500 characters.
If your application is optimized for phone or tablet use, you can alert SlideME users of this fact via a check box. You must declare whether your app uses in-app billing or advertisements. If your app uses advertisments, you must describe the ad network or networks you use.
A few more details—such as your software license, terms and conditions, and a privacy policy—are optional.
One minor sticking point is that SlideME parses your AndroidManifest.xml file to look for your application name. The Google Play Store quite happily extracts your application name from your activity tag (it looks for the android:label tag). Unfortunately, SlideME searches only for the android:label contained within the application tag. If this tag is missing, SlideME can’t tell the name of your app and does not allow you to upload it. This is a very minor change to make, but it is a bit of an annoyance.
SlideME displays at least 12 lines, perhaps more, of text when users search for apps. Screen shots and icons are also required. SlideME has an approval process for apps that might take as long as four days. To begin, you need to create a developer account here: http://slideme.org/developers
Other App Stores
GetJar displays 2 lines (about 15 words) of description when users search for apps. Those first two lines are critical to getting noticed. Screen shots and icons are also required. A detailed tutorial on uploading your app to GetJar can be found here: http://blog.getjar.com/developer/tutorial-upload-your-app-to-getjar/
The Samsung App Store doesn’t display a description when users search for apps. Screen shots and icons are required. You can learn how to submit your app to Samsung here: http://developer.samsung.com/distribute/app-submission-guide
The BlackBerry World app store displays a two-line (about eight-word) description when users search for apps. Screen shots and icons are required. Learn how to submit your Android app to the BlackBerry market here: https://developer.blackberry.com/android/
Summary
- Is your app ready to be placed in the marketplace?
- Do you have at least three great screen shots that explain the essence of your app?
- Do you have an application description that explains your app and catches the reader’s attention?
- Do your icon and other graphics resources look professional and comport with all the proper formatting requirements?
- Have you decided which marketplace is best for you? Or have you decided to use more than one?