Overview
C# and .NET provide a highly effective way to run concurrent code, making it easy to perform complex and often time-consuming actions. In this chapter, you will explore the various patterns that are available, from creating tasks using the Task factory methods to continuations to link tasks together, before moving on to the async/await keywords, which vastly simplify such code. By the end of this chapter, you will see how C# can be used to execute code that runs concurrently and often produces results far quicker than a single-threaded application.
Introduction
Concurrency is a generalized term that describes the ability of software to do more than one thing at the same time. By harnessing the power of concurrency, you can provide a more responsive user interface by offloading CPU-intensive activities from the main UI thread. On the server side, taking advantage of modern processing power through multi-processor and multi-core architectures, scalability can be achieved by processing operations in parallel.
Multithreading is a form of concurrency whereby multiple threads are used to perform operations. This is typically achieved by creating many Thread instances and coordinating operations between them. It is regarded as a legacy implementation, having largely been replaced by parallel and async programming; you may well find it used in older projects.
Parallel programming is a class of multithreading where similar operations are run independently of each other. Typically, the same operation is repeated using multiple loops, where the parameters or target of the operation themselves vary by iteration. .NET provides libraries that shield developers from the low-level complexities of thread creation. The phrase embarrassingly parallel is often used to describe an activity that requires little extra effort to be broken down into a set of tasks that can be run in parallel, often where there are few interactions between sub-tasks. One such example of parallel programming could be counting the number of words found in each text file within a folder. The job of opening a file and scanning through the words can be split into parallel tasks. Each task executes the same lines of code but is given a different text file to process.
Asynchronous programming is a more recent form of concurrency where an operation, once started, will complete at some point in the future, and the calling code is able to continue with other operations. This completion is often known as a promise (or a future in other languages) and is implemented through the task and its generic Task<> equivalent. In C# and .NET, async programming has become the preferred means to achieve concurrent operations.
A common application of asynchronous programming is where multiple slow-running or expensive dependencies need to be initialized and marshaled prior to calling a final step that should be called only when all or some of the dependencies are ready to be used. For example, a mobile hiking application may need to wait for a reliable GPS satellite signal, a planned navigation route, and a heart-rate monitoring service to be ready before the user can start hiking safely. Each of these distinct steps would be initialized using a dedicated task.
Another very common use case for asynchronous programming occurs in UI applications where, for example, saving a customer's order to a database could take 5-10 seconds to complete. This may involve validating the order, opening a connection to a remote server or database, packaging and sending the order in a format that can be transmitted over the wire, and then finally waiting for confirmation that the customer's order has been successfully stored in a database. In a single-threaded application, this would take much longer, and this delay would soon be noticed by the user. The application would become unresponsive until the operation was completed. In this scenario, the user may rightly think the application has crashed and may try to close it. That is not an ideal user experience.
Such issues can be mitigated by using async code that performs any of the slow operations using a dedicated task for each. These tasks may choose to provide feedback as they progress, which the UI's main thread can use to notify the user. Overall, the operation should complete sooner, thus freeing the user to continue interacting with the app. In modern applications, users have come to expect this method of operation. In fact, many UI guidelines suggest that if an operation may take more than a few seconds to complete, then it should be performed using async code.
Note that when code is executing, whether it's synchronous or asynchronous code, it is run within the context of a Thread instance. In the case of asynchronous code, this Thread instance is chosen by the .NET scheduler from a pool of available threads.
The Thread class has various properties but one of the most useful is ManagedThreadId, which will be used extensively throughout this chapter. This integer value serves to uniquely identify a thread within your process. By examining Thread.ManagedThreadId, you can determine that multiple thread instances are being used. This can be done by accessing the Thread instance from within your code using the static Thread.CurrentThread method.
For example, if you started five long-running tasks and examined the Thread.ManagedThreadId for each, you would observe five unique IDs, possibly numbered as two, three, four, five, and six. In most cases, the thread with ID number one is the process's main thread, created when the process first starts.
Keeping track of thread IDs can be quite useful, especially when you have time-consuming operations to perform. As you have seen, using concurrent programming, multiple operations can be executed at the same time, rather than using a traditional single-threaded approach, where one operation must complete before a subsequent operation can start.
In the physical world, consider the case of building a train tunnel through a mountain. Starting at one side of a mountain and tunneling through to the other side could be made considerably faster if two teams started on opposite sides of the mountain, both tunneling toward each other. The two teams could be left to work independently; any issues experienced by a team on one side should not have an adverse effect on the other side's team. Once both sides have completed their tunneling, there should be one single tunnel, and the construction could then continue with the next task, such as laying the train line.
The next section will look at using the C# Task class, which allows you to execute blocks of code at the same time and independently of each other. Consider again the example of the UI app, where the customer's order needs to be saved to a database. For this, you would have two options:
Option 1 is to create a C# Task that performs each step one after another:
- Validate the order.
- Connect to the server.
- Send the request.
- Wait for a response.
Option 2 is to create a C# Task for each of the steps, executing each in parallel where possible.
Both options achieve the same end result, freeing the UI's main thread to respond to user interactions. Option one may well be slower to finish, but the upside is that this would require simpler code. However, Option two would be the preferred choice as you are offloading multiple steps, so it should complete sooner. Although, this could involve additional complexity as you may need to coordinate each of the individual tasks as they are complete.
In the upcoming sections, you will first get a look at how Option one could be approached, that is, using a single Task to run blocks of code, before moving on to the complexity of Option two where multiple tasks are used and coordinated.
Running Asynchronous Code Using Tasks
The Task class is used to execute blocks of code asynchronously. Its usage has been somewhat superseded by the newer async and await keywords, but this section will cover the basics of creating tasks as they tend to be pervasive in larger or mature C# applications and form the backbone of the async/await keywords.
In C#, there are three ways to schedule asynchronous code to run using the Task class and its generic equivalent Task<T>.
Creating a New Task
You'll start off with the simplest form, one that performs an operation but does not return a result back to the caller. You can declare a Task instance by calling any of the Task constructors and passing in an Action based delegate. This delegate contains the actual code to be executed at some point in the future. Many of the constructor overloads allow cancellation tokens and creation options to further control how the Task runs.
Some of the commonly used constructors are as follows:
- public Task(Action action): The Action delegate represents the body of code to be run.
- public Task(Action action, CancellationToken cancellationToken): The CancellationToken parameter can be used as a way to interrupt the code that is running. Typically, this is used where the caller has been provided with a means to request that an operation be stopped, such as adding a Cancel button that a user can press.
- public Task(Action action, TaskCreationOptions creationOptions): TaskCreationOptions offers a way to control how the Task is run, allowing you to provide hints to the scheduler that a certain Task might take extra time to complete. This can help when running related tasks together.
The following are the most often used Task properties:
- public bool IsCompleted { get; }: Returns true if the Task completed (completion does not indicate success).
- public bool IsCompletedSuccessfully { get; }: Returns true if the Task completed successfully.
- public bool IsCanceled { get; }: Returns true if the Task was canceled prior to completion.
- public bool IsFaulted { get; }: Returns true if the Task has thrown an unhandled exception prior to completion.
- public TaskStatus Status { get; }: Returns an indicator of the task's current status, such as Canceled, Running, or WaitingToRun.
- public AggregateException Exception { get; }: Returns the exception, if any, that caused the Task to end prematurely.
Note that the code within the Action delegate is not executed until sometime after the Start() method is called. This may well be some milliseconds after and is determined by the .NET scheduler.
Start here by creating a new VS Code console app, adding a utility class named Logger, which you will use in the exercises and examples going forward. It will be used to log a message to the console along with the current time and current thread's ManagedThreadId.
The steps for this are as follows:
- Change to your source folder.
- Create a new console app project called Chapter05 by running the following command:
source>dotnet new console -o Chapter05
- Rename the Class1.cs file to Logger.cs and remove all the template code.
- Be sure to include the System and System.Threading namespaces. System.Threading contains the Threading based classes:
using System;
using System.Threading;
namespace Chapter05
{
- Mark the Logger class as static so that it can be used without having to create an instance to use:
public static class Logger
{
Note
If you use the Chapter05 namespace, then the Logger class will be accessible to code in examples and activities, provided they also use the Chapter05 namespace. If you prefer to create a folder for each example and exercise, then you should copy the file Logger.cs into each folder that you create.
- Now declare a static method called Log that is passed a string message parameter:
public static void Log(string message)
{
Console.WriteLine($"{DateTime.Now:T} [{Thread.CurrentThread.ManagedThreadId:00}] {message}");
}
}
}
When invoked, this will log a message to the console window using the WriteLine method. In the preceding snippet, the string interpolation feature in C# is used to define a string using the $ symbol; here, :T will format the current time (DateTime.Now) into a time-formatted string and :00 is used to include Thread.ManagedThreadId with a leading 0.
Thus, you have created the static Logger class that will be used throughout the rest of this chapter.
Note
You can find the code used for this example at https://packt.link/cg6c5.
In the next example, you will use the Logger class to log details when a thread is about to start and finish.
- Start by adding a new class file called TaskExamples.cs:
using System;
using System.Threading;
using System.Threading.Tasks;
namespace Chapter05.Examples
{
class TaskExamples
{
- The Main entry point will log that taskA is being created:
public static void Main()
{
Logger.Log("Creating taskA");
- Next, add the following code:
var taskA = new Task(() =>
{
Logger.Log("Inside taskA");
Thread.Sleep(TimeSpan.FromSeconds(5D));
Logger.Log("Leaving taskA");
});
Here, the simplest Task constructor is passed an Action lambda statement, which is the actual target code that you want to execute. The target code writes the message Inside taskA to the console. It pauses for five seconds using Thread.Sleep to block the current thread, thus simulating a long-running activity, before finally writing Leaving taskA to the console.
- Now that you have created taskA, confirm that it will only invoke its target code when the Start() method is called. You will do this by logging a message immediately before and after the method is called:
Logger.Log($"Starting taskA. Status={taskA.Status}");
taskA.Start();
Logger.Log($"Started taskA. Status={taskA.Status}");
Console.ReadLine();
}
}
}
- Copy the contents of Logger.cs file to same folder as the TaskExamples.cs example.
- Next run the console app to produce the following output:
10:47:34 [01] Starting taskA. Status=Created
10:47:34 [01] Started taskA. Status=WaitingToRun
10:47:34 [03] Inside taskA
10:47:39 [03] Leaving taskA
Note that the task's status is WaitingToRun even after you've called Start. This is because you are asking the .NET scheduler to schedule the code to run—that is, to add it to its queue of pending actions. Depending on how busy your application is with other tasks, it may not run immediately after you've called Start.
Note
You can find the code used for this example at https://packt.link/DHxt3.
In earlier versions of C#, this was the main way to create and start Task objects directly. It is no longer recommended and is only included here as you may find it used in older code. Its usage has been replaced by the Task.Run or Task.Factory.StartNew static factory methods, which offer a simpler interface for the most common usage scenarios.
Using Task.Factory.StartNew
The static method Task.Factory.StartNew contains various overloads that make it easier to create and configure a Task. Notice how the method is named StartNew. It creates a Task and automatically starts the method for you. The .NET team recognized that there is little value in creating a Task that is not immediately started after it is first created. Typically, you would want the Task to start performing its operation right away.
The first parameter is the familiar Action delegate to be executed, followed by optional cancelation tokens, creation options, and a TaskScheduler instance.
The following are some of the common overloads:
- Task.Factory.StartNew(Action action): The Action delegate contains the code to execute, as you have seen previously.
- Task.Factory.StartNew(Action action, CancellationToken cancellationToken): Here, CancellationToken coordinates the cancellation of the task.
- Task.Factory.StartNew(Action<object> action, object state, CancellationToken cancellationToken, TaskCreationOptions creationOptions, TaskScheduler scheduler): The TaskScheduler parameter allows you to specify a type of low-level scheduler responsible for queuing tasks. This option is rarely used.
Consider the following code, which uses the first and simplest overload:
var taskB = Task.Factory.StartNew((() =>
{
Logger.Log("Inside taskB");
Thread.Sleep(TimeSpan.FromSeconds(3D));
Logger.Log("Leaving taskB");
}));
Logger.Log($"Started taskB. Status={taskB.Status}");
Console.ReadLine();
Running this code produces the following output:
21:37:42 [01] Started taskB. Status=WaitingToRun
21:37:42 [03] Inside taskB
21:37:45 [03] Leaving taskB
From the output, you can see that this code achieves the same result as creating a Task but is more concise. The main point to consider is that Task.Factory.StartNew was added to C# to make it easier to create tasks that are started for you. It was preferable to use StartNew rather than creating tasks directly.
Note
The term Factory is often used in software development to represent methods that help create objects.
Task.Factory.StartNew provides a highly configurable way to start tasks, but in reality, many of the overloads are rarely used and need a lot of extra parameters to be passed to them. As such, Task.Factory.StartNew itself has also become somewhat obsolete in favor of the newer Task.Run static method. Still, the Task.Factory.StartNew is briefly covered as you may see it used in legacy C# applications.
Using Task.Run
The alternative and preferred static factory method, Task.Run, has various overloads and was added later to .NET to simplify and shortcut the most common task scenarios. It is preferable for newer code to use Task.Run to create started tasks, as far fewer parameters are needed to achieve common threading operations.
Some of the common overloads are as follows:
- public static Task Run(Action action): Contains the Action delegate code to execute.
- public static Task Run(Action action, CancellationToken cancellationToken): Additionally contains a cancelation token used to coordinate the cancellation of a task.
For example, consider the following code:
var taskC = Task.Run(() =>
{
Logger.Log("Inside taskC");
Thread.Sleep(TimeSpan.FromSeconds(1D));
Logger.Log("Leaving taskC");
});
Logger.Log($"Started taskC. Status={taskC.Status}");
Console.ReadLine();
Running this code will produce the following output:
21:40:27 [03] Inside taskC
21:40:27 [01] Started taskC. Status=WaitingToRun
21:40:28 [03] Leaving taskC
As you can see, the output is pretty similar to the outputs of the previous two code snippets. Each wait for a shorter time than its predecessor before the associated Action delegate completes.
The main difference is that creating a Task instance directly is an obsolete practice but will allow you to add an extra logging call before you explicitly call the Start method. That is the only benefit in creating a Task directly, which is not a particularly compelling reason to do so.
Running all three examples together produces this:
21:45:52 [01] Creating taskA
21:45:52 [01] Starting taskA. Status=Created
21:45:52 [01] Started taskA. Status=WaitingToRun
21:45:52 [01] Started taskB. Status=WaitingToRun
21:45:52 [01] Started taskC. Status=WaitingToRun
21:45:52 [04] Inside taskB
21:45:52 [03] Inside taskA
21:45:52 [05] Inside taskC
21:45:53 [05] Leaving taskC
21:45:55 [04] Leaving taskB
21:45:57 [03] Leaving taskA
You can see various ManagedThreadIds being logged and that taskC completes before taskB, which completes before taskA, due to the decreasing number of seconds specified in the Thread.Sleep calls in each case.
It is preferable to favor either of the two static methods, but which should you use when scheduling a new task? Task.Run should be used for the majority of cases where you need to simply offload some work onto the thread pool. Internally, Task.Run defers down to Task.Factory.StartNew.
Task.Factory.StartNew should be used where you have more advanced requirements, such as defining where tasks are queued, by using any of the overloads that accept a TaskScheduler instance, but in practice, this is seldom the requirement.
Note
You can find more information on Task.Run and Task.Factory.StartNew at https://devblogs.microsoft.com/pfxteam/task-run-vs-task-factory-startnew/ and https://blog.stephencleary.com/2013/08/startnew-is-dangerous.html.
So far, you have seen how small tasks can be started, each with a small delay before completion. Such delays can simulate the effect caused by code accessing slow network connections or running complex calculations. In the following exercise, you'll extend your Task.Run knowledge by starting multiple tasks that run increasingly longer numeric calculations.
This serves as an example to show how potentially complex tasks can be started and allowed to run to completion in isolation from one another. Note that in a traditional synchronous implementation, the throughput of such calculations would be severely restricted, owing to the need to wait for one operation to complete before the next one can commence. It is now time to practice what you have learned through an exercise.
Exercise 5.01: Using Tasks to Perform Multiple Slow-Running Calculations
In this exercise, you will create a recursive function, Fibonacci, which calls itself twice to calculate a cumulative value. This is an example of potentially slow-running code rather than using Thread.Sleep to simulate a slow call. You will create a console app that repeatedly prompts for a number to be entered. The larger this number, the longer each task will take to calculate and output its result. The following steps will help you complete this exercise:
- In the Chapter05 folder, add a new folder called Exercises. Inside that folder, add a new folder called Exercise01. You should have the folder structure as Chapter05ExercisesExercise01.
- Create a new file called Program.cs.
- Add the recursive Fibonacci function as follows. You can save a little processing time by returning 1 if the requested iteration is less than or equal to 2:
using System;
using System.Globalization;
using System.Threading;
using System.Threading.Tasks;
namespace Chapter05.Exercises.Exercise01
{
class Program
{
private static long Fibonacci(int n)
{
if (n <= 2L)
return 1L;
return Fibonacci(n - 1) + Fibonacci(n - 2);
}
- Add the static Main entry point to the console app and use a do-loop to prompt for a number to be entered.
- Use int.TryParse to convert the string into an integer if the user enters a string:
public static void Main()
{
string input;
do
{
Console.WriteLine("Enter number:");
input = Console.ReadLine();
if (!string.IsNullOrEmpty(input) && int.TryParse(input, NumberStyles.Any, CultureInfo.CurrentCulture, out var number))
- Define a lambda statement that captures the current time using DateTime.Now, calls the slow-running Fibonacci function, and logs the time taken to run:
{
Task.Run(() =>
{
var now = DateTime.Now;
var fib = Fibonacci(number);
var duration = DateTime.Now.Subtract(now);
Logger.Log($"Fibonacci {number:N0} = {fib:N0} (elapsed time: {duration.TotalSeconds:N0} secs)");
});
}
The lambda is passed to Task.Run and will be started by Task.Run shortly, freeing the do-while loop to prompt for another number.
- The program shall exit the loop when an empty value is entered:
} while (input != string.Empty);
}
}
}
- For running the console app, start by entering the numbers 1 and then 2. As these are very quick calculations, they both return in under one second.
Note
The first time you run this program, Visual Studio will show a warning similar to "Converting null literal or possible null value to non-nullable type". This is a reminder that you are using a variable that could be a null value.
Enter number:1
Enter number:2
11:25:11 [04] Fibonacci 1 = 1 (elapsed time: 0 secs)
Enter number:45
11:25:12 [04] Fibonacci 2 = 1 (elapsed time: 0 secs)
Enter number:44
Enter number:43
Enter number:42
Enter number:41
Enter number:40
Enter number:10
11:25:35 [08] Fibonacci 41 = 165,580,141 (elapsed time: 4 secs)
11:25:35 [09] Fibonacci 40 = 102,334,155 (elapsed time: 2 secs)
11:25:36 [07] Fibonacci 42 = 267,914,296 (elapsed time: 6 secs)
Enter number: 39
11:25:36 [09] Fibonacci 10 = 55 (elapsed time: 0 secs)
11:25:37 [05] Fibonacci 43 = 433,494,437 (elapsed time: 9 secs)
11:25:38 [06] Fibonacci 44 = 701,408,733 (elapsed time: 16 secs)
Enter number:38
11:25:44 [06] Fibonacci 38 = 39,088,169 (elapsed time: 1 secs)
11:25:44 [05] Fibonacci 39 = 63,245,986 (elapsed time: 2 secs)
11:25:48 [04] Fibonacci 45 = 1,134,903,170 (elapsed time: 27 secs)
Notice how the ThreadId is [04] for both 1 and 2. This shows that the same thread was used by Task.Run for both iterations. By the time 2 was entered, the previous calculation had already been completed. So .NET decided to reuse thread 04 again. The same occurs for the value 45, which took 27 seconds to complete even though it was the third requested.
You can see that entering values above 40 causes the elapsed time to increase quite dramatically (for each increase by one, the time taken almost doubles). Starting with higher numbers and descending downward, you can see that the calculations for 41, 40, and 42 were all completed before 44 and 43, even though they were started at similar times. In a few instances, the same thread appears twice. Again, this is .NET re-using idle threads to run the task's action.
Note
You can find the code used for this exercise at https://packt.link/YLYd4.
Coordinating Tasks
In the previous Exercise 5.01, you saw how multiple tasks can be started and left to run to completion without any interaction between the individual tasks. One such scenario is a process that needs to search a folder looking for image files, adding a copyright watermark to each image file found. The process can use multiple tasks, each working on a distinct file. There would be no need to coordinate each task and its resulting image.
Conversely, it is quite common to start various long-running tasks and only continue when some or all of the tasks have completed; maybe you have a collection of complex calculations that need to be started and can only perform a final calculation once the others have completed.
In the Introduction section, it was mentioned that a hiking application needed a GPS satellite signal, navigation route, and a heart rate monitor before it could be used safely. Each of these dependencies can be created using a Task and only when all of them have signaled that they are ready to be used should the application then allow the user to start with their route.
Over the next sections, you will cover various ways offered by C# to coordinate tasks. For example, you may have a requirement to start many independent tasks running, each running a complex calculation, and need to calculate a final value once all the previous tasks have completed. You may either like to start downloading data from multiple websites but want to cancel the downloads that are taking too long to complete. The next section will cover this scenario.
Waiting for Tasks to Complete
Task.Wait can be used to wait for an individual task to complete. If you are working with multiple tasks, then the static Task.WaitAll method will wait for all tasks to complete. The WaitAll overloads allow cancellation and timeout options to be passed in, with most returning a Boolean value to indicate success or failure, as you can see in the following list:
- public static bool WaitAll(Task[] tasks, TimeSpan timeout): This is passed an array of Task items to wait for. It returns true if all of the tasks complete within the maximum time period specified (TimeSpan allows specific units such as hours, minutes, and seconds to be expressed).
- public static void WaitAll(Task[] tasks, CancellationToken cancellationToken): This is passed an array of Task items to wait for, and a cancellation token that can be used to coordinate the cancellation of the tasks.
- public static bool WaitAll(Task[] tasks, int millisecondsTimeout, CancellationToken cancellationToken): This is passed an array of Task items to wait for and a cancellation token that can be used to coordinate the cancellation of the tasks. millisecondsTimeout specifies the number of milliseconds to wait for all tasks to complete by.
- public static void WaitAll(params Task[] tasks): This allows an array of Task items to wait for.
If you need to wait for any task to complete from a list of tasks, then you can use Task.WaitAny. All of the WaitAny overloads return either the index number of the first completed task or -1 if a timeout occurred (the maximum amount of time to wait for).
For example, if you pass an array of five Task items and the last Task in that array completes, then you will be returned the value four (array indexes always start counting at zero).
- public static int WaitAny(Task[] tasks, int millisecondsTimeout, CancellationToken cancellationToken): This is passed an array of Task items to wait for, the number of milliseconds to wait for any Task to complete by, and a cancellation token that can be used to coordinate the cancellation of the tasks.
- public static int WaitAny(params Task[] tasks): This is passed an array of Task items to wait for any Task to be completed.
- public static int WaitAny(Task[] tasks, int millisecondsTimeout): Here, you pass the number of milliseconds to wait for any tasks to complete.
- public static int WaitAny(Task[] tasks, CancellationToken cancellationToken) CancellationToken: This is passed a cancellation token that can be used to coordinate the cancellation of the tasks.
- public static int WaitAny(Task[] tasks, TimeSpan timeout): This is passed the maximum time period to wait for.
Calling Wait, WaitAll, or WaitAny will block the current thread, which can negate the benefits of using a task in the first place. For this reason, it is preferable to call these from within an awaitable task, such as via Task.Run as the following example shows.
The code creates outerTask with a lambda statement, which itself then creates two inner tasks, inner1, and inner2. WaitAny is used to get the index of the first inner task to complete. In this example, inner2 will complete first as it pauses for a shorter time, so the resulting index value will be 1:
TaskWaitAnyExample.cs
1 var outerTask = Task.Run( () =>
2 {
3 Logger.Log("Inside outerTask");
4 var inner1 = Task.Run(() =>
5 {
6 Logger.Log("Inside inner1");
7 Thread.Sleep(TimeSpan.FromSeconds(3D));
8 });
9 var inner2 = Task.Run(() =>
10 {
11 Logger.Log("Inside inner2");
12 Thread.Sleep(TimeSpan.FromSeconds(2D));
13 });
14
15 Logger.Log("Calling WaitAny on outerTask");
You can find the complete code here: http://packt.link/CicWk.
When the code runs, it produces the following output:
15:47:43 [04] Inside outerTask
15:47:43 [01] Press ENTER
15:47:44 [04] Calling WaitAny on outerTask
15:47:44 [05] Inside inner1
15:47:44 [06] Inside inner2
15:47:46 [04] Waitany index=1
The application remains responsive because you called WaitAny from inside a Task. You have not blocked the application's main thread. As you can see, thread ID 01 has logged this message: 15:47:43 [01] Press ENTER.
This type of pattern can be used in cases where you need to fire and forget a task. For example, you may want to log an informational message to a database or a log file, but it is not essential that the flow of the program is altered if either task fails to complete.
A common progression from fire-and-forget tasks is those cases where you need to wait for several tasks to complete within a certain time limit. The next exercise will cover this scenario.
Exercise 5.02: Waiting for Multiple Tasks to Complete Within a Time Period
In this exercise, you will start three long-running tasks and decide your next course of action if they all completed within a certain randomly selected time span.
Here, you will see the generic Task<T> class being used. The Task<T> class includes a Value property that can be used to access the result of Task (in this exercise, it is a string-based generic, so Value will be a string type). You won't use the Value property here as the purpose of this exercise is to show that void and generic tasks can be waited for together. Perform the following steps to complete this exercise:
- Add the main entry point to the console app:
using System;
using System.Threading;
using System.Threading.Tasks;
namespace Chapter05.Exercises.Exercise02
{
class Program
{
public static void Main()
{
Logger.Log("Starting");
- Declare a variable named taskA, passing Task.Run a lambda that pauses the current thread for 5 seconds:
var taskA = Task.Run( () =>
{
Logger.Log("Inside TaskA");
Thread.Sleep(TimeSpan.FromSeconds(5));
Logger.Log("Leaving TaskA");
return "All done A";
});
- Create two more tasks using the method group syntax:
var taskB = Task.Run(TaskBActivity);
var taskC = Task.Run(TaskCActivity);
As you may recall, this shorter syntax can be used if the compiler can determine the type of argument required for a zero- or single-parameter method.
- Now pick a random maximum timeout in seconds. This means that either of the two tasks may not complete before the timeout period has elapsed:
var timeout = TimeSpan.FromSeconds(new Random().Next(1, 10));
Logger.Log($"Waiting max {timeout.TotalSeconds} seconds...");
Note that each of the tasks will still run to completion as you have not added a mechanism to stop executing the code inside the body of the Task.Run Action lambda.
- Call WaitAll, passing in the three tasks and the timeout period:
var allDone = Task.WaitAll(new[] {taskA, taskB, taskC}, timeout);
Logger.Log($"AllDone={allDone}: TaskA={taskA.Status}, TaskB={taskB.Status}, TaskC={taskC.Status}");
Console.WriteLine("Press ENTER to quit");
Console.ReadLine();
}
This will return true if all tasks complete in time. You will then log the status of all tasks and wait for Enter to be pressed to exit the application.
- Finish off by adding two slow-running Action methods:
private static string TaskBActivity()
{
Logger.Log($"Inside {nameof(TaskBActivity)}");
Thread.Sleep(TimeSpan.FromSeconds(2));
Logger.Log($"Leaving {nameof(TaskBActivity)}");
return "";
}
private static void TaskCActivity()
{
Logger.Log($"Inside {nameof(TaskCActivity)}");
Thread.Sleep(TimeSpan.FromSeconds(1));
Logger.Log($"Leaving {nameof(TaskCActivity)}");
}
}
}
Each will log a message when starting and leaving a task, after a few seconds. The useful nameof statement is used to include the name of the method for extra logging information. Often, it is useful to examine log files to see the name of a method that has been accessed rather than hardcoding its name as a literal string.
- Upon running the code, you will see the following output:
14:46:28 [01] Starting
14:46:28 [04] Inside TaskBActivity
14:46:28 [05] Inside TaskCActivity
14:46:28 [06] Inside TaskA
14:46:28 [01] Waiting max 7 seconds...
14:46:29 [05] Leaving TaskCActivity
14:46:30 [04] Leaving TaskBActivity
14:46:33 [06] Leaving TaskA
14:46:33 [01] AllDone=True: TaskA=RanToCompletion, TaskB=RanToCompletion, TaskC=RanToCompletion
Press ENTER to quit
While running the code, a seven-second timeout was randomly picked by the runtime. This allowed all tasks to complete in time, so true was returned by WaitAll and all tasks had a RanToCompletion status at that point. Notice that the thread ID, in square brackets, is different for all three tasks.
- Run the code again:
14:48:20 [01] Starting
14:48:20 [01] Waiting max 2 seconds...
14:48:20 [05] Inside TaskCActivity
14:48:20 [06] Inside TaskA
14:48:20 [04] Inside TaskBActivity
14:48:21 [05] Leaving TaskCActivity
14:48:22 [04] Leaving TaskBActivity
14:48:22 [01] AllDone=False: TaskA=Running, TaskB=Running, TaskC=RanToCompletion
Press ENTER to quit
14:48:25 [06] Leaving TaskA
This time the runtime picked a two-second maximum wait time, so the WaitAll call times out with false being returned.
You may have noticed from the output that Inside TaskBActivity can sometimes appear before Inside TaskCActivity. This demonstrates the .NET scheduler's queuing mechanism. When you call Task.Run, you are asking the scheduler to add this to its queue. There may only be a matter of milliseconds between the time that you call Task.Run and when it invokes your lambda, but this can depend on how many other tasks you have recently added to the queue; a greater number of pending tasks could increase that time period.
Interestingly, the output shows Leaving TaskBActivity, but the taskB status was still Running just after WaitAll finished waiting. This indicates that there can sometimes be a very slight delay when a timed-out task's status is changed.
Some three seconds after the Enter key is pressed, Leaving TaskA is logged. This shows that the Action within any timed-out tasks will continue to run, and .NET will not stop it for you.
Note
You can find the code used for this exercise at https://packt.link/5lH0o.
Continuation Tasks
So far, you have created tasks that are independent of one another, but what if you need to continue a task with the results of the previous task? Rather than blocking the current thread, by calling Wait or accessing the Result property, this can be achieved using the Task ContinueWith methods.
These methods return a new task, referred to as a continuation task, or more simply, a continuation, which can consume the previous task's or the antecedent's results.
As with standard tasks, they do not block the caller thread. There are several ContinueWith overloads available, many allowing extensive customization. A few of the more commonly used overloads are as follows:
- public Task ContinueWith(Action<Task<TResult>> continuationAction): This defines a generic Action<T> based Task to run when the previous task completes.
- public Task ContinueWith(Action<Task<TResult>> continuationAction, CancellationToken cancellationToken): This has a task to run and a cancellation token that can be used to coordinate the cancellation of the task.
- public Task ContinueWith(Action<Task<TResult>> continuationAction, TaskScheduler scheduler): This also has a task to run and a low-level TaskScheduler that be used to queue the task.
- public Task ContinueWith(Action<Task<TResult>> continuationAction, TaskContinuationOptions continuationOptions): A task to run, with the behavior for the task specified with TaskContinuationOptions. For example, specifying NotOnCanceled indicates that you do not want the continuation to be called if the previous task is canceled.
Continuations have an initial WaitingForActivation status. The .NET Framework will execute this task once the antecedent task or tasks have completed. It is important to note that you do not need to start a continuation and attempting to do so will result in an exception.
The following example simulates calling a long-running function, GetStockPrice (this may be some sort of web service or database call that takes a few seconds to return):
ContinuationExamples.cs
1 class ContinuationExamples
2 {
3 public static void Main()
4 {
5 Logger.Log("Start...");
7 .ContinueWith(prev =>
8 {
9 Logger.Log($"GetPrice returned {prev.Result:N2}, status={prev.Status}");
10 });
11
12 Console.ReadLine();
13 }
14
You can find the complete code here: http://packt.link/rpNcx.
The call to GetStockPrice returns a double, which results in the generic Task<double> being passed to as a continuation (see the highlighted part). The prev parameter is a generic Action of type Task<double>, allowing you to access the antecedent task and its Result to retrieve the value returned from GetStockPrice.
If you hover your mouse over the ContinueWith method, you will see the IntelliSense description for it as follows:
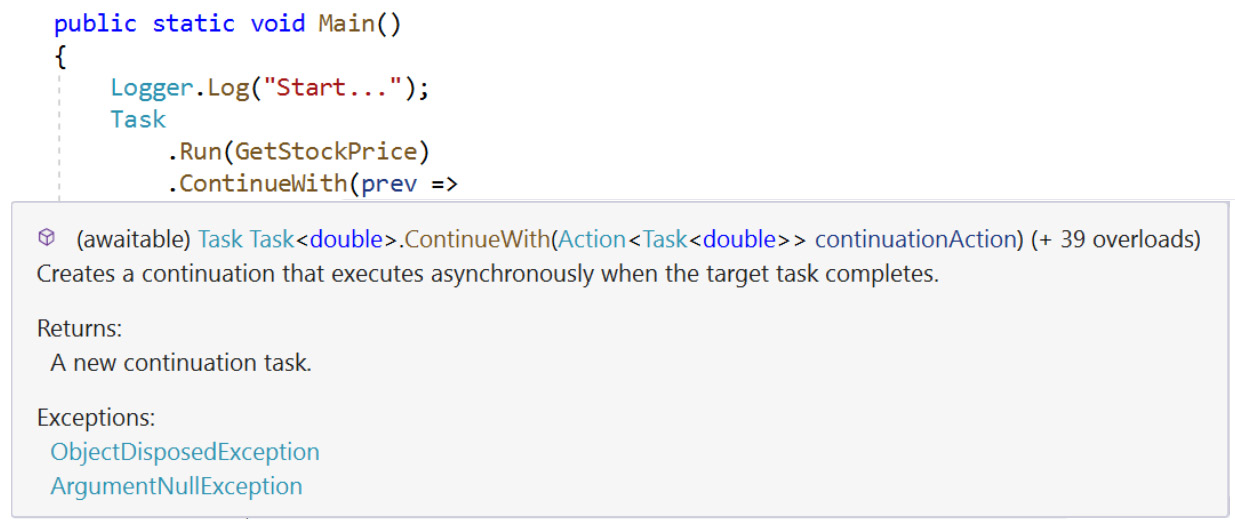
Figure 5.1: ContinueWith method signature
Note
The ContinueWith method has various options that can be used to fine-tune behavior, and you can get more details about them from https://docs.microsoft.com/en-us/dotnet/api/system.threading.tasks.taskcontinuationoptions.
Running the example produces an output similar to the following:
09:30:45 [01] Start...
09:30:45 [03] Inside GetStockPrice
09:30:50 [04] GetPrice returned 76.44, status=RanToCompletion
In the output, thread [01] represents the console's main thread. The task that called GetStockPrice was executed by thread ID [03], yet the continuation was executed using a different thread, thread ([04]).
Note
You can find the code used for this example at https://packt.link/rpNcx.
The continuation running on a different thread may not be a problem, but it certainly will be an issue if you are working on UWP, WPF, or WinForms UI apps where it's essential that UI elements are updated using the main UI thread (unless you are using binding semantics).
It is worth noting that the TaskContinuationOptions.OnlyOnRanToCompletion option can be used to ensure the continuation only runs if the antecedent task has run to completion first. For example, you may create a Task that fetches customers' orders from a database and then use a continuation task to calculate the average order value. If the previous task fails or is canceled by the user, then there is no point in wasting processing power to calculate the average if the user no longer cares about the result.
Note
The ContinueWith method has various options that can be used to fine-tune behavior, and you can see https://docs.microsoft.com/en-us/dotnet/api/system.threading.tasks.taskcontinuationoptions for more details.
If you access the Task<T> Result property on a failed or canceled antecedent task, this will result in an AggregateException being thrown. This will be covered in more detail later.
Using Task.WhenAll and Task.WhenAny with Multiple Tasks
You have seen how a single task can be used to create a continuation task, but what if you have multiple tasks and need to continue with a final operation when any or all of the previous tasks have completed?
Earlier, the Task.WaitAny and Task.WaitAll methods were used to wait for tasks to complete, but these block the current thread. This is where Task.WhenAny and Task.WhenAll can be used. They return a new Task whose Action delegate is called when any, or all, of the preceding tasks have completed.
There are four WhenAll overloads, two that return a Task and two that return a generic Task<T> allowing the task's result to be accessed:
- public static Task WhenAll(IEnumerable<Task> tasks): This continues when the collection of tasks completes.
- public static Task WhenAll(params Task[] tasks): This continues when the array of tasks completes.
- public static Task<TResult[]> WhenAll<TResult>(params Task<TResult>[] tasks): This continues when the array of generic Task<T> items complete.
- public static Task<TResult[]> WhenAll<TResult>(IEnumerable<Task<TResult>> tasks): This continues when the collection of generic Task<T> items complete.
WhenAny has a similar set of overloads but returns the Task or Task<T> that is the first task to complete. You'll next perform a few exercises showing WhenAll and WhenAny in practice.
Exercise 5.03: Waiting for All Tasks to Complete
Say you have been asked by a car dealer to create a console application that calculates the average sales value for cars sold across different regions. A dealership is a busy place, but they know it may take a while to fetch and calculate the average. For this reason, they want to enter a maximum number of seconds that they are prepared to wait for the average calculation. Any longer and they will leave the app and ignore the result.
The dealership has 10 regional sales hubs. To calculate the average, you need to first invoke a method called FetchSales, which returns a list of CarSale items for each of these regions.
Each call to FetchSales could be to a potentially slow-running service (you will implement random pauses to simulate such a delay) so you need to use a Task for each as you can't know for sure how long each call will take to complete. You also do not want slow-running tasks to affect other tasks, but to calculate a valid average, it's important to have all results returned before continuing.
Create a SalesLoader class that implements IEnumerable<CarSale> FetchSales() to return the car sales details. Then, a SalesAggregator class should be passed a list of SalesLoader (in this exercise, there will be 10 loader instances, one for each region). The aggregator will wait for all loaders to finish using Task.WhenAll before continuing with a task that calculates the average across all regions.
Perform the following steps to do so:
- First, create a CarSale record. The constructor accepts two values, the name of the car and its sale price (name and salePrice):
using System;
using System.Collections.Generic;
using System.Globalization;
using System.Linq;
using System.Threading;
using System.Threading.Tasks;
namespace Chapter05.Exercises.Exercise03
{
public record CarSale
{
public CarSale(string name, double salePrice)
=> (Name, SalePrice) = (name, salePrice);
public string Name { get; }
public double SalePrice { get; }
}
- Now create an interface, ISalesLoader, that represents the sales data loading service:
public interface ISalesLoader
{
public IEnumerable<CarSale> FetchSales();
}
It has just one call, FetchSales, returning an enumerable of type CarSale. For now, it's not important to know how the loader works; just that it returns a list of car sales when called. Using an interface here allows using various types of loader as needed.
- User the aggregator class to call an ISalesLoader implementation:
public static class SalesAggregator
{
public static Task<double> Average(IEnumerable<ISalesLoader> loaders)
{
It is declared as static as there is no state between calls. Define an Average function that is passed an enumerable of ISalesLoader items and returns a generic Task<Double> for the final average calculation.
- For each of the loader parameters, use a LINQ projection to pass a loader.FetchSales method to Task.Run:
var loaderTasks = loaders.Select(ldr => Task.Run(ldr.FetchSales));
return Task
.WhenAll(loaderTasks)
.ContinueWith(tasks =>
Each of these will return a Task<IEnumerable<CarSale>> instance. WhenAll is used to create a single task that continues when all of the loader tasks have completed via a ContinueWith call.
- Use the LINQ SelectMany to grab all of the CarSale items from every loader call result, before calling the Linq Average on the SalePrice field of each CarSale item:
{
var average = tasks.Result
.SelectMany(t => t)
.Average(car => car.SalePrice);
return average;
});
}
}
}
- Implement the ISalesLoader interface from a class called SalesLoader:
public class SalesLoader : ISalesLoader
{
private readonly Random _random;
private readonly string _name;
public SalesLoader(int id, Random rand)
{
_name = $"Loader#{id}";
_random = rand;
}
The constructor will be passed an int variable used for logging and a Random instance to help create a random number of CarSale items.
- Your ISalesLoader implementation requires a FetchSales function. Include a random delay of between 1 and 3 seconds to simulate a less reliable service:
public IEnumerable<CarSale> FetchSales()
{
var delay = _random.Next(1, 3);
Logger.Log($"FetchSales {_name} sleeping for {delay} seconds ...");
Thread.Sleep(TimeSpan.FromSeconds(delay));
You are trying to test that your application behaves with various time delays. Hence, the random class use.
- Use Enumerable.Range and random.Next to pick a random number from one to five:
var sales = Enumerable
.Range(1, _random.Next(1, 5))
.Select(n => GetRandomCar())
.ToList();
foreach (var car in sales)
Logger.Log($"FetchSales {_name} found: {car.Name} @ {car.SalePrice:N0}");
return sales;
}
This is the total number of CarSale items to return using your GetRandomCar function.
- Use the GetRandomCar to generate a CarSale item with a random manufacturer's name from a hardcoded list.
- Use the carNames.length property to pick a random index number between zero and four for the car's name:
private readonly string[] _carNames = { "Ford", "BMW", "Fiat", "Mercedes", "Porsche" };
private CarSale GetRandomCar()
{
var nameIndex = _random.Next(_carNames.Length);
return new CarSale(
_carNames[nameIndex], _random.NextDouble() * 1000);
}
}
- Now, create your console app to test this out:
public class Program
{
public static void Main()
{
var random = new Random();
const int MaxSalesHubs = 10;
string input;
do
{
Console.WriteLine("Max wait time (in seconds):");
input = Console.ReadLine();
if (string.IsNullOrEmpty(input))
continue;
Your app will repeatedly ask for a maximum time that the user is prepared to wait while data is downloaded. Once all the data has been downloaded, the app will use this to calculate an average price. Pressing Enter alone will result in the program loop ending. MaxSalesHubs is the maximum number of sales hubs to request data for.
- Convert the entered value into an int type, then use Enumerable.Range again to create a random number of new SalesLoader instances (you have up to 10 different sales hubs):
if (int.TryParse(input, NumberStyles.Any, CultureInfo.CurrentCulture, out var maxDelay))
{
var loaders = Enumerable.Range(1, random.Next(1, MaxSalesHubs))
.Select(n => new SalesLoader(n, random))
.ToList();
- Pass loaders to the static SalesAggregator.Average method to receive a Task<Double>.
- Call Wait, passing in the maximum wait time:
var averageTask = SalesAggregator.Average(loaders);
var hasCompleted = averageTask.Wait( TimeSpan.FromSeconds(maxDelay));
var average = averageTask.Result;
If the Wait call does return in time, then you will see a true value for has completed.
- Finish off by checking hasCompleted and log a message accordingly:
if (hasCompleted)
{
Logger.Log($"Average={average:N0}");
}
else
{
Logger.Log("Timeout!");
}
}
} while (input != string.Empty);
}
}
}
- When running the console app and entering a short maximum wait of 1 second, you see three loader instances randomly created:
Max wait time (in seconds):1
10:52:49 [04] FetchSales Loader#1 sleeping for 1 seconds ...
10:52:49 [06] FetchSales Loader#3 sleeping for 1 seconds ...
10:52:49 [05] FetchSales Loader#2 sleeping for 1 seconds ...
10:52:50 [04] FetchSales Loader#1 found: Mercedes @ 362
10:52:50 [04] FetchSales Loader#1 found: Ford @ 993
10:52:50 [06] FetchSales Loader#3 found: Fiat @ 645
10:52:50 [05] FetchSales Loader#2 found: Mercedes @ 922
10:52:50 [06] FetchSales Loader#3 found: Ford @ 9
10:52:50 [05] FetchSales Loader#2 found: Porsche @ 859
10:52:50 [05] FetchSales Loader#2 found: Mercedes @ 612
10:52:50 [01] Timeout!
Each loader sleeps for 1 second (you can see various thread IDs are logged) before returning a random list of CarSale records. You soon reach the maximum timeout value, hence the message Timeout! with no average value displayed.
- Enter a larger timeout period of 10 seconds:
Max wait time (in seconds):10
20:08:41 [05] FetchSales Loader#1 sleeping for 2 seconds ...
20:08:41 [12] FetchSales Loader#4 sleeping for 1 seconds ...
20:08:41 [08] FetchSales Loader#2 sleeping for 1 seconds ...
20:08:41 [11] FetchSales Loader#3 sleeping for 1 seconds ...
20:08:41 [15] FetchSales Loader#5 sleeping for 2 seconds ...
20:08:41 [13] FetchSales Loader#6 sleeping for 2 seconds ...
20:08:41 [14] FetchSales Loader#7 sleeping for 1 seconds ...
20:08:42 [08] FetchSales Loader#2 found: Porsche @ 735
20:08:42 [08] FetchSales Loader#2 found: Fiat @ 930
20:08:42 [11] FetchSales Loader#3 found: Porsche @ 735
20:08:42 [12] FetchSales Loader#4 found: Porsche @ 735
20:08:42 [08] FetchSales Loader#2 found: Porsche @ 777
20:08:42 [11] FetchSales Loader#3 found: Ford @ 500
20:08:42 [12] FetchSales Loader#4 found: Ford @ 500
20:08:42 [12] FetchSales Loader#4 found: Porsche @ 710
20:08:42 [14] FetchSales Loader#7 found: Ford @ 144
20:08:43 [05] FetchSales Loader#1 found: Fiat @ 649
20:08:43 [15] FetchSales Loader#5 found: Ford @ 779
20:08:43 [13] FetchSales Loader#6 found: Porsche @ 763
20:08:43 [15] FetchSales Loader#5 found: Fiat @ 137
20:08:43 [13] FetchSales Loader#6 found: BMW @ 415
20:08:43 [15] FetchSales Loader#5 found: Fiat @ 853
20:08:43 [15] FetchSales Loader#5 found: Porsche @ 857
20:08:43 [01] Average=639
Entering a value of 10 seconds allow 7 random loaders to complete in time and to finally create the average value of 639.
Note
You can find the code used for this exercise at https://packt.link/kbToQ.
So far, this chapter has considered the various ways that individual tasks can be created and how static Task methods are used to create tasks that are started for us. You saw how Task.Factory.StartNew is used to create configured tasks, albeit with a longer set of configuration parameters. The Task.Run methods, which were more recently added to C#, are preferable by using their more concise signatures for most regular scenarios.
Using continuations, single and multiple tasks can be left to run in isolation, only continuing with a final task when all or any of the preceding tasks have run to completion.
Now it is time to look at the async and wait keywords to run asynchronous code. These keywords are a relatively new addition to the C# language. The Task.Factory.StartNew and Task.Run methods can be found in older C# applications, but hopefully, you will see that async/await provides a much clearer syntax.
Asynchronous Programming
So far, you have created tasks and used the static Task factory methods to run and coordinate such tasks. In earlier versions of C#, these were the only ways to create tasks.
The C# language now provides the async and await keywords to mark a method as asynchronous. This is the preferred way to run asynchronous code. Using the async/await style results in less code and the code that is created is generally easier to grasp and therefore easier to maintain.
Note
You may often find that legacy concurrent-enabled applications were originally created using Task.Factory.StartNew methods are subsequently updated to use the equivalent Task.Run methods or are updated directly to the async/await style.
The async keyword indicates that the method will return to the caller before it has had a chance to complete its operations, therefore the caller should wait for it to complete at some point in time.
Adding the async keyword to a method instructs the compiler that it may need to generate additional code to create a state machine. In essence, a state machine extracts the logic from your original method into a series of delegates and local variables that allows code to continue onto the next statement following an await expression. The compiler generates delegates that can jump back to the same location in the method once they have completed.
Note
You don't normally see this extra complied code, but if you are interested in learning more about state machines in C#, visit https://devblogs.microsoft.com/premier-developer/dissecting-the-async-methods-in-c.
Adding the async keyword does not mean that all or any part of the method will actually run in an asynchronous manner. When an async method is executed, it starts off running synchronously until it comes to a section of code with the await keyword. At this point, the awaitable block of code (in the following example, the BuildGreetings call is awaitable due to the preceding async keyword) is checked to see if it has already been completed. If so, it continues executing synchronously. If not, the asynchronous method is paused and returns an incomplete Task to the caller. This will be complete once the async code has been completed.
In the following console app, the entry point, static Main, has been marked as async and the Task return type added. You cannot mark a Main entry point, which returns either int or void, as async because the runtime must be able to return a Task result to the calling environment when the console app closes:
AsyncExamples.cs
1 using System;
2 using System.Threading;
3 using System.Threading.Tasks;
4
5 namespace Chapter05.Examples
6 {
7 public class AsyncExamples
8 {
9 public static async Task Main()
10 {
11 Logger.Log("Starting");
12 await BuildGreetings();
13
14 Logger.Log("Press Enter");
15 Console.ReadLine();
You can find the complete code here: http://packt.link/CsCek.
Running the example produces an output like this:
18:20:31 [01] Starting
18:20:31 [01] Morning
18:20:41 [04] Morning...Afternoon
18:20:42 [04] Morning...Afternoon...Evening
18:20:42 [04] Press Enter
As soon as Main runs, it logs Starting. Notice how the ThreadId is [01]. As you saw earlier, the console app's main thread is numbered as 1 (because the Logger.Log method uses the 00 format string, which adds a leading 0 to numbers in the range zero to nine).
Then the asynchronous method BuildGreetings is called. It sets the string message variable to "Morning" and logs the message. The ThreadId is still [01]; this is currently running synchronously.
So far, you have been using Thread.Sleep to block the calling thread in order or simulate long-running operations, but async/await makes it easier to simulate slow actions using the static Task.Delay method and awaiting that call. Task.Delay returns a task so it can also be used in continuation tasks.
Using Task.Delay, you will make two distinct awaitable calls (one that waits for 10 seconds and the second for two seconds), before continuing and appending to your local message string. The two Task.Delay calls could have been any method in your code that returns a Task.
The great thing here is that each awaited section gets its correct state in the order that it was declared in the code, irrespective of waiting 10 (or two) seconds prior. The thread IDs have all changed from [01] to [04]. This tells you that a different thread is running these statements. Even the very last Press Enter message has a different thread to the original thread.
Async/await makes it easier to run a series of task-based codes using the familiar WhenAll, WhenAny, and ContinueWith methods interchangeably.
The following example shows how multiple async/await calls can be applied at various stages in a program using a mixture of various awaitable calls. This simulates an application that makes a call to a database (FetchPendingAccounts) to fetch a list of user accounts. Each user in the pending accounts list is given a unique ID (using a task for each user).
Based on the user's region, an account is then created in the northern region or the other region, again, using a task for each. Finally, an awaitable Task.WhenAll call signals that everything has been completed.
using System;
using System.Collections.Generic;
using System.Linq;
using System.Threading.Tasks;
namespace Chapter05.Examples
{
Use an enum to define a RegionName:
public enum RegionName { North, East, South, West };
A User record constructor is passed a userName and the user's region:
public record User
{
public User(string userName, RegionName region)
=> (UserName, Region) = (userName, region);
public string UserName { get; }
public RegionName Region { get; }
public string ID { get; set; }
}
AccountGenerator is the main controlling class. It contains an async CreateAccounts method that can be awaited by a console app (this is implemented at the end of the example):
public class AccountGenerator
{
public async Task CreateAccounts()
{
Using the await keyword, you define an awaitable call to FetchPendingAccounts:
var users = await FetchPendingAccounts();
For each one of the users returned by FetchPendingAccounts, you make an awaitable call to GenerateId. This shows that a loop can contain multiple awaitable calls. The runtime will set the user ID for the correct user instance:
foreach (var user in users)
{
var id = await GenerateId();
user.ID = id;
}
Using a Linq Select function, you create a list of tasks. For each user, a Northern or Other account is created based on the user's region (each one of the calls is a Task per user):
var accountCreationTasks = users.Select(
user => user.Region == RegionName.North
? Task.Run(() => CreateNorthernAccount(user))
: Task.Run(() => CreateOtherAccount(user)))
.ToList();
The list of account creation tasks is awaited using the static WhenAll call. Once this completes, UpdatePendindAccounts will be called passing in the updated user list. This shows that you can pass lists of tasks between async statements:
Logger.Log($"Creating {accountCreationTasks.Count} accounts");
await Task.WhenAll(accountCreationTasks);
var updatedAccountTask = UpdatePendingAccounts(users);
await updatedAccountTask;
Logger.Log($"Updated {updatedAccountTask.Result} pending accounts");
}
The FetchPendingAccounts method returns a Task containing a list of users (here you simulate a delay of 3 seconds using Task.Delay):
private async Task<List<User>> FetchPendingAccounts()
{
Logger.Log("Fetching pending accounts...");
await Task.Delay(TimeSpan.FromSeconds(3D));
var users = new List<User>
{
new User("AnnH", RegionName.North),
new User("EmmaJ", RegionName.North),
new User("SophieA", RegionName.South),
new User("LucyG", RegionName.West),
};
Logger.Log($"Found {users.Count} pending accounts");
return users;
}
GenerateId uses Task.FromResult to generate a globally unique ID using the Guid class. Task.FromResult is used when you want to return a result but do not need to create a running task as you would with Task.Run:
private static Task<string> GenerateId()
{
return Task.FromResult(Guid.NewGuid().ToString());
}
The two bool task methods create either a northern account or other account. Here, you return true to indicate that each account creation call was successful, regardless:
private static async Task<bool> CreateNorthernAccount(User user)
{
await Task.Delay(TimeSpan.FromSeconds(2D));
Logger.Log($"Created northern account for {user.UserName}");
return true;
}
private static async Task<bool> CreateOtherAccount(User user)
{
await Task.Delay(TimeSpan.FromSeconds(1D));
Logger.Log($"Created other account for {user.UserName}");
return true;
}
Next, UpdatePendingAccounts is passed a list of users. For each user, you create a task that simulates a slow-running call to update each user and returning a count of the number of users subsequently updated:
private static async Task<int> UpdatePendingAccounts(IEnumerable<User> users)
{
var updateAccountTasks = users.Select(usr => Task.Run(
async () =>
{
await Task.Delay(TimeSpan.FromSeconds(2D));
return true;
}))
.ToList();
await Task.WhenAll(updateAccountTasks);
return updateAccountTasks.Count(t => t.Result);
}
}
Finally, the console app creates an AccountGenerator instance and waits for CreateAccounts to finish before writing an All done message:
public static class AsyncUsersExampleProgram
{
public static async Task Main()
{
Logger.Log("Starting");
await new AccountGenerator().CreateAccounts();
Logger.Log("All done");
Console.ReadLine();
}
}
}
Running the console app produces this output:
20:12:38 [01] Starting
20:12:38 [01] Fetching pending accounts...
20:12:41 [04] Found 4 pending accounts
20:12:41 [04] Creating 4 accounts
20:12:42 [04] Created other account for SophieA
20:12:42 [07] Created other account for LucyG
20:12:43 [04] Created northern account for EmmaJ
20:12:43 [05] Created northern account for AnnH
20:12:45 [05] Updated 4 pending accounts
20:12:45 [05] All done
Here, you can see that thread [01] writes the Starting message. This is the application's main thread. Note, too, that the main thread also writes Fetching pending accounts... from the FetchPendingAccounts method. This is still running synchronously as the awaitable block (Task.Delay) has not yet been reached.
Threads [4], [5], and [7] create each of the four user accounts. You used Task.Run to call the CreateNorthernAccount or CreateOtherAccount methods. Thread [5] runs the last statement in CreateAccounts: Updated 4 pending accounts. The thread numbers might differ in your system because .NET uses an internal pool of threads which vary based on how busy each thread is.
Note
You can find the code used for this example at https://packt.link/ZIK8k.
Async Lambda Expressions
Chapter 3, Delegates, Events, and Lambdas, looked at lambda expressions and how they can be used to create succinct code. You can also use the async keyword with lambda expressions to create code for an event handler that contains various async code.
The following example uses the WebClient class to show two different ways to download data from a website (this will be covered in great detail in Chapter 8, Creating and Using Web API Clients and Chapter 9, Creating API Services).
using System;
using System.Net;
using System.Net.Http
using System.Threading.Tasks;
namespace Chapter05.Examples
{
public class AsyncLambdaExamples
{
public static async Task Main()
{
const string Url = "https://www.packtpub.com/";
using var client = new WebClient();
Here, you add your own event handler to the WebClient class DownloadDataCompleted event using a lambda statement that is prefixed with the async keyword. The compiler will allow you to add awaitable calls inside the body of the lambda.
This event will be fired after DownloadData is called and the data requested has been downloaded for us. The code uses an awaitable block Task.Delay to simulate some extra processing on a different thread:
client.DownloadDataCompleted += async (sender, args) =>
{
Logger.Log("Inside DownloadDataCompleted...looking busy");
await Task.Delay(500);
Logger.Log("Inside DownloadDataCompleted..all done now");
};
You invoke the DownloadData method, passing in your URL and then logging the length of the web data received. This particular call itself will block the main thread until data is downloaded. WebClient offers a task-based asynchronous version of the DownloadData method called DownloadDataTaskAsync. So it's recommended to use the more modern DownloadDataTaskAsync method as follows:
Logger.Log($"DownloadData: {Url}");
var data = client.DownloadData(Url);
Logger.Log($"DownloadData: Length={data.Length:N0}");
Once again, you request the same URL but can simply use an await statement, which will be run once the data download has been completed. As you can see, this requires less code and has a cleaner syntax:
Logger.Log($"DownloadDataTaskAsync: {Url}");
var downloadTask = client.DownloadDataTaskAsync(Url);
var downloadBytes = await downloadTask;
Logger.Log($"DownloadDataTaskAsync: Length={downloadBytes.Length:N0}");
Console.ReadLine();
}
}
}
Running the code produces this output:
19:22:44 [01] DownloadData: https://www.packtpub.com/
19:22:45 [01] DownloadData: Length=278,047
19:22:45 [01] DownloadDataTaskAsync: https://www.packtpub.com/
19:22:45 [06] Inside DownloadDataCompleted...looking busy
19:22:45 [06] DownloadDataTaskAsync: Length=278,046
19:22:46 [04] Inside DownloadDataCompleted..all done now
Note
When running the program, you may see the following warning: "Warning SYSLIB0014: 'WebClient.WebClient()' is obsolete: 'WebRequest, HttpWebRequest, ServicePoint, and WebClient are obsolete. Use HttpClient instead.'". Here, Visual Studio has suggested that the HttpClient class be used, as WebClient has been marked as obsolete.
DownloadData is logged by thread [01], the main thread, which is blocked for around one second until the download completes. The size of the downloaded file is then logged using the downloadBytes.Length property.
The DownloadDataTaskAsync request is handled by thread 06. Finally, the delayed code inside the DownloadDataCompleted event handler completes via thread 04.
Note
You can find the code used for this example at https://packt.link/IJEaU.
Canceling Tasks
Task cancelation is a two-step approach:
- You need to add a way to request a cancelation.
- Any cancelable code needs to support this.
You cannot provide cancelation without both mechanisms in place.
Typically, you will start a long-running task that supports cancelation and provide the user with the ability to cancel the operation by pressing a button on a UI. There are many real-world examples where such cancellation is needed, such as image processing where multiple images need to be altered allowing a user to cancel the remainder of the task if they run out of time. Another common scenario is sending multiple data requests to different web servers and allowing slow-running or pending requests to be canceled as soon as the first response is received.
In C#, CancellationTokenSource acts as a top-level object to initiate a cancelation request with its Token property, CancellationToken, being passed to concurrent/slow running code that can periodically check and act upon this cancellation status. Ideally, you would not want low-level methods to arbitrarily cancel high-level operations, hence the separation between the source and the token.
There are various CancellationTokenSource constructors, including one that will initiate a cancel request after a specified time has elapsed. Here are a few of the CancellationTokenSource methods, offering various ways to initiate a cancellation request:
- public bool IsCancellationRequested { get; }: This returns true if a cancellation has been requested for this token source (a caller has called the Cancel method). This can be inspected at intervals in the target code.
- public CancellationToken Token { get; }: The CancellationToken that is linked to this source object is often passed to Task.Run overloads, allowing .NET to check the status of pending tasks or for your own code to check while running.
- public void Cancel(): Initiates a request for cancellation.
- public void Cancel(bool throwOnFirstException): Initiates a request for cancellation and determines whether further operations are to be processed should an exception occur.
- public void CancelAfter(int millisecondsDelay): Schedules a cancel request after a specified number of milliseconds.
CancellationTokenSource has a Token property. CancellationToken contains various methods and properties that can be used for code to detect a cancellation request:
- public bool IsCancellationRequested { get; }: This returns true if a cancellation has been requested for this token.
- public CancellationTokenRegistration Register(Action callback): Allows code to register a delegate that will be executed by the system if this token is canceled.
- public void ThrowIfCancellationRequested(): Calling this method will result in OperationCanceledException being thrown if a cancellation has been requested. This is typically used to break out of loops.
Throughout the previous examples, you may have spotted that CancellationToken can be passed to many of the static Task methods. For example, Task.Run, Task.Factory.StartNew, and Task.ContinueWith all contain overrides that accept CancellationToken.
.NET will not try to interrupt or stop any of your code once it is running, no matter how many times you call Cancel on a CancellationToken. Essentially, you pass these tokens into target code, but it is up to that code to periodically check the cancellation status whenever it can, such as within a loop, and then decide how it should act upon it. This makes logical sense; how would .NET know at what point it was safe to interrupt a method, maybe one that has hundreds of lines of code?
Passing CancellationToken to Task.Run only provides a hint to the queue scheduler that it may not need to start a task's action, but once started, .NET will not stop that running code for you. The running code itself must subsequently observe the cancelation status.
This is analogous to a pedestrian waiting to cross a road at a set of traffic lights. Motor vehicles can be thought of as tasks that have been started elsewhere. When the pedestrian arrives at the crossing and they press a button (calling Cancel on CancellationTokenSource), the traffic lights should eventually change to red so that the moving vehicles are requested to stop. It is up to each individual driver to observe that the red light has changed (IsCancellationRequested) and then decide to stop their vehicle. The traffic light does not forcibly stop each vehicle (.NET runtime). If a driver notices that the vehicle behind is too close and stopping soon may result in a collision, they may decide to not stop immediately. A driver that is not observing the traffic light status at all may fail to stop.
The next sections will continue with exercises that show async/await in action, some of the commonly used options for canceling tasks, in which you will need to control whether pending tasks should be allowed to run to completion or interrupted, and when you should aim to catch exceptions.
Exercise 5.04: Canceling Long-Running Tasks
You will create this exercise in two parts:
- One that uses a Task that returns a double-based result.
- Second that provides a fine-grained level of control by inspecting the Token.IsCancellationRequested property.
Perform the following steps to complete this exercise:
- Create a class called SlowRunningService. As the name suggests, the methods inside the service have been designed to be slow to complete:
using System;
using System.Globalization;
using System.Threading;
using System.Threading.Tasks;
namespace Chapter05.Exercises.Exercise04
{
public class SlowRunningService
{
- Add the first slow-running operation, Fetch, which is passed a delay time (implemented with a simple Thread.Sleep call), and the cancellation token, which you pass to Task.Run:
public Task<double> Fetch(TimeSpan delay, CancellationToken token)
{
return Task.Run(() =>
{
var now = DateTime.Now;
Logger.Log("Fetch: Sleeping");
Thread.Sleep(delay);
Logger.Log("Fetch: Awake");
return DateTime.Now.Subtract(now).TotalSeconds;
},
token);
}
When Fetch is called, the token may get canceled before the sleeping thread awakes.
- To test whether Fetch will just stop running or return a number, add a console app to test this. Here, use a default delay (DelayTime) of 3 seconds:
public class Program
{
private static readonly TimeSpan DelayTime=TimeSpan.FromSeconds(3);
- Add a helper function to prompt for a maximum number of seconds that you are prepared to wait. If a valid number is entered, convert the value entered into a TimeSpan:
private static TimeSpan? ReadConsoleMaxTime(string message)
{
Console.Write($"{message} Max Waiting Time (seconds):");
var input = Console.ReadLine();
if (int.TryParse(input, NumberStyles.Any, CultureInfo.CurrentCulture, out var intResult))
{
return TimeSpan.FromSeconds(intResult);
}
return null;
}
- Add a standard Main entry point for the console app. This is marked async and returns a Task:
public static async Task Main()
{
- Create an instance of the service. You will use the same instance in a loop, shortly:
var service = new SlowRunningService();
- Now add a do-loop that repeatedly asks for a maximum delay time:
Console.WriteLine($"ETA: {DelayTime.TotalSeconds:N} seconds");
TimeSpan? maxWaitingTime;
while (true)
{
maxWaitingTime = ReadConsoleMaxTime("Fetch");
if (maxWaitingTime == null)
break;
This allows you to try various values to see how that affects the cancel token and the results you receive back. In the case of a null value, you will break out of the do-loop.
- Create CancellationTokenSource, passing in the maximum waiting time:
using var tokenSource = new CancellationTokenSource( maxWaitingTime.Value);
var token = tokenSource.Token;
This will trigger a cancellation without having to call the Cancel method yourself.
- Using the CancellationToken.Register method, pass an Action delegate to be invoked when the token gets signaled for cancellation. Here, simply log a message when that occurs:
token.Register(() => Logger.Log($"Fetch: Cancelled token={token.GetHashCode()}"));
- Now for the main activity, call the service's Fetch method, passing in the default DelayTime and the token:
var resultTask = service.Fetch(DelayTime, token);
- Before you await resultTask, add a try-catch block to catch any TaskCanceledException:
try
{
await resultTask;
if (resultTask.IsCompletedSuccessfully)
Logger.Log($"Fetch: Result={resultTask.Result:N0}");
else
Logger.Log($"Fetch: Status={resultTask.Status}");
}
catch (TaskCanceledException ex)
{
Logger.Log($"Fetch: TaskCanceledException {ex.Message}");
}
}
}
}
}
When using cancelable tasks, there is a possibility that they will throw TaskCanceledException. In this case, that is okay as you do expect that to happen. Notice that you only access the resultTask.Result if the task is marked as IsCompletedSuccessfully. If you attempt to access the Result property of a faulted task, then AggregateException instance is thrown. In some older projects, you may see non-async/await code that catches AggregateException.
- Run the app and enter a waiting time greater than the ETA of three seconds, 5 in this case:
ETA: 3.00 seconds
Fetch Max Waiting Time (seconds):5
16:48:11 [04] Fetch: Sleeping
16:48:14 [04] Fetch: Awake
16:48:14 [04] Fetch: Result=3
As expected, the token was not canceled prior to completion, so you see Result=3 (the elapsed time in seconds).
- Try this again. For the cancellation to be triggered and detected, enter 2 for the number of seconds:
Fetch Max Waiting Time (seconds):2
16:49:51 [04] Fetch: Sleeping
16:49:53 [08] Fetch: Cancelled token=28589617
16:49:54 [04] Fetch: Awake
16:49:54 [04] Fetch: Result=3
Notice that the Cancelled token message is logged before the Fetch awakes, but you still end up receiving a result of 3 seconds with no TaskCanceledException message. This emphasizes the point that passing a cancellation token to Start.Run does not stop the task's action from starting, and more importantly, it did not interrupt it either.
- Finally, use 0 as the maximum waiting time, which will effectively trigger the cancellation immediately:
Fetch Max Waiting Time (seconds):
0
16:53:32 [04] Fetch: Cancelled token=48717705
16:53:32 [04] Fetch: TaskCanceledException A task was canceled.
You will see the canceled token message and TaskCanceledException being caught, but there are no Sleeping or Awake messages logged at all. This shows that the Action passed to Task.Run was not actually started by the runtime. When you pass a CancelationToken to Start.Run, the task's Action gets queued but TaskScheduler will not run the action if it notices that the token has been canceled prior to starting; it just throws TaskCanceledException.
Now for an alternative slow-running method, one that allows you to support cancellable actions via a loop that polls for a change in the cancellation status.
- In the SlowRunningService class, add a FetchLoop function:
public Task<double?> FetchLoop(TimeSpan delay, CancellationToken token)
{
return Task.Run(() =>
{
const int TimeSlice = 500;
var iterations = (int)(delay.TotalMilliseconds / TimeSlice);
Logger.Log($"FetchLoop: Iterations={iterations} token={token.GetHashCode()}");
var now = DateTime.Now;
This produces a result similar to the earlier Fetch function but its purpose is to show how a function can be broken into a repeating loop that offers the ability to examine CancellationToken as each loop iteration runs.
- Define the body of a for...next loop, which checks, for each iteration, if the IsCancellationRequested property is true and simply returns a nullable double if it detects that a cancellation has been requested:
for (var i = 0; i < iterations; i++)
{
if (token.IsCancellationRequested)
{
Logger.Log($"FetchLoop: Iteration {i + 1} detected cancellation token={token.GetHashCode()}");
return (double?)null;
}
Logger.Log($"FetchLoop: Iteration {i + 1} Sleeping");
Thread.Sleep(TimeSlice);
Logger.Log($"FetchLoop: Iteration {i + 1} Awake");
}
Logger.Log("FetchLoop: done");
return DateTime.Now.Subtract(now).TotalSeconds;
}, token);
}
This is a rather firm way to exit a loop, but as far as this code is concerned, nothing else needs to be done.
Note
You could have also used a continue statement and cleaned up before returning. Another option is to call token.ThrowIfCancellationRequested() rather than checking token.IsCancellationRequested, which will force you to exit the for loop.
- In the Main console app, add a similar while loop that calls the FetchLoop method this time. The code is similar to the previous looping code:
while (true)
{
maxWaitingTime = ReadConsoleMaxTime("FetchLoop");
if (maxWaitingTime == null)
break;
using var tokenSource = new CancellationTokenSource(maxWaitingTime.Value);
var token = tokenSource.Token;
token.Register(() => Logger.Log($"FetchLoop: Cancelled token={token.GetHashCode()}"));
- Now call the FetchLoop and await the result:
var resultTask = service.FetchLoop(DelayTime, token);
try
{
await resultTask;
if (resultTask.IsCompletedSuccessfully)
Logger.Log($"FetchLoop: Result={resultTask.Result:N0}");
else
Logger.Log($"FetchLoop: Status={resultTask.Status}");
}
catch (TaskCanceledException ex)
{
Logger.Log($"FetchLoop: TaskCanceledException {ex.Message}");
}
}
- Running the console app and using a 5-second maximum allows all the iterations to run through with none detecting a cancellation request. The result is 3 as expected:
FetchLoop Max Waiting Time (seconds):5
17:33:38 [04] FetchLoop: Iterations=6 token=6044116
17:33:38 [04] FetchLoop: Iteration 1 Sleeping
17:33:38 [04] FetchLoop: Iteration 1 Awake
17:33:38 [04] FetchLoop: Iteration 2 Sleeping
17:33:39 [04] FetchLoop: Iteration 2 Awake
17:33:39 [04] FetchLoop: Iteration 3 Sleeping
17:33:39 [04] FetchLoop: Iteration 3 Awake
17:33:39 [04] FetchLoop: Iteration 4 Sleeping
17:33:40 [04] FetchLoop: Iteration 4 Awake
17:33:40 [04] FetchLoop: Iteration 5 Sleeping
17:33:40 [04] FetchLoop: Iteration 5 Awake
17:33:40 [04] FetchLoop: Iteration 6 Sleeping
17:33:41 [04] FetchLoop: Iteration 6 Awake
17:33:41 [04] FetchLoop: done
17:33:41 [04] FetchLoop: Result=3
- Use 2 as the maximum. This time the token is auto-triggered during iteration 4 and spotted by iteration 5, so you are returned a null result:
FetchLoop Max Waiting Time (seconds):
2
17:48:47 [04] FetchLoop: Iterations=6 token=59817589
17:48:47 [04] FetchLoop: Iteration 1 Sleeping
17:48:48 [04] FetchLoop: Iteration 1 Awake
17:48:48 [04] FetchLoop: Iteration 2 Sleeping
17:48:48 [04] FetchLoop: Iteration 2 Awake
17:48:48 [04] FetchLoop: Iteration 3 Sleeping
17:48:49 [04] FetchLoop: Iteration 3 Awake
17:48:49 [04] FetchLoop: Iteration 4 Sleeping
17:48:49 [06] FetchLoop: Cancelled token=59817589
17:48:49 [04] FetchLoop: Iteration 4 Awake
17:48:49 [04] FetchLoop: Iteration 5 detected cancellation token=59817589
17:48:49 [04] FetchLoop: Result=
- By using 0, you see the same output as the earlier Fetch example:
FetchLoop Max Waiting Time (seconds):
0
17:53:29 [04] FetchLoop: Cancelled token=48209832
17:53:29 [08] FetchLoop: TaskCanceledException A task was canceled.
The action doesn't get a chance to run. You can see a Cancelled token message and TaskCanceledException being logged.
By running this exercise, you have seen how long-running tasks can be automatically marked for cancellation by the .NET runtime if they do not complete within a specified time. By using a for loop, a task was broken down into small iterative steps, which provided a frequent opportunity to detect if a cancellation was requested.
Note
You can find the code used for this exercise at https://packt.link/xa1Yf.
Exception Handling in Async/Await Code
You have seen that canceling a task can result in TaskCanceledException being thrown. Exception handling for asynchronous code can be implemented in the same way you would for standard synchronous code, but there are a few things you need to be aware of.
When code in an async method causes an exception to be thrown, the task's status is set to Faulted. However, an exception will not be rethrown until the awaited expression gets rescheduled. What this mean is that if you do not await a call, then it's possible for exceptions to be thrown and to go completely unobserved in code.
Unless you absolutely cannot help it, you should not create async void methods. Doing so makes it difficult for the caller to await your code. This means they cannot catch any exceptions raised, which by default, will terminate a program. If the caller is not given a Task reference to await, then there is no way for them to tell if the called method ran to completion or not.
The general exception to this guideline is in the case of fire-and-forget methods as mentioned at the start of the chapter. A method that asynchronously logs the usage of the application may not be of such critical importance, so you may not care if such calls are successful or not.
It is possible to detect and handle unobserved task exceptions. If you attach an event delegate to the static TaskScheduler.UnobservedTaskException event, you can receive a notification that a task exception has gone unobserved. You can attach a delegate to this event as follows:
TaskScheduler.UnobservedTaskException += (sender, args) =>
{
Logger.Log($"Caught UnobservedTaskException {args.Exception}");
};
The runtime considers a task exception to be unobserved once the task object is finalized.
Note
You can find the code used for this example at https://packt.link/OkH7r.
Continuing with some more exception handling examples, see how you can catch a specific type of exception as you would with synchronous code.
In the following example, the CustomerOperations class provides the AverageDiscount function, which returns Task<int>. However, there is a chance that it may throw DivideByZeroException, so you will need to catch that; otherwise, the program will crash.
using System;
using System.Threading.Tasks;
namespace Chapter05.Examples
{
class ErrorExamplesProgram
{
public static async Task Main()
{
try
{
Create a CustomerOperations instance and wait for the AverageDiscount method to return a value:
var operations = new CustomerOperations();
var discount = await operations.AverageDiscount();
Logger.Log($"Discount: {discount}");
}
catch (DivideByZeroException)
{
Console.WriteLine("Caught a divide by zero");
}
Console.ReadLine();
}
class CustomerOperations
{
public async Task<int> AverageDiscount()
{
Logger.Log("Loading orders...");
await Task.Delay(TimeSpan.FromSeconds(1));
Choose a random value for ordercount between 0 and 2. An attempt to divide by zero will result in an exception being thrown by the .NET runtime:
var orderCount = new Random().Next(0, 2);
var orderValue = 1200;
return orderValue / orderCount;
}
}
}
}
The results show that when orderCount was zero, you did catch DivideByZeroException as expected:
15:47:21 [01] Loading orders...
Caught a divide by zero
Running a second time, there was no error caught:
17:55:54 [01] Loading orders...
17:55:55 [04] Discount: 1200
On your system you may find that the program needs to be run multiple times before the DivideByZeroException is raised. This is due to the use of a random instance to assign a value to orderCount.
Note
You can find the code used for this example at https://packt.link/18kOK.
So far, you have created single tasks that may throw exceptions. The following exercise will look at a more complex variant.
Exercise 5.05: Handling Async Exceptions
Imagine you have a CustomerOperations class that can be used to fetch a list of customers via a Task. For each customer, you need to run an extra async task, which goes off to a service to calculate the total value of that customer's orders.
Once you have your customer list, the customers need to be sorted in descending order of sales, but due to some security restrictions, you are not allowed to read a customer's TotalOrders property if their region name is West. In this exercise you will create a copy of the RegionName enum that was used in the earlier example.
Perform the following steps to complete this exercise:
- Start by adding the Customer class:
1 using System;
2 using System.Collections.Generic;
3 using System.Linq;
4 using System.Threading.Tasks;
5
6 namespace Chapter05.Exercises.Exercise05
7 {
8 public enum RegionName { North, East, South, West };
9
10 public class Customer
11 {
12 private readonly RegionName _protectedRegion;
13
14 public Customer(string name, RegionName region, RegionName protectedRegion)
15 {
The constructor is passed the customer name and their region, along with a second region that identifies the protectedRegion name. If the customer's region is the same as this protectedRegion, then throw an access violation exception on any attempt to read the TotalOrders property.
- Then add a CustomerOperations class:
public class CustomerOperations
{
public const RegionName ProtectedRegion = RegionName.West;
This knows how to load a customer's name and populate their total order value. The requirement here is that customers from the West region need to have a restriction hardcoded, so add a constant called ProtectedRegion that has RegionName.West as a value.
- Add a FetchTopCustomers function:
public async Task<IEnumerable<Customer>> FetchTopCustomers()
{
await Task.Delay(TimeSpan.FromSeconds(2));
Logger.Log("Loading customers...");
var customers = new List<Customer>
{
new Customer("Rick Deckard", RegionName.North, ProtectedRegion),
new Customer("Taffey Lewis", RegionName.North, ProtectedRegion),
new Customer("Rachael", RegionName.North, ProtectedRegion),
new Customer("Roy Batty", RegionName.West, ProtectedRegion),
new Customer("Eldon Tyrell", RegionName.East, ProtectedRegion)
};
This returns a Task enumeration of Customer and is marked as async as you will make further async calls to populate each customer's order details inside the function. Await using Task.Delay to simulate a slow-running operation. Here, a sample list of customers is hardcoded. Create each Customer instance, passing their name, actual region, and the protected region constant, ProtectedRegion.
- Add an await call to FetchOrders (which will be declared shortly):
await FetchOrders(customers);
- Now, iterate through the list of customers, but be sure to wrap each call to TotalOrders with a try-catch block that explicitly checks for the access violation exception that will be thrown if you attempt to view a protected customer:
var filteredCustomers = new List<Customer>();
foreach (var customer in customers)
{
try
{
if (customer.TotalOrders > 0)
filteredCustomers.Add(customer);
}
catch (AccessViolationException e)
{
Logger.Log($"Error {e.Message}");
}
}
- Now that the filteredCustomers list has been populated with a filtered list of customers, use the Linq OrderByDescending extension method to return the items sorted by each customer's TotalOrders value:
return filteredCustomers.OrderByDescending(c => c.TotalOrders);
}
- Finish off CustomerOperations with the FetchOrders implementation.
- For each customer in the list, use an async lambda that pauses for 500 milliseconds before assigning a random value to TotalOrders:
private async Task FetchOrders(IEnumerable<Customer> customers)
{
var rand = new Random();
Logger.Log("Loading orders...");
var orderUpdateTasks = customers.Select(
cust => Task.Run(async () =>
{
await Task.Delay(500);
cust.TotalOrders = rand.Next(1, 100);
}))
.ToList();
The delay could represent another slow-running service.
- Wait for orderUpdateTasks to complete using Task.WhenAll:
await Task.WhenAll(orderUpdateTasks);
}
}
- Now create a console app to run the operation:
public class Program
{
public static async Task Main()
{
var ops = new CustomerOperations();
var resultTask = ops.FetchTopCustomers();
var customers = await resultTask;
foreach (var customer in customers)
{
Logger.Log($"{customer.Name} ({customer.Region}): {customer.TotalOrders:N0}");
}
Console.ReadLine();
}
}
}
- On running the console, there are no errors as Roy Batty from the West region was skipped safely:
20:00:15 [05] Loading customers...
20:00:16 [05] Loading orders...
20:00:16 [04] Error Cannot access orders for Roy Batty
20:00:16 [04] Rachael (North): 56
20:00:16 [04] Taffey Lewis (North): 19
20:00:16 [04] Rick Deckard (North): 10
20:00:16 [04] Eldon Tyrell (East): 6
In this exercise, you saw how exceptions can be handled gracefully with asynchronous code. You placed a try-catch block at the required location, rather than over-complicating and adding too many unnecessary levels of nested try-catch blocks. When the code was run, an exception was caught that did not crash the application.
Note
You can find the code used for this exercise at https://packt.link/4ozac.
The AggregateException Class
At the beginning of the chapter, you saw that the Task class has an Exception property of type AggregateException. This class contains details about one or more errors that occur during an asynchronous call.
AggregateException has various properties, but the main ones are as follows:
- public ReadOnlyCollection<Exception> InnerExceptions { get; }: A collection of exceptions that caused the current exception. A single asynchronous call can result in multiple exceptions being raised and collected here.
- public AggregateException Flatten(): Flattens all of the AggregateException instances in the InnerExeceptions property into a single new instance. This saves you from having to iterate over AggregateException nested with the exceptions list.
- public void Handle(Func<Exception, bool> predicate): Invokes the specified Func handler on every exception in this aggregate exception. This allows the handler to return true or false to indicate whether each exception was handled. Any remaining unhandled exceptions will be thrown for the caller to catch as required.
When something goes wrong and this exception is caught by a caller, InnerExceptions contains a list of the exceptions that caused the current exception. These can be from multiple tasks, so each individual exception is added to the resulting task's InnerExceptions collection.
You may often find async code with a try-catch block that catches AggregateException and logs each of InnerExceptions details. In this example, BadTask returns an int based task, but it can be the cause of an exception when run. Perform the following steps to complete this example:
using System;
using System.Collections.Generic;
using System.Linq;
using System.Threading.Tasks;
namespace Chapter05.Examples
{
class WhenAllErrorExamples
{+
It sleeps for 1,000 milliseconds before throwing the InvalidOperationException in case the number passed in is an even number (using the % operator to see if the number can be divided by 2 with no remainder):
private static async Task<int> BadTask(string info, int n)
{
await Task.Delay(1000);
Logger.Log($"{info} number {n} awake");
if (n % 2 == 0)
{
Logger.Log($"About to throw one {info} number {n}"…");
throw new InvalidOperationException"($"Oh dear from {info} number "n}");
}
return n;
}
Add a helper function, CreateBadTasks, that creates a collection of five bad tasks. When started, each of the tasks will eventually throw an exception of type InvalidOperationException:
private static IEnumerable<Task<int>> CreateBadTasks(string info)
{
return Enumerable.Range(0, 5)
.Select(i => BadTask(info, i))
.ToList();
}
Now, create the console app's Main entry point. You pass the results of CreateBadTasks to WhenAll, passing in the string [WhenAll] to make it easier to see what is happening in the output:
public static async Task Main()
{
var whenAllCompletedTask = Task.WhenAll(CreateBadTasks("[WhenAll]"));
Before you attempt to await the whenAllCompletedTask task, you need to wrap it in try-catch, which catches the base Exception type (or a more specific one if you are expecting that).
You cannot catch AggregateException here as it's the first exception inside the Task that you receive, but you can still use the Exception property of whenAllCompletedTask to get at the AggregateException itself:
try
{
await whenAllCompletedTask;
}
catch (Exception ex)
{
You've caught an exception, so log its type (this will be InvalidOperationException instance that you threw) and the message:
Console.WriteLine($"WhenAll Caught {ex.GetType().Name}, Message={ex.Message}");
Now you can examine whenAllCompletedTask, iterating though this task's AggregateException to see its InnerExceptions list:
Console.WriteLine($"WhenAll Task.Status={whenAllCompletedTask.Status}");
foreach (var ie in whenAllCompletedTask.Exception.InnerExceptions)
{
Console.WriteLine($"WhenAll Caught Inner Exception: {ie.Message}");
}
}
Console.ReadLine();
}
}
}
Running the code, you'll see five tasks that sleep, and eventually, numbers 0, 2, and 4 each throw InvalidOperationException, which you will catch:
17:30:36 [05] [WhenAll] number 3 awake
17:30:36 [09] [WhenAll] number 1 awake
17:30:36 [07] [WhenAll] number 0 awake
17:30:36 [06] [WhenAll] number 2 awake
17:30:36 [04] [WhenAll] number 4 awake
17:30:36 [06] About to throw one [WhenAll] number 2...
17:30:36 [04] About to throw one [WhenAll] number 4...
17:30:36 [07] About to throw one [WhenAll] number 0...
WhenAll Caught InvalidOperationException, Message=Oh dear from [WhenAll] number 0
WhenAll Task.Status=Faulted
WhenAll Caught Inner Exception: Oh dear from [WhenAll] number 0
WhenAll Caught Inner Exception: Oh dear from [WhenAll] number 2
WhenAll Caught Inner Exception: Oh dear from [WhenAll] number 4
Notice how number 0 appears to be the only error that was caught ((Message=Oh dear from [WhenAll] number 0). However, by logging each entry in the InnerExceptions list, you see all three erroneous tasks with number 0 appearing once again.
You can try the same code, but this time use WhenAny. Remember that WhenAny will complete when the first task in the list completes, so notice the complete lack of error handling in this case:
var whenAnyCompletedTask = Task.WhenAny(CreateBadTasks("[WhenAny]"));
var result = await whenAnyCompletedTask;
Logger.Log($"WhenAny result: {result.Result}");
Unless you wait for all tasks to complete, you may miss an exception raised by a task when using WhenAny. Running this code results in not a single error being caught and the app does not break. The result is 3 as that completed first:
18:08:46 [08] [WhenAny] number 2 awake
18:08:46 [10] [WhenAny] number 0 awake
18:08:46 [10] About to throw one [WhenAny] number 0...
18:08:46 [07] [WhenAny] number 3 awake
18:08:46 [09] [WhenAny] number 1 awake
18:08:46 [07] WhenAny result: 3
18:08:46 [08] About to throw one [WhenAny] number 2...
18:08:46 [06] [WhenAny] number 4 awake
18:08:46 [06] About to throw one [WhenAny] number 4...
You will finish this look at async/await code by looking at some of the newer options in C# around handling streams of async results. This provides a way to efficiently iterate through the items of a collection without the calling code having to wait for the entire collection to be populated and returned before it can start processing the items in the list.
Note
You can find the code used for this example at https://packt.link/SuCXK.
IAsyncEnumerable Streams
If your application targets .NET 5, .NET6, .NET Core 3.0, .NET Standard 2.1, or any of the later versions, then you can use IAsyncEnumerable streams to create awaitable code that combines the yield keyword into an enumerator to iterate asynchronously through a collection of objects.
Note
Microsoft's documentation provides this definition of the yield keyword: When a yield return statement is reached in the iterator method, expression is returned, and the current location in code is retained. Execution is restarted from that location the next time that the iterator function is called.
Using the yield statement, you can create methods that return an enumeration of items to the caller. Additionally, the caller does not need to wait for the entire list of items to be returned before they can start traversing each item in the list. Instead, the caller can access each item as soon as it becomes available.
In this example, you will create a console app that replicates an insurance quoting system. You will make five requests for an insurance quote, once again using Task.Delay to simulate a 1-second delay in receiving each delay.
For the list-based approach, you can only log each quote once all five results have been received back to the Main method. Using IAsyncEnumerable and the yield keyword, the same one second exists between quotes being received, but as soon as each quote is received, the yield statement allows the calling Main method to receive and process the value quoted. This is ideal if you want to start processing items right away or potentially do not want the overhead of having thousands of items in a list for longer than is needed to process them individually:
using System;
using System.Collections.Generic;
using System.Threading.Tasks;
namespace Chapter05.Examples
{
class AsyncEnumerableExamplesProgram
{
public static async Task Main()
{
Start by awaiting for GetInsuranceQuotesAsTask to return a list of strings and iterate through each, logging the details of each quote. This code will wait for all quotes to be received before logging each item:
Logger.Log("Fetching Task quotes...");
var taskQuotes = await GetInsuranceQuotesAsTask();
foreach(var quote in taskQuotes)
{
Logger.Log($"Received Task: {quote}");
}
Now for the async stream version. If you compare the following code to the preceeding code block, you'll see that there are fewer lines of code needed to iterate through the items returned. This code does not wait for all quote items to be received but instead writes out each quote as soon as it is received from GetInsuranceQuotesAsync:
Logger.Log("Fetching Stream quotes...");
await foreach (var quote in GetInsuranceQuotesAsync())
{
Logger.Log($"Received Stream: {quote}");
}
Logger.Log("All done...");
Console.ReadLine();
}
The GetInsuranceQuotesAsTask method returns a Task of strings. Between each of the five quotes, you wait for one second to simulate a delay, before adding the result to the list and finally returning the entire list back to the caller:
private static async Task<IEnumerable<string>> GetInsuranceQuotesAsTask()
{
var rand = new Random();
var quotes = new List<string>();
for (var i = 0; i < 5; i++)
{
await Task.Delay(1000);
quotes.Add($"Provider{i}'s quote is {rand.Next(5, 10)}");
}
return quotes;
}
The GetInsuranceQuotesAsync method contains the same delay between each quote, but rather than populating a list to return back to the caller, the yield statement is used to allow the Main method to process each quote item immediately:
private static async IAsyncEnumerable<string> GetInsuranceQuotesAsync()
{
var rand = new Random();
for (var i = 0; i < 5; i++)
{
await Task.Delay(1000);
yield return $"Provider{i}'s quote is {rand.Next(5, 10)}";
}
}
}
}
Running the console app produces the following output:
09:17:57 [01] Fetching Task quotes...
09:18:02 [04] Received Task: Provider0's quote is 7
09:18:02 [04] Received Task: Provider1's quote is 9
09:18:02 [04] Received Task: Provider2's quote is 9
09:18:02 [04] Received Task: Provider3's quote is 8
09:18:02 [04] Received Task: Provider4's quote is 8
09:18:02 [04] Fetching Stream quotes...
09:18:03 [04] Received Stream: Provider0's quote is 7
09:18:04 [04] Received Stream: Provider1's quote is 8
09:18:05 [05] Received Stream: Provider2's quote is 9
09:18:06 [05] Received Stream: Provider3's quote is 8
09:18:07 [04] Received Stream: Provider4's quote is 7
09:18:07 [04] All done...
Thread [04] logged all five task-based quote details five seconds after the app started. Here, it waited for all quotes to be returned before logging each quote. However, notice that each of the stream-based quotes was logged as soon as it was yielded by threads 4 and 5 with 1 second between them.
The overall time taken for both calls is the same (5 seconds in total), but yield is preferrable when you want to start processing each result as soon as it is ready. This is often useful in UI apps where you can provide early results to the user.
Note
You can find the code used for this example at https://packt.link/KarKW.
Parallel Programming
So far, this chapter has covered async programming using the Task class and async/await keywords. You have seen how tasks and async blocks of code can be defined and the flow of a program can be finely controlled as these structures complete.
The Parallel Framework (PFX) offers further ways to utilize multicore processors to efficiently run concurrent operations. The phrase TPL (Task Parallel Library) is generally used to refer to the Parallel class in C#.
Using the Parallel Framework, you do not need to worry about the complexity of creating and reusing threads or coordinating multiple tasks. The framework manages this for you, even adjusting the number of threads that are used, in order to maximize throughput.
For parallel programming to be effective, the order in which each task executes must be irrelevant and all tasks should be independent of each other, as you cannot be certain when one task completes and the next one begins. Coordinating negates any benefits. Parallel programming can be broken down into two distinct concepts:
- Data parallelism
- Task parallelism
Data Parallelism
Data parallelism is used when you have multiple data values, and the same operation is to be applied concurrently to each of those values. In this scenario, processing each of the values is partitioned across different threads.
A typical example might be calculating the prime numbers from one to 1,000,000. For each number in the range, the same function needs to be applied to determine whether the value is a prime. Rather than iterating through each number one at a time, an asynchronous approach would be to split numbers across multiple threads.
Task Parallelism
Conversely, task parallelism is used where a collection of threads all performs a different action, such as calling different functions or sections of code, concurrently. One such example is a program that analyzes the words found in a book, by downloading the book's text and defining separate tasks to do the following:
- Count the number of words.
- Find the longest word.
- Calculate the average word length.
- Count the number of noise words (the, and, of, for example).
Each of these tasks can be run concurrently and they do not depend on each other.
For the Parallel class, the Parallel Framework provides various layers that offer parallelism, including Parallel Language Integrated Query (PLINQ). PLINQ is a collection of extension methods that add the power of parallel programming to the LINQ syntax. The PLINQ won't be covered here in detail, but the Parallel class will be covered in more detail.
Note
If you're interested in learning more about PLINQ, you can refer to the online documentation at https://docs.microsoft.com/en-us/dotnet/standard/parallel-programming/introduction-to-plinq.
The Parallel Class
The Parallel class contains just three static methods but there are numerous overloads providing options to control and influence how actions are performed. Each of the methods block the current thread, and if an exception occurs, whilst an iterator is working, the trailing iterators are stopped and an exception is thrown to the caller. Due to this blocking behavior, the Parallel class is often called from within an awaitable block such as Task.Run.
It is worth remembering that the runtime may run the required operations in parallel only if it thinks that is warranted. In the case of individual steps completing sooner than others, the runtime may decide that the overhead of running the remaining operations in parallel is not justified.
Some of the commonly used Parallel method overloads are as follows:
- public static ParallelLoopResult For(int from, int to, Action<int> body): This data parallelism call executes a loop by invoking the body Action delegate, passing in an int value across the from and to numeric range. It returns ParallelLoopResult, which contains details of the loop once completed.
- public static ParallelLoopResult For(int from, int to, ParallelOptions options, Action<int, ParallelLoopState> body): A data parallelism call that executes a loop across the numeric range. ParallelOptions allows loop options to be configured and ParallelLoopState is used to monitor or manipulate the state of the loop as it runs. It returns ParallelLoopResult.
- public static ParallelLoopResult ForEach<TSource>(IEnumerable<TSource> source, Action<TSource, ParallelLoopState> body): A data parallelism call that invokes the Action body on each item in the IEnumerable source. It returns ParallelLoopResult.
- public static ParallelLoopResult ForEach<TSource>(Partitioner<TSource> source, Action<TSource> body): An advanced data parallelism call that invokes the Action body and allows you to specify Partitioner to provide partitioning strategies optimized for specific data structures to improve performance. It returns ParallelLoopResult.
- public static void Invoke(params Action[] actions): A task parallelism call that executes each of the actions passed.
- public static void Invoke(ParallelOptions parallelOptions, params Action[] actions): A task parallelism call that executes each of the actions and allows ParallelOptions to be specified to configure method calls.
The ParallelOptions class can be used to configure how the Parallel methods operate:
- public CancellationToken CancellationToken { get; set; }: The familiar cancelation token that can be used to detect within loops if cancellation has been requested by a caller.
- public int MaxDegreeOfParallelism { get; set; }: An advanced setting that determines the maximum number of concurrent tasks that can be enabled at a time.
- public TaskScheduler? TaskScheduler { get; set; }: An advanced setting that allows a certain type of task queue scheduler to be set.
ParallelLoopState can be passed into the body of an Action for that action to then determine or monitor flow through the loop. The most commonly used properties are as follows:
- public bool IsExceptional { get; }: Returns true if an iteration has thrown an unhandled exception.
- public bool IsStopped { get; }: Returns true if an iteration has stopped the loop by calling the Stop method.
- public void Break(): The Action loop can call this to indicate execution should cease beyond the current iteration.
- public void Stop(): Requests that the loop should cease execution at the current iteration.
- ParallelLoopResult, as returned by the For and ForEach methods, contains a completion status for the Parallel loop.
- public bool IsCompleted { get; }: Indicates that the loop ran to completion and did not receive a request to end before completion.
- public long? LowestBreakIteration { get; }: If Break is called while the loop runs. This returns the index of the lowest iteration the loop arrived at.
Using the Parallel class does not automatically mean that a particular bulk operation will complete any faster. There is an overhead in scheduling tasks, so care should be taken when running tasks that are too short or too long. Sadly, there is no simple metric that determines an optimal figure here. It is often a case of profiling to see if operations do indeed complete faster using the Parallel class.
Note
You can find more information on data and task parallelism at https://docs.microsoft.com/en-us/dotnet/standard/parallel-programming/potential-pitfalls-in-data-and-task-parallelism.
Parallel.For and Parallel.ForEach
These two methods offer data parallelism. The same operation is applied to a collection of data objects or numbers. To benefit from these, each operation should be CPU-bound, that is it should require CPU cycles to execute rather than being IO-bound (accessing a file, for example).
With these two methods, you define an Action to be applied, which is passed an object instance or number to work with. In the case of Parallel.ForEach, the Action is passed an object reference parameter. A numeric parameter is passed to Parallel.For.
As you saw in Chapter 3, Delegates, Events, and Lambdas, the Action delegate code can be as simple or complex as you need:
using System;
using System.Threading.Tasks;
using System.Globalization;
using System.Threading;
namespace Chapter05.Examples
{
class ParallelForExamples
{
public static async Task Main()
{
In this example, calling Parallel.For, you pass an inclusive int value to start from (99) and an exclusive end value (105). The third argument is a lambda statement, Action, that you want invoked over each iteration. This overload uses Action<int>, passing an integer via the i argument:
var loopResult = Parallel.For(99, 105, i =>
{
Logger.Log($"Sleep iteration {i}");
Thread.Sleep(i * 10);
Logger.Log($"Awake iteration {i}");
});
Examine the ParallelLoopResult IsCompleted property:
Console.WriteLine($"Completed: {loopResult.IsCompleted}");
Console.ReadLine();
}
}
}
Running the code, you'll see that it stops at 104. Each iteration is executed by a set of different threads and the order appears somewhat random with certain iterations awaking before others. You have used a relatively short delay (using Thread.Sleep) so the parallel task scheduler may take a few additional milliseconds to activate each iteration. This is the reason why the orders in which iterations are executed should be independent of each other:
18:39:37 [10] Sleep iteration 104
18:39:37 [03] Sleep iteration 100
18:39:37 [06] Sleep iteration 102
18:39:37 [04] Sleep iteration 101
18:39:37 [01] Sleep iteration 99
18:39:37 [07] Sleep iteration 103
18:39:38 [03] Awake iteration 100
18:39:38 [01] Awake iteration 99
18:39:38 [06] Awake iteration 102
18:39:38 [04] Awake iteration 101
18:39:38 [07] Awake iteration 103
18:39:38 [10] Awake iteration 104
Completed: True
Using the ParallelLoopState override, you can control the iterations from with the Action code. In the following example, the code checks to see if it is at iteration number 15:
var loopResult1 = Parallel.For(10, 20, (i, loopState) =>
{
Logger.Log($"Inside iteration {i}");
if (i == 15)
{
Logger.Log($"At {i}…break when you're ready");
Calling Break on loopState communicates that the Parallel loop should cease further iterations as soon as it can:
loopState.Break();
}
});
Console.WriteLine($"Completed: {loopResult1.IsCompleted}, LowestBreakIteration={loopResult1.LowestBreakIteration}");
Console.ReadLine();
From the results, you can see you got to item 17 before things actually stopped, despite asking to break at iteration 15, as can be seen from the following snippet:
19:04:48 [03] Inside iteration 11
19:04:48 [03] Inside iteration 13
19:04:48 [03] Inside iteration 15
19:04:48 [03] At 15...break when you're ready
19:04:48 [01] Inside iteration 10
19:04:48 [05] Inside iteration 14
19:04:48 [07] Inside iteration 17
19:04:48 [06] Inside iteration 16
19:04:48 [04] Inside iteration 12
Completed: False, LowestBreakIteration=15
The code used ParallelLoopState.Break; this indicates the loop should cease at the next iteration if possible. In this case, you actually arrived at iteration 17 despite requesting a stop at iteration 15. This generally occurs when the runtime has already started a subsequent iteration and then detects a Break request just after. These are requests to stop; the runtime may run extra iterations before it can stop.
Alternatively, the ParallelLoopState.Stop method can be used for a more abrupt stop. An alternative Parallel.For overload allows state to be passed into each loop and return a single aggregate value.
To better learn about these overloads, you will calculate the value of pi in the next example. This is an ideal task for Parallel.For as it means repeatedly calculating a value, which is aggregated before being passed to the next iteration. The higher the number of iterations, the more accurate the final number.
Note
You can find more information on the formula at https://www.mathscareers.org.uk/article/calculating-pi/.
You use a loop to prompt the user to enter the number of series (the number of decimal places to be shown) as a multiple of a million (to save typing many zeroes):
double series;
do
{
Console.Write("Pi Series (in millions):");
var input = Console.ReadLine();
Try to parse the input:
if (!double.TryParse(input, NumberStyles.Any, CultureInfo.CurrentCulture, out series))
{
break;
}
Multiply the entered value by one million and pass it to the awaitable CalcPi function (which will be defined shortly):
var actualSeries = series * 1000000;
Console.WriteLine($"Calculating PI {actualSeries:N0}");
var pi = await CalcPi((int)(actualSeries));
You eventually receive the value of pi, so use the string interpolation feature to write pi to 18 decimal places using the :N18 numeric format style:
Console.WriteLine($"PI={pi:N18}");
}
Repeat the loop until 0 is entered:
while (series != 0D);
Console.ReadLine();
Now for the CalcPi function. You know that the Parallel methods all block the calling thread, so you need to use Task.Run which will eventually return the final calculated value.
The concept of thread synchronization will be covered briefly. There is a danger when using multiple threads and shared variables that one thread may read a value from memory and attempt to write a new value at the same time a different thread is trying to do the same operation, with its own value and what it thinks is the correct current value, when it may have read an already out-of-date shared value.
To prevent such issues, a mutual-exclusion lock can be used so that a given thread can execute its statements while it holds a lock and then releases that lock when finished. All other threads are blocked from acquiring the lock and are forced to wait until the lock is released.
This can be achieved using the lock statement. All of the complexities are handled by the runtime when the lock statement is used to achieve thread synchronization. The lock statement has the following form:
lock (obj){ //your thread safe code here }.
Conceptually, you can think of the lock statement as a narrow gate that has enough room to allow just one person to pass through at a time. No matter how long a person takes to pass through the gate and what they do while they are there, everyone else must wait to get through the gate until the person with the key has left (releasing the lock).
Returning to the CalcPi function:
private static Task<double> CalcPi(int steps)
{
return Task.Run(() =>
{
const int StartIndex = 0;
var sum = 0.0D;
var step = 1.0D / (double)steps;
The gate variable is of type object and used with the lock statement inside the lambda to protect the sum variable from unsafe access:
var gate = new object();
This is where things get a little more complex, as you use the Parallel.For overload, which additionally allows you to pass in extra parameters and delegates:
- fromInclusive: The start index (0 in this case).
- toExclusive: The end index (steps).
- localInit: A Func delegate that returns the initial state of data local to each iteration.
- body: The actual Func delegate that calculates a value of Pi.
- localFinal: A Func delegate that performs the final action on the local state of each iteration.
Parallel.For(
StartIndex,
steps,
() => 0.0D, // localInit
(i, state, localFinal) => // body
{
var x = (i + 0.5D) * step;
return localFinal + 4.0D / (1.0D + x * x);
},
localFinal => //localFinally
{
Here, you now use the lock statement to ensure that only one thread at a time can increment the value of sum with its own correct value:
lock (gate)
sum += localFinal;
});
return step * sum;
});
}
By using the lock(obj) statement, you have provided a minimum level of thread safety, and running the program produces the following output:
Pi Series (in millions):1
Calculating PI 1,000,000
PI=3.141592653589890000
Pi Series (in millions):20
Calculating PI 20,000,000
PI=3.141592653589810000
Pi Series (in millions):30
Calculating PI 30,000,000
PI=3.141592653589750000
Parallel.ForEach follows similar semantics; rather than a range of numbers being passed to the Action delegate, you pass a collection of objects to work with.
Note
You can find the code used for this example at https://packt.link/1yZu2.
The following example shows Parallel.ForEach using ParallelOptions along with a cancelation token. In this example, you have a console app that creates 10 customers. Each customer has a list containing the value of all orders placed. You want to simulate a slow-running service that fetches a customer's order on demand. Whenever any code accesses the Customer.Orders property, the list is populated only once though. Here, you will use another lock statement per customer instance to ensure the list is safely populated.
An Aggregator class will iterate through the list of customers and calculate the total and average order costs using a Parallel.ForEach call. Allow the user to enter a maximum time period that they are prepared to wait for all of the aggregations to complete and then show the top five customers.
Start by creating a Customer class whose constructor is passed a name argument:
using System;
using System.Collections.Generic;
using System.Globalization;
using System.Linq;
using System.Threading;
using System.Threading.Tasks;
namespace Chapter05.Examples
{
public class Customer
{
public Customer(string name)
{
Name = name;
Logger.Log($"Created {Name}");
}
public string Name { get; }
You want to populate the Orders list on demand and once only per customer, so use another lock example that ensures the list of orders is safely populated once. You simply use the Orders get accessor to check for a null reference on the _orders variable, before creating a random number of order values using the Enumerable.Range LINQ method to generate a range of numbers.
Note, you also simulate a slow request by adding Thread.Sleep to block the thread that is accessing this customer's orders for the first time (as you're using the Parallel class, this will be a background thread rather than the main thread):
ParallelForEachExample.cs
1 private readonly object _orderGate = new object();
2 private IList<double> _orders;
3 public IList<double> Orders
4 {
5 get
6 {
7 lock (_orderGate)
8 {
9 if (_orders != null)
10 return _orders;
11
12 var random = new Random();
13 var orderCount = random.Next(1000, 10000);
14
You can find the complete code here: https://packt.link/Nmx3X.
The Total and Average properties that will be calculated by your Aggregator class are as follows:
public double? Total { get; set; }
public double? Average { get; set; }
}
Looking at the Aggregator class, note that its Aggregate method is passed a list of customers to work with and CancellationToken, which will automatically raise a cancellation request based on the console user's preferred timespan. The method returns a bool-based Task. The result will indicate whether the operation was canceled partway through processing the customers:
public static class Aggregator
{
public static Task<bool> Aggregate(IEnumerable<Customer> customers, CancellationToken token)
{
var wasCancelled = false;
The main Parallel.ForEach method is configured by creating a ParallelOptions class, passing in the cancellation token. When invoked by the Parallel class, the Action delegate is passed a Customer instance (customer =>) that simply sums the order values and calculates the average which is assigned to the customer's properties.
Notice how the Parallel.ForEach call is wrapped in a try-catch block that catches any exceptions of type OperationCanceledException. If the maximum time period is exceeded, then the runtime will throw an exception to stop processing. You must catch this; otherwise, the application will crash with an unhandled exception error:
ParallelForEachExample.cs
1 return Task.Run(() =>
2 {
3 var options = new ParallelOptions { CancellationToken = token };
4
5 try
6 {
7 Parallel.ForEach(customers, options,
8 customer =>
9 {
10 customer.Total = customer.Orders.Sum();
11 customer.Average = customer.Total / 12 customer.Orders.Count;
13 Logger.Log($"Processed {customer.Name}");
14 });
15 }
You can find the complete code here: https://packt.link/FfVNA.
The main console app prompts for a maximum waiting time, maxWait:
class ParallelForEachExampleProgram
{
public static async Task Main()
{
Console.Write("Max waiting time (seconds):");
var input = Console.ReadLine();
var maxWait = TimeSpan.FromSeconds(int.TryParse(input, NumberStyles.Any, CultureInfo.CurrentCulture, out var inputSeconds)
? inputSeconds
: 5);
Create 100 customers that can be passed to the aggregator:
var customers = Enumerable.Range(1, 10)
.Select(n => new Customer($"Customer#{n}"))
.ToList();
Create CancellationTokenSource instance, passing in the maximum wait time. As you saw earlier, any code that uses this token will be interrupted with a cancellation exception should the time limit be exceeded:
var tokenSource = new CancellationTokenSource(maxWait);
var aggregated = await Task.Run(() => Aggregator.Aggregate(customers, tokenSource.Token));
Once the task completes, you simply take the top five customers ordered by total. The PadRight method is used to align the customer's name in the output:
var topCustomers = customers
.OrderByDescending(c => c.Total)
.Take(5);
Console.WriteLine($"Cancelled: {aggregated }");
Console.WriteLine("Customer Total Average Orders");
foreach (var c in topCustomers)
{
Console.WriteLine($"{c.Name.PadRight(10)} {c.Total:N0} {c.Average:N0} {c.Orders.Count:N0}");
}
Console.ReadLine();
}
}
}
Running the console app with a short time of 1 second produces this output:
Max waiting time (seconds):1
21:35:56 [01] Created Customer#1
21:35:56 [01] Created Customer#2
21:35:56 [01] Created Customer#3
21:35:56 [01] Created Customer#4
21:35:56 [01] Created Customer#5
21:35:56 [01] Created Customer#6
21:35:56 [01] Created Customer#7
21:35:56 [01] Created Customer#8
21:35:56 [01] Created Customer#9
21:35:56 [01] Created Customer#10
21:35:59 [07] Processed Customer#5
21:35:59 [04] Processed Customer#3
21:35:59 [10] Processed Customer#7
21:35:59 [06] Processed Customer#2
21:35:59 [05] Processed Customer#1
21:35:59 [11] Processed Customer#8
21:35:59 [08] Processed Customer#6
21:35:59 [09] Processed Customer#4
21:35:59 [05] Caught The operation was canceled.
Cancelled: True
Customer Total Average Orders
Customer#1 23,097,348 2,395 9,645
Customer#4 19,029,182 2,179 8,733
Customer#8 15,322,674 1,958 7,827
Customer#6 9,763,247 1,568 6,226
Customer#2 6,189,978 1,250 4,952
The operation of creating 10 customers ran using Thread 01 as this was intentionally synchronous.
Note
Visual Studio may show the following warning the first time you run the program: Non-nullable field '_orders' must contain a non-null value when exiting constructor. Consider declaring the field as nullable. This is a suggestion to check the code for the possibility of a null reference.
Aggregator then starts processing each of the customers. Notice how different threads are used and processing does not start with the first customer either. This is the task scheduler deciding which task is next in the queue. You only managed to process eight of the customers before the token raised the cancelation exception.
Note
You can find the code used for this example at https://packt.link/1LDxI.
You have looked at some of the features available in the Parallel class. You can see that it provides a simple yet effective way to run code across multiple tasks or pieces of data.
The phrase embarrassingly parallel was covered under Parallel Programming section at the beginning of the chapter and refers to cases in which a series of tasks can be broken down into small independent chunks. Using the Parallel class is an example of this and can be a great utility.
The next section will bring these concurrency concepts into an activity that uses multiple tasks to generate a sequence of images. As each of the images can take a few seconds to create, you will need to offer the user a way to cancel any remaining tasks if the user so chooses.
Activity 5.01: Creating Images from a Fibonacci Sequence
In Exercise 5.01, you looked at a recursive function to create a value called a Fibonacci number. These numbers can be joined into what is known as a Fibonacci sequence and used to create interesting spiral-shaped images.
For this activity, you need to create a console application that allows various inputs to be passed to a sequence calculator. Once the user has entered their parameters, the app will start the time-consuming task of creating 1,000 images.
Each image in the sequence may take a few seconds to compute and create so you will need to provide a way to cancel the operation midway using TaskCancellationSource. If the user cancels the task, they should still be able to access the images that were created prior to the cancellation request. Essentially, you are allowing the user to try different parameters to see how this affects output images.

Figure 5.2: Fibonacci sequence image files
This is an ideal example for the Parallel class or async/await tasks if you prefer. The following inputs will be needed from the user:
- Input the value for phi (values between 1.0 and 6.0 provide ideal images).
- Input the number of images to create (the suggestion is 1,000 per cycle).
- Input the optional number of points per image (a default of 3,000 is recommended).
- Input the optional image size (defaults to 800 pixels).
- Input the optional point size (defaults to 5).
- Next input the optional file format (defaults to .png format).
- The console app should use a loop that prompts for the preceding parameters and allows the user to enter new criteria while images are created for previous criteria.
- If the user presses Enter whilst a previous set of images is still being created, then that task should be canceled.
- Pressing x should close the application.
As this activity is aimed at testing your asynchronous skills, rather than math or image processing, you have the following classes to help with calculations and image creation:
- The Fibonacci class defined here calculates X and Y coordinates for successive sequence items. For each image loop, return a list of Fibonacci classes.
- Create the first element by calling CreateSeed. The remainder of the list should use CreateNext, passing in the previous item:
FibonacciSequence.cs
1 public class Fibonacci
2 {
3 public static Fibonacci CreateSeed()
4 {
5 return new Fibonacci(1, 0D, 1D);
6 }
7
8 public static Fibonacci CreateNext(Fibonacci previous, double angle)
9 {
10 return new Fibonacci(previous, angle);
11 }
12
13 private Fibonacci(int index, double theta, double x)
14 {
15 Index = index;
You can find the complete code here: http://packt.link/I7C6A.
- Create a list of Fibonacci items using the following FibonacciSequence.Calculate method. This will be passed the number of points to be drawn and the value of phi (both as specified by the user):
FibonacciSequence.cs
1 public static class FibonacciSequence
2 {
3 public static IList<Fibonacci> Calculate(int indices, double phi)
4 {
5 var angle = phi.GoldenAngle();
6
7 var items = new List<Fibonacci>(indices)
8 {
9 Fibonacci.CreateSeed()
10 };
11
12 for (var i = 1; i < indices; i++)
13 {
14 var previous = items.ElementAt(i - 1);
15 var next = Fibonacci.CreateNext(previous, angle);
You can find the complete code here: https://packt.link/gYK4N.
- Export the generated data to .png format image files using the dotnet add package command to add a reference to the System.Drawing.Common namespace. Within your project's source folder, run this command:
sourceChapter05>dotnet add package System.Drawing.Common
- This image creation class ImageGenerator can be used to create each of the final image files:
ImageGenerator.cs
1 using System.Collections.Generic;
2 using System.Drawing;
3 using System.Drawing.Drawing2D;
4 using System.Drawing.Imaging;
5 using System.IO;
6
7 namespace Chapter05.Activities.Activity01
8 {
9 public static class ImageGenerator
10 {
11 public static void ExportSequence(IList<Fibonacci> sequence,
12 string path, ImageFormat format, 13 int width, int height, double pointSize)
14 {
15 double minX = 0;
You can find the complete code here: http://packt.link/a8Bu7.
To complete this activity, perform the following steps:
- Create a new console app project.
- The generated images should be saved in a folder within the system's Temp folder, so use Path.GetTempPath() to get the Temp path and create a subfolder called Fibonacci using Directory.CreateDirectory.
- Declare a do-loop that repeats the following Step 4 to Step 7.
- Prompt the user to enter a value for phi (this typically ranges from 1.0 to 6.00). You will need to read the user's input as a string and use double.TryParse to attempt to convert their input into a valid double variable.
- Next, prompt the user to enter a value for the number of image files to create (1,000 is an acceptable example value). Store the parsed input in an int variable called imageCount.
- If either of the entered values is empty, this will indicate that the user pressed the Enter key alone, so break out of the do-loop. Ideally, CancellationTokenSource can also be defined and used to cancel any pending calculations.
- The value of phi and imageCount should be passed to a new method called GenerateImageSequences, which returns a Task.
- The GenerateImageSequences method needs to use a loop that iterates for each of the image counts requested. Each iteration should increment phi, and a constant value (a suggestion is 0.015) before awaiting a Task.Run method that calls FibonacciSequence.Calculate, passing in phi and a constant for the number of points (3,000 provides an acceptable example value). This will return a list of Fibonacci items.
- GenerateImageSequences should then pass the generated Fibonacci list to the image creator ImageGenerator.ExportSequence, awaiting using a Task.Run call. An image size of 800 and a point size of 5 are recommended constants for the call to ExportSequence.
- Running the console app should produce the following console output:
Using temp folder: C:TempFibonacci
Phi (eg 1.0 to 6.0) (x=quit, enter=cancel):1
Image Count (eg 1000):1000
Creating 1000 images...
20:36:19 [04] Saved Fibonacci_3000_1.015.png
20:36:19 [06] Saved Fibonacci_3000_1.030.png
20:36:20 [06] Saved Fibonacci_3000_1.090.png
You will find that various image files have been generated in the Fibonacci folder in the system's Temp folder:

Figure 5.3: Windows 10 Explorer image folder contents (a subset of images produced)
By completing this activity, you have seen how multiple long-running operations can be started and then coordinated to produce a single result, with each step running in isolation, allowing other operations to continue as necessary.
Note
The solution to this activity can be found at https://packt.link/qclbF.
Summary
In this chapter, you considered some of the power and flexibility that concurrency provides. You started by passing target actions to tasks that you created and then looked at the static Task factory helper methods. By using continuation tasks, you saw that single tasks and collections of tasks can be coordinated to perform aggregate actions.
Next, you studied the async/await keywords that can help you write simpler and more concise code that is, hopefully, easier to maintain.
This chapter looked at how C# provides, with relative ease, concurrency patterns that make it possible to leverage the power of multicore processors. This is great for offloading time-consuming calculations, but it does come at a price. You saw how the lock statement can be used to safely prevent multiple threads from reading or writing to a value simultaneously.
In the next chapter, you will look at how Entity Framework and SQL Server can be used to interact with relational data in C# applications. This chapter is about working with databases. If you are unfamiliar with database structure or would like a refresher on the basics of PostgreSQL, please refer to the bonus chapter available in the GitHub repository for this book.