Overview
This chapter introduces you to the basics of database design, storage, and processing using SQL and C#. You will learn about the Entity Framework (EF), and Object-Relational Mapper (ORM) and use them to convert database results into C# objects. You will then learn about the main performance pitfalls of SQL and EF and how to find and fix them.
Finally, you will delve into enterprise practices of working with databases by looking at Repository and Command Query Responsibility Segregation (CQRS) patterns and also by setting up a local database for development and testing. By the end of this chapter, you will be able to create and design your own database using PostgreSQL Server and use EF to hook a C# backend to it.
Introduction
There are multiple types of databases, but the most common one is relational, and the language for managing relational databases is SQL. SQL is optimized for data persistence. However, executing business rules in it is inefficient. Therefore, before consumption, data is often fetched in application memory and transformed into objects. This transformation is called object-relational mapping.
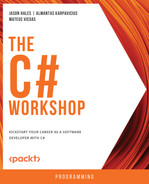
There is a lot of complexity in mapping database records to objects. However, this complexity is mitigated by Object-Relational Mapper (ORM). Some ORMs only do mapping (called micro-ORMs), but many popular ORMs also abstract away database language and allow you to use the same language to execute business rules and process data:
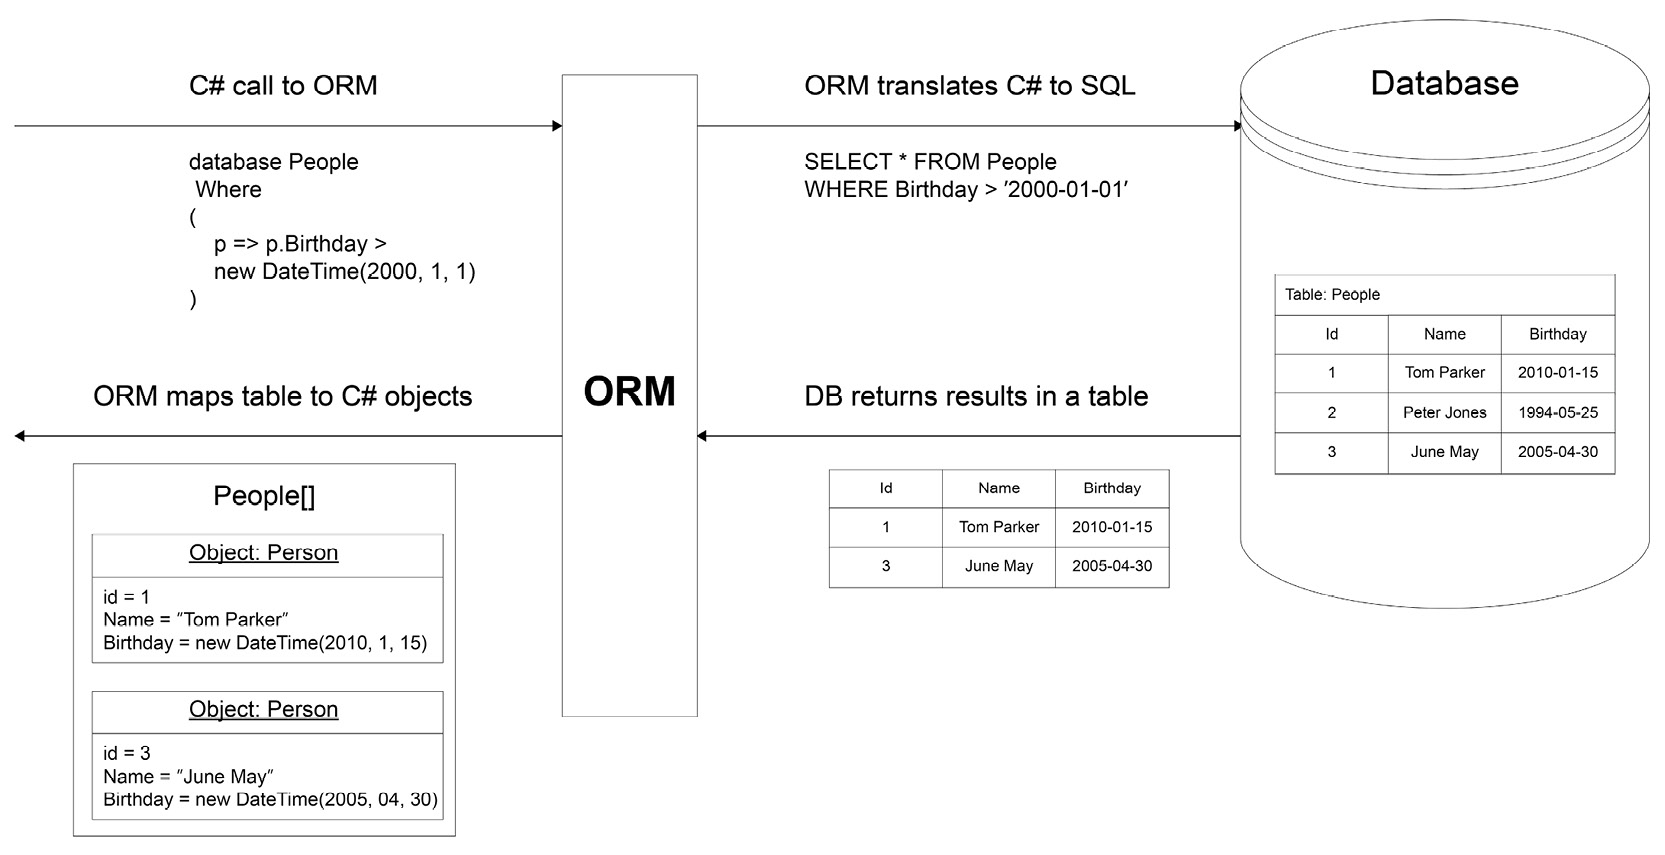
Figure 6.1: How an ORM works in translating C# to SQL and back
The focus of this chapter will be on Entity Framework (EF)—the most popular ORM in .NET. In the practical sections of this chapter, you will use it to rapidly prototype relational databases, and then make queries against them. It's worth mentioning that internally, whenever databases are involved, you are interacting with the ADO.NET part of .NET.
Before proceeding, however, it's recommended that you install the latest version of PostgreSQL with PostgreSQL Server found here: https://www.enterprisedb.com/downloads/postgres-postgresql-downloads. You can find the installation instructions for this in the Preface.
This chapter will use the AdventureWorks database, which is an adaptation of a popular example database that Microsoft often uses; it will be defined in detail in the following section.
Note
For those who are interested in learning the basics of databases and how to work with PostgreSQL, a reference chapter has been included in the GitHub repository of this book. You can access it at https://packt.link/sezEm.
Creating a Demo Database Before You Start
You will use Adventureworks as an example because it is a common database used by Microsoft and has just enough complexity to learn about databases topic.
Perform the following steps to do so:
- Open the command line and make a directory where you will call AdventureWorks database and move to that directory:
C:<change-with-your-download-path-to-The-C-Sharp-Workshop>Chapter06AdventureWorks>
Note
Replace <change-with-your-download-path-to-The-C-Sharp-Workshop> with a directory where you downloaded the The-C-Sharp-Workshop repository.
- Create an empty Adventureworks database by running the following command in the console:
psql -U postgres -c "CREATE DATABASE "Adventureworks";"
- Create tables and populate them with data using the installation script.
Note
The installation script is found at https://packt.link/0SHd5.
- Run the following command pointing to the installation script:
psql -d Adventureworks -f install.sql -U postgres
Modeling Databases Using EF
Working with a database from any other language comes with an interesting problem and that is, how do you convert table rows into C# objects? In C#, communicating with a database requires a database connection and SQL statements. Executing the statements will bring up a results reader, which is very similar to a table. Using the results reader dictionary, you can go through the results and map them into a new object.
The code for this would look like the following:
using var connection = new NpgsqlConnection(Program.GlobalFactoryConnectionString);
connection.Open();
NpgsqlCommand command = new NpgsqlCommand("SELECT * FROM factory.product", connection);
var reader = command.ExecuteReader();
var products = new List<Product>();
while (reader.Read())
{
products.Add(new Product
{
Id = (int)reader["id"],
//ManufacturerId = (int)reader["ManufacturerId"],
Name = (string)reader["name"],
Price = (decimal)reader["price"]
});
}
return products;
Don't worry about the details of this code yet; it will be broken down soon. For now, it is enough to know that the preceding snippet returns all rows from the factory.product table and maps the results to a list named products. Using this approach may be okay when working with a single table, but when joins are involved, it becomes tricky. Mapping from one type to another, as has been done here, is very granular and can become tedious. In order to run this example, go to https://packt.link/2oxXn and comment all lines within static void Main(string[] args) body except Examples.TalkingWithDb.Raw.Demo.Run();.
Note
You can find the code used for this example at https://packt.link/7uIJq.
Another factor to consider is that when you deal with SQL from the client side, you should be careful. You should not assume that a user will use your program as intended. So, you should therefore add validation on both the client and server sides. For example, if a textbox requires a user ID to be entered, the client could enter 105 and get the details of the user of that ID. The query for this would be as follows:
SELECT * FROM Users WHERE UserId = 105
A user could also enter 105 or 1 = 1, which is always true and thus this query returns all users:
SELECT * FROM Users WHERE UserId = 105 or 1 = 1
At best, this breaks your application. At worst, it leaks all the data. This kind of exploit is called SQL injection.
A simple yet effective way to solve the problem of accepting any kind of user input is to use an ORM as it allows you to convert database tables into C# objects and vice versa. In the .NET ecosystem, the three ORMs most commonly used are EF, Dapper, and NHibernate. Dapper is effective when top performance is needed because working with it involves executing raw SQL statements. Such ORMs are called micro-ORMs because they just do the mapping and nothing else.
NHibernate originated with the Java ecosystem and was one of the first ORMs in .NET. NHibernate, just like EF, solves a bigger problem than micro-ORMs by trying to abstract away SQL and database-related low-level details. Using a full-fledged ORM, such as EF or Nhibernate, often means that you don't need to write SQL to communicate with a database. In fact, the two ORMs allow you to generate complex databases out of the objects you have. The opposite is also possible (that is, you can generate objects out of databases you already have).
In the next sections, the focus will be on EF. Why not Dapper? Because Dapper requires knowledge of SQL and you want to make use of a simplified syntax. Why not NHibernate? Because NHibernate is old, it has too many configuration options, none of which are useful for getting started with ORMs.
Before delving into EF, you first need to connect to a database. So, proceed to learn about connection string and security.
Connection String and Security
No matter what language you use, connecting to a database will always involve using a connection string. It contains three important parts:
- IP or a server name.
- The name of the database you would like to connect to.
- Some sort of security credentials (or none, if using a trusted connection only used for databases on the same network).
To connect to the local database you were previously working on in the Modeling Databases Using EF section (new NpgsqlConnection(ConnectionString)), you could use the following connection string (the password has been obfuscated for security reasons):
"Host=localhost;Username=postgres;Password=*****;Database=globalfactory2021"
The connection string will be used when you will add the environment variables in your OS. This is detailed ahead. Different databases use different connections. For example, the following databases use these connections:
- SQL Server: SqlConnection
- PostgreSQL: NpgsqlConnection
- MySql: MySqlConnection
- SQLite: SqliteConnection
The connection object is the touching point between .NET and SQL database because it is only through it that you can communicate with a database.
Hardcoding a connection string comes with a few problems:
- To change a connection string, the program must be recompiled.
- It's not secure. The connection string can be viewed by everyone who knows how to decompile code (or worse, is publicly visible if it's an open-source project).
Therefore, a connection string is usually stored in a configuration file. This does not solve the problem of sensitive parts of a connection string being stored. To fix that, often, either the whole string or a part of it is replaced during the application's deployment. There are three main ways to securely store and retrieve application secrets:
- Environment variables: These are variables unique to a system and can be accessed by any application on the same machine. This is the simplest secure approach and might not be safe in a production environment.
- Secret Manager tool (available in both .NET and .NET Core applications): Similar to environment variables but more .NET specific, it will store all secrets on the local machine as well but in a file called secrets.json. This option, too, might not be safe in a production environment.
- Key vault: This is the most secure approach because, unlike the other two, it is not coupled with a specific environment. Key vaults store secrets in one centralized place; usually remotely. This approach is most commonly used for enterprise applications. In the context of Azure, Azure Key Vault is the best choice and is perfect for a production environment.
In the following example, you'll try to securely store the connection string you made previously. You will use the simplest secure approach that is suitable for a development environment—that is, environment variables. This approach fits local development the best because the other two require third-party tools to set up and take much longer.
Note
Before you continue, make sure to go through Exercise 1 of the Reference Chapter, A Primer for Simple Databases and SQL. It has the steps needed to create a new database with the needed tables.
Adding an environment variable in your OS is just a matter of performing some simple steps. Perform the following steps in Windows to set the environment variables:
- Go to Control Panel.
- Click System & Security and choose System.
- Type Environmental Variables in the search box.
- Then choose Edit Environment Variables for your account from the list displayed.
- Inside the Environment Variables window, click New under the System Variables window.
- Inside the New System variable window, type GlobalFactory beside the Variable name.
- Beside Variable value, paste the following:
Host=localhost;Username=postgres;Password=*****;Database=globalfactory2021
- Next click OK on all windows to set your environment variables.
Note
Here the password would carry your database superuser password which you entered while creating the globalfactory2021 database in PostgreSQL.
- Mac: From the command line, find bash-profile: ~/.bash-profile f. Open it using any text editor, then at the end of the file, add export GlobalFactory='Host=localhost;Username=postgres;Password=*****;Database=globalfactory2021'. Lastly, run source ~/.bash-profile, which will update the environment variables.
- Linux: From the command line, run this: export GlobalFactory='Host=localhost;Username=postgres;Password=*****;Database=globalfactory2021'.
Getting the environment variable instead of an in-memory one can now be done by placing a property in Program.cs, at the top of the class, as follows:
public static string ConnectionString { get; } = Environment.GetEnvironmentVariable("GlobalFactory", EnvironmentVariableTarget.User);
This line returns the value of the GlobalFactory environment variable, configured for the local user. In the preceding snippet, you have added this line to Program.cs and made it static because that makes it easily accessible throughout the application. While in big applications, it is not a practice you would want to go for; however, for your purposes here, this is fine.
Before you grasp models—the centerpiece of a program—you need to know about the major versions of EF.
Which One to Choose—EF or EF Core?
There are two major versions of EF—EF and EF Core. Both are widely used, but you should be aware of some factors before making the choice that fits your project's requirements the best. EF was first released in 2008. At that time, there was no .NET Core and C# was for Windows only and strictly required .NET Framework. Currently, the latest major version of EF is 6 and it's likely that there won't be any other major version, because in 2016, along with .NET Core 1.0 came EF Core 1 (a rework of EF 6).
EF Core was initially named EF 7. However, it was a complete rewrite of EF 6 and therefore was soon renamed EF Core 1.0. EF works only on .NET and is for Windows only, whereas .NET Core works only on .NET Core and is multi-platform.
Feature-wise, both frameworks are similar and are still being developed. However, the focus these days is on EF Core because the future of C# is associated with .NET 6, which is a multi-platform framework. At the time of writing this book, EF 6 has a richer set of features. However, EF Core is quickly catching up and is likely to soon be ahead. If your project's specifications do not require working with .NET Framework, it is preferable to stick with EF Core.
Note
For the latest list of differences between the two, please refer to a comparison by Microsoft here: https://docs.microsoft.com/en-us/ef/efcore-and-ef6/.
Before you proceed, install the EF Core NuGet package so that you get access to the EF Core API. With the project open in Visual Studio Code (VS Code), run the following line in the terminal:
dotnet add package Microsoft.EntityFrameworkCore
By itself, EntityFrameworkCore is just a tool to abstract away database structures. To connect it with a specific database provider, you will need another package. Here you are using PostgreSQL. Therefore, the package you will install is Npgsql.EntityFrameworkCore.PostgreSQL. In order to install it, from the VS Code console, run the following:
dotnet add package Npgsql.EntityFrameworkCore.PostgreSQL
You are now aware of the two versions of EF and how they work with .NET Framework and .NET. The next section will delve into the models which are the heart of a program.
Model
A class designed to represent a business object is called a model. It always has data managed by properties or methods. Models are the centerpiece of a program. They don't depend on anything; other parts of a program point to them.
An object to which an ORM maps data tables is called an entity. In simple applications, an entity and a model are the same class. In complex applications, a change to a database is a common thing. That means that entities change often, and if you do not have a separate class for a model, your model would be impacted as well. Business logic should be isolated from database changes, and it is therefore recommended to have two classes—one for an entity and one for a model.
Before you continue with the next section, have a quick look at the factory.product and factory.manufacturer tables. One manufacturer makes many products. The following Entity Relationship (ER) diagram illustrates this relationship in Figure 6.2.

Figure 6.2: ER diagram of products and manufacturers
An entity, ideally, should mirror table columns. You can mirror columns through properties. For example, a factory.product table has id, name, price, and manufacturerId. An object that maps to that would look like this:
public class Product
{
public int id { get; set; }
public string name { get; set; }
public decimal price { get; set; }
public int manufacturerId { get; set; }
}
You know that only the price of a product can change; the rest of the properties would not. However, in the preceding snippet, a setter has still been written for every property. This is because entities created through an ORM always need to have all properties with setters, or else it might not set the value.
An entity should be designed to match a table structure, but it does not always have to be that way. For example, if the Id property were renamed to PrimaryKey, you could still use EF the same way by using a special data annotation [Key]:
public class Product
{
[Key]
public int PrimaryKey { get; set; }
public string name { get; set; }
public decimal price { get; set; }
public int manufacturerId { get; set; }
}
Data Annotation is an attribute that adds metadata to a property. You can use it to provide a different name, have a constraint column as a key, add the minimum and maximum lengths for fields, add precision, declare a field as mandatory, and more. On their own, data annotations don't do anything. They don't add logic to a model. Some other components will consume annotated objects, which will involve reading their attributes and performing actions based on that.
Your model (illustrating the ER diagram from Figure 6.2) is almost complete, but there are a few problems to be addressed:
- First, the table-model mapping is missing a schema (factory, in this case), and so you need to specify it explicitly using a Table attribute.
- Second, by default if you wanted to also retrieve a manufacturer, you would need another query. You can fix this by adding a navigational property that refers to the manufacturer. But why should you use a navigational property? If there were only an ID, you would need a separate query to get the related entity. However, using navigational properties, you can use eager loading and get two or more entities at once.
The following code snippet will show you how to create a Manufacturer class and fix these issues for both models:
[Table("manufacturer", Schema = "factory")]
public class Manufacturer
{
public int id { get; set; }
public string name { get; set; }
public string country { get; set; }
public virtual ICollection<Product> Products { get; set; } = new List<Product>();
}
Note the new List<Product>(); part. It is needed so that if a table does not yet have products, the code would still function when you try to add a new product without throwing NullReferenceException.
In the following snippet of code, a model is created for a product table:
[Table("product", Schema = "factory")]
public class Product
{
public int id { get; set; }
public string name { get; set; }
public decimal price { get; set; }
public int manufacturerId { get; set; }
public virtual Manufacturer Manufacturer { get; set; }
}
The two models are complete for mapping to tables from your database. You did not replace an ID property with a navigational property; both are present. If you did not do this, it would require the parent entity (Manufacturer) to be fetched before you could do anything with a product. With this approach, you can work with a product in isolation from the manufacturer. All you need is an ID link.
On top of the mentioned fixes, you made your navigational properties (Manufacturer and Products) virtual. This is needed to enable lazy loading for EF. Lazy loading means that there is no data loaded in a property until that property is referenced.
Finally, it is worth mentioning that for manufacturer products, you used ICollection and not IEnumerable or other collections. This makes sense because EF will need to populate the collection when it retrieves and map the items. List or even Set could work, but when designing object-oriented code, you should focus on the highest abstraction you can depend on, in this case it is ICollection.
Note
You can find the code used for this example at https://packt.link/gfgB1.
In order to run this example, go to https://packt.link/2oxXn and comment all lines within the static void Main(string[] args) body, except Examples.TalkingWithDb.Orm.Demo.Run();.
You are now clear about the entity, models, entity relationship, data annotation, eager loading, and lazy loading. The next section will show you how to combine everything and communicate with a database through EF Core.
DbContext and DbSet
DbContext is what EF uses as an abstraction to a database. A new database abstraction must be derived from the DbContext class and provide a way of connecting to a database. Just like a database contains one or more tables, DbContext contains one or more DbSet entities. For example, consider the following code:
public class FactoryDbContext : DbContext
{
public DbSet<Product> Products { get; set; }
public DbSet<Manufacturer> Manufacturers { get; set; }
protected override void OnConfiguring(DbContextOptionsBuilder optionsBuilder)
{
if (!optionsBuilder.IsConfigured)
{
optionsBuilder.UseNpgsql(Program.GlobalFactoryConnectionString);
}
}
}
Here, FactoryDbContext is an abstraction of the database that you created before, with two tables: Products and Manufacturers. The OnConfiguring method takes DbContextOptionsBuilder, which allows you to specify what database you want to connect to and how that connection is made. In this case, you are using PostgreSQL Server and specifying a database to connect to. Please note that in case there is an already configured database provider then you will not use Npgsql in the if statement i.e., the if (!optionsBuilder.IsConfigured) statement.
It is important to note that you should not completely depend on a specific database provider for two reasons:
- Firstly, changing a database provider is easy; it is just a matter of using a different extension method on a builder.
- Secondly, EF has an in-memory database provider, which is effective for testing. Alternatively, you could use SQLite as well as a lightweight database meant just for testing.
Currently, your database abstraction needs improvement because it only lets you communicate with the SQL Server database. Instead of hardcoding the options, you will inject them. Injecting allows you to configure an existing class differently, without modifying it. You do not need to change the models to be able to choose the database you want to connect to. You can specify which database you want to connect to by passing an options object through the FactoryDbContext constructor:
public FactoryDbContext(DbContextOptions<FactoryDbContext> options)
: base(options)
{
}
The default constructor is for the default provider, which will be used when no options are supplied. In this case, the context was designed to use PostgreSQL; therefore, you would add the following code:
public FactoryDbContext()
: base(UsePostgreSqlServerOptions())
{
}
DbContext can be configured using DbContextOptions. In this example, you need to configure a database provider (PostgreSQL) and a connection string. Choose the provider using DbContextOptionsBuilder. The UseNpgsql is how you hook the PostgreSQL provider with your database context, as shown here:
protected static DbContextOptions UsePostgreSqlServerOptions()
{
return new DbContextOptionsBuilder()
.UseNpgsql(Program.ConnectionString)
.Options;
}
The full DbContext now looks like this:
FactoryDbContext.cs
public class FactoryDbContext : DbContext
{
public DbSet<Product> Products { get; set; }
public DbSet<Manufacturer> Manufacturers { get; set; }
public FactoryDbContext(DbContextOptions<FactoryDbContext> options)
: base(options)
{
}
public FactoryDbContext()
: base(UsePostgreSqlServerOptions())
{
}
The complete code can be found here: https://packt.link/0uVPP.
In order to run this example, go to https://packt.link/2oxXn and comment all lines within the static void Main(string[] args) body, except Examples.TalkingWithDb.Orm.Demo.Run();.
To get the products from the database you have made, you first connect to a database by initializing an instance of your DbContext. You then call a wanted DbSet from that context and send a call to a database by calling ToList():
using var context = new FactoryDbContext();
var products = context.Products.ToList();
In this case, you create a FactoryDbContext (which creates a connection to the GlobalFactory database) and the context.Products.ToList() equates to a SELECT * FROM Products SQL statement.
Note
The two lines mentioned are not included within GitHub. They are trivial and are here only for illustrative purposes.
When you initialize a DbContext, you almost always create a connection to a database, and if not managed, you might eventually run out of connections inside a connection pool (a collection of available connections). DbContext is an unmanaged resource; it implements the IDisposable interface, and so it needs explicit cleanup. Here, you applied a C# feature—inline using—which disposes of the object after it leaves the scope it is at:
using var context = new FactoryDbContext()
When you have a DbContext, getting data from it is trivial:
- Access a DbSet.
- Convert it into a list.
Why do you need to make any conversions, though? That is because DbSet, much like IEnumerable, is lazy-loaded. It encapsulates the SQL needed to execute. So, unless you explicitly demand it (for example, by calling ToList), there won't be any data queried. Calling ToList does the actual call to a database and retrieves all the products.
You now know all about databases. The next section will touch on the AdventureWorks database which is a common database for teaching SQL to beginners.
AdventureWorks Database
AdventureWorks is a database used for learning purposes. It contains dozens of tables and has hundreds of records in each table. The tables are focused on wholesale, which is a common scenario in enterprise applications. In other words, the AdventureWorks database provides examples for learning with closeness to real-world problems.
Note
You must first create the AdventureWorks database in PostgreSQL. You can find the steps to create this database in the reference chapter placed on GitHub.
The previous sections covered entity, models, and how to combine everything and communicate with a database. You also learned about DbContext and DbSet. This concludes the theoretical portion of this section. In the following section, you will put this into practice with an exercise.
Exercise 6.01: Reading Stock Locations from AdventureWorks Database
The simplest use case of EF is to read data tables into C# objects. This exercise will teach you how to create a data entity class and add correct attributes to it. For this, you will create an inventory location table within the example AdventureWorks database. Perform the following steps to do so:
- Create a Location entity. It should have LocationId, Name, Costrate, Availability, and ModifiedDate properties, as follows:
[Table("location", Schema = "production")]
public class Location
{
[Column("locationid")]
public int LocationId { get; set; }
[Column("name")]
public string Name { get; set; }
[Column("costrate")]
public double Costrate { get; set; }
[Column("availability")]
public double Availability { get; set; }
[Column("modifieddate")]
public DateTime ModifiedDate { get; set; }
}
A [Table] attribute has been applied because you need to specify a schema as well as a properly capitalized table name. On top of that, every column name needs to be explicitly specified using the [Column] attribute since the capitalization does not match.
- Create a class named AdventureWorksContext, which inherits the DbContext, as follows:
public class AdventureWorksContext : DbContext
{
public DbSet<Location> Locations { get; set; }
public AdventureWorksContext()
: base(UsePostgreSqlServerOptions())
{
}
protected static DbContextOptions UsePostgreSqlServerOptions()
{
return new DbContextOptionsBuilder()
.UseNpgsql(Program.AdventureWorksConnectionString)
.Options;
}
Inheriting DbContext is necessary if you want to reuse the base functionality of database abstraction such as connecting to a database. The use of base functionality is visible in the two base constructors. In the parameterized constructor, you use PostgreSQL; in non-parameterized you can supply whatever database provider you choose.
- Now use the Program.AdventureWorksConnectionString connection string as follows:
Host=localhost;Username=postgres;Password=****;Database=Adventureworks. DbSet<Location>Locations
This represents the needed location table.
Note
Please keep your PostgreSQL passwords safe. Don't write them in code in plaintext, instead use environment variables or secrets.
- Connect to a database:
var db = new AdventureWorksContext();
This is as simple as creating a new DbContext.
- Get all products by adding the following code:
var locations = db.Locations.ToList();
- Now that you have queried the locations and no longer need to keep the connection open, it is better to disconnect from the database. In order to disconnect from the database, call the Dispose method as follows:
db.Dispose();
- Print the results by adding the following code:
foreach (var location in locations)
{
Console.WriteLine($"{location.LocationId} {location.Name} {location.Costrate} {location.Availability} {location.ModifiedDate}");
}
The code itself is run from https://packt.link/2oxXn. Make sure to comment all lines within static void Main(string[] args) body, except Exercises.Exercise03.Demo.Run(). When you run the code, the following output gets displayed:
1 Tool Crib 0 0 2008-04-30 00:00:00
2 Sheet Metal Racks 0 0 2008-04-30 00:00:00
3 Paint Shop 0 0 2008-04-30 00:00:00
4 Paint Storage 0 0 2008-04-30 00:00:00
5 Metal Storage 0 0 2008-04-30 00:00:00
6 Miscellaneous Storage 0 0 2008-04-30 00:00:00
7 Finished Goods Storage 0 0 2008-04-30 00:00:00
10 Frame Forming 22,5 96 2008-04-30 00:00:00
20 Frame Welding 25 108 2008-04-30 00:00:00
30 Debur and Polish 14,5 120 2008-04-30 00:00:00
40 Paint 15,75 120 2008-04-30 00:00:00
45 Specialized Paint 18 80 2008-04-30 00:00:00
50 Subassembly 12,25 120 2008-04-30 00:00:00
60 Final Assembly 12,25 120 2008-04-30 00:00:00
Working with EF is simple. As you can see from this exercise, it is intuitive and feels like a natural extension to C#.
Note
You can find the code used for this exercise at https://packt.link/9Weup.
Querying a Database—LINQ to SQL
One of the more interesting features of EF is that running SQL statements is very much like working with a collection. For example, say you want to retrieve a product by its name. You can get a product by name the same way you would be using LINQ:
public Product GetByName(string name)
{
var product = db.Products.FirstOrDefault(p => p.Name == name);
return product;
}
Here, FirstOrDefault returns the first matching product by its name. If no product by that name exists, then it returns a null.
What about finding a unique element by its ID? In that case, you would use a special method (Find), which either gets an entity from a database or, if one with the same ID has been retrieved recently, returns it from memory:
public Product GetById(int id)
{
var product = db.Products.Find(id);
return product;
}
When using a primary key, it is better to use Find instead of Where because it has a slightly different meaning in the context of EF. Instead of trying to create a SQL query and execute it, Find will check whether this item has already been accessed and will retrieve it from a cache, rather than going through a database. This makes for more efficient operations.
What about finding all products by the related manufacturer ID? You can create a method that returns an IEnumerable<Product> for this purpose, named GetByManufacturer, as follows:
public IEnumerable<Product> GetByManufacturer(int manufacturerId)
{ var products = db
.Products
.Where(p => p.Manufacturer.Id == manufacturerId)
.ToList();
return products;
}
You might be wondering why you should choose to use Where instead of Find here. That is because you are getting many products by their foreign key manufacturerId. Be careful not to mix foreign and primary keys; Find is used only for primary keys.
In order to run this example, go to https://packt.link/2oxXn and comment all lines within static void Main(string[] args) body except Examples.Crud.Demo.Run();.
Note
You can find the code used for this example at https://packt.link/pwcwx.
Now, how about retrieving related entities? If you simply call db.Manufacturers.ToList(), you will have null products. This is because the products will not be retrieved automatically unless explicitly specified. If you didn't call ToList(), you could make use of lazy-loading (that is, loading the required entities on demand), but that would result in a very suboptimal solution as you would always be querying child entities for every parent.
A proper solution is to call Include(parent => parent.ChildToInclude):
db.Manufacturers
.Include(m => m.Products)
.ToList();
This approach is called eager loading. With this approach, you specify which child entities should be retrieved immediately. There will be scenarios where child entities will have their child entities; there, you could call ThenInclude. In order to run this example, comment all lines within static void Main(string[] args) body except Examples.Crud.Demo.Run(); in Program.cs.
Note
You can find the code used for this example at https://packt.link/c82nA.
Remember when it was established that trying to get everything from a table is not the right thing to do in most cases? Eager loading has the same problem. So, what should you do if you only want some properties? It's time to learn about the other side of LINQ.
Query Syntax
Query syntax is an alternative syntax to LINQ lambdas. It is very similar to SQL. The main advantage of query syntax over lambdas is that it feels more natural to write queries when you have complex joins and want only some of the data back. Imagine you wanted to get all product-manufacturer name pairs. You cannot simply get manufacturers and include products; you only want two products. If you tried using LINQ, the code would like the following:
db.Products
.Join(db.Manufacturers,
p => p.ManufacturerId, m => m.Id,
(p, m) => new {Product = p.Name, Manufacturer = m.Name})
.ToList();
The same operation using query syntax looks like this:
(from p in db.Products
join m in db.Manufacturers
on p.ManufacturerId equals m.Id
select new {Product = p.Name, Manufacturer = m.Name}
).ToList();
Break the code down:
from p in db.Products
Now select all products and their columns:
join m in db.Manufacturers
For every product, add manufacturer columns like this:
on p.ManufacturerId equals m.Id
Manufacturer columns are added only for products which have ManufacturerId equal to the Id of the manufacturer (INNER JOIN).
Note
Why can't you write == instead of equals? That is because, in LINQ query syntax, equals completes a join; it is not just a comparison of two values.
The select part is the same in both lambda and query syntax; however, it's worth mentioning what you selected. The select new {...} means that you create a new anonymous object to have all the things you want to select. The idea is to later use this to return a strongly typed object that you need. Therefore, after a ToList method, you are likely to perform another select operation to map the results for the final return. You cannot do the mapping right away because before you do ToList, you are still working with an expression that is yet to be converted into SQL. Only after ToList is called can you be sure that you are working with C# objects.
Finally, you may be wondering why the join is surrounded by brackets before calling ToList. That's because you were still in query syntax mode and the only way to escape it and go back to normal LINQ is by surrounding it with brackets.
If you struggle to remember LINQ query syntax, remember a foreach loop:
foreach(var product in db.Products)
The query syntax of from is as follows:
from product in db.Products
The highlighted part in the preceding code snippet is the syntax parts that overlap on both. This also applies to join. The two make the most of query syntax.
Both lambda and query syntax has the same performance metrics because, in the end, the query syntax will be compiled into the lambda equivalent. When making complex joins, it might make more sense to use a query syntax because it will look closer to SQL and therefore might be easier to grasp.
Now run the code. In order to run this example, comment all lines within static void Main(string[] args) body except Examples.Crud.Demo.Run(); in Program.cs:
Note
You can find the code used for this example at https://packt.link/c82nA.
You now know that query syntax is an alternative syntax to LINQ lambdas. But how you can perform the remaining operations with rows that are, create, update, and delete, using query syntax? The next section details how that can be done.
The Rest of CRUD
Adding, updating, and removing data using query syntax is also similar to basic LINQ. However, similar to executing the queries by calling ToList, it involves one extra step that is, committing the changes. Consider the following code where you are creating a new product:
var product = new Product
{
Name = "Teddy Bear",
Price = 10,
ManufacturerId = 1
};
db.Products.Add(product);
db.SaveChanges();
This code should look almost completely familiar, except for the last line. The SaveChanges method is used to run the actual SQL. If you don't call it, nothing will happen, and the changes will be gone after disconnecting from the database. Also, when adding a child entity (product), you don't have to get a parent entity (manufacturer). All you have to do is to provide a link between the two via the foreign key (ManufacturerId).
Why do you need an extra method to apply your changes? Wouldn't it be simpler to call Add and immediately have a new product row created? In practice, it is not that simple. What happens if multiple Add methods of different entities need to be performed, and what if one of them fails? Should you allow some of them to succeed, while others fail? The worst thing you can do is to put your database in an invalid state, or, in other words, break data integrity. You need a mechanism to either complete fully or fail without affecting anything.
In the SQL context, such commands that are run together are called a transaction. You can do two things with transactions—either commit or roll them back. In EF, every action, other than a query, results in a transaction. The SaveChanges completes the transaction, whereas a command failing rolls the transaction back.
If you were to call plain SQL commands in C#, you would need to create a parameterized SQL command, provide each argument separately, and concatenate SQL for multi-query updates. For a small entity it may be easy; however, as the size grows the complexity increases as well. Using EF, you don't need to care about low-level details, such as passing arguments to a command. For example, with EF, adding a manufacturer with a few products is as simple as adding a manufacturer to a Manufacturers list:
var manufacturer = new Manufacturer
{
Country = "Lithuania",
Name = "Toy Lasers",
Products = new List<Product>
{
new()
{
Name = "Laser S",
Price = 4.01m
},
new()
{
Name = "Laser M",
Price = 7.99m
}
}
};
db.Manufacturers.Add(manufacturer);
db.SaveChanges();
As you can see, creating manufacturers is nearly the same as adding an element to a list. The major difference is the need to complete the changes using db.SaveChanges() method.
What about updating an existing product? Set the price of a product to 45.99:
var productUpdate = new Product
{
Id = existingProduct.Id,
Price = 45.99m,
ManufacturerId = existingProduct.ManufacturerId,
Name = existingProduct.Name
};
db.Products.Update(productUpdate);
db.SaveChanges();
If you look carefully at this code, you are provided with not only the updated Price and an existing item Id but also all other fields. This is because there is no way for EF to know whether you want to set existing values to null or only set the new values. But don't worry; logically, there is rarely a case when you update something out of nowhere. You should have a set of items loaded somewhere. Therefore, updating an existing object would simply be a matter of setting a new value of a property of that object.
Of course, there are exceptions when you want to update just one thing. In that case, you can have a dedicated method and be completely in control. In the following snippet, you will update product values, but only when they are not null:
var productToUpdate = db.Products.Find(productUpdate.Id);
var anyProductToUpdate = productToUpdate != null;
if (anyProductToUpdate)
{
productToUpdate.Name = productUpdate.Name ?? productToUpdate.Name;
productToUpdate.ManufacturerId = (productUpdate.ManufacturerId != default)
? productUpdate.ManufacturerId
: productToUpdate.ManufacturerId;
productToUpdate.Price = (productUpdate.Price != default)
? productUpdate.Price
: productToUpdate.Price;
db.SaveChanges();
}
Here, you would only update the values if they were not the default ones. Ideally, when working in situations like this (in which you only want to update some of the fields), you should have a dedicated model for the updated fields, send those fields, and map them using libraries such as AutoMapper.
Note
To learn more about AutoMapper, refer to their official documentation at https://docs.automapper.org/en/stable/Getting-started.html.
What about deleting existing rows from a database? This involves first getting the object you want to remove and only then remove it. For example, say you want to remove a product with a particular ID:
var productToDelete = db.Products.Find(productId);
if (productToDelete != null)
{
db.Products.Remove(productToDelete);
db.SaveChanges();
}
Once again, removing something from a database is nearly the same as removing an element from a list with a small difference that db.SaveChanges() is used to confirm the changes. In order to run this example, comment all lines within static void Main(string[] args) body except Examples.Crud.Demo.Run(); in Program.cs.
Note
You can find the code used for this example at https://packt.link/bH5c4.
You have grasped that the basic concept of CRUD is a combination of four functions—create, read, update, and delete. Now it is time to put this into practice in the following exercise.
Exercise 6.02: Updating Products and Manufacturers Table
You have already created a GlobalFactory database with Products and Manufacturers tables, and you now have enough components to perform full Create, Read, Update and Delete (CRUD) on the database. In this exercise, you will use FactoryDbContext to create methods inside a new class called GlobalFactoryService, which can accomplish the following tasks:
- Add a list of manufacturers in the US.
- Add a list of products to all manufacturers in the US.
- Update any one product in the US with a given discount price.
- Remove any one product from the US region.
- Get all manufacturers from the US and their products.
Perform the following steps to complete this exercise:
- First, create a GlobalFactoryService class.
- Create FactoryDbContext inside a constructor and inject the context. Injecting the context means that you have a choice of setting it up in any way you want (for example, using different providers).
- Create a constructor that accepts FactoryDbContext as an argument, as follows:
public class GlobalFactoryService : IDisposable
{
private readonly FactoryDbContext _context;
public GlobalFactoryService(FactoryDbContext context)
{
_context = context;
}
- Create a public void CreateManufacturersInUsa(IEnumerable<string> names) method, as follows:
public void CreateManufacturersInUsa(IEnumerable<string> names)
{
var manufacturers = names
.Select(name => new Manufacturer()
{
Name = name,
Country = "USA"
});
_context.Manufacturers.AddRange(manufacturers);
_context.SaveChanges();
}
A manufacturer has only two custom fields—Name and Country. In this case, the value of the Country is known to be "USA". All you have to do is to pass a list of manufacturer names and build Manufacturers by combining the value of the Country with their name.
- To create the products, create a public void CreateUsaProducts(IEnumerable<Product> products) method.
- Then get all the manufacturers in the US.
- Finally, iterate each manufacturer and add all the products to each of them:
public void CreateUsaProducts(IEnumerable<Product> products)
{
var manufacturersInUsa = _context
.Manufacturers
.Where(m => m.Country == "USA")
.ToList();
foreach (var product in products)
{
manufacturersInUsa.ForEach(m => m.Products.Add(
new Product {Name = product.Name, Price = product.Price}
));
}
_context.SaveChanges();
}
Note that in this example, you have recreated a new product every time that you add the same product to a manufacturer. This is done because even though the product has the same properties, it belongs to a different manufacturer. In order for that distinction to be set, you need to pass different objects. If you do not do that, the products will be assigned to the same (last referenced) manufacturer.
- Create a public void SetAnyUsaProductOnDiscount(decimal discountedPrice) method.
- To set any USA product on discount, first get all the products from the US region and then select the first of them (order doesn't matter).
- Next set a new Price for that product, and call SaveChanges() to confirm it:
public void SetAnyUsaProductOnDiscount(decimal discountedPrice)
{
var anyProductInUsa = _context
.Products
.FirstOrDefault(p => p.Manufacturer.Country == "USA");
anyProductInUsa.Price = discountedPrice;
_context.SaveChanges();
}
- Create a public void RemoveAnyProductInUsa() method.
- To delete an item, simply select the first product in the "USA" group and remove it:
public void RemoveAnyProductInUsa()
{
var anyProductInUsa = _context
.Products
.FirstOrDefault(p => p.Manufacturer.Country == "USA");
_context.Remove(anyProductInUsa);
_context.SaveChanges();
}
Note
Observe that the SaveChanges has been called after every step.
- In order to get a manufacturers from USA, create a public IEnumerable<Manufacturer> GetManufacturersInUsa() method.
- Call the ToList() at the end of a query so that the SQL gets executed:
public IEnumerable<Manufacturer> GetManufacturersInUsa()
{
var manufacturersFromUsa = _context
.Manufacturers
.Include(m => m.Products)
.Where(m => m.Country == "USA")
.ToList();
return manufacturersFromUsa;
}
}
- Create a Demo class where you call all functions:
Demo.cs
public static class Demo
{
public static void Run()
{
var service = new GlobalFactoryService(new FactoryDbContext());
service.CreateManufacturersInUsa(new []{"Best Buy", "Iron Retail"});
service.CreateUsaProducts(new []
{
new Product
{
Name = "Toy computer",
Price = 20.99m
},
new Product
{
The complete code can be found here: https://packt.link/qMYbi.
In order to run this exercise, comment all lines within static void Main(string[] args) body except Exercises.Exercise02.Demo.Run(); in Program.cs. The output of the preceding code will be as follows:
Best Buy:
Loli microphone 5
Iron Retail:
Toy computer 20,99
Loli microphone 7,51
This output shows exactly what you wanted to achieve. You created two manufacturers: Best Buy and Iron Retail. Each of them had two products, but from the first manufacturer, Best Buy, you removed one. Therefore, only a single product appears under it, as opposed to two products under Iron Retail.
Note
You can find the code used for this exercise at https://packt.link/uq97N.
At this point, you know how to interact with an existing database. However, what you have done so far is manually written models to fit the GlobalFactory database you have created. Using EF, you only need one side—either a database or a DbContext schema. In the next sections, you will learn how to work with either approach.
Database First
In some cases, you won't have to design a database yourself. Often, an architect will do that for you and then a database administrator will handle further changes. In other cases, you may get to work with some really old projects and a legacy database. Both scenarios are perfect for a database first approach because you can generate a DbContext schema with all the needed models using an existing database.
The project selected must be an executable project. For example, WebApi and ConsoleApp are okay; however, a class library is not (you cannot run a class library; you can only reference it from other applications). So, install EF tools by running this in the console:
dotnet add package Microsoft.EntityFrameworkCore.tools
Finally, run the following:
dotnet ef dbcontext scaffold "Host=localhost;Username=postgres;Password=****;Database=Adventureworks" Npgsql.EntityFrameworkCore.PostgreSQL -o your/models/path --schema "production"
This command reads the database schema (you specified to generate the database from all the schemas rather than just one production schema) and generates models out of it. You used the AdventureWorks database. Using the -o flag, you select the output directory, and using the –schema flag, you specify the schemas you would like to generate the database from.
Note
The generated models from an existing database can be found at https://packt.link/8KIOK.
The models generated are quite interesting. They reveal two things that have not yet been talked about. When you created a Manufacturer class (read the Modeling Databases Using EF section), you did not initialize a collection of products from a constructor. This is not a big issue, but instead of not returning data, you get a null reference exception, which might not be what you want. None of the models, no matter how simple or complex they are, have attributes.
You are almost done with the db-first approach. The next section will revisit DbContext and inspect how EF does it so you can then apply what you learned in a code-first approach.
Revisiting DbContext
By logically grasping the following snippet, AdventureWorksContext, you will notice that the default configuration is passed slightly differently from the one created in the DbContext and DbSet section. Instead of directly using a connection string for SQL Server, the generated context uses the OnConfiguring method to double-check the given context options and if they are unconfigured, set one. This is a cleaner approach because you don't have to manually initialize the builder yourself and prevent unconfigured options:
public globalfactory2021Context()
{
}
public globalfactory2021Context(DbContextOptions<globalfactory2021Context> options)
: base(options)
{
}
protected override void OnConfiguring(DbContextOptionsBuilder optionsBuilder)
{
if (!optionsBuilder.IsConfigured)
{
optionsBuilder.UseNpgsql(Program.GlobalFactoryConnectionString);
}
}
Next, there is a method named OnModelCreating. It is a method that takes ModelBuilder that is used to dynamically build models for your database. ModelBuilder directly replaces the attribute-based approach because it allows you to keep the models attribute-free and add whatever constraints or mappings are needed when the context is initialized. It includes column names, constraints, keys, and indexes.
ModelBuilder allows you to use Fluent API (that is, method chaining), which in turn allows you to add extra configurations to models. Consider the following single, fully configured model:
globalfactory2021Context.cs
protected override void OnModelCreating(ModelBuilder modelBuilder)
{
modelBuilder.Entity<Manufacturer>(entity =>
{
entity.ToTable("manufacturer", "factory");
entity.Property(e => e.Id)
.HasColumnName("id")
.UseIdentityAlwaysColumn();
entity.Property(e => e.Country)
.IsRequired()
.HasMaxLength(50)
.HasColumnName("country");
The complete code can be found here: https://packt.link/S5s6d.
Looking at this part of ModelBuilder will give you a full picture of how the model maps to a table and its columns, keys, indexes, and relations. The generated code is broken down for you. To begin configuring an entity, you need to call the following:
modelBuilder.Entity< Manufacturer >(entity =>
Mapping to the table and schema looks like this:
entity.ToTable("manufacturer", "factory");
You can also add constraints (for example, to make sure that a field is not null) and set the character limit and name of a column the property maps to. In the following code, you're doing so for Name:
entity.Property(e => e.Name)
.IsRequired()
.HasMaxLength(50)
.HasColumnName("name");
Lastly, some entities have multiple navigational properties associated with them. When multiple navigational properties are involved, EF may not be able to clearly interpret what the relationship should be. In those cases, you will need to configure it manually, as shown in the following code:
entity.HasOne(d => d.Manufacturer)
.WithMany(p => p.Products)
.HasForeignKey(d => d.Manufacturerid)
.HasConstraintName("product_manufacturerid_id");
The preceding code maps the Manufacturer entity to Product with a 1:n relationship and sets the foreign key column to product_manufacturerid_id. Spotting those cases might be tricky; therefore, you should only add manual configurations when an error informs you about such an ambiguity:
Unable to determine the relationship represented by navigation property Entity.NavProperty' of type 'AnotherEntity'. Either manually configure the relationship, or ignore this property from the model.
Note
There is no runnable code here; this is just a scaffold of a database.
Now you know what a generated DbContext looks like and how to customize models yourself. Without touching model classes, and instead using ModelBuidler, it is time to get familiar with doing the opposite, which is generating a database out of the context.
Generating DbContext from an Existing Database
For subsequent examples, you will be using the GlobalFactory2021 database. Just to be sure that what you have made is the same as what the database contains, you'll perform database scaffolding one more time. Scaffolding is an operation that takes a database schema (or DbContext, in this case) and generates a physical database out of it.
Open the console and run the following:
dotnet ef dbcontext scaffold "Host=localhost;Username=postgres;Password=****;Database=globalfactory2021" Npgsql.EntityFrameworkCore.PostgreSQL -o Examples/GlobalFactory2021.
For security, do not forget to replace the hardcoded connection string in DbContext with the one from the environment variable. The resulting DbContext should look like this:

Figure 6.3: DbContext generated after applying the scaffold command
One of the main advantages of EF is that you can quickly define entities and then create a database out of them. But first, you'll need to learn the code first approach.
Code First and Migrations
Usually, when you need to create a proof of concept, you will create a DbContext schema with the models and then generate a database out of that. Such an approach is called code first.
In this example, you will use the context you have generated from the GlobalFactory2021 database and then generate a new database out of it. This approach requires an extra package named Design, so make sure it is installed by running the following command:
dotnet add package Microsoft.EntityFrameworkCore.Design
EF is able to generate a database and have different versioning for it. In fact, it can move from one database version to another. A single database version at any given time is called migration. Migrations are needed to ensure that you do not just always recreate databases (after all, you don't want to lose the existing data), but instead, apply them neatly in a secure and trusted way. To add the first migration, from the VS Code terminal, run the following:
dotnet ef migrations add MyFirstMigration -c globalfactory2021Context
This will generate a migration file:

Figure 6.4: New migration with defaults placed under the project Migrations folder in the project root
The migration provides EF with information about the next database schema version and can therefore be used to generate a database from (or apply new changes to an existing database). Note that since you have multiple DbContext schemas and EF cannot tell you which context to use, you have to provide one explicitly. It is also worth mentioning that running this command requires selecting a default project, which includes the required context. and placing the migrations in that project's directory.
Why can't you just generate a database right away? When working with data, capturing a change at any given time and being able to go back to a previous version is very important. Even though directly generating a database might sound easy, it is not a viable approach because changes happen all the time. You want to be in control and have a choice to switch between versions at will. The migrations approach also works with code versioning systems, such as Git, because you can see the changes made to your database through a migration file. You will learn more about version control in Chapter 11, Production-Ready C#: from Development to Deployment.
Before creating a database, make sure you change the database name inside the connection string so that a new database can be created and not overwritten. Creating a new database from a migration you have can be done by running this command:
dotnet ef database update -c globalfactory2021context
If you open pgAdmin, you will see a very familiar view with the manufacturer and product. However, there is one new table for the migration history:
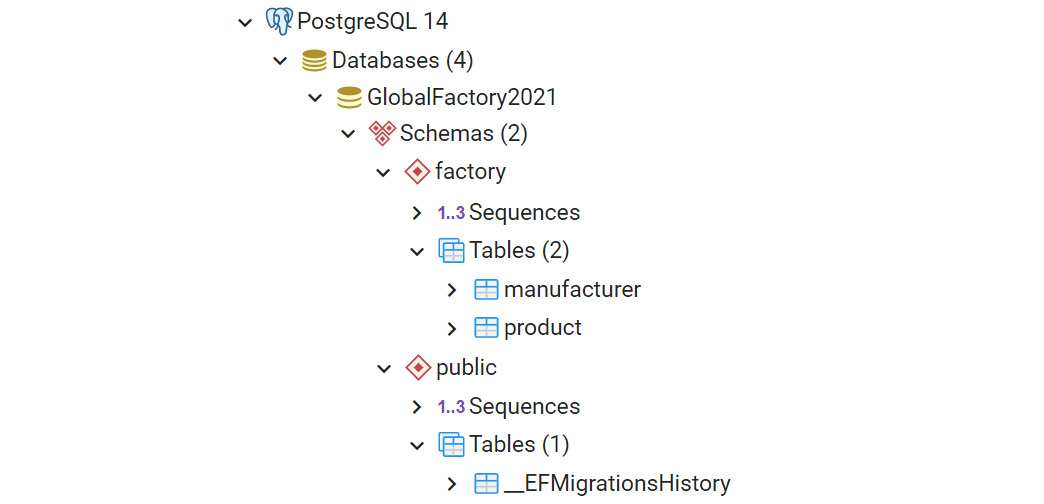
Figure 6.5: Generated database inside pgAdmin browser (simplified view for brevity)
The __EFMigrationsHistory table lays out all the migrations performed, when they were performed, and the EF version with which they were executed. In the following screenshot, you can see the first migration created as MyfirstMigration:
Figure 6.6: EFMigrationsHistory table rows
You might find it strange that a migrations table has only two columns. However, those two columns have all the needed information, such as when, what, and how. Under MigrationId, the digits before _ refer to the date and time the migration was run. This is followed by the migration name. The ProductVersion refers to the EF Core version with which the command was executed.
What if you wanted to make changes in your data models? What if you would like the manufacturer table to also have a date for the foundation? You would need to go through the same flow—add a migration and update the database.
So first, you would add a new property inside a Manufacturer class:
public DateTime FoundedAt { get; set; }
Here FoundedAt is a date. It does not need time associated with it, so you should specify an appropriate SQL Server type that maps to it. You would do this in GlobalFactory2021Context inside the OnModelCreating method:
entity.Property(e => e.FoundedAt)
.HasColumnType("date")
Now you can add that to a new migration:
dotnet ef migrations add AddManufacturerFoundedDate -c globalfactory2021Context
Apply the new migration to the database:
dotnet ef database update -c globalfactory2021context
This will add a new entry to the migration history:
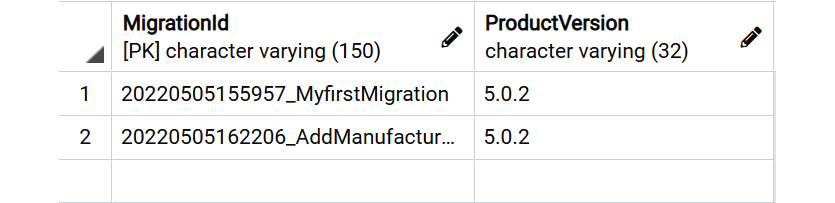
Figure 6.7: Migration 2 as the new migration created in the migrations table
You should see the new column in the manufacturer table as follows:

Figure 6.8: The manufacturer table with the new column named as foundedat
Now you know how to apply your models, change them, and generate a database out of the models. So far, you have made the following changes:
- Added the FoundedAt property and model builder changes.
- Created a migration file.
- Updated a database with that migration file.
Undoing those changes will involve doing the opposite, in this sequence:
- Rolling back database changes (updating the database to the last successful migration).
- Removing the migration file.
- Removing model builder changes.
EF migrations allow you to selectively apply any migration you want. Here, you will be applying the previous migration:
dotnet ef database update MyFirstMigration -c globalfactory2021context
You will delete the migration file using the following command:
dotnet ef migrations remove -c globalfactory2021Context
When working with big and complex databases, especially when they are already in production, performing migration using EF tools may become too complex. After all, you do not have full control of the exact script EF will generate for a migration. If you ever need a custom migration script, EF will no longer fit your bill. However, you can always convert whatever EF would do into SQL. You can do this by running the following command:
dotnet ef migrations script -c globalfactory2021context
This command produces, instead of a C# migration class, a SQL script. Executing a SQL script (often modified) is the preferred way of performing migrations in a production environment.
Those are just some basic yet common scenarios that you will be dealing with when working with databases. Change almost always happens; therefore, you should expect it and be prepared, as you will see in the following exercise.
Exercise 6.03: Managing Product Price Changes
Once again, your manager is impressed with your results. This time, they have asked you to keep track of product price changes. They would like a new table, ProductPriceHistory, that holds a record of the changes in the price of a product.
The following steps will help you complete this exercise:
- To track price changes, add a new model, ProductPriceHistory with the following fields:
- Id
- Price
- DateOfPrrice
- ProductId
- Product
The code for the new model will be as follows:
public class ProductPriceHistory
{
public int Id { get; set; }
public decimal Price { get; set; }
public DateTime DateOfPrice { get; set; }
public int ProductId { get; set; }
public Product Product { get; set; }
}
- Next, update the Product model so that it includes the historical price changes. So, add a new collection property, ProductPriceHistory:
public ICollection<ProductPriceHistory> PriceHistory { get; set; }
- Change the Price column. Price should now be a method that gets the latest price of a product and the full model now looks like this:
public partial class Product
{
public int Id { get; set; }
public string Name { get; set; }
public int ManufacturerId { get; set; }
public decimal GetPrice() => PriceHistory
.Where(p => p.ProductId == Id)
.OrderByDescending(p => p.DateOfPrice)
.First().Price;
public Manufacturer Manufacturer { get; set; }
public ICollection<ProductPriceHistory> PriceHistory { get; set; }
}
- Update DbContext to include a new DbSet and add the ProductPriceHistory configuration to the OnModelCreating method, as follows:
modelBuilder.Entity<ProductPriceHistory>(entity =>
{
entity.ToTable("ProductPriceHistory", "Factory");
entity.Property(e => e.Price)
.HasColumnType("money");
entity.Property(e => e.DateOfPrice)
.HasColumnType("date");
The preceding code provides mappings to a table and column property types. A Product has many historical price changes, therefore it forms a 1:n relation with a PriceHistory.
- Just after the preceding code, create a 1:n relation between Product and PriceHistory:
RelationalForeignKeyBuilderExtensions.HasConstraintName((ReferenceCollectionBuilder)
entity.HasOne(d => d.Product)
.WithMany(p => p.PriceHistory)
.HasForeignKey(d => d.ProductId), "FK_ProductPriceHistory_Product");
});
- For the database change to be captured (so that you can apply the change from code to database or roll back), add the migration as follows:
dotnet ef migrations add AddProductPriceHistory -c globalfactory2021Contextv3 -o Exercises/Exercise03/Migrations
The following will be generated:

Figure 6.9: The generated database migrations and extra files
- In order to apply the migration, run the following command:
dotnet ef database update -c globalfactory2021contextv3
- Create a Demo by adding some dummy data:
Demo.cs
public static class Demo
{
public static void Run()
{
var db = new globalfactory2021Contextv3();
var manufacturer = new Manufacturer
{
Country = "Canada",
FoundedAt = DateTime.UtcNow,
Name = "Fake Toys"
};
var product = new Product
{
Name = "Rubber Sweater",
The complete code can be found here: https://packt.link/4FMz4.
Here, you first created a manufacturer and its product and then added a few price changes. Once the changes were saved, you disconnected from the database (so that you don't work with cached entities). In order to test whether it works, you queried all "Fake Toys" manufacturer with their products and their price history.
Note
When working with dates, especially in the context of databases or environments that may be shared beyond your local, prefer to use dates without your locale by calling DateTime.UtcNow.
- In order to run this exercise, comment all lines within static void Main(string[] args) body except Exercises.Exercise03.Demo.Run(); in Program.cs. You will see the following output:
Fake Toys Rubber Sweater 15.5000
In the Demo, you created a manufacturer with one product which is a toy (Rubber Sweater). The toy has two prices: 15.11 and 15.50 (the latest). You then saved that toy in the database, disconnected, and reconnected from that database (making sure that the toy is not cached, but rather fetched), and executed an eager loading-based join.
Note
You can find the code used for his exercise at https://packt.link/viVZW.
EF is effective for rapid database development, but for that same reason, it is also very dangerous. Inexperienced developers often rely on the magic that happens behind the scenes and therefore forget that EF cannot magically optimize data models to fit your specific scenario or guess that the intended query should perform better. The following sections will review the main mistakes that people make while working with EF.
Pitfalls of EF
EF abstracts a lot of details from you, significantly simplifying your work. However, it also introduces the risk of not being aware of what is actually happening. Sometimes, you might achieve what you want, but there may be a chance that you are not optimally achieving your goal. The following are some of the most common mistakes made in EF.
Examples Setup
For all the following examples, assume that you will have this line initialized at the start:
var db = new GlobalFactory2021Context();
Assume, too, that every example will finish with this:
db.Dispose();
Also, the data itself will be seeded (pre-generated) using the following code:
DataSeeding.cs
public static class DataSeeding
{
public const string ManufacturerName = "Test Factory";
public const string TestProduct1Name = "Product1 ";
/// <summary>
/// Padding should be 13 spaces to the right as per our test data, db and filtering requirements
/// </summary>
public const string TestProduct2NameNotPadded = "Product2";
public const decimal MaxPrice = 1000;
public static void SeedDataNotSeededBefore()
{
var db = new globalfactory2021Context();
var isDataAlreadySeeded = db.Manufacturers.Any(m => m.Name == ManufacturerName);
if (isDataAlreadySeeded) return;
The complete code can be found here: https://packt.link/58JTd.
The preceding code creates a manufacturer with 10,000 products, but only if that manufacturer does not already exist. The ManufacturerName will be exactly 13 characters long, and their prices will be random, but no bigger than the maximum price. All of this information is saved to a database before you disconnect from it.
Note
This is no runnable code and will be used in all the performance comparison examples.
All the examples will compare two functions achieving the same output. A summary of all the comparisons is done by executing this demo code:
Demo.cs
public static class Demo
{
public static void Run()
{
// For benchmarks to be more accurate, make sure you run the seeding before anything
// And then restart the application
// Lazy loading is a prime example of being impacted by this inverting the intended results.
DataSeeding.SeedDataNotSeededBefore();
// Slow-Faster example pairs
// The title does not illustrate which you should pick
// It rather illustrates when it becomes a problem.
CompareExecTimes(EnumerableVsQueryable.Slow, EnumerableVsQueryable.Fast, "IEnumerable over IQueryable");
CompareExecTimes(MethodChoice.Slow, MethodChoice.Fast, "equals over ==");
CompareExecTimes(Loading.Lazy, Loading.Eager, "Lazy over Eager loading");
The complete code can be found here: https://packt.link/xE0Df.
Here, you compare in-memory and SQL filtering, lazy and eager loading, tracked and untracked entities, and adding entities one by one as opposed to adding them in bulk. In the paragraphs that follow, you will find the functions being compared, but every comparison will show the following:
- Names of a scenario
- Slow and fast versions for doing the same thing
You will be using a stopwatch to measure execution time and print a formatted comparison after each run. In order to run this example, comment all lines within static void Main(string[] args) body except Examples.PerformanceTraps.Demo.Run(); in Program.cs. You can refer to the Summary of Results section for the output.
The idea behind these examples is to compare an efficient way of working with EF with a direct equivalent inefficient way. The slow scenario is the inefficient way and the fast (which is the efficient one) is the way it should be done. The next section will detail the efficient way of using EF.
Multiple Adds
Sometimes, without realizing it at the time, you'll find that you tend to use the most straightforward route while writing programs. For example, to add 100 items, you may use 100 individual addition operations. However, this isn't always the optimal approach and is especially inefficient when you're using EF. Instead of one query for a bulk of 100, you might run a single insert 100 times. As an example, see the following code:
for (int i = 0; i < 1000; i++)
{
var product = new Product
{
Name = productName,
Price = 11,
ManufacturerId = 2
};
db.Products.Add(product);
}
This code creates 1,000 products and attaches them to DbContext. What happens is that those 1,000 entities inside a DbContext schema are tracked. Instead of tracking them all as a single batch, you track each individually.
What you want to do, though, is to work with range operations:
- AddRange or
- UpdateRange, or
- RemoveRange
A better version of the preceding code, designed to work in an optimal way with batches, looks like this:
var toAdd = new List<Product>();
for (int i = 0; i < 1000; i++)
{
var product = new Product
{
Name = productName,
Price = 11,
Manufacturerid = 2
};
toAdd.Add(product);
}
db.Products.AddRange(toAdd);
When creating multiple items with the intention to add them to the database, you should first add them to a list. After your list is complete, you can add the items as a batch to DbSet<Product>. You still have the problem of multiple adds, but the benefit of it over directly calling a DbSet<Product> add is that you no longer hit the change tracker with every add. In order to run this example, comment all lines within static void Main(string[] args) body except Examples.PerformanceTraps.Demo.Run(); in Program.cs.
Note
You can find the code used for this example at https://packt.link/wPLyB.
The next section will take a look at another pitfall—how to query properly based on equality of properties.
Equals over ==
The devil lies in the details. C# developers usually do not make this mistake, but if you are moving between languages (especially from Java), you might be doing this when filtering:
var filtered = db.Products
.Where(p => p.Name.Equals(DataSeeding.TestProduct1Name))
.ToList();
For LINQ, it is harmless. However, while using EF, this approach is not recommended. The problem is that EF can convert only some expressions to SQL. Usually, a complex method, such as equals, cannot be converted because it comes from a base object class, which can have multiple implementations. Instead, use a simple equality operator:
var filtered = db.Products
.Where(p => p.Name == DataSeeding.TestProduct1Name)
.ToList();
The problem with the first attempt was that it would first get all products (that is, execute a get statement in SQL) and only then the filter would be applied (in memory, in C#). Once again, this is problematic because getting with a filter applied in a database-native language is optimal but getting products in SQL and then filtering in C# is suboptimal. The problem is solved in the second attempt by replacing Equals with the equality operator, ==. In order to run this example, comment all lines within static void Main(string[] args) body except Examples.PerformanceTraps.Demo.Run(); in Program.cs.
Note
You can find the code used for this example at https://packt.link/js2es.
Using IEnumerable over IQueryable
Another example involves misunderstanding the concept of IEnumerable<Product>:
IEnumerable<Product> products = db.Products;
var filtered = products
.Where(p => p.Name == DataSeeding.TestProduct1Name)
.ToList();
Here, you are getting products by a specific product name. But what happens when you assign a DbSet<Product> object to Ienumerable<Product> is that the SELECT * statement is executed. Therefore, instead of getting only the filtered products that you need, you will first get everything and then manually filter it.
You might wonder why you couldn't filter right away. In some cases, it makes sense to build queries and pass them across methods. But when doing so, you should not execute them until they are completely built. Therefore, instead of Ienumerable<Product>, you should use Iqueryable<Product>, which is an abstraction of queried entities—an expression that will be converted to SQL after calling ToList<Product> or similar. An efficient version of the preceding code would look like this:
IQueryable<Product> products = db.Products;
var filtered = products
.Where(p => p.Name == DataSeeding.TestProduct1Name)
.ToList();
The latter works faster because you apply a filter in SQL and not in memory. In order to run this example, comment all lines within static void Main(string[] args) body except Examples.PerformanceTraps.Demo.Run(); in Program.cs.
Note
You can find the code used for this example at https://packt.link/ehq6C.
Eager and lazy loading has already been mentioned, but there is still another complexity that is significant enough and should be covered. The next section details them.
Lazy over Eager Loading
In EF, you have an interesting n+1 queries problem. For example, if you get a list of items, then getting the list of their respective manufacturers afterward would result in a SQL query being executed; this would be lazy-loaded. Fortunately, from EF 2.1, this no longer happens by default, and it needs to be enabled explicitly. Assume that in the following examples, you have already enabled it.
Here is a query to get any first item and its manufacturer:
var product = db.Products.First();
// Lazy loaded
var manufacturer = product.Manufacturer;
Initially, upon looking at this code, you might think that there is no issue, but this small chunk of code executes two SQL queries:
- First, it selects the top product.
- Then it selects the associated manufacturer, along with the manufacturer ID.
To make the code more efficient, you need to explicitly specify that you do want the Manufacturer to be included with a product. A better, more efficient version of the code is as follows:
var manufacturer = db.Products
// Eager loaded
.Include(p => p.Manufacturer)
.First()
.Manufacturer;
The latter translates to a single query where a join between two tables is made and the first item from one of them is returned. In order to run this example, comment all lines within static void Main(string[] args) body except Examples.PerformanceTraps.Demo.Run(); in Program.cs.
Note
You can find the code used for this example at https://packt.link/osrEM.
Read-Only Queries
EF assumes many things when running your queries. In most cases, it gets it right, but there are many cases when you should be explicit and order it not to assume. For example, you could get all the products like this:
var products = db.Products
.ToList();
By default, EF will track all retrieved and changed entities. This is useful in some cases, but not always. When you have read-only queries, to just get and not modify entities, you would explicitly tell EF to not track any of them. An optimal way of getting products is as follows:
var products = db.Products
.AsNoTracking()
.ToList();
All this code does is run a query against the database and map the results. EF keeps the context clean. In order to run this example, comment all lines within static void Main(string[] args) body except Examples.PerformanceTraps.Demo.Run(); in Program.cs.
Note
You can find the code used for this example at https://packt.link/rSW1k.
Summary of Results
The following snippet shows all results from the previous sections, in a tabulated form:
IENUMERABLE OVER IQUERYABLE Scenario1: 75ms, Scenario2: 31ms
EQUALS OVER == Scenario1: 33ms, Scenario2: 24ms
LAZY OVER EAGER LOADING Scenario1: 3ms, Scenario2: 29ms
READ-ONLY QUERIES Scenario1: 40ms, Scenario2: 10ms
MULTIPLE ADDS Scenario1: 8ms, Scenario2: 8ms
Note that the output depends on the machine you are running the database, the data, and more. The point of this comparison is not to give you hard rules of what should be chosen, but rather to show how different approaches might save a lot of computing time.
EF is a powerful tool that allows rapid work with databases; however, you should be careful with how you use it. Do not worry, even if you think you are not sure how the queries work internally, there is still a way to see what happens underneath.
Tools to Help You Spot Problems Early On
EF is a toolbox in itself; it allows you to easily hook into it and track what is happening without any external tools. You can enable logging all the EF actions by adding this to the OnConfiguring method:
optionsBuilder.LogTo((s) => Debug.WriteLine(s));
If you run any of the example's code, this will log the trace inside an output window, as follows:
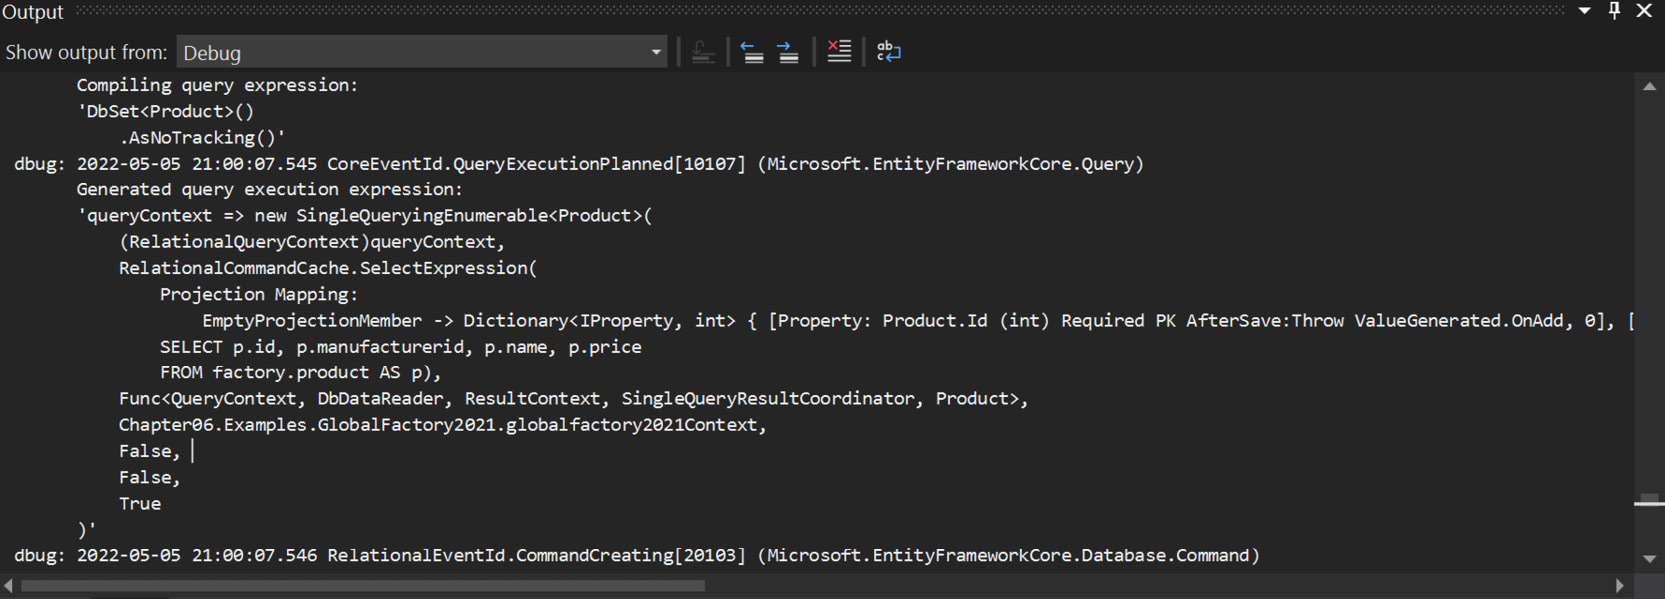
Figure 6.10: Debugging output after running the performance pitfalls demo
The image shows what SQL is generated when EF executes the code—specifically selecting all products.
This approach is useful when you want to both fully debug your application and know every step EF makes. It is efficient for spotting queries that you expect to execute as SQL but execute in memory.
In the next section, you will learn about patterns that will help you organize database communication code.
Working with a Database in Enterprise
When talking about databases, you usually imagine SQL or another language to talk with them. On top of that, another language (C#, in this case) is most often used to connect to a database to execute SQL queries. If not controlled, C# gets mixed with SQL, and it causes a mess of your code. Over the years, there have been a few patterns refined to implement the communication with a database in a clean way. Two such patterns, namely, Repository and CQRS, are commonly used to this day.
Repository Pattern
The Repository is a pattern that targets a model and defines all (if needed) possible CRUD operations. For example, if you take a Product model, you could have a repository with this interface:
public interface IProductRepository
{
int Create(Product product);
void Delete(int id);
void Update(Product product);
Product Get(int id);
IEnumerable<Product> Get();
}
This is a classical repository pattern where every database operation is abstracted away. This allows you to do pretty much anything you want in a database without worrying about the underlying database or even the technology you use to communicate with the database.
Note that a Create method in this case returns an integer. Usually, when writing code, you would segregate methods that change a state from those that query something. In other words, do not try to both get something and change something. However, in this case, it is difficult to achieve because the ID of an entity will be generated by the database. Therefore, if you want to do something with the entity, you will need to get that ID. You could instead return the whole entity, but that is like getting a house when all you need is an address.
Given you want to do the same four operations (create, delete, update, and get), the pattern would look like this:
public interface IManufacturerRepository
{
int Create(Manufacturer product);
void Delete(int id);
void Update(Manufacturer product);
Manufacturer Get(int id);
IEnumerable<Manufacturer> Get();
}
It looks almost the same; the only difference is the targeted entity. Given that you had a very simple application that just does data processing in a very simple way, it would make sense to make these repositories generic:
public interface IRepository<TEntity>: IDisposable where TEntity : class
{
int Create(TEntity productentity);
void Delete(long id)(int id);
void Update(TEntity entityproduct);
TEntity Get(long id)(int id);
IEnumerable<TEntity> Get();
void Dispose();
}
Here, instead of Product or Manufacturer, the interface takes a generic TEntity that must be a class. You have also inherited an IDisposable interface to clean up all the resources that a repository used. This repository is still flawed. So, should you be able to persist any class? In that case, it would be nice to mark the classes that you could persist in.
Yes, you can do that. When talking about a repository, you should realize that even if something is supposed to be saved in a database, that does not mean that it will be saved separately. For example, contact information will always be saved with a person. A person can exist without contact information but contact information cannot exist without a person. Both person and contact information are entities. However, a person is also an aggregate (that is the entity that you will be targeting when adding data to a database), and it can exist by itself. This means that it makes no sense to have a repository for contact information if storing it would violate data integrity. Therefore, you should create a repository not per entity, but per aggregate.
What should every row in a database have? It should have an ID. An entity is a model that you can persist (that is, have an ID); therefore, you can define an interface for it:
public interface IEntity
{
int Id { get; }
}
Please note that here you are using a get-only property because it does not make sense to set an ID in all cases. However, being able to identify an object (by getting the ID) is critical. Also note that the ID, in this case, is an integer because it is just a simple example and there will not be much data; but in real applications, it is usually either an integer or a GUID. Sometimes, an ID could even be both. In those cases, a consideration to make an entity interface generic (that is, taking generic TId) could be made.
What about an aggregate? An aggregate is an entity; you would therefore write the following:
public interface IAggregate : IEntity
{
}
In this scenario, you would then just write Person: IAggregate, ContactInfo: IEntity. If you apply the same principles to the two tables you had, you will get Product: IAggregate, Manufacturer: IAggregate because the two can be saved separately.
Note
There is no runnable code here; however, you will be using it in the upcoming exercise. You can find the code used for this example at https://packt.link/JDLAo.
Writing a repository for every aggregate might become a tedious job, especially if there is no special logic to the way persistence is done. In the upcoming exercise, you will learn how to generalize and reuse repositories.
Exercise 6.04: Creating a Generic Repository
Being coupled to an ORM may make your business logic harder to test. Also, due to persistence being so rooted at the core of most applications, it might be a hassle to change an ORM. For those reasons, you may want to put an abstraction layer in between business logic and a database. If you use DbContext as is, you couple yourself to EntityFramework.
In this exercise, you will learn how to create a database operations abstraction—a generic repository—that will work on any entity and support create, delete, update, and get operations. Implement those methods one by one:
- First, create a generic repository class that takes DbContext in the constructor:
public class Repository<TAggregate>: IRepository<TAggregate> where TAggregate: class
{
private readonly DbSet<TAggregate> _dbSet;
private readonly DbContext _context;
public Repository(DbContext context)
{
_dbSet = context.Set<TAggregate>();
_context = context;
}
The context.Set<TEntity>() allows getting a table-model binding and then using it throughout the repository. Another interesting point is that you didn't have to supply a concrete DbContext as it uses generic entities, and a generic repository is applicable to every kind of context.
- To implement a Create operation, add a method to insert a single aggregate:
public int Create(TAggregate aggregate)
{
var added = _dbSet.Add(aggregate);
_context.SaveChanges();
return added.Entity.Id;
}
- To implement a Delete operation, add a method to delete an aggregate by ID:
public void Delete(int id)
{
var toRemove = _dbSet.Find(id);
if (toRemove != null)
{
_dbSet.Remove(toRemove);
}
_context.SaveChanges();
}
- To implement an Update operation, add a method to update an entity by overriding the old values with the values of a new entity:
public void Update(TAggregate aggregate)
{
_dbSet.Update(aggregate);
_context.SaveChanges();
}
- To implement a Read operation, add a method to get a single entity by ID:
public TAggregate Get(int id)
{
return _dbSet.Find(id);
}
- A Read operation should also support getting all the entities. So, add a method to get all entities:
public IEnumerable<TAggregate> Get()
{
return _dbSet.ToList();
}
- Passing a DbContext to a constructor will open a database connection. As soon as you are done using a database, you should disconnect. In order to support a conventional disconnect, implement an IDisposable pattern:
public void Dispose()
{
_context?.Dispose();
}
}
- To test whether the generic repository works, create a new Run() method:
public static void Run()
{
- Inside the Run() method, initialize a new repository for the Manufacturer entity:
var db = new FactoryDbContext();
var manufacturersRepository = new Repository<Manufacturer>(db);
- Test whether the Create operation works, by inserting a new manufacturer as shown in the following code:
var manufacturer = new Manufacturer { Country = "Lithuania", Name = "Tomo Baldai" };
var id = manufacturersRepository.Create(manufacturer);
- Test whether the Update operation works, by updating the manufacturer's name as follows:
manufacturer.Name = "New Name";
manufacturersRepository.Update(manufacturer);
- Test whether the Read operation works on a single entity, by retrieving the new manufacturer from a database and print it:
var manufacturerAfterChanges = manufacturersRepository.Get(id);
Console.WriteLine($"Id: {manufacturerAfterChanges.Id}, " +
$"Name: {manufacturerAfterChanges.Name}");
You should see the following output:
Id: 25, Name: New Name
- Test whether the Read operation works on all entities by getting the count of all manufacturers with the following code:
var countBeforeDelete = manufacturersRepository.Get().Count();
- You can test whether the Delete operation works by deleting the new manufacturer as follows:
manufacturersRepository.Delete(id);
- In order to see the impact of delete (one less manufacturer is expected), compare the counts as follows:
var countAfter = manufacturersRepository.Get().Count();
Console.WriteLine($"Before: {countBeforeDelete}, after: {countAfter}");
}
- In order to run this exercise, comment all lines within static void Main(string[] args) body except Exercises.Exercise04.Demo.Run(); in Program.cs. You should see the following output upon running the dotnet run command:
Before: 3, after: 2
Repositories used to be the way to go (maybe 10-20 years ago) for implementing interactions with a database because these were a well-abstracted way to make calls against a database. An abstraction from a database would enable people to change the underlying database provider if needed. If a database changes, only the class that implements the interface will change but whatever consumes the interface will remain unaffected.
Looking back at DbContext and DbSet, you might ask why those can't be used directly. The answer is that you can, and it serves a similar purpose as repositories do. That is why the repository pattern should only be used if your queries are sufficiently complex (meaning it's several lines long).
Note
You can find the code used for this exercise at https://packt.link/jDR0C.
The next section will explore another benefit of EF that is, local database testing.
Testing Data Persistence Logic Locally
When developing software, you should always have quality and testability in mind. The problem with database testability is that it often requires a physical machine to host a database somewhere. However, you do not always have access to such a setup, especially at the start of a project.
Thankfully, EF is very flexible and offers a few packages to help out here. There are three main ways of testing with EF—InMemory, using SQLite, and calling an actual database. You have already seen plenty of demos calling a physical database. Next, you'll explore the other two: In-Memory and SQLite.
In-Memory Database Provider
An in-memory database provider is just a bunch of in-memory lists available internally that make no queries whatsoever to a database. Usually, even garbage collection eliminates its state. Before you can continue, just like all other database providers, you will need to add one to your project.
Run the following command:
dotnet add package Microsoft.EntityFrameworkCore.InMemory
This command enables you to use an in-memory database when supplying DbContextOptionsBuilder with the UseInMemoryDatabase option, as done in the following snippet:
var builder = new DbContextOptionsBuilder<FactoryDbContext>();
builder.UseInMemoryDatabase(Guid.NewGuid().ToString());
var options = builder.Options;
_db = new FactoryDbContext(options);
In this snippet, you've used an options builder and created a new, isolated, in-memory database. The most important part here is the builder.UseInMemoryDatabase(); method, which specifies that an in-memory database should be created. Also, note the Guid.NewGuid().ToString() argument. This argument is for a database name. In this case, it means that every time you call that line you will generate a unique database name, thus ensuring isolation between the new test databases. If you don't use this argument, you risk affecting a context under the test state. You want to avoid that for testing scenarios. When it comes to testing, starting with a fresh state is the right way to go.
In order to run this example, comment all lines within static void Main(string[] args) body except Examples.TestingDb.Demo.Run(); in Program.cs.
Note
You can find the code used for this example at https://packt.link/mOodJ.
To test whether a generic repository for manufacturers works (assume that the preceding code will be reused), first create a new repository:
var productsRepository = new Repository<Product>(db);
The power of this pattern is that a new entity repository is simply specified as a different generic argument. If you wanted to test a manufacturer, you would not need to design a repository class for it. All you would have to do is to initialize a repository with Manufacturer passed as a generic argument, for example new Repository<Manfacturer>(db).
Now, create a test product and save it:
var product = new Product {Name = "Test PP", ManufacturerId = 1, Price = 9.99m};
var id = productsRepository.Create(product);
To test the price update method, update product.Price and call the Update method:
product.Price = 19m;
productsRepository.Update(product);
In order to check whether a product was created successfully, call a Get method and pass the new product id:
var productAfterChanges = productsRepository.Get(id);
Type the following to print the product to the console:
Console.WriteLine($"Id: {productAfterChanges.Id}, " +
$"Name: {productAfterChanges.Name}, " +
$"Price: {productAfterChanges.Price}");
The output will get displayed as follows:
Id: 1, Name: Test PP, Price: 19
Now you need to check whether delete works. So, create a new product:
var productToDelete = new Product { Name = "Test PP 2", ManufacturerId = 1, Price = 9.99m };
var idToDelete = productsRepository.Create(productToDelete);
Check the current count of products in a repository:
var countBeforeDelete = productsRepository.Get().Count();
Now delete the product:
productsRepository.Delete(idToDelete);
Check the count once again, comparing it with the previous one:
var countAfter = productsRepository.Get().Count();
Console.WriteLine($"Before: {countBeforeDelete}, after: {countAfter}");
In order to run this example, comment all lines within static void Main(string[] args) body except Examples.TestingDb.Demo.Run(); in Program.cs. The following output will get displayed:
Before: 2, after: 1
Note
You can find the code used for this example at https://packt.link/DGjf2.
Using an In-Memory provider has its limitations. Up next, you will learn another alternative to testing code depending on the DbContext with fewer limitations.
SQLite Database Provider
The problem with in-memory providers is that you cannot run any SQL statements on them. If you do, the code fails. Also, an in-memory provider is all about in-memory data structures and has nothing to do with SQL. SQLite database provider is free from those problems. The only issue it has is that SQLite is a dialect of SQL, so some raw SQL queries of other providers might not work.
To try out SQLite, run the following command in the VS Code terminal:
dotnet add package Microsoft.EntityFrameworkCore.Sqlite
The installed NuGet allows you to use SQLite provider when creating a DbContext schema, like this:
var connection = new SqliteConnection("Filename=:memory:");
connection.Open();
var builder = new DbContextOptionsBuilder<FactoryDbContext>();
builder.UseSqlite(connection);
var options = builder.Options;
var db = new FactoryDbContext(options);
db.Database.EnsureCreated();
In the preceding snippet, you have created a SQL connection, specifying that an in-memory SQLite database will be used. The Db.Database.EnsureCreated() was needed because the database would not always be created using that connection string. In order to run this example, comment all lines within static void Main(string[] args) body except Examples.TestingDb.Demo.Run(); in Program.cs.
Note
You can find the code used for this example at https://packt.link/rW3JS.
If you were to create ProductsRepository and run the same code from the InMemory database example, you would get an error: SQLite Error 19: 'FOREIGN KEY constraint failed'. This is due to a missing manufacturer with an ID of 1 to which you are trying to link the new test products. This is a prime example of why the EF in-memory provider is not that reliable.
In order to fix this, add the following just before creating a test product:
var manufacturer = new Manufacturer() { Id = 1 };
db.Manufacturers.Add(manufacturer);
db.SaveChanges();
The only thing to remember is to clean up. After you are done using a database context that was created using a SQL connection, do not forget to dispose of that connection this way:
connection.Dispose();
At this point, you already know how to use DbContext in many different ways in order to communicate with a database. However, a dependency on a third-party library (EF Core) and unit testing maybe be tricky if all depends on a specific ORM. In the next paragraph, you will learn how to escape such a dependency.
A Few Words on Repository
The Repository pattern works for simple CRUD applications because it can further simplify database interactions. However, given you are using EF, it is already simple enough to interact with a database and another layer of abstraction is not always justified. After all, one of the key reasons why the Repository pattern caught so much attention is that it allows you to escape database interactions. However, the EF in-memory provider allows that too, so there is even less of a reason to use a repository.
The generic repository pattern is a useful abstraction. It abstracts away database interaction under a simple interface. However, for non-trivial scenarios, you are likely to need your custom CRUD operations and then you would create a non-generic repository. In fact, non-generic repositories are the recommended approach (given you want to implement the pattern) because you rarely want all the CRUD methods for all the entities. It is not rare to end up with as little as a single method on a repository. If you use a generic repository, you could still make all methods virtual and override them, but then you will end up overriding all the time or having methods that you don't use. It is less than ideal.
The following section will explore a different pattern that strives to make simple, optimal interactions per database operation—CQRS.
Query and Command Handlers Patterns
Command Query Responsibility Segregation (CQRS) is a pattern that aims to separate reads from writes. Instead of one class for all CRUD operations, you will have one class per CRUD method. On top of that, instead of one entity that fits all, you will have request and query object models dedicated to those specific scenarios. In CQRS, all database operations can be classified into two:
- Command: An operation that changes state (create, update, delete).
- Query: An operation that gets something, without affecting the state.
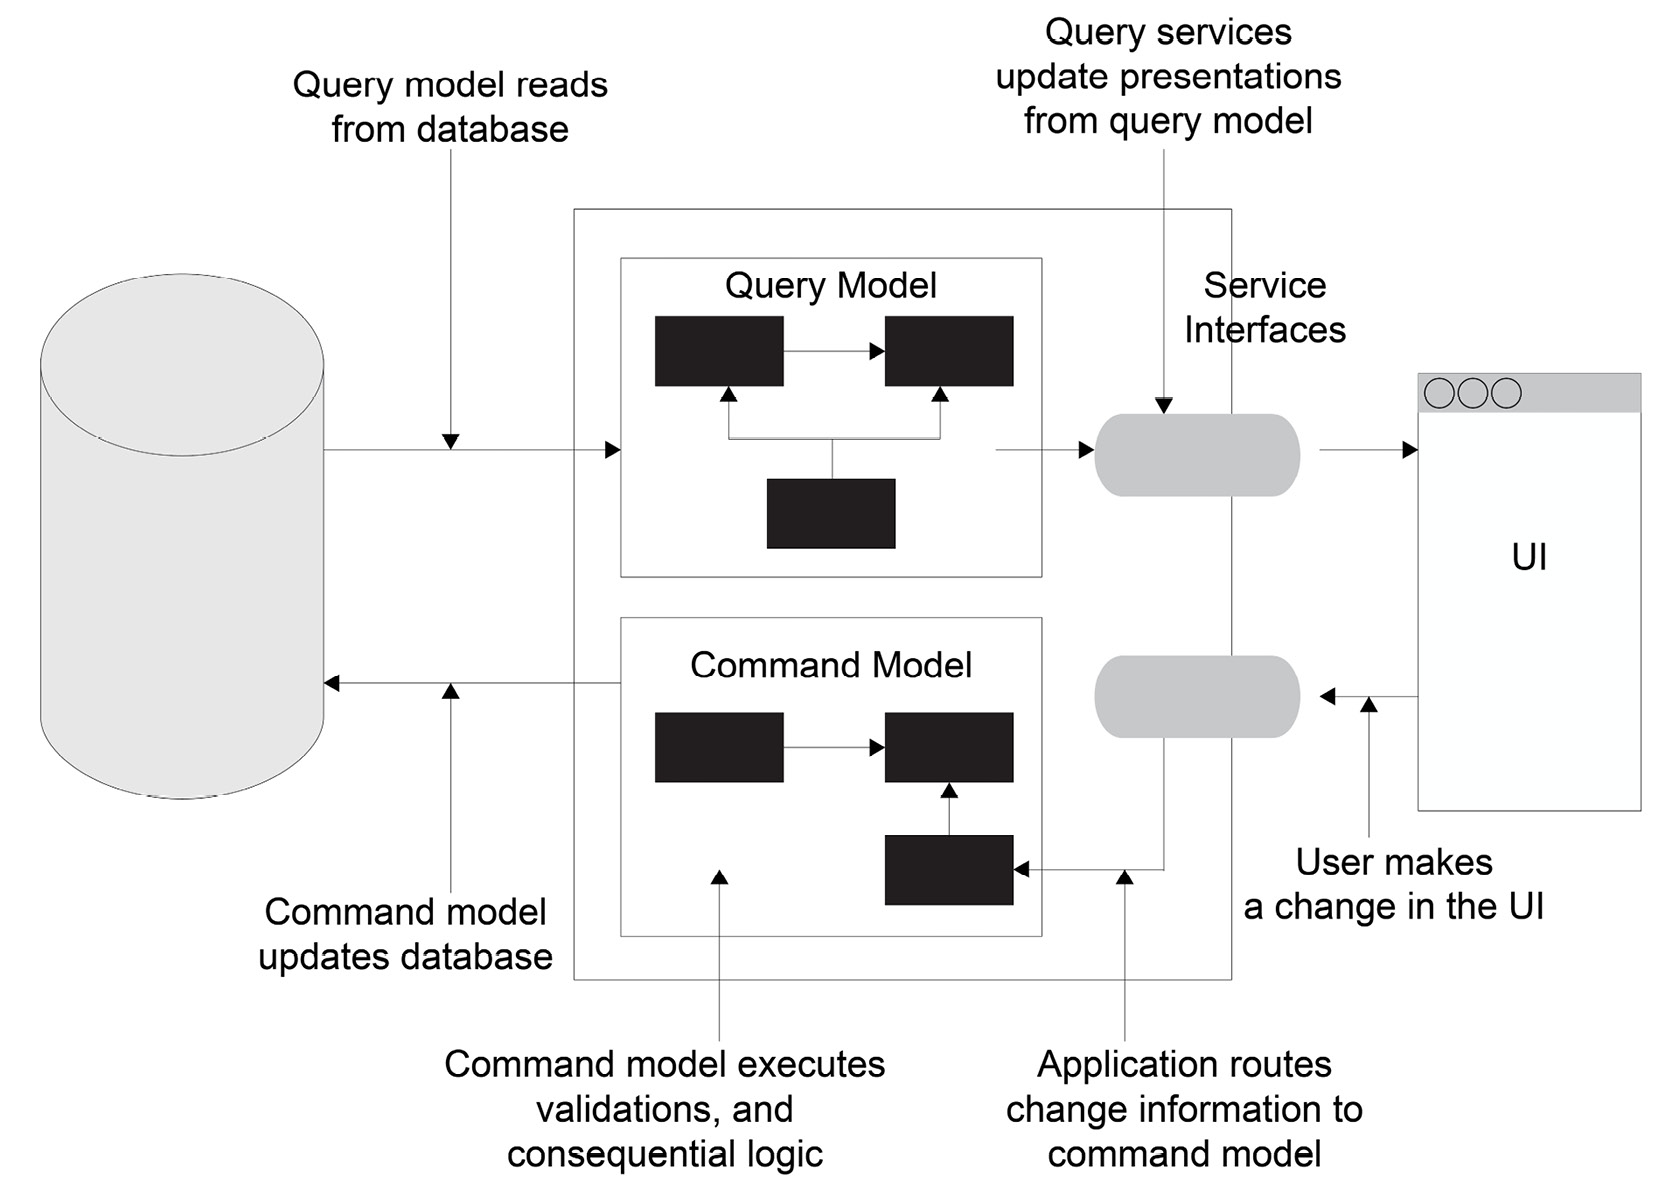
Figure 6.11: CQRS pattern as used by Martin Fowler
Note
The original source for this diagram can be found at https://www.martinfowler.com/bliki/CQRS.html.
In order to implement a command handler for creating a product, you would start by defining the command. What does the product need? It needs a name and a price, as well as a manufacturer. The ID for the create command is not needed (because the database generates it) and the manufacturer property can be removed as well because you will not make use of navigational properties. The name of a CQRS operation is made up of three parts—operation name, entity name, and command or query suffix. You are creating a product; therefore, the model will be called CreateProductCommand:
public class CreateProductCommand
{
public string Name { get; set; }
public decimal Price { get; set; }
public int ManufacturerId { get; set; }
}
Next, you will create a handler of this command. In the constructor, pass the database context. In the Handle method, pass CreateProductCommand:
CreateProductQueryHandler.cs
public class CreateProductCommandHandler
{
private readonly FactoryDbContext _context;
public CreateProductCommandHandler(FactoryDbContext context)
{
_context = context;
}
public int Handle(CreateProductCommand command)
{
var product = new Product
{
ManufacturerId = command.ManufacturerId,
Name = command.Name,
The complete code can be found here: https://packt.link/xhAVS.
Handlers are simple, single-method objects that implement all that is needed to process a command or a query. In order to test things, you'll also create a GetProductQueryHandler class:
public class GetProductQueryHandler
{
private readonly FactoryDbContext _context;
public GetProductQueryHandler(FactoryDbContext context)
{
_context = context;
}
public Product Handle(int id)
{
return _context.Products.Find(id);
}
}
The idea is almost the same, except that, in this case, querying is so simple that the optimal model for it is a simple integer. In some scenarios, if you can predict the complexity growing and the query becoming more complex, then even such an integer could go to a model (in order to avoid a breaking change of query format changing completely—from a primitive integer to an object).
In order to see whether the command and query work, you will be using an in-memory database context once again. So, create a command to create a new product, a handler to handle it, execute it, and print the results as follows:
var command = new CreateProductCommand { Name = "Test PP", Manufacturerid = 1, Price = 9.99m };
var commandHandler = new CreateProductCommandHandler(db);
var newProductId = commandHandler.Handle(command);
Create a query to get the created product and a handler to execute the query:
var query = newProductId;
var queryHandler = new GetProductQueryHandler(db);
var product = queryHandler.Handle(query);
Console.WriteLine($"Id: {product.Id}, " +
$"Name: {product.Name}, " +
$"Price: {product.Price}");
In order to run this example, comment all lines within static void Main(string[] args) body except Examples.Cqrs.Demo.Test(); in Program.cs. The output will be displayed as follows:
Id: 1, Name: Test PP, Price: 9,99
Note
You can find the code used for this example at https://packt.link/Ij6J8.
You might have wondered why, after so many demos, the ProductId is still 1. That's because it is an in-memory database—one that you create fresh for a new test every time. Since you are starting with an empty database every time, the first addition of a new entity to a database results in a new item with an ID of 1.
You might wonder if you made some changes to a database or added a column to it, and how it would impact the rest of the codebase and the business logic. The next section will detail these scenarios.
Separating the Database Model from the Business Logic (Domain) Model
Databases often change. However, should that impact the rest of the codebase? Should the fact that a column type changed, or another column was added affect the business logic? There is no straight answer to that. It all depends on the project scope, the resources, and the team's maturity. However, if you are working on a medium or a big project, you should consider segregating the database and domain completely. This does not only mean that different logic should be placed in different projects, but it also means that those projects should be decoupled from one another.
It is okay for a database layer to consume a domain layer, but it is not okay for the domain layer to do the same. If you want a complete separation between the two, you will have to introduce an anti-corruption layer. It is a concept that says not to consume foreign models and instead map them as soon as they hit the public component of that layer. The idea is that all interfaces should be domain-specific (that is, work with domain models). However, for a database communication implementation, internally, you will be working with database entities instead of domain models. This requires mapping one to another (when taking input or returning output).
In cases where database entities change completely, the domain-specific interface will remain the same. Only the mapping will change, which will prevent the database from impacting anything else. It is not an easy thing to grasp and implement for a beginner. It is recommended that you ignore that for now; your personal project scope is not worth the effort and you might not see any benefit.
This concludes the theoretical portion of this section. In the following section, you will put this into practice with an activity.
Activity 6.01: Tracking System for Trucks Dispatched
A logistics company has hired you to keep track of dispatched trucks. A single dispatch includes the current location of a truck, the truck's ID, and the driver's ID. In this activity, you will create a database for dispatched trucks, seed it with a few dispatches, and prove it works by getting all possible data from it.
You will create two classes (Truck and Person), which consist of the following objects:
- Truck: Id, Brand, Model, YearOfMaking
- Person: Id, Name, DoB
All tables are stored in the TruckLogistics database, in the TruckLogistics schema.
Perform the following steps to complete this activity:
- Create a Person class.
- Create a Truck class.
- Create a TruckDispatch class.
- Create a TruckDispatchDbContext schema with three tables.
- Create a connection string (ideally from environment variables).
- Add a database migration.
- Generate a database from the migration.
- Connect to a database.
- Seed the database with the initial data.
- Get all data from the database.
- Print the results.
- Dispose of the TruckDispatchesDbContext schema (that is, disconnect).
After completing these steps correctly, you should see the following output:
Dispatch: 1 1,1,1 2021-11-02 21:45:42
Driver: Stephen King 2021-07-25 21:45:42
Truck: Scania R 500 LA6x2HHA 2009
Note
In order to run this activity, comment all lines within static void Main(string[] args) body except Activities.Activity01.Demo.Run(); in Program.cs.
The database should look like this:

Figure 6.12: Generated TruckLogistics database (simplified for brevity)
And the following migration files (similar, not exact) will be created:

Figure 6.13: Migration files created for the solution
Note
The solution to this activity can be found at https://packt.link/qclbF.
With the successful execution of this activity, you should now have solid know-how of how EF is used for rapidly developing solutions integrated with a database.
Summary
In this chapter, you covered the benefits of an ORM and how to talk with a database from C# using the EF Core 6. EF allowed you to abstract a database using DbContext and include abstractions to tables, DbSet.
You experienced the simplicity of consuming a database using EF, which felt almost the same as writing LINQ queries. The only difference was the initial setup of a connection using a database context. You learned the client input should not be trusted, but ORMs allow you to consume queries with confidence because they take security into consideration and protect you from SQL injection. However, the way you connect to a database (that is, the connection string) has to be secured, and for that reason, you must store it just like any other secret and not hardcode it. You also studied the most common pitfalls when working with EF and tools that could help avoid those pitfalls. This chapter has given you enough skills to create and consume databases using EF.
In the next chapter, you will be focusing more on web applications—what they are, and how to build them.