
Overview
In this chapter, we look at testing in Clojure. We start by learning about different types of tests. We then explore the most common unit testing libraries in order to test our Clojure functions. We see how to do test-driven development. We dive into property-based testing that helps us to generate a vast amount of testing data. We then learn how to integrate testing with Clojure and ClojureScript projects.
By the end of this chapter, you will be able to test programs in Clojure and ClojureScript using their respective standard test libraries.
Introduction
In the previous chapter, we learned about host platform interoperability (inter-op) in Clojure. We explored how to use Java code in Clojure and JavaScript in ClojureScript. During our inter-op adventure, we created a coffee-ordering application. The application has various features, such as displaying a menu with coffee choices and ordering a coffee. We ran the code and we saw the application working. It is now time to learn about testing in Clojure.
Clojure was designed from the beginning to be a very practical language. Getting things done means interacting with the outside world, building projects, using libraries, and deploying your work. We need to be confident that the code that we write does what it is supposed to do. As a developer, you will need to test your applications. In this chapter, we will see what types of tests can be used. We will look at unit tests as they are the most common type of test written by developers.
Consider a situation where we have an air-ticket ordering application. This application allows users to search for flights and book flights. One of its features is searching for flights. A user should be able to enter search dates. The end date should be after the start date – it does not make much sense to fly back before we have even flown out. Testing allows us to ensure that the code handling start and end dates are in order.
Similarly, we would want to make sure that when many customers enter our site, it does not slow down. User experience elements such as website speed are also tested in software.
The first step is to understand why testing is important and what types of tests can be done in Clojure and ClojureScript. Then, we will look at testing libraries in Clojure and ClojureScript. Finally, we will look at a special type of testing called generative testing and how it helps developers to write tests.
Why Testing Is Important
At the beginning of this chapter, we saw that software testing is important. Why? In order to answer that, we will need to understand what software testing is. It can be defined as a process that ensures that a particular piece of software is bug-free. A software bug is a problem that causes a program to crash or produce invalid output. In Chapter 9, Host Platform Interoperability with Java and JavaScript, we learned about errors in Clojure and ClojureScript. Testing is a step-by-step process that ensures that software passes expected standards of performance, set by customers or the industry. These steps can also help to identify errors, gaps, or missing requirements. Bugs, errors, and defects are synonyms. They all mean problems with our software.
The benefits of software testing are as follows:
- Providing a high-quality product with low maintenance costs
- Assuring the accuracy and consistency of the product
- Discovering errors that are not recognized during the developmental phase
- Checking whether the application produces the expected output
- Providing us with knowledge of customers' satisfaction with the product
There are a number of software testing methodologies, depending on the angle from which we look at the software. The most common distinction is between functional testing and non-functional testing. We will now discuss what makes tests functional or non-functional, and when it is appropriate to use one type or the other.
Functional Testing
Functional tests try to capture the functional requirements of the software being tested. The requirements are taken from the specifications of the software.
Consider the air-ticket ordering application, which allows users to buy airline tickets. As mentioned, one of its features is searching for flights. Users would want to search using different criteria. One criterion could be searching for direct flights. Functional tests would ensure that when a user searches for a direct flight, they do not see connecting flights.
Typically, functional testing involves the following steps:
- Identifying what functions and features a software component has, based on the requirements specification document
- Creating input data based on the requirements
- Determining the expected output
- Executing the tests
- Comparing the expected results with the actual output
While functional testing has advantages, there are some testing areas that are not covered by functional tests. In such cases, so-called non-functional tests are performed.
Non-Functional Testing
Non-functional tests check things that are not directly related to the functional requirements. To put it another way, non-functional tests are concerned with the way that software operates as a whole, rather than with the specific behaviors of the software or its components.
With non-functional tests, we are concerned with areas such as security, how a system behaves under various load conditions, whether it is user-friendly, and whether it provides localization to run in different countries.
Consider the air-ticket ordering application again. This application allows users to buy airline tickets. Users should be able to pay with their credit cards. The application should handle payments securely. This means that transactions should be encrypted. Encryption is the process of encoding a message or information in such a way that only authorized parties can access it and those who are not authorized cannot. Someone who is not authorized should not be able to see transaction details.
Another non-functional test for the air-ticket ordering application would be load testing. With load testing, we would test that our application can handle a very high page load. During the festive period, many customers will enter our website. We need to make sure that thousands of users can use the application at the same time. The application should be responsive and not slow down when many customers use it.
Functional tests ensure that our applications are secure. While we have discussed functional and non-functional testing separately, they should not be seen as opposing testing methodologies, but rather, complementary approaches. They are often performed together to provide assurance that software has a high standard of quality and can operate under various conditions.
Testing and catching bugs in software are not free. It requires time and resources from developers and testers. Having said that, fixing bugs late in development is more expensive than catching them early in the development phase. Unit testing allows us to catch many bugs early on, while not requiring too many resources from developers.
In the next topic, we will examine what unit testing is, and the most popular unit testing frameworks in Clojure.
Clojure Unit Testing
Unit testing is the testing of an individual software component or module. In Clojure, a function is a good candidate for unit testing. A function is intended to perform one task at a time. Otherwise, a change in logic in one job would influence a second job. When a function has one responsibility, we can reason about the function much more easily than if it performed more than one thing. Clojure provides a number of testing frameworks for unit testing. When we use testing libraries, we often call them frameworks. A framework is a structure that supports and encloses testing. With testing frameworks, we support testing our code. Our code is enclosed in a number of tests written for our code.
There are a number of concepts in testing, two of which are as follows:
- Assertion: A Boolean (true or false) expression. An assertion is a statement about a specific part of our program, which will be true or false. For example, we can state that a function in our program will throw an error when we pass a string instead of a number as a parameter. The assertion will be: Does this function throw an error? The answer is either yes (true) or no (false).
- Stub: A temporary replacement for a part of a code or a concept. A stub simulates the behavior of the replaced software component. In the flight-ticket ordering application, we could have a payment component that takes card details and contacts the bank to withdraw money for the plane ticket. After taking payment through the bank, we would display ticket details. A stub would simulate contacting the bank without actually contacting the bank. When we use a stub, we can focus on testing displaying ticket details without handling contacting the bank and all card transactions. This keeps the test focused on a single task, in this case, displaying a ticket after taking payment via a bank.
The clojure.test framework is the default Clojure unit testing framework that comes with the Clojure standard library. The purpose of clojure.test is to provide developers with a number of testing functions. In our first exercise, we will write unit tests for the coffee app from the previous chapter using the clojure.test library.
Exercise 10.01: Unit Testing with the clojure.test Library
The aim of this exercise is to learn how to perform unit testing with the clojure.test library. This is the default testing library in Clojure. It is included in Clojure so we do not need to import this library as an external dependency. In the previous chapter, we created a coffee-ordering application that allowed us to display a coffee menu and order coffees. In this exercise, we will write unit tests for the functions created in the coffee-ordering application.
First, we will create the application, then we will write tests:
- Create the coffee-ordering application:
lein new app coffee-app
Leiningen created the project for us. By default, we have one source file called core.clj. Inside this file, we will add the code responsible for displaying the menu options and processing them.
- Import the java.util.Scanner class in the core namespace:
(ns coffee-app.core
(:require [coffee-app.utils :as utils])
(:import [java.util Scanner])
(:gen-class))
We have imported the Scanner class. This class allows us to get input from a keyboard. In order to use methods from Scanner, we need to create an instance of this class.
- Create an instance of the Scanner class.
We will call methods on this class instance when we want to get input from a user. The Scanner class needs to know what the source of the input is. In our case, we use the default in source of the System class – the keyboard.
(def input (Scanner. System/in))
When a user runs the application, they should see a menu with options. The options are displaying and ordering coffees, listing orders, and exiting the application.

Figure 10.1: Menu of the application showing all the options
- Add the code for displaying the menu and handling user choices:
(defn- start-app []
"Displaying main menu and processing user choices."
(let [run-application (ref true)]
(while (deref run-application)
(println " | Coffee app |")
(println "| 1-Menu 2-Orders 3-Exit | ")
(let [choice (.nextInt input)]
(case choice
1 (show-menu)
2 (show-orders)
3 (dosync (ref-set run-application false)))))))
- In the start-app function, we set the application to running by default:
run-application (ref true)
(while (deref run-application)
In order to get the values stored in run-application, we use the deref function.
- Inside the while block, the application runs until the user chooses the exit option. In such cases, we will update the value of ref:
(dosync (ref-set run-application false))
- After updating, ref is no longer true but false. The while block will stop when the value of ref is false and our application will exit. When our application runs, the user can choose options from the menu:
(println "| 1-Menu 2-Orders 3-Exit | ")
This will display the following menu:

Figure 10.2: Menu of the coffee ordering application
We are able to display the initial menu. We can work on handling user choices from the menu.
- In order to get the user response, we call the nextInt method from the Scanner instance:
Finally, once we get the user input, we check which option from the menu should be executed:
1 (show-menu)
2 (show-orders))
We now know about the logic in the main application menu when we start the app. It is time to dig deeper and look at the code for the show-menu function.
- Display the menu for the available coffees:
(println "| Available coffees |")
(println "|1. Latte 2.Mocha |")
(let [choice (.nextInt input)]
(case choice
1 (buy-coffee :latte)
2 (buy-coffee :mocha))))
In the show-menu function, we let the user know about two available coffees – Latte and Mocha:
(println "| Available coffees |")
(println "|1. Latte 2.Mocha |")
This will display the coffee menu:

Figure 10.3: Coffee menu display
The user can choose numbers 1 or 2. We need to respond to the user's coffee choice now.
- We use the Scanner instance to get the user input:
- Finally, we proceed to buy the coffee that the user chose:
1 (buy-coffee :latte)
2 (buy-coffee :mocha))
The show-menu function is not long. Its purpose is to display the available coffees and get the user input. Once the user has chosen their coffee, we call the buy-coffee function to handle buying the selected coffee.
- Ask the user how many coffees they'd like to buy:
(println "How many coffees do you want to buy?")
(let [choice (.nextInt input)
price (utils/calculate-coffee-price price-menu type choice)]
(utils/display-bought-coffee-message type choice price)))
The buy-coffee function asks how many coffees the user wants to buy. Again, we use an instance of the Scanner class – input – to get the user's choice. Next, the function calls two utility functions to process the purchase. The functions are responsible for calculating the coffee price and displaying the feedback message to the user.
All the functions will be placed in the utils.clj file. Instead of having all functions in one big file, it is good practice to split functions into various namespaces. A common namespace name is utils. We can keep any useful functions that operate on data there.
- Create a utils namespace:
- Calculate the coffee price:
(defn calculate-coffee-price [coffees coffee-type number]
(->
(get coffees coffee-type)
(* number)
float))
Our first utility function calculates the coffee price. It uses the get function to check the coffees hash for the passed-in coffee type. The hash is defined in the core namespace:
(ns coffee-app.core
(:require [coffee-app.utils :as utils])
(:import [java.util Scanner])
(:gen-class))
(def ^:const price-menu {:latte 0.5 :mocha 0.4})
The value obtained from the hash is then multiplied by the number of coffee cups that the user ordered. Finally, we coerce the number to float. This allows us to convert a number such as 1.2000000000000002 to 1.2.
The last utility function used when we handle buying coffee is the display-bought-coffee-message function.
- Display the message to the user after buying the coffee:
(ns coffee-app.utils)
(defn display-bought-coffee-message [type number total]
(println "Buying" number (name type) "coffees for total:€" total))
The display-bought-coffee-message function takes the order map and constructs a string message for the user based on the data from the map. The user is informed that they bought a certain amount of cups of coffee for the specified price.
With this function, we can control the information passed back to the user after completing their order:

Figure 10.4: Displaying the message for the coffee bought
The second option from the main menu allows us to see the placed orders:

Figure 10.5: Orders allows the user to see their orders
The function responsible for displaying orders is show-orders from the coffee-app.core namespace.
- Display the placed orders:
(ns coffee-app.core)
(defn- show-orders []
(println " ")
(println "Display orders here"))
This function will display the coffee orders made. In this exercise, we informed the user that orders will be displayed here. In the following exercise, we will implement saving and displaying orders:
Display orders here
When we run the application and buy two cups of latte, we will see the following output:
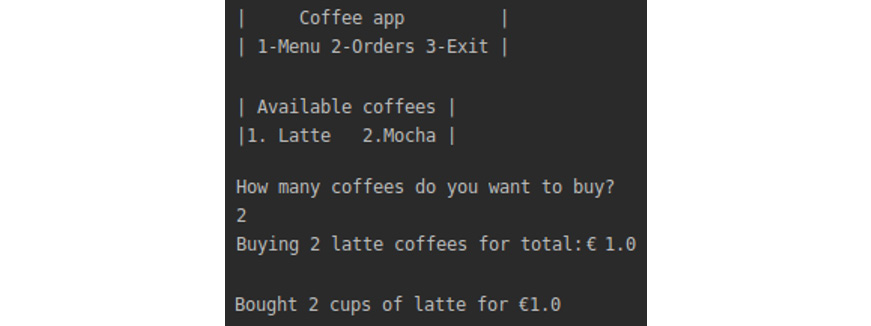
Figure 10.6: Output when the user buys two cups of coffee
- Add the main function as follows:
(defn -main
"Main function calling app."
[& args]
(start-app))
- In order to run the application, we will use the following:
lein run
Once we run the application, we can see the available coffees and order them, similar to what we saw in Figure 10.6.
We have our application running successfully. We will create tests for our application now.
- Check the testing directory. We use the tree command to display a list of folders and files within the test directory:
tree test
When we created the application, Leiningen created the test directory for us. There are a number of ways to check the project's structure. We check the project structure using the preceding tree command.

Figure 10.7: Project structure
We have one test file, core.clj. Inside this file, there is a sample test created by Leiningen:
(ns coffee-app.core-test
(:require [clojure.test :refer :all]
[coffee-app.core :refer :all]))
This file imports the Clojure testing namespace, as well as the core file from the source directory. The file contains one test method. This method is called a-test. Because we have autogenerated the a-test test function, we can run tests after creating a Leiningen project:
(deftest a-test
(testing "FIXME, I fail."
(is (= 0 1))))
When we create a new project with Leiningen, it will create one test function. This function is called a-test and is inside the core_test.clj file.
- In order to run tests, we need to call Leiningen's test task. The test task is a task that will run the tests within the test directory:
lein test
The output is as follows:
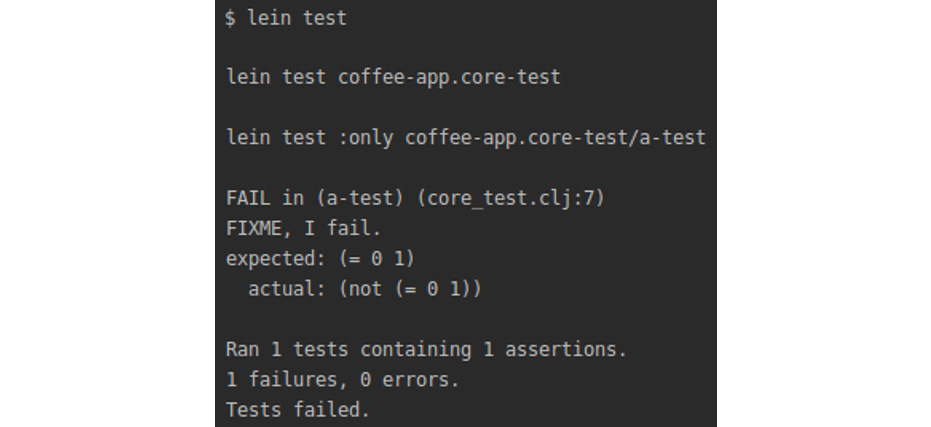
Figure 10.8: Running the test task
The a-test test fails, as we have not yet implemented the a-test test from the core_test.clj file. Leiningen informed us that it tested the coffee-app.core-test namespace. We have information that the test failed, including which line in the test file (line 7) caused the test to fail.
Leiningen even provided us with information about what the test expected and what the actual result was. In this case, the default test tried to compare the numbers one and zero. In order to make the test pass, let's change the a-test function.
- To fix the default test function from the Leiningen project, we will change the implementation of the default a-test function that we have just seen:
(deftest a-test
(testing "FIXME, I fail."
(is (= 1 1))))
We changed the test to state that 1 is equal to 1. This will make our a-test pass.
- We run the test using the following:
lein test
We can run the tests again:

Figure 10.9: Running the test after fixing the default a-test function
This time, Leiningen informs us that it ran one test with one assertion (test condition). There were zero failures and zero errors. We now know how to run tests. It is time to write tests for the utils namespace. We will create a testing file for the utils namespace.
- Create a test file for the utils namespace. Inside the file, we will write code to test functions in the utils namespace:
touch test/coffee_app/utils_test.clj
After creating utils_test.clj, we will have two test files:

Figure 10.10: We now have two test files after creating utils_test.clj
In utils_test.clj, we want to test functions from the utils namespace. We will add the necessary dependencies to the testing namespace. Inside core_test.clj, we will keep tests for functions that are defined in the core.clj file. The utils_test.clj file will contain tests for functions defined in the utils.clj file.
- We will import the clojure.test library and namespaces from the source directory that we will test:
(ns coffee-app.utils-test
(:require [clojure.test :refer [are is deftest testing]]
[coffee-app.core :refer [price-menu]]
[coffee-app.utils :refer :all]))
The clojure.test namespace has a number of testing functions. We import them using the :refer keyword, which we learned about in Chapter 8, Namespaces, Libraries, and Leiningen. We import four functions:
are: Allows you to test multiple testing scenarios
is: Allows you to test a single testing scenario
deftest: Defines a Clojure test
testing: Defines an expression that will be tested
We import the coffee-app.core and coffee-app.utils namespaces from the source directory. From the core namespace, we import price-menu, which contains a list of available coffees and the price for each coffee. Finally, we import the utils namespace, which contains the functions that we want to test.
- The clojure.test object provides the is macro for testing. We will learn about macros in Chapter 11, Macros. For the purpose of this exercise, you can think of macros as special functions. Macros are used in the same way as we have used functions.
The is macro takes a test and an optional assertion message. Add the following code to utils_test.clj:
(deftest calculate-coffee-price-test-with-single-is
(testing "Single test with is macro."
(is (= (calculate-coffee-price price-menu :latte 1)
0.5))))
The deftest macro allows us to define tests. Each test is defined using the testing macro. The testing macro can be supplied with a string to provide a testing context. Here, we inform you that this is a single test using the is macro. In this test, we call the calculate-coffee-price function, passing price-menu, which contains information about the available coffees.
The second argument that we pass is the number of cups of coffee that we want to buy. In our case, we want to buy one cup. For the test, the result of calling the calculate-coffee-price function for one latte should be 0.5.
We will run the test now:
lein test
The output is as follows:

Figure 10.11: Running the test after using the is macro
We can see that the newly added test passes.
- While we can write tests with the is macro, testing multiple times with the is macro results in the unnecessary duplication of code. Consider the next test, where we run through three scenarios:
Buying one coffee – a user decides to buy one cup of coffee
Buying two coffees – a user decides to buy two cups of coffee
Buying three coffees – a user decides to buy three cups of coffee
(deftest calculate-coffee-price-test-with-multiple-is
(testing "Multiple tests with is macro."
(is (= (calculate-coffee-price price-menu :latte 1) 0.5))
(is (= (calculate-coffee-price price-menu :latte 2) 1.0))
(is (= (calculate-coffee-price price-menu :latte 3) 1.5))))
Inside the calculate-coffee-price-test-with-multiple-is test, we have three single tests using the is macro. We test three different scenarios: buying one coffee, buying two coffees, and buying three coffees.
- Run multiple is tests. We run the tests for the calculate-coffee-price-test-with-multiple-is test:
lein test
The output is as follows:

Figure 10.12: Running multiple is tests
The new test has been run and passes. In the preceding code, we see that we duplicate a lot of calls to the calculate-coffee-price function. There should be a more efficient way to write tests for multiple scenarios.
- The are macro is a convenience macro when we plan to write multiple tests using the is macro. The are macro is a test macro used for testing multiple testing scenarios. It differs from the is macro in a number of scenarios that we can test.
The is macro allows us to test one scenario. It is singular. The are macro allows us to test more than one scenario. It is plural. We use the is macro when we want to test a single scenario and the are macro when we want to test more than one scenario. The previous test with multiple is macro calls can be rewritten as:
(deftest calculate-coffee-price-test-with-are
(testing "Multiple tests with are macro"
(are [coffees-hash coffee-type number-of-cups result]
(= (calculate-coffee-price coffees-hash coffee-type number-of-cups) result)
price-menu :latte 1 0.5
price-menu :latte 2 1.0
price-menu :latte 3 1.5)))
The are macro checks multiple tests against the assertion written by us.
In the preceding test, we wrote an assertion:
(= (calculate-coffee-price coffees-hash coffee-type number-of-cups) result)
The result of calling calculate-coffee-price with coffees-hash coffee-type number-of-cups should be equal to the result.
Inside the vector, we specify four arguments that we need to run our test:
price-menu :latte 1 0.5
The arguments include coffee-hash with information about coffees, coffee-type, number-of-cups, and result – the result of calculating the coffee price.
Again, we use the equals (=) function to check the result of calling the calculate-coffee-price function against the result that we expect.
- When we run the tests again, we get the following:
lein test
The output is as follows:

Figure 10.13: Output for tests run after using the are macro
Our new test passes. We used the are macro to simplify writing multiple test assertions. Whenever we need to write multiple tests with the is macro, using the are macro will make our code shorter and more readable.
In this exercise, we have seen how to write tests using the clojure.test library. In the next exercise, we will look at another Clojure library for testing.
Using the Expectations Testing Library
The main philosophy in the Expectations library revolves around an expectation. The expectation object is built with the idea that unit tests should contain one assertion per test. A result of this design choice is that expectations have very minimal syntax, and reduce the amount of code needed to perform tests.
Minimal syntax helps to maintain the code as it is easier to read and reason about code that is short and focused on testing one feature. Another benefit relates to testing failing code. When a test fails, it is easy to check which test failed and why because the test is focused on one feature and not multiple features.
The Expectations library allows us to test things like the following:
- Errors thrown by the code: We can test whether a part of our code throws an error. Imagine a function that calculates a discount. This function takes numbers as input and multiplies them. If we pass a string such as "text" and a number 5, we will get an error because Clojure cannot multiply a number and a string. We can write tests to check whether an error is thrown in this scenario.
- The function's return value: We can test whether a function returns the expected value. Imagine a function that calculates a discount. This function takes numbers as input and multiplies them. After the multiplication, it should return a number. We can write tests to check that our function returns a number instead of a collection or a string.
- Elements in a collection: We can write tests to check whether a collection contains expected elements. Imagine a function checking a list of users for children. This function takes a list of users as input. We can write tests checking the age of users.
In order to use Expectations, we need to import it into a Leiningen project:
- We add a dependency for the expectations library [expectations "2.1.10"].
- lein-expectations is a Leiningen plugin that runs expectations tests from the command line [lein-expectations "0.0.8"].
We will write tests for the calculate-coffee-price function. This will allow us to compare how we compose tests in the Expectations library against tests written using the clojure.test library.
Exercise 10.02: Testing the Coffee Application with Expectations
The aim of this exercise is to learn how to write unit testing in Clojure using the Expectations library. We will write tests for the calculate-coffee-price function:
- Add expectations to the project.clj file. After adding the Expectations library to project.clj, the file should look as follows:
(defproject coffee-app "0.1.0-SNAPSHOT"
;;; code omitted
:dependencies [[org.clojure/clojure "1.10.0"]
:plugins [[lein-expectations "0.0.8"]]
;;; code omitted
)
- Create a file for the utils tests.
In order to use the Expectations library, we need to import functions first. The utils namespace should look like the following:
(ns coffee-app.utils-test
(:require [coffee-app.core :refer [price-menu]]
[coffee-app.utils :refer :all]
- Test the calculate-coffee-price function. Buying three cups of latte should cost us 1.5. The following test will check this condition:
(expect 1.5 (calculate-coffee-price price-menu :latte 3))
We are ready to run the test.
- Run the expectations test with the Leiningen task. In order to run tests on the command line, we need to use the Leiningen task from the lein-expectations plugin:
lein expectations
This task will execute the expectations tests.

Figure 10.14: Output after running the expectations test
As we expected, for three lattes, we need to pay 1.5. What will happen if we pass a string instead of a number for a number of cups? We would expect an error. With expectations, we can test for errors.
- The expectations library allows us to test whether a function throws an error. The calculate-coffee-price function requires a number. Passing a string should result in an error:
(expect ClassCastException (calculate-coffee-price price-menu :latte "1"))
The output is as follows:

Figure 10.15: Testing the calculate-coffee-price function using the Expectations library
After running the test, we see that all tests pass. Tests do not always pass. With expectations, we are informed when tests fail.
- When we run a test that fails, Expectations will let us know. Testing for an error when the error is not thrown will fail the test:
(expect ClassCastException (calculate-coffee-price price-menu :latte 2))
The output is as follows:
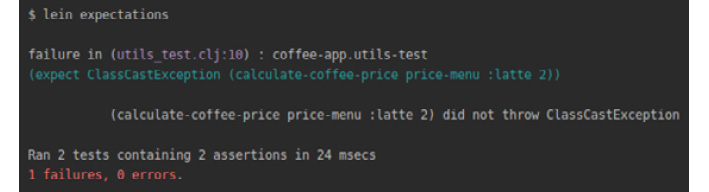
Figure 10.16: Running a test that fails using the Expectations library
The Expectations library informed us that one test failed. We also know in which namespace we have a failing test and which line of code caused the test to fail. This allows us to quickly find the failing test.
We know that passing a string to calculate-coffee-price will result in an error. With Expectations, we can also check what the return type from the function is.
- In Clojure code, we often compose functions. One function operates on the result of running other functions. It is common to check that functions that we call return the types of values that we expect. With Expectations, we can check the return type from a function:
(expect Number (calculate-coffee-price price-menu :latte 2))
We expect that calculate-coffee-price will return a number:

Figure 10.17: Using Expectations
Running the tests confirms that the number is the correct return type of the calculate-coffee-price function. With Expectations, we also can test whether a collection contains requested elements.
- The price-menu hash contains information about the available coffees, such as type and price. With Expectations, we can test whether elements belong to a collection:
(expect {:latte 0.5} (in price-menu))
We expect that, on the menu, we have latte and that its price is 0.5.

Figure 10.18: Testing whether latte belongs to the menu
As expected, on our menu, we have a latte. We now know two testing libraries in Clojure: clojure.test and Expectations. The third testing library that we will learn about is Midje.
Unit Testing with the Midje Library
Midje is a testing library in Clojure that encourages writing readable tests. Midje builds on top of the bottom-up testing provided by clojure.test and adds support for top-down testing. Bottom-up testing means that we write tests for a single function first. If this function is used by some other function, we write tests after finishing the implementation for the other function.
In the coffee-ordering application, we have the load-orders function:
(defn load-orders
"Reads a sequence of orders in file at path."
[file]
(if (file-exists? file)
(with-open [r (PushbackReader. (io/reader file))]
(binding [*read-eval* false]
(doall (take-while #(not= ::EOF %) (repeatedly #(read-one-order r))))))
[]))
The load-orders function uses the file-exists? function. Functions in Clojure should not perform many things. It is good practice to have small functions focusing on single tasks. The file-exist function checks a file. The load-orders function loads orders. Because we cannot load orders from a file that does not exist, we need to use the file-exist function to check for a file with saved orders:
(defn file-exists? [location]
(.exists (io/as-file location)))
With bottom-up testing, we have to write the implementation for file-exists first. After we have a working implementation of file-exist, then we can write the implementation for load-orders. This way of writing tests forces us to think about implementation details for all functions instead of focusing on a feature that we want to implement. Our original goal was to load data from a file but we are focusing now on checking whether a file exists.
With a top-down approach, we can write working tests for the main tested function without implementing functions that are used by the tested function. We state that we want to test the load-orders function and that it uses the file-exist function but we do not need to have a full implement of file-exist. We merely need to say that we will use this function. This allows us to focus on a feature that we want to test without worrying about implementing all sub-steps.
In order to use Midje, add it as a dependency ([midje "1.9.4"] to project.clj) to the project.clj file.
Exercise 10.03: Testing the Coffee Application with Midje
The aim of this exercise is to learn how to use the Midje library and write top-down tests. We will write tests for calculate-coffee-price. We will use a top-down approach to write tests for the load-orders function:
- We will import the Midje namespace to the utils namespace:
(ns coffee-app.utils-test
(:require [coffee-app.core :refer [price-menu]]
[coffee-app.utils :refer :all]
[midje.sweet :refer [=> fact provided unfinished]]))
After importing the Midje namespace, we are ready to use the fact macro from the Midje namespace.
- Midje uses the fact macro, which states certain facts about a future version of our test. The macro takes a single argument on both sides of the => symbol. The fact macro states that the result from the left-hand side is to be expected on the right-hand side of the symbol:
(fact (calculate-coffee-price price-menu :latte 3) => 3)
We wrote a test where we expect that the price for three cups of latte is 3.
Midje supports autotesting in the REPL.
- With autotesting, we do not need to run tests every time we make changes. The autotester will run the tests anytime it detects changes. In order to use autotesting in Midje, we enable autotesting in the REPL:
lein repl
- After starting the REPL, we import the Midje namespace and enable the autotester:
user=> (use 'midje.repl)
user=> (autotest)
After starting the REPL, we imported the Midje namespace.
The second step was calling the autotest function. This function will run the tests automatically when our code changes.
After enabling autotesting, our tests are run thanks to the autotest function that we used in the REPL:
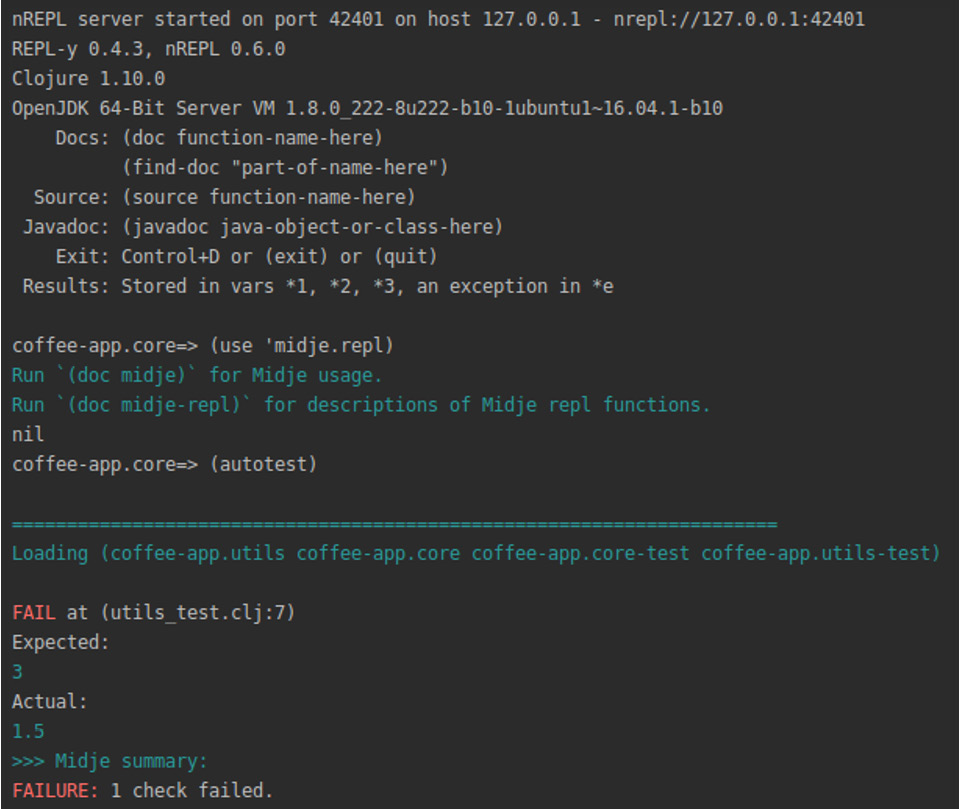
Figure 10.19: Executing the tests
- Midje informs us that our tests failed. The price for three cups of latte is not 3 but 1.5. When we change the implementation of the test, the autotest runs again:
(fact (calculate-coffee-price price-menu :latte 3) => 1.5)
The autotest runs as follows:

Figure 10.20: Running autotest after changing the implementation
This time, we are informed that our tests pass. We know now how to run autotests and how to write tests using Midje. It is time now to explore top-down testing in Midje.
- In the utils namespace, we have the display-bought-coffee-message function, which displays a message about the number of coffee types bought. This function has a hardcoded currency symbol:
(defn display-bought-coffee-message [type number total]
(str "Buying" number (name type) "coffees for total:€" total))
It would be nice to obtain the currency code from a utility function and not hardcode it. As some countries use the same currency, just as the euro is used in many European countries, it is a good idea to encapsulate the logic of getting the currency into a function.
- We will keep the information about the currencies in a hash. Remember from Chapter 1, Hello REPL!, that a hash is a Clojure collection where we store data using keys and values:
(def ^:const currencies {:euro {:countries #{"France" "Spain"} :symbol "€"}
:dollar {:countries #{"USA"} :symbol "$"}})
This allows us to check the currencies that different countries use and currency symbols.
- As we do not plan to write the implementation for the functions of currencies, we will provide a stub (substitution) for it.
We saw an explanation of a stub at the beginning of this chapter:
(unfinished get-currency)
- This tells Midje that we plan to use the get-currency function but we have not implemented it yet. We will test against the euro, so we will add the helper var:
(def test-currency :euro)
- The function for displaying information about bought coffees will initially look like this:
(defn get-bought-coffee-message-with-currency [type number total currency]
(format "Buying %d %s coffees for total: %s%s" number (name type) "€" total))
- The test for the get-bought-coffee-message-with-currency function looks as follows:
(fact "Message about number of bought coffees should include currency symbol"
(get-bought-coffee-message-with-currency :latte 3 1.5 :euro) => "Buying 3 latte coffees for total: €1.5"
(provided
(get-currency test-currency) => "€"))
In the test, we use the Midje => symbol. We expect the result of calling get-bought-coffee-message-with-currency to equal the string message.
We use the provided function from Midje to stub call to the get-currency function. When the Midje test calls this function, it should return the euro symbol, €.
If we check autorun in the REPL, we will see the following:
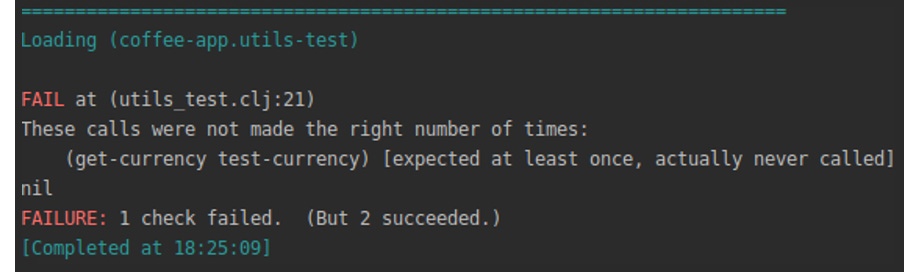
Figure 10.21: Testing the get-bought-coffee-message-with-currency function using Midje
- Midje informs us that one test failed. The get-currency function should have been called but was not called at all. We just wrote a test that compiled and ran. We did not get a compilation error. We focused on the logic for displaying a message and this part was a success. Once we have a test for get-bought-coffee-message-with-currency, it is time now to think about using get-currency to display messages:
(defn get-bought-coffee-message-with-currency [type number total currency]
(format "Buying %d %s coffees for total: %s%s" number (name type) (get-currency test-currency) total))
This implementation of the get-bought-coffee-message-with-currency function uses the get-currency function:

Figure 10.22: Testing again after using the get-currency function
When we check the autotest in the REPL, we see that all tests pass now.
In this exercise, we were able to write tests using the Midje library. This library allows us to write tests using a top-down approach where we think about testing the main function and any other functions called by it are stubbed first. This helps us to focus on the behavior of the main function under test without worrying about implementing all of the used functions.
While we wrote tests using various libraries, all tests are limited. When we tested calculate-coffee-price, we tested it a few times. If we could test it more times, we could be more confident that the calculate-coffee-price function is performing as expected. Writing a few tests can be quick but writing 100 or 200 tests takes time. Luckily, with property-based testing, we can generate lots of test scenarios very quickly.
Property-Based Testing
Property-based testing, also known as generative testing, describes properties that should be true for all valid test scenarios. A property-based test consists of a method for generating valid inputs (also known as a generator), and a function that takes a generated input. This function combines a generator with the function under test to decide whether the property holds for that particular input. With property-based testing, we automatically generate data across a wide search space to find unexpected problems.
Imagine a room-booking application. We should allow users to search for rooms suitable for families. Such rooms should have at least two beds. We could have a function that returns only those rooms that have at least two beds. With unit testing, we would need to write scenarios for the following:
- Zero beds
- One bed
- Two beds
- Three beds
- Four beds
- Five beds
- And other scenarios
If we wanted to test rooms with 20 beds, it would mean creating over 20 tests that are very similar. We would only change the number of beds. We can generalize such tests by describing what a family room is in general terms. As we said, a family room would have at least two beds. Property-based testing allows us to generalize inputs and generate them for us. Because inputs are generated automatically, we are not limited to manually typing tests and we could create 1,000 test scenarios easily. For our family room example, the input is a number of rooms. Testing would involve specifying that a room number is a number. With property-based tests, integer inputs would be automatically generated for us.
Clojure provides the test.check library for property-based testing. Property-based testing has two key concepts:
- Generators: A generator knows how to generate random values for a specific type. One generator could create strings, another generator could create numbers. The test.check.generators namespace has many built-in generators, as well as combinator functions for creating your own new generators from the built-in generators.
- Properties: Properties are characteristics of inputs. An input to any function can be described in general terms. In our family room example, the input is a number of rooms. So, the property is a number.
In the next exercise, we will write property-based tests for the coffee-ordering application.
Exercise 10.04: Using Property-Based Testing in the Coffee-Ordering Application
The aim of this exercise is to learn how to create tests using property-based testing. We will describe inputs for the calculate-coffee-price function and this will allow us to generate tests automatically.
In order to use the test.check library, we need to add [org.clojure/test.check "0.10.0"] as a dependency in the project.clj file:
- Before we can use test.check in the utils namespace, we need to import the necessary namespaces:
(ns coffee-app.utils-test
(:require [clojure.test.check :as tc]
[clojure.test.check.generators :as gen]
[clojure.test.check.properties :as prop]
[clojure.test.check.clojure-test :refer [defspec]]
[coffee-app.core :refer [price-menu]]
[coffee-app.utils :refer :all]))
We import three test.check namespaces:
clojure.test.check.generators: Will generate inputs
clojure.test.check.properties: Will allow us to describe inputs in a general form
clojure.test.check.clojure-test: Will allow us to integrate with clojure.test
If we wanted to import these namespaces in the REPL, we would do the following:
(require '[clojure.test.check :as tc]
'[clojure.test.check.generators :as gen]
'[clojure.test.check.properties :as prop])
Once we have the necessary namespaces imported, we can look at how to generate inputs.
- In order to generate inputs for tests, we will use generators. The calculate-coffee-price function takes a number of cups as an argument. A generator creating numbers such as small-integer is what we need:
(gen/sample gen/small-integer)
The small-integer function from the generators' namespace returns an integer between -32768 and 32767. The sample function returns a sample collection of the specified type. In the preceding example, we have a sample collection of small integers:

Figure 10.23: Creating a sample of small integers
- With generator combinators, we can obtain new generators. The fmap generator allows us to create a new generator by applying a function to the values created by another generator. The fmap generator works like the map function, which we know about from the first chapter. It allows us to map a function to a value created by the following generator. In this example, each integer created by the small-integer generator is incremented using the inc function:
(gen/sample (gen/fmap inc gen/small-integer))
This will return the following:
(1 2 1 -1 -3 4 -5 -1 7 -6)
We were able to increase the numbers generated by the small-integer generator by applying the inc function using the fmap combinator.
We now know how to create inputs using generators. It is time to learn how to describe the properties of inputs.
- A property is an actual test — it combines a generator with a function you want to test, and checks that the function behaves as expected given the generated values.
Properties are created using the for-all macro from the clojure.test.check.properties namespace:
(defspec coffee-price-test-check 1000
(prop/for-all [int gen/small-integer]
(= (float (* int (:latte price-menu))) (calculate-coffee-price price-menu :latte int))))
The defspec macro allows you to run test.check tests like standard clojure.test tests. This allows us to extend test suits to include property-based testing together with standard unit tests. In the for-all macro, we use a small-integer generator to create a number of small integers. Our test passes when the number of coffee cups value created by the generator is multiplied by the price of the coffee. The result of this calculation should equal the result of running the calculate-coffee-price function. We intend to run the test 1,000 times. This is amazing that with three lines of code we were able to create 1,000 tests.
- We can run test.check tests using Leiningen:
lein test
The output is as follows:
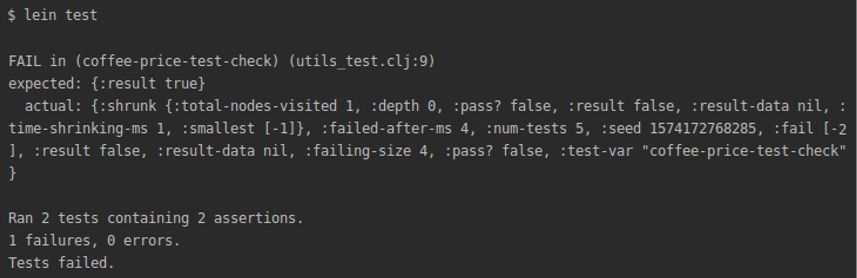
Figure 10.24:Testing test.check using Leiningen
After running tests with lein test, we will quickly get a result similar to the following:
{:num-tests 5,
:seed 1528580863556,
:fail [[-2]],
:failed-after-ms 1,
:result false,
:result-data nil,
:failing-size 4,
:pass? false,
:shrunk
{:total-nodes-visited 5,
:depth 1,
:pass? false,
:result false,
:result-data nil,
:time-shrinking-ms 1,
:smallest [[-1]]}}
Our test failed. The original failing example [-2] (given at the :fail key) has been shrunk to [-1] (under [:shrunk :smallest]). The test failed because in the implementation of calculate-coffee-price, we return only absolute, non-negative values. The current implementation of calculate-coffee-price is as follows:
(defn calculate-coffee-price [coffees coffee-type number]
(->
(get coffees coffee-type)
(* number)
float
Math/abs))
In the last line, we have the Math/abs function call. calculate-coffee-price should return only absolute numbers. Yet in our tests we allowed negative numbers to be generated. We need to use a different generator to match the expected result from the calculate-coffee-price function.
- test.check provides a nat generator that can create natural numbers (non-negative integers).
The test for calculate-coffee-price should be updated to the following:
(defspec coffee-price-test-check 1000
(prop/for-all [int gen/nat]
(= (float (* int (:latte price-menu))) (calculate-coffee-price price-menu :latte int))))
When we run tests with this generator, the tests pass:
lein test
The output is as follows:
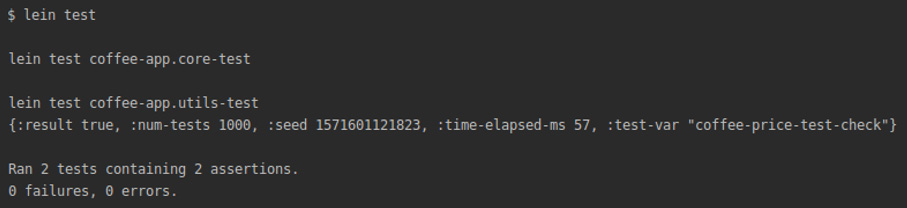
Figure 10.25: Using nat to create non-negative integers and running tests
We were able to test the calculate-coffee-price function 1,000 times. We generated an integer each time and used the integer as a number of cups. With test.check, we can truly check parameters against generated inputs. We have tested only the number of cups parameter. It is time to write generators and test all of the parameters.
- In order to generate all of the remaining parameters for the calculate-coffee-price function, we will use some new generators. The code for creating all parameters is as follows:
(defspec coffee-price-test-check-all-params 1000
(prop/for-all [int (gen/fmap inc gen/nat)
price-hash (gen/map gen/keyword
(gen/double* {:min 0.1 :max 999 :infinite? false :NaN? false})
{:min-elements 2})]
(let [coffee-tuple (first price-hash)]
(= (float (* int (second coffee-tuple)))
(calculate-coffee-price price-hash (first coffee-tuple) int)))))
The coffee hash that stores the coffee menu contains information about the coffee type as a key and its value as a double:
{:latte 0.5 :mocha 0.4}
The gen/map generator allows us to create a hash. In the hash, we want to generate a keyword as a key and a double for a value. We limit the value to be between 0.1 and 999. We are only interested in numbers. We do not want to get an infinite value. With generators, we could create an infinite value if we wanted. We also do not want a NaN (not a number) to be generated. Lastly, our hash should have at least two elements – two tuples to be precise. Each tuple is a pair of a key and a value.
In the let block, we take the first tuple and assign it to coffee-tuple. This will help us to test and pass appropriate arguments to the calculate-coffee-price function.
We will run the tests again:
lein test
The output is as follows:

Figure 10.26: Running the tests after generating all parameters for the calculate-coffee-price function
We see that both test.check tests pass. With a few lines of code, we were able to test 2,000 scenarios. This is amazing.
So far, we have tested the calculate-coffee-price function. In the following activity, you will write tests for other functions from the coffee-ordering application.
Activity 10.01: Writing Tests for the Coffee-Ordering Application
In this activity, we will apply knowledge about unit testing to write a test suite. Many applications running in production are very complex. They have lots of features. Developers write unit tests in order to increase their trust in the application. The features coded should fulfill business needs. A well written and maintained test suite gives confidence to developers and people using such applications that the applications' features perform as expected.
The coffee-ordering application that we wrote in the previous chapter allowed us to display the coffee menu and order some coffees. In this chapter, we have learned about unit testing libraries in Clojure by testing the calculate-coffee-price function. In the coffee-ordering application, there are still functions that have not been tested.
In this activity, we will write unit tests for the following functions:
- display-order: Displays information about the order
- file-exist: Checks whether a given file exists
- save-coffee-order: Saves the coffee order to a file
- load-orders: Loads coffee orders from a file
These steps will help you complete the activity:
- Import the testing namespace.
- Create tests using the clojure.test library to display orders messages:
Tests using is macro
Tests using are macro
- Create tests using the clojure.test library to test if the file exists or if the file does not exist
- Create tests using the clojure.test library to save orders, load empty orders, load coffee orders.
- Create tests using the expectations library to save data to file, save coffee orders, save coffee data, and load orders
- Create tests using the expectations library to check whether the file exists.
- Create tests using the expectations library to save and load orders.
- Create tests using the Midje library to display the orders messages.
- Create tests using the Midje library to check whether the file exists.
- Create tests using the Midje library to load orders.
- Create tests using test.check to display the orders messages:
Import the test.check namespace
Test the displayed orders
- Create tests using test.check to check whether the file exists.
- Create tests using test.check to load orders.
The output of the clojure.test and test.check tests will look as follows:
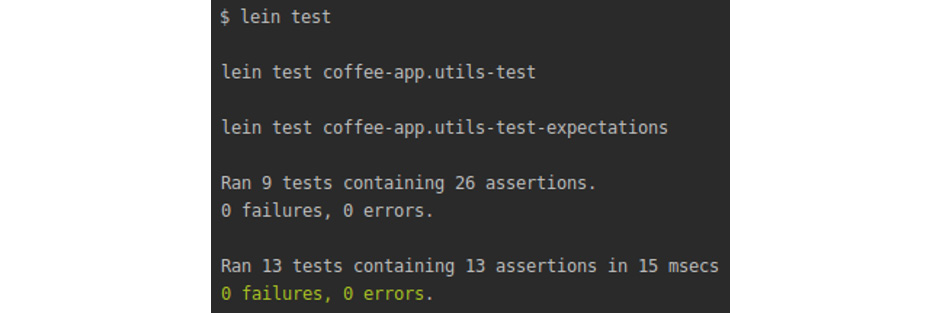
Figure 10.27: Expected output for the clojure.test and test.check tests
The output of the expectations tests will look as follows:

Figure 10.28: Expected output for the expectations test
The output of the Midje tests will look as follows:
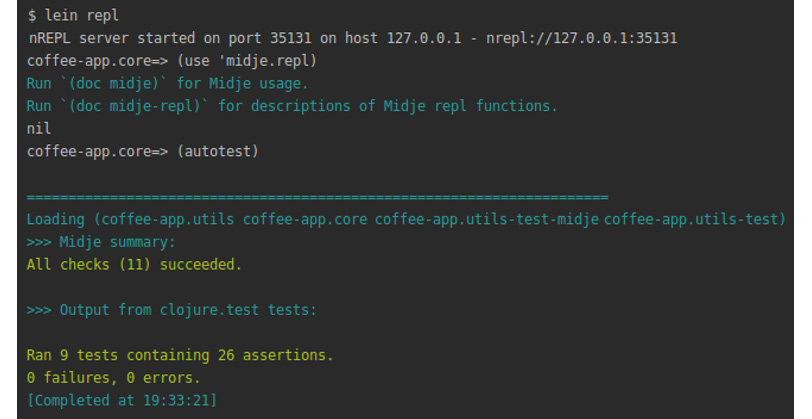
Figure 10.29: Output for the Midje tests
The output of the test.check tests will look as follows:
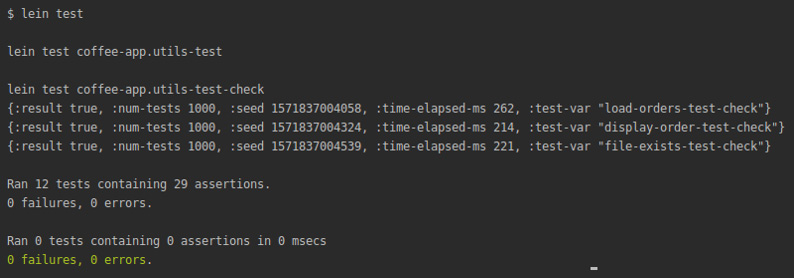
Figure 10.30: Output for the test.check tests
Note
The solution for this activity can be found on page 723.
We now know how to write unit tests in Clojure using four libraries. In the next section, we will look at testing in ClojureScript.
Testing in ClojureScript
In Clojure, we used the clojure.test library for testing. In ClojureScript, we have a port of clojure.test in the form of cljs.test. In cljs.test, we have functionality that we used when we wrote tests using the clojure.test library. We can use the is and are macros to write our tests. cljs.test provides facilities for asynchronous testing. Asynchronous testing is a type of testing that tests asynchronous code. We will see shortly why it is important that cljs.test allows us to test asynchronous code.
Synchronous code is what developers write most of the time, even without realizing this. In synchronous code, code is executed line by line. For example, the code defined in line 10 needs to finish executing before the code on line 11 can start executing. This is step-by-step execution. Asynchronous coding is a more advanced concept.
In asynchronous programming, executing code and completing the execution of code cannot happen in a line-by-line fashion. For example, we could schedule downloading a song on line 10 and then on line 11 we could have code to let the user know that downloading has finished. In synchronous code, we would have to wait for the download to finish before we can show information to the user or perform some other actions. This is not what we would really want. We would like to inform the user about the progress as we download the song. In asynchronous code, we would schedule downloading a song and start showing the progress bar before the song is downloaded.
In Java and Clojure, we would use threads to write asynchronous code. A thread is a process on a JVM that consumes little computer resources. One thread would handle downloading a song and the other would display the progress bar.
As we learned in Chapter 1, Hello REPL, ClojureScript runs on top of JavaScript. JavaScript provides a single-thread environment. This is in contrast to Java, which allows creating many threads. Writing code for one thread is simpler as we do not need to coordinate resource-sharing between many threads. ClojureScript applications requiring asynchronous code need to use some other facilities than threads.
JavaScript provides callbacks to manage writing asynchronous code. Callbacks are functions that we define to be run once certain conditions are met. In our downloading example, a callback would let us know when downloading is finished so we can inform the user.
ClojureScript provides the core.async library for working with asynchronous code. The core.async library has a number of functions and macros:
- go: Creates a block that marks the code as asynchronous. The result from the block is put on a channel.
- <!: Takes a value from a channel.
Why do we need a go block and channels?
Asynchronous code is by definition asynchronous. We do not know when we will get a return value from an asynchronous call. When we use channels for asynchronous calls, our code becomes simpler. This happens because return values are put on a channel. We do not need to manage this channel. core.async does this management for us. When we are ready, we just take value from this channel. Without explicit channel management, our code is shorter as the code can focus on simpler tasks that we program.
In the following exercise, we will see how to set up and use testing libraries in ClojureScript.
Exercise 10.05: Setting Up Testing in ClojureScript
The aim of this exercise is to learn how to set up testing libraries in ClojureScript and how to use those libraries. We will use cljs.test for testing.
In this exercise, we will create a number of folders and files. There are many ways to create folders and files. Readers are welcome to use any methods they are most comfortable with. The following steps will use the command line.

Figure 10.31: Command and it's description
- Create a project named hello-test, as follows:
mkdir hello-test
This will create a project where we will keep our code. Once we finish setting up, the project structure should look like the following screenshot. We can see the project structure using the tree command or your preferred way to check directories:
tree
The output is as follows:

Figure 10.32: Project structure
- Inside the source folder, we will keep our code:
mkdir -p src/hello_test
Executing this command will create the src and hello_test folders.
- Create a source file. In the source file, we will keep our code:
touch src/hello_test/core.cljs
This command creates an empty core file.
- Create a core namespace. Inside the core.cljs file, add a namespace:
(ns hello-test.core)
- Inside the core.cljs file, put a function for adding numbers:
(defn adder [x y ]
(+ x y))
- Create a testing folder.
We will create a folder for our testing files:
mkdir -p test/hello_test
This command will create the test and hello_test folders.
- Create the configuration.
We will keep the project configuration in the project.clj file. The file should look like the following:
(defproject hello-test "0.1.0-SNAPSHOT"
:description "Testing in ClojureScript"
:dependencies [[org.clojure/clojure "1.10.0"]
[org.clojure/clojurescript "1.10.520"]
[cljs-http "0.1.46"]
[org.clojure/test.check "0.10.0"]
[funcool/cuerdas "2.2.0"]])
This is a standard project.clj file like we created in Chapter 8, Namespaces, Libraries and Leiningen. Inside the project.clj file, we have the :dependencies key where we put the libraries that we need for testing.
The cljs-http library will allow us to make HTTP calls. We will use GET requests to make asynchronous calls that will be tested.
The cuerdas library has many string utility functions. Some of the functions are as follows:
capital: Uppercases the first character of a string. The string "john" becomes "John".
Clean: Trims and replaces multiple spaces with a single space. The string " a b " becomes "a b."
Human: Converts a string or keyword into a human-friendly string (lowercase and spaces). The string "DifficultToRead" becomes "difficult to read."
Reverse: Returns a reverted string. The string "john" becomes "nhoj."
We will write unit tests manipulating strings.
- Add a test plugin dependency. We will use the lein-doo plugin to run ClojureScript tests. Add the following line in project.clj:
:plugins [[lein-doo "0.1.11"]]
The lein-doo plugin will be used to run ClojureScript tests. This plugin will autorun tests and display test results. We will run lein-doo against a web browser environment. lein-doo relies on the JavaScript Karma library to run tests in a JavaScript environment. Karma is a JavaScript tool that helps to run JavaScript tests. We need to install the necessary dependencies for Karma.
- Install Karma. Karma is distributed using Node Package Manager (NPM). npm is an equivalent of Maven that we learned about in Chapter 8, Namespaces, Libraries, and Leiningen. Basically, it is a repository of projects. While Maven hosts Java projects, npm hosts JavaScript projects.
We will use npm to install Karma:
npm install karma karma-cljs-test –save-dev
With the -save-dev flag, we install the karma packages in the current directory. The purpose of using the -save-dev flag is to allow us to separate different test configurations between projects. One legacy project could still rely on an old version of Karma while a new project could use a newer version of Karma.
- We will install the Chrome Karama launcher. Our tests will be run (launched) in the Chrome browser:
npm install karma-chrome-launcher –save-dev
The preceding command searches npm for karma-chrome-launcher projects. When npm finds this project, it will download the Chrome launcher and install it. With the -save-dev flag, we install the karma-chrome-launcher in the current directory.
- Install the Karma command-line tool.
The final step to install the Karma libraries is to install command-line tools that allow executing Karma commands:
npm install -g karma-cli
We install Karma command-line tools globally as the ClojureScript plugin running the tests needs to access Karma commands.
- We need to set the build configuration for the test task in the project.clj file:
:cljsbuild {:builds
{:test {:source-paths ["src" "test"]
:compiler {:output-to "out/tests.js"
:output-dir "out"
:main hello-test.runner
:optimizations :none}}}}
ClojureScript build configurations are set under the :cljsbuild key in the project.clj file. We specify one :browser-test build. This build will access files from the src and test directories. The code will be compiled to the out directory to the tests.js file. The :main entry point for tests is the hello-test.runner namespace. For testing, we do not need any optimizations for compilation so we set the optimizations parameter to :none.
- Create a core test file:
touch test/hello_test/core_test.cljs
This command creates the core_test.cljs file.
- Import the testing namespaces.
The core_test.cljs file will contain the tests. We need to import the necessary namespaces:
(:require [cljs.test :refer-macros [are async deftest is testing]]
[clojure.test.check.generators :as gen]
[clojure.test.check.properties :refer-macros [for-all]]
[clojure.test.check.clojure-test :refer-macros [defspec]]
[cuerdas.core :as str]
[hello-test.core :refer [adder]]))
We import the testing macros from the cljs.test namespace. We will use them for testing our code. We also import the namespace from the test.check namespace. We will write property-based tests for our functions. The cuerdas namespace will be used to manipulate strings. Finally, we import test functions from the hello-test.core namespace.
- Create a test runner.
A test runner is a file that runs all the tests. We will test our code using the browser engine from Karma:
touch test/hello_test/runner.cljs
- Import the namespaces for the test runner.
Inside hello_test.runnerfile, we import the core testing namespace and the lein-doo namespace:
(ns hello-test.runner
(:require [doo.runner :refer-macros [doo-tests]]
(doo-tests 'hello-test.core-test)
We let lein-doo know that it needs to run tests from the hello-test.core-test namespace.
- Once we install Karma and create all the files, the project structure should look like this:
tree
The output is as follows:

Figure 10.33: Project structure after installing Karma and creating all the files
We are ready to launch the test runner.
- Launch the test runner:
lein doo chrome test
We call the lein doo plugin to run tests using the Chrome browser. Remember that JavaScript is a language that runs in browsers.
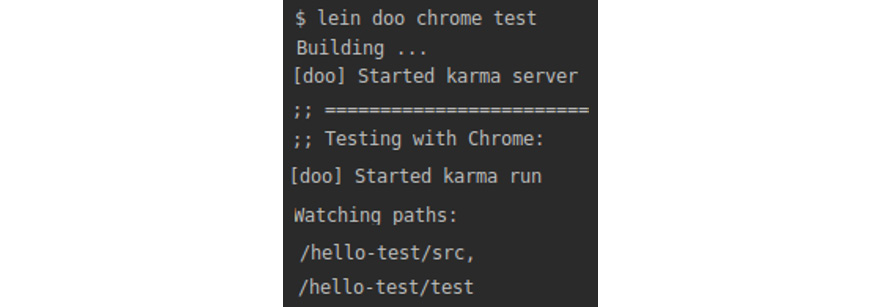
Figure 10.34: Launching the test runners
The lein doo plugin launched a Karma server for us. The server is watching the source and test directories for us. When we make changes in our ClojureScript files, the tests will run against our code.
In this exercise, we learned how to set up testing in ClojureScript. In the next exercise, we will learn how to write ClojureScript tests.
Exercise 10.06: Testing ClojureScript Code
In the previous exercise, we configured a project for ClojureScript testing. In this exercise, we will write ClojureScript tests. We will use functions from the cuerdas library that allow us to manipulate strings. We will also test the asynchronous ClojureScript code.
We will implement and test three functions:
- profanity-filter: It is common to filter certain words in chat applications or web forums. A profanity filter will remove words that we consider inappropriate.
- prefix-remover: This function will use string functions and will remove prefixes from words.
- http-caller: This function will make a HTTP call to a web address. This will help us test asynchronous code.
- Import namespaces for the core file.
Inside the core.cljs file, add the necessary namespaces:
(ns hello-test.core
(:require [cuerdas.core :as str]))
We import the cuerdas namespace for string manipulation.
- Create a profanity filter. The first function that we will write in the hello_test.core.cljs file is a profanity filter:
(defn profanity-filter [string]
(if (str/includes? string "bad")
(str/replace string "bad" "great")
string))
In this function, we test whether a passed string contains the word bad. If it does, we replace it with the word great.
- Import the test namespaces.
Inside the hello_test.core_test.cljs file, import the necessary test namespaces:
(ns hello-test.core-test
(:require [cljs.test :refer-macros [are async deftest is testing]]
[cuerdas.core :as str]
[hello-test.core :refer [profanity-filter]]))
- Write a test for the profanity-filter functions.
Inside the hello_test.core_test.cljs file, add a test for the profanity filter function:
(deftest profanity-filter-test
(testing "Filter replaced bad word"
(is (= "Clojure is great" (profanity-filter "Clojure is bad"))))
(testing "Filter does not replace good words"
(are [string result] (= result (profanity-filter string))
"Clojure is great" "Clojure is great"
"Clojure is brilliant" "Clojure is brilliant")))
The tests look similar to the ones we wrote using the clojure.test library. We use is and are macros to set testing scenarios. We are ready to run the tests.
- In order to run the tests, we call the lein doo task from the command line. If you have a lein doo running from the previous exercise, it will watch file changes and run the tests for us:
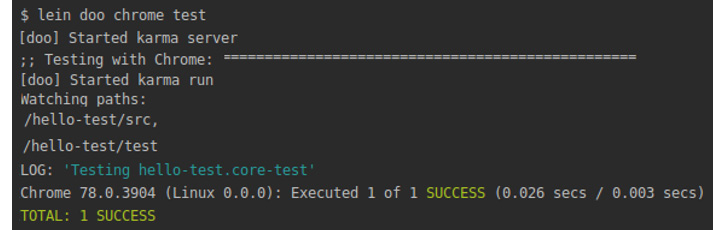
Figure 10.35: Calling the lein doo task from the command line
The profanity filter test was run. The output informs us that one test was successful.
- If you do not have lein doo running, you need to start lein doo:
lein doo chrome test
Starting the lein doo task will start watching our ClojureScript files for changes:

Figure 10.36: Starting the lein doo task
Once the lein doo is watching the changes in our file, we are ready. We are informed that the karma server has been started. The autorunner is watching for changes in the src and test directories. Any changes in these directories will result in lein doo running the tests again.
Go to hello_test.core_test.cljs, save the file, and watch the tests being executed:
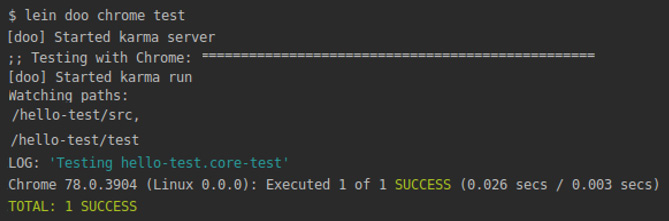
Figure 10.37: Executing the tests
We are informed that one test has been successfully executed.
- The autorunner will let us know if our tests fail. If we add the following test, the autorunner informs us that one test failed:
(deftest capitalize-test-is
(testing "Test capitalize? function using is macro"
(is (= "katy" (str/capitalize "katy")))
(is (= "John" (str/capital "john")))
(is (= "Mike" (str/capitalize "mike")))))
The test fails as follows:
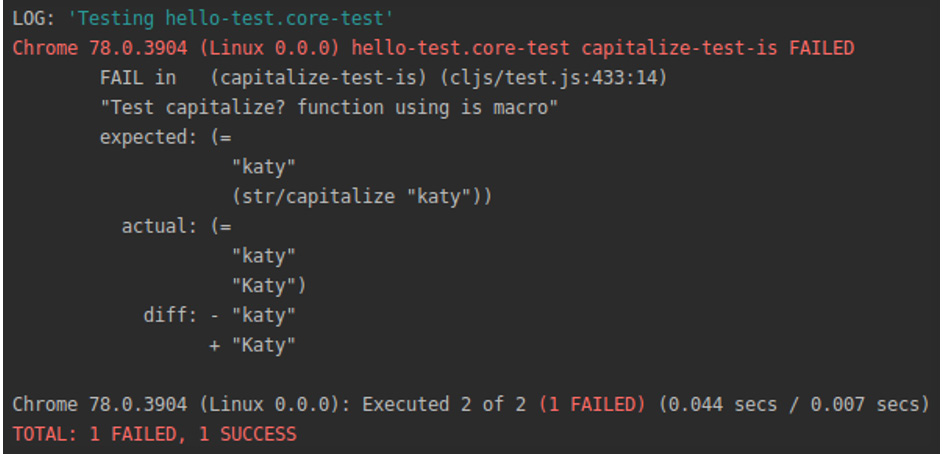
Figure 10.38: The autorunner informs us when a test fails
We see that we expected lowercase katy but the capitalize function returned Katy instead.
We will fix the test as follows:
(is (= "Katy" (str/capitalize "katy")))
In the test, we pass the lowercase string "katy" to the capitalize function from the cuerdas library. The capitalize function will uppercase the first letter, "k," and return a new string, "Katy". This new string is compared to the string Katy in a test.
As both strings, Katy and Katy, are equal, the tests will pass.
The autorunner tells us that all of the tests passed now:

Figure 10.39: All of the tests passed after we fixed the string case
- We can check for errors being thrown by our code:
(deftest error-thrown-test
(testing "Catching errors in ClojureScript"
(is (thrown? js/Error (assoc ["dog" "cat" "parrot"] 4 "apple")))))
In the preceding code, we wanted to insert an apple in the fourth index, which does not exist as we have only three elements. Remember that, in Clojure, the first index is zero so the third element in a list has an index of two. Trying to add an element at index 4 generates an error in ClojureScript. In our test, we caught this error:

Figure 10.40: The third test passes because we caught the error in our code
The autorunner tests our code and the third test passed.
- In ClojureScript, we can make requests to websites. These requests are asynchronous. We will import ClojureScript namespaces that help us to make asynchronous calls:
(ns hello-test.core
(:require-macros [cljs.core.async.macros :refer [go]])
(:require [cljs.core.async :refer [<!]]
[cljs-http.client :as http]))
The cljs-http.client namespace will allow us to make HTTP calls. Functions from the core.async namespace will manage asynchronous calls for us.
- Our HTTP function will take three arguments, a website address, HTTP parameters, and a callback function to call after we finish sending the request to the website address:
(defn http-get [url params callback]
(go (let [response (<! (http/get url params))]
(callback response))))
- We have our function making asynchronous calls. We need to import this function:
(ns hello-test.core-test
(:require [hello-test.core :refer [http-get]))
- HTTP calls happen asynchronously in ClojureScript. A GET request will run a callback function when the request finishes. This is ideal for testing asynchronous code:
(deftest http-get-test
(async done
(http-get "https://api.github.com/users" {:with-credentials? false
:query-params {"since" 135}}
(fn [response]
(is (= 200 (:status response)))
(done)))))
The async macro allows us to write an asynchronous block of code for testing. In our block, we make a GET request to GitHub API to access the list of current public users. The http-get function takes a callback function as the last parameter. In the callback, we check the response. A successful response will have the status 200.
The final function call in the callback is done. done is a function that is invoked when we are ready to relinquish control and allow the next test to run:

Figure 10.41: The fourth test is passed
Our request was successful and the fourth test passed.
- Import the namespaces for property-based testing. ClojureScript allows us to use property-based testing to check our functions:
(ns hello-test.core-test
(:require [clojure.test.check.generators :as gen]
[clojure.test.check.properties :refer-macros [for-all]]
[clojure.test.check.clojure-test :refer-macros [defspec]]))
We already know about generators and the properties used for property-based testing. With generators, we can create various types of function inputs such as numbers or strings. Properties allow us to describe the characteristics of the inputs.
The defspec macro allows us to write tests that can be run with the clsj.test library.
- With property-based tests, we can check 1,000 scenarios against our profanity filter. The structure of property-based tests in ClojureScript is the same as in Clojure:
(defspec simple-test-check 1000
(for-all [some-string gen/string-ascii]
(= (str/replace some-string "bad" "great") (profanity-filter some-string))))
With the for-all macro, we specify what properties our function parameters should have. For the profanity filter, we generate ASCII strings. ASCII, abbreviated from American Standard Code for Information Interchange, is a character encoding standard for electronic communication:

Figure 10.42: The fifth test is passed
Our fifth test passed. Furthermore, the test.check informed us that 1,000 test scenarios were executed.
In this exercise, we have seen how to set up testing in ClojureScript. We wrote functions and tested them using the cljs.test and test.check libraries. In the next section, we will see how to integrate tests with existing projects.
Testing ClojureScript Applications with Figwheel
In Chapter 9, Host Platform Interoperability with Java and JavaScript, we learned about Figwheel. Figwheel allows us to create ClojureScript applications. Most developers use Figwheel because it provides hot-code reloading. It means that any changes in our code are recompiled and the application running in the web browser is updated.
In the previous exercise, we learned how to add testing to a ClojureScript project. Figwheel comes with a testing configuration. Any Figwheel application is ready to add tests to after creating the application. Because the testing configuration is included in each project, developers save time. Developers do not need to install external tools or create the configuration; they can start writing tests straight away.
In Chapter 9, Host Platform Interoperability with Java and JavaScript, we talked about Figwheel projects in detail. As a reminder, in Figwheel, we use two concepts:
- Reactive components
- Application state management
For reactive components – HTML elements that react to user actions – we will use the Rum library. The state of the application will be kept inside an atom. Concurrency is a topic covered in Chapter 12, Concurrency. For our purposes, an atom is a data structure like a collection. We learned about collections in Chapter 1, Hello REPL!. The main difference between collections and atoms is that we can alter the value of an atom, while collections are immutable.
Exercise 10.07: Tests in Figwheel Applications
In the previous section, we learned that Figwheel supports testing ClojureScript applications. We revised the benefits of using Figwheel to create ClojureScript applications. We also reminded ourselves about important concepts in Figwheel applications, such as reactive components and application state management.
In this exercise, we will investigate how Figwheel configures projects to support testing in ClojureScript. Figwheel aims to support developers creating applications. Figwheel sets up default testing configuration for us. In Exercise 10.5, Setting Up Testing in ClojureScript, we saw how much setup is needed to configure testing in ClojureScript. With Figwheel, we do not need to write this configuration; we can focus on writing our code.
In order to write tests in Figwheel, we need to understand how Figwheel sets up the default testing configuration:
- Create a Figwheel application:
lein new figwheel-main test-app -- --rum
We created a new Figwheel project using Rum.
- Test the configuration in the project.clj file.
Figwheel puts some testing configuration in the project.clj file:
:aliases {"fig:test" ["run" "-m" "figwheel.main" "-co" "test.cljs.edn" "-m" "test-app.test-runner"]}
Inside the project.clj file, Figwheel defines aliases to help run tasks on the command line. An alias is a shortcut for commands that we use often. Using aliases saves developers typing. Figwheel defines the fig:test task.
This task runs on a command line with a number of parameters:
-m: Search a file for the main function. Remember from Chapter 8, Namespaces, Libraries, and Leiningen, that the main function in Leiningen projects is an entry point in an application. We start applications in main functions.
-co: Load options from a given file.
- Test the configuration in the test.cljs.edn file. Inside the test.cljs.edn file, we have the testing configuration:
{
;; use an alternative landing page for the tests so that we don't launch the application
:open-url "http://[[server-hostname]]:[[server-port]]/test.html"
}
{:main test-app.test-runner}
When the Figwheel application is run, it launches a web page. Figwheel provides two web pages. There is one web page for the actual application that we are developing. Also, there is a different web page for testing.
Figwheel also provides a main method inside the test-app.test-runner namespace.
- Test the runner namespace. Inside the test/test_app/test_runner.cljs file, we have code for running ClojureScript tests:
(ns test-app.test-runner
(:require
;; require all the namespaces that you want to test
[test-app.core-test]
[figwheel.main.testing :refer [run-tests-async]]))
(defn -main [& args]
(run-tests-async 5000))
First, in the file, we require the namespaces that we want to test. Initially, the only namespace to test is a test-app.core-test namespace created by default by Leiningen. If we add more files for testing, we need to import namespaces in those files. The second namespace that is required is a Figwheel namespace with a utility function.
Second, we have the -main function. This function is called by Leiningen to run tests. Figwheel provides a run-tests-async function. This means that tests are run in an asynchronous manner. This allows the tests to run faster than if run in a synchronous manner. They run faster because the tests do not need to wait for other tests to finish before they can be started.
- Inside the test/test_app/core_test.cljs file, we have autogenerated tests by Figwheel:
(ns test-app.core-test
(:require
[cljs.test :refer-macros [deftest is testing]]
[test-app.core :refer [multiply]]))
Figwheel first requires the cljs.test namespace with macros that we are familiar with. The tests will use macros such as deftest, is, and testing.
The second namespace required is the test-app.core namespace. This namespace, from the source directory, contains the implementation for a multiply function.
- Inside the core_test.cljs file, we have two autogenerated tests:
(deftest multiply-test
(is (= (* 1 2) (multiply 1 2))))
(deftest multiply-test-2
(is (= (* 75 10) (multiply 10 75))))
Both tests use the familiar is macro. With the is macro, we test whether calling the multiply function is equal to the expected output. Multiplying 1 by 2 should equal calling the multiply function with two arguments: 1 and 2.
- Run the default tests. When we create a new application based on Figwheel, the application has some default tests. Straight after creating the application, we can run the default tests:
lein fig:test
The output is as follows:
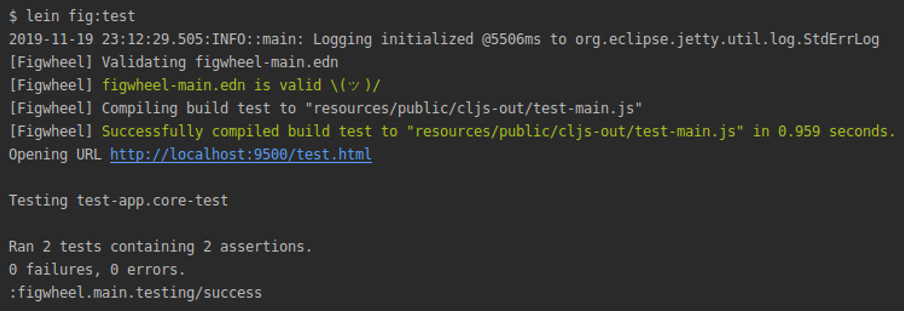
Figure 10.43 Using the fig:test command to run tests
We use Leiningen to launch Figwheel. In order to run tests, we use the fig:test command-line task. This task will read the Figwheel configuration from the project.clj file and run tests according to the configuration.
We saw two default tests in the previous steps. Both tests pass and we are informed about the tests passing.
- The selling point of Figwheel is hot-code reloading. In order to get an interactive development environment, run the following:
lein fig:build
This will launch Figwheel, which autocompiles code for us:
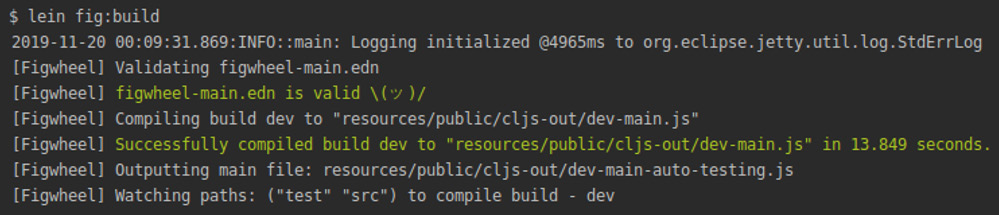
Figure 10.44: Figwheel validates the configuration on the figwheel-main.edn file
Figwheel reads and validates the configuration on the figwheel-main.edn file. Then, if compiles our source code to the dev-main.js file. The test code is compiled to the dev-auto-testing.js file.
- With Figwheel, we can see a summary of our tests in a browser. Go to http://localhost:9500/figwheel-extra-main/auto-testing:
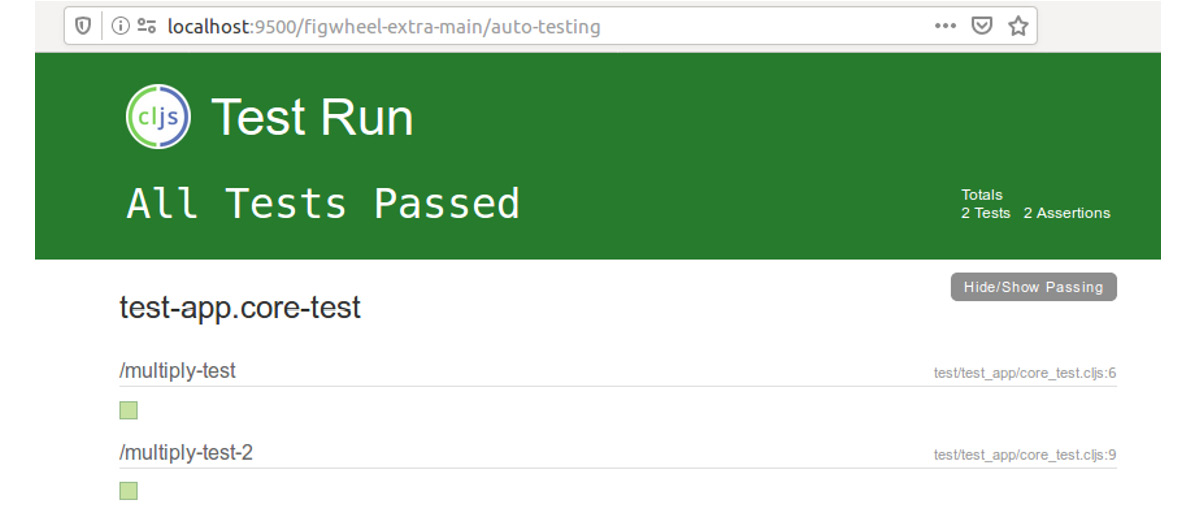
Figure 10.45: All tests passed
Figwheel informs us that all tests have passed. We have a summary displaying which tests were run.
In this exercise, we learned how Figwheel supports testing in ClojureScript. We saw the default testing configuration provided by Figwheel. In the next exercise, we will see how to add tests to a Figwheel application.
Exercise 10.08: Testing a ClojureScript Application
The aim of this exercise is to learn how to test ClojureScript applications. Often, front-end code is complex. The state of an application in the browser changes. User interactions result in many unpredictable scenarios. Having ClojureScript tests for frontend applications helps us to catch bugs early.
In the previous chapter, we learned about the Figwheel application template. It is a very common template for writing frontend applications in ClojureScript. We will create an application that will react to user actions. When a user clicks on the action button, we will increment a counter.
Initially, the count will be zero:

Figure 10.46: The initial number of clicks is zero
After six clicks the count will change:

Figure 10.47: The count changes to six
We know what our application will do. We are ready to implement the functionality now.
- Create a Figwheel application:
lein new figwheel-main test-app -- --rum
We created a new Figwheel project using Rum.
- In the previous section, we learned that Figwheel supports testing. After creating a project, we are already set to run tests:
lein fig:test
The output is as follows:
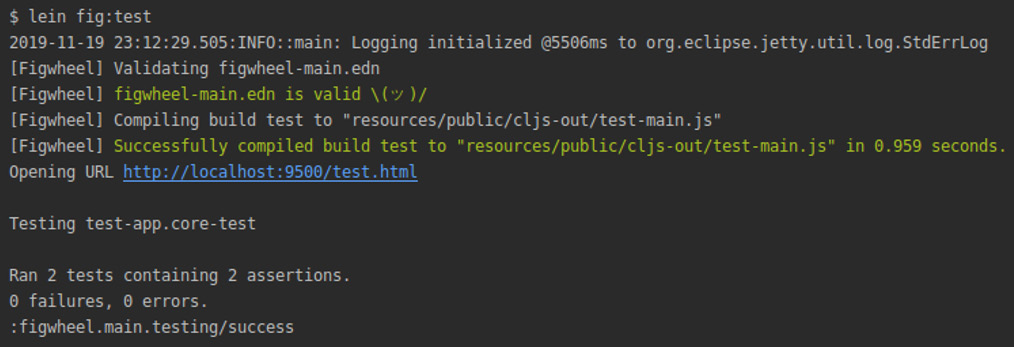
Figure 10.48: Two tests containing two assertions are passed
Figwheel compiles our code and runs the tests. We test the tet-app.core-test namespace. The two tests pass.
- We will implement a function to handle user clicks inside the src/test_app/core.cljs file:
(ns test-app.core)
(defn handle-click [state]
(swap! state update-in [:counter] inc))
The handle-click function has one parameter. The parameter is the current application state. We increment the value stored in the atom under the :counter key.
- We will store the state application in an atom in the core.cljs file:
(ns test-app.core)
(defonce state (atom {:counter 0}))
The atom is a hash with the :counter key. The initial value of the key is zero.
- Create the counter component.
We create a Rum component that will display the number of mouse clicks:
(rum/defc counter [number]
[:div {:on-click #(handle-click state)}
(str "Click times: " number)])
The component displays the number of clicks, which is passed as an argument. Inside the component, we use the handle-click function to respond to :on-click actions. Whenever a user clicks on the component, the handle-click function is called.
- Create a page component. We will put the counter component inside the page-content component. It is good practice to have a main component on the page where we will put all our components. In our example, we have one component:
(rum/defc page-content < rum/reactive []
[:div {}
(counter (:counter (rum/react state)))])
The container uses Rum's reactive directive. This directive instructs Rum to handle the component in a special manner. Reactive components will react to changes to the application state. Whenever there is a change to the application state, the component will be updated and redisplayed in the browser using the new application state. We learned about reactive components in Chapter 9, Host Platform Interoperability with Java and JavaScript, and refreshed our memory in the section preceding this exercise.
- Finally, we need to attach our page-component to a web page. As we did in Chapter 9, Host Platform Interoperability with Java and JavaScript, we use the mount method from Rum:
(defn mount [el]
(rum/mount (page-content) el))
The page-content component is mounted to the web page.
- Run the application.
We will run our Figwheel application:
lein fig:build
This command will launch Figwheel for us:
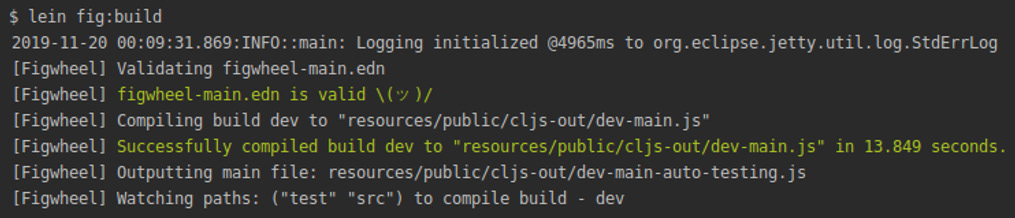
Figure 10.49: Launching the Figwheel
Figwheel successfully launches our application. We can see the page in the browser. It will look as follows:

Figure 10.50: The number of clicks at the start of the application
When the application starts, the number of clicks is zero. After six clicks, the state is updated and a new value is displayed on the page:

Figure 10.51: The updated number of clicks
We see that the component on the page reacts to our actions. It is time to write tests for the handle-click function.
- We will create fixtures for our tests. A test fixture is a fixed state of a set of objects used as a baseline for running tests. The purpose of a test fixture is to ensure that there is a well-known and fixed environment in which tests are run so that results are repeatable.
Because we will manipulate the state of an application, we want the state to be the same every time we run our tests. We do not want previous tests to influence subsequent tests.
The handle-click function takes a state atom as an argument. In order to test the handle-click function, we need a state atom. cljs.test provides the use-fixtures macro, which allows us to preset tests to the required state before tests are run. This is a good place to create a state atom for further manipulation.
We will put our tests inside the core_test.cljs file:
(ns test-app.core-test
(:require
[cljs.test :refer-macros [are deftest is testing use-fixtures]]
[test-app.core :refer [handle-click multiply]]))
(use-fixtures :each {:before (fn [] (def app-state (atom {:counter 0})))
:after (fn [] (reset! app-state nil))})
With the :each keyword, we specify that we want the fixtures to be run for each test. This way, we can set the state for each test. An alternative would be to use the :only keyword, which would set up fixtures only once per test.
In the fixtures, we have two keys:
:before: Runs a function before the test is executed
:after: Runs a function after the test is executed
In :before and :after, we set the state of the application's atom. Before each test, we set :counter to zero. After each test, we reset the application state to nil. Setting the counter to zero resets it. This way, every time we run a new test, the counter is started from zero. Previous tests will not influence subsequent tests.
After setting up fixtures, we are ready to launch the test runner.
- Test the handle-click function.
We will test handling multiple clicks:
(deftest handle-click-test-multiple
(testing "Handle multiple clicks"
(are [result] (= result (handle-click app-state))
{:counter 1}
{:counter 2}
We use the are macro to simplify testing. We compare the expected result to the return value of calling the handle-click function. Calling handle-click three times should increase the counter to three.
- We will run the tests now:
lein fig:test
The output is as follows:
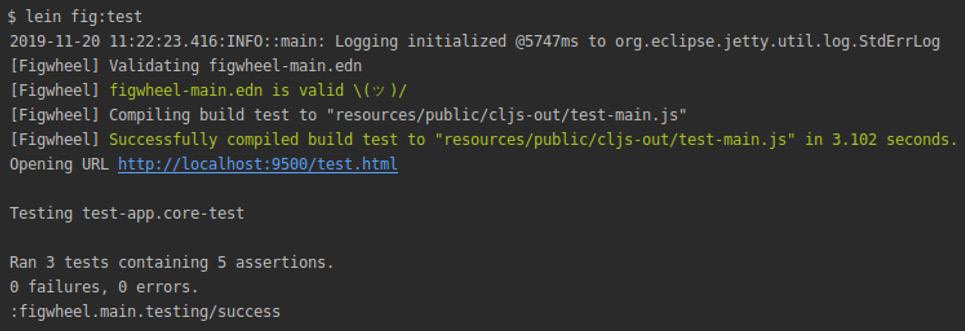
Figure 10.52: Running the tests
As we see in the summary, the tests pass. The handle-click test used app-state, which we set up using the use-fixtures macro. Before each test, the fixtures created an application state. After each test, the fixtures should reset the state to zero. We will write a new test to check whether the application state is reset.
- In the following test, we will test a single click:
(deftest handle-click-test-one
(testing "Handle one click"
(is (= {:counter 1} (handle-click app-state)))))
In this test, we use the is macro to test a single click.
- We will run the tests again:
lein fig:test
The output is as follows:
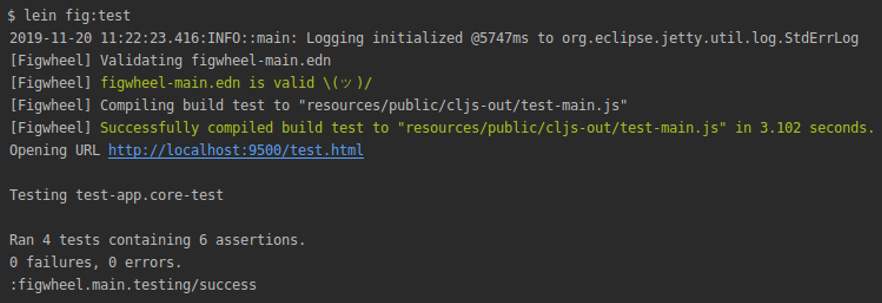
Figure 10.53: Running the tests again
Running the new test tells us that the state has been reset. We see that our test passed as the application state has been reset successfully.
In this exercise, we learned how to integrate testing into ClojureScript applications. We created a project using the Figwheel template. This template allowed us to create a web application. In the application, we added user interaction. The application counted the number of clicks. We wrote tests to make sure that our functions perform as expected.
You are ready to start writing web applications and adding tests to them. In the following activity, you will put your new knowledge to use.
Activity 10.02: Support Desk Application with Tests
The aim of this activity is to add a testing suite to a web application. Many applications require complex functionality and many features. While manual testing can catch many bugs, it is time-consuming and requires many testers. With automated testing, checking applications are faster and more features can be tested. ClojureScript provides tools to help with unit testing.
In the previous chapter, we wrote a support desk application that allowed us to manage issues raised with the help desk (https://packt.live/2NTTJpn). The application allows you to sort issues and resolve them when they are done. By sorting the issues, we can raise the priority of the issue. In this activity, we will add unit tests using clsj.test and test.check for property-based testing.
You will write tests for the following:
- A function displaying the sort message status
- A function filtering the list of issues by priority
- A function sorting the list of issues
- A function deleting an item from the issues list
These steps will help you complete the activity:
- Add the testing dependencies to the project.clj file.
- Import the namespaces to the core_test.cljs file.
- Create fixtures with issues in the application state.
- Write tests for the sort message function, cljs.test.
- Write tests for the sort message function using test.check.
- Write tests to filter issues by priority function using cljs.test.
- Write tests to sort the issues list using cljs.test.
- Write tests to delete issues from the list using cljs.test.
- Write tests to handle the sort function using cljs.test.
The initial issues list will look as follows:
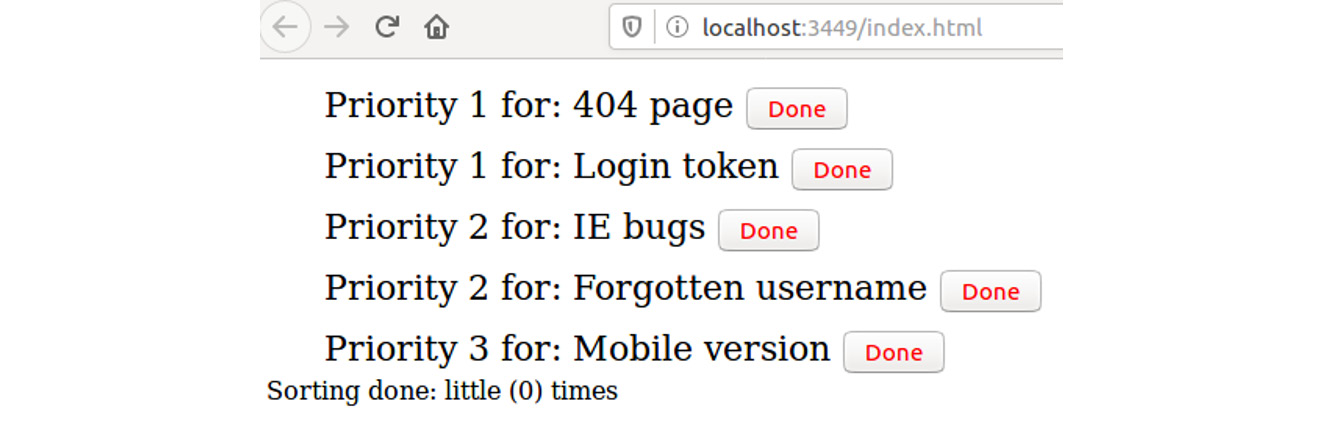
Figure 10.54: List of initial issues
The issues list after sorting will look as follows:
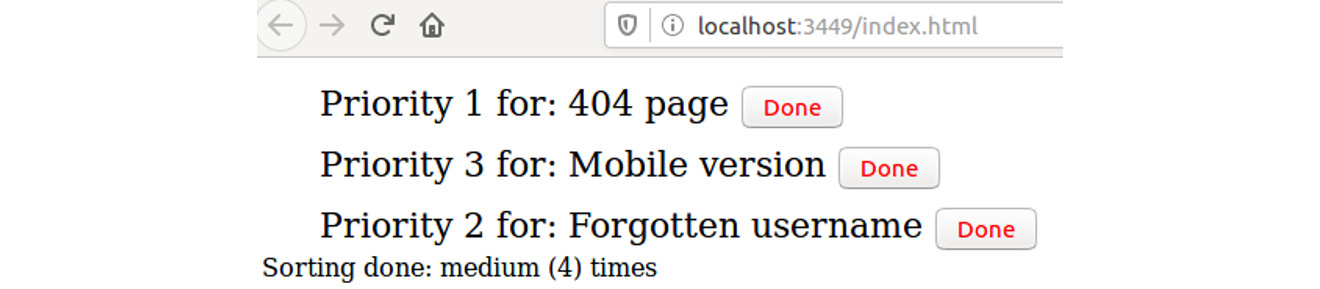
Figure 10.55: List after sorting
When the tests are run, the output should look like the following:
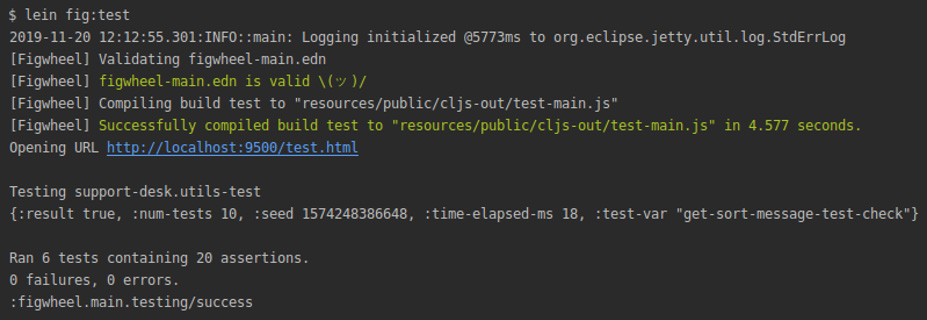
Figure 10.56: Output after running the tests
Note
The solution for this activity can be found on page 730
Summary
In this chapter, we learned about testing in Clojure. First, we explored why testing is important. We looked at some of the benefits, such as reduced maintenance costs and bug fixing. We also learned what testing methodologies are available. We focused on unit testing as this is the most common type of test written by developers.
Next, we explored four testing libraries available in Clojure. We started with the standard clojure.test library, which provides a rich set of testing features. The second library we learned about was Expectations. It allows us to write concise tests as it focuses on readability.
The Midje library allowed us to explore top-down test-driven development (TDD). We created a test for the main function and stubs for functions that would be implemented in the future. TDD allows us to focus on testing functions' features without worrying about implementing all of the subfunctions used.
The last library used was test.check, which introduced us to property-based testing. With property-based tests, we describe the properties of function arguments in a general form. This allows tests to generate input based on such properties. With this type of test, we can run thousands of test scenarios with a few lines of code. There's no need to enumerate every single test case.
In the second part of this chapter, we learned about testing in ClojureScript. We saw that the cljs.test library provides us with features comparable to the clojure.test library. With clsj.test, we were able to test ClojureScript code. We also looked at macros, allowing us to test asynchronous ClojureScript code. We also set up an autorunner to run ClojureScript tests automatically when our code changes.
Finally, we worked through two activities that allowed us to use our testing knowledge in projects. We wrote tests using libraries we learned about for applications developed in previous chapters.
In the next chapter, we will learn about macros. Macros are a powerful feature that allows us to influence the Clojure language.