
In this chapter we will create and connect to an Apache Derby instance on your local machine. We will also create and use a connection pool for efficient database interactions, and create and load a database schema. We will then create, read, update, and delete data using clojure.java.jdbc.
By the end of this chapter, you will be able to implement an application layer sitting on top of a database instance, ingest data from a CSV file on disk, and write it to the database via an application layer API.
Introduction
So far, we have been interacting with Comma-Separated Values (CSV) files from disk and in memory with no persistence. Each time we restart our REPL, we lose all the data manipulation or ELO calculations we've made up to that point and must restart from scratch. If there were a means of persisting this state each time, we could begin where we left off last time. Indeed, we could imagine building an ELO calculation application with a web interface or even a ClojureScript frontend once we've established a means of persistent storage so that our progress is maintained from session to session.
When considering persistence, most applications will reach for a relational database implementation (for example, MySQL, Oracle, or PostgreSQL). There are many implementations to choose from, each with their own strengths and weaknesses.
We'll use Apache Derby as an on-disk Relational Database Management System (RDBMS). It is implemented entirely in Java, meaning there is minimal setup required for our use case, giving us more time to focus on the topics of data modeling, persistence, and retrieval. The function of the RDBMS is to manage the storage of our data across our user-defined tables, allowing queries to be executed across them. It is relational as it supports relations across these tables. For example, a driver owning one or more cars could be represented as a Driver table and a Car table, with a reference linking them. We'll cover the means of describing this relation in the Creating Database Schemas section later.
Going into a little more detail about our potential ELO calculation application, there are numerous topics to consider when it comes to persistence. We'll need to determine what data we want to store, and then determine the model that best describes that data and any relations between different parts of the model. There are constraints we'll have to consider; for example, how will we uniquely identify the entities we're persisting? This will be codified in our database schema using the Data Definition Language (DDL).
With a schema defined, we need a means of inserting, retrieving, updating, and deleting data. Since Apache Derby is a Structured Query Language (SQL)-based RDBMS, this is the most appropriate means of interacting with the database for these purposes. We'll construct SQL commands that cover each of the preceding requirements. These commands will understand the underlying data model, how the relations are constructed, and how to access the relevant parts of the model we're interested in. Apache Derby will execute the SQL commands for us and return the result.
In terms of interacting with this database from Clojure, we'll primarily use clojure.java.jdbc, which is a longstanding, stable, low-level library for talking to databases using Java Database Connectivity (JDBC).
It should be noted that the maintainers of this library have created a successor, next.jdbc, with a focus on simplicity and performance. An interesting task for you would be to take the examples provided here and rework them to conform to the next.jdbc API.
Connecting to a Database
As alluded to previously, we'll be leveraging JDBC for all our database interactions. JDBC allows a Java client to connect to an RDBMS using a well-defined Application Programming Interface (API). This API gives us a clear contract between ourselves (the client) and our database (the server). Since Clojure sits atop the Java Virtual Machine (JVM), JDBC is the natural choice for us.
For those familiar with JDBC, you'll have encountered the (occasionally unwieldy) JDBC URL. These URLs vary depending on the RDBMS, where the database is located, and how it is secured, among other things. In essence, they are a database connection descriptor.
Fortunately, clojure.java.jdbc abstracts this away with its concept of db-spec (a database specification). db-spec is a simple map structure holding details pertinent to the connection we're looking to make. This db-spec structure can then be passed to any clojure.java.jdbc API call and it will build the connection for us behind the scenes. This specification is fairly broad and can take many different forms. We'll touch on a few as we progress.
An important point to note is that clojure.java.jdbc expects the driver of your target database to be available on the classpath prior to making an API call. The driver acts as a means of converting your JDBC-based API calls into something your RDBMS understands. Each RDBMS will, therefore, have its own specific driver. Without this, any database operations will throw an exception.
For example, if we were to define a deps.edn with only the clojure.java.jdbc dependency, and then attempt a jdbc/query operation, this would be the result:
{:deps {org.clojure/java.jdbc {:mvn/version "0.7.9"}}}
(require '[clojure.java.jdbc :as jdbc])
Here, we encounter our first concrete db-spec definition. This is the DriverManager form of db-spec and is the preferred format for clojure.java.jdbc:
(def db {:dbtype "derby" ;; the type of RDBMS
:dbname "derby-local" ;; the DB as it will be stored on disk
:create true ;; essential on first interaction
})
Breaking down our db-spec definition, we're interacting with an Apache Derby database (this is the driver we're looking for). We're naming our database derby-local in the current working directory. The :create true flag will create the database file if it does not already exist:
user=> (jdbc/get-connection db)
The output is as follows:

Figure 13.1: Error due to no driver being added
Encountering this is generally an indication that you have not added the driver to your deps.edn file or equivalent.
The Releases and Dependencies section of the clojure.java.jdbc GitHub page contains links to drivers for popular RDBMSes. Once the appropriate driver version has been located, add it to your deps.edn file. Consider the following example:
{:deps {org.apache.derby/derby {:mvn/version "10.14.2.0"}}
As you can see, Apache Derby provides a package containing its database implementation alongside an embedded driver, meaning we don't need an explicit driver dependency in our project.
Exercise 13.01: Establishing a Database Connection
In this exercise, we will connect to a local on-disk database:
- We'll begin by setting up our dependencies. Create a file named deps.edn in your current working directory and paste in the following content:
{:deps
{org.apache.derby/derby {:mvn/version "10.14.2.0"}
org.clojure/java.jdbc {:mvn/version "0.7.9"}}}
It should be noted, at the time of writing, that Apache Derby version 10.15.1.3 is available. This should not be used with clojure.java.jdbc 0.7.9! The maintainer of clojure.java.jdbc advises that it is untested against 10.15.x.
- Require clojure.java.jdbc and alias (a temporary name) it as jdbc for convenience:
user=> (require '[clojure.java.jdbc :as jdbc])
nil
- Here, we use the db-spec definition from the preceding introduction. Introduce a concrete instance of a db-spec definition:
user=> (def db {:dbtype "derby"
:dbname "derby-local"
:create true})
=> #'user/db
- Test that we can obtain a connection to this database:
user=> (jdbc/get-connection db)
The output is as follows:

Figure 13.2: Obtaining a connection to the database
Note
The preceding output is the toString representation of our connection. The content is of no real consequence as we are not concerned with the internal representation of the connection object.
Great! We have a means of creating an Apache Derby instance on disk and have established a connection successfully. This db-spec definition is, therefore, valid and can be used anywhere the db-spec definition is accepted.
Note
Any time we wish to remove our local database and start over, we can do so by removing the directory matching our database name in our current working directory.
Introduction to Connection Pools
Although it's convenient for clojure.java.jdbc to create our database connections for us (it does this on each API call when we pass it a db-spec definition), there is a resulting performance overhead we should be aware of. This can become burdensome as establishing a connection (particularly to a remote machine) can often take many times longer than our query will actually take to execute! This is, therefore, an expensive operation that we'd like to avoid. Connection pooling is one such way of avoiding this overhead.
When we talk of a connection pool, we're essentially talking about establishing one or more connections ahead of time and making them available to our application anytime a database connection is required. In this way, we deal with the connection overhead once on application startup and benefit from connection reuse from that point onward.
clojure.java.jdbc does not itself offer a connection pooling implementation, but it does integrate well with a number of pooling libraries, including c3p0 and hikari-cp. We'll focus on hikari-cp as it is a Clojure wrapper for the lightning-quick hikariCP connection with a super-simple API.
hikari-cp provides an API that allows us to construct a connection-pooled data source; we can use this to construct an alternative db-spec definition to use in place of our DriverManager based db-spec with no other changes required. hikari-cp will manage the pool of connections for us.
Exercise 13.02: Creating a Connection Pool
In this exercise, we will create an alternative db-spec definition that can be used in place of the one created in Step 3 of Exercise 13.01, Establishing a Database Connection. The benefit will be an increase in the speed of database interactions since a connection does not need to be established afresh for each interaction:
- Add the hikari-cp dependency into our application:
{:deps
{hikari-cp {:mvn/version "2.8.0"}
org.apache.derby/derby {:mvn/version "10.14.2.0"}
org.clojure/java.jdbc {:mvn/version "0.7.9"}}}
- Now, depending on our precise needs, we have a few different means of constructing a valid data source. When we are starting from scratch and are expected to create the database as well as establish a connection, then we will need to reach for the appropriate JDBC URL. The Apache Derby URLs are less troublesome than others to construct and follow this simple syntax:
jdbc:derby:[subprotocol:][databaseName][;attribute=value]
Note
More details on Derby JDBC database connection URL can be found at https://packt.live/2Fnnx9f.
- Given this, we can define our db-spec definition (using the datasource format) like so:
user=> (require '[clojure.java.jdbc :as jdbc]
'[hikari-cp.core :as hikari])
nil
user=> (def db {:datasource (hikari/make-datasource {:jdbc-url "jdbc:derby:derby-local;create=true"})})
=> #'user/db
To break this down, we're connecting to an Apache Derby instance where the database is named derby-local. You will recall that create=true instructs the database to be created if not already present.
- Alternatively, if we know the database already exists, then the create=true flag will not be required. We could amend the JDBC URL or allow hikari-cp to build it for us:
(def db {:datasource
(hikari/make-datasource {:database-name "derby-local"
:datasource-class-name "org.apache.derby.jdbc.EmbeddedDataSource"})})
Note that, here, we are required to specify the datasource-class-name, which, in this case, is the embedded version, since we're running locally.
- Regardless of the means we've used to construct our data source, we can pass this to the clojure.java.jdbc library as an alternative db-spec definition:
(jdbc/get-connection db)
The output is as follows:

Figure 13.3: Printing the output
We've now defined and tested two different db-spec formats successfully, demonstrating the flexibility offered by clojure.java.jdbc. It should be noted that a considerable number of alternatives are also acceptable, including :connection-uri (a JDBC URL) and :connection (an already established connection, rarely required).
Note
You can refer to http://clojure.github.io/java.jdbc/#clojure.java.jdbc/get-connection for full details of the supported db-spec definition.
To summarize, clojure.java.jdbc is flexible in what it consumes. Therefore, we'll be working with a connection-pooled data source as we start to interact more seriously with our newly created database.
Creating Database Schemas
We have our database connection. Before we begin to persist and query data, we must define our database model, or "schema" as it is more commonly known. This will take the form of the following:
- Tables
- Fields/columns within tables
- Relationships across tables
Let's consider the example of a sports activity tracker, which our tennis superstars might use in their spare time. We'd like to store application users and activities. Let's look at how we could model those using two tables.
The app_user table will store the first name, surname, height, and weight. The activity table will store the date, activity type, distance, and duration.
Primary Keys
It's important to note that there is nothing unique in the information we're storing. How would we correctly load a user's height and weight when we only have their name to query on? For example, multiple users could be created with the same name, and then we'd run into issues regarding correct ownership of activities.
We need to introduce primary keys to each of our tables. These are unique to each row and could be constructed and added to our insert statements; however, it is useful to leverage a feature of Apache Derby where it can allocate a unique ID on our behalf, and then communicate that back to us on insertion.
Adding GENERATED ALWAYS AS IDENTITY to a column definition will instruct Apache Derby to auto-allocate a monotonically increasing integer ID on the insertion of each new row in our table. This removes any overhead we might have in constructing one and guarantees its uniqueness.
Foreign Keys
When considering an activity, we can observe that one cannot exist without the prior existence of an app_user; that is, an activity must reference an existing entry in the app_user table. This is where the concept of a foreign key comes in.
A foreign key is a means of creating a relationship between a parent table and a child table. We can define a foreign key in our activity table, which references the primary key of our app_user table. When we create an activity, we must have the primary key of the app_user table available to us such that we can add it to our activity. With this linkage/relationship in place, we can then construct a query for all activities belonging to a user, for example.
The definition of a simple foreign key would look like this:
<foreign key field name> <foreign key type> REFERENCES <parent table>
Additionally, we generally add ON DELETE CASCADE to this definition, indicating that entries in the child table should be deleted when the corresponding entries are deleted from the parent table. This is important if the entry in the activity table cannot exist as a standalone entity; that is, it only makes sense in the context of its association with an app_user.
Exercise 13.03: Defining and Applying a Database Schema
Given our table requirements mentioned previously, we'll now codify those using DDL (that is, the actual SQL commands we'll use to create these structures):
- Representing this in DDL, we will have something like this:
(def create-app-user-ddl "CREATE TABLE app_user (
id INT GENERATED ALWAYS AS IDENTITY CONSTRAINT USER_ID_PK PRIMARY KEY,
first_name VARCHAR(32),
surname VARCHAR(32),
height SMALLINT,
weight SMALLINT)")
=> #'user/create-app-user-ddl
(def create-activity-ddl "CREATE TABLE activity (
id INT PRIMARY KEY GENERATED ALWAYS AS IDENTITY,
activity_type VARCHAR(32),
distance DECIMAL(5,2),
duration INT,
user_id INT REFERENCES app_user ON DELETE CASCADE)")
#'user/create-activity-ddl
Note
Each of our preceding symbols is suffixed with -ddl. This is the syntax that's typically used for describing database schemas.
- clojure.java.jdbc provides a helper function of sorts that can construct a DDL statement for us. Although, the only real benefits for our use case are the ability to switch the format of the entities (table names, column names, and types) as well as the usage of keywords in place of parts of the manually constructed string. The equivalent function execution that would generate the create-app-user-ddl is as follows:
(def create-app-user-ddl-2 (jdbc/create-table-ddl :app_user
[[:id :int "GENERATED ALWAYS AS IDENTITY CONSTRAINT USER_ID_PK PRIMARY KEY"]
[:first_name "varchar(32)"]
[:surname "varchar(32)"]
[:height :smallint]
[:weight :smallint]]
{:entities clojure.string/lower-case}))
- Looking at the clojure.java.jdbc API, we may intuitively expect that we can execute these DDL statements using the jdbc/execute! function. We can (this approach will work for the creation of single tables), however, if we wish to create more than one table, make use of db-do-commands, which accepts one or more command statements to be executed within a transaction:
user=> (jdbc/db-do-commands db [create-app-user-ddl create-activity-ddl])
=> (0 0)
Note
Rerunning the preceding command results in an error indicating the table already exists.
The output is as follows:

Figure 13.4: The execution error
It should be noted that, in general, using CREATE TABLE IF NOT EXISTS is sufficient to avoid this. However, Apache Derby does not support this syntax. Avoidance of this error would involve writing custom code to do the following:
- Attempt a SELECT statement from said table and detect a table does not exist error before performing the creation of the table.
- Attempt the creation and gracefully handle the table already exists error message.
- Leverage a migration library such as Migratus to keep track of the schema updates that we've applied up to this point, and automatically apply new changes as we introduce them.
In summary, we now have the ability to define our database schema using DDL and can apply this schema to our database, ready for data ingestion.
Managing Our Data
When dealing with persistent storage, and services that interact with them, we usually encounter the term CRUD, which stands for Create, Read, Update, and Delete. These are the four primary operations we can expect to perform against our database. clojure.java.jdbc exposes an API that directly maps to each of those operations, as we'd expect any good database library to do.
The following commands describe each of the CRUD operations and the appropriate API call to use in clojure.java.jdbc. Note that the tables, columns, and values are arbitrary and only serve to show the format of the call.
For creating an entry in the example table, we will set col1 to the numeric value 42 and col2 to the string value "123":
(jdbc/insert! db-spec :example {:col1 42 :col2 "123"})
We can read or extract an entry from the example table where the id value of the row is 13:
(jdbc/query db-spec ["SELECT * FROM example WHERE id = ?" 13])
To update the row with an ID of 13, we will set col1 to the numeric value 77 and col2 to the string value "456":
(jdbc/update! db-spec :example {:col1 77 :col2 "456"} ["id = ?" 13])
Delete or remove an entry from the example table with ID 13:
(jdbc/delete! db-spec :example ["id = ?" 13])
It should be noted that these functions have multiple arities, where the optional last argument is a map of SQL options. We'll cover these options as we are introduced to each function in turn.
Also of note is the ! suffix on three of the API calls. This is conventionally (but not always!) used to indicate that the function itself will perform a side effect. In the functional programming world, this can be deemed important enough to draw extra attention to.
Inserting, updating, and deleting will indeed result in a side effect – that of changing the persistent storage in some way. A query, by contrast, is a simple read function and will have no effect besides data retrieval.
Inserting Data
We'll cover the C in CRUD first. Indeed, we can't do anything exciting with our database until it's populated with some data.
Recall our two database tables, app_user and activity, and the relationship between them. Our foreign key reference stipulates that an activity cannot exist without the prior existence of an app_user. The creation of an activity must, therefore, reference an entity in the app_user.
Inserting Single Rows
jdbc/insert! operates in two modes, accepting either a map of column-value pairs or accepting a vector of columns and a vector of values. Let's explore the differences between both modes.
Firstly, using map mode, the structure of our insert command and the associated return value will be:
user=> (jdbc/insert!
<db-spec>
table name keyword>
{<column_name> <column_value>
..})
({:1 1M})
The equivalent in vector mode is as follows:
user=> (jdbc/insert!
<db-spec>
<table name keyword>
[<column name> ..]
[<column value> ..])
(1)
Note
It is possible to omit the vector describing the column names. This would require us to insert values using the column order of the table as it was created. However, it is not possible to do this with Apache Derby when one or more of the columns is autogenerated.
Although entirely equivalent in terms of the rows created in the database, you'll notice the return values differ.
In the first case, we are returned a single-element sequence containing a map. The value associated with the :1 key is the ID that's been generated and persisted along with the row that we've just inserted. That's handy; we can use that when persisting any further rows in tables that require this as a foreign key. Without the automatic return of the generated ID, we'd need to submit a separate query to the database to retrieve it.
In the second case, we again get a single-element sequence – this time containing an integer. It may be tempting to assume that the integer corresponds to a generated ID; this would be incorrect – the integer instead tells us the number of rows affected. jdbc/insert! only supports the insertion of a single row; this integer will always be 1 and is, therefore, of little use.
A few important points should be noted here. The "generated ID" or "generated key" format is RDBMS-specific. If we were to swap in MySQL instead, we'd find our return value would be of the following form:
({:generated_key 1})
We should, therefore, be careful about how we process these return values and be cognizant that a change of database could result in broken code.
The ({:1 1M}) return value looks a little curious. Keywordized integers are perfectly valid – they're just not encountered particularly often. Apache Derby obviously has no concept of Clojure keywords; clojure.java.jdbc is (helpfully) keywordizing our return keys by default.
This segues nicely into some of the options we can pass to any of the CRUD API calls, namely:
- keywordize? (Boolean, defaults to true)
- identifiers (function, defaults to identity)
If we are happy to receive our keys as is, then we can switch keywordization off:
user=> (jdbc/insert! db :app_user {:first_name "Andre" :surname "Agassi" :height 180 :weight 80} {:keywordize? false})
({"1" 1M})
Inserting Multiple Rows
insert-multi! (like insert!) works in two different modes. It accepts a collection of maps or a collection of vectors. The overall result of calling either is identical, but there are key differences that you need to be aware of.
We've already covered the "generated ID" (when working with maps) versus "rows affected" (when working with vectors) return values. This also holds true when working with insert-multi!.
In addition, we should be aware that doing multiple inserts in vector mode will execute the inserts in batched transactions. This is more performant when doing a large number of inserts.
The following code demonstrates insert-multi! in map and vector mode:
user=> (jdbc/insert-multi!
<db-spec>
<table name keyword>
[{<column name> <column value> ..}
{<column name> <column value> ..}])
({:1 1M} {:1 2M})
(jdbc/insert-multi!
<db-spec>
<table name keyword>
[<column name> ..]
[[<column value> ..] [<column value> ..]])
=> (1 1)
Again, note the return values indicating that we've allocated IDs 1 and 2 to the inserted rows.
We can insert partial records using either map or vector mode. When working with map mode, we simply omit any unwanted key-value pairs. In vector mode, we must specify the column names, and then insert nil values as required.
Exercise 13.04: Data Insertion
Let's begin by creating entries in each of the tables we've defined, ensuring we respect the foreign key constraint:
- Inserting our favorite tennis player of the 1990s as an app_user can be achieved with either of the following function calls. We recommend choosing one of these to avoid spurious duplicates in our data:
user=> (jdbc/insert!
db
:app_user
{:first_name "Andre"
:surname "Agassi"
:height 180
:weight 80})
({:1 1M})
user=> (jdbc/insert!
db
:app_user
[:first_name :surname :height :weight]
["Andre" "Agassi" 180 80])
(1)
Note
When considering the existing state of the database, the 1M value for our generated key can differ since it represents the next unique integer value.
- We've inserted our first record successfully. Let's now create several activities and associate them with our app_user, Andre. This will allow us to exercise the jdbc/insert-multi! API call:
user=> (jdbc/insert-multi!
db
:activity
[{:activity_type "run" :distance 8.67 :duration 2520 :user_id 1}
{:activity_type "cycle" :distance 17.68 :duration 2703 :user_id 1}])
({:1 1M} {:1 2M})
When inserting data, there are several considerations to keep in mind. If inserting a single row, use insert!. If inserting multiple rows, use insert-multi!. If we are interested in the generated keys, then we should favor map insertion mode. If, on the other hand, performance is critical, we may favor vector insertion mode. When inserting a mixture of full and partial rows, then the reader may use their personal preference of map versus vector mode.
Querying Data
In order to view what we've persisted in our database thus far, we'll consider the R in CRUD. Reading, or querying, data is very simple. At its most basic, we just need our db-spec definition along with a vector containing a SQL string.
Exercise 13.05: Querying Our Database
Here, we'll cover the variety of options that we have available to us when querying the data we inserted as part of the prior exercise:
- To find what we have in our app_user and activity tables, the following will suffice:
user=> (jdbc/query db ["select * from app_user"])
({:id 1, :first_name "Andre", :surname "Agassi", :height 180, :weight 80})
user=> (jdbc/query db ["select * from activity"])
({:id 1, :activity_type "run", :distance 8.67M, :duration 2520, :user_id 1}
{:id 2, :activity_type "cycle", :distance 17.68M, :duration 2703, :user_id 1})
As alluded to in the Managing Our Data introduction, there is a 3-arity definition of jdbc/query, accepting a map of options. Since we have not provided that (we used the 2-arity version here) we have accepted all the default options. We'll now explore those options and how they can be used to manipulate the result set.
Consider the preceding return values. We're returned a sequence of maps by default, where the keys are lowercase keywords.
Of the options that are supported, the first three we'll cover are trivial and allow us to control the format of the keys returned are keywordize?, identifiers, and qualifier.
- Setting keywordize? to false gives us string keys. Identifiers can be overridden by providing a single-arity function that converts the key to our chosen format. For example, retrieving data where the keys are uppercase strings can be achieved using these options (and clojure.string):
{:keywordize? false :identifiers str/upper-case}
user=> (require '[clojure.string :as str])
=> nil
user=> (jdbc/query db ["select * from app_user"] {:keywordize? false :identifiers str/upper-case})
({"ID" 1, "FIRST_NAME" "Andre", "SURNAME" "Agassi", "HEIGHT" 180, "WEIGHT" 80})
qualifier only works when keywordize? is true (the default) and allows us to specify a namespace for our keywords. Our keys are then returned in the form:
:<qualifier>/<column name>
user=> (jdbc/query db ["select * from app_user"] {:identifiers str/upper-case :qualifier "app_user"})
(#:app_user{:ID 1, :FIRST_NAME "Andre", :SURNAME "Agassi", :HEIGHT 180, :WEIGHT 80})
- For those not familiar with the preceding format, this indicates that we have a map where our keyword namespace is homogenous (every key has the same app_user namespace). More explicitly, we can see the individual keys from that query:
user=> (-> (jdbc/query db ["select * from app_user"] {:identifiers str/upper-case :qualifier "app_user"})
first
keys)
=> (:app_user/ID :app_user/FIRST_NAME :app_user/SURNAME :app_user/HEIGHT :app_user/WEIGHT)
- In the same way, we can insert data using (sequences of) maps or (sequences of) vectors. We can control the maps versus vectors result format in our queries as well. In the preceding code, we see maps as the default and can alter this by passing the following options map:
{:as-arrays? true}
The output is as follows:
user=> (jdbc/query db ["select * from activity"] {:as-arrays? true})
[[:id :activity_type :distance :duration :user_id]
[1 "run" 8.67M 2520 1]
[2 "cycle" 17.68M 2703 1]]
Thinking back to the chapter where we first interacted with CSV files, you may recognize this as the same data structure used for reading from or writing to a CSV file; that is, a sequence of vectors where the first vector corresponds to the columns of the file and subsequent vectors are the data entries of the file.
Manipulating Query Return Values
Besides manipulating the format of the return values, there are two additional options that give us complete control over each individual row returned by the query, or over the result set as a whole. We provide these using the :row-fn or :result-set-fn options; these can be combined if required.
The row-fn option should be a single-arity function, where the sole argument is a map representation of the current row. Similarly, the result-set-fn option should be a single-arity function where the sole argument is a sequence of maps representing the entirety of the query result. Consider the following example.
(defn custom-row-fn [row]
)
(defn custom-result-set-fn [result-set]
)
There are no constraints in what our functions can do, besides returning a value in the same data structure we received as input.
It should be noted that the result-set-fn option you pass should not be lazy; otherwise, the connection could be closed before the function completes. reduce (or a function that calls reduce under the hood) is a good choice here.
Exercise 13.06: Controlling Results with Custom Functions
Examples, where the row-fn would be applicable, include performing some calculation or aggregation that would be clumsy to achieve in raw SQL, formatting values, and enriching each row with computed values.
Combining all three of these use cases, let's consider our activity table, specifically the duration column. This is an integer value measuring the number of seconds of the activity in question. For the purposes of display or reporting to a user, we may find it more user-friendly to quote this in hours, minutes, and seconds:
- Defining a row-fn where the sole argument is a map representation of a row and that generally speaking the row should be returned, with any manipulation applied:
(defn add-user-friendly-duration
[{:keys [duration] :as row}]
(let [quot-rem (juxt quot rem)
[hours remainder] (quot-rem duration (* 60 60))
[minutes seconds] (quot-rem remainder 60)]
(assoc row :friendly-duration
(cond-> ""
(pos? hours) (str hours "h ")
(pos? minutes) (str minutes "m ")
(pos? seconds) (str seconds "s")
:always str/trim))))
#'user/add-user-friendly-duration
- Now adding that to our SQL options map and re-running the activity query from Exercise 13.05, Querying Our Database:
user=> (jdbc/query db ["select * from activity"]
{:row-fn add-user-friendly-duration})
({:id 1, :activity_type "run", :distance 8.67M, :duration 2520, :user_id 1, :friendly-duration "42m"}
{:id 2, :activity_type "cycle", :distance 17.68M, :duration 2703, :user_id 1, :friendly-duration "45m 3s"})
- Let's now calculate the total distance traveled across all activities in the database. This could trivially be achieved via raw SQL, but nevertheless will give us an opportunity to explore alternatives.
We'll define our function as follows:
(fn [result-set]
(reduce (fn [total-distance {:keys [distance]}]
(+ total-distance distance))
0
result-set))
- When used along with our query, we predictably retrieve a single number representing total distance across all activities:
user=> (jdbc/query db ["select * from activity"]
{:result-set-fn (fn [result-set]
(reduce (fn [total-distance {:keys [distance]}]
(+ total-distance distance))
0
result-set))})
26.35M
- To demonstrate how row-fn and result-set-fn can work together, we could use a row-fn to extract the distance, then a much simpler result-set-fn to sum those numbers like so:
(jdbc/query db ["select * from activity"]
{:row-fn :distance
:result-set-fn #(apply + %)})
=> 26.35M
Through these last two exercises, we see clojure.java.jdbc gives us complete control over our query results, directly within the API call. Regardless of our requirements, we can leverage the options to the jdbc/query function to achieve the result we want, with custom formatting.
Updating and Deleting Data
Finally, we come to the U and D in CRUD; updates and deletes. These are simpler operations than the previous two and can be covered much more concisely.
When the state of the world we're modeling has changed, we'll want to reflect that in our persisted data. Before we perform our update, we determine the following:
- The table(s) affected
- The new values we wish to set
- The subset of data we want to have those values
The signature of jdbc/update! gives us these pointers if we were not already aware:
(update! db table set-map where-clause opts)
Exercise 13.07: Updating and Removing Existing Data
Let's assume we discover that Andre Agassi has lost 2 kg. We can surmise that we'll be updating the app_user table, setting the weight to 78 kg where the first name and last names are Andre and Agassi (or where the ID is 1; we may have this available to us from earlier queries):
- Construct the update! function call as follows:
user=> (jdbc/update! db :app_user {:weight 78} ["first_name = 'Andre' and surname = 'Agassi'"])
=> (1)
Note
Updates (and deletes), when successful, will only ever return the number of rows affected.
- If we query the app_user table, we expect this new fact to be persisted:
user => (jdbc/query db ["select * from app_user"])
=> ({:id 1, :first_name "Andre", :surname "Agassi", :height 180, :weight 78})
- Now, we could imagine a case where Agassi has removed his account from our activity tracking service and requested that his data be deleted. We have a function signature as follows:
(delete! db table where-clause opts)
- We can construct a function call that will remove Agassi and all his activities from our database:
user=> (jdbc/delete! db :app_user ["first_name = 'Andre' and surname = 'Agassi'"])
=> [1]
Interestingly, the number of rows affected is reported as 1. Since we set an ON DELETE CASCADE option, we expected that all Andre's activities would also be removed. Let's verify that is indeed the case:
user=> (jdbc/query db ["select * from activity"])
=> ()
As we can see, Andre's activities have been removed. We can, therefore, conclude that the rows affected will only ever correspond to those removed from the target table.
Introduction to the Application Layer
Until now, we've been creating ad hoc functions, testing them out at the REPL, occasionally creating a namespace or two that brings them together. We can think of the application layer as bringing all those namespaces and functions together into a working, coherent application with an associated API. In essence, we are designing the backend of our application in this step. We will then learn how to expose that API via REST in the next chapter; it will be useful to bear that in mind as we design our application.
When designing our application layer, it makes sense to take a step back and ask what our requirements are. If we consider the activity tracking application, we might realistically have the following high-level requirements:
- Create a new user.
- Create an activity for a given user.
- Query users and activities.
- Run reports across individual users (that is, by activity or time period).
Implementing the preceding requirements would give us a functional (albeit limited) application that users could begin interacting with to track activities and measure their fitness.
Since we've already demonstrated most of this functionality as we learned how to interact with a database, we can leverage a lot of the code we've already written, making it more generic as we go.
We could structure the preceding application in a number of different ways, depending on our own individual views on the logical split that makes the most sense. We could spend a number of hours in the design phase, working out the exact project structure before we write any code; however, we would prefer to propose a starting structure, begin fleshing it out, and take an agile/evolutionary approach to develop this simple application.
Exercise 13.08: Defining the Application Layer
We'll look to create our backend/application layer here; defining our namespaces and exposing an appropriate API.
Looking at the requirements we have, I'd suggest the following namespaces:
- schema: Our data models
- ingest: Single user and activity ingestion
- query: General queries for users and activities, plus more complex report queries
Again, remembering that we'd ideally layer on a REST service on top, imagine a top-level web or api namespace that will be interacting with the preceding namespaces and the public functions within.
Before proceeding with this exercise, add the following to your deps.edn file or similar:
{:deps {..
semantic-csv {:mvn/version "0.2.1-alpha1"}
org.clojure/data.csv {:mvn/version "0.1.4"}}
Starting with a clean database, we'll begin by defining our ns schema, containing our DDL definitions that we'll expand slightly to support our reporting requirement. Notably, we've added an activity_date field to the activity table, allowing us to report on activities across time:
- Define our namespace, including our jdbc and hikari requirements:
(ns packt-clj.fitness.schema
(:refer-clojure :exclude [load])
(:require
[clojure.java.jdbc :as jdbc]
[hikari-cp.core :as hikari]))
Note the use of (:refer-clojure :exclude [load]) in the previous code. This is not essential, but will suppress a warning that we're replacing a function from clojure.core when we come to define our own load function next. The warning we'd experience without this line would be as follows:
WARNING: load already refers to: #'clojure.core/load in namespace: packt-clj.fitness.schema, being replaced by: #'packt-clj.fitness.schema/load
- Now, define our jdbc-url parameter and create a hikari connection-pooled data source. This db variable will be referenced and used throughout this exercise whenever we load our schema, insert rows, or query rows from our database:
(def ^:private jdbc-url "jdbc:derby:derby-local;create=true")
(def db {:datasource (hikari/make-datasource {:jdbc-url jdbc-url})})
- We'll now create our app_user and activity DDL:
(def ^:private create-app-user-ddl "CREATE TABLE app_user (
id int GENERATED ALWAYS AS IDENTITY CONSTRAINT USER_ID_PK PRIMARY KEY,
first_name varchar(32),
surname varchar(32),
height smallint,
weight smallint)")
(def ^:private create-activity-ddl "CREATE TABLE activity (
id INT PRIMARY KEY GENERATED ALWAYS AS IDENTITY,
activity_type VARCHAR(32),
distance DECIMAL(7,2),
duration INT,
activity_date DATE,
user_id INT REFERENCES app_user ON DELETE CASCADE)")
- Finally, we'll bring this all together under a load function, which will apply our database schema (that is, our DDL) to the database referenced by our JDBC URL, via a connection pool:
(defn load
[]
(jdbc/db-do-commands db [create-app-user-ddl create-activity-ddl]))
Notice that some of our variables are defined as private, meaning that referencing them outside of the schema namespace is not required (or permitted). We make reference to them indirectly by calling the public load function. Note that schema/load is the only function in this ns that makes up our public API. The db var is public and we'd expect to reference it when making any queries or ingesting data.
- Now for our ingestion code, where we'll allow the creation of individual users and activities:
(ns packt-clj.fitness.ingest
(:require
[clojure.java.jdbc :as jdbc]))
(defn user
[db app_user]
(first (jdbc/insert! db :app_user app_user)))
(defn activity
[db activity]
(first (jdbc/insert! db :activity activity)))
Note
jdbc/insert! returns a one-element sequence. We can, therefore, call first on the result of each insert statement to save our callers some work.
- This is our query code where we'll expand a little on what we've written before:
(ns packt-clj.fitness.query
(:require
[clojure.java.jdbc :as jdbc]))
(defn all-users
[db]
(jdbc/query db ["select * from app_user"]))
(defn user
[db user-id]
(jdbc/query db [(str "select * from app_user where id = " user-id)]))
- Expand on the all-activities function as follows:
(defn all-activities
[db]
(jdbc/query db ["select * from activity"]))
(defn activity
[db activity-id]
(jdbc/query db [(str "select * from activity where id = " activity-id)]))
(defn activities-by-user
[db user-id]
(jdbc/query db [(str "select * from activity where user_id = " user-id)]))
- Now, let's add our more advanced query definitions to the query namespace. We'll introduce the medley and java-time dependencies into our project and require them in our ns query before creating a function that determines the most active user:
{:deps {..
clojure.java-time {:mvn/version "0.3.2"}
medley {:mvn/version "1.2.0"}}
(ns packt-clj.fitness.query
(:require
[clojure.java.jdbc :as jdbc]
[java-time :as t]
[medley.core :as medley]))
medley is a third-party convenience library that provides commonly required functions that would otherwise be constructed using components of clojure.core:
- The most-active-user function would look as follows:
(defn most-active-user
[db]
(jdbc/query
db
["select au.first_name, au.surname, a.duration from app_user au, activity a where au.id = a.user_id "]
{:row-fn (fn [{:keys [first_name surname duration]}] {:name (str first_name " " surname)
:duration duration})
:result-set-fn (fn [rs]
(->> rs
(group-by :name)
(medley/map-vals #(apply + (map :duration %)))
(sort-by val)
last))}))
- Finally, we'll create a function that will calculate our single-user activity report by month:
query.clj
41 (defn monthly-activity-by-user
42 [db user-id]
43 (jdbc/query
44 db
45 [(str "select au.first_name, au.surname, a.duration, a.activity_type, a.distance, a.activity_date from app_user au, activity a where au.id = a.user_id and a.user_id = " 1)]
46 {:row-fn (fn [row] (update row :activity_date t/local-date))
47 :result-set-fn (fn [rs]
48 (reduce
49 (fn [acc {:keys [activity_date activity_type distance duration first_name surname] :as row}]
50 (let [month-year (t/as activity_date :month-of-year :year)]
The complete code can be referred at: https://packt.live/37G4naC
- Now that we have an application layer defined, we can begin interacting with the functions we've exposed in each of our namespaces. We should see they read and return results in an intuitive manner. In order to make use of our API, require and alias each of our namespaces:
(require '[packt-clj.fitness.ingest :as ingest]
'[packt-clj.fitness.schema :as schema]
'[packt-clj.fitness.query :as query])
- We must load our schema to our empty database, being careful to drop any child tables before their parents:
user=> (jdbc/execute! schema/db ["drop table activity"])
[0]
user=> (jdbc/execute! schema/db ["drop table app_user"])
[0]
user=> (schema/load)
(0 0)
- Now, let's define a handful of users and persist them to the database:
user=> (def users [{:first_name "Andre"
:surname "Agassi"
:height 180
:weight 80}
{:first_name "Pete"
:surname "Sampras"
height 185
:weight 77
}
{:first_name "Steffi"
surname "Graff"
:height 176
:weight 64}])
#'user/users
user=> (doseq [user users]
(ingest/user schema/db user))
nil
Note our use of doseq in the preceding code. doseq can be used to iterate over a collection when we are not interested in the result (as we are when using map). Since we are iterating over a collection purely for side effects, we cannot be lazy about this operation as there is no guarantee we'd ever persist every user.
Familiarize yourself with the sample-activities.csv file, which contains 20 randomly generated activities for each of the three users we've just persisted. Note how the structure of the file does not map perfectly to our schema and consider potential methods we could use to parse the CSV file into a format that our ingest/activity function would support.
One method would be to define a map where the keys are precisely those that meet our schema requirements. If the values were then single-arity functions that would extract the relevant data from a given row, we could apply each of these in turn, generating a map that conforms to our schema.
- Define the accessor map as follows:
user=> (def accessors
{:activity_type :type
:distance :distance_metres
:duration :duration_seconds
:user_id :userid
:activity_date (fn [{:keys [day month year]}] (str year "-" month "-" day))})
user=> #'user/accessors
Note how all but the activity_date accessor is performing a simple rename. activity_date is doing a (very slightly!) more complex operation, extracting multiple fields from a row and combining them into one. We could imagine extending this to perform arbitrarily complex parsing and data extraction.
- An apply-accessors function is required to actually take a row, an accessor map, and return the schema-conforming map:
user=> (defn apply-accessors
[row accessors]
(reduce-kv
(fn [acc target-key accessor]
(assoc acc target-key (accessor row)))
{}
accessors))
=> #'user/apply-accessors
reduce-kv can be used to iterate over the key-value pairs in our accessor map.
- With our accessors and our apply-accessors functions defined, we can now read our CSV file and parse to a form that matches our activity table schema:
user=> (require '[semantic-csv.core :as sc]
'[clojure.data.csv :as csv]
'[clojure.java.io :as io])
=> nil
user=> (def activities
(->> (csv/read-csv (io/reader "resources/sample-activities.csv"))
sc/mappify
(map #(apply-accessors % accessors))))
user=> #'user/activities
Inspecting our first entry, we see that it does indeed look as we expect:
user=> (first activities)
=> {:activity_type "swim", :distance "5100.00", :duration "9180", :user_id "1", :activity_date "2019-01-22"}
- We can now persist these activities in the same manner that we did for persisting our users:
user=> (doseq [activity activities]
(ingest/activity schema/db activity))
=> nil
- Finally, let's exercise our queries in turn and verify the results:
user=> (count (query/all-users schema/db))
=> 3
user=> (count (query/all-activities schema/db))
=> 60
user=> (query/user schema/db 1)
=> ({:id 1, :first_name "Andre", :surname "Agassi", :height 180, :weight 80})
user=> (query/activity schema/db 1)
=>
({:id 1,
:activity_type "swim",
:distance 5100.00M,
:duration 9180,
:activity_date #inst"2019-01-22T00:00:00.000-00:00",
:user_id 1})
user=> (count (query/activities-by-user schema/db 1))
=> 20
user=> (query/most-active-user schema/db)
=> ["Pete Sampras" 136680]
user=> (clojure.pprint/pprint (query/monthly-activity-by-user schema/db 3))
The output will look as follows:
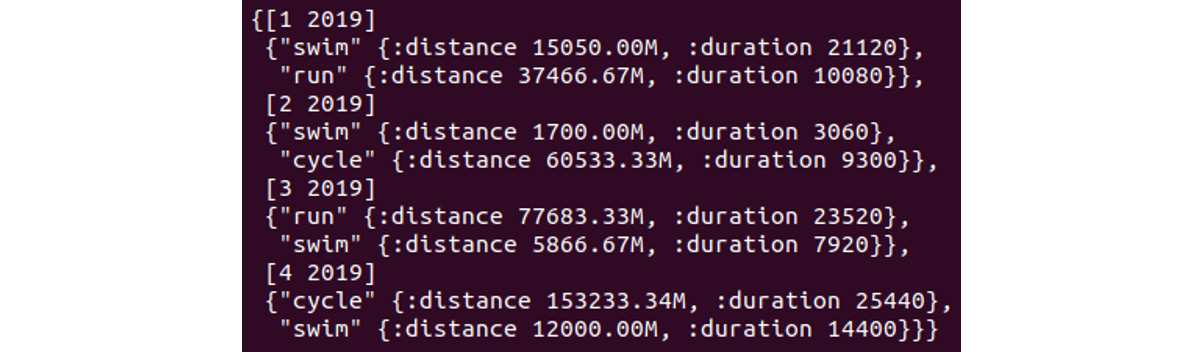
Figure 13.5: Output on verifying the results
We've now created the backend of our application, logically separating the various functions our application comprises. We've created a database, loaded our schema, and then ingested and retrieved data. This demonstrates a typical application life cycle, and hopefully we could imagine a REST service or mobile app sitting on top of this API we've constructed.
Activity 13.01: Persisting Historic Tennis Results and ELO Calculations
Given your experience with historic tennis results and ELO calculations, you've been hired by Tennis Analytics Ltd. They have a large CSV file that is difficult to work with; they'd like the competitor data to be modeled and persisted to a database. Once ingested, they would like to perform ELO calculations across the entire dataset maintaining a full ELO history. The ultimate goal is to find the competitor with the best ELO rating for a historic dataset.
These steps will help you complete the activity:
- Add the required dependencies to your deps.edn file or equivalent.
- Create the packt-clj.tennis.database, packt-clj.tennis.elo, packt-clj.tennis.ingest, packt-clj.tennis.parse, and packt-clj.tennis.query namespaces.
- In the database namespace, define a connection pool, referencing a new tennis database on disk, and store it in the db var.
- Define a database player table using DDL consisting of the id (provided in the CSV file) and full_name fields.
- Define a tennis_match table consisting of the id (a composite ID can be constructed from the CSV file), tournament_year, tournament, tournament_order, round_order, match_order, and winner_id (a foreign key referencing the player ID from the table in Step 4) fields.
- Define an elo table consisting of the id (can be autogenerated), player_id (foreign key referencing the player ID from the table in Step 4), and rating fields.
- Create (and execute) a load function that will apply the DDL from Steps 4-6 to our database defined in Step 3.
In the parse namespace, define a historic function that accepts a string representing a file path on the local disk. This function should read the CSV file from disk; convert the file to a sequence of maps; iterate over each row in turn; extract the fields pertinent for our players and matches data structures (fields will not necessarily be extracted exactly as-is; that is, some additional parsing or formatting will be required); and build up a data structure, ultimately returning a map of the following form:
{:players [<player 1> ...]
:matches [<match 1> ...]}
Here, players and matches are maps that conform to the schema we've created.
Helper functions should be defined as required. Some suggestions of functions that could prove helpful include being a means of parsing a row into a winning-player, losing-player, and match column, and being a means of defining the mapping of target-key function to the row-extraction function for each of the preceding structures.
Note
We should be cautious to avoid defining unique players multiple times. We should also be aware that the match_id column in the CSV file is not unique! An appropriate composite should be constructed.
- In the ingest namespace, define a historic function that accepts a db-spec definition and a string representing a path/filename on the local disk. This function should pass the file path to the function defined in step 8, destructure the players and matches, and then perform insert-multi! on each in turn.
Note
Players must be ingested prior to matches to ensure we satisfy our foreign key constraints.
- Copy the match_scores_1991-2016_unindexed_csv.csv CSV file into the resources directory, and then ingest all player and match data from this file using the historic function from Step 8.
Note
The match_scores_1991-2016_unindexed_csv.csv CSV file can be found on GitHub at https://packt.live/30291NO.
- Now we have our data ingested, we'd like to calculate the ELO value for all historic matches, storing the ELO rating as we go. In the query namespace, define an all-tennis-matches function that accepts db-spec and returns the contents of the tennis_match table. This should be sorted appropriately by tournament_year, tournament_order, reverse round_order, and match_order to ensure we're calculating ratings chronologically.
- We'll now leverage two of the functions we've already met in Chapter 5, Many to One: Reducing, namely match-probability and recalculate-rating. Introduce those to the elo namespace.
- In the elo namespace, define a new calculate-all function that accepts db-spec and retrieves all tennis matches using query/all-tennis-matches (ordered chronologically, as described in Step 10), and then iterates over this dataset, calculating the ELO rating for each match, returning a collection of elo ratings that conform to the schema of the elo table.
- Define a simple function that takes the result of the calculate-all function call and persists it into the elo table. Call this function to persist our ELO calculations.
- Finally, define a select-max-elo function (we are interested in the player who has the highest ELO rating) in the query namespace, which returns a result in the following form:
{:max-rating …
:player-name …}
On executing this, we should see a familiar name!
Note
The solution for this activity can be found on page 745.
Summary
This chapter gave us an introduction to the Apache Derby RDBMS, creating a locally hosted instance with minimal setup. We then explored data models and how to codify them into a schema using DDL. We used clojure.java.jdbc to load this schema before investigating how the API allows us to perform CRUD operations, spending time on how to control the results from our query executions.
We then built an application layer for our ELO calculation application. In doing so, we learned which functions to expose as part of our API and which are internal to our application and should be kept private from a user.
In the next chapter, we'll take the public API of our application layer and learn how to build a REST-based web service to expose that API over HTTP. In this way, we can make calls from a REST client and interact with our application over a network, rather than via a locally hosted REPL.
Subsequently, we'll improve this RESTful interaction by adding a higher-level UI layer so that a user can interact with our service via a web browser.