
CHAPTER 8
Advanced User Management
Plone is a powerful and flexible system not only for web content management but also for user management. Plone stores all its users inside the Zope Object Database (ZODB) in a separate user list; however, you may need to use another service, such as a relational database that manages your users' information. Thanks to Plone's pluggable authentication service (PAS), you can use other services to authenticate your users. The most common alternative system is LDAP, which we will discuss in this chapter. Of course, if you don't have any special requirements, you can just use Plone as it is, with users and groups stored in the ZODB.
Note that you don't need to write any code to integrate your Plone site with another application for user management. As you will see in this chapter, you only have to install the product. Then you will be able to configure your service to authenticate your users directly from Plone without dealing with the ZMI—all with just a couple of clicks! You can also create new plug-ins, if you use different user sources.
In this chapter, first we will introduce some basic concepts about how the authentication service works in Plone. After that, you will see how it is possible to attach Plone to LDAP or relational databases.
Caution In this chapter, you will be playing around with the acl_users folders inside a Plone site. Never delete or alter the acl_users folder in the root of your Zope instance. If you do that and your user folder breaks for some reason (the server goes down, for example), your entire site will be blocked, and you will no longer be able to get any access, even as an administrator. So, make sure you change only the user folder in the Plone site!
In any case, if you have locked yourself out of your Plone site, don't worry, because you can perform a little rescue mission. The page http://plone.org/documentation/faq/locked-out explains how to create a new user without having a manager user account for newer versions, for nonbuildout versions, and for old versions of Zope.
The Pluggable Authentication Service (PAS)
The PAS is Plone's built-in user authentication system. It takes care of user authentication, asks users to log in if needed, allows you to search for users and groups, determines the groups to which a user belongs, and is responsible for extracting credentials from the request and many other things.
It is not built as a monolithic service, but rather it is implemented by several components, called plug-ins, that provide the interfaces needed by the PAS. The concepts behind the extreme modularity of the PAS come from the Zope Component Architecture.
In case you are not familiar with this powerful architecture, we'll start with a brief introduction to the concept of interfaces in PAS. What kind of functionality does the PAS need? Surely, it needs at least authentication functionality, extraction, properties functionality, and roles and groups membership, as you will see later. For each functionality needed by PAS, there is one or more plug-ins, which are small components that provide interfaces related to a specific functionality. The interface describes the PAS functionality; it's like the interface is a contract between two parts (the PAS infrastructure and the plug-in). Essentially, the plug-in promises to provide certain functionalities, and the PAS system knows how to interact with the plug-in thanks to the interface.
Now we'll give you a bit more of a technical definition of interface: it is a class with a set of declarations (attributes or methods) that have to be implemented by the object that will declare to provide this interface. So, if you have an object that provides an interface, this object is supposed to work as specified in the interface. That is why interfaces are commonly referred to as contracts; you'll find a similar concept of interfaces in the Java programming language.
What are the advantages? As the Zope Component Architecture teaches, having small and simple components helps in the readability of code, offers maintainability, and allows each component to be better tested. The same considerations apply to PAS and the plug-ins' architecture. There are one or more content components for the storage feature (that is, where users are stored, as in the Zope Object Database, LDAP, relational database, and so on), one or more registered extraction plug-ins for the extraction interface needed by the PAS (how users authenticate), and so on. For each PAS functionality, you can register one or more plug-ins providing that feature needed by PAS.
Why, you may ask, would you want to register one or more plug-ins for the same feature? We'll answer that by providing a simple example. The extraction feature allows PAS to detect how users authenticate, extracting credentials from a request. By default, credentials are taken from HTTP cookies, HTTP login form data, or basic HTTP authentication, but you can also use other methods to authenticate users. For instance, if you want to authenticate users through an IP address, you only have to write a new PAS plug-in providing the extraction interface and plug it in. You're done! Having more than one plug-in for the same functionality also allows you to present users with various authentication methods; the PAS will try the authentication methods in the order you specify, such as HTTP cookie, then HTTP login form, then basic HTTP authentication, and so on. Situations such as these are why Plone allows one or more plug-ins to provide the same feature.
The PAS in Plone
Where is the PAS in Plone? Newer versions of Plone provide a PAS-based user folder by default. If you have an old version of Plone (2.1.x and older; you should have at least version 2.5.x), you will have to install the Plone PAS products manually. In all cases, you can find the PAS-based user folder by going into the ZMI and clicking the acl_users tool (as shown in Figure 8-1).
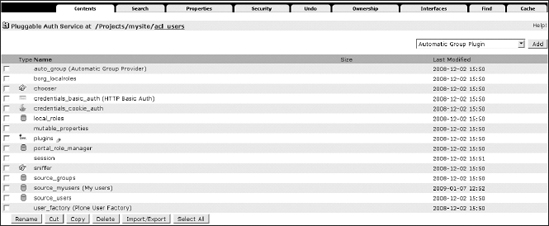
Figure 8-1. The acl_users tool for your Plone site, where you can add and manage user accounts
Note In this case, we are talking about the acl_users tool in the Plone site; it is not the http://localhost:8080/acl_users item.
As we discussed in Chapter 7, the acl_users tool has several tabs; one of them is the Search tab that lets you search for users by user ID or login name. But let's go to the default view of acl_users now and click the Contents tab.
You should see a lot of PAS items in this panel. The most important item is Plugins, which is a registry of plug-ins. For each PAS functionality, it registers which plug-ins that feature provides and in which order the plug-ins should be called. The other items you'll see in the acl_users tool, such as source_groups, source_users, and so on, are all PAS plug-ins. Each of them provides some PAS functionality, specified in a particular interface.
The Plug-in Types
There are many other plug-in types, and each of them provides a PAS feature such as adding users, user enumeration, roles and local role issues, and so on, as mentioned earlier. On each of these plug-in items, you will find a different view and several configuration tabs. Click the plugins item in the acl_users tool of your Plone site again; Figure 8-2 shows you what you will find.

Figure 8-2. The Plugin Types panel (the figure has been cropped to make the image more readable), where you can click the different plug-ins and configure them
These are the most important interfaces that you may want to configure:
- Extraction Plugins: Extraction plug-ins are responsible for extracting credentials from the request.
- Authentication Plugins: Authentication plug-ins are responsible for validating credentials generated by the extraction plug-in.
- Groups Plugins: These determine the groups to which a user belongs.
- Group_Enumeration Plugins: These allow you to query groups by ID and implement search logic for groups.
- Properties Plugins: These generate property sheets for users.
Let's return to the Plugin Types item and inspect one PAS functionality as an example to see which registered plug-ins this feature provides and how they are configured. Let's consider the Extraction Plugins (the interface provided by Extraction Plugins is IExtractionPlugin). Click this item, and a panel like the one shown in Figure 8-3 will appear.
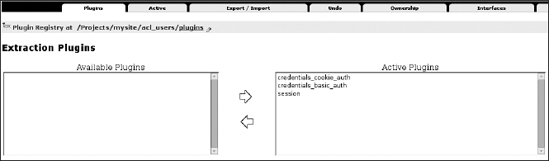
Figure 8-3. The Extraction Plugins panel, where you can configure the plug-ins that are responsible for extracting credentials from the request
On the left you should find the available plug-ins, and on the right you'll see the enabled plug-ins providing IExtractionPlugin. Note that the order of registered plug-ins is important because it changes the order in which the plug-ins will be called (the plug-in on top takes precedence). In this case, the select box on the left is empty, and you can see three registered plug-ins on the right for this functionality, in this order:
credentials_cookie_auth: This is responsible for extracting the credentials of users through HTTP cookies (if used) or from login forms or login portlets in Plone.credentials_basic_auth: If you perform basic HTTP authentication from the ZMI before entering Plone,credentials_basic_authmanages the extraction.session: Finally, thesessionplug-in is configured to use an SHA1-based authentication method to identify login sessions.
This is the chain of extraction plug-ins by default.
Managing Users Through the acl_users Tool
Now let's return to the acl_users tool and click one of the plug-ins we just mentioned; for example, click the credentials_cookie_auth plug-in (Figure 8-4 shows what you will get).
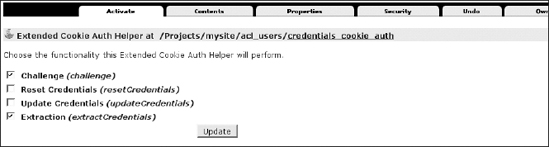
Figure 8-4. The credentials_cookie_auth panel, where you can choose the functionality this Extended Cookie Auth Helper will perform
Here you'll see several tabs. The tabs may differ from plug-in to plug-in. For example, with some plug-ins you'll see a Properties tab that lets you configure a plug-in; other plug-ins may not have such a tab. One mandatory tab for all PAS plug-ins is Activate, which is a configuration view where you can enable or disable the functionality that the plug-in will be able to perform.
You have seen the role of the plug-in registry and how components are plugged together. Now we'll talk about the following important plug-ins:
source_userssource_groupsportal_role_manager
These plug-ins are responsible for storing users and groups into the Zope Object Database by default in Plone; for example, you can also change passwords and roles for a particular user by going, respectively, to the source_users and portal_role_manager plug-ins.
Note You should always manage users and groups using the Plone interface whenever possible, as you saw in Chapter 4. The next examples are useful only if you are working outside Plone. If you have a particular requirement that compels you to do something different or if you are curious about understanding how Plone users, groups, and roles management work "under the hood," then follow the next examples to discover more about the acl_users tool and basic PAS plug-ins.
If you click the source_groups plug-in, you will find a listing of groups on your Plone site. In the "Current Groups" section, you can add new groups (or remove existing ones) and assign users to an existing group. If you move on to the source_users plug-in, you will find a listing of registered users on the site. This listing will be empty when you're starting with a new site or when users are being handled by another plug-in, but, generally, this is where you can manage your users. You can add and remove users, change login names, and change passwords.
If you want to create a new user, you can click the "Add a user" link, fill in the add form, and confirm your decision by clicking the Add User button, as you already saw in Chapter 7. We've added a user named John, for example, as shown in Figure 8-5.

Figure 8-5. The source_users plug-in, where we just added a new user called John
Now, if you want, you can remove this new user by selecting its check box and clicking the Remove Users button. You can change the login name by clicking the user ID, and you can change the password for this user by clicking Password.
Suppose you now want to grant user John the manager role. You will have to click the portal_role_manager plug-in. When you do, you'll see a tabular listing of existing roles and assignments. In this case, click the manager role (the question mark link in the Assignments column), search for a user named John, and assign that user to the manager role. At this point, John will be considered a manager (for a more complete explanation, review Chapter 7).
Now we'll show a more practical example. You have seen that for each PAS function you can have one or more plug-ins providing the interface. So, now you can manually create a new source for users and play with PAS settings in order to have and manage more than one user manager. This way you will start learning to deal with PAS settings; after that, you should also be able to apply these configurations when you are configuring LDAP or SQL user sources. Go to the acl_users tool of your Plone site, and from the Add drop-down menu select ZODB User Manager. Fill in the form with an ID such as source_myusers, and confirm that decision clicking the Add button. Go to the new source, and click the Activate tab. Here you will find these options, all deselected:
- Authentication: Select this option to let users contained in this source authenticate.
- User_Adder: Select this option to enable this source to accept user additions.
- User_Enumeration: Select this option to allow the enumeration or search for users contained in this source.
By playing with these three options and configuring the order of plug-ins, you will be able to implement some interesting use cases.
Users Will Not Appear in Search Results
Do you want to use this new source (the one we just created called source_myusers) for adding new users that for some reason you don't want to enumerate in search results? (In other words, do you want to make it so that there's no way to search for those new users in the Sharing panel or in the user management area in the Plone control panel?)
If so, select the Authentication and User_Adder options, and click the Update button, keeping the User Enumeration option unselected. Then click the Authentication link, and put your new source on top of the enabled plug-ins. Now, new users will be created automatically in your source of users because your source takes precedence, and they will not appear in user searches. If you go to the Plone control panel and add a new user, it will be created in this source, but it will not appear in user enumerations. This could be useful for managing a forum in which many users will register to add comments and participate in discussions but for which you don't need to enumerate this kind of user in search results; you just need to search and give permissions to the actual site managers.
Users Can Be Searched but Cannot Authenticate
Do you want to set your new source of users so that the users contained in it will be available for searches? In other words, do you want to let them authenticate?
Select only the User_Enumeration option, and confirm by clicking the Update button. The users contained in this source will be available as search results or other listings, but they will not be able to authenticate. It will be impossible to log in for a user contained in this source. This can be useful for sites whose content has been written by an external provider. This way, the authors (who will be registered in the source you are managing) will be available for searches and you will respect their intellectual property, but those users will not be able to authenticate, since there is no reason to let them do so.
No Other Users Will Be Created in This Source
Do you want to plug into Plone a different source for letting users authenticate but you don't want to let anyone create new users on this source? In that case, select the Authentication and User_Enumeration options, and confirm by clicking the Update button. New users will be created in the default source of users. This configuration is very common with external sources that are LDAP or SQL based.
For example, when you plug into Plone an external source of users such as LDAP or a relational database, deselecting the User_Adder option is common. Adding an LDAP user is managed using another tool in order to have a unique management tool. You can mix all these use cases; it just depends on what you need to do.
Note You can easily export and reimport your source with all registered users with the zexp import/export tool available in the ZMI.
Authentication with LDAP
In this section you will see how to authenticate users through LDAP. You will have to install the plone.app.ldap Python egg only (which was formerly called simplon.plone.ldap), and Plone will automatically install all the necessary dependencies. Here are all the dependencies you will need for plone.app.ldap:
python-ldap, which provides an object-oriented API to access LDAP directory servers from Python codeLDAPUserFolder, which is a user folder replacement for Zope that authenticates Zope users against LDAPLDAPMultiPlugins, which providesPluggableAuthServiceplug-ins that interoperate with LDAPProducts.PloneLDAP, which is built upon theLDAPMultiPluginsandLDAPUserFolderproducts and contains PAS plug-ins that allow you to use LDAP and Active Directory servers in a Plone site, making it easier to use LDAP connections
Thanks to the plone.app.ldap Python egg, it is now easier to create LDAP connections in a Plone web site and manage LDAP and Active Directory servers through a Plone configuration panel with a friendly user interface; in other words, you don't have to deal directly with the acl_users tool and the ZMI.
You should know that advanced users may prefer to deal directly with PAS plug-ins instead of working with these wrappers that give a more user-friendly interface but less control. However, if you want to start and install LDAP support quickly, the plone.app.ldap product may prove useful for you.
Note This works for Plone 2.5 or newer versions (it is highly recommended you use a Plone 3.x version).
Installing Plone.app.ldap
We'll now show how to install plone.app.ldap and the other dependencies. If you have an existing buildout, you only have to add the plone.app.ldap Python egg to the buildout:eggs section and to the instance:zcml section, as you saw in Chapter 2's "Installing an Add-on Products" section, and shown here:
[buildout]

...

eggs =

    ...

    plone.app.ldap


...

zcml =

    ...

    plone.app.ldap
At this point, you should run the buildout script and restart your Zope instance:
$ ./bin/buildout

$ ./bin/instance restart
Note that the python-ldap library is a mandatory dependency. If you have already installed this library in your Python installation, you can prevent the automatic installation from the Python package index. Just look for the [zope2] section of your buildout configuration, and add this line:
additional-fake-eggs = python_ldap
Otherwise, if you want to make the complete installation automatic, the procedure may be a bit more complicated because of a version mismatch with the python-ldap egg and the OpenLDAP library. You can solve this by compiling the whole OpenLDAP library as a buildout part with the zc.recipe.cmmi recipe; however, we will not cover this installation method because it is outside the scope of this chapter. You can find more information at www.openldap.org.
Configuring Your LDAP Connection
At this point, you can go to the Plone control panel and click the Site Setup link; then click Add-on Products, and install LDAP support. After that, in the Plone control panel a new link in the Add-on Product Configuration area will be available: LDAP Connection. Click this link now, and you will see a screen similar to Figure 8-6.

Figure 8-6. The LDAP configuration panel, where you can easily configure your LDAP connection (part of the panel has been cropped to make the image more readable)
In this control panel, you can configure an LDAP connection. You can use either a standard LDAP server or a Microsoft Active Directory server. This panel is split into three sections:
- Global Settings, where configuration settings affect rules globally
- LDAP Schema, where you can configure the LDAP schema mapping
- LDAP Servers, where you can add one or more LDAP servers to attach
You will fill in all the global configuration information, specifying the LDAP server type and the other basic properties of your LDAP schema configuration, such as the users/group's base distinguished name (DN) and other specific settings that depend on your LDAP server configuration. Then you'll create the mapping from LDAP user properties and Plone properties. Finally, you'll have to add one or more LDAP servers to attach, assuming they listen on the standard port 389 (the plone.app.ldap interface doesn't let you specify the server port, so you have to deal with the basic PAS plug-in in the ZMI). If multiple servers are used, they will be called in top-to-bottom order.
You're done! You have plugged a new LDAP source of users, and now you can search for users defined on your LDAP server.
It is important to remember that you have seen only a front-end configuration panel. All your changes will be reflected in the less-user-friendly PAS plugin ldap contained in the acl_users tool. If you are curious, you can take a look at the acl_users tool—you should find a new item related to your LDAP connection PAS plug-in (type Plone LDAP plug-in) named ldap. If you enter this plug-in, the Activate tab will let you enable or disable PAS features such as authentication, user enumeration, and so on, as you previously saw with the source_myuser user manager you added in the "Managing Users Through the acl_users Tool" section of this chapter. Note that there is no front end for these settings; you should also know that with the current version of plone.app.ldap (as of press time), if you change something working directly with the ZMI, changes may not reflected in the plone.app.ldap interface because of caching issues.
Configuring Your LDAP Connection Through the ZMI
Dealing directly with the PAS plug-in gives users more control than when using the plone.app.ldap Plone interface. For example, with the current version of plone.app.ldap, you cannot set an LDAP port other than the default one—but with the ldap PAS plug-in, you can. In this case, you will have to configure the connection through the ZMI at http://localhost:8080/mysite/acl_users/ldap/acl_users/manage_servers. You can browse there by going to the acl_users tool, clicking the "ldap" item, clicking the Contents tab, clicking "acl_users (Plone managed LDAP)," and finally clicking the LDAP Servers tab. Once there, fill in a different LDAP port, and confirm by clicking the Add Server button. Note also that changing settings directly on the ldap plug-in through the ZMI will not affect the plone.app.ldap interface.
Another common use case that requires dealing with a PAS plug-in is disabling the User Adder PAS feature on the Activate tab of the new ldap source. You can just deselect the User_Adder option and confirm by clicking the Update button. Now Plone will let you authenticate users through an LDAP source, but it will not create new users on the LDAP source. This is a common setting for closed sites or intranets because sometimes LDAP administrators may prefer to manage users using their well-known custom LDAP tools.
On the Contents tab, you should find a new user manager (type LDAPUserFolder) item with all the configurations you created through the plone.app.ldap configuration panel. Here there are several useful tabs:
- The Configure tab contains the basic properties of
LDAPUserFolder(here there are more configurations available than on theplone.app.ldapfront end). You can specify all your LDAP settings that depend on your environment such as the base DN for groups or users, the password encryption type, and so on. - The LDAP Schema tab is where you can map LDAP attributes to Plone user properties.
- The Users tab is where you can search for existing users or add new users specifying the group membership.
- The Groups tab shows all LDAP group records found on the LDAP server and allows deletion and addition. You can also map LDAP groups to Zope roles, thereby conferring a Zope role on members of an LDAP group. Note that with the
plone.app.ldapplug-in, the group-roles mapping is not available.
You have seen just how it is possible to set up Plone with LDAP without having to write a single line of code. Once you've installed all the dependencies, you can easily and quickly plug an existing source of users into Plone with little work and plug an existing LDAP source into your Plone. You can use a tool such as plone.app.ldap to perform these configurations with a user-friendly interface that lets you quickly start configuring LDAP with little effort; then, if you are curious, you can take a look at the PAS plug-in directly in the acl_users tool in order to find out how it works. You can have more control or even plug in an LDAP source starting from scratch with PAS plug-ins and getting rid of plone.app.ldap.
Authentication with Relational Databases
In this section, you will learn how to manage user management/authentication from a SQL relational database. First, you will set up the database and the database connection; then, you will see how to install and configure the sqlpasplugin product that lets you easily configure the sql plug-in with just a few clicks.
In real cases, you may have an enterprise relational database with your table of users. This section does not cover the installation of real databases because it isn't part of the aim of this book. But in order to be more practical and to keep things as simple as possible, in the example we'll use throughout this section we use a dummy database type available in Zope by default (the Gadfly database). This way you can quickly create a new database and fill it with a couple of tuples representing users. As a result, you should find many Plone members as items in your database. You will thus be able to test SQL user integration in Plone without having to install any complex databases.
Note In production environments, you should use a professional database. However, the Zope Book covers in detail how to set up access to a relational database; see http://zope.org/Documentation/Books/ZopeBook/2_6Edition/RelationalDatabases.stx.
Let's start! Go to the ZMI, and select the Z Gadfly Database Connection item from the Add list. This will lead you to the add form for a Gadfly database connection. Since it runs inside Zope, you do not need to specify a connection string as other credentials-based database connectors might require. As shown in Figure 8-7, fill in the add form: enter users_db as the database ID, select the "demo" item as the data source (you could add other data sources in the var/gadfly subdirectory of your Zope installation), and then confirm your changes by clicking the Add button.
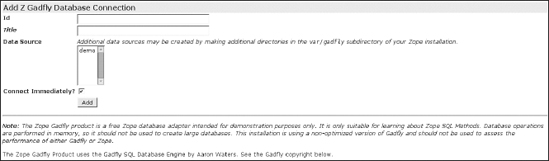
Figure 8-7. Part of the Add Z Gadfly Database Connection form; you just have to fill in some data and click the Add button. The rest of the panel gives you information about the Gadfly copyright.
This adds your first database connection. Now click the newly added item. As shown in Figure 8-8, you'll see several tabs; the following are the most important:
- The Status tab shows status and manages database connection.
- The Test tab lets you insert SQL statements (for example, to debug or to create, insert, and so on, tables or items).
- The Browse tab lets you browse the structure of tables of your database.

Figure 8-8. The available tabs for your database connection
Your dummy database should be empty. Now you can create a user table and add a new user on the Test tab. Go to the Test tab, fill in this SQL statement, and confirm by clicking the Submit Query button:
CREATE TABLE users_table(

username varchar, password varchar, mail varchar, name varchar)
We have just inserted the first row as an example; in real cases, your database should be already filled with all registered users. However, if you want to test your SQL integration and quickly add a new user, you can click the Test tab again, insert this simple SQL statement according to the type of table you created, and confirm by clicking the Submit Query button:
insert into users_table values ('db_user', '12345',

'[email protected]', 'john')
You have filled the dummy database with one user, so you can now query the user table with a select statement, as done for the create and insert statements, with this SQL code:
select * from users_table
You have created a dummy database with a table containing one user named db_user, so now you are ready to start configuring your SQL PAS plug-in and plug new members from a SQL source into Plone. At this point, you are ready to install and configure the sqlpasplugin product. If you have a buildout, you can add this URL to the urls variable of the productdistros section:
http://plone.org/products/sqlpasplugin/releases/1.0/SQLPASPlugin-1.0.tar.gz
And after that, rerun the buildout script. After restarting Zope, you should find SQLPASPlugin as an installable product in your Plone site. Install SQLPASPlugin via the portal_quickInstaller tool or the Plone control panel. Otherwise, if you want, you can download the tarball from the Plone.org web site and untar it into the products folder of your instance.
You can find the SQL Authentication Configuration panel in Plone control panel, reachable by clicking the SQL Authentication link in the Add-on Product Configuration area Figure 8-9 shows what the SQL Authentication configuration panel will look like after your first initialization. The first time you access the SQL Authentication Configuration panel, you will have to choose which database connection you wish to use; in this case, your only choice will be the users_db connection we have just created. Select it and confirm.
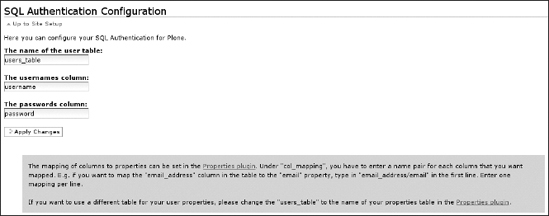
Figure 8-9. The SQL Authentication Configuration panel
An important element is the "Properties plugin" link that you can see in the first line of the paragraph shown at the bottom of the panel; by clicking it, you will be able to change the mapping of columns. Clicking this link will lead you to the ZMI configuration tool of the SQL PAS plug-in. Under col_mapping, you have to enter a name pair for each column that you want to be mapped, with a forward slash (/) as a separator (this is valid only for the mapping of columns). For example, if you want to map the mail column in the table to the email property, type in mail/email in the first line. Enter one mapping per line, as shown in Figure 8-10.
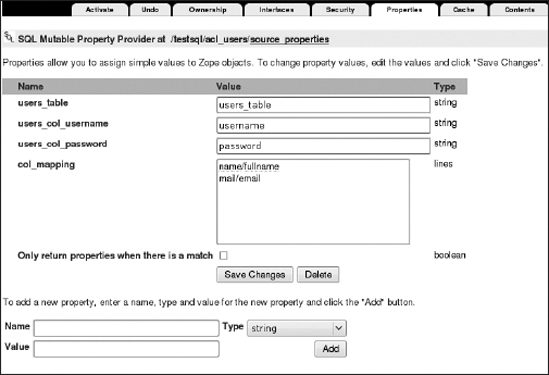
Figure 8-10. The SQL Mutable Property Provider panel in the ZMI, where you can assign simple values to Zope objects
You're done! Now you can search for users defined in the SQL source, and users defined on the users_table table are allowed to log in your portal with properties correctly mapped from columns to Plone member properties. Does it work well? Click Users and Groups in the Plone control panel, and search for all users; you should find your user defined in the SQL source, as shown in Figure 8-11.

Figure 8-11. The Users Overview panel shows you the user contained in the database you created.
A wonderful source of information and practical details about the PAS is the PAS Reference Manual, where you can find instruction for configuring user management in Plone and also for developing PAS plug-ins; visit http://plone.org/documentation/manual/pas-reference-manual.
Summary
In this chapter, we have introduced the concepts that lie behind the PAS and showed you the flexibility you can thus create. You have learned the following:
- How to search for users with the PAS
- How to create a new user with the PAS
- How to change the password for a user with the PAS
- How to change role mapping
- How to create a new source for users and configure the different plug-ins according to your needs
What if your users are on an LDAP server or they are stored in a relational database? No matter. You have seen how to install and configure, with a few clicks, two useful add-on products for plugging in an LDAP connection and a SQL connection. It is easy to integrate a different source of users in your Plone site (OpenID, for example). On the Internet you'll find various useful tutorials to make almost any source of users work with your web site.