
CHAPTER 11
System Architectures and Deployment Configurations
You know how to install Plone and set up small to medium sites. Plone is a great tool for managing large and complex sites as well, but to use it for that, you'll need to speed up and tune your system. That is the aim of this chapter: learning how to build and manage a system architecture that will allow you to get the best performance for your web site, even in mission-critical cases. This chapter is also intended to be a technical reference with configuration examples for common use cases.
We should remind you that since Plone works very well as a stand-alone service anyway, you won't need to build any particular system architecture if you don't have any special needs; thanks to its built-in web server, Zope, which can directly serve requests.
What are the main problems or common requirements you could have managing a big site or an intranet? Let's list a few:
- Slow page display
- Many visitors and high load
- Large
Data.fsfile - Concurrent writing on the
Data.fsfile - Managing a site with a lot of large images or attachments
- Managing a site with a lot of large documents to be indexed
- Securing Zope behind a web server
We will introduce new system architectures in the context of considering these requirements and problems you may have to face. For each of those requirements, we will discuss one or more solutions we can adopt.
Tip All the system architectures we will describe can be mixed up together in different combinations, in order to meet any requirement that you might find in a complex environment like a big intranet or portal. All the examples we will provide are in a Linux environment.
Optimizing Storage Configurations
Objects published by the Zope application server are stored by default into the ZODB. The ZODB provides an object database and stores pickles of objects and transactions in a file named Data.fs (remember that you can have more than one ZODB).
Note When we talk about "pickles," we are talking about a concept that concerns Python. Pickling is the process whereby a Python object hierarchy is converted into a byte stream; briefly, the pickle module implements a fundamental and powerful algorithm for serializing and deserializing a Python object structure.
The Data.fs file can grow too quickly and become too big if, for example, big attachments and transactions are stored in the ZODB. This is one thing you never want to occur, because it makes the site hard to manage and it slows down the entire site-maintenance process. In order to prevent ending up with too big a Data.fs, we can do the following:
- Store images and attachments outside the
Data.fsfile—for example, on the file system using Binary Large Object (BLOB) storage, thanks to theplone.app.blobpackage. In this manner, uploaded attachments or images will not affect theData.fsfile. - Schedule the automatic packing of the
Data.fsfile once a week or daily, removing previous versions of objects. (Note that when you remove old versions of objects, you will not be able to restore them!) If you pack the ZODB, there may be a little performance improvement, it will be easier to manage, and you can avoid high disk space consumption. We will face this case in the "Automatic ZODB Packing" section.
If the solutions don't solve your particular problem well enough, you might use another storage implementation strategy on relational databases for the ZODB, like RelStorage, or consider the solutions in the "Relational Databases" section of Chapter 10.
Configuring BLOB Storage
BLOB support can be integrated into Plone thanks to the plone.app.blob package. Using BLOB storage, you will keep your Data.fs file lighter and in general get better performance. BLOB storage allows large binary data to be managed directly by the ZODB but separately from your Data.fs, so that images and attachments aren't stored in the Data.fs file—they're saved on the file system instead.
If you want to install BLOB support, you have to configure where to store it, and then add plone.app.blob to the eggs variable in the [buildout] section of your buildout configuration. The same line should be added in the zcml variable of the [instance] section, as follows:
[buildout]

...

eggs =

   ...

    plone.app.blob

....

[instance]

....

blob-storage = var/blobstorage

....

zcml =

    ....

    plone.app.blob
Note here that the blob-storage option lets you choose a folder into which attachments will be saved; in this case, we have set it to var/blobstorage; you may wish to set a different directory. After you've saved your changes, stop the Zope instance, run the buildout script, and restart the service as follows:
$ ./bin/buildout

$ ./bin/instance start
After that, you have only to install the plone.app.blob package in the portal_quickinstaller tool or in the Site Setup area of Plone. That's it! Now, your attachments are no longer stored in the Data.fs file, but in the var/blobstorage directory; so you will avoid having a huge Data.fs file on your system. You can get more information at http://plone.org/products/plone.app.blob.
Note BLOB support is a tool with a lot of potential, but it is still a work in progress. So, keep in mind that for now it works only with Plone 3 and later versions. Older versions are not supported, and there is no official release out yet. However, the experimental release of the BLOB support tool is already used in production sites, and a stable release will soon be available.
Configuring RelStorage
RelStorage is a storage implementation for ZODB that stores pickles in a relational database. It supports many popular relational databases, including MySQL, PostgreSQL, and Oracle. The way RelStorage is installed depends on whether you have a traditional Zope instance or a buildout.
Actually installing RelStorage requires applying a patch to the ZODB, customizing the zope.conf file if you have a traditional instance, or modifying buildout.cfg and putting the access credentials of your relational database into the rel-storage option.
Note that installing RelStorage is an advanced task that only experienced webmasters and developers should perform. Also, RelStorage doesn't have a stable release at the time of this writing, and developers are still working on this project. So, some of the details we describe in this book may change in the future. For updates about the latest developments of the project, stay tuned on http://pypi.python.org/pypi/RelStorage.
RelStorage requires a version of ZODB with the invalidation-polling patch applied. You will be asked to manually apply a patch or to use a buildout configuration that uses a patched version of the ZOBD. You can find the patch already applied here: http://packages.willowrise.org. The patches are also included in the source distribution of RelStorage.
If you want to actually try RelStorage, you can install a database (e.g., PostgreSQL) and use a buildout configuration similar to the following one:
[buildout]

...


find-links =

http://packages.willowrise.org

...


versions = versions


eggs =

...

psycopg2

RelStorage


[versions]

ZODB3 = 3.8.1-polling-serial


[instance]

...


 rel-storage =

type postgresql

dbname relstorage_zodb

user pgzope

host localhost

password postgres
To install a PostgreSQL database on a Debian-like distribution (or on Ubuntu), you will have to type the following commands:
# apt-get install postgresql

# apt-get install postgresql-server-dev-8.3
After you've installed PostgreSQL, you will have to start it, create a new user named pgzope, and enter the password postgres when required. You'll also have to create a database for support, which we will call relstorage_zodb. To do so, type the following commands:
# sudo su - postgres

$ createuser -P pgzope

$ createdb relstorage_zodb
Once you have initialized the instance, the system will save everything in the new database, instead of in FileStorage. Figure 11-1 shows what has changed in the ZMI, in the Database Management panel for the new database connection we have just set up.

Figure 11-1. The Database Management panel, where you can see that the database location is now RelStorage on PostgreSQL
You can find more information on RelStorage at http://wiki.zope.org/ZODB/RelStorage.
Asynchronous Indexing
If your site contains many large documents (such as DOC or PDF files), and you often perform searches, normal searching-and-indexing configurations can be inappropriate. Synchronous and repeated indexing operations of big attachments can seriously slow down your Plone site.
The solution is performing indexing asynchronously with searching with a more efficient queuing system. For this purpose, you can install the collective.indexing package, which lets you optimize indexing operations in Plone, thanks to an approach that provides an abstract framework for asynchronous queuing. This package allows you to take advantage of a more efficient indexing queue that gets rid of redundant indexing operations.
If you want to enable asynchronous indexing in Plone, you just have to install the collective.indexing package. Stop your instance and modify the buildout contained in buildout.cfg as follows:
[buildout]

...

eggs =

    ...

    collective.indexing

....

[instance]

....

zcml =

    ....

    collective.indexing
Then run the buildout script and restart your instance:
$ ./bin/buildout

$ ./bin/instance start
Finally, go to your Plone site and install the collective.indexing package from the portal_quickinstaller tool in the ZMI or in the Plone Site Setup area. Visit this link to find out more information about collective.indexing: http://pypi.python.org/pypi/collective.indexing.
Plone Behind a Web Server
It is very common for Zope production servers to run behind a web server like Apache or ngnix. Figure 11-2 shows you a schema of Plone running behind a web server.

Figure 11-2. A schema of a Zope installation behind a web server
Although Zope has its own embedded web server, you may have to deal with certain scenarios that require a more complex structure. For example, you may want to take advantage of the well-tested and full-featured Apache SSL layer provided by Apache. This way you will be able to use rewrite rules in order to have one or more domains served by the same server, or disallow direct access to your Zope instance (in order to prevent invalid HTTP requests or denial-of-service attacks). How can we configure Zope behind a web server in order to handle one or more virtual hosts on the same server?
As an example use case, let's configure virtual hosting for several sites in one Zope instance (remember, of course, that different mixed options are possible). Start by creating a new Plone site in the root of Zope with the ID myexampledomain. We will assume that we are working with the Apache web server, and we'll configure a virtual host. We want to end up with several domains served by the same web server. For example, myexampledomain.com should correspond to our first Plone site at http://localhost:8080/myexampledomain.
First check that the Apache web server is correctly installed. Then add the following lines to the /etc/hosts file:
127.0.0.1 myexampledomain.com
This way, we can easily simulate a domain configuration and make our new domain point to localhost. If you ping, for example, myexampledomain, your local machine should respond.
Now that our basic Plone site is set up, let's configure Apache to serve it. Create a file named myexampledomain.com in the directory /etc/apache2/sites-available, with the following configuration:
<VirtualHost *>

 ServerAlias    myexampledomain.com

 ServerAdmin    [email protected]

 ServerSignature On

 LogLevel warn

  <IfModule mod_rewrite.c>

   RewriteEngine On

   RewriteRule ^/(.*)

      http://localhost:8080/VirtualHostBase/http/%{SERVER_NAME}:80/

myexampledomain/VirtualHostRoot/$1 [L,P]

 </IfModule>

</VirtualHost>
Now you just have to enable this site and reload the Apache configuration by typing the following into your shell:
# a2ensite myexampledomain.com

# /etc/init.d/apache2 reload
Finally, if you enter the URL http://myexampledomain.com in your browser, you should get our Plone site. You can add one or more domains—you just need to repeat the preceding steps. See the following links for more details:
- http://plone.org/documentation/tutorial/plone-apache
- http://plone.org/documentation/how-to/apache-ssl
Caching, Clustering, and Load Balancing
So, is the rendering of your pages too slow? Let's cache! You can make your portal up to 40 times faster or more (depending on what configuration you choose) by integrating Plone with a caching proxy, using a combination of memory, proxies, and browser caching. There are many system architectures available. Plone with caching proxies not only gives you the flexibility of a powerful CMS environment with user facilities, but also serves dynamic pages immediately—as fast or faster than for static HTML!
Another common issue we should mention concerns clustering. What happens if your portal gets so many visits that it slows down? In this case, you can balance the higher load using a cluster of Zope instances: ZEO allows you to use one database to share the workload among different servers. And when there is the need, you can always add another Zope instance to help in scaling and balancing the load.
In this section, you will see how to scale and balance the load of your system and speed up your site by configuring a ZEO environment integrated with a caching proxy.
Zope Clustering with ZEO
Let's start confronting the concept of Zope clustering by looking at ZEO. If your use case matches the classic web pattern of many reads and few writes, you may want to take advantage of ZEO. Briefly, ZEO works like this:
- Concurrent requests are served by two or more Zope clients at the same time, thanks to a load balancer.
- The ZEO servers manage a common ZODB shared between ZEO clients.
Using ZEO, you can provide a distributed object architecture to Zope instances. ZEO allows multiple processes, machines, and locations to work together as one transactional object system. All this will be a big advantage in many practical use cases, compared with a simpler architecture where you have a transactional object system like a stand-alone Zope server with an in-memory cache of objects. This is ZEO!
With ZEO, you can create many Zope instances that are connected to a Zope Storage Server (ZSS or, commonly, ZEO server). When one Zope instance (or, as it is commonly referred to in this context, ZEO client) changes an object, the changes are sent to the ZEO server, which sends a message to the other ZEO clients. The other ZEO clients then remove the object from their local cache. When a ZEO client already has an object in its local cache, then there is no need to fetch it another time from the ZEO server, as long as it hasn't been modified.
The great thing is that ZEO clients can be added whenever you need to scale the workload, and they can also be set up on different machines. On very complex systems, ZEO clients can even mount one or more shared ZODBs from one or more ZEO servers.
As the load balancer for our concurrent requests, we use Pound. Pound was originally developed to enable distributing workload among several web servers, so we can use it as load balancer for our ZEO clients. With Pound, you can manage complex persistent session policies. Figure 11-3 shows you a possible configuration.
Note This is only one possible configuration. You can, for example, reserve a ZEO client for heavy batch jobs, among other configurations. See in Chapter 12 for a more complex use case.
Note that outside the classic web pattern just mentioned (many reads and few writes), the ZEO system architecture pays a penalty. For example, when the number of writes starts to get close to the number of reads, you should use an alternative storage like RelStorage that better handles loads of concurrent writes. For more information about ZEO, see the "Scalability and ZEO" chapter of the Zope Book, at www.zope.org/Documentation/Books/ZopeBook/2_6Edition/ZEO.stx.
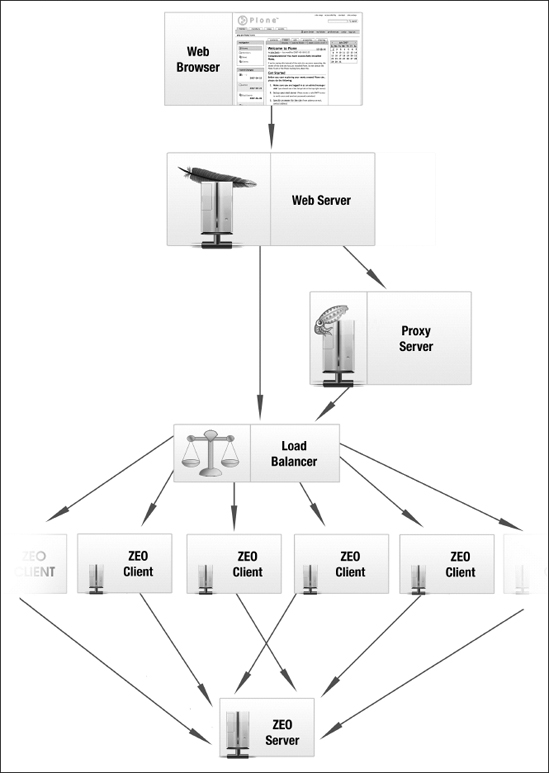
Figure 11-3. Distributing the load among web servers thanks to Pound: a possible configuration of the ZEO server and ZEO clients
Installing a Load-Balancing ZEO Cluster with buildout
This section shows you how to build a balanced ZEO cluster with buildout. We will use the Pound load balancer (note that you may choose other similar services instead of Pound), and two ZEO clients and a ZEO server that share the ZODB.
In order to apply this configuration, you have to run the buildout script. When you do this, you should get the following scripts in the bin folder of your buildout: zeo, instance01, instance02, and poundctl. Here are the parts of the buildout that let you set this configuration:
[buildout]

parts =

    ...

    zeo

    instance01

    instance02

    ...

    pound-build

    pound

[zeo]

recipe = plone.recipe.zope2zeoserver

zope2-location = ${zope2:location}

zeo-address = 127.0.0.1:8000

...

[instance01]

recipe = plone.recipe.zope2instance >=2.0

zope2-location = ${zope2:location}

debug-mode = off

verbose-security = off

zeo-client = True

zeo-address = ${zeo:zeo-address}

user = admin:admin

http-address = 127.0.0.1:8010

eggs =

    ${buildout:eggs}

    ${plone:eggs}

    elementtree

zcml =

    ${buildout:zcml}

products =

    ${buildout:directory}/products

    ${productdistros:location}

    ${plone:products}

...

[instance02]

recipe = ${instance01:recipe}

zope2-location = ${instance01:zope2-location}

debug-mode = ${instance01:debug-mode}

verbose-security = ${instance01:verbose-security}

zeo-client = ${instance01:zeo-client}

zeo-address = ${instance01:zeo-address}

user = admin:admin

http-address = 127.0.0.1:8011

eggs = ${instance01:eggs}

zcml = ${instance01:zcml}

products = ${instance01:products}

[instance03]

...

[pound-build]

recipe = plone.recipe.pound:build

url = http://www.apsis.ch/pound/Pound-2.3.2.tgz

...

[pound]

recipe = plone.recipe.pound:config

daemon = 0

timeout = 90

balancers =

        myplone 127.0.0.1:8002 127.0.0.1:8010 127.0.0.1:8011
Here, we get a ZEO server running on port 8000 (see the [zeo] section) and two ZEO clients, instance01 and instance02, running respectively on ports 8010 and 8011. Both ZEO clients are balanced, thanks to Pound running on port 8002. You can of course add one or more ZEO clients.
Take a look at the [instance02] section; note how it is different from [instance01]. What this shows is that you can have ZEO clients with different configuration settings.
After running the buildout script, you can start your ZEO cluster. Do this by calling the executables in the bin directory (poundctl, zeo, instance01, and instance02) in the following order:
$ ./bin/poundctl start

$ ./bin/zeo start

$ ./bin/instance01 start

$ ./bin/instance02 start
These commands will start your load balancer, the ZEO server, and the two Zope instances. All requests received on port 8002 (served by Pound) will be balanced on the two ZEO clients listening on ports 8010 and 8011.
You can also use the supervisord utility to monitor and control the processes of your buildout. For more information, take a look at http://supervisord.org and http://pypi.python.org/pypi/collective.recipe.supervisor.
If you want to know more about the configuration of these recipes, take a look at the following links:
- See http://pypi.python.org/pypi/plone.recipe.pound for a recipe for installing and configuring Pound.
- See http://pypi.python.org/pypi/plone.recipe.zope2zeoserver for a buildout recipe for installing a Zope 2 ZEO server.
Caching Proxies and Your Plone Site
You have seen that a caching server can help performance a good deal. You can increase performance using a caching proxy in front of your Plone site. A caching proxy keeps local copies of frequently requested resources, so that they will be served directly from the proxy server without having to ask to the Zope server. This can dramatically speed up the display time of your pages!
A good product for speeding up your site is CacheFu. CacheFu, as mentioned on http://plone.org/products/cachefu, "is a collection of products that aggregate and simplify various caching settings, speeding up Plone sites using a combination of memory, proxy, and browser caching. CacheFu can be used by itself or with Squid, Varnish, and/or Apache. Configuration files can be generated for Squid, Varnish, Squid-behind-Apache, Varnish-behind-Apache, and Apache cache proxy (if you are using a noncaching Apache by itself or just Zope-only, no extra configuration files are needed)."
To install CacheFu, you have to include Products.CacheSetup (a package that installs all CacheFu dependencies) in your buildout configuration, just as for Plone products released as Python eggs (see the "Installing an Add-on Product" section of Chapter 2 for more information). You can find details on installing CacheFu on this page: http://pypi.python.org/pypi/Products.CacheSetup.
After you update the buildout configuration, you have to restart your instance and install CacheFu on the site you want to speed up. Once installed (as usual, click Add-on Products in the Plone control panel, and install the product in your Plone site), CacheFu can be configured through the Cache Configuration tool, available in the Plone control panel. This tool lets you select which kind of proxy cache purge configuration you want to enable (Zope-only, Zope behind Apache, Squid/Varnish in front, etc.), provides you with a list of domains for your site (along with HTTPS versions of your domains if you use them), and gives you a list of domains for any purgeable proxy caches if needed (e.g., if you are using Squid with Apache, there will commonly be a single Squid instance at http://localhost:3128).
Changing other default settings of this tool requires a deep knowledge of the HTTP protocol. Fortunately, the default values are commonly valid for the main use cases, so you generally won't need to change them. For these purposes, you just need to know that the Cache Configuration tool lets you add or edit existing cache policies and rules to apply to certain content types. For example, standard content types refer to a particular rule for views of Plone content types. As the description of the rule says, anonymous users are served content object views from memory, not the proxy cache; authenticated users are not cached in memory or proxy (because caching personalized pages is inefficient), but an ETag is added to enable proper HTTP not modified responses. The member ID (a parameter that is for identifying a site member) is used in the ETag because content is personalized. The time of the last catalog change is included so that the navigation tree stays up to date.
Note If you are using a noncaching Apache server by itself or just a stand-alone Zope instance, no extra configuration files are needed to run CacheFu.
CacheFu allows Plone to explicitly invalidate old caches when operations such as editing content are performed, so that your content is always fresh, even if you have an aggressive caching policy. Figure 11-4 shows you a logical configuration of a common system architecture with proxies.

Figure 11-4. A logical configuration with a caching proxy
Be aware that the scheme described depends on your environment. If you want to support advanced session-persistence policies, support or not support HTTPS, and so on, there are many other possible configurations.
Installing a Proxy Cache Server with buildout
You can install a proxy cache server manually or using a specific buildout recipe that lets you build and configure the desired proxy server (e.g., Squid or Varnish) automatically. The main buildout recipes to do that are plone.recipe.squid and plone.recipe.varnish.
Let's take Varnish as an example. There are many settings, depending on your environment. The basic buildout configuration to build and configure Varnish is as follows:
[buildout]

parts =

 ...

    varnish-build

    varnish

[varnish-build]

recipe = zc.recipe.cmmi

url = http://downloads.sourceforge.net/varnish/varnish-2.0.2.tar.gz

[varnish-instance]

recipe = plone.recipe.varnish

daemon = ${buildout:directory}/parts/varnish-build/sbin/varnishd

bind = 127.0.0.1:8000

backends = 127.0.0.1:8002

cache-size = 1G
After having changed the buildout configuration, don't forget to run the buildout script to build Varnish. In this case, the [varnish-build] section will build our proxy cache server and the [varnish-instance] will be used for configuring our Varnish service. Varnish will be listening on port 8000 and will use a service running on port 8002 as back-end service (a Zope instance, a load balancer, or a web server, depending on your environment). For reference, take a look at http://pypi.python.org/pypi/plone.recipe.varnish.
After setting up the cache proxy, you can install CacheFu, as described in the previous section.
Multiple ZODBs
A ZODB has its own caching mechanism. For each mounted ZODB, you can choose the cache size in number of objects, tuning it as needed for your environment. The general idea is to keep as many objects in cache as possible, but this value depends on the amount of RAM you have available.
We should mention what we mean by "objects" in this context. We mean both standard heavy objects like Plone content, and smaller catalog information objects (in Plone slang, these are known as "brains") that Plone uses instead of dealing with real objects (for performance reasons).
While you have the same cache for all fetched objects, you will want to have as many brains as possible in cache as well. Brains should always be ready to be used, because they are frequently used by Plone for things like object listings, searches, and so on.
Depending on your environment, your site may slow down if you have thousands of objects stored. The solution is to create a separate ZODB, with a larger cache size for your objects, to serve only the portal_catalog tool of your portal. This will give you two separate ZODBs, each with dedicated caches: one for the main site and another dedicated to the portal_catalog tool. This way, you will keep all the brains in the ZODB cache, and your site will perform better. You can increment the cache dedicated to the ZODB serving the portal_catalog tool and keep all the brains in memory, ready to be used for searches or listings with comparatively little memory consumption (because brains are small objects).
Depending on what you have to implement, you may want to split the main ZODB into smaller ones, each served by one or more ZEO servers if needed. In this section, you will see how to mount sections (e.g., the portal_catalog tool) served by multiple ZODBs with both stand-alone installations and ZEO clusters. We will assume that you already have a buildout. However, it is also simple to adapt these configurations to a traditional Zope installation as well.
Speeding Up Plone by Putting portal_catalog on a Different ZODB with a Stand-Alone Zope Instance
In this section, you'll see how to serve the portal_catalog tool on a different ZODB with a stand-alone Zope instance. To do so, we will assume we are working on a Plone site named myplone, and we will for simplicity start by duplicating our Data.fs file, which is used by default in Plone as the file store. We will call our copy of the Data.fs file CatalogData.fs. To perform the duplication, run the following command after you have stopped your Zope instance:
$ cp var/filestorage/Data.fs var/filestorage/CatalogData.fs
Why did we duplicate the Data.fs file? So that we can have a duplicate of the portion of the file storage (i.e., the portal_catalog tool) that we want to be served by a different ZODB. Note that you can also use this technique for other portions of your system—even an entire Plone site. Copying the Data.fs file, you will have an exact copy of the data, and it will be served by a different ZODB.
So, we created a new file store called CatalogData.fs; now we have to make our Zope instance know that this new file store exists and has to be mounted. To do so, we have to modify the zope-conf file. In a traditional instance, you can modify it directly; if you use buildout, you will have to modify buildout-cfg as follows, adding a zope-conf-additional option to the [instance] section of your buildout, as shown here:
zope-conf-additional =

  <zodb_db catalog>

    # Catalog database

    <filestorage>

      path ${buildout:directory}/var/filestorage/CatalogData.fs

    </filestorage>

    mount-point /myplone/portal_catalog:/myplone/portal_catalog

    container-class Products.CMFPlone.CatalogTool.CatalogTool

    cache-size 10000

  </zodb_db>
In the configuration we have just made, we specified the name of the Catalog database that will use the CatalogData.fs file as the file store, and we configured the parameters we need for the mounting.
You can also tune the cache-size value, depending on how many objects you want to have in cache. The final aim is to have all the brains in cache memory, although this depends on software settings and hardware architecture. As mentioned, the idea is to have as many objects as possible in cache for your environment.
Next, run the buildout script as shown:
$ ./bin/buildout
Then restart your instance, go to your myplone site, and from the ZMI, delete the portal_catalog tool. You're doing this because the portal_catalog tool will be served by another file store (in this example called CatalogData.fs). Don't worry, this won't break your site forever!
After that, we have to mount our portal_catalog tool served by the CatalogData.fs file. To do so, we have to add a ZODB mount point from the Add drop-down menu in the ZMI, which we will call "catalog." Use the form that will appear to finalize the mount point configured in zope.conf. On this form, select your mount point without modifying the other options, and confirm by clicking the "Create selected mount points" button. Finally, in some cases you will have to recatalog the portal_catalog tool (e.g., mounting a folder with content from one database into another one). In this case, it might not be necessary, but it won't do any damage to perform it anyhow.
Now, in the database management area (http://localhost:8080/Control_Panel/Database/manage_main), you should see our new mount point, called catalog, that uses as its file store the CatalogData.fs file. If you click the catalog mount point, you should see the cache settings.
Speeding Up Plone by Putting portal_catalog on a Different ZODB with a ZEO Cluster
In the case of a ZEO cluster, the ZEO server will serve both the main Data.fs file and the ZODB containing the portal_catalog tool. All databases will be shared among ZEO clients. In the ZEO server configuration, we have to register a new file store; each ZEO client will mount and share this new database. Basically, you should stop your cluster and copy the main Data.fs to a new file (CatalogData.fs):
$ cp ./var/filestorage/Data.fs ./var/filestorage/CatalogData.fs
The CatalogData.fs file will provide the portal_catalog once mounted. Now modify your existing buildout.cfg configuration, adding to the ZEO recipe a zeo-conf-additional option, registering the new file store, and adding a zope-conf-additional option for each ZEO client, as shown here (the added options are in bold):
[zeo]

recipe = plone.recipe.zope2zeoserver

...

zeo-conf-additional =

  <filestorage 2>

     path ${buildout:directory}/var/filestorage/CatalogData.fs

  </filestorage>

[instance01]

recipe = plone.recipe.zope2instance

...

zope-conf-additional =

  <zodb_db catalog>

    mount-point /myplone/portal_catalog

    container-class Products.CMFPlone.CatalogTool.CatalogTool

    cache-size 10000

    <zeoclient>

      server ${zeo:zeo-address}

      storage 2

      name catalogstorage

      var ${buildout:parts-directory}/instance01/var

      cache-size 400MB

    </zeoclient>

  </zodb_db>

  <environment>

    DISABLE_PTS 1

    TEMP ${buildout:directory}/tmp

  </environment>
Save and rerun the buildout as shown:
$ ./bin/buildout
After you have restarted the cluster, delete the portal_catalog tool of your myplone Plone site in the ZMI, select ZODB Mount Point from the Add drop-down menu, select your ZODB to be mounted, and leave the other default settings untouched, as in the previous paragraph.
That's it! In this example we have cloned a ZODB CatalogData.fs file from the Data.fs file. Note that it is also possible to keep only the mounted area of CatalogData.fs and remove the other sections (so your ZODB will be lighter).
Caution Once you have mounted a new ZODB, you should usually begin a tuning phase wherein you can change ZEO client or ZODB settings. However, since that depends on your server and what kind of application you are developing, we won't delve into those issues here.
Automatic ZODB Packing
Why does the ZODB grow to a size that makes us need to pack it? The ZODB provides all of the ACID properties—properties that are well known and used often in computer science and relational databases theory. ACID stands for atomicity, consistency, isolation, and durability in database transactions; these properties exist in order to guarantee that transactions are processed reliably. If you want to find out more information about ACID properties and relational databases, take a look at http://en.wikipedia.org/wiki/ACID. In order to support the rollback of transactions, changes written to a ZODB database are appended to the Data.fs file.
Let's better define the concept of packing: the ZODB keeps a record of transactions, which can be used, for example, by an application to allow undo functionality. But with the passing of time, the database file can grow in size, storing a longer and longer list of changes to each object. Packing the ZODB is the operation of shrinking it back to a more efficient size. This operation can also be scheduled so that it will be performed automatically—we'll show you how presently.
It is a good idea to schedule the automatic packing of the ZODB if you use FileStorage, the default storage system in Zope (of course, if you have configured RelStorage, the mechanisms will be different), so that you are sure that periodically you will get performance and disk space benefits.
If you want to pack the ZODB of a stand-alone Zope instance, you can put the following command in a cron job:
wget http://localhost:8080/Control_Panel/Database/main/manage_pack?days:float=7

 --http-user=admin --http-passwd=admin -q --delete-after
As an alternative, you may want to try the PortalMaintenance Plone product, which lets you add a pack task without having to use the admin password of your instance (see http://plone.org/products/plonemaintenance).
If you want to pack a ZODB that's served by a ZEO server, you can put the following command in a cron job, assuming again that you're working in a UNIX-like environment:
./PATH_TO_BUILDOUT/bin/zeopack -p 8000 -h 127.0.0.1 -S 1 -d 7
The parameters used are as follows:
-pstands for the ZEO server listening port.-hstands for the ZEO server listening address.-Sstands for the storage name (the default is1).-dremoves transactions that are older than the number of days the value indicates.
Running this command, you should now find a packed ZODB in the var/filestorage directory of your buildout, and the addition of a .old extension to the original ZODB file name.
For more information, see the tutorial at http://plone.org/documentation/tutorial/introduction-to-the-zodb/tutorial-all-pages.
Summary
At this stage you should know that, thanks to Plone and Zope flexibility, you can use a stand-alone installation when you are developing your system and for normal use cases, but when the going gets tough, you can set up auxiliary services such as caching and load balancing to make the Plone application more scalable. In place of having a stand-alone Zope installation, you can mix together the techniques described in this chapter to achieve a more performant system for the specific needs you are facing (e.g., managing large Internet sites or intranets).
In the next and final chapter, we'll cover some of the most common cases that you may encounter in your experience as Plone webmaster or developer. You will learn how to solve some common problems and how to set up a web application able to solve many of your needs. We will cover the management of enterprise workflows, the automatic handling of documents and images, the management of multimedia files and big objects, the integration of external applications and single-sign-on, and the creation of custom member profiles. You will see how you can realize with Plone an efficient e-commerce site, a social network, a community site, and a company intranet, among others. Let's get to work!