
CHAPTER 7
Managing Security and Workflows
Zope has a very powerful and granular security architecture, and Plone of course inherits this structure. This chapter shows how security settings are handled in the Zope application server. Most of the concepts in this chapter are related to Zope users and permissions management, but as you saw in Chapter 4's "Managing Users and Permissions" section, you can also manage users, groups, and permissions through the Plone interface. If you have to work with simple settings, you should always work at the Plone level and use its tools for user management, security, and permission settings instead of working in the ZMI.
This chapter also covers a topic related to security: workflows in Plone. Workflows let you define different behaviors for your objects in different logical states. In particular, you can alter permission settings for each logical state. You can manage users' permissions for reviewing, generate PDF documents, view and modify an item or just certain parts of it, and so on.
In Plone, you can create very simple workflows or build complex systems, which is a very important feature for a web application, because it allows people with different roles to interact well together. In this respect, Plone comes with a set of well-tested workflows available by default for common use cases. For example, with just a couple clicks, you can convert a section of your portal into a reserved area or create an intranet. You can also associate custom workflows to your objects, with different behaviors and security settings for each state.
Implementing Security in Zope
These are the main concepts in Zope's security architecture:
- Permissions
- Roles
- Users
- Groups
We went through these Plone concepts in Chapter 4's "Managing Users and Permissions" section. Basically, users can have one or more roles, and roles can be assigned by default or "acquired" from a particular context (for example, granting higher privileges in certain folders). Roles can also be granted to a particular group so that when a user becomes a member of that group, that user will "acquire" the group's roles. In this way, roles and groups are used for grouping similar users so that you can define security configurations once per group or role, instead of setting this configuration for each user of a certain type.
The security machinery checks whether a user can perform some operation by querying permissions. For each role, you can assign one or more permissions that grant or remove the ability to perform specific operations.
Let's start with the Security tab in the root of the ZMI so that you can see how to manage security settings. Figure 7-1 shows just a small part of the panel that will appear if you are in the root of Zope (http://localhost:8080/manage).
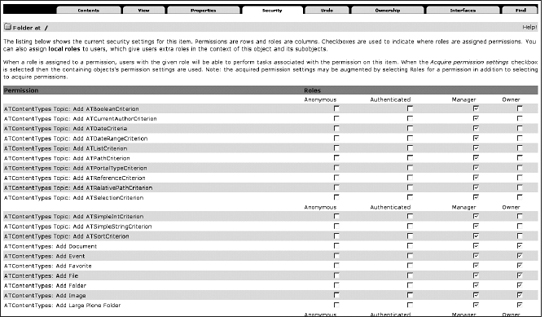
Figure 7-1. Part of the security settings in Zope that will appear by clicking the Security tab in the ZMI
As you can see, a lot of permissions are available by default; they're listed on the left side. You'll also see a couple of roles, listed in the top, middle, and bottom rows.
If you click the Security tab for your Plone site (instead of at the root of Zope), you can see the other roles that are available, as shown in Figure 7-2. These are the roles that are created by default in Plone.
You can grant each permission to one or more roles; you just have to select the check box in the appropriate column and row.
Note Permissions are contextual, meaning that you can, for instance, grant a permission in the root folder of Zope, and in another folder you can override that permission setting. In this way, you can easily create different areas with different context-sensitive permissions. We'll go into this in just a moment.
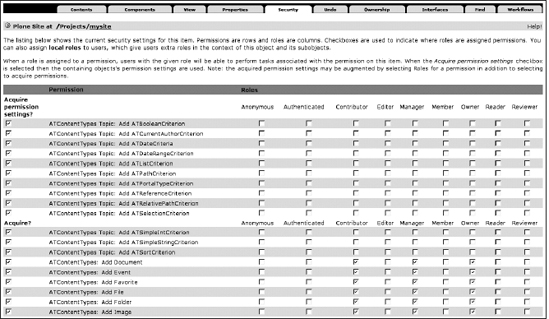
Figure 7-2. Part of the security settings for your Plone site
Adding New Roles
You can add new roles directly on the Security tab. In the "User defined roles" field at the bottom of the page, enter a name for your new role, and click the Add Role button, as shown in Figure 7-3.

Figure 7-3. Adding a new role
For example, you could create a new role called database manager and then grant to it the permissions of configuring and setting up database connections; for example, you could assign the following permissions:
- Add database methods
- Change database methods
- Add Z gadfly database connections
This way, all users with the database manager role would be allowed to modify database settings and database methods. To grant permissions on the database manager role, all you need to do is go to the Security tab, where you should see the database manager role listed now. You then only have to select the desired permissions that you want to grant to it, confirm, and then save your changes. Now, people who have this role will be allowed to add, for example, database connections (or whatever else you have decided to grant them).
This use case is similar to many others; you can also create different roles for CSS designers, for Python programmers, and so on. Each user will be allowed to do only what you want to grant them the ability to do, and lots of users with different roles can work all together without viewing or breaking things from other people.
Understanding the Way Zope Stores Users' Information
Where does Zope store user information by default? Zope users will be stored by default in the acl_users tool (ACL, in computer sciences in general, stands for access control list). If you have an account on a Zope server and you try to log in, Zope will authenticate you through the acl_users tool. Figure 7-4 shows you what the acl_users tool looks like.
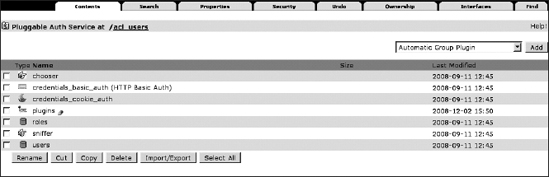
Figure 7-4. The acl_users tool for Zope
The acl_users tool is the pluggable authentication service (PAS) folder object, where you can add new Zope users and map users with roles. You can also create new plug-ins, for example, to manage user authentication through an LDAP server or other systems you already use.
If you want to create a new Zope user, you have to click Users in the acl_users tool and then click "Add a user." As a simple example, let's create a new user called new_user and assign it to have the manager role. Fill in the creation form, as shown in Figure 7-5, and then confirm by clicking the Add User button.

Figure 7-5. Adding a new user in the acl_users tool
You may grant to new_user higher privileges by changing the roles assignment. Click the Roles option in the Zope acl_users tool, and click the "?" link near the manager role. Here you can search for the new user you just created and enable it for the manager role, as shown in Figure 7-6.

Figure 7-6. Assigning the role of manager to your new user
Now you have a new Zope user, new_user, with manager privileges.
In the root of Zope, you always have an acl_users tool, but you can also create one or more acl_users tools in certain folders contained in the Zope instance; then you can use those tools to store users or override the roles of existing users. That's how you create different areas with local Zope users so that they can authenticate only in that part of the application. For example, you could create accounts for developers only in a certain area (by creating an acl_users tool in the proper folder) so that developers can manage the code in one section but won't have the ability to view or manipulate code in other sections.
What you have just seen is only part of what you can do with Zope and users in Zope. If you are interested in finding out more information about Zope 2 security, you can take a look at the Zope Book at www.zope.org/Documentation/Books/ZopeBook/2_6Edition/Security.stx. But, as you probably already know, Plone introduces other advanced security features. Let's go through these new concepts now!
Using Plone Workflows
As you may have already noticed in previous chapters, when you create a new document or view a document as a logged-in user, you'll see the State drop-down menu. "What is that for?" you may ask. Well, it's for managing the "visibility" of your content. The State menu determines whether a page is published so that every visitor can see it or whether it's private so that only certain users can see it. You are probably already familiar with these concepts, because you met them in Chapter 3. So, the State drop-down menu allows you to trigger a state transition and put the item in another logical state. These state transitions compose what is known as workflow. This term in general refers to the series of actions that people will go through in an organizational structure. Thus, in content management, it is the step-by-step status that a piece of content will go through, depending on the organization's needs. We'll go more in-depth into workflows in just a moment.
The chain of actions that occurs on objects in Plone is managed by its workflow. In this section, you will see how it is possible, with a few clicks, to change the workflow associated by default with a particular type of object and manage the settings of each transition and workflow state. You will do this inspecting a workflow that's available by default in Plone.
Using the portal_workflow Tool
How do you associate a workflow with a particular content type? How do you choose the default state for a newly created object? Where do you create or customize workflows? We'll answer these questions in order.
First, associations of workflows with particular content types are managed by the portal_workflow tool, which contains the workflow definitions for your portal. You can see the tool in Figure 7-7.
The main panel of this tool shows the mapping for portal types and used workflows. For instance, as you can see, the Document (Page) content type is associated with the (Default) workflow, and the (Default) workflow is mapped to the simple_publication_workflow, since this is what is assigned by default. From here, it is possible to change the workflow mapping.
Don't worry if the workflow you choose doesn't have some states, because you can map them by changing the previous state to a new one that is available in the new workflow you want to enable! You can change the workflow mapping through the Plone interface as well; just enter the Plone control panel, and click Types. As you learned in Chapter 4's "Main Site Setup" section, through this panel you can change the default workflow, either for individual content types or for the entire web site. Whenever you change the associated workflow for an object, you will be prompted to assign a mapping so that you can migrate the old states to new states of existing objects; see Figure 7-8 for an example of changing states to equivalent ones in the new associated workflow.

Figure 7-7. The portal_workflow tool in the ZMI
The portal_workflow tool has many useful tabs and buttons you should note. One particularly important button you will find in the portal_workflow tool is the "Update security settings" button in the Workflows tab, which lets you update security settings. You should use it every time you change any security configuration, as you will see soon in this chapter. There's also a Contents tab that lets you see what workflows are defined in your portal, as shown in Figure 7-9.

Figure 7-8. The Type Settings panel for the news item content type, where you can change the workflow and use the state's mapping to select an equivalent state in the new workflow

Figure 7-9. The Contents tab in the portal_workflow tool
Let's look more closely at the simple_publication_workflow so that we can show how to manage states, transitions, roles and permissions, groups, variables, and scripts.
Managing an Existing Workflow
As you can see in the Contents tab for the portal_workflow tool, one of the available workflows is the one we already talked about, the simple_publication_workflow, which is set by default for your site.
Other defined workflows are as follows:
folder_workflow: This is for folders and used in conjunction with the Community workflow. It has no Pending state and allows the owner to publish the folder without approval.intranet_folder_workflow: This is an Intranet workflow for folders. It's normally used with the Intranet/Extranet workflow on folder types. It has only two states: Private and Internal Draft.intranet_workflow: This is an Intranet/Extranet workflow. It's an intranet workflow when content is accessible only if you are logged in. Its basic states are Internal Draft, Pending Review, Internally Published, and Private. It also has an Externally Published state, so you can make selected content available to people outside the intranet.one_state_workflow: This is a single-state workflow. This is essentially a workflow with no transitions but only a Published state.plone_workflow: This is a Community workflow. Users can create content that is immediately publicly accessible; content can be submitted for publication by the content's creator or a manager, which is typically done to promote events or news to the front page. Reviewers can publish or reject content, and content owners can retract their submissions. While the content is awaiting review, it is readable by anybody. Once content is published, it can be retracted only by a manager.
The Contents tab is also the place where you can create your own workflows, as you will see later in this chapter.
Click the simple_publication_workflow link, and a new panel will appear, as you can see in Figure 7-10.

Figure 7-10. Information about the simple_publication_workflow
The simple_publication_workflow is useful for basic web sites. The description says it all: "Things start out as private, and can either be submitted for review, or published directly. The creator of a content item can edit the item even after it is published."
Before explaining the behavior of this workflow in detail, we'll introduce some basic concepts about how workflows are built.
The main concepts of state-based workflows are as follows:
- States
- Transitions
- Roles
- Permissions
In Plone there are also other features such as review lists, variables, or custom scripts after or before transitions.
A workflow defines one or more logical states and can be associated to a specific portal_type. When you create a new document, it will be in the initial state defined by the associated workflow. At this point, if you have the correct rights, you can click a state transition, and change it to another logical state. In each logical state, users have different permission settings; in other words, the mappings for member roles vary. Each mapping looks like a matrix that establishes the relationships between roles and permissions for each state.
For each workflow defined in Plone, some useful configuration tabs are available in the ZMI:
- States
- Transitions
- Variables
- Worklists
- Scripts
- Permissions
- Groups
Let's see what each tab lets you do.
The Permissions tab lets you define which permissions are managed by that workflow. For the simple_publication_workflow, the following permissions are considered by default:
- Access contents information
- Change portal events
- List folder contents
- Modify portal content
- View
You can add other permissions to the previous list by using the "Add a managed permission" drop-down menu shown in Figure 7-11. You can also remove permissions by selecting the appropriate check box and clicking the "Remove selected" button.
The Permissions tab is available for each individual workflow state: click the States tab, choose a workflow state, and then click the Permissions tab. Here, you can create a custom permissions-roles mapping for each state, as you will see soon when we will talk about the States tab. In this way, you can grant or not grant permission to members, according to the kind of security settings you want to enable for your content. For instance, by default the anonymous role can view a published object but not hidden objects, only a user with the manager role can edit it, and the creator of it can't edit it (see Figure 7-12).
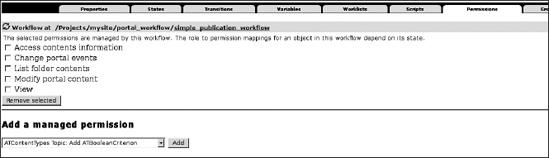
Figure 7-11. The Permissions tab for simple_publication_workflow

Figure 7-12. The Permissions panel for a single state
You can also protect single fields so that they can be viewed, modified, and so on, only by users with certain roles and permissions. But, to do so, you need to write some supplementary code, so we won't face this case here.
The Worklists tab lets you define one or more review chains. By default you will find a review queue for the Pending state.
The Scripts tab lets you include Python scripts in your workflow in order to run them before or after a particular transition. By default it is empty, and these scripts are written only by programmers, not end users (so don't worry about security issues).
The Variables tab lets you add new variables to include in the workflow history of your objects, and you can catalog this information. For example, you can add as variables the time when a transition was performed or comments about the last transition.
The Groups tab lets you set how groups are managed in your workflow. In particular, you can create a group-roles mapping for each logical state.
And now we will cover the most important configuration tabs for workflows: States and Transitions.
The States tab lets you define and manage all the states defined in your workflow. Click the States tab now; you will see the list of all the logical states defined in the current workflow, as shown in Figure 7-13.

Figure 7-13. The States tab for the simple_publication_workflow
Here you'll find the following states for the simple_publication_workflow:
- Pending
- Private
- Published
As you have probably noticed, the Private state is marked with an asterisk (*). Only one state can be marked like this because the asterisk indicates the initial state of objects in Plone. That is why when you create a new item on your portal, it is in the Private state. You should also have noticed that for each state some transitions are enabled. For example, from the Private state you can choose a transition that will put items in a different logical state, in this case Publish and Submit. From this tab, you can also create new states, or you can rename and configure an existing state.
Clicking each state allows you to configure it. You can define which transitions you want to enable for that state and configure what users can acquire permission settings (such as viewing, editing, and so on). Let's inspect the Private state and try to find out what you can do through its configuration panel (see Figure 7-14).

Figure 7-14. The configuration panel for the Private state
If you want to manage permission settings for this state, you have to click the Permissions tab, which lets you define a custom permission-roles mapping for that particular state. Figure 7-15 shows the permission settings for the Private state.
Caution Be aware that this is not the same Permissions tab we have already discussed! Previously, we talked about the Permissions tab for each type of workflow registered in the portal_workflow tool. Here we are talking about the tab that refers to permission mappings that is different for each workflow state. The same is true for the Groups and Variables tabs. The Groups tab lets you define a group-roles mapping for that particular state. The Variables tab for a particular state allows you to assign values to workflow variables for when objects move to the relevant state.
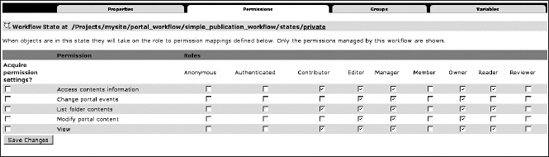
Figure 7-15. The permission settings for the Private state
You can grant different permissions to each role from this tool. For example, let's consider the anonymous role. Anonymous users don't have any permission in this particular state, which is why they cannot view a private document. The user with the role of reader can view this object only if it is in the Private state. And if you have a higher role such as manager, you can view and modify this object. So, we get different behaviors on the same objects according to the role of users!
You can modify permission settings for each state, granting or rescinding permissions to roles. Once you're done, you have to update the workflow security settings by clicking the "Update security settings" button in the default view of the portal_workflow tool.
Now let's return to the main view of the simple_publication_workflow, and let's see how transitions are registered and configured. Click the Transitions tab, and you will find a listing of registered transitions with some basic information, as Figure 7-16 shows.

Figure 7-16. The workflow transitions configuration panel for the simple_publication_workflow
You should find these registered transitions:
- Publish
- Reject
- Retract
- Submit
For each transition, this listing shows other information. The most important here is the "Destination state" value that lets you define the destination state after the transition, if triggered. For instance, under the reject transition, you can see that if an item undergoes reject, its destination state sets it to Private.
From this panel you can also add new transitions. You can add a new transition from scratch or take a look at how other transitions are configured. Just be sure that you enable your new transition in other states.
To change the settings related to a transition, you need to click the link on that transition to open its configuration panel. To take a closer look at how transitions are configured, click the Publish transition link, and look at the corresponding panel (see Figure 7-17).

Figure 7-17. The configuration panel for the Publish transition
Here you will find a title and some description text, which is useful in order to quickly understand what kind of transition it is. Below that you will find a "Destination state" drop-down menu that lets you set the destination state (in this case Published). You can also select some Python scripts, if there are any, to be launched before or after this transition.
For each transition, you can also configure how it's triggered: by a permission, by a role, by a group, or by an inline generic Python expression. In this case, the Publish transition is protected by the "Review portal content" permission. You can alter this setting with another Zope permission, and this transition will be displayed only to allowed profiles of members. Finally, at the bottom, you'll find the "Display in actions box" area, where you can change the text shown to you in the State menu.
If you can imagine a workflow like a graphical states diagram with transitions that lead you from state to state, on each state you may have a different permissions-roles mapping, and your object behavior will change from role to role! Figure 7-18 shows how the simple_publication_workflow could graphically appear.
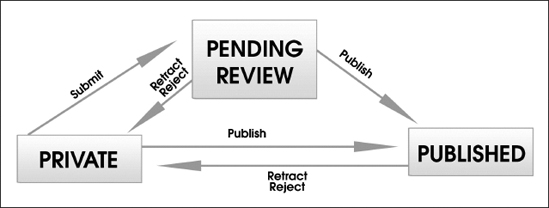
Figure 7-18. A graphical representation of the simple_publication_workflow
After this tour of the portal_workflow tool, you should understand how workflows are built in Plone, and you should also be able to customize an existing workflow, including these tasks:
- Adding permissions handled in the current workflow
- Modifying a permission-roles mapping
- Adding new states
- Adding new transitions
- Modifying existing states and transitions
- Using the Types Settings area in the Plone control panel
- Changing the default workflow for different content types
- Setting a workflow for your objects and migrating them to the desired workflow states
After all your changes, you can easily export the workflow settings using the portal_setup tool. In this way, you can create a snapshot/backup configuration; otherwise, if you are a developer, you can include all the configurations you made in the file system product you are developing. With just a few clicks within the portal_setup tool, you can install your product, automatically getting all your workflow settings!
Adding Plone Policy Support
Now we'll introduce the concept of workflow policies. Workflow policies are local configurations on site areas and objects so that you can map each content type to existing workflows or custom ones and give different permissions in a specific section of your site. With just a couple of clicks, workflow policies let you create an intranet area within your web site, or a special section with a particular workflow for news items and events, so that the editorial office of a big company can have a custom workflow, for example.
We will not work in the ZMI; we will use the Plone user interface this time, so don't worry! This feature is very easy to manage.
First, enable the Workflow Policy Support product (CMFPlacefulWorkflow) available (but not installed) by default in Plone. To do so, go to the Plone control panel, click Add-on Products, select the Workflow Policy Support item, and confirm the installation. After that, a new item, named Workflow Policies, should appear in the Plone control panel; clicking it will lead to a new configuration form.
Through the Workflow Policies configuration panel you will be able to modify the global portal_type-workflow mapping (you will be able to select the workflow you want for each content type in a certain area of your web site), modify existing local workflow policy settings, and create or duplicate a new workflow policy that you can apply locally on content.
The Workflow Policies configuration panel presents two configuration tabs, as you can see in Figure 7-19. The Global Content Type to Workflow Mapping tab lets you select the workflow you want to apply to each content type.

Figure 7-19. The Global Content Type to Workflow Mapping tab for workflow policies
If you change something here, whatever you change will be reflected in the portal_workflow tool, which we already discussed. In fact, this configuration panel is more than a user-friendly front-end view for the portal_workflow tool—it also introduces some new useful features! We'll discuss them in a moment.
The second tab, Local Content Type to Workflow Mapping (shown in Figure 7-20), leads you through the Workflow Policies configuration panel; it lets you define new custom workflow policies and configure the existing ones, if needed, by changing the default mapping for content types and used workflows.
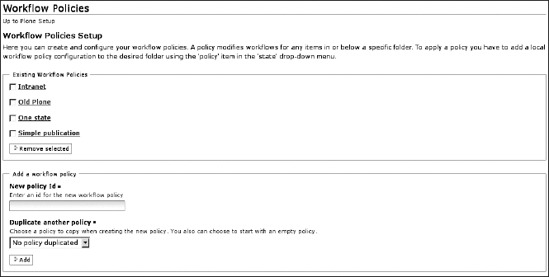
Figure 7-20. The Local Content Type to Workflow Mapping tab for workflow policies
At this point, you can simply use the existing workflow policies or create new ones. Existing policies, registered by default in this tool, are as follows:
- Intranet: A policy for intranet areas where users cannot access content if they are not logged in
- Old Plone: A policy with the standard Plone workflow as default
- One State: A policy with no transitions and only one state
- Simple publication: A policy with the
simple_publication_workflowas the default workflow
If you click one of these policies—for example, Intranet—you can see that you can choose a local workflow used by default (see Figure 7-21 for an example), and for each content type you can map the workflow to be used only in the area where you apply this policy.
Let's start with a simple example in order to understand how it is possible to apply local workflow mappings. Imagine you have to deal with a public web site powered by Plone, but you want also to add a reserved area, reachable only by registered users. In this area, different profiles of users can create, view, and modify content depending on user roles. You can also publish some content externally if you want, letting anonymous users view the content; otherwise, nobody can see inside this area.
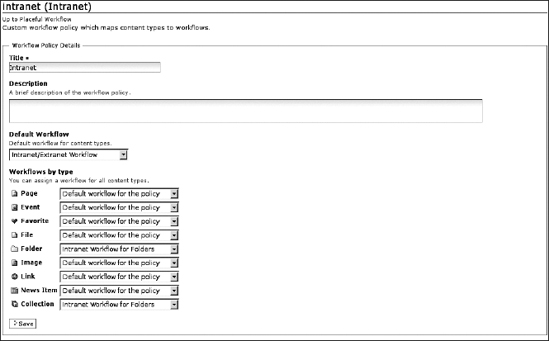
Figure 7-21. The workflow mapping configuration panel for Intranet
How can you do this? Go into the root of your web site, and create a new folder named, for example, Intranet. At this point, if you have correctly installed the workflow policy support, look at the State drop-down menu, and you will see a new item, Policy, as shown in Figure 7-22.
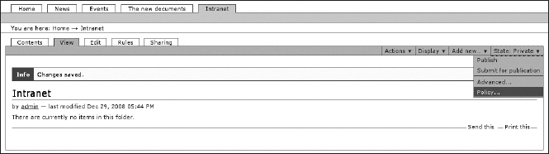
Figure 7-22. The new option that will appear in the State menu: Policy
Click the Policy option, and you will get a page similar to the panel shown in Figure 7-23.
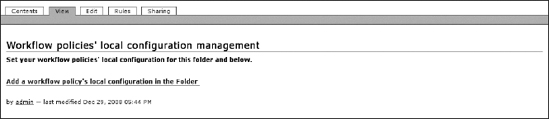
Figure 7-23. The Workflow Policies' Local Configuration Management panel for new folders
At this point, you can click the following link: "Add a workflow policy's local configuration in the Folder," as shown in Figure 7-24.

Figure 7-24. Adding a new workflow policy in a folder
You can choose a workflow policy for the current folder and also for other content that the folder contains. Toggle the Intranet option for both sections of the configuration panel (you can choose any other option, of course, according to your needs).
With just a couple of clicks of your mouse, you've created an entire intranet area—wow! The entire web site now has a global workflow definition. In the Intranet folder only, you have a custom workflow policy that puts at your disposal an intranet/extranet area. If you take a closer look at the Intranet folder, you will notice that both the Intranet folder and the items it contains have different workflow states, as you can see in Figure 7-25, for example.

Figure 7-25. The State menu for the intranet area
If you want to find out more details of how the intranet workflow works, you can go to the portal_workflow tool in the ZMI. You can see these available states:
- Internal Draft: Visible to all intranet users; editable by the owner
- Pending Review: Waiting to be reviewed; not editable by the owner
- Internally Published: Published and visible to intranet users; not editable by the owner
- Private: Cannot be seen by simple registered members
- Externally Published: Selected content available to people outside the intranet
You can inspect the permission settings for each state in the same manner you inspected the simple_publication_workflow in this chapter.
In this case, you used a workflow policy already available in Plone. The workflow policy configuration panel will also let you create new policies manually or duplicate existing ones. So, if you want a new local configuration workflow policy, you can create it by hand or, if it is similar to an existing one, duplicate it and change only those mappings that you want to modify. In this way, you can duplicate and customize a policy without modifying the original one. Once created, you can create a new area and apply the new policy, as already done, or apply it to an existing folder.
Creating and Customizing Plone Workflows
You have already seen how workflows are organized. In this section, we will show how to build a couple of simple and practical examples.
Customizing an Existing Workflow
You have seen that the intranet_workflow allows you to publish content externally so that anonymous users can also view it. If you want to disable this feature from the default intranet workflow, you can untoggle the publish_externally transition on those states where it is enabled: Pending and Internally Published. To do so, go to the portal_workflow tool of your Plone site, click the Contents tab, and select intranet_workflow. At this point, click the States tab, click the Internal Published state, and deselect the transition called publish_externally. Repeat this operation also for the Pending state. After that you can remove the external state if you want because there are no transitions to this state.
That is it—you have just customized your first workflow! Now if you are using the intranet_workflow, you should not find any publish_externally option in the State menu. You can also export all your manual configurations using the portal_setup tool.
Note Instead of doing it this way, you can also change the permission settings for the publish_externally transition and protect this transition with a higher permission. It just depends on what you want to do.
Duplicating and Creating New Workflows
Let's say you want to create your own intranet workflow and keep the original Plone's intranet_workflow untouched. Go to the portal_workflow tool, copy and paste the intranet_workflow, and rename it to myintranet_workflow.
Do this as an exercise, but first remove from the new myintranet_workflow the publish_externally transition created in the previous example. At this point, you can disable transitions, change permission settings, and add new states and transitions, all by working through your browser. When you have finished, you can use it as a local workflow policy or assign this workflow to one or more content types.
Let's enrich our example. Let's add a new state called to_be_deleted and of course a new transition called request_delete. This means you will be able to mark some content as removed, and this content should not be visible for anonymous users; reviewers can manually decide whether content marked as to_be_deleted should be removed, or you can choose to automatically eventually delete content from a batch script called once a week. We will not implement the batch script, but we will cover the workflow configuration.
Note You can do something similar with several methods. For example, you can put your objects in the state Hidden and mark them with a to_be_deleted keyword. You will be equally able to apply a script that deletes those objects automatically.
It's also a good idea to create the ability to undo any changes if you make a mistake; to do this, we'll create a new transition called undelete. Let's start from the myintranet_workflow. Go to the States tab of this workflow; fill in the "Add a state" form with the name of the new state, to_be_deleted; and finally click the Add button.
At this point, you can click the new state you just created and configure the permission settings. You can copy the same settings of the Private state.
Now return to the default view of your myintranet_workflow, and click the Transitions tab. Then add a new transition named request_delete through the "Add transition" field. Click the new transition, and configure it: insert a title, choose to_be_deleted as the destination state, and allow this transition to trigger only for those users who have the "Review portal content" permission. Then configure the display box: use request_delete as the title, and finally put this expression into the URL section:
%(content_url)s/content_status_modify?workflow_action=request_delete
You can copy this expression from another transition. Note that the last part of the URL is the transition ID!
Repeating these steps, now create a new transition called undelete that will lead the object into another state (such as the Private one), letting users undelete contents marked as to_be_deleted before the batch script will run. In Figure 7-26 you can see what the transition configuration form should look like.
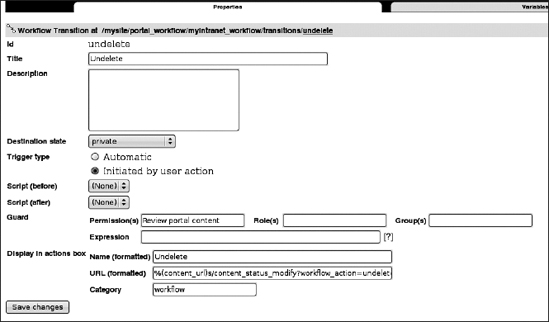
Figure 7-26. The configuration panel for the workflow transition "undelete" we just created in our example
Note that we have only created two new transitions; we still have to enable them. So, enable only the first new transition, request_delete, in the Internally Published state (or wherever you need to enable it) by toggling the request_delete transition. Next, do the same for the undelete transition. Go to the to_be_deleted state, toggle undelete, and confirm. You're done! Using only a browser, you have created a custom workflow, and now you can export it using the portal_setup tool.
Summary
In this chapter, you learned how security is handled at the Zope level, and we introduced some basic concepts such as users, permissions, and roles. You also learned how to manage Zope users using the acl_users tool, creating and changing roles as necessary.
By now you should know that Zope has a very powerful and granular security architecture and that Plone inherits this solidity. Plone takes advantage of the Zope security architecture; but more important, it adds other concepts such as workflows applied to content.
Finally, you learned how to edit existing workflows provided by default in Plone and how to create new workflows from scratch using just a browser. This way, you can add all the states you need for your objects with different permission settings for each state, where permissions may refer to viewing the whole object, viewing or modifying a particular field, reviewing it, and so on. This lets you build complex state-based workflows that let different users interact, with review steps and other cool things, all from right within your browser.