
Chapter Five. Shooting Weddings Like a Pro
Recipes for Making the Bride Look Awesome (Because Nobody Cares About the Groom)
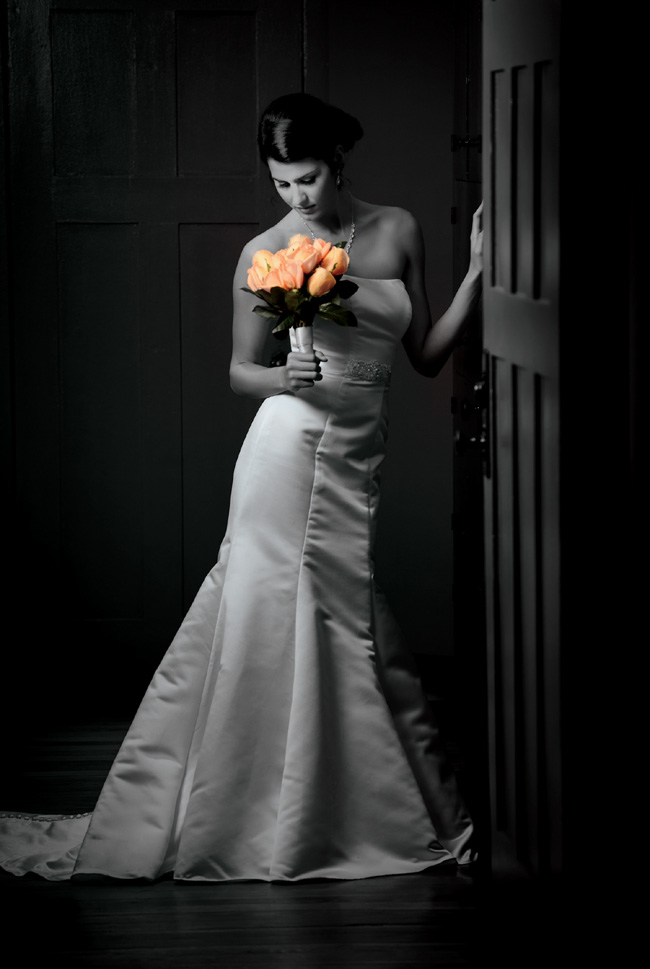
SHUTTER SPEED: 1/80 SEC F-STOP: F/5 ISO: 100 FOCAL LENGTH: 150MM | PHOTOGRAPHER: SCOTT KELBY
Okay, that last part about nobody caring about the groom isn’t really true. There are people who care very much about photos of the groom, like the groom’s mom, and...and...wait, just give me a minute on this one. Ummmm. I’m almost certain there’s someone else.... Anyway, what I was trying to say was your job at a wedding is to get amazing pictures of the bride, her bridesmaids, the maid of honor, the bride’s mother, and really, beyond that it’s okay to pretty much ignore everybody else, especially the groom and groomsmen because by and large they are loud and grotesque, but more importantly, they are not the bride. If you get a stunning shot of the bride, it really doesn’t matter what else you do that day, so this chapter is focused on how to do just that. Here we go: Tip #1 is only shoot beautiful brides. If you show up for an interview with the engaged couple and that bride-to-be doesn’t look like Scarlett Johansson or Rihanna, it’s time to bail. I don’t care what kind of fancy Profoto lights you have, or if your softbox is the size of a NASA radar dish, if your bride is ugly, you’re going to have the most beautifully lit ugly shots you’ve ever seen. So, bail now while the getting’s good. Tip #2: If the groom is ugly, who cares? His mom? Yes, but she knows he’s ugly. Tip #3: If you’re ugly, keep the camera up to your face as much as possible so it doesn’t scare the bride. Tip #4: If your second shooter is ugly, hire a professional model as a stand-in. Doesn’t matter if they even know how to turn on a camera because he/she is just there to distract the bridesmaids/groomsmen from how hideously ugly you are. Tip #5: What if you’re not ugly? Look, I’ve seen you. Trust me, you’re a troll. I’m sorry. Somebody had to say it. This is called “tough love,” but love is what weddings are all about.
Controlling Light Outdoors
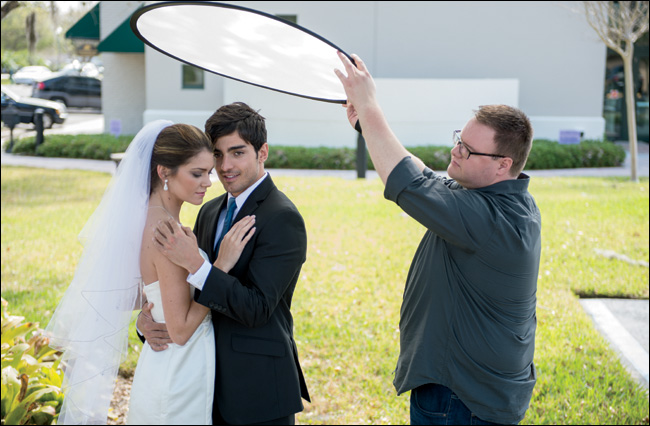
BEHIND THE SCENES: The photographer doesn’t usually get to determine when in the day the wedding will be held, so you can almost bet that whenever it is, the light will be pretty harsh and crappy. That’s why it’s so worth investing around $19 in a Westcott 1-stop collapsible diffuser. You just put this diffuser between your subjects and the harsh, direct sun. It will spread and soften the direct sunlight, creating gorgeous natural light anywhere you need it (and since it’s collapsible, it’ll hardly take up any room in your camera bag). This is my #1 go-to solution in direct sunlight. As far as placement goes, you want this down as close to your subjects as possible without it actually appearing in the photo (the closer you can get that diffuser to your subjects, the softer and more wrapping the light will be). So, I have the person holding the diffuser for me bring it closer and closer to my subjects until I can see the edge of it in my frame. At that point, I ask them to raise it just a little—just enough to where it’s out of my view—and then I take the photo, knowing the diffuser’s positioned in its most soft and beautiful place.
CAMERA SETTINGS: I shot this with my 70–200mm f/2.8 lens (my go-to lens) zoomed in to 195mm and at f/2.8 to blur the background. My shutter speed was 1/2500 of a second (I was in aperture priority mode, where I choose the f-stop and the camera automatically chooses the shutter speed it needs to make a proper exposure), and my ISO was at 1600 (I could’ve lowered it, but we’d been shooting inside and I forgot).
Final Image
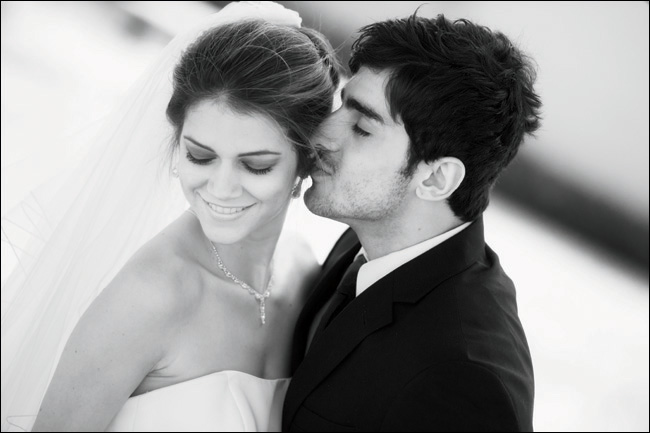
THOUGHT PROCESS: Our goal is soft, beautiful, natural light outdoors and you normally won’t need to add any fill-in light with flash—there should be plenty of sunlight coming through that diffuser to light your bride and groom. Remember, the diffuser isn’t blocking out the sun, it’s just spreading and softening the sunlight so it’s not harsh. If the sun isn’t out, you don’t need the diffuser, because the clouds will act as a natural diffuser.
POST-PROCESSING: I often add a big, soft glow. If you have Photoshop and the Nik Collection (software plug-ins that are very popular with photographers—around $149 bought direct from Google, who bought out Nik a while back), then you can use the Glamour Glow filter inside the Nik Color Efex Pro plug-in. The default preset setting is nice, and the Stronger Glow preset works well, too (it’s just a stronger amount of glow). Those are the only two presets I use, but they work great. If you don’t have the Nik Collection, then you can do this in either Photoshop or Elements: (1) Duplicate the Background layer. (2) Go under the Filter menu, under Blur, and choose Gaussian Blur. When the filter’s dialog appears, enter 50 pixels and click OK. Now, in the Layers panel, change the blend mode (the pop-up menu at the top left of the panel) from Normal to Soft Light (to add contrast), then lower this top layer’s Opacity to around 50%. That should do the trick. In this case, I also converted the image to black and white using Nik’s Silver Efex Pro plug-in (also part of the collection), but you can use Photoshop and convert the image from RGB to Grayscale under Mode on the Image menu.
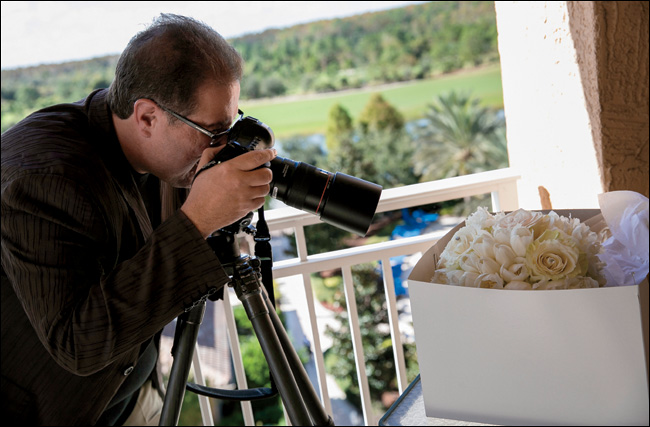
BEHIND THE SCENES: The bouquet had just been delivered, and I wanted to get a few tight shots while it was at its freshest. I went out to the hotel room’s balcony so I could use natural light, and I was careful to place the bouquet in the shade so the natural light would be soft. I also went and borrowed the bride’s engagement ring for the shot and placed it inside the petals of one of the roses.
CAMERA SETTINGS: I’m using a macro lens here (and also for stuff like close-ups of the groom’s cuff links, or the invitation with both rings sitting on it, etc.). They have a ridiculously shallow depth of field, so any camera movement at all and the whole shot will be out of focus—you really need to be on a tripod. I’m shooting here in aperture priority mode and, since the depth of field is so shallow, I try to shoot at f/16 or f/22 to squeeze another 1/16" that’s in focus. On a tripod, I use my lowest ISO (as always) and it doesn’t matter what my shutter speed is because (wait for it...) I’m on a tripod.
Final Image
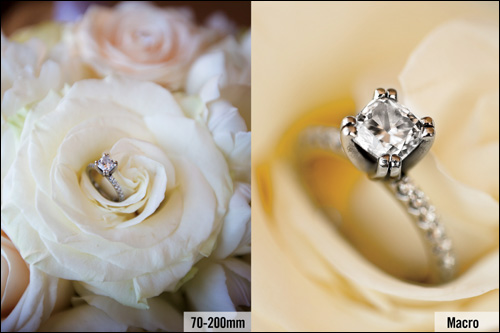
THOUGHT PROCESS: The 70–200mm lens is a staple of many wedding photographers, but you’re not going to be able to get in as tight as you’d like because they usually have a minimum focusing distance. So, if you start to get too close to the ring, everything goes out of focus and you can’t get in really close (and if you try to get as close as you can and then crop it tight, you won’t get that super-crisp detail and mega-shallow depth of field that is the trademark of a macro shot. The shot at left is as close as I can get with a 70–200mm before it goes out of focus). That’s where a macro lens comes in (or better yet, use my handy tip from part 2 of this book below). A macro lens lets you zoom in and get crazy close (like you see above on the right), and create a level of detail that has real impact. Plus, look at how amazingly shallow the depth of field is for the image on the right. The diamond and mount are in focus, and just 1/16 of an inch behind that, it all goes blurry and out of focus, which really makes the diamond stand out.
TIP: DON’T BUY A MACRO LENS, GET A CLOSE-UP LENS INSTEAD
Whether you shoot Nikon or Canon, you can use Canon’s brilliant screw-on close-up lens, which is only about 3/4" thick, super-lightweight, and pretty inexpensive (starting at around $72, but it’s based on the size of your glass in mm). You just throw it in your camera bag and screw it on to your zoom lens when you need it. Super handy!
Mixing Natural Light with Strobes
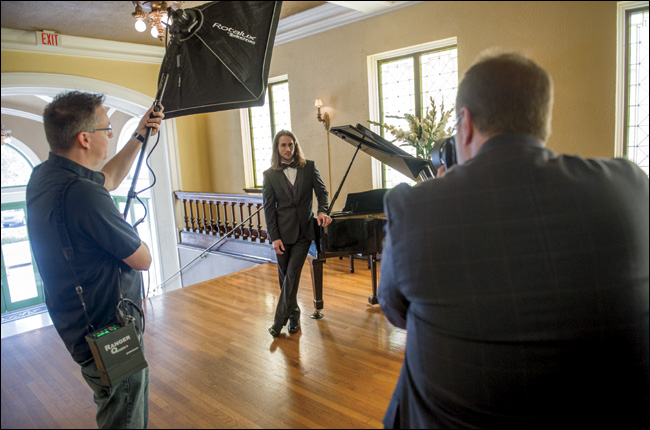
BEHIND THE SCENES: Here, we’re mixing the little bit of natural light coming in through the windows (camera right) with the light from our single flash (mounted here on a monopod with a small 24x24" softbox—one of my favorite sizes for weddings, where most of the shots I take with flash will be from the waist up). The light is in the standard position: at a 45° angle to the subject, up high, and aiming down at him.
CAMERA SETTINGS: I’m using a flash, so I’m always going to be in manual mode on my camera, and my shutter speed was set to 1/125 of a second (my safe, standard starting point). My f-stop was f/8, which pretty much kept everything in focus, front to back. I used an 85mm lens—a little wider than I normally go, but I wanted to include enough of the piano in the shot that you could instantly tell it was a piano. The power setting on my flash was very low (I didn’t want the flash to look like I used flash. I like to keep it subtle).
Final Image
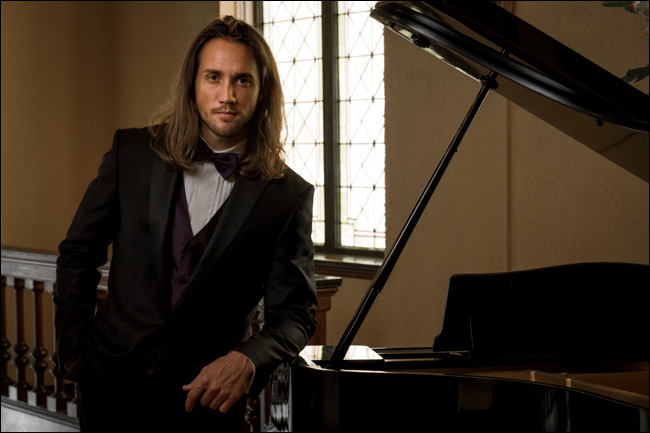
THOUGHT PROCESS: The idea here is to use the little bit of light coming in through the stained glass window as our second light (a kicker light, if you will), just adding a bit of light to the camera-right side of his face and hair, and then letting the flash be the main source of light that actually lights him. You don’t want to let the light spill too much onto the camera-right side of his face or it will overpower that light coming in from the window, and I think that window light adds a nice bit of depth, dimension, and separation. The way to keep that flash from overpowering the window light is to move the light farther away from the camera position (toward camera left), so more of the shadows fall on the right side of his face. Just a note: you’re not actually going to move the light to the left. You’re going to rotate around him like he’s at the center of a clock, so if you’re shooting directly in front of him (at the 6:00 position) and the light was at 7:30, you’d move it to closer to the 8:00 position to create more shadows on the right side of his face (the 9:00 position would have the right side of his face fully in shadow). At this point, our job is to balance the power of the light with the existing room light. I keep the power of the flash low, and adjust the shutter speed to a slower speed than my starting point of 1/125 of a second to add in more room light. The slower the shutter speed, the more natural room light you get. Think of your shutter speed dial as a dimmer switch for the light in the room. Just like in real life, lowering the dimmer switch for the lights in the room wouldn’t affect the power setting of your flash—it stays the same throughout.
Reception Flash
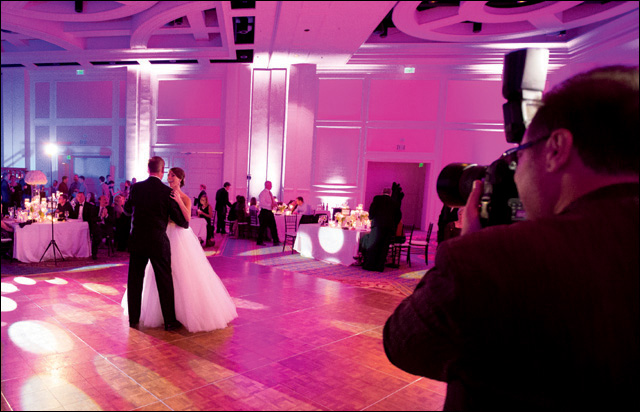
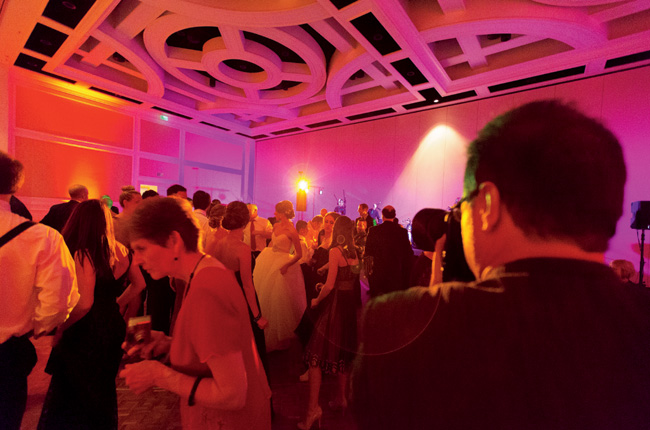
BEHIND THE SCENES: Here, we’re in a hotel ballroom and you can see the room’s lit with colored lights from the DJ/band and constantly changing colored LEDs on the walls provided by the hotel for the reception. I’m using one single speedlight flash on my camera’s hot-shoe mount, and I’ve aimed it straight upward toward the ceiling. Even though I’m aimed straight upward, some of the light from the flash still goes forward to light the bride and her father (in this case) on the dance floor, and it’s just enough to add a little light on them while still blending in with the existing room light.
CAMERA SETTINGS: Since the flash is aiming straight up at the ceiling (it’s not bouncing off the ceiling back down to the subject—the ceiling is too high for that—I’m only interested in the tiny bit of flash that comes out of the front), I have it set to full power. When using flash, my camera’s always in manual mode. My shutter speed is set to 1/250 of a second, here (making the room appear darker than it really is). My f-stop is f/1.4, which lets me hand-hold in a low-light situation like this, but to do that I had to raise my ISO to 640. I used an 85mm lens so I could shoot at that fast aperture, and it’s wide enough to let me include some of the reception hall in the shots.
TAKE-AWAYS: In low-light situations like this, you need a fast lens (like an f/1.4) to keep your ISO from getting too high. Aiming your flash straight upward toward the ceiling can send a little bit of light toward your subjects without overpowering the existing light.
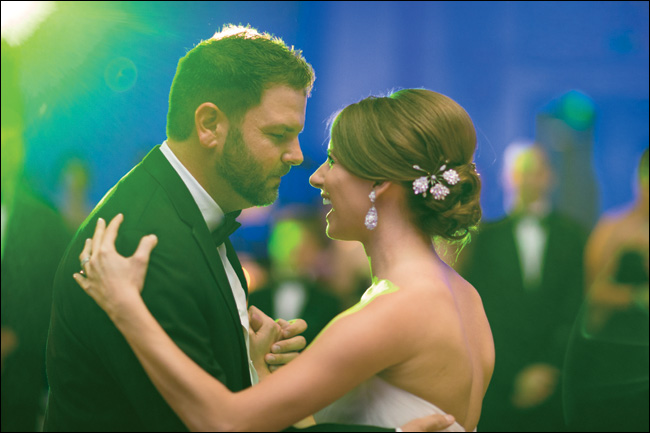
Final Image
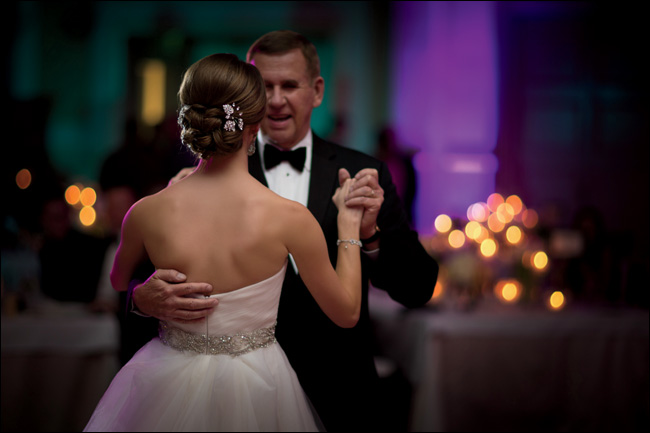
THOUGHT PROCESS: My goal here is to add just a little bit of light to the scene, and not to overpower the existing light in the reception hall. The lighting was very colorful, which is what the bride and groom wanted, so if I turned up the flash and aimed it directly at them (even if I added a diffuser or small softbox), you’d see mostly flash, and most of the color will have been overpowered. Notice how you can still see a magenta light on the bride’s dress and along her arm, and on her dad’s head. Also, using such a low f-stop (like f/1.4) puts the background a bit out of focus, separating them from the background, even though we’re not zoomed-in tight. By the way, to give you an example of how important having a fast lens is in a low-light situation like this, I was able to take the shot above at 640 ISO to give me a shutter speed of 1/250 of a second (enough to freeze their motion while dancing, and eliminate any movement from me hand-holding the camera). The production shot of me shooting on the previous page was taken at a slower (higher-numbered) f-stop of f/2.8. To get the shutter speed to 1/125 of a second (just fast enough for a non-blurry hand-held photo), my assistant Brad needed to use an ISO of (wait for it...wait for it...) 16000. That’s not 1600 ISO. That’s sixteen thousand ISO! It looks really clean because he uses a camera that performs really great at high ISOs like this (a Canon 1D X), but what I wanted to demonstrate is that those really fast f-stops (like f/1.4) really do make a difference.
Be the Second Shooter
BEHIND THE SCENES: We’re shooting with just available light and a long lens here, so we’re kind of “out of sight, out of mind.” I’m standing at the foot of a stairway (after coming down the stairs), and I saw the bridesmaids and bride standing around the piano talking, so I was ready. The moment I saw the maid of honor wrap her arms around the bride, I started firing.
CAMERA SETTINGS: You don’t need a super-fast shutter speed to freeze the action, but it needs to be fast enough to where you don’t come back with a blurry shot. So, you don’t want to let your shutter speed fall below around 1/125 of a second for a hand-held, “run-and-gun” shot like this (there is nothing worse than capturing a magical moment and finding the shot is out of focus). That means shooting at a wide-open aperture (like f/2.8 or f/4), and then bumping up the ISO until you reach that 1/125 of a second mark or faster. This is also an ideal time to use your camera’s Auto ISO feature, where you can tell it not to let your shutter speed fall below 1/125 of a second and, from that moment on, it raises the ISO just enough so that never happens. Ever. So if you miss the shot now, it won’t be because you didn’t have enough shutter speed to hand-hold a shot and keep it sharp.
Final Image
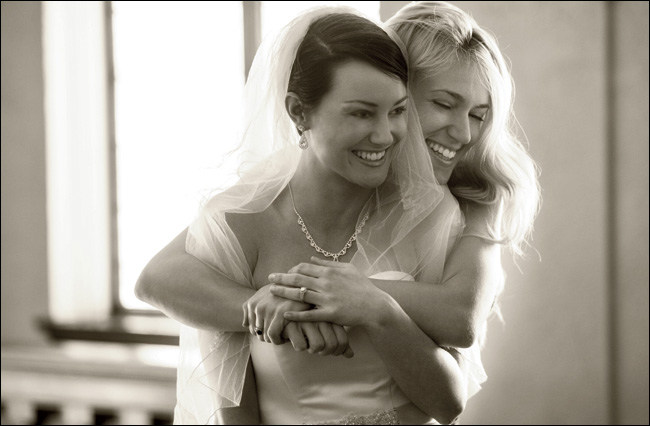
THOUGHT PROCESS: The idea here (which I got from pro wedding photographer Joe Buissink) is to blend into the background and let the first shooter handle the official stuff (like dealing with the parents of the bride/groom and staging shoots with the grooms-men and bridesmaids), so your main job is to capture special moments—the moments you would have missed while arranging groomsmen in a row and tracking down Aunt Helen. As second shooter, you shoot with available light (so, high ISO stuff) and stay kind of off to the side watching and waiting to capture the images that will thrill the bride and groom (trust me, the shots that thrill them will not be the formals).
POST-PROCESSING: Because you’ll be shooting at high ISOs, you’ll probably wind up with some noise in your shots, but don’t worry, they will look great when you convert them to black and white or to a duotone (like you see above). I provided a short video for you on how to create duotones in Lightroom or Photoshop/Elements on the book’s companion webpage (you can find the link to it in the book’s introduction up front). When you convert to black and white, or duotone, that noise is now seen as film grain, and it goes from a negative to a positive really quickly.
Dramatic Lighting
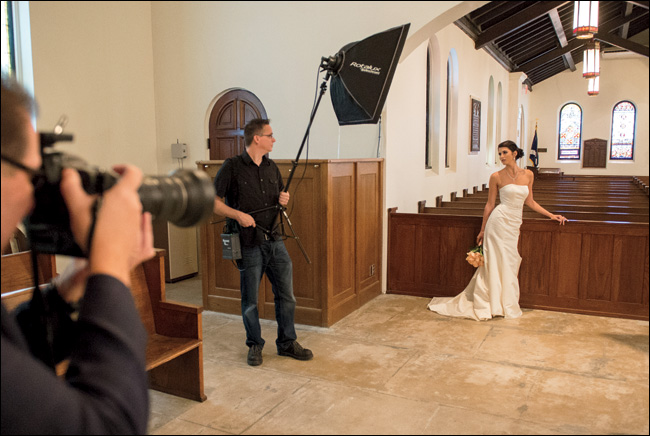
BEHIND THE SCENES: Here, you can see the simple one-light setup (it’s a 24" softbox on a lightweight light stand). It’s to the left of the camera, a few feet in front of our subject, up high, and aiming down. All the lights are on in the church.
CAMERA SETTINGS: I’m shooting in manual mode on my camera, but to create the drama, I’m shooting with a higher shutter speed than my normal 1/125 of a second. In this case, to intentionally darken the area around my subject, I raised the shutter speed to 1/200 of a second (that’s about as high as I can go with a studio strobe, which is what I’m using here with an Elinchrom Ranger Quadra flash head and its portable battery pack. If you’re using a Canon or Nikon speedlight, then you can go up to 1/250 of a second before you have a flash sync problem, where you see a dark gradient across the bottom of the image). I stood way back from our bride and used a 70–200mm f/2.8 lens at f/6.3 zoomed out to around 82mm to capture some of the pews and the stained glass windows behind her in the shot.
Final Image
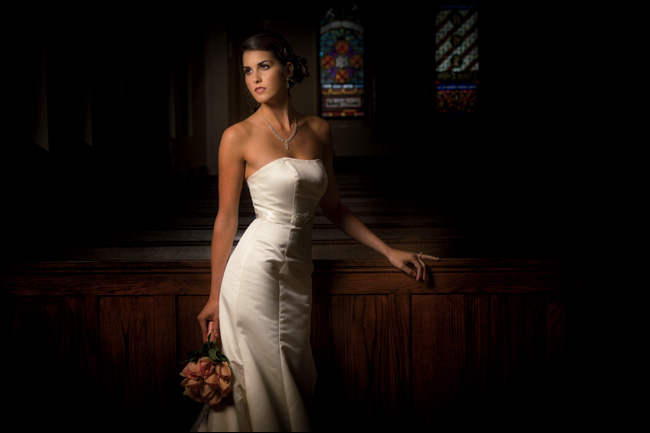
THOUGHT PROCESS: The idea for this look is to keep the light really soft and subtle, and let the background pretty much fall to black, which is why I raised the shutter speed to 1/200 of a second. Beside the light, what makes this shot look so elegant is the pose. First, her body is turned away from the light. When the bride tilts her head toward her back shoulder, it’s a more casual look. When she tilts her head to the front shoulder (as seen here), it gives a more elegant look.
POST-PROCESSING: To make the light appear more focused, add a dark edge vignette around the edges of the image. You can do this in the Effects panel in Lightroom’s Develop module (or Camera Raw), under Post Crop Vignetting: drag the Amount slider to the left and, if it doesn’t extend inward far enough, drag the Midpoint slider to the left, as well (the farther to the left you drag it, the farther in the edge darkening extends).
Using Natural Light Indoors
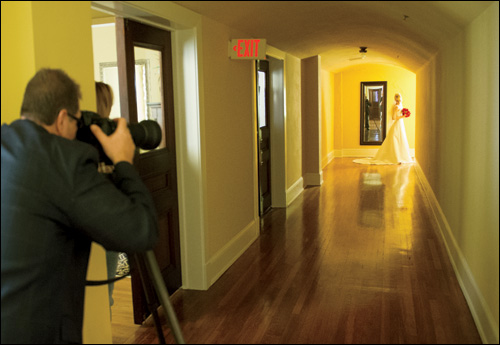
BEHIND THE SCENES: This hallway is in the reception hall. I noticed the natural light at the end of the hall, so I positioned the bride there so she’d be lit with the natural light.
CAMERA SETTINGS: Although it looks like there’s a lot of light here, when I held up my camera I could see that I wouldn’t be able to get a sharp shot hand-holding (my shutter speed fell below 1/60 of a second), so I put the camera on a tripod to keep it steady in the low light. The lens is a 70–200mm f/2.8 and my f-stop is at f/11. Since I’m on a tripod, I can use the cleanest possible ISO (on this camera, it was 100 ISO).
Final Image
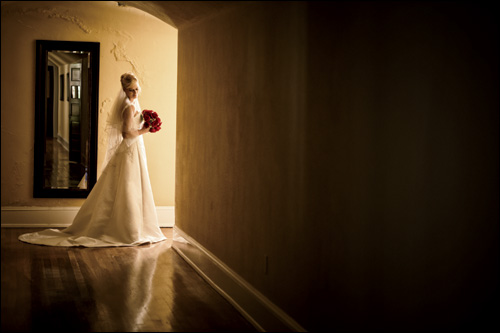
THOUGHT PROCESS: Getting a shot like this is actually very easy: it’s just natural light and there are no special camera settings or anything else that make it unique from a shooting perspective. The only hard part is finding a great hallway like this, and not every church or reception hall has one. It’s something we don’t talk about a lot as photographers, but it’s a very real part of our lives, and that’s luck. In this case, I got lucky that this reception hall had this great hallway, and the end of the hallway happened to be lit with natural light. If it hadn’t been lit with natural light, I could have put a flash down there to light the bride (as long as I was using a wireless radio transmitter, because you don’t want to use a flash to light that hallway you’re shooting down—that would take away all the mystery and drama).
POST-PROCESSING: There was very little to do here, but the yellow color on the walls was kind of overpowering, so I desaturated the overall color in the photo using Photo-shop’s Hue/Saturation adjustment (just drag the Saturation slider to the left, but don’t drag too far or the red roses will turn brown). I also added a darkening around the edges (edge vignetting). You can do this in the Effects panel in Lightroom’s Develop module (or in Camera Raw), under Post Crop Vignetting: drag the Amount slider to the left and, if it doesn’t extend inward far enough, drag the Midpoint slider to the left, as well (the farther to the left you drag it, the farther in the edge darkening extends).
Dramatic Edge Lighting with One Light

BEHIND THE SCENES: You only need one flash for this look, and we place it behind the bride and at a 45° angle (so it’s behind her and off to the side). The softbox is just a small softbox (24x24") on a light stand held up by an assistant. That’s pretty much it—just a flash with a small softbox behind her to the side. Simple.
CAMERA SETTINGS: Since we’re shooting with a flash, we’re in manual mode on the camera (that way we can dial in the exact settings we need). My f-stop is f/5, and my shutter speed is 1/60 of a second (anything under 1/200 of a second will work. If you go much higher than that, you’ll probably see a dark gradient start to appear across the bottom of your image). I’m shooting with a 70–200mm lens zoomed all the way out to 70mm, and I’m at 100 ISO (my lowest, cleanest ISO).
TIP: THE ADVANTAGE OF A LIGHT STAND VS. A MONOPOD
Mounting your flash on the end of a monopod is super-convenient, because it’s very lightweight, there are no legs hanging off, etc., but holding up a light stand does have one big advantage over a monopod: when your helper holding the flash gets tired, they can simply extend the legs of the light stand, put it down, and take a rest (or just use the light stand, in some cases). With the monopod, when they need to take a rest, they have to find a place to put the light where it won’t tip over and crash to the ground (I’ve seen it happen. When it does, the flash is usually dead). Just a heads up.
Final Image
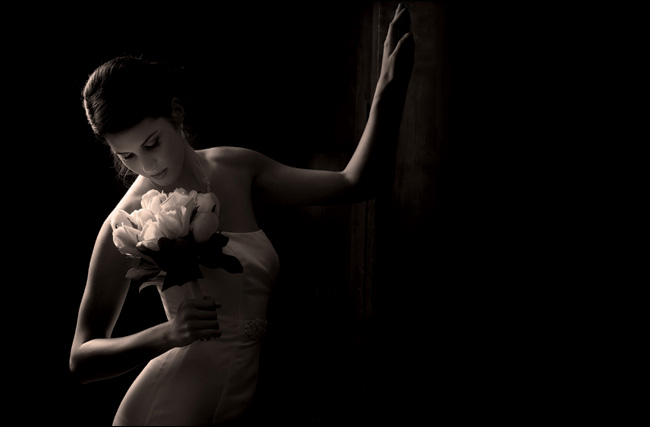
THOUGHT PROCESS: Light bounces off whatever it hits and if it hits something red, like that red door she’s leaning against, it’s going to bounce a lot of red light back onto her, so I pretty much knew this was going to need to be either a black and white or a duotone, like you see above. This shot is all about the shadows, which is why I put the light behind her, but we’re going to need some post-processing to make it as dark as we want it. As far as the lighting goes, what we’re aiming for is that rim light along the edges of her hair, shoulders, arms, and dress, so keep the power of the flash pretty low. If you turn the power of the flash up too high, it will bounce off of everything and overlight it so you’ll lose all those nice, dark shadow areas.
POST-PROCESSING: To make the shot more dramatic, in Lightroom’s Develop module (or Camera Raw), I darkened the overall exposure by dragging the Exposure slider to the left quite a bit. To make the lighting brighter, I dragged the Highlights slider to the right quite a bit, as well. Then, I converted the image to black and white (by clicking on Black & White at the top right of the Basic panel; in Camera Raw, turn on the Convert to Grayscale checkbox in the HSL/Grayscale panel) and applied a duotone look in the Split Toning panel by increasing just the Shadows Saturation slider to 20 and Hue slider to 32. I also used the Adjustment Brush to brighten her face a little bit, darken the bouquet some, and darken the far-right side of the wall (it was reflecting too much of the light). Does that seem like a lot? It’s really not, but I did a video for you anyway. It’s on the book’s companion webpage, mentioned in the book’s introduction.
Go Super-Wide for an Epic Feel
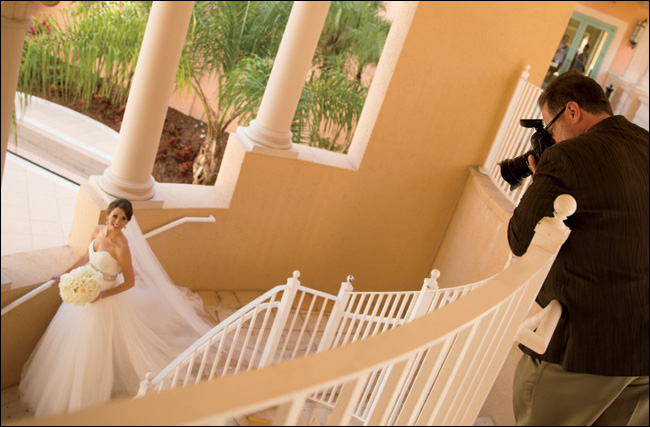
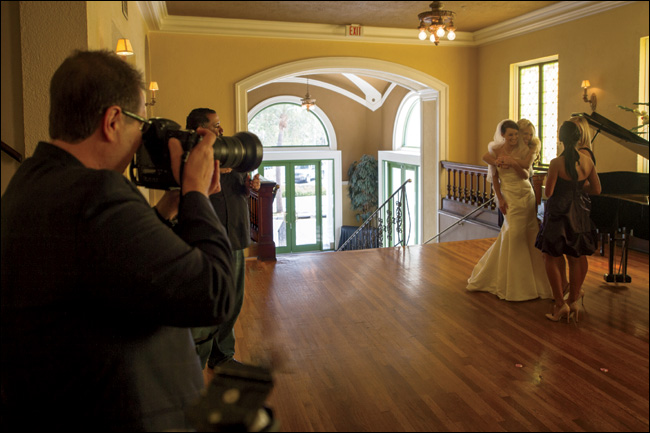
BEHIND THE SCENES: It was the middle of the day before we left for the church and we scouted for some shooting locations for the bridal portrait that weren’t out in the direct sunlight. We found this beautiful staircase (actually the entrance to the hotel’s spa, as it turns out). Since she was inside the stair area here, she was shielded from the sun. I positioned myself up high, shooting down, so I could see the bride and the elegant-looking columns behind her, as well.
CAMERA SETTINGS: We were using available light and, in that case, I shoot in aperture priority mode (where I choose the f-stop and the camera automatically chooses a shutter speed it thinks will make a decent exposure, and it’s usually right). Normally, I would use a higher-numbered f-stop, like f/8 or f/11, but despite how it looks here, the lighting was actually fairly low in this shade, so I lowered my f-stop to f/2.8. The background didn’t actually go out of focus here because I was shooting a wide-angle lens, so even though I’m at f/2.8, I’m not zoomed in tight (I’m way out wide) and everything will pretty much be in focus throughout. Perhaps not as sharp as at a higher f-stop, but I was able to keep my ISO at 100 (the cleanest setting) and still get 1/125 of a second shutter speed so the shot wouldn’t be blurry because of movement while hand-holding the shot.
Final Image
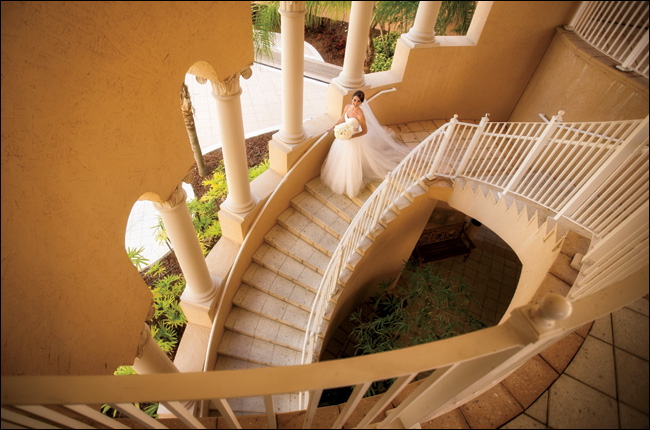
THOUGHT PROCESS: The idea here was to go for the “epic” wedding shot, which means the bride is swept away in the beautiful surroundings. To get that look, I chose a super-wide-angle lens—a 16–35mm f/2.8 lens. The key when using a super-wide-angle lens like this is to keep your subject from getting too close to the sides of the image because it will normally distort them and stretch them so they look much wider. Not flattering, and so far I haven’t ever had a single bride request to look stretched wider and distorted. To make it look even bigger and more epic, I climbed up two steps on a LadderKart. That way, I could include the railing right in front of me and create more depth (see page 141 from part 2 of this book series for more on the awesomely handy Conair Travel Smart LadderKart).
POST-PROCESSING: To focus the light more toward the center of the image, I darkened the edges all the way around the photo just a tiny bit using the Post Crop Vignetting feature found in the Effects panel in Lightroom’s Develop module (or Camera Raw): just drag the Amount slider to the left a little bit and you’ll see the edges darken all the way around. It usually just needs a touch, but it adds a lot.
The Lens Flare Look
BEHIND THE SCENES: This was taken during the reception (I know, duh!), and I positioned myself so I’m shooting directly into the colored light that’s aimed at the dance floor—a sure recipe for getting lens flare. The light was constantly changing color, and even moving (it was motorized), so I would pick an area, kind of camp out there, and try to catch the bride and groom in between the other guests out dancing alongside them. You can see the lens flare creating a ring over my shoulder (camera left) in the behind-the-scenes shot above. This technique just takes a little patience because, even though you’re aiming directly at a light shining right in your direction, it still doesn’t flare every time. You’ll get a bunch with the effect, and a bunch without it, as well, but that’s not a bad thing. At least you’ll have both to choose from.
CAMERA SETTINGS: The technique I used was to lock focus on my subjects (the bride and groom) by holding the shutter button halfway down, and then reposition myself so the light was aiming straight at me. When I saw it start to flare, I pressed the shutter button the rest of the way down to take the shot, knowing that it would be in focus because I had already locked the focus on the bride/groom before aiming my lens at the light. I used an 85mm lens, and just the existing room light at f/1.2. Even at that wide-open of an f-stop (the lowest f-stop I’ve ever used in my life), my ISO was still 2500. My shutter speed was probably a bit higher than I really needed at 1/250 of a second, but they were moving (dancing) and I wanted to make sure it would freeze their movement.
Final Image
THOUGHT PROCESS: While this lens flare look drives some traditional photographers crazy, a lot of today’s brides love it and request it (not by name, of course, but in sample images they provide the photographer). In fact, I know of photographers who have scoured eBay searching for older used lenses (these older lenses don’t have a special nano-coating added to reduce lens flare, so that makes creating a lens flare look that much easier). Another thing that makes creating lens flare looks easier is to simply remove your lens hood (if you have one on, take it off). They are designed to help you avoid lens flare and, once again, that’s not your goal. Your goal is to accentuate it (don’t shoot the messenger). I took this shot at f/1.2 because of the low light, but a happy by-product is that it puts the background way out of focus, which helps give the bride/groom visual separation from the background. Just one thing to keep in mind: when you shoot at f-stops like f/1.2 and f/1.4, your focus is really critical. Lock your focus (hold the shutter button down halfway) when you’re directly over the subject’s eye that’s closest to you.
POST-PROCESSING: In-camera lens flare effects tend to create a flat, hazy look, so you might want to add some contrast back into the image by dragging the Contrast slider to the right in the Basic panel in Lightroom’s Develop module (or Camera Raw).
Controlling What You See in the Frame
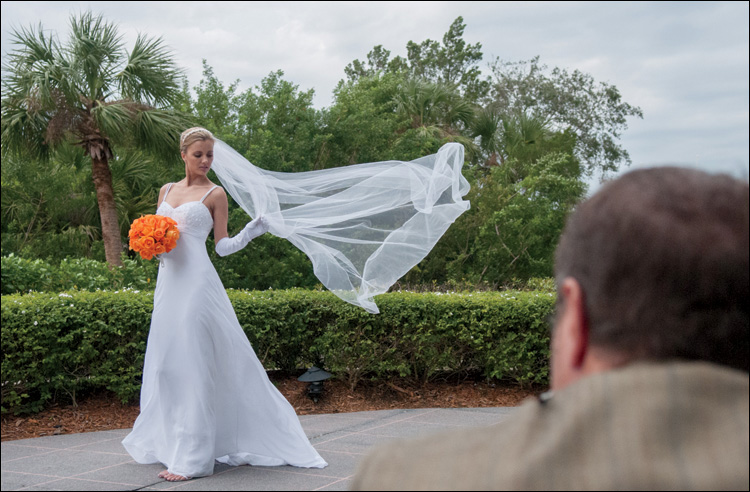
BEHIND THE SCENES: This was taken at a hotel, in an area where they hold outdoor events (cocktail parties, receptions, etc.). This is a natural-light shot, so you pretty much just see me and the bride. However, one thing we were able to do that made a big difference in this shot was to use a really long veil. I wish the idea was mine, but at an industry tradeshow party years ago I overheard a photographer say, “Give me a long veil and I’ll give you magic,” and man was he ever right! (I would love to give credit to the photographer, but I didn’t know who he was. Still don’t, but he was right on the money.)
CAMERA SETTINGS: My goal for most outdoor shots is to put the background as out of focus as possible, so I’m going to: (a) zoom in tight, and (b) use the lowest-numbered f-stop my lens will allow (in this case, f/2.8). You can see it’s a very cloudy day (thankfully), and the clouds in the sky are acting as a giant softbox and keeping the harsh light away, so I didn’t have to do anything to try to make the natural sunlight soft (there’s a word for this: luck). It’s not really super-bright outside, but at a wide-open f-stop like f/2.8, I was able to get my shutter speed to 1/500 of a second, which is fast enough to be able to hand-hold the camera without worrying about movement and a blurry shot.
Final Image
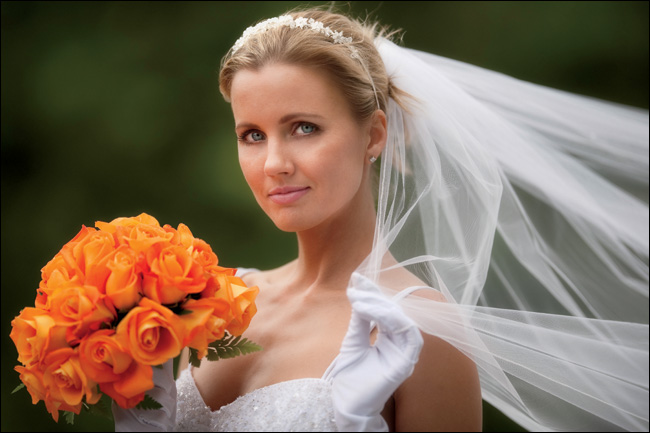
THOUGHT PROCESS: There’s a kind of busy, and not particularly attractive, background behind her. So, I tried to position myself so I was aimed at a less-busy part of the background and, if you look at the production photo on the opposite page, you can see I’m squatting down quite a bit to help me find a better background area, as well. Even though it’s going to be blurry (courtesy of the f/2.8 f-stop), I still want as little going on behind her as possible. Since I will be blurring the background so much, the bigger picture is this: we get to choose what makes it into our frame, and it’s our job to eliminate distractions in and around our subject (or they get lost in all the visual noise). I zoomed in tight like this to: (1) simplify the background, (2) create a direct connection with the viewer by making her very large in the frame, while leaving enough room that you can see the veil blowing in the wind, and (3) avoid the hedge and the walkway where she’s standing, and make the image really about her, the bouquet, her veil, and nothing else.
POST-PROCESSING: Mostly portrait retouching for this shot: smoothing out her skin and adding some light to her eyes (our bride has deep-set eye sockets and that creates a lot of shadows, so I had to lighten that area using the Adjustment Brush found both in Lightroom’s Develop module and in Camera Raw). The other adjustment was warming up the white balance a little, so her dress looks white (the original looked a little blue because I shot in the shade of the clouds).