
Chapter Four. Hot-Shoe Flash Like a Pro
Quick Lighting Recipes for Using Flash Like a Pro
SHUTTER SPEED: 1/50 SEC F-STOP: F/16 ISO: 100 FOCAL LENGTH: 70MM | PHOTOGRAPHER: SCOTT KELBY
If there’s an industry phrase that throws a lot of photographers off, it’s “hot-shoe flash.” The reason is that you’d have to know, in the first place, that the small metal socket on the top of your camera body is called a “hot shoe.” Since so many folks don’t know that, before we dive into this chapter, I thought I’d endeavor to make the concept much clearer by breaking it down to its roots. That way, we can analyze the individual words (stop snickering like I just said “Uranus”), and hopefully that will clear things up. The first word, “hot,” gets its origin from the Germanic term “hovolklejetstealin,” which is roughly translated as “hot wiring a Volkswagen Jetta,” or the term “der hund haus,” which means “foot-long Coney dog.” The second word, “shoe,” is actually a modern day term coined by poets Thom McAn and Dr. Scholl’s, whose collaboration gave birth to the most influential and acclaimed poem of their time, the graceful and lilting “Odoriferous Insole,” in which the term “shoe” was first used to describe a place that smells like Doritos. Lastly, is the word “flash,” which quite literally means the bright sudden burst of light you see within seconds of eating a foot-long Coney dog and a bag of Doritos. This bright flash of light lets you know that death can’t be too far behind if you keep eating like this, so the entire phrase, “hot-shoe flash,” is generally accepted by most scholars as meaning: a small metal socket with electrical contacts, which discharges just enough electrical current to make you drop that Coney dog before the merciful angel of death takes you away toward an even brighter light. You can see why there was so much confusion. Hope that clears things up.
Making the Light Even Softer
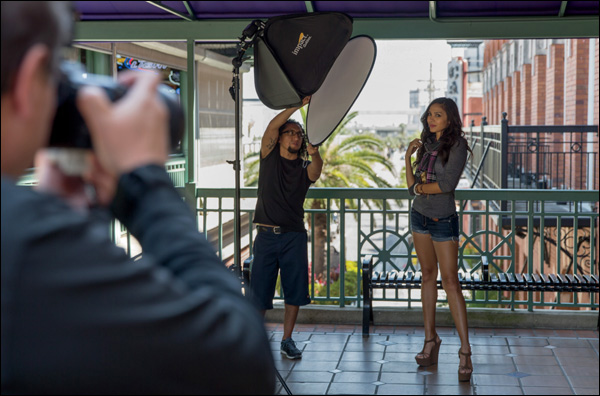
BEHIND THE SCENES: Here, we’re using our flash with our go-to softbox, the Impact Quikbox pop-up softbox, but we’re also holding a Westcott diffuser (the one that comes inside the 5-in-1 Reflector I talked about in Chapter 1) in front of the softbox, so the light is actually firing through two diffusers before it reaches our subject.
CAMERA SETTINGS: The lens is a 70–200mm f/2.8 and I’m zoomed in tight to around 120mm. My f-stop is f/5.6 but I could have used a lower f-stop (like f/4 or f/2.8), which would have put the background very out of focus. I wanted the background here to be just a little out of focus (to help separate her from the background), but I still wanted you to be able to see the railings behind her (I thought they looked kinda cool, and that’s why I positioned her there). We’re shooting in the shade, and I was concerned that I wouldn’t have enough shutter speed to hand-hold the shot, so I had to increase the ISO to 200 to get my shutter speed up to 1/160 of a second (plenty of shutter speed to hand-hold in this light).
Final Image
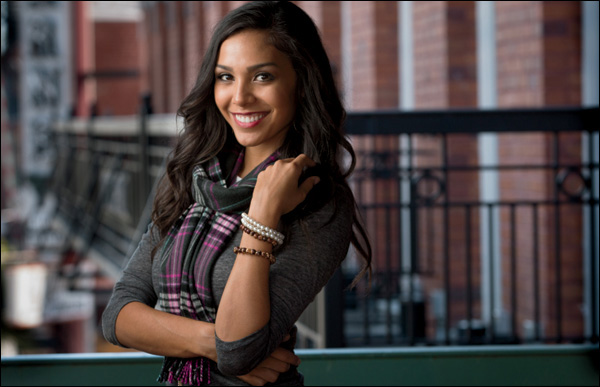
THOUGHT PROCESS: The diffuser on the front of your softbox is designed to spread and soften the light, and it does a pretty darn good job of it, but what if you take a test shot and you don’t think it’s quite soft enough? Well, the first thing you’d do is move the softbox as close as you possibly can to your subject without actually seeing it in the shot because the closer the softbox is to them, the softer the light will be. Well, what do you do if you move it in as close as you can, and it’s still not soft enough? Well, you diffuse it some more by adding another diffuser. It’s around $20 to pick up a hand-held diffuser like this and I gotta tell you, it does a beautiful job of creating really soft light (just take a look up above). Now, of course, when you shoot through two diffusers, you’re going to have to turn the power of your flash up a bit so the same amount of light gets all the way through both. Here I started with my power setting at 1/4-power (my usual starting place), but once I added the second diffuser, I had to increase the power to 1/2-power to get the same amount of light. A note about the composition: If you look directly behind our subject on the previous page, you can see a lot of bright natural light back there. When I first composed the shot, I could see that behind her and it really drew my eye, so I moved a step or two to the left and recomposed the shot so I wouldn’t see those distracting bright areas. Something to keep in mind: the background matters.
POST-PROCESSING: Nothing much to do here beyond the standard portrait retouching stuff (removing minor blemishes, brightening eyes, etc.).
Two-Light Location Setup
BEHIND THE SCENES: We’re on location, and we’re using a very large Westcott Mega JS Apollo softbox (we go big like this to create very soft light or to light more of the subject, or both). So, that big Apollo is the main light, and behind our subject (directly opposite that big softbox) is a second flash on a light stand with a Rogue 3-in-1 Honeycomb Grid made by ExpoImaging. This grid focuses the light from that second flash into a direct beam, so it doesn’t spill everywhere (you can see a close-up of the second flash grid setup above in the upper right). We’re firing these flashes using PocketWizard’s PlusX model wireless transmitters, and you can see one hanging from the second flash (it’s connected to the flash using a cable that comes with the PocketWizard).
CAMERA SETTINGS: It’s my go-to lens (the 70–200mm f/2.8), but I’m only zoomed in to around 135mm. I’m at f/4.5, so the background is reasonably out of focus. My ISO is 400 and my shutter speed is just 1/25 of a second. I know what you’re thinking, “Isn’t that a little low for a shutter speed for hand-holding?” That would be correct if (wait for it... wait for it...) I wasn’t using a flash. The flash does a great job of freezing any movement, so you can get away with lower shutter speeds.
Final Image
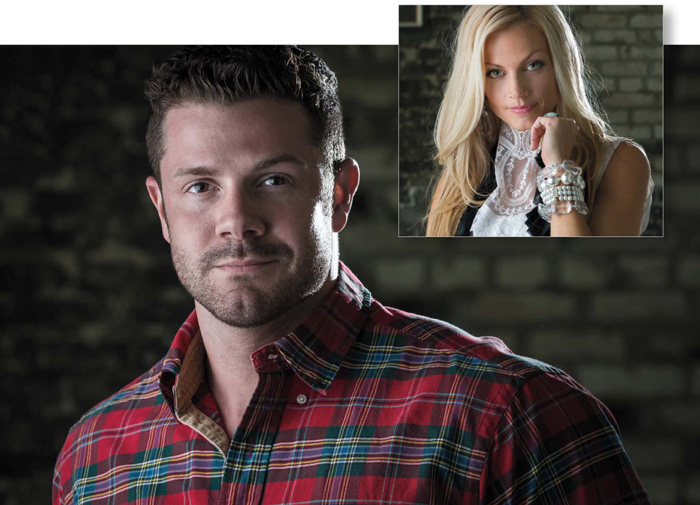
THOUGHT PROCESS: I’ve already talked about how zooming in tight and using a low-numbered f-stop puts the background out of focus, which helps separate your subject from the background (well, you read that if you read Chapter 1, anyway). Another way to separate your subject from the background is to use a second light, like we did here. It really adds a sense of depth to the image and makes the lighting look more interesting, which makes the entire image look more professional. So, there are a number of legitimate reasons for using more than one light. When I do two flashes like this, I like for one light to be really soft (usually the front light), then I like the other flash to be more hard-edged so it creates a nice contrast between the two lights. I also try to position the front light so I get a little area of shadows on the subject’s face between where the soft light ends and the hard light begins. You can see this in our subjects’ faces above. Look from left to right: first, you see the soft light on the left side and part of the right side of their faces; then as you move to the right, you see an area of shadows on the right side of their faces; then you see the hard light on his right cheek and the right side of his head and her hair. Tip: The key to making two lights work like this is to start with only the back flash on. Get that aimed and looking good all on its own, then turn on the front flash.
POST-PROCESSING: Two things: (1) standard portrait retouching, and (2) in Lightroom’s Develop module (or Camera Raw), in the Effects panel, under Post Crop Vignetting, drag the Amount slider to –11 to darken the edges of the image just a tiny bit.
One-Flash Environmental Portrait
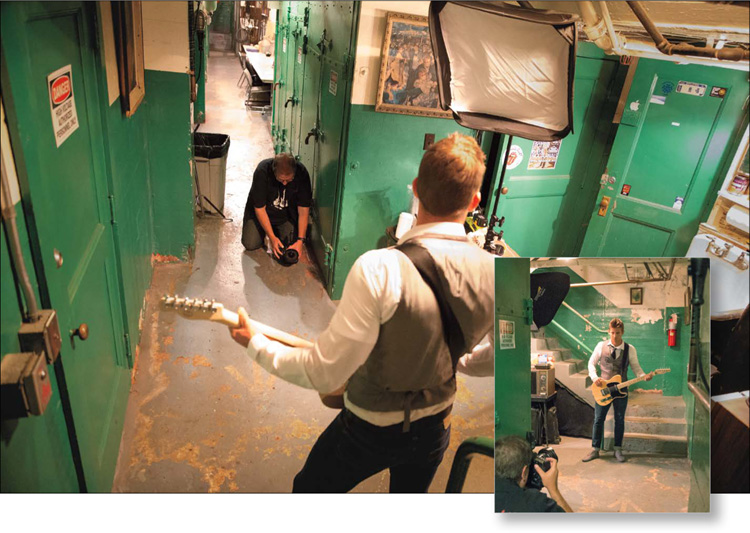
BEHIND THE SCENES: We’re backstage at a classic old theater and the dressing rooms are to my left (this place just might be ready for a makeover, eh? But honestly, that’s what drew me to doing a backstage shoot here—it’s got “character”). I’m using my go-to lighting setup, which I talked about earlier in this chapter (the Impact QuikBox). I’m using a very-wide-angle lens, and I’m getting the camera really low to the ground to get a low perspective. To have the shot stay in focus, I hold the camera up to my eye, press the shutter button halfway down to lock the focus, then I lower the camera straight down to ground level while still holding the shutter button, and I take the shot (hey, it beats lying down on the dirty floor). It takes a little trial-and-error using this method, but again, it beats lying on the floor. Also, it’s not as bright backstage as this image makes it appear—I brightened this behind-the-scenes shot, so you could clearly see the setup.
CAMERA SETTINGS: I’m using a super-wide-angle 16–35mm lens on a full-frame camera body with my f-stop at f/3.5. It was pretty dark down there (lit only by some dim factory lamps from above), so I had to crank up the ISO to 400. For an environmental portrait like this, it’s really important to see the environment, so I had to lower the shutter speed from my normal 1/125 of a second down to 1/60 of a second to let more of the room light into the shot. The final image (facing page) was actually taken at 16mm, so it was wider than what you see here. I cropped it in tighter, so you could see the musician better.
Final Image
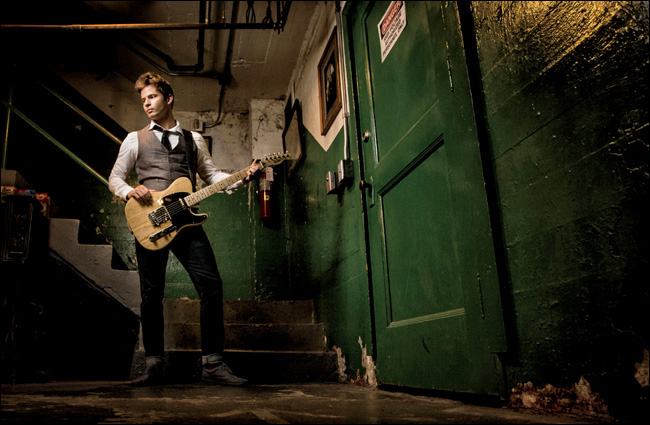
THOUGHT PROCESS: Environmental portraits aren’t just about the subject, they’re about the subject in that particular setting (maybe it’s taken where they work, like a guitar player backstage, or in their home, or art studio, etc.). The surroundings tell a story about the subject. For portraits where I want to see a lot of the surroundings like this, I generally use a wide-angle lens (usually either a 24–70mm or, in this case, my widest lens, a 16–35mm). While I love how the wide-angle lens takes in a lot more of the environment, there are three things to remember: (1) Be careful about stretching your subject wide. If you get your subject close to the left or right edges of your frame, it will distort and stretch their body, generally making them look heavier, which will definitely not make you any friends. (2) Know that shooting anyone up close with a wide-angle lens isn’t generally going to give you as flattering a look for your subject as zooming in tight with a long lens because you lose that flattering lens compression. That’s why I made sure I wasn’t up close when I was shooting this wide—look how far my subject is from me in the frame (and I already cropped it in a bit). And, (3) even if you’re at f/3.5 like this, when you shoot with a wide-angle, everything will pretty much be in focus in the background.
POST-PROCESSING: In Lightroom’s Develop module (or Camera Raw), I increased the Contrast amount by 1/3, added a little bit of Clarity (around 10%), and darkened the edges all the way around by going under Post Crop Vignetting in the Effects panel and dragging the Amount slider to –22. Lastly, I applied the Nik Color Efex Pro plug-in’s Tonal Contrast filter. That’s it.
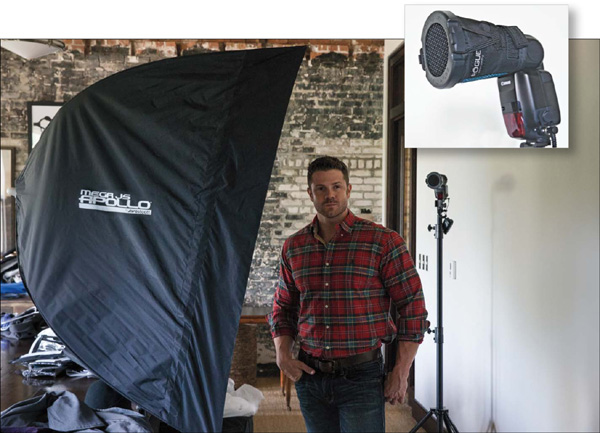
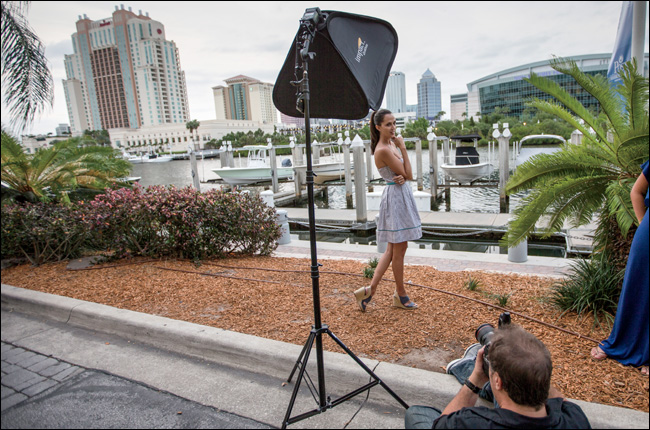
The Advantages of Using a Larger Softbox
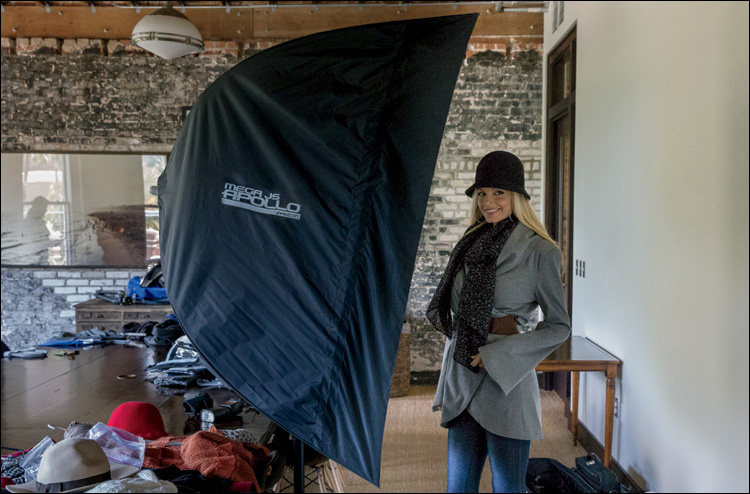
BEHIND THE SCENES: If I think I might want to light more than just my subject’s head and shoulders (as the softbox does in the setup shot above), I’m going to go for a much larger softbox, and if I’m using hot-shoe flash like this, I go with the really huge F.J. West-cott Apollo softbox. Technically, it’s not a softbox, it’s a pop-up umbrella that looks and acts like a softbox, but the advantage is that it’s very portable and pops right up, so it’s really quick to set up and tear down. They are made to use with hot-shoe flash and there’s a zippered slot where your flash fits right through. They’re really pretty clever (and very popular). The one I’m using here is a 50" Recessed Mega JS Apollo. It’s a big-un, but if you need to do fashion or full-length, this will surely do the trick.
CAMERA SETTINGS: Once again, I’m using my trusty 70–200mm. I tried a number of different focal lengths: for full-length shots, I had to stand way back and shoot at 70mm; for 2/3-length body shots, I could zoom in to around 100mm; and for the final shot you see on the facing page, I zoomed in to 120mm. I wanted the background behind her to be out of focus, so I shot at f/2.8 and 800 ISO, with a shutter speed of 1/30 of a second. The reason I lowered the shutter speed to 1/30 was so I could see more of the available room light in the shot. The lower your shutter speed, the more room light you see, and our job is to find the right balance between the two so it looks natural. We do this by doing a test shot, looking at the room light, then lowering or raising the shutter speed until the blend looks good. It’s a bit of trial and error, but at least the film is free, right?
Final Image
THOUGHT PROCESS: First, let’s talk about the lens selection, because you might think that if you wanted to be able to shoot full-length, you’d use a 50mm lens or a wide-angle lens (and a lot of people do shoot full-length with a 50mm lens). So, why did I go with a 70–200mm? Because if I stand back far enough, I can zoom in a bit and make the background out of focus. That’s a lot harder to do with a 50mm lens from far away—chances are, even at a low-numbered f-stop, the background is going to be fairly in focus—so by using this lens, I can get that background fairly out of focus just by zooming in. Of course, in the final shot (above), I zoomed in to 120mm, so I had no problem getting the background out of focus at f/2.8. Now, for full- and 2/3-length shots to look right, you really need a perspective. I often sit in a chair or on the ground to get an even lower perspective. Lower is better. Next, let’s look at the falloff of the light (how quickly the light fades away to black). There is none—that’s the beauty of the big softbox. If lighting the clothing is important (like it is in fashion), then you want your subject evenly lit without the falloff-to-black lighting like we do in standard portraiture, and a big softbox like this really does the trick. Lastly, the other reason to use a really big softbox like this is just the sheer softness of the lighting. The bigger the softbox, the softer, more beautiful, and more wrapping the light will be.
POST-PROCESSING: Just standard portrait retouching.
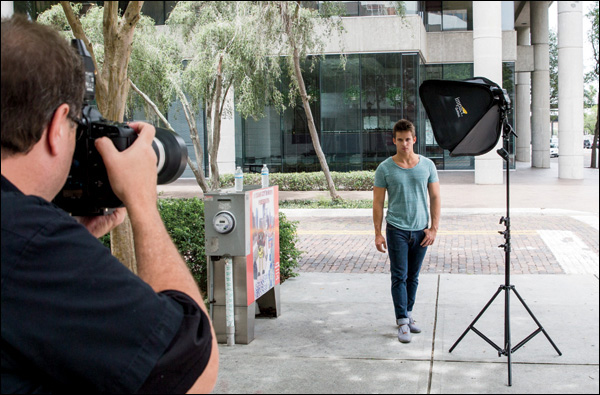
Simple One-Light Outdoor Flash
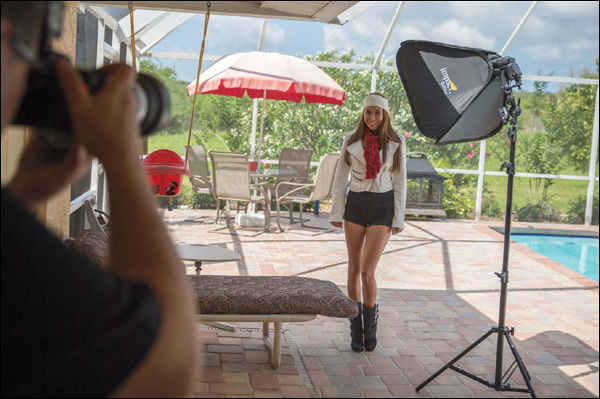
BEHIND THE SCENES: We’re in kind of a busy scene here, a pool area, and we placed our subject in direct shade (to get away from the harsh, direct sun). We’re lighting her with kind of my go-to kit for hot-shoe flash. It’s a 24x24" pop-up collapsible softbox from Impact called a QuikBox. It folds up flat and literally pops up into place. So, we have our flash on a light stand with the Quikbox in front to spread and diffuse the light from the flash. I fire my flash using a wireless transmitter from PocketWizard (more on this on the next page). What I love about this rig is that it’s: (a) very lightweight and portable, (b) it sets up in no time, but most importantly, (c) it’s pretty darn inexpensive. The Impact QuikBox Softbox Kit (from B&H Photo), which comes with the softbox, an 8’ light stand, a hot-shoe flash mount that goes on top of the light stand, and a tilt bracket, is just $149. That’s pretty screamin’ cheap for a setup that works this well.
CAMERA SETTINGS: When I do location flash, I shoot in manual mode with these settings as my starting place: f/5.6 at 1/125 of a second shutter speed and 100 ISO. That’s exactly what I used here. Easy peasy. I’m using my 70–20mm f/2.8 lens zoomed in to 125mm.
Final Image
THOUGHT PROCESS: I always (always!) use a real wireless transmitter to trigger the flash, rather than using the pop-up flash on my camera to trigger the other flash, because I got tired of the flash not firing consistently. It would work a lot of the time, or some of the time, but it never fired all of the time. So, I finally switched to real wireless transmitters and my stress level on shoots has come down by a factor of 10. I use PocketWizard’s PlusX model transmitters (they are $99 each and you need two—one sits on top of your camera in the hot-shoe flash mount, and the other one attaches to the flash with a short cord that comes with the PocketWizard transmitter). A cheaper alternative are Cactus Triggers, which are only around $60 for a set of two and they work pretty well (and they’re $140 cheaper). I also use my flash in manual mode, rather than TTL mode, which means if the flash is too bright, I just walk over to the back of the flash and turn the power down a notch and try another test shot. I stopped using TTL for the same reason I stopped triggering my flash with my pop-up: I want it to work consistently, and with TTL, sometimes it works great, and sometimes it’s a disaster. Now it just works. If I need the flash brighter, I turn it up. If I need it less bright, I turn it down. Don’t overthink it.
POST-PROCESSING: The standard portrait retouching stuff, but I also darkened the edges a bit by going in Lightroom’s Develop module (or Camera Raw), in the Effects panel, under Post Crop Vignetting, and dragging the Amount slider to –11.
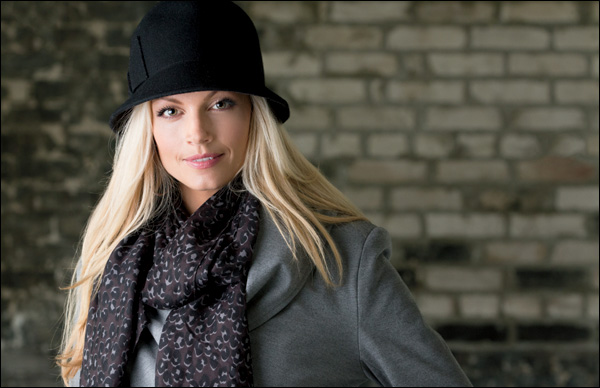
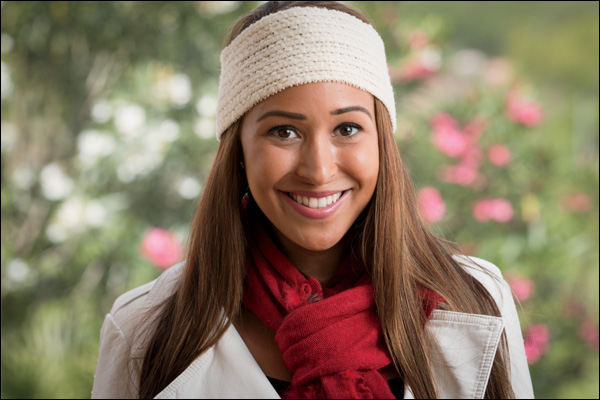
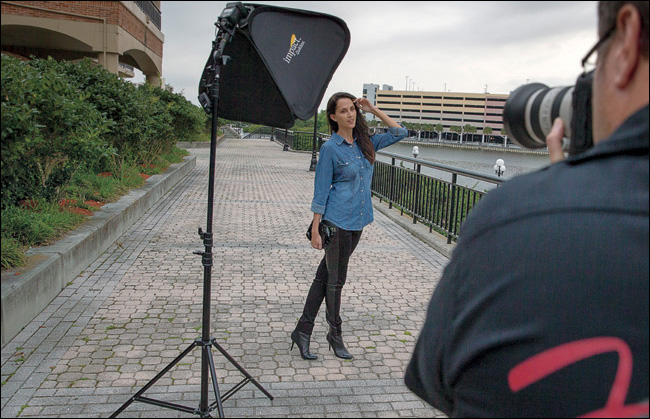
Softening Flash with a Hand-Held Diffuser
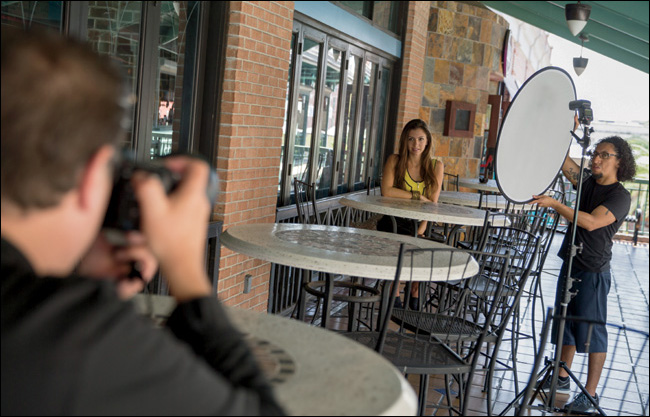
BEHIND THE SCENES: Here, we’re on location, and in the shade (as we are here) the lighting is pretty flat, so we’re using a flash. To soften the light, we’re using the diffuser that comes inside F.J. Westcott’s 5-in-1 Reflector (it’s around $29). Our flash is on a light stand, and it’s sitting on a tilt bracket so we can aim it where we want it. I’m standing back pretty far from our subject so I can zoom in tight to get a more flattering look, and it also helps me put the background out of focus a bit.
CAMERA SETTINGS: I was using my go-to lens—the 70–200mm f/2.8—but my f-stop was at f/5.6 (which is why the background is a bit out of focus, but you can still make out some details). I was zoomed in to 142mm. My shutter speed was 1/30 of a second (more on this on the next page), and my ISO was at 100 (my lowest, cleanest setting).
Final Image
THOUGHT PROCESS: If you don’t want to spend the money for a softbox, you can still do something to spread and soften the light, and this super-lightweight collapsible diffuser does a great job of just that (plus, it’s really inexpensive). It’s collapsible (so it folds up flat) and all you have to do is have a friend hold it between the flash and your subject. If you want the light to be really soft, move the diffuser farther away from the flash (so it can spread the light out more, which makes it softer), or move it closer to the flash (like we did here) so it’s not quite as soft and is a bit punchier. Also, although we have our flash on a light stand here, you could just have the person holding the diffuser hold the flash in one hand and the diffuser in the other. The only downside is that they won’t be able to get the diffuser quite as far away as you’d be able to with a light stand (they can only move it as far away as they can reach out their arm). Now, on to why I lowered my shutter speed to 1/30 of a second (from my normal 1/125 of a second). On a location shoot like this, your shutter speed controls the amount of natural light in your image, so when I did my first test shot at 1/125 of a second, it was very dark around her and you could barely see the location where we were shooting. By lowering the shutter speed, you can now see the brick walls behind her and other tables and stuff.
POST-PROCESSING: Just your standard portrait retouching stuff.
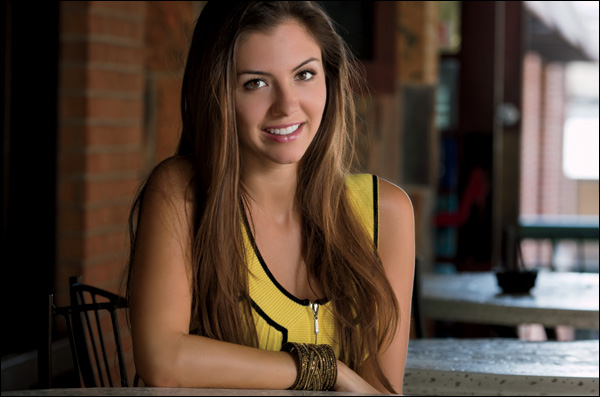
Using Sunlight as Your Second Light
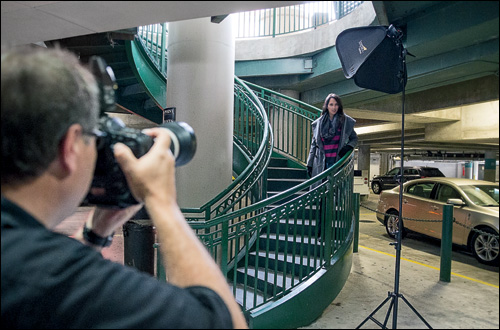
BEHIND THE SCENES: Believe it or not, we’re in a multi-level underground parking garage and we’re using our go-to setup for hot-shoe flash: the Impact Quikbox kit. We have our subject standing on a circular staircase that leads to an office building above, and there’s natural light coming in from directly above, so we’re going to add the natural sunlight to what we’re doing with our hot-shoe flash.
CAMERA SETTINGS: I’m using my 70–200mm f/2.8 lens (as usual) zoomed in to 160mm at f/2.8 (so the background will be out of focus, which will help hide the fact that we’re in a parking garage). I’m at 100 ISO with a shutter speed of just 1/25 of a second. I lowered it from 1/125 of a second, my standard starting-point shutter speed, so I could get more of the existing light into my background. Without lowering the shutter speed, it was just solid black around her.
Final Image
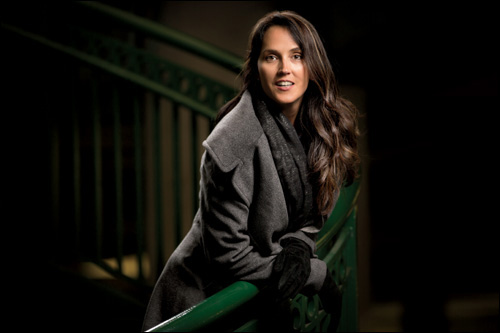
THOUGHT PROCESS: We had actually parked in this underground garage just to use it as a staging area for us to do a shoot outside along the waterfront. But, as we were setting up, I turned around and saw this spiral staircase with natural light streaming in from above and thought we could use that overhead natural light as a rim light on her hair and along her arms, and it worked out really well. That bright light you see along her left side and on top of her hair is that natural light. It’s just a touch of light, not enough to fully light her face, but that’s okay—that’s what our flash with a softbox is for. My standard flash settings would be f/5.6 at 1/125 of a second, but since I knew I wanted the background way out of focus (so you wouldn’t see that we were in a parking garage), I started by lowering my f-stop to f/2.8 (by the way, I can use this low of an f-stop because we’re already in a low-lighting situation under a roof. Outside in the direct sun, it would be a lot harder to shoot at f/2.8 and not have the photo overexposed by a ton). I took a test shot and I could hardly see any of the existing light, so I lowered the shutter speed (it controls the amount of existing light in the photo) to 1/25 of a second to let in more light. (I didn’t just instinctively know that 1/25 of a second was the right amount. I did a few test shots, starting at 1/100, then 1/80, then 1/60, and so on, until I settled at 1/25.)
POST-PROCESSING: Just the standard retouching stuff, and I darkened the outside edges all the way around by going to Lightroom’s Develop module (or Camera Raw) and, under Post Crop Vignetting in the Effects panel, dragging the Amount slider to the left to –11.
The “Instant Black Background”
BEHIND THE SCENES: We’re out on the street in downtown and we’ve set up my go-to flash lighting setup, the Impact QuikBox.
CAMERA SETTINGS: The settings for this particular outdoor shoot are very different than usual because we’re trying to do something very different: make a regular daylight background turn solid black. I’m shooting my 70–200mm f/2.8 lens (that part is pretty much the same as always), but my f-stop is set to f/22. My ISO is set to 100 and my shutter speed is 1/250 of a second. More on the “why” of these settings on the facing page.
Final Image
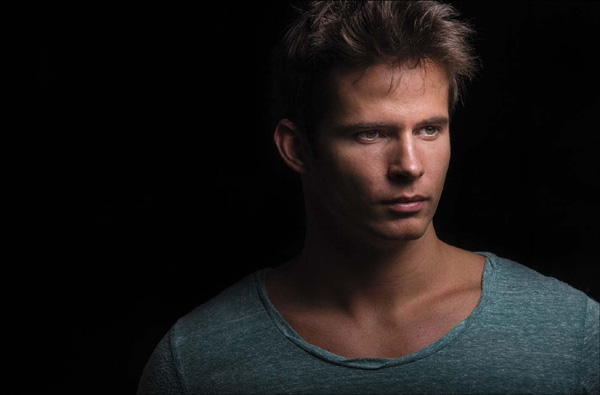
THOUGHT PROCESS: The name and idea for this technique comes from my buddy, UK-based photographer and trainer Glyn Dewis. The idea is you set your camera’s settings so that so little light comes into the camera that when you take a shot, all you get is a solid black image. Then, when you turn on your flash at full power, the only thing you’ll see in your image is whatever is lit with the light from that full-power flash—that’s all that lights your subject. There are three things we can do to limit the light that reaches our sensor: (1) Raise the f-stop. In my case, my lens only goes to f/22, but there are plenty of lenses that go to f/32. The higher the number, the darker your scene will be. (2) Lower your ISO to its lowest setting. The lower the number, the less your camera is sensitive to light. (3) Raise your shutter speed to 1/250 of a second (that’s the highest normal sync speed for most hot-shoe flashes, but at that speed it lets in the least amount of existing light. Now, you may not need to do all three of these to create a solid black image. It may only take #1, or #1 and #2, but you’ll know it’s right when you take a photo and there’s no image, it’s just solid black. That’s your cue to turn your flash on at full power, and now you’ve created the “Instant Black Background.” Thanks to Glyn for this awesome technique.
POST-PROCESSING: Just standard portrait retouching stuff (removing blemishes, brightening the eyes, and so on) and, of course, sharpening with the Unsharp Mask filter in Photoshop (I used: Amount 120%, Radius 1, Threshold 3).
Using Gels with Flash
BEHIND THE SCENES: We’re on location with my standard location one-flash lighting setup, but what you can’t see from this shot is that there is a piece of orange gel taped over the front of the flash.
CAMERA SETTINGS: For location flash, I shoot in manual mode with these settings as my starting place: f/5.6 at 1/125 of a second shutter speed at 100 ISO, and that’s exactly what I used here. I start with my flash power set at 1/4-power and I do a test shot and look at the shot on the back of my camera. If the flash isn’t bright enough, I turn up the power on the flash to 1/2-power and do another test shot. If it’s too bright, I turn the power down on the flash to 1/8-power and do another test shot to see how it looks (and so on). I’m using a 70–200mm lens zoomed in to 165mm.
Final Image
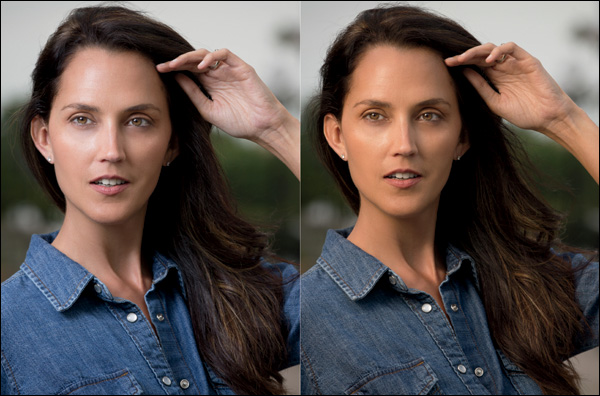
THOUGHT PROCESS: When you’re using flash on location like this, the flash is going to create bluish-white light. That white light looks fine in a studio environment, with a solid white, black, or gray background, but when you’re on location, having that white light from the flash not only doesn’t look natural, but people also just look better with a warmer skin tone. So, we tape a thin orange gel over the front of the flash and that gives you a warmer, more natural-looking light from your location flash (take a look above: the shot on the left has no gel, while the shot on the right used an orange gel). These gels come in different thicknesses called “cuts.” (The orange gels themselves are called “CTO” gels. CTO stands for Color Temperature Orange.) A 1/4-cut is a small amount of orange, so you can leave it taped on your flash any time you go out on location, either indoors or outdoors. A 1/2-cut is twice as much orange and you’d switch to this later in the day when the sun is much lower in the sky and getting close to sunset. Right around sunset, to make the light from your flash look more like the setting sun, you’d switch to a full-cut of CTO (by the way, you can buy these gels in 24x20" sheets from B&H Photo for around $6.50 a sheet).
POST-PROCESSING: Just the standard portrait retouching stuff.
Dramatic Sunset Portrait
BEHIND THE SCENES: Okay, the dramatic part is here, I’m just not quite sure the sunset part is. It was too cloudy for the sun to actually make an appearance, but this is the technique I use for sunset portraits (it’s really based on the settings, which I’ll go over below and on the next page). If you’re thinking, “Gosh, he’s using that same 24x24" softbox again,” it’s because that’s pretty much what I use on location—that and the big Westcott Apollo I used earlier in this chapter. Those are my two go-to softboxes, so that’s what I use (no sense in me pulling out a bunch of stuff I don’t really use or wouldn’t recommend, right?). As far as setting up this shot, we are just across the river from downtown, and there’s a lot of distracting stuff already in the scene, so to eliminate all of it from view, I generally get down really low and shoot upward. In this case, I sat down on the ground and aimed upward to compose the shot so you would see some of the downtown buildings, but you wouldn’t see the distracting palm trees creeping in from the sides (although I did have to have a friend hold back the palm fronds on the right—that’s why her foot is making a cameo appearance), and this angle hid all the shrubs and most of the pylons and ropes and such.
CAMERA SETTINGS: For the final image on the facing page, I’m using a 16–35mm super-wide-angle lens (on a full-frame camera), zoomed in to 29mm. Notice that I kept our subject from getting too close to the edges where she’d get stretched and distorted. My shutter speed is my standard 1/125 of a second, but my f-stop is f/5.6 (more on why on the facing page). My ISO is 100.
Final Image
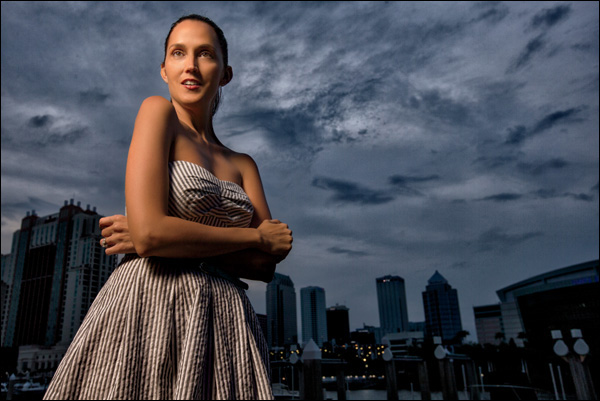
THOUGHT PROCESS: When it gets late in the day like this, I use a technique that makes the sky much darker and more dramatic. It starts with putting your subject with their back to the setting sun (as I did here). Next, you’re going to intentionally underexpose the shot by about 2 stops or so (making the sky much darker than it really is). You need to do this in manual mode: Start with your shutter speed set to 1/125 of a second, then don’t touch it again. Move your f-stop until you get a proper exposure reading. Look at the little meter inside your viewfinder (it’s either along the bottom or the right side) and get it to the center position by moving just your f-stop. When you get the proper exposure (let’s say it was f/2.8, for example), then you’d raise your f-stop to around f/8 (two full stops darker) or so and take a test shot. If your subject now looks like a silhouette against the sunset sky, then just turn on the flash with a low power setting (like 1/4-power) and you’re good to go. If they don’t look like a silhouette, you need to darken the scene even more (try f/9 or f/10) and do a test shot again until you see they finally do look like a silhouette. That’s your goal: to get them black against a dark sky. Then, turn on the flash.
POST-PROCESSING: Just a few things: (1) I increased the Contrast in Lightroom’s Develop module (or Camera Raw), (2) I did standard portrait retouching, and (3) I applied the Nik Color Efex Pro plug-in’s Tonal Contrast filter twice in a row to make the clouds in the sky have all that detail. Then, I added a layer mask in Photoshop and painted over our subject with a soft brush to remove the effect from her, leaving it just on the sky.
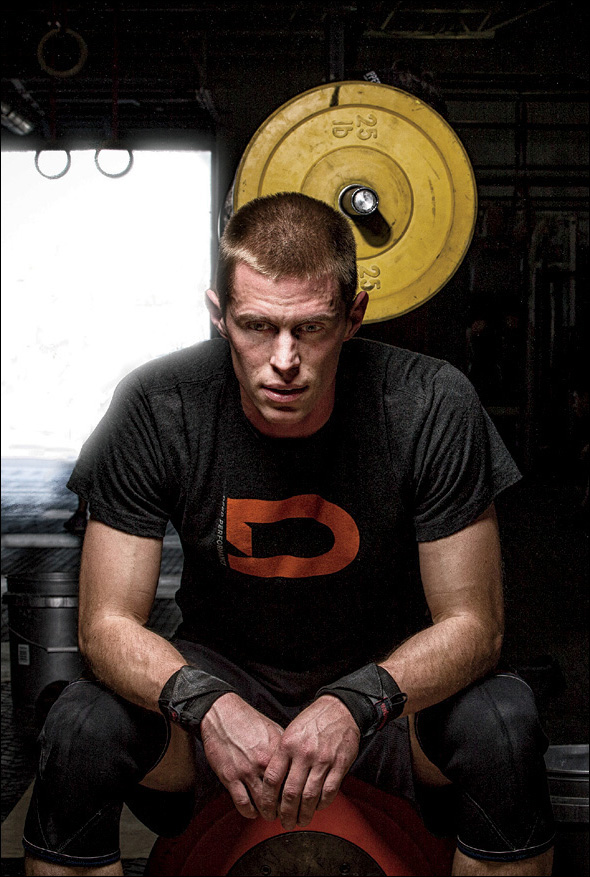
Using a Spot Grid for a Focused Beam
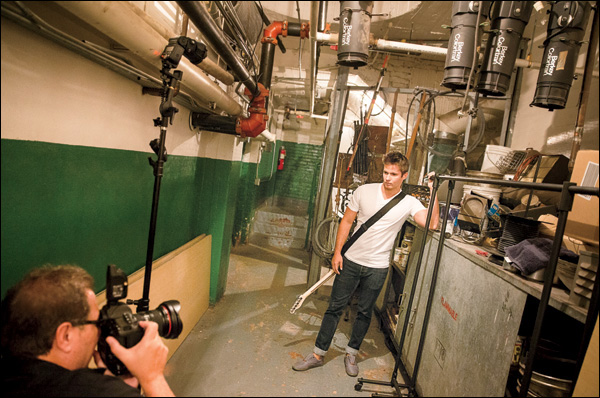
BEHIND THE SCENES: We’re backstage in the theater again (at the other end of the hall), and we’re using just one bare-bulb flash, but we’ve put a grid over the end of the flash that turns this bright bare-bulb flash that just kind of goes everywhere (lighting his shirt, and guitar, and pants, and everything around him on either side) into a precise beam of light that we can aim right where we want it—on just his face. I’m down low, sitting in a chair, shooting up at him because the stuff above him and behind his head and shoulders is a lot more interesting than the boring-looking floor and cabinets. So, I composed the shot to hide the boring stuff and show more of the interesting stuff around him.
CAMERA SETTINGS: For the final image on the facing page, I’m using a 16–35mm super-wide-angle lens (on a full-frame camera), zoomed in to 27mm. I lowered my shutter speed down to 1/40 of a second, so I could see the yellow room light.
Final Image
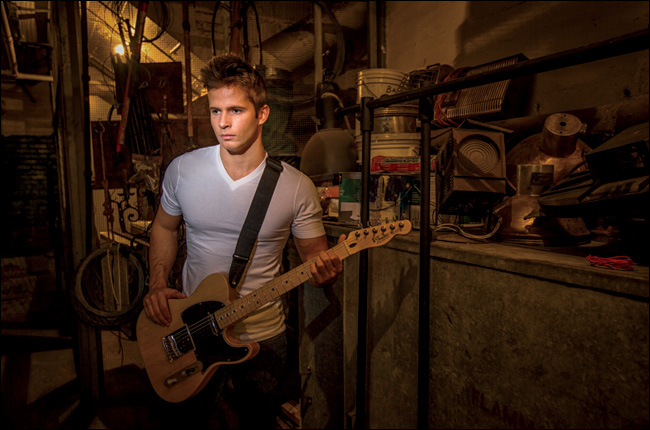
THOUGHT PROCESS: One reason I wanted to use a grid is because he’s wearing a white shirt, so if I use a regular softbox, his white shirt is going to be super-bright because it’s reflecting all that light. Another reason is that I like the drama of just having a small beam hit our subject. I also didn’t use the softbox because, with the grid, the light will be edgier. The particular grid we used is a Rogue 3-in-1 Honeycomb Grid made by ExpoImaging. It just attaches right over the head of your flash (it takes all of 20 seconds to put in place), and then creates this very defined narrow beam of light. The street price is around $50.
POST-PROCESSING: The standard portrait retouching stuff (very minor with him), and then I applied the Nik Color Efex Pro plug-in’s Tonal Contrast filter to the entire image. If this had been a photo of a woman, I would have added a layer mask to erase the effect from her skin (it isn’t very flattering to women’s skin), but since this is a guy, it actually looked pretty good so I just left it applied to the entire image (which is easier than having to mask your subject’s skin away).