
6
Leveraging Machine Learning
ML applications have grown to dominate in highly visible and enterprise-scale uses today: Google search results, Facebook/Instagram/TikTok/Twitter sorting algorithms, YouTube’s suggested content, Alexa/Siri voice assistants, internet advertising, and more. These use cases all host their ML models and perform their inferences in the cloud, then show the results to us as end users on our edge devices such as phones, tablets, or smart speakers. This paradigm is beginning to change, with more models being stored (and inferences being run) on the edge devices themselves. The shift to processing at the edge removes the need for transmission to and storage in the cloud, and as a result, provides the benefits listed here:
- Enhanced security: Reducing attack vectors
- Enhanced privacy: Reducing the sharing of data
- Enhanced performance: Reducing application latency
This chapter is intended to give an overview and practical guide for using ML on edge devices. It will cover the following topics:
- The high-level life cycle of creating and maintaining an ML application
- Key ML libraries/software to be aware of
- Three hands-on examples using different ML algorithms on embedded platforms
Understanding the ML application life cycle
The life cycle to create, maintain, and update an ML application can be visualized in a few different ways. The following diagram shows a high-level view of this ML life cycle for a typical ML project being deployed on edge devices. Take a minute to look through the listed steps before we explain each section:
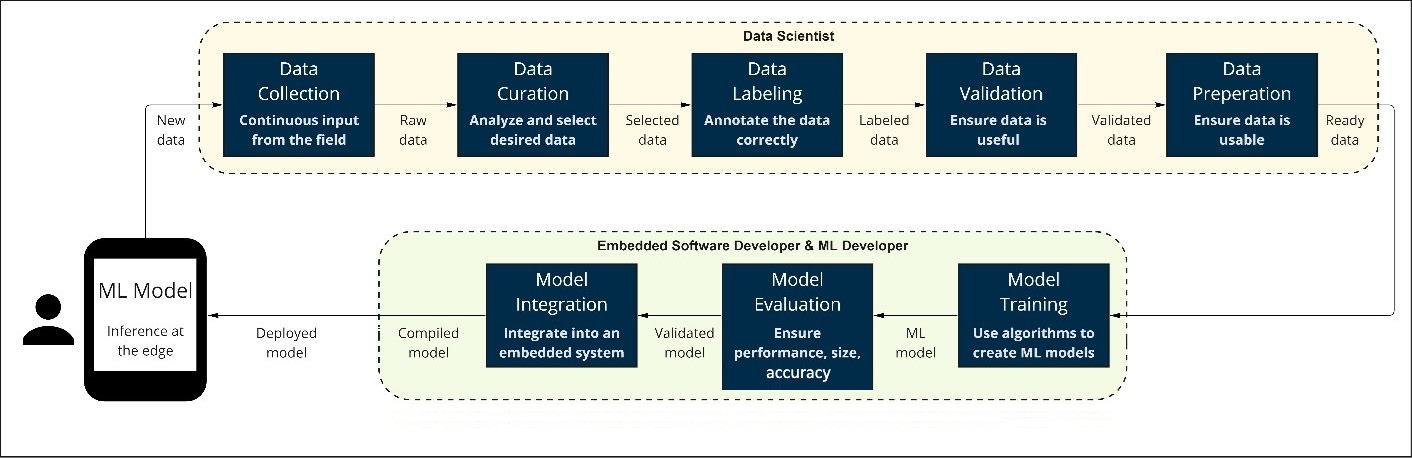
Figure 6.1 – Typical ML life cycle for embedded projects
The steps at the top all pertain to data. Gathering it and preparing it for use in ML algorithms is a non-trivial task and is often the source of competitive advantage for companies (as opposed to the ML algorithms themselves). Commonly, there is a dedicated resource—or resources—for preparing data at companies, referred to here as data scientists. Once the data is prepared, the data is used to create and train an ML model. This is commonly performed by an embedded software developer and—potentially—an ML developer that specializes in ML models and training. The data scientist will likely help with model evaluation as well.
The bottom three steps are of most interest to us in this chapter, as data preparation and compiled software deployment are outside the scope of this book. These three steps are model training, model evaluation, and model integration.
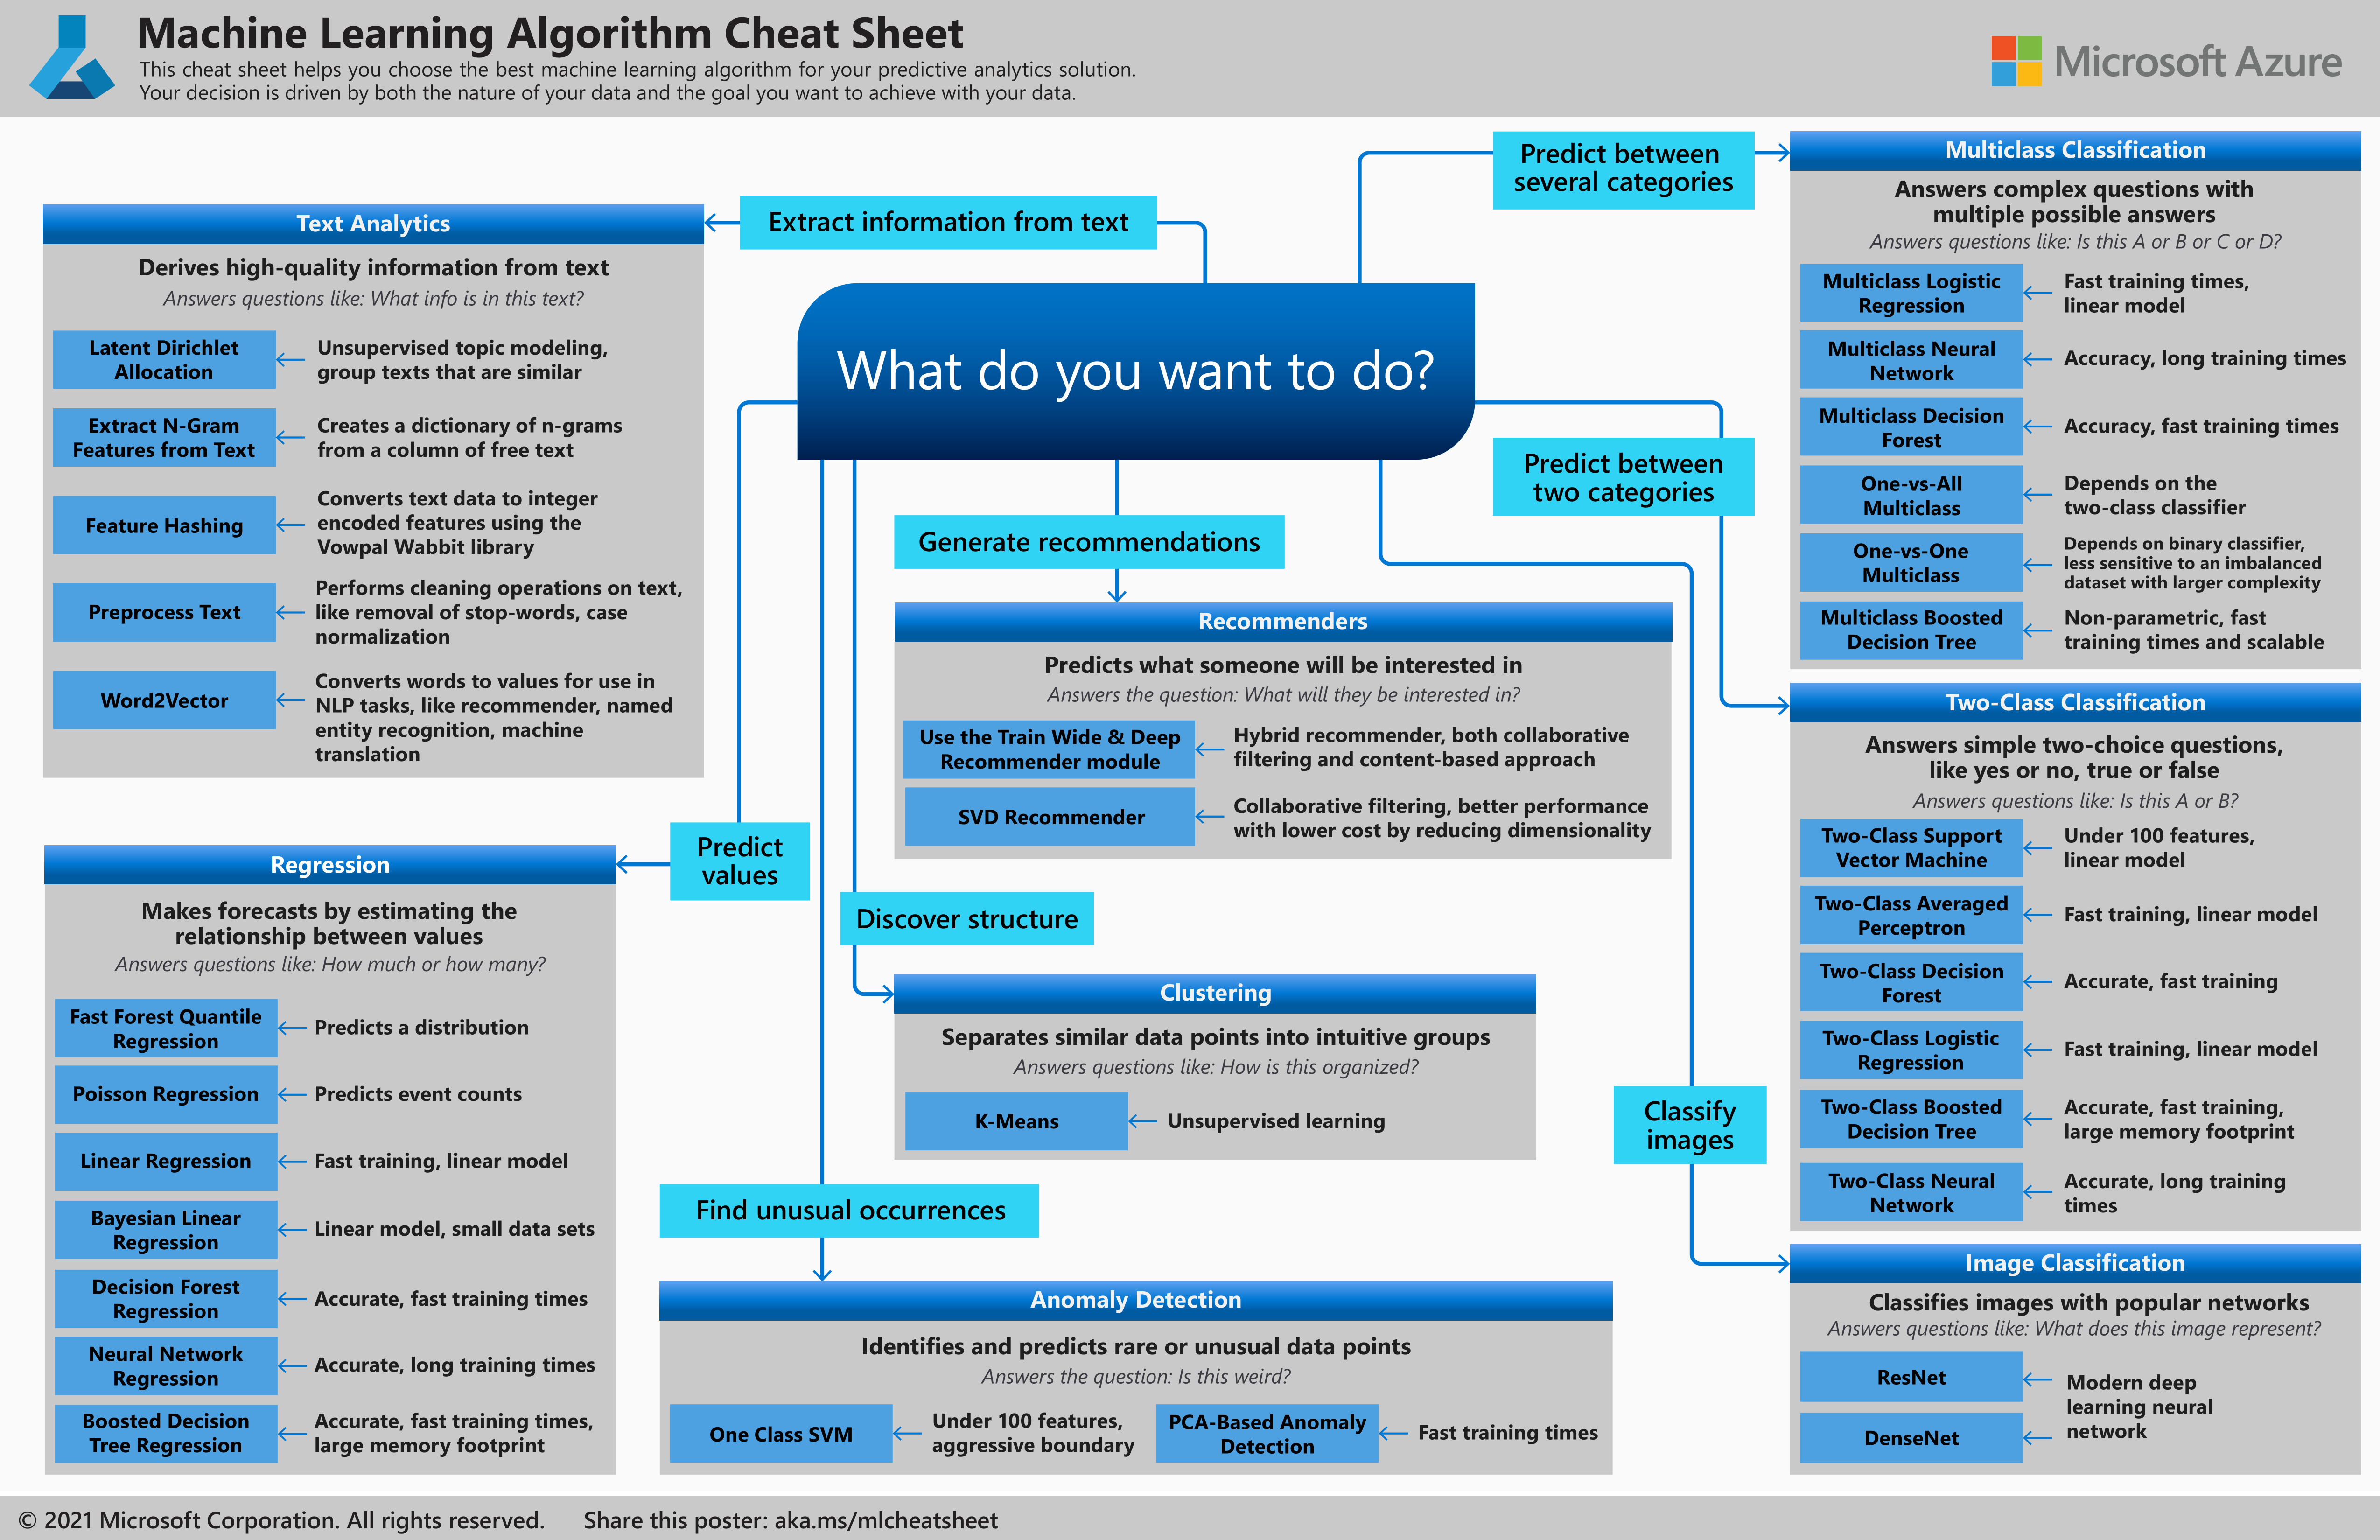
The model training phase takes prepared data and builds an ML model for use in the embedded device. An algorithm must be selected that meets your goals and is possible to implement with the data you possess. Algorithm selection is another detailed topic in and of itself. There is an excellent algorithm cheat sheet from Microsoft on this topic. Refer to it for further guidance here: https://docs.microsoft.com/en-us/azure/machine-learning/media/algorithm-cheat-sheet/machine-learning-algorithm-cheat-sheet.png.
While we are not going into deep detail, here is a brief guide to algorithm types based on what your goals are:
- Extract information from text: “What information is in this text?”
- Text-analysis algorithms are best, such as feature hashing and word2vec
- Predict future values: “How much of this will there be?”
- Find unusual occurrences: “Is this unusual?”
- Discovering structure: “How does this have structure?”
- Clustering algorithms, such as the unsupervised K-Means algorithm
- Generate recommendations: “What would this person like to see?”
- Classify images: “What is this image?”
- Image classification algorithms, such as ResNet or DenseNet
- Predict between categories: “What is this thing most like?”
- Classification, either two-class or multi-class algorithms such as two-class NNs or multi-class decision forest
The terms supervised learning (SL) and unsupervised learning (UL) refer to the nature of how the ML algorithm learns from data. Put simply, if data is labeled, then you can use an SL algorithm (as you are supervising the learning by labeling the data and verifying its correct analysis during model training). If data is not labeled, then you use UL algorithms. This is ideal for discovering hidden patterns in data, as the ML algorithm is not bound or influenced by defined labels.
The model evaluation phase is for you to ensure the model has been trained to your specifications. The most common metrics for success in embedded systems are noted here:
- Accuracy: Critical to the application’s success is the ability to provide sensible results. The margin for errors is specific to your use case and industry and can be evaluated through appropriate training versus test dataset splits.
- Performance: The inference can run within a certain time to ensure application usability in practice. This performance should be measured from the inference running on the edge device (or a simulation of the edge device) to give realistic results. Running tests on your actual device, similar development boards, or even Arm Virtual Hardware (AVH) can help give pointers on inference performance.
- Size: The model must fit on your edge device, which has a limited amount of memory that can hold the model. This can be measured after the model is trained and compiled for your specific system.
The model integration phase is when you take the model and integrate it within your other application code. At this point, you turn the ML model into a C++ (or similar) file and stitch it into the overall system through the typical code, compile, run, debug cycle of embedded development.
Finally, after the model is integrated into your overall application that has been compiled, it can be deployed to your edge device. This may involve updating an existing device with a new model or creating a new device to be distributed. In either case, at this point, your model is now deployed and being used.
With this high-level overview of the life cycle of an ML model in embedded systems, it is time to look at some specific libraries that provide algorithms and stitching capabilities that simplify this process.
Investigating ML frameworks and libraries
The list of frameworks and libraries that help bring ML to edge devices is large and constantly evolving. This section will highlight the top three most common ML frameworks and libraries for Cortex-M ML at the time of writing this book. We will cover the following:
- TensorFlow Lite for Microcontrollers
- CMSIS-NN
- TinyML
TensorFlow Lite for Microcontrollers
The first framework to discuss is TensorFlow Lite for Microcontrollers (TFlite Micro). TensorFlow Lite is a framework that is designed for mobile devices, microcontrollers, and other edge devices where a small memory footprint and optimized performance are important. TFlite Micro is a C++ framework for ML inference that works well on Cortex-M microcontrollers. It is an optimized version of TensorFlow for embedded C/C++ applications. It is designed to run on 32-bit microcontrollers and results in very small binary files. It also doesn’t require an operating system (OS), standard C++ libraries, or dynamic memory allocation functions. A small memory footprint combined with the power of TensorFlow makes TFlite Micro one of the most popular ML frameworks for Internet of Things (IoT) applications.
Note that at present, this is one of the only fundamental frameworks for bringing ML to Cortex-M devices, so you will almost certainly work with this framework if introducing ML capabilities to your edge device. In terms of the life cycle of ML projects detailed earlier, the data selection and normalization—as well as model training and testing—will be performed through TensorFlow Lite on a desktop computer (or cloud environment). In the model integration step, you will then convert this trained model into a TFlite Micro model, then finally into your embedded application itself.
CMSIS-NN
The Common Microcontroller Software Interface Standard (CMSIS) and CMSIS-NN were previously mentioned in Chapter 1, Selecting the Right Hardware. CMSIS-NN is tightly integrated with TFlite Micro providing optimized versions of TFlite Micro kernels in an easy-to-understand way. CMSIS-NN is an excellent choice for bringing ML capabilities to Cortex-M devices in an optimized fashion without rewriting existing functionality.
TinyML
TinyML is relatively new on the scene, first introduced in 2018 and popularized by Google’s Pete Warden in his book on the topic in 2020. It is primarily a concept of generally bringing ML to small IoT devices as opposed to a specific library. TinyML is a useful term to be aware of as it may refer to projects that leverage TFlite Micro or other languages such as MicroPython. An example of TinyML in practice using MicroPython on a Cortex-M4 device can be found in the Further reading section at the end of this chapter.
Now that we have looked at the commonly used ML frameworks and libraries for the development of your ML applications on Cortex-M-based devices, let us dive into exploring some of these applications with hands-on examples.
Exploring ML use cases
ML is rapidly evolving to more use cases such as fraud detection, personalized targeted marketing, and self-driving cars, to name a few. Currently, the most popular applications for ML in the embedded space can be grouped into three areas: vibration, vision, and voice. These categories were briefly discussed in Chapter 1, Selecting the Right Hardware, with the current chapter focusing on running examples in each of these areas. Vibration typically is the most straightforward and is therefore a good starting point to begin exploring. After familiarizing ourselves with the vibration example, we provide more details on the construction of the ML software stack in the vision and voice examples that follow. The three use cases are presented here:
- Anomaly detection using the Cortex-M55
- Image classification using the Cortex-M55 and Ethos-U55
- Micro speech using the Cortex-M55 and Ethos-U55
Anomaly detection – vibration
To replicate the example in this section, you will be using the following tools and environments:
|
Platform |
Arm Virtual Hardware – Corstone-300 |
|
Software |
ML Application (Anomaly detection) |
|
Environment |
Amazon Elastic Compute Cloud (EC2) (Amazon Web Services (AWS) account required) |
|
Host OS |
Ubuntu Linux |
|
Compiler |
Arm Compiler for Embedded |
|
IDE |
- |
Vibration ML applications gather motion data, typically from an accelerometer, and analyze it periodically to ensure normal behavior. This type of analysis can be found in the health industry and particularly in ensuring industrial machines are working correctly. These algorithms are ideal to detect unusual mechanical movements that are precursors to failure, enabling companies to take preventative action before expensive machinery breaks down.
The example in this section is anomaly detection based on audio data that comes from the Arm ML Embedded Evaluation Kit. This kit is a great resource to get started and see how to run realistic ML workloads on an example system. The example system, in this case, is the Corstone-300 Fixed Virtual Platform (FVP) provided in AVH, enabling the exploration of these models without any physical hardware.
An anomaly detection example can be found here: https://review.mlplatform.org/plugins/gitiles/ml/ethos-u/ml-embedded-evaluation-kit/+/HEAD/docs/use_cases/ad.md. It illustrates how an anomaly detection flow could be used to monitor for anomalies in running industrial machines. This software example uses audio recordings instead of vibration from an accelerometer, but the principle is the same between the two data types. The software records an audio sample, performing inferences to identify whether the audio sample is outside a set acceptable threshold range of variance from the normal. If the sample is outside this threshold, the machine is flagged as behaving anomalously and corrective action could be taken.
Environment setup
To get started, launch the AVH Amazon Machine Image (AMI) in AWS. You will then need to connect to the AMI. The steps are documented here: https://arm-software.github.io/AVH/main/infrastructure/html/run_ami_local.html#connect.
Note that these examples use the Corstone-300 FVP in AVH display features to show images and serial output on a separate screen, so an X server is required to run properly. Connecting to your EC2 instance via the online AWS terminal, or a simple ssh via Command Prompt in Windows, will not properly forward an X display to run the example correctly. Make sure you connect to your EC2 instance with a method that enables display. Here are some options based on the OS you are using:
- Windows
- MobaXterm
- Mac/Linux
- XQuartz
- Full graphical user interface (GUI) options for any OS
- NoMachine
- Any virtual network computing (VNC) client
Connect to an AWS instance of the AMI using ssh. This was covered previously in Chapter 4, Booting to Main. The code is illustrated here:
$ ssh -i <your-private-key>.pem ubuntu@<your-ec2-IP-address>
Start by cloning the Git repository for the previously mentioned ML Embedded Evaluation Kit from Arm. It will automatically download several example ML use cases that run on the Corstone-300 FVP, including this example and the next section’s example as well on image classification. The code is illustrated here:
git clone --recursive “https://review.mlplatform.org/ml/ethos-u/ml-embedded-evaluation-kit”
Then, enter the directory to proceed with downloading all the files required to build this example:
cd ml-embedded-evaluation-kit/
Before building the example software, you need to download some dependencies and resources that are not included in the Git repository due to space and third-party arrangements. Enter this command first to download the CMSIS, TFlite, and Ethos-U55 drivers:
python download_dependencies.py
If this command fails with a Dependencies folder exists. Skipping download message, then delete the dependencies folder with rm -rf dependencies/ and try again.
Lastly, you will need to set up the resources just downloaded from Git and the download_dependencies.py script. Do so with this command:
python set_up_default_resources.py
If this command fails, debug depending on the error you obtain, as follows:
- If it’s a failure due to resources_downloaded directory exists, then delete this folder with rm -rf resources_downloaded/ and try again
- If it doesn’t work due to python3 -m venv env failing, then install the python3 virtual environment with the sudo apt install python3.8-venv command, and try again
It will take about a minute to download, and then you are ready to build the example application.
Build
This repository uses cmake (https://cmake.org/) as the build system. The applications can be built using either the Arm Compiler for Embedded toolchain or the GNU Compiler Collection (GCC). This book will use the Arm Compiler for Embedded toolchain here, which is already included in the AMI and initialized in the previous steps.
Make a build directory, enter it, and run the following cmake command followed by make to kick off the build process. The exact commands are shown here:
mkdir cmake-build-mps3-sse-300-arm
cd cmake-build-mps3-sse-300-arm
cmake .. -DTARGET_PLATFORM=mps3 -DTARGET_SUBSYSTEM=sse-300 -DETHOS_U_NPU_ENABLED=OFF -DCMAKE_TOOLCHAIN_FILE=~/ml-embedded-evaluation-kit/scripts/cmake/toolchains/bare-metal-armclang.cmake -DUSE_CASE_BUILD=ad
make
This will take about 2 minutes or so to complete, with the final executable being built as a result: ethos-u-ad.axf. ad stands for anomaly detection here. Note that it is located in the cmake-build-mps3-sse-300-arm/bin/ directory. The neural processing unit (NPU) is disabled, even with the name of the .axf file including ethos-u.
Before we move on to running this executable on the Corstone-300 FVP in AVH, let’s look at some of the options we passed to the preceding cmake command, what they mean, and how we can change them for different results, as follows:
- -DTARGET_PLATFORM=mps3 -DTARGET_SUBSYSTEM=sse-300
- These commands specify to use the MPS3 platform and SSE-300 subsystem as the targets for building. This will build the application for the correct memory map of the VHT_Corstone_SSE-300_Ethos-U55 FVP, whether or not we take advantage of the Ethos-U55 accelerator.
- -DCMAKE_TOOLCHAIN=~/ml-embedded-evaluation-kit/scripts/cmake/bare-metal-gcc.cmake
- This will set your compiler toolchain as GCC instead of the default Arm Compiler for Embedded.
- -DETHOS_U_NPU_ENABLED=OFF
- This specifies that we are just running the ML application on the Cortex-M55 processor, not taking advantage of the Ethos-U55 acceleration. This simple vibration detection use case does not need acceleration, but the next example of image classification will show specifically how to use this in practice.
- -DETHOSU_TARGET_NPU_CONFIG=H32
- Only applies when -DETHOS_U_NPU_ENABLED=ON, when using the NPU as an accelerator. This option defines the configuration of the NPU that you are building the application for. It corresponds to the number of 8x8 multiply-accumulates (MACs) per cycle performed by the NPU. The allowed values are H32, H64, H128, and Y256. H128 is the default setting, and you can override it using this parameter—for example, to build for 32 MACs.
Now that we have looked at the steps to build the anomaly detection application, let us move on to running the executable.
Run
To execute the anomaly detection example we built, execute the following command:
VHT_Corstone_SSE-300_Ethos-U55 -a ~/ml-embedded-evaluation-kit/cmake-build-mps3-sse-300-arm/bin/ethos-u-ad.axf
-a points to the application that we are running on the model.
Note again that if you get an error about Display not set or an xterm error, you need to ensure your SSH connection method has X-forwarding and your system has an X server. Refer to the start of the example to fix this problem. You may also see a Warning: Failed to write bytes at address range … message pop up, but that is just a warning, and it is running just fine.
A liquid-crystal display (LCD) terminal will appear, replicating the MPS3 physical board’s LCD board behavior. Then, another Telnet terminal will also appear, displaying the program output and inference status, as depicted in the following screenshot:
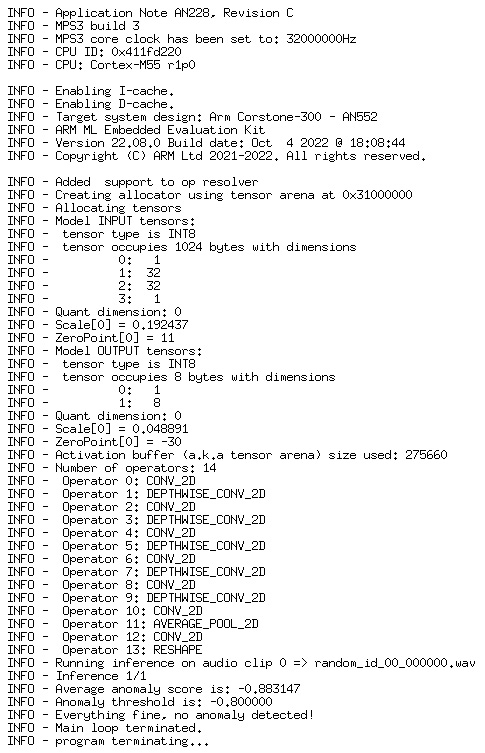
Figure 6.2 – Anomaly detection output
This execution will take about 2 minutes and will finish by displaying a success inference and a non-anomalous machine. Running the ML model on the Ethos-U55 will significantly speed up the execution, as it is intended to.
This example was a quick-start guide to running an ML algorithm on a Cortex-M55-based system, using virtual hardware. The next example will show the different commands to enable and run an example on the Ethos-U55 included in the same system with the image classification algorithm.
Image classification – vision
To replicate the example in this section, you will be using the following tools and environments:
|
Platform |
Arm Virtual Hardware – Corstone-300 |
|
Software |
ML Application (Image classification) |
|
Environment |
Amazon EC2 (AWS account required) |
|
Host OS |
Ubuntu Linux |
|
Compiler |
Arm Compiler for Embedded |
|
IDE |
- |
Vision ML applications can range greatly in uses. Object detection is used in self-driving cars, face unlocking is used in mobile devices and smart home cameras, and image classification is common across many industries for various purposes. The value of vision-based algorithms at the edge will only grow over the coming years.
Image classification refers to the task of identifying what an image represents. For example, you can train an NN model to recognize images of different animals such as a cat or a dog. This image classification example uses the MobileNetV2-1.0 quantized uint8 NN model, which is openly available on TensorFlow Hub here: https://tfhub.dev/tensorflow/lite-model/mobilenet_v2_1.0_224_quantized/1/default/1. The pre-trained network model is trained on more than a million images from the ImageNet database (https://image-net.org/) and can classify images into 1,000 object categories. If you are curious and want to look at all the object categories, take a look here: https://github.com/google-coral/edgetpu/blob/master/test_data/imagenet_labels.txt.
The example in this section can be found here: https://review.mlplatform.org/plugins/gitiles/ml/ethos-u/ml-embedded-evaluation-kit/+/HEAD/docs/use_cases/img_class.md. It runs classification on four different input images (cat, dog, kimono, and tiger). Note that this is the same Arm ML Embedded Evaluation Kit from the previous section on anomaly detection and will follow similar steps. Here, however, we will take advantage of the Ethos-U55 to increase the performance of the system. Let us go over the software flow for the Ethos-U55, as this is relatively new to most developers.
Ethos-U55 in practice
Have a look at the following diagram:
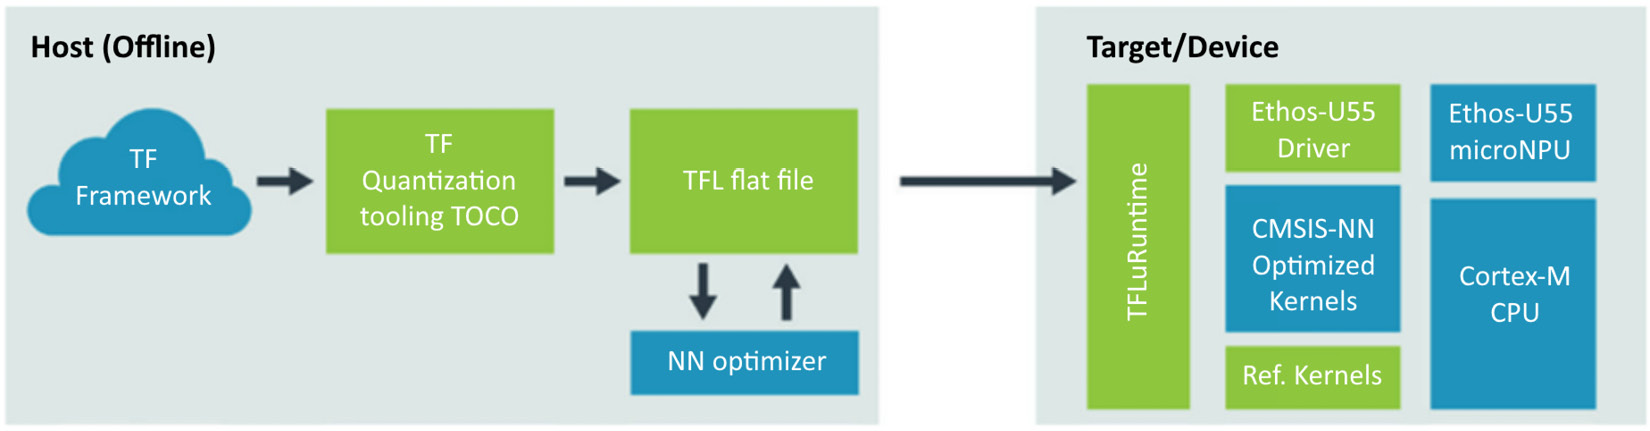
Figure 6.3 – Ethos-U55 optimized software flow
You can benefit from the processing capability of the Ethos-U55 microNPU by using the TFlite Micro ML framework from Google, which runs on the host application processor (Cortex-M55, in the case of the Corstone-300 FVP). The process starts by training or acquiring a TensorFlow model that is to be accelerated. The model is then quantized to 8-bit integer format and converted to the standard TensorFlow Lite flat-file format (.tflite file). The TensorFlow Lite flat file is then input to an NN optimizer tool called Vela, which you run on your host machine. Vela is an open sourced Python tool that you can install from the PyPI community (https://pypi.org/project/ethos-u-vela/). The output of the tool is an optimized TensorFlow Lite file that is now ready for deployment on your Ethos-U55 target device or, in this case, the Corstone-300 FVP.
Vela identifies which ML operators can be executed by the Ethos-U55 microNPU and substitutes these with a sequence of optimized and special operations. All other ML operators can be executed on the Cortex-M55 processor either by optimized kernels from the CMSIS-NN library or by fallback support in TensorFlow Lite reference kernels. The Ethos-U55 driver, which you can download from https://review.mlplatform.org/plugins/gitiles/ml/ethos-u/ethos-u-core-driver, manages the communication and workloads that execute the inferences on the Ethos-U55 microNPU.
Environment setup
The environment setup is identical to the previous section on anomaly detection; here are the commands again for easy reference.
Create and connect to an AVH AMI instance following these instructions: https://arm-software.github.io/AVH/main/infrastructure/html/run_ami_local.html#connect.
Then connect to the AMI over ssh (ensuring you have X forwarding enabled to view visual displays), and obtain the required resources with these commands:
ssh -i <your-private-key>.pem ubuntu@<your-ec2-IP-address>
git clone --recursive “https://review.mlplatform.org/ml/ethos-u/ml-embedded-evaluation-kit”
cd ml-embedded-evaluation-kit/
python download_dependencies.py
python set_up_default_resources.py
At this point, you are set up to build the image classification application. You can also use the same AWS instance to run the anomaly detection and this image classification example; just keep the build directories separate to avoid overlapping files.
Build
The same cmake and Arm Compiler for Embedded tools will be used in this example as in the previous example. First, create a build directory, like so:
mkdir cmake-build-mps3-sse-300-ethos-u55-256-arm
cd cmake-build-mps3-sse-300-ethos-u55-256-arm
Then, build the example with the following two commands:
cmake .. -DTARGET_PLATFORM=mps3 -DTARGET_SUBSYSTEM=sse-300 -DCMAKE_TOOLCHAIN_FILE=~/ml-embedded-evaluation-kit/scripts/cmake/toolchains/bare-metal-armclang.cmake -DETHOS_U_NPU_ENABLED=ON -DETHOS_U_NPU_CONFIG_ID=Y256 -DUSE_CASE_BUILD=img_class
make
This will again take about 2 minutes or so to complete, with the final executable being built as a result: ethos-u-image_class.axf. It is also located in the cmake-build-mps3-sse-300-ethos-u55-256-arm/bin/ directory. This time, because of the ETHOS_U_NPU_ENABLED=ON command, the Ethos-U55 will help run the application, set to use 256 MACs.
Run
To execute the image classification example, run the following command:
VHT_Corstone_SSE-300_Ethos-U55 -C ethosu.num_macs=256 -a ~/ml-embedded-evaluation-kit/cmake-build-mps3-sse-300-ethos-u55-256-arm/bin/ethos-u-img_class.axf
The Corstone-300 FVP simulation model can be run with several different parameter settings, which are passed with the -C option shown in the preceding code snippet. The ethosu.num_macs parameter maps to the number of 8x8 MACs performed per cycle. This should match the MAC setting we built the application for. By default, the simulation model sets this to 128. As we built our application for 256 MACs, we passed this value to the simulation model as well. As before, -a points to the application that we are running on the model.
With the application running, you will be presented with a menu of options, as shown here:

Figure 6.4 – Input selection for image classification example
The first menu option is to execute image classification on the next input image in the queue, which in this case is cat.bmp.
The following code snippet shows the application output for classification on the cat.bmp input image:
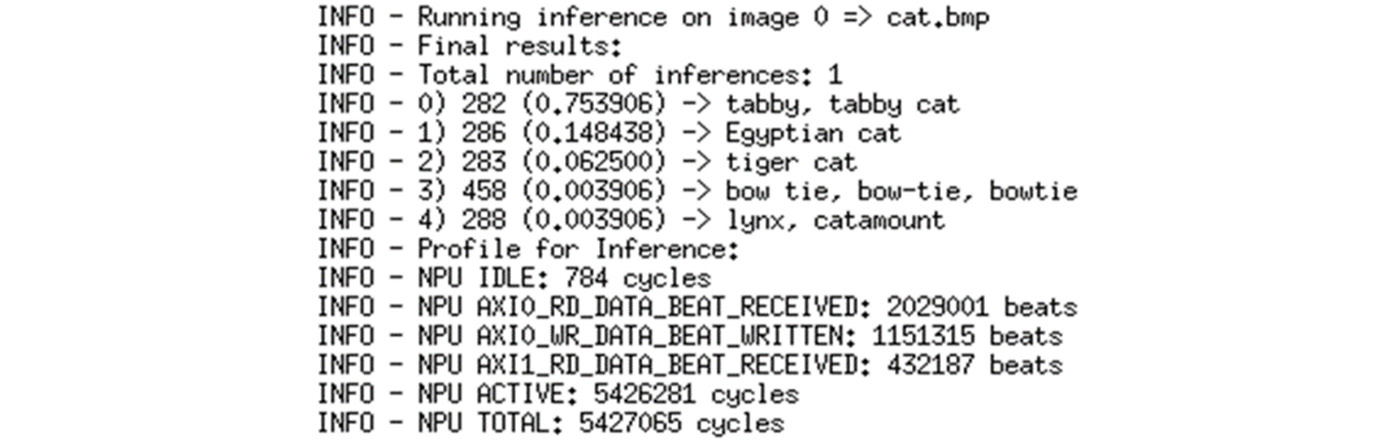
Figure 6.5 – Output from image classification example
The top five classifications with confidence indexes are provided, along with some performance data on how long it took the NPU to run an inference on the input cat image and provide the classification results. For example, in the preceding screenshot, you can see the cat.bmp image is classified as a tabby cat with a confidence of 75.39%.
You can similarly run an inference on any of the other input images in the example and check the classified output.
This section expanded on the previous anomaly detection example by running inferences on the Ethos-U55 through an image classification application. The next example, focusing on the third V, of voice, will dive deeper into another software stack to provide a wider perspective on ML software.
Micro speech – voice
To replicate the example in this section, you will be using the following tools and environments:
|
Platform |
Arm Virtual Hardware – Corstone-300 |
|
Software |
ML Application (Micro speech) |
|
Environment |
Amazon EC2 (AWS account required) |
|
Host OS |
Ubuntu Linux |
|
Compiler |
Arm Compiler for Embedded |
|
IDE |
- |
Voice recognition is one of the most common ML example applications on Cortex-M microcontrollers. TensorFlow Lite is ideal for these use cases where a small memory footprint and optimized performance are important. This section demonstrates a TensorFlow Lite example application running on the same Cortex-M55-based AVH AWS AMI as the previous sections, now running a TensorFlow Lite example application called micro speech.
The micro-speech application is a simple demonstration of speech recognition. The application receives a Waveform audio file, also known as a wave or WAV file, as an audio sample. The micro-speech application is looking for the yes and no keywords. The Waveform file may contain the keywords the application is looking for or some other audio that is not one of the keywords. The input audio is processed by the application and reports if yes or no keywords are detected.
Micro speech is written in C++ and uses CMSIS build, also known as cbuild, to compile the application (different from the cmake build system used in the previous examples). CMSIS applications are constructed using software packs. One of the software packs used in micro speech is the TFlite Micro software pack. The application performance is also accelerated using CMSIS-NN kernels.
An additional explanation of the application source code, ML model, and Waveform file input processing will be covered in the following subsections.
Running ML models on microcontrollers
As we covered in the chapter introduction, ML applications consist of a training phase that takes test data and builds an ML model that is used during the inference phase to process new data. Model training is a complex subject beyond the scope of this text, but there are many good references to learn more about model training. To learn more about the training for the micro-speech application, look at the training details here: https://github.com/tensorflow/tflite-micro/tree/main/tensorflow/lite/micro/examples/micro_speech/train. To train an ML model for yes and no keyword recognition, a number of audio samples—including yes, no, and additional audio or background noise—are used. From this training data, the TensorFlow framework creates an ML model.
To use a model with TFlite Micro models must be saved in TensorFlow Lite format. The Lite format is an optimized format that can be processed with a very small amount of code and is easy to use in many languages, including C++. The file naming convention for ML models saved in the Lite format is to use a .tflite extension.
For the micro-speech application, we start from an already trained model that is saved for use as a TensorFlow Lite file (.tflite). The model is available on GitHub—the size is only 20 kilobytes (KB) and the amount of random-access memory (RAM) used is only 10 KB. Find the model here: https://github.com/tensorflow/tflite-micro/blob/main/tensorflow/lite/micro/examples/micro_speech/micro_speech.tflite.
Microcontrollers often run with no OS and may not have a filesystem to store ML models in .tflite format. Instead, the xxd command (https://linux.die.net/man/1/xxd) is used to turn the .tflite file into a hexadecimal (hex) data array that can be directly embedded in the C++ application. This means that changing the ML model will require the application to be recompiled, but for microcontrollers, this is an efficient solution.
To convert a .tflite file into a C++ file, run the following command:
xxd -i micro_speech.tflite > model.cc
unsigned char micro_speech_tflite[] = {
0x20, 0x00, 0x00, 0x00, 0x54, 0x46, 0x4c, 0x33, 0x00, 0x00, 0x00, 0x00,
0x00, 0x00, 0x12, 0x00, 0x1c, 0x00, 0x04, 0x00, 0x08, 0x00, 0x0c, 0x00,
<< continued >>
Add the DATA_ALIGN_ATTRIBUTE macro. This macro ensures that the model data array is aligned in a way that it does not overlap memory boundaries for optimal read performance by the processor.
This provides a basic overview of how to create an ML model for a microcontroller application.
Next, let’s look at the tools used to make the micro-speech application.
Environment setup
The micro-speech example will be compiled using Arm Compiler for Embedded and run on AVH in an AMI, as with the previous examples in this chapter. The build process uses CMSIS packs (https://github.com/ARM-software/CMSIS_5) and the CMSIS-Toolbox (https://github.com/Open-CMSIS-Pack/devtools). The most important CMSIS pack for the project is the TensorFlow Lite pack (https://github.com/MDK-Packs/tensorflow-pack), which provides a build-and-test environment for TFlite Micro.
The micro-speech example is designed to be compiled and run on Linux. Additional tools that are part of the AMI are listed here:
- Python
- Ninja build system (https://ninja-build.org/)
- CMake
- Corstone-300 FVP
- Arm Compiler for Embedded
- The CMSIS-Toolbox, including cbuild.sh to build the application
To get started, connect to an AWS instance of the AMI using ssh, like so:
$ ssh -i <your-private-key>.pem ubuntu@<your-ec2-IP-address>
Once connected to the AMI, clone the project repository, as follows:
$ git clone https://github.com/ARM-software/AVH-TFLmicrospeech.git
Application overview
Before getting started, let’s review the contents of the project to get familiar with the code.
The Platform_FVP_Corstone_SSE-300_Ethos-U55/ directory contains all the files required to build and run the application on the FVP. Look in this directory for the project configuration and source code for the main() functions.
The project build is configured via a project file, microspeech.Example.cprj.
The .crpj file includes the following information:
- Required CMSIS packs
- Compiler to be used
- Compiler flags
- CMSIS components to be used
- Source files that make up the project
The ML model is located in the ./micro_speech/src/micro_features subdirectory. Look at the model.cc and model.h files to see the ML model that was created using the flow described in the Running ML models on microcontrollers section earlier and the xxd command to generate an array of data found in model.cc.
The application starts from the main() function in main.c and is built around CMSIS-RTOS2 (https://www.keil.com/pack/doc/CMSIS/RTOS2/html/index.html), which provides generic real-time OS (RTOS) interfaces for Cortex-M microcontrollers. The main() function calls the app_initialize() function, which starts the main thread, named app_main(), in microspeech.c. This main thread calls the TensorFlow Lite setup() and loop() functions to begin the audio processing. The loop() function is called from an infinite loop to continuously process audio data.
The CMSIS-NN software library is also used. This provides a library of efficient NN kernels developed to get the best performance across a variety of Cortex-M microcontrollers while keeping memory usage low. For the Cortex-M55, it will take full advantage of the Cortex-M Vector Extensions (MVE) to provide high performance without the need to learn or use assembly code to implement vector operations.
The library covers a variety of function classes useful in ML applications, as follows:
- Convolution functions
- Activation functions
- Fully connected layer functions
- Single-value decomposition filter (SVDF) layer functions
- Pooling functions
- Softmax functions
- Basic math functions
We introduced this library of functions for operating on different weight and activation data types in Chapter 2, Selecting the Right Software. It may be interesting to browse the CMSIS-NN source code to get a feel for the type of functions available and how they are implemented. The micro speech uses 8-bit integer functions. The code can be found here: https://github.com/ARM-software/CMSIS_5/tree/develop/CMSIS/NN/Source.
The Corstone-300 FVP is used to execute the micro-speech application. Recall that the Corstone-300 is a full hardware design including the Cortex-M55 processor, the Ethos-U55 ML processor, memories, and peripherals.
Build
To build the application using cbuild from the CMSIS-Toolbox, run the following command:
$ cd Platform_FVP_Corstone_SSE-300_Ethos-U55
$ cbuild.sh microspeech.Example.cprj
It will take about a minute to compile the entire application and produce a binary at Objects/microspeech.axf. To run the application, execute the following script as shown in the command:
$ ./run_example.sh
This produces the output from the application, as shown here:
Fast Models [11.16.14 (Sep 29 2021)]
Copyright 2000-2021 ARM Limited.
All Rights Reserved.
telnetterminal0: Listening for serial connection on port 5000
telnetterminal1: Listening for serial connection on port 5001
telnetterminal2: Listening for serial connection on port 5002
telnetterminal5: Listening for serial connection on port 5003
Ethos-U rev afc78a99 --- Aug 31 2021 22:30:42
(C) COPYRIGHT 2019-2021 Arm Limited
ALL RIGHTS RESERVED
Heard yes (146) @1000ms
Heard no (145) @5600ms
Heard yes (143) @9100ms
Heard no (145) @13600ms
Heard yes (143) @17100ms
Heard no (145) @21600ms
Info: Simulation is stopping. Reason: Cycle limit has been exceeded.
Info: /OSCI/SystemC: Simulation stopped by user.
[warning ][main@0][01 ns] Simulation stopped by user
--- cpu_core statistics: ------------------------------------------------------
Simulated time : 23.999999s
User time : 25.804117s
System time : 3.336213s
Wall time : 29.132544s
Performance index : 0.82
cpu_core.cpu0 : 26.36 MIPS ( 768000000 Inst)
------------------------------------------------------------------
The print statements from the software occur when the application has detected yes or no.
Let’s look at where the input comes from and understand what it is and how to change it.
Run
The default audio input file is test.wav. You can download this file to your computer and play it using an audio player application. On Windows or macOS computers, the file should play automatically when you click on it. You should hear a sequence of yes, no three times. This corresponds to the printed output from the application.
The test.wav file is sent into the hardware design using Python. The Python interface to the simulated hardware is called the Virtual Streaming Interface, or VSI (https://arm-software.github.io/AVH/main/simulation/html/group__arm__vsi.html). VSI is a flexible, generic peripheral interface that can be used to simulate data streaming in and out of a device for applications such as audio, video, or sensor data. In the micro-speech application, VSI is used to stream the test.wav file into memory. This streaming interface takes the place of a microphone capturing audio. Streaming audio data from a file is useful for automated testing. It allows a large library of sample audio data to be saved and used over and over as the ML model is changed.
The Python code for the audio input is located in VSI/audio/python/arm_vsi0.py. Take a look at the code and see that it is reading test.wav when the audio driver running on the processor writes to the control register to initiate the streaming audio transfer. The audio driver is found in the VSI/audio/driver directory. The VSI is controlled by the audio driver.
Presented here are two recommendations for the next steps to try:
- Experiment with the micro-speech example by recording a new test.wav file and run it. Check whether the micro-speech application can correctly process your audio sample.
- Edit the arm_vsi0.py file to enable more logging and try to understand the sequence of events for how it works.
For the second option, uncomment the following line:
#verbosity = logging.DEBUG
Then, add a comment (#) in front of the following line:
verbosity = logging.ERROR
This changes the verbosity to DEBUG instead of ERROR, so more output will be printed when the application is run.
Use the run_example.sh script again and see the extra output coming from the Python code, and see whether you can understand how the audio streaming is working in conjunction with the audio driver to process the audio file.
This section has presented the TFlite Micro example called micro speech. It has explained numerous points that are different from the official version found in TFlite Micro We have reviewed the following points:
- Application creation with CMSIS packs and the CMSIS-Toolbox to build Cortex-M applications on Linux
- UsingAWS to start a virtual machine (VM) with the needed tools already installed to save time
- Running applications on an FVP instead of a physical board when the hardware is not available
- Providing streaming audio data from files instead of a microphone to create a library of test data that can be reused as software changes
Summary
In this chapter, we first provided an overview of the ML software development process. We also looked at ML frameworks and libraries that can be leveraged to build ML applications on Arm Cortex-M-based devices.
In the remainder of the chapter, we focused on the steps to run three different ML use cases on the Arm Cortex-M55 AVH simulation system.
In summary, we have looked at the ML software flow targeting Arm Cortex-M devices, components that enable this flow, and examples that illustrate running this flow. In the next chapter, we will cover a vaunted but often confusing area of embedded development: security. We will provide both an introduction to and an implementation guide for security in Cortex-M products.
Further reading
For more information, refer to the following resources:
- TinyML example:
https://dev.to/tkeyo/tinyml-machine-learning-on-esp32-with-micropython-38a6
- Arm ML Embedded Evaluation kit:
- Blog post on the optimization of ML models running on Arm Ethos-U microNPU:
- TinyML audio classification example running on a Cortex-M0+ microcontroller board:
https://blog.tensorflow.org/2021/09/TinyML-Audio-for-everyone.html
- TinyML motion recognition example on Raspberry Pi Pico:
https://mjrobot.org/2021/03/12/tinyml-motion-recognition-using-raspberry-pi-pico/
- TensorFlow Lite for Microcontrollers: https://www.tensorflow.org/lite/microcontrollers