
Throughout the history of photography, the process of producing a photographic image has been split into two parts—one done in the camera and the other in the darkroom. It is not always easy to decide which has more effect on the final “look” of the photograph. With the camera, one makes an initial decision that has a profound effect on the image—choice of subject, composition, and so on. The options for altering the image, and thus how it is perceived, that are provided by the darkroom (tone, contrast, density, cropping, etc.) can have an equally profound effect. In this age of the digital manipulation of images, the actual photograph may only be the raw material in the production of a much more complicated image.
Both cameras and darkrooms can be extremely crude and still produce fine images. Many of the great images throughout the history of photography have been produced in odd darkrooms under the most trying circumstances. Some have even been scary. Imagine using a darkroom wagon pulled up to the battle-field during the Civil War. While shells burst outside, you are desperately trying to coat a glass plate to be used in the camera, or developing one just exposed! All the while, you are making sure the entire plate is still wet! However, a good camera and a good darkroom allow the photographer to concentrate on what is really important—the process of producing an image. While it would be difficult for most of us to build a camera (barring those enduring pin-hole cameras), the building of a darkroom can be both easy and satisfying. It separates the total amateur from the serious photographer. Building your own darkroom is a rite of passage to a new world of possibilities.
It is the purpose of this book to make that passage as simple and satisfying as possible. This book uses ideas that have been tried and used successfully by other photographers to produce darkrooms that are functional, personal, efficient, and inexpensive. It shows how to tailor your darkroom to your space, wherever that might be.
Because a significant part of the time in producing an image is spent in the darkroom—the time in the camera may only be 1/125th of a second!—all obstacles to the pleasant and efficient workings of that space should be removed. Planning and forethought are the essential ingredients to the successful completion of any project, and it is no less true of darkroom construction. The time spent before any physical work is done is often the time best spent. This book gives guidelines and many useful hints for planning a darkroom, and for how the resulting plan can be brought to fruition.
You should start by brainstorming and daydreaming about your ideal darkroom. Then slowly whittle it down based on the realities of space, time, and finances. The dreaming phase should not be neglected, because you may surprise yourself with what you can actually have. It often takes only a simple solution to allow yourself a luxury you once thought impossible to obtain. A darkroom does not have to be all stainless steel and fancy electronics. There is no real correlation between money spent and quality of image produced. Darkrooms have existed in all places and with all degrees of sophistication. It’s not the money that makes your darkroom a great place to work, it’s the planning and personal touches that make a space truly your own. Your darkroom represents your tastes and personal feelings as much as your photographs do.
In the final chapter on digital darkrooms, we will see how you may create a “darkroom” that is nothing more than a table top with a few pieces of electronic equipment on it. Under this system, there is no need to isolate yourself in a dark space, surrounded by large and sometimes noisy pieces of equipment that are based on concepts more than 100 years old. Here there are no chemicals, no odors, no skin irritations. And yet, perhaps the feeling of actually making something by hand is lost. Is the manipulation of a mouse and the insertion of a piece of paper in a machine as satisfying as working on an image under the light and time constraints of a traditional exposure? Is there more satisfaction in sloshing a piece of paper around in a series of trays? Each photographer must decide for him or herself, but there seems to be nothing quite so satisfying to human beings as actually touching things with their hands.
So, roll up your sleeves, dig in, and build yourself a darkroom.
It’s easy to forget that photography today, where the taking of the picture and the development of the negative are two distinct acts, is quite different from what it used to be. During the wet-plate era of photography (c. 1853-1890) the characteristics of the glass plate negatives were such that the negative glass had to be coated with the emulsion, the exposure made, and then the development completed while the plate was still wet. Since the negatives could not be taken back to a darkroom for development, the only solution was to take a darkroom along. Early photographers must have looked strange to passersby, but they did come up with creative solutions to problems that make ours pale by comparison.
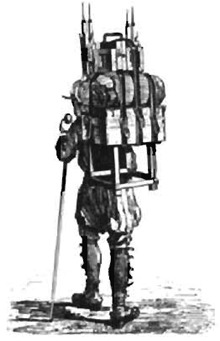
A photographer of the wet-plate period loaded with camera and darkroom equipment.
Gernsheim Collection, Humanities Research Center, The University of Texas at Austin
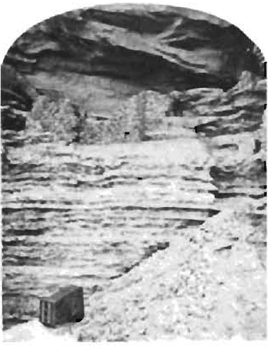
View showing William Henry Jackson’s darkroom set up amongst the rocks.
R. A. Ronzio Collection

An engraving showing a portable darkroom set up close to the camera so the plate can be coated, loaded in the camera, and then returned to the darkroom for development after the exposure and before the emulsion dried (c. 1865).
Photo, Science Museum, London

A mobile darkroom that was a step up in class from the tent; it gave slightly more comfort to the photographer.
Courtesy Colorado Historical Society
Safelights. 1880s safelights came in kerosene and candle versions.
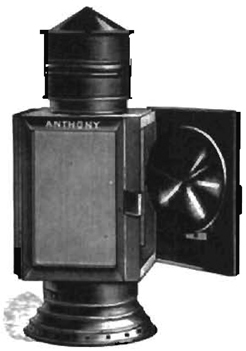
Enlarger

Enlarger. Since electricity was not yet widely available, even the enlarger had to be operated with kerosene.
U.S. Photo Clip
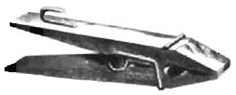
U.S. Photo Clip. Not at all unlike the venerable old clothespin still used to hang negatives and prints to dry.
Chemical Storage
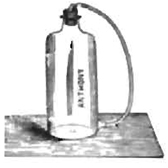
Chemical Storage. This innovative developer bottle had a tube to draw the fluid from the bottom of the bottle and a thin layer of oil on top to keep the air and developer from making contact. This enabled the developer to last longer.
Print Mounter

Print Mounter. This is basically the same design still used today.
Timing Plummet

Timing Plummet. It must have been difficult to swing, count, dodge, and burn at the same time.
A Portable Darkroom Tent

A Portable Darkroom Tent. Similar units are in use today, especially for color photography where the print is exposed, put in a light-tight drum, and then processed in daylight.

Print Dryer. This print dryer revolved increasing the air flow over the print surface to speed drying.
Allderige’s Developing Rocker
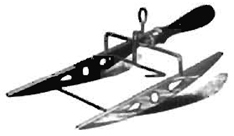
Allderige’s Developing Rocker. Agitation during development was as important in the 1880s as it is today. This is the forerunner of Amblico wave trays and drum processors.
A Typical Darkroom of the 1880s

A Typical Darkroom of the 1880s. Papers were contact-printed and produced the same sized print as the negative. They were exposed in the frames mounted to the wall on either side of the door.