
3 Ideas for Placement

Contents
Darkrooms in Closets
Most closets hardly have sufficient space for clothes and other items needing storage space. Occasionally, however, you may be lucky enough to have a very large walk-in closet, or a long closet with sliding or folding doors that can be spared for a darkroom or a portion of a darkroom. In most cases (but not all), working in a closet means you will have a “dry darkroom.” Prints will be stored in a water tray after fixing, then carried in batches to another room for washing. If you are printing in color, all you have to do in the closet is make the exposure and insert the print into a light-tight drum (see Chapter 9, ‘The Color Darkroom”). All other processing can be done where there is more room. Closets are generally so small that careful planning is required to make one acceptable for use as a darkroom.
Enlarger
Where possible, the enlarger should be wall-mounted, because it can be difficult to find a small table that is steady enough for it. Or you can build a sturdy counter on which to set the enlarger and its baseboard. As closet space is at a premium, an adjustable enlarger base is not practical, since 11 × 14 prints can normally be made on the baseboard, and there probably will not be space to process larger prints.
Counter Tops
Shelves to hold the processing trays should be built at a convenient height, often counter-top height. You will require a minimum of four trays (developer, stop bath, fixer, and water-holding trays).
Storage
If the enlarger and processing trays fit, you could store everything else outside of the darkroom. If you have a tendency, however, to see how many people will fit in a phone booth, you can build storage shelves over cabinets in whatever space is available.
Ventilation
Working in a small space increases the problems of fumes and vapors. Good ventilation is almost a necessity for closet work, so plan on installing a fan and air vents in the closet.
Lights
The white light in the closet could be string-operated if the switch is outside the room. You can pick up a screw-in, string-operated adaptor at any hardware store if one is not already in the socket.
An extension cord can be run into the room to provide electricity for the enlarger, timer, and safe-lights. Be sure it has sufficient space so the door does not crush it when closed. If the cord is slammed by the door a few times, it could create a short circuit and possibly be a fire hazard.
Very Small Closet

Very Small Closet. The most space-saving design consists of an enlarger and a tray rack that permits trays to be stacked on top of each other, which reduces the amount of counter space required. Timers and safelights should be wall-mounted, so they don’t use the scarce counter space. As you can see from the elevation, storage of paper and chemicals can be arranged on shelves under the enlarger. A splashboard made of plywood or masonite should be installed between the enlarger and the processing trays to reduce the risk of contamination.
Long Closet

Long Closet. These are ideal, but generally require that the entire room in which it is located be light-proofed. The closet can have wet and dry sides facing each other with one or the other permanently installed in the closet. If the wet side is built in, plumbing can be added. The enlarger can be mounted to an old (solid) desk and pushed into place when needed. The desk can also be used for storage.

Walk-in Closet. These are generally larger-sized closets that permit slightly more flexibility than a small closet does. An L-shaped darkroom layout is most common, unless the closet is large enough to have a wet side and a dry side separated by an aisle. Storage and splashboard would be the same as for a very small closet.


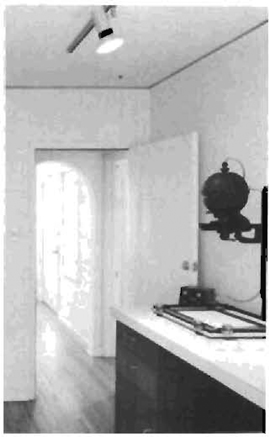
Before and After. These before and after photographs show how Ron Harrod installed his darkroom in a small closet. The sliding doors were removed (folding doors would not have to be) and the entire room was light-proofed. Plumbing was hooked up to nearby pipes and a sink constructed out of a plastic sign. The plumbing system connects and disconnects with threaded fittings, so if the darkroom has to move, the plumbing can go with it.
Photographs, Ron Harrod
A Closet Darkroom
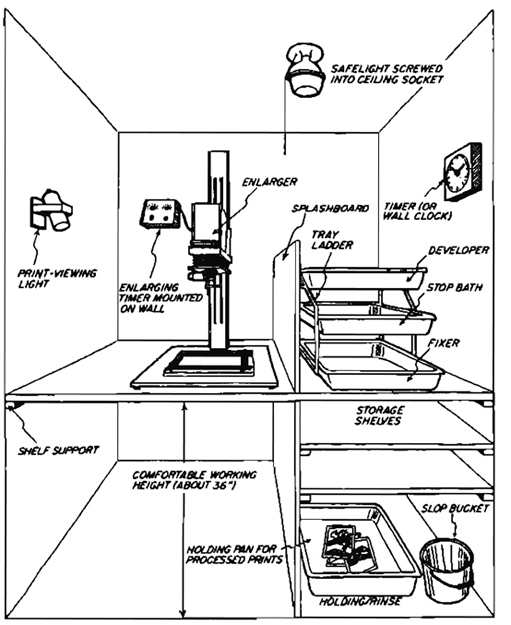
A Closet Darkroom. A few innovations make even a small closet darkroom a feasible option. Wall-mount your timer and safelight or screw a safelight into the ceiling fixture. Use a tray rack to stack your three trays. Keep a bucket nearby for fixed prints that will be washed elsewhere. Construct a splashboard to protect your dry side. Store your chemicals below the counter. When set up, run an extension cord under the door to plug in your electrical equipment.
Closet Elevation

Closet Elevation. If you build a permanent darkroom in a closet the space below the enlarger makes an ideal place to store chemicals and trays. The tray ladder used to hold the trays vertically is described in Chapter 6. A piece of paneling between the enlarger (dry side) and the processing trays (wet side) prevents splashes.
Darkrooms in Kitchens
Using a kitchen for a darkroom is only slightly more desirable than using the only bathroom in your house or apartment. Kitchens can be difficult to light-proof, must serve a second use on a daily basis, tend to have heavy traffic, and are more difficult to keep clean. You also have to worry about contaminating not only your developer but also your yogurt. Photographic chemicals are hazardous to your health, and when you work in the kitchen, all food items should be stored away.
Yet it is still possible to work in the kitchen and do it well. Thousands of photographers do it every day—several of them known by the authors— so there is no reason why you cannot.
Evening is the best time to work in the kitchen, because meals are over and after dark the light-proofing is simplified. A safelight can be screwed into the existing ceiling fixture, the windows and doors draped with light-proof cloth, and you’re in business until dawn.
Finding a stable base for the enlarger can be a problem. If it will not fit onto one of the counters, it might be a good investment to buy a small sturdy table or old desk on which to keep it. Some kitchen tables tend to be unstable and this will definitely show in your prints.
An alternative is to wall-mount the enlarger (see “Mounting the Enlarger” in Chapter 6) in a place where it will be out of the way. If no such place exists, the enlarger can be attached to a wall mount with bolts and wing nuts so it is easy to remove.
The Work Triangle
The efficiency of any kitchen is based on a “work triangle,” the distances between the three key units of refrigerator, stove, and sink. The efficiency of a darkroom superimposed over this initial design is based on a work triangle between the enlarger, developer tray, and fixer tray.
The wet side is determined to a large extent by the position of the sink, and the processing trays should be arranged as close to it as possible. The placement of the enlarger should then be as close to the wet side as possible.
Kitchens are generally designed in one of four patterns. The following illustrations suggest ways of superimposing a darkroom over these existing designs. As you can see from the work triangles indicated on the drawings, the placement of the enlarger has a tremendous influence on the length of the walk required to expose and process a print.
If need be, work surfaces can be expanded by using plywood to cover the range (be sure pilot lights on the gas range are out), or to bridge other work surfaces, such as between two facing counters.
Corridor Kitchen

Corridor Kitchen. A piece of plywood can be placed as a bridge between counters. You should reinforce it with a wooden frame if you are going to place the enlarger on it. The enlarger would best be placed on the counter at the location indicated by A, since this is both sturdy and convenient to the developer tray on the sink side of the kitchen.
U-Shaped Kitchen

U-Shaped Kitchen. In a U-shaped kitchen, the enlarger can be placed on the counter next to the developing tray, on a table in the middle of the kitchen, or on a facing counter.

L-Shaped Kitchen. In a kitchen such as this, the ideal place for the enlarger is on the counter between the wall and the stove. Barring that, a wall mount is possible, or the enlarger can be placed on a sturdy table in the center of the room, convenient to the developer tray.
Single-Wall Kitchen

Single-Wall Kitchen. In many small apartments, the kitchen occupies a single stretch of wall. In this case, the only place for the enlarger is on a facing table or on a wall mount.
A Kitchen Darkroom.

Desk-Mounted Enlarger. An old-style oak desk commonly found in secondhand stores or flea markets, makes an outstanding enlarger stand. This one, in the R&D darkroom of Saunders Photo/Graphic, was painted mat black, but the desk can be used in its natural finish as well. The drawers provide handy, dust-free storage for lenses and accessories. The enlarger should be securely bolted to the top. Do not use wood screws. A sheet of pegboard on the wall behind the enlarger, as shown, provides a handy place for negative carriers.
Photo by Metzger Studios, Rochester, New York
A Kitchen Darkroom

A Kitchen Darkroom. A kitchen may seem to be the ideal location for a darkroom, but it is often time-consuming to light-proof. If you do use your kitchen, avoid chemical contamination of surfaces and utensils used in preparing food. No matter what shape your kitchen is, a sturdy sheet of plywood is often handy to use as extra counter space on top of the stove (but turn off pilot lights on a gas range) or as a bridge to span the gap in a corridor-type kitchen.
Darkrooms in Bathrooms.
Many photographers at one time or another have used a bathroom for either a temporary or permanent darkroom. It has the advantage of having running water and is usually easy to light-proof. A bathroom can function well if its double use is taken into account. Its major drawback is, of course, that its use cannot be as carefully scheduled as a kitchen’s can.
Layout
Some bathrooms lend themselves to using the bathtub side as the wet side and the sink and toilet side as the dry side.
Sink
In the beginning it may be acceptable to kneel alongside the tub while processing prints, but you will probably soon tire of this. For a more permanent arrangement, it is usually possible to build rails above the tub on which a wooden sink can be placed. When the sink is removed for storage, the rails stay permanently attached. If good molding is used, and it is painted, the rails will not detract from the bathroom. The sink can drain, through a rubber hose, into the bathtub below without additional plumbing. A water supply can also be connected to the sink by connecting the shower head to a faucet mounted on the sink. It may be difficult to adjust the water temperature if the handles are near the tub (and under the darkroom sink) but it is possible to live with this.
If the tub is installed along a single wall, rather than in a corner, a large box may have to be built around it to accommodate the sink and sink rails.
Enlarger
The toilet can be boxed in, providing room for both an adjustable enlarger baseboard and an enlarger mount. By removing the easel board, the toilet is accessible, especially when the enlarger head is raised to the top of the column. The instructions in Chapter 6 for building an adjustable enlarger base can be followed to build this unit.
Working Space
Additional working space can be obtained by using two or three enlarger bases at one time. The top one holds the easel, and the lower two hold unexposed and exposed paper. A piece of plywood can be cut to cover the sink if additional space is needed.

Wall Mount Over Toilet. The space over the toilet is usually wasted, although it makes a possible place to permanently wall-mount the enlarger. The shelf rails can be designed to permit lowering the shelf for greater enlargements. The shelves are removable, so the room can be converted to its original purpose.
Bathroom Plumbing
When converting a bathroom to serve a dual function as a darkroom, it helps to adapt the faucets to accept the fittings of the darkroom equipment. Pfefer Products makes a complete line of adaptors to be used for this purpose. Other units are also available at your local hardware store. Some of the major ones are:
Shower Diverter. This unit can be permanently installed on the shower head. When adjusted, it allows the water to flow out of either the shower head or a fitting to which a print washer can be connected.

Y-Adaptor. This unit allows two hoses to be fed from one faucet.

Standard Adaptor. This unit is designed to fit most kitchen and bathroom male- or female-threaded faucets. It will convert a faucet to accept male garden hose fittings.


Sink Over Bathtub. A rail installed around the bathtub can be used to support a removable wooden darkroom sink. The sink can drain directly into the tub below, which eliminates any plumbing problems. Water can be obtained from the bathtub outlet or the shower head. The shower head might not have its own mixing valves, so temperature regulation can be difficult. The print washer can be located either in the sink or in the tub below.
Bathroom Dry Side
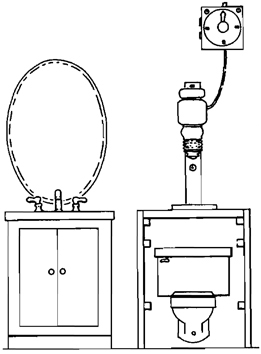
Bathroom Dry Side. This elevation shows how the toilet can be enclosed in a cabinet for an adjustable enlarger baseboard. Instructions on how to build one of these units are given in Chapter 6. The sink can be covered with a piece of plywood to increase the amount of dry-side shelf space.
A Bathroom Darkroom

A Bathroom Darkroom. A bathroom is often the best location for a darkroom. It has the necessary plumbing, waterproof surfaces, and can easily be made light-proof. A bathtub makes a good wet side: it’s waterproof, and has running water and a drain. You can lay your trays out in the tub, or you can save your back by placing them on a sheet of plywood covering the tub, for the dry side. You can place your enlarger directly on top of your sink space, or you can first cover the sink with a sheet of plywood. It’s important that the enlarger be very stable; any vibration will mean unsharp, blurred prints.
Darkrooms in Spare Rooms
In most apartments and many homes, it is inconvenient to convert a closet, kitchen, or bathroom into a darkroom. Therefore, one of the rooms that is normally used as a bedroom or spare room can be the location for the darkroom.
Unlike bathroom and kitchen locations, a spare room generally does not have a water source. This means that either the darkroom must be dry and the prints washed in another room, or a water source must be brought into the room.
Another problem with converting spare rooms is minimizing the damage caused to the room so it can be reconverted back to its original purpose should the darkroom be moved. Or perhaps the spare room must serve a number of functions simultaneously. At the very least, it may have to be both darkroom and workroom.
Anthony Hernandez, a Los Angeles photographer, was confronted with this problem when moving into an apartment. His solution was to convert a bedroom into a combination office, workroom, and darkroom. The room functions as an office and general working space during the day and is converted to a darkroom at night by putting down the window shades.
The room is one of the major spaces in the apartment and was designed to be an elegant addition to the living space, with utilitarian features concealed in the overall design.

Organization. The darkroom is designed with the dry side on the left, the wet side on the right, and the office/workspace at the other end of the room. The blinds are pulled at night to convert the room into a darkroom. Because they are not totally light-proof, it is not possible to print during daylight hours.
The Entrance. The entrance to the darkroom does not give a feeling that you have stepped into a different world. The room still seems to be part of the apartment and functions as a living space as well as a darkroom.

The Dry Side. The dry side of the room consists of storage cabinets and a large formica-covered counter. The cabinets supporting the counter and the separate cabinet underneath are used to store equipment and prints. The track lights on the ceiling are used when the room functions as an office, and the dry-side safelight rests on the counter along with the enlarger and timer.

The Wet Side. The wet side of a darkroom is the place where, in most darkrooms, the greatest disorder appears. The photographer solved the problem by designing the wet side so that the majority of the equipment is hidden from view when the darkroom is not in use. The exhaust fan is located in the ceiling over the sink, the print-viewing light on the right end of the sink complements the overall style of the room, and even the print drying screens directly over the sink do not detract from the room’s clean appearance.

The Wet-Side Equipment. Opening the doors over the print-drying rack reveals the wet-side timer, safelights, and equipment storage. When closed, the equipment is again concealed from view.
Workrooms
Generally, all stages after print washing can be completed in an adjoining workroom. Print drying, spotting, matting, and mounting are some of the activities that can and should be done outside of the darkroom. Each photographer’s situation is slightly different, and many, where space is tight, will build their print-drying rack in the darkroom itself but complete all other steps in a separate room. Many home darkrooms utilize whatever available space there is; to free up additional space for a workroom is a real luxury.
Given space limitations, a good alternative is to use a room such as a bedroom for print finishing and storage. The main space requirements are for matting and mounting equipment. Many photographers work on the kitchen or dining-room table.
Counter or Table Space
Counter or table space is needed for cutting mats and holding a dry-mount press. If you do not have a press, you might still need space to mount the prints with an iron or cold mounting tissue. Because of the cleanliness required, it’s best to have a permanent space set aside, but if need be, the table can be cleaned after dinner and the equipment set up. After all of the hard work it took to get the print to this stage, it is a heartbreaker to find that you have set it in a puddle of giblet gravy.
Storage Space
For most photographers, what begins as a “little” darkroom starts to expand and consume incredible amounts of space. Very few photographers can bring themselves to throw out extra prints. Negatives and other supplies such as paper and mount board need a home. Because many of these materials are to some extent affected by humidity, they cannot be tucked away in the basement or stored in a hot, humid attic. This means that a space in the house must be found where shelves can be built or cabinets installed.
Light
An absolute necessity for a workroom is good light. This can be natural light from numerous windows or bright artificial lights. Natural light is excellent, especially when spotting prints or evaluating color proofs. Matting and framing under glass can be done in strong artificial or natural light.

Harry Callahan’s workroom, which is a combination office and print-finishing room, occupies the top floor of his Providence townhouse adjacent to his darkroom. This photograph was taken from the immediate vicinity of his desk and shows the side of the room where the dry-mount press and print-finishing equipment are stored and used. The light in the room is natural and bright, good for making those last final adjustments to a final print.

This photograph taken from George Tice’s office shows the rest of Tice’s print-finishing area. On the left are the print-drying screens in an open frame. Paper is stored at the far end of the room and the right side is devoted to paper trimmers and the dry storage area.

Neal Slavin’s prints are given their final wash in the print-finishing area. The window has sliding red plexiglass panels that are used as a “pass through” for prints from the darkroom to the washer. The red plexiglass acts as a safelight, so the lights in the print-finishing room do not affect the sensitive materials in the darkroom (color material excepted). The light entering the darkroom through the panels gives the room a pleasant open feeling. The cabinet on the lower left contains print-drying racks concealed behind the swinging door.

Naomi Savage’s workroom is on the ground level and looks out on a landscape that includes her husband’s welded stainless steel sculptures. The room is bright and full of light. This view shows a paper trimmer in the foreground and a large expanse of open counter space used for print finishing. The stairway rises to a storage area.

Mike Shaw and Peter Rayment handle the print finishing at the Sutcliffe Galleries in Whitby, England in a well laid-out workroom. Spotting and print finishing are done on a sloped drafting table with strong natural light entering from a nearby window. Shaw is shown framing prints on a large work table. Supplies are stored close by on the racks behind him.