In my first book, The One-Page Project Manager, I covered in detail the thinking behind this valuable tool for project managers and how to construct one. In this book, I will be discussing how to apply the One-Page Project Manager (OPPM) specifically to information technology (IT) projects.
I first want to cover, in an abbreviated form, how to construct an OPPM. If you have read my first book, this chapter, which is based on that book, will provide a useful review. If you have not read that book, this will give you the basics so you can start applying the tool in your everyday work life.
Imagine your boss asking you to quickly provide a report on your project—what aspects of the project are on, ahead, or behind schedule; who is responsible for each of the project's major tasks; how the project is performing in terms of the budget; how well the project is meeting its objectives; what major problems have cropped up; and generally how well the project is presently progressing, coupled with a forecast for the next three months.
Wow, you think, that's a major undertaking. It will take me and my team hours to collect and organize that much information and put it into a presentable form. This could hurt our performance because this is time away from directly working on the project. And then there's a good chance the boss won't even read all of it because things are always hectic and the boss is always very, very busy.
After working on enough projects, I knew it was a challenge to provide upper management with the information it needed about a project, to provide it in a way that was easily understood and digested, and to collect and present the information in a format that did not take up too much of my time and my team's time.
This was the impetus behind the creation of the OPPM, which is a communication tool that I needed but that simply did not exist in the project management world. It is designed primarily to communicate all the most salient information a project's stakeholders need to know and provide it in a timely, easy-to-understand, and easy -to-compile format.
Moreover, every project has an important group of people deeply interested, though not directly involved in it, yet few project managers know how to effectively communicate to them.
This constituency may include the board of directors, senior management, suppliers, customers, and superiors or subordinates indirectly involved with the project or its outcome, and others. They want to be told what is going on in ways that engage them and doesn't waste their time, but they don't want to be given long reports with very detailed analyses. Yet, they also don't want communications that are too brief, too inconsequential, and too unsubstantial that tend to generate more questions than they answer. Instead, they want enough information to answer their questions, but not so much information as to cause them to become inundated with facts and figures.
The OPPM neatly balances their need to know with their desire to know just enough in an easy-to-read format. It answers more questions than it generates, which is why it is such an effective communication tool.
The OPPM uses symbols and color to paint a visual, easy-to-understand picture of where a project is at any given moment in time. And it links important components of a project. For example, managers of each part of a project are linked to their part in terms of deadlines and challenges. All stakeholders can easily see who is responsible for what, and how well each part of the project is going. Outstanding performance that exceeds the plan shows up and both management and peers immediately know who is personally responsible and who should be recognized. "Great management is born when recognition is added to the other characteristics of leadership." (See The Carrot Principle by Chester Elton and Adrian Gostick, New York: Free Press, 2007).
An aspect of a project that is going well is illustrated with a bright green box or filled-in dot. An aspect behind in terms of time, or over budget, is highlighted in bright red. When there is ambiguity, yellow is used. This use of color makes the OPPM visually clear and informative and allows senior management to quickly see what is going well, what is in trouble, and where there are some questions.
The layout of the OPPM also visually helps clarify the tool's information. Time lines, areas of responsibility, budget, tasks, and objectives are interrelated on the OPPM—just as in real life. The reader can quickly make connections between the important aspects of a project because of how the tool is graphically designed.
Let me make a statement here that may, at first, seem counterintuitive. Efficient, effective project management includes just the right number of details, while avoiding too many. Often, the more detailed and more elegant a plan is, the more pedantic and plodding the execution becomes. The details can become the drivers, and when this happens, you lose sight of what's important and the management process becomes ineffective.
One of the strengths of the OPPM—which can be counterintuitive—is having just the right degree of the absence of precision. For example, those deeply immersed in a project will want to know the status of critical equipment for the project—has it been manufactured, has it been shipped, where is it now, and similar concerns. But management only wants to know if it will arrive on time. The details of what it will take to make sure that critical equipment arrives on time are beyond the interests of management. They don't need to know that. This is an example of what I mean when I say the OPPM has an absence of precision; it doesn't cover every detail, nor should it.
Before I go into the specific steps involved in creating an OPPM, let me make clear one of its great strengths. It is a communication tool that can be used in almost every type of project. It may need to be tweaked when applied to different projects, but the basic tool remains surprisingly consistent.
Within IT, it can be used in a variety of projects, as I'll discuss later in this book. At the company where I work, O.C. Tanner in Salt Lake City, Utah, we've used it with such IT-related projects as implementing an enterprise-resource-planning software project, developing marketable software, launching a new Internet business, and obtaining ISO 9000 certification. Whatever your role in IT management, this tool can help you.
The OPPM navigates between failing to plan and over-planning. The plan is just the beginning, the means to the end, but not the end.
All of a project's owners are readily identifiable to everyone with the OPPM. Owners have no place to hide when a project is being monitored with this tool.
It makes clear—visually, through the use of interconnected graphics and color—who is responsible for what and how they are performing. Senior management sees, immediately, by glancing at one page, who is performing well and who is behind or having difficulty on their portion of the project.
Not only does this visualization make it easier for management to understand a project's status and who is responsible, but it is also an important motivator to the owners. They know that their role and performance is continually and immediately visible to senior management.
The OPPM is a tool that can be used in a surprisingly wide variety of projects. The OPPM evolved through several years and a number of projects to the tool that we now use. Originally, it was printed entirely in black and white; now, it has been expanded to use colors for the qualitative parts of a project and to highlight budget performance. These improvements have enhanced the tool's effectiveness.
The OPPM doesn't replace your existing tools; it augments what you are already using. The information presented isn't new. What's new is that existing information is placed in a format that is easy to use and to read. That's not a trivial distinction. By placing information in a new, easy-to-grasp format, management becomes better informed and those involved with the project become more highly motivated.
Every project has five essential elements (see Figure 1.1). It is not coincidental that the OPPM also has the same five elements; we have used the elements that make up all projects as the structure on which we build the OPPM. These elements are part of a project manager's DNA—they are second nature. The five elements are:
Tasks: The how—Tasks are the center of a project and need to be complete to accomplish the objectives. They are the nuts and bolts of a project, the specifics of what needs to be done—the work.
Objectives: The what and the why—Objectives are the vision, the where-you-are-going of a project. Objectives can be general or specific—the scope.
Time line: The when—The time line measures when things are supposed to be done and when they are actually done. Time lines can be elastic. If a project is expanded, for example, the time line (and the budget) will probably have to be expanded.
Cost: The how much— Project expenses can have hard costs, like consulting and machinery, or soft costs, as with internal staff deployed on the project. Cost accounting can be complex, and every project needs input from accounting professionals.
Owners: The who— Task owners are the "who." This is vital. The OPPM makes clear to management who owns what tasks. Clear ownership makes obvious who deserves commendations for jobs well done and who needs to be assisted.

The project's manager and the project's owners together build and maintain the OPPM—and then they live with it. Creating the OPPM and updating it must be a team effort. Owners own it. You, as the project manager, may have to negotiate with team members but, ultimately, you need their buy-in and full commitment. Figure 1.2 shows the OPPM template. A full set of OPPM forms is available for no charge at www.onepageprojectmanager.com Let's now look at the 12 steps needed to create an OPPM.
This goes at the top of the form and includes the project's name, project leader, project objective, and the current date.
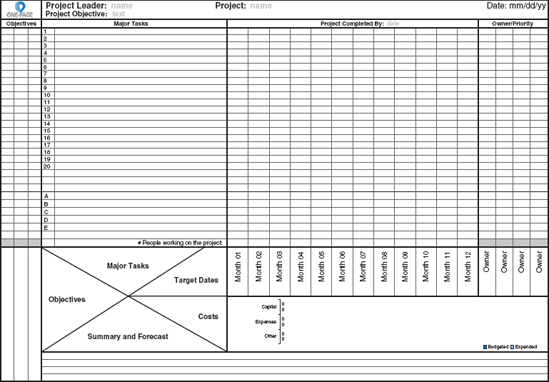
Copyright O.C. Tanner 2007. To customize this document, download it to your hard drive from the following web site: www.onepageprojectmanager.com. The document can be opened, edited, and printed using Microsoft Excel or another popular spreadsheet application.
Naming a project is important because the name is what everyone will use to refer to the project from now until the project is finished—and even beyond. Consider holding off naming the project until the team is in place.
The project leader is the ultimate owner, and every project requires one, but only one leader. This person is almost invariably a full-time employee of the company, not a consultant or outside advisor.
The same people who give the project manager the project in the first place usually gives him or her the objective. If the project manager has not been given an objective, he or she must go back to those who assigned the project and clarify the objective. The objective should make clear: why those who assigned the project want the project to be done and what they hope to gain from the project.
A preliminary completion date is established at this time. Through the remaining 11 steps, the team's commitment to that final date emerges.
As the project manager works through the header with the executive assigning him the project (Figure 1.3), it is a good time to discuss the priorities of the project's triple constraints of costs, scope, and time line.
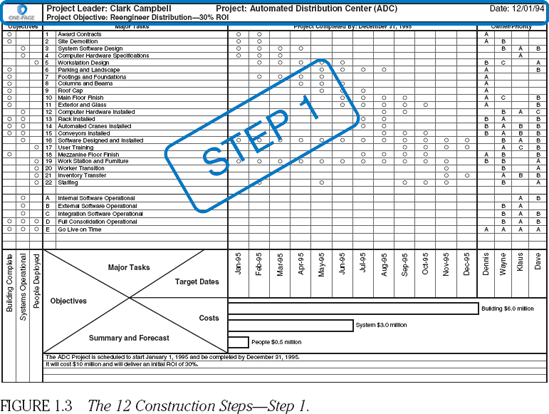
Copyright O.C. Tanner 2007. To customize this document, download it to your hard drive from the following web site: www.onepageprojectmanager.com. The document can be opened, edited, and printed using Microsoft Excel or another popular spreadsheet application.
The project manager will be making trade off decisions throughout the project. The key guiding principle will be management's ranking of these variables.
We'll assume from this point on that you are the project manager. Your next step is to name your team (Figure 1.4). These are the people who will manage the major components of the project. Your success, to a large degree, depends on them. They are the owners. Keep the number of owners as small as possible.

Copyright O.C. Tanner 2007. To customize this document, download it to your hard drive from the following web site: www.onepageprojectmanager.com. The document can be opened, edited, and printed using Microsoft Excel or another popular spreadsheet application.
From my experience, three or four is usually about right. On a large project, there will be more than one layer of OPPMs, and each will have its own set of owners.
Think of the Matrix as the focal point, the hub of the project as expressed on the OPPM (Figure 1.5). Or, to use another metaphor, think of it as a compass that will guide your project from start to finish. The Matrix is the OPPM's foundation. It links all of a project's essential elements and communicates them to your readers.
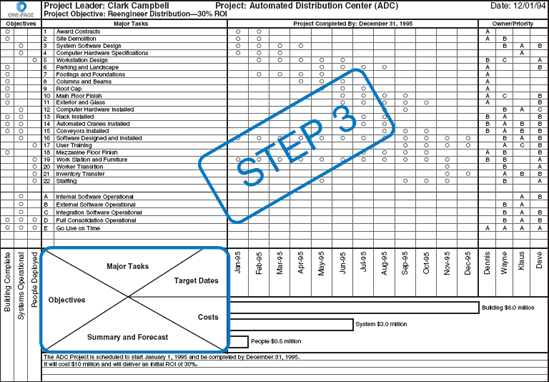
Copyright O.C. Tanner 2007. To customize this document, download it to your hard drive from the following web site: www.onepageprojectmanager.com. The document can be opened, edited, and printed using Microsoft Excel or another popular spreadsheet application.
The Matrix flows naturally out of the creation of the entire OPPM. During this step, as project manager, you will want to present your team with an overview of the project, discuss how to handle the project, and go thoroughly through the pieces of the Matrix, including objectives, major project tasks, target dates, and budget. The Matrix is the focal point around which you will teach your team the fundamentals of the OPPM. Don't be surprised by the need to teach some of the basics of project management to your team.
With your team in place, you are now ready to break down the project into second-level objectives required to meet the main objective delineated in the header. Objectives go in the rectangle on the lower left-hand corner of the OPPM (Figure 1.6). Have no more than three or four objectives. With a $10 million distribution center project, we had three objectives: complete construction of the building; have the distribution center's systems operational; and hire, train, and deploy the people who will be running the center.
To set up objectives, ask yourself: how much time will be needed to complete the various objectives and what resources (financial, human, etc.) are necessary to meet the scope requirements and final deliverables. Later, as you outline the tasks, you will want a fairly equal distribution of tasks for each second-level objective.
Copyright O.C. Tanner 2007. To customize this document, download it to your hard drive from the following web site: www.onepageprojectmanager.com. The document can be opened, edited, and printed using Microsoft Excel or another popular spreadsheet application.
On the left side of the OPPM, we place the major project tasks (Figure 1.7). Large projects are really just the sum of many smaller projects that are coordinated and combined to add up to the final project. On the top-most level OPPM, each of these projects is expressed as a task, such as award contracts to subcontractors, design systems, lay the foundation for a building. Tasks should be measurable in terms of their progress so you can gauge their advancement and report on them in the OPPM.
Copyright O.C. Tanner 2007. To customize this document, download it to your hard drive from the following web site: www.onepageprojectmanager.com. The document can be opened, edited, and printed using Microsoft Excel or another popular spreadsheet application.
Each task is assigned at least one owner, which is why getting the buy-in from team members for each task is essential. Match tasks with the strengths of the owners whenever possible.
Try to average two to three tasks per reporting period for the length of the project. If a project will run 12 months, 30 or so tasks are about right. Most projects are divided into monthly increments. Some tasks will be as short as one month, while others will last the full time line.
Keep in mind that behind each of these tasks, you could have another OPPM, or a Microsoft Project or Primavera P3 PERT chart.
In this step, make sure the tasks on your list will, when completed, produce the project's objectives. As you go through your tasks and objectives, it is essential the two match up. All tasks are aligned with at least one objective; some will naturally connect with more (Figure 1.8).
This alignment of task and objective often reveals inconsistencies or things missing. The process of alignment is not something done once and left forever. As you work your way through building the OPPM, with each step it is natural that you reevaluate preceding steps and try to constantly improve. Identifying tasks may reveal a missing objective. You may also find a disproportionate number of tasks aligning with a single objective, therefore suggesting further evaluation of both.
Copyright O.C. Tanner 2007. To customize this document, download it to your hard drive from the following web site: www.onepageprojectmanager.com. The document can be opened, edited, and printed using Microsoft Excel or another popular spreadsheet application.
This form of progressive elaboration will enhance the quality of your plan as well as the communicating power of your OPPM.
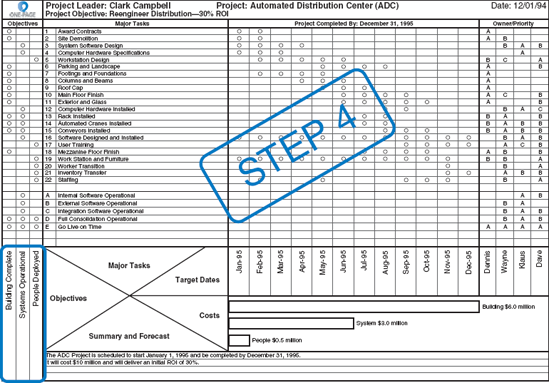
The target dates are found in the rectangle running left to right near the bottom of the OPPM (Figure 1.9). Here we break down the time line into discrete steps, most commonly monthly (though a short project may have weekly or biweekly steps, and a very long project may have commensurately longer periods). Every period does not need to be the same length. Keep in mind that when you let everyone know the project's time line and time increments, you magnify your responsibility for meeting them. As with tasks, you need total buy-in for time from your team.
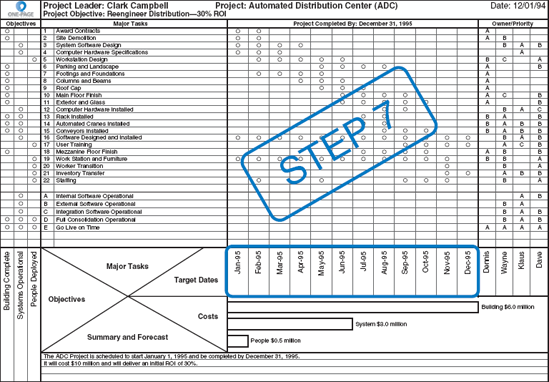
Copyright O.C. Tanner 2007. To customize this document, download it to your hard drive from the following web site: www.onepageprojectmanager.com. The document can be opened, edited, and printed using Microsoft Excel or another popular spreadsheet application.
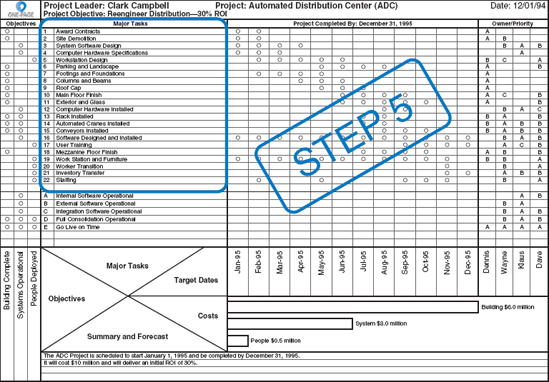
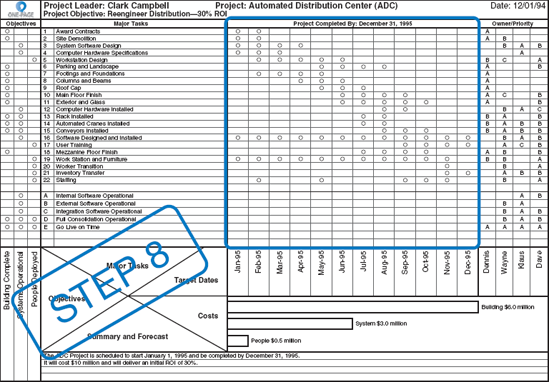
This step involves creating a time line for each of the project's tasks. We place an empty circle in the boxes alongside the task, representing the start, length, and completion date for each task (Figure 1.10). If the task will take seven months and the time buckets are in monthly increments, there will be seven circles next to this task. As each task is completed, the aligned circle will be filled in.
Each team member will approach the task time line discovery process with very different kinds of thinking. Some start at the beginning and think forward; some, start with the end in mind and work backward. Your most creative team members often think "out of the box " in a random way. It is critical that you encourage each in order to facilitate the creation of a robust plan.
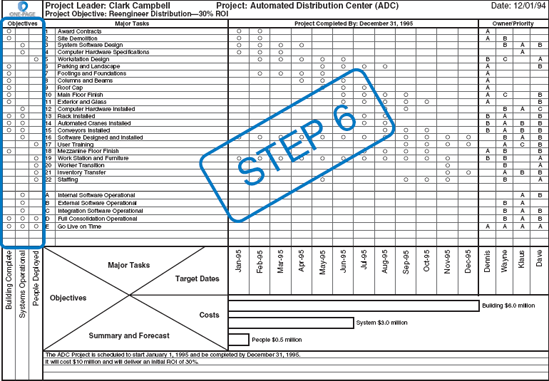
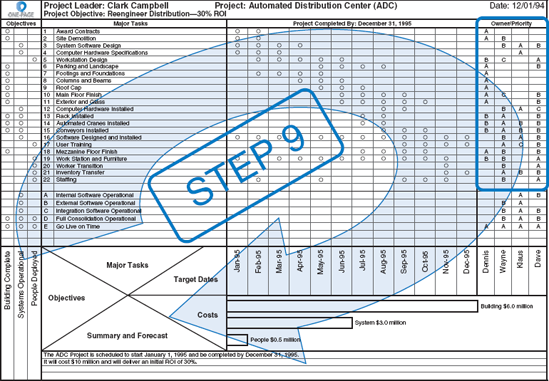
Tasks have owners, usually one, rarely more than three. No matter how many owners per task, a priority between owners must be set. There is almost always one main owner per task. The letter A on the OPPM designates that owner as the primary one (Figure 1.11). A subowner would be designated as a B owner, and someone subordinate to that owner would be a C owner. Who owns what is decided through a process of negotiation between team members, with you, as project manager, providing leadership and, if need be, mediation.
Copyright O.C. Tanner 2007. To customize this document, download it to your hard drive from the following web site: www.onepageprojectmanager.com. The document can be opened, edited, and printed using Microsoft Excel or another popular spreadsheet application.
This is the portion of the OPPM that deals with subjective or qualitative tasks. Not everything about a project can be quantified on a time line (software performance, for example). A computer programmer's sense of adequate performance may be quite different from an end-users. Think of cell phone service. A dropped call would be considered unacceptable, but what about sporadic static? Is that acceptable once in a while?
Copyright O.C. Tanner 2007. To customize this document, download it to your hard drive from the following web site: www.onepageprojectmanager.com. The document can be opened, edited, and printed using Microsoft Excel or another popular spreadsheet application.
Situations like these are subjective. This section is where you place the subjective aspects of a project (Figure 1.12). Be sure, though, the objectives and owners are aligned with these subjective tasks just as they are with the more quantifiable tasks. Judgments concerning performance against these tasks will be shown as red, yellow, or green.

Copyright O.C. Tanner 2007. To customize this document, download it to your hard drive from the following web site: www.onepageprojectmanager.com. The document can be opened, edited, and printed using Microsoft Excel or another popular spreadsheet application.
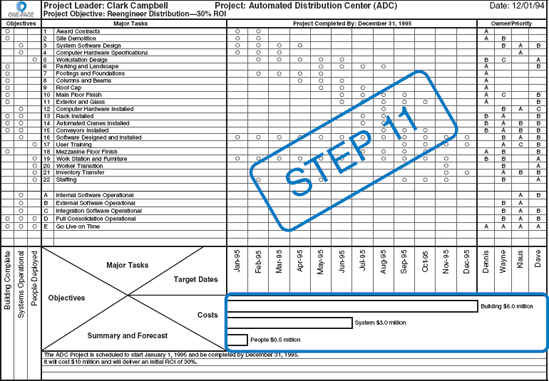
On the lower right-hand side of the OPPM is where the budget is represented (Figure 1.13). The budget is dealt with simply, using bar graphs, with a bar graph for each portion of the budget. When the portion is on budget, it is depicted with green. When it is running over budget but is recoverable, it is shown in yellow. And when it is incurably over budget, it is depicted in red.
Copyright O.C. Tanner 2007. To customize this document, download it to your hard drive from the following web site: www.onepageprojectmanager.com. The document can be opened, edited, and printed using Microsoft Excel or another popular spreadsheet application.
Showing the budget on the OPPM is easy; deriving it is much more difficult. Before you draw up the budget, know all your costs. Include provisions for incremental increases, such as those due to uncertainty or potential changes in the project. This is the place to show contingency funds.
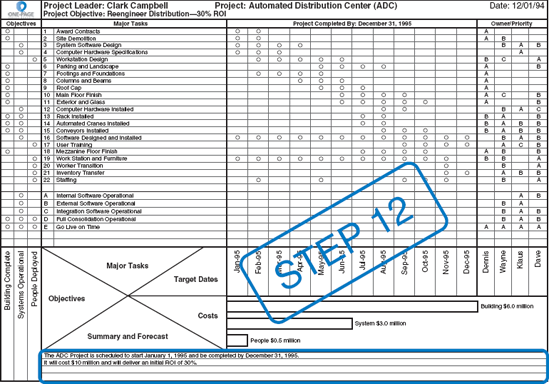
A good summary clears up any ambiguities or glaring questions, and heads off potential future misunderstandings. Everybody should now be "reading from the same page"—both literally and metaphorically. The summary is used to answer questions prompted by the graphics, not to explain the graphics themselves. Your language should add future expectations to your analyses—a what's next to the why. Here you will need to be as succinct and comprehensive as possible. The space for the summary and forecast is limited (Figure 1.14). This is by design. The lack of space forces you to be selective about what you describe and to be efficient in your discussion. Do not try to expand the summary space by attaching additional pages or diagrams. The power of the OPPM rests, in part, on the fact it is, well, one page.
Copyright O.C. Tanner 2007. To customize this document, download it to your hard drive from the following web site: www.onepageprojectmanager.com. The document can be opened, edited, and printed using Microsoft Excel or another popular spreadsheet application.
Creating an OPPM report for each time period (usually monthly) involves five steps. You meet with your project's owners near the conclusion of each target date and complete the following tasks:
Bold the target date.
Fill in major task progress. This is where you fill in the dots. While filling in the dots is easy, getting agreement from team members on which to fill in or not fill in is often anything but easy. Your job as project manager is to bring the team together and communicate unambiguously.
Designate qualitative performance. This involves using colors. At O.C. Tanner, we define green as adequate performance, yellow as worrisome performance, and red as dangerous performance. As with filling in the dots, agreeing to the colors is essential, and can be a source of tension and require negotiation.
Report expenditures. Figures should come from the accounting department, which has to be in agreement with how the budget is portrayed on the OPPM.
Write the summary and forecast.
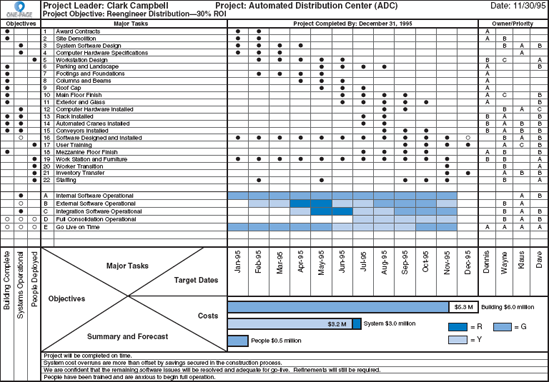
Figure 1.15 is an example of a completed OPPM 11 months into the 12-month project.
Copyright O.C. Tanner 2007. To customize this document, download it to your hard drive from the following web site: www.onepageprojectmanager.com. The document can be opened, edited, and printed using Microsoft Excel or another popular spreadsheet application.
You now have the basics of creating and using the OPPM. We'll spend the remainder of the book discussing how to apply the OPPM to IT related projects. The goal is to take what, to this point, has been a somewhat abstract discussion, and make it a practical, hands-on exercise.
One final comment: A November 2007 Harvard Business Review article asks, "Are Your Engineers Talking to One Another When They Should? ... Cost overruns, schedule slippage, and quality problems often result from a failure to provide timely information ... . It is important that teams are working with the optimum communication tools" ("Are Your Engineers Talking to One Another When They Should? "by Manuel E. Sosa, Steven D. Eppinger, and Craig M. Rowles). The authors propose a "compact and visual" communication tool designed specifically for project engineers. The OPPM is just such a compact and visual tool uniquely designed for the highest level of project communication. Please use and enjoy it!