CHAPTER 8
EDITING AERIAL VIDEO
AERIAL VIDEO IS VERY EXCITING! It’s the closest you can come to flying without, um, actually flying. In this chapter we are going to look at some of the basics of editing aerial footage. This is not intended to be a “how to edit video” chapter, because there just isn’t space for 400 pages on video editing. Many good resources already exist, and it would be impossible to cover all the possible video editing packages. You could be using iMovie, GoPro Studio, Sony Vegas, Adobe Premiere Pro, Apple Final Cut Pro, Avid, or even Photoshop.
Because it’s my video editor of choice, I’m going to be using Adobe Premiere Pro. Remember that this isn’t a Premiere Pro tutorial; it’s a video editing tutorial, and I hope to share strategies and ideas that will work on any video editing application. But I will begin by discussing a few other video applications.
FREE (OR ALMOST FREE)
MANY VIDEO-EDITING PACKAGES ARE AVAILABLE TODAY. These range from software preinstalled on your computer to professional editing programs used in television and movies. Some examples of free or nearly free packages: GoPro Studio, iMovie, HitFilm Express 4, Windows Movie Maker, and DaVinci Resolve Lite. You can also edit video in Adobe Photoshop CS6 Extended and Photoshop CC.
The professional packages cost money. The most popular are Adobe Premiere Pro, Apple Final Cut Pro, Avid Media Composer, and Sony Vegas.

8.1 Final Cut Pro
Other applications, such as After Effects, SpeedGrade, and DaVinci Resolve, are specialized for visual effects and color grading. It’s possible to do basic video editing on those applications, but it’s not efficient.

8.2 GoPro Studio
TRIMMING CLIPS
WHEN YOU HAVE FINISHED SHOOTING and transferring all your footage to your computer, you now have video clips. The next step is to find the “shots,” those moments that you are going to use. Not the setups, the follow-through, or flying into position—the actual hero shots. These shots should be clean and smooth. You might have multiple takes of the same thing. You could find multiple candidates and then choose the winner later, or you could be looking for that winner right now.
The important thing is that we have to mine all this footage for the very best shots to use. This used to be tedious when we were all flying GoPros. Because there was no remote shutter, each clip would last an entire flight. We would press Record manually, take off, and fly, and then push Stop upon landing. All our clips would be 10 to 20 minutes long, just for a few seconds of action.
Now we have the option to start and stop video while in the air. This cuts down on a lot of the clutter. If you read chapter 5, you’ll know it’s good to always shoot a little pre and post roll. Start recording a few seconds before starting the shot, and let the camera roll for a few seconds after the shot. Before we do anything else, we need to find these shots. Maybe you took notes while shooting? Not a bad idea to jot down a few things after you have landed, while everything is fresh in your mind—or have an assistant make the notes while you are shooting. Check out the Adobe app Prelude Live Logger.
Mining the Shots in NLE
Here is the process for mining all the shots in an NLE (non-linear editor). I call it mining because you have to dig through a lot of footage to find the gold, but it’s there. I’m using Premiere Pro for this task. This process is the same in Final Cut Pro and other NLEs.
Import the clips that you want to work with; they will appear in your Project panel in Premiere Pro or in the Library in Final Cut Pro (FCP). Double-click to open it in the Source Monitor. We haven’t added this clip to a timeline; we are just examining it right now (Figure 8.3).

8.3
Examine the clip to find your first shot. There are a few ways of doing this.
- Simply press the Play button or the spacebar to play the video clip normally.
- Use the JKL Keys. This is the preferred method of professional editors. Tap the L key to play the video, the K key to stop it, and the J key to play backward. Each time you tap the L key, it will increase the speed; each time you tap the J key, it will decrease the speed. If you are playing backward, successive taps of the J key will increase backward speed and L will slow it down. Most editors keep fingers on these three keys and use them to quickly navigate and home in on the areas that interest them.
- Scrub the timeline. Drag the playhead to quickly move to a section that interests you (Figure 8.4).
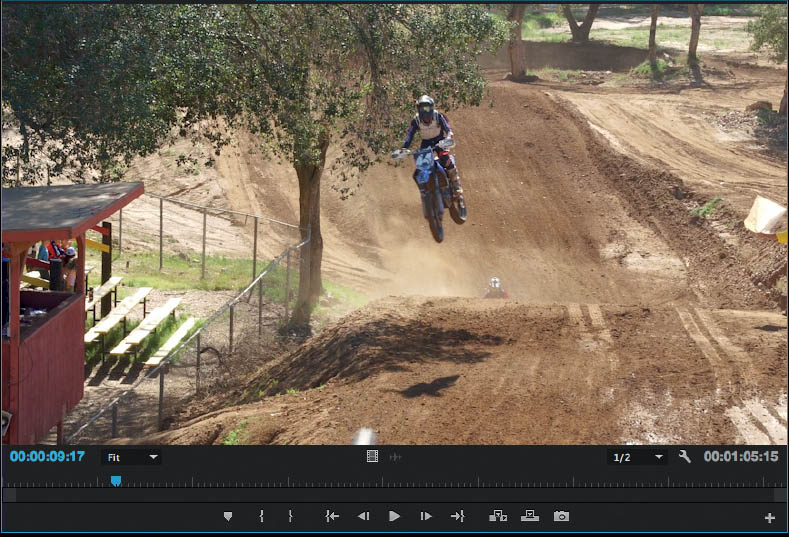
8.4
When you have found your shot, move the playhead to where the action starts. Press the I key. This will set an “in point.” You have marked the clip to begin paying from here (Figure 8.5).

8.5
Play until the end of the shot, and press the O key to set an “out point.” You will see your isolated shot marked. Note that this doesn’t delete any of the video; we have just marked the clip to begin and end on our in and out points (Figure 8.6).
Eventually, all the clips that you will use will go on a timeline; this is where you construct your movie from all the shots. There may be other shots that you want to extract from the same clip, so here is how you can save the shot that you just marked.

8.6
To create a new timeline (called a sequence) (Figure 8.7):
- 1. Drag from the Source Monitor to the New Item icon.
- 2. A new sequence will be created with your trimmed clip on the timeline. The timeline will inherit all the settings (frame rate, size, codec settings) from the video clip that you dragged to the New Item icon. (To change any of these, go to Sequence > Sequence Settings.)
NOTE You only need to create one sequence for each video you are making. After this, any additional clips will be added to the timeline of the same sequence (timelines and sequences are the same thing).

8.7
If you prefer to prepare all your shots at once and add them to a sequence later, you can create subclips (called compound clip in FCP X). A subclip is a separate file that contains the video from in point to out point. This works just like any video clip, but it’s all trimmed and ready for assembly later.
To create a subclip, right-click the clip in the Source Monitor and choose Make Subclip. You will see a dialog box (Figure 8.8). Make sure to deselect Restrict Trims to Subclip Boundaries. Name your subclip.

8.8
You will see your named subclip in the Project panel (or bin). I suggest creating a bin by clicking the Folder icon and naming it. You can now drag all your subclips into this bin to keep them together (Figure 8.9).
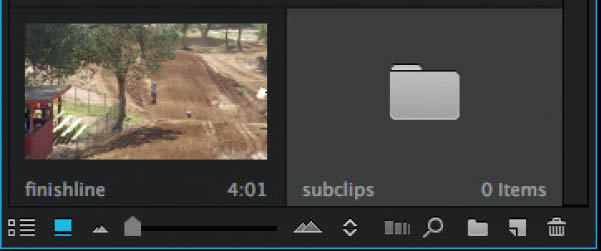
8.9
Play the rest of the clip and look for additional shots. Here is one we would like to use (Figure 8.10).

8.10
Oh no! What do we do to get the next clip? We already have in and out points set. Simply press the I key to set a new in point at the playhead. If it’s after the out point, the out point will be cleared. Find the end of this second clip, and press the O key to set the new out point. Bingo—that’s two clean shots from one clip.
Convert this clip into a new subclip, or add it to the timeline if you are building as you go. To add it to the timeline, make sure the playhead in the sequence is at the end of the previous clip and press the Comma (,) key (Figure 8.11).
To make a timeline assembly, continue to do this for all your clips. Either make subclips and then assemble them, or add them to the timeline as you go.

8.11
Trimming in Photoshop
Did you know you can edit video in Photoshop? Photoshop CS6 and CC are capable of working with video. You can get some pretty impressive results. It’s a bit slower than Premiere Pro, but it can get the job done.
Choose File > Open, and select your video clip. It will open in Photoshop. If you don’t see the timeline, choose Window > Timeline (Figure 8.12).

8.12
To set the in point, place your cursor over the beginning of the clip in the timeline and drag to the right. You will notice a little window that allows you to preview your edit. Release to trim to the new start point (Figure 8.13).

8.13
To set the out point, drag from the right side of the clip. Drag to the left to set the new out point. You will see a little window that shows where you are trimming (Figure 8.14).

8.14
You can add more clips to the timeline by clicking the Filmstrip icon to the left of the timeline and choosing Add Media (Figure 8.15).

8.15
WHY TRIM?
The old-school way of filming forced people to watch the entire video from start to finish. Everything you recorded was played. Now, we have technology that allows us to edit our films to be short and tight, which keeps the audience wanting more. For sharing aerial clips online, you don’t want anything over three minutes long; often, 90 seconds is enough. Keep it short and sweet and people will enjoy watching your videos. Drag it on and on and people will get bored very quickly.
There is a saying: “If in doubt, leave it out.” If you’re unsure of the value of a shot, then don’t include it. You want your video to be compelling and interesting.
PHOTOS FROM VIDEO
IT’S ALWAYS BETTER TO SHOOT PHOTOS SEPARATELY because you really want them in RAW format to get the best quality. Also, you should be setting a shutter speed for video, which isn’t ideal for photos because of blur. There will always be those times when you capture a magical moment on video that just can’t be repeated for a photograph.
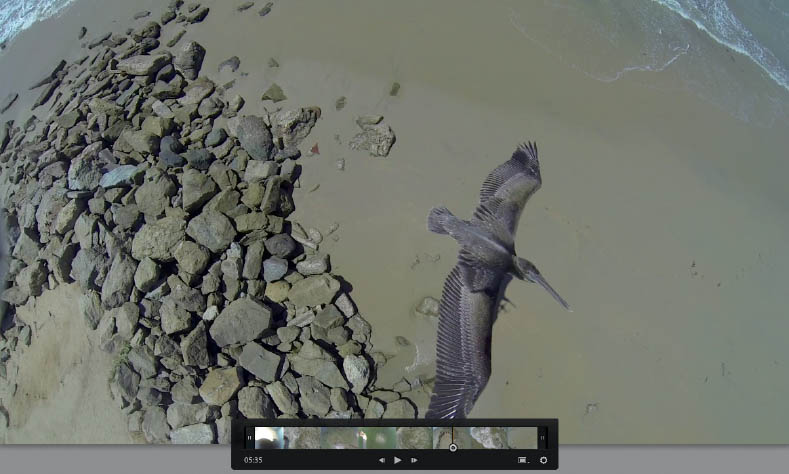
A good example of this is my iconic “pelican from above” shot. This was the first image of its kind captured (before the eagle on Dronestagram) and was used by DJI, Adobe, and a number of drone dealers to showcase what was possible with this technology. It was also exhibited internationally as part of the Skypixel Perspectives gallery.
A little back-story on this shot: It was my first flight by the ocean, and I was using a Phantom 1 with a GoPro Hero 3 Black Edition, and rolling video at 1080p. After filming some surfers, I brought the Phantom back to land. I saw the pelican heading in my direction and could see that it was on a direct path to fly under my camera. My heart was pounding with excitement. I made some quick adjustments to the angle of the camera and hovered perfectly still. The pelican wasn’t even bothered by my drone and swooped very close under the camera. Even though I didn’t have any FPV at the time, I knew I had the shot of a lifetime. The pelican appeared in exactly 25 frames, so the whole moment lasted only one second.
I found the frame that I liked the best, and slightly warmed up the color to match the colors present at the time. I also created a vignette on this version of the photo to show the pelican a bit better, since it’s such a similar color to the environment. I didn’t make any other alterations or manipulations (Figure 8.16).
To achieve this, a photograph has to be extracted from video. After examining and trying many different methods, I’ve found that the two best ways to extract an image from video without losing quality are available in Premiere Pro and in Lightroom. (I used the Lightroom method to make the pelican image.) Both methods produce the same quality and result.

8.16
Extracting a Still in Premiere Pro
This method is very quick and simple. It’s the best option if you are editing a video and come across a frame that you would like to turn into a still image. Use the Left Arrow and Right Arrow keys to move forward and back, frame by frame, to find the exact frame you desire.
Click the Export Frame button, or press Shift+E (Figure 8.17).

8.17
When the Export Frame dialog pops up, choose TIFF as the format, because this is a nondestructive format that will retain the most detail (Figure 8.18).

8.18
Select the Import Into Project box to add the image to the Project panel. This makes it easy to find—just right-click and choose Reveal in Finder.
Extracting a Still in Lightroom
Lightroom is a great program for extracting frames from video. The first thing you need to do is open the video in the Library module.
You will see a player at the bottom of the window (Figure 8.19).
- 1. Click the little gear icon to open up the options.
- 2. Scrub through the video.
- 3. Click the arrows to move frame by frame to find the exact frame you want.

8.19

8.20

8.21
8.22

8.23
When you have the frame that you desire, click the box next to the gear and choose Capture Frame (Figure 8.24). That’s it!

8.24
For a shot like this, it’s more about capturing a unique moment than about artistic expression. Apply minimal adjustments and maintain journalistic integrity. Here, I barely moved any sliders at all to finish the image (Figure 8.25).

8.25
COLOR GRADING
COLOR GRADING IS A FANCY TERM that really means making your video look awesome. Grading and color correction are used to fix video issues such as a color casts, and to enhance a video and give it a cinematic look. There are a lot of good dedicated applications for color grading, such as DaVinci Resolve, After Effects, and SpeedGrade. You can also do a lot inside your video editor.
Lumetri
The Lumetri panel for color and tone correction was recently added to Premiere Pro CC. This makes it as easy as using Lightroom to make adjustments to video. First we are going to look at basic adjustments and enhancements.
Here is a clip that was filmed a bit later in the day. Because of the clouds, there was no sunset to speak of, and things ended up looking a little gloomy and blue. To apply the adjustments, select the clip in the timeline and then open the Lumetri panel by choosing Window > Lumetri Color (Figure 8.26).
In the past, it required quite a bit of skill to do a simple color correction to video. Now, we can just slide the Temperature slider like we do in Lightroom to warm up the shot (Figure 8.27).

8.26

8.27
In the Basic Correction panel there are sliders for tone. Here, I made adjustments to add a bit more contrast to the shot without getting too carried away. The names and functions of the sliders are similar to those in Lightroom. When editing video, you generally go for a little more contrast and less saturation than you would with a photograph. You will notice on films and television that colorists very often crush the blacks to achieve that cinematic look. Of course, this isn’t a hard rule, and you can do whatever you want to make your shots look the way you want them to (Figure 8.28).
- 1. Exposure: Overall brightness.
- 2. Contrast: Changes overall bright and dark tones. High contrast means more punch. Lower contrast means more details in shadows and highlights.
- 3. Highlights: Recover details in highlights by sliding to the left.
- 4. Shadows: Recover details in shadows by sliding to the right.
- 5. Whites: Brighten and clean highlight areas by moving to the right.
- 6. Blacks: Add deep, rich blacks to shadows by moving to the left.

8.28
What About the Histogram?
Normally when you are adjusting photos, you will look at a histogram to see if your shadows and highlights are clipping. In video, these indicators are called scopes. In Premiere Pro, they are called Lumetri scopes and can be found under Window > Lumetri Scopes. When the panel opens, it may be blank. You will see a little wrench icon at the bottom; this is where you choose which scopes you want to use. There are a number of different scopes, and it’s an education in itself to understand all of them.
In this image, I have opened the histogram and the RGB Parade. You can see that the histogram is very much like the one in Photoshop—with a difference: this one is rotated 270 degrees. The shadows are on the bottom and the highlights are on the top.
One of the most useful scopes for video is the RGB Parade. Here you can see all three color channels at once, and you can see shadows on the bottom. If the colors run past the bottom, those shadows are crushed and losing detail. If the colors run all the way to the top, it means the highlights are blown out (Figure 8.29).

8.29
Adding Color to the Shadows and Highlights
A very common practice in color grading is adding color to the shadows and highlights. Perhaps the most common are a blue/teal in the shadows and a yellow/orange in the highlights. This is nicknamed the “blockbuster look.” You will see it a lot in Hollywood movies.
Of course, if you are going for beautiful nature shots, you might want to take a note from National Geographic and keep the colors as natural as possible by sticking mainly to the Basic Correction panel. However, if you are going for a dramatic cinematic look, then these tools are your friends.
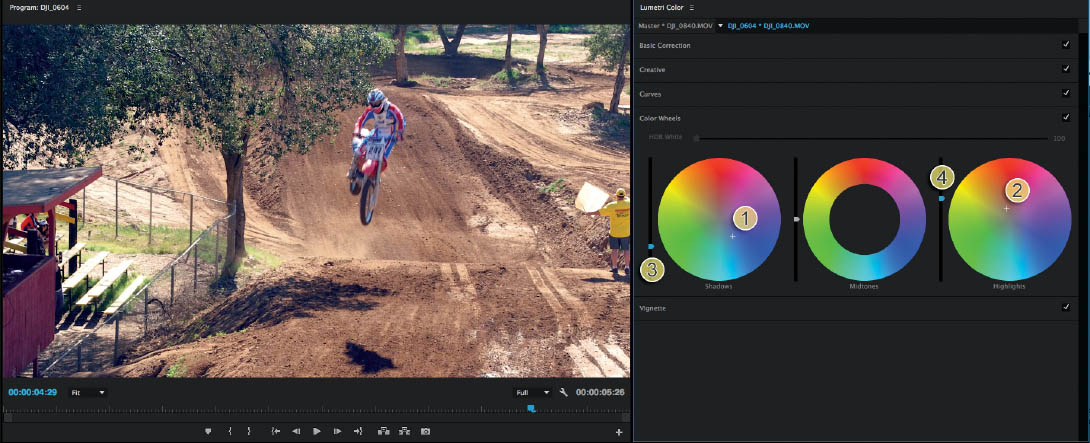
Click the Color Wheels panel. You will see that it’s broken up into three areas: Shadows, Midtones, and Highlights. Using the slider to the left of the wheels will either brighten or darken the tones in those regions. To adjust colors, drag the wheel toward the color that you want to add more of. If you hold down the Shift key, you can move them faster (Figure 8.30).
Here we have applied some subtle shadow and highlight adjustment to our shot. We added a little bit of green to the shadows to make the water look more natural and added a bit of red to the highlights (Figure 8.31).

8.30

8.31
To further demonstrate the power of the Hollywood cinema look, let’s take a shot right out of camera.
Let’s add a subtle blockbuster look (Figure 8.32).
- 1. Add some teal in the shadows.
- 2. Add orange in the highlights.
- 3. Darken down the shadows.
- 4. And brighten up the highlights.
The result can be seen in Figure 8.33.
8.32

8.33
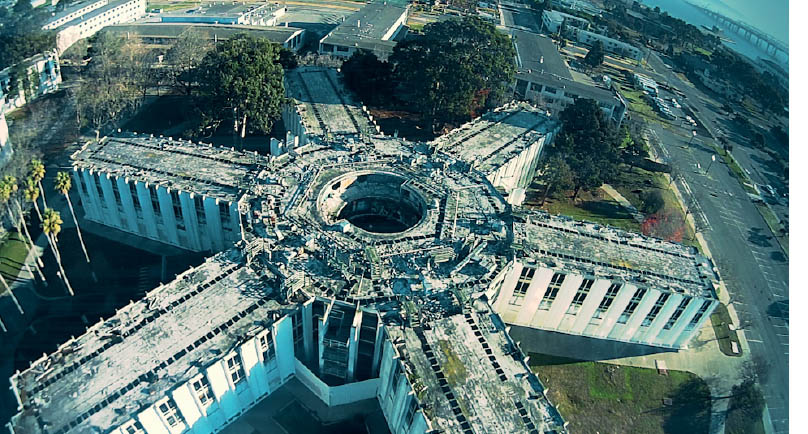
Storytelling with Color Grading
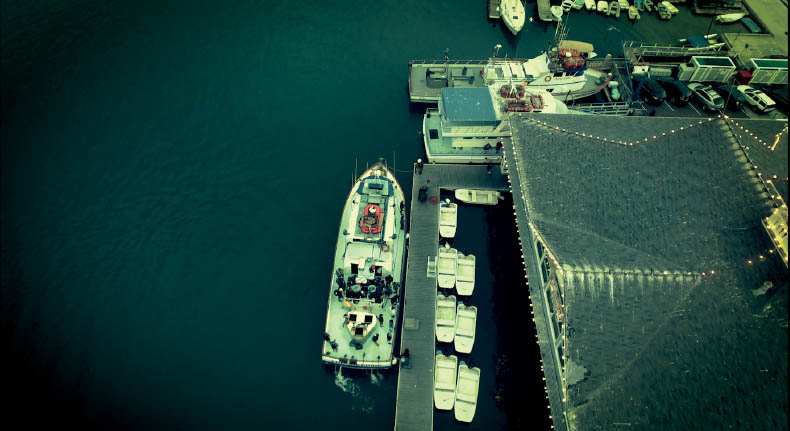
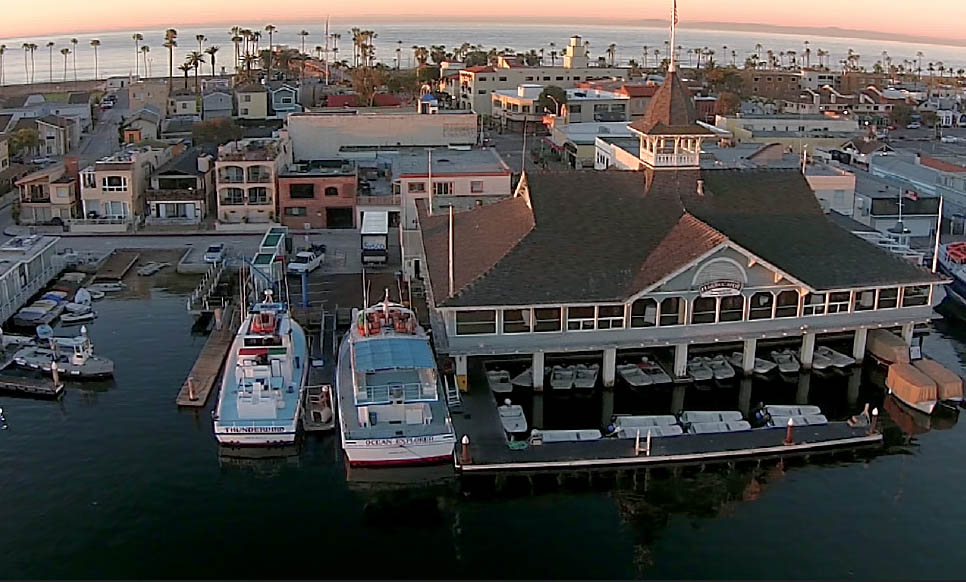
In this establishing shot, we are slowly moving up the harbor toward the pavilion. Our heroes are on a boat. As we approach, our boat comes into the scene and we follow it into the dock. This might be a perfect time to cut to some dialogue in the boat. As you can see in this sequence, the color grading adds to the story. What have they been up to? Where have our heroes been and what are they going to do next? (Figures 8.34–8.36)

8.34

8.35
8.36
The establishing shot gets the viewer’s attention and sets them up for the next part of the story by giving a sense of location and mood. Let’s examine how to create this look. If you aren’t using Premiere Pro CC, you can apply these principles to the tools available in your editor.
First of all, we start with the Basic Correction panel and make adjustments like we did earlier. This time we are embracing the gloomy blue and even enhancing it (Figure 8.37).

8.37
Next we go to the Creative panel (don’t worry about the looks yet; we will get to that next). We are able to apply some of the blockbuster look in the Shadows and Highlights color wheels here. Reducing the saturation and boosting the vibrance is a great combination to reduce distracting color. I also added some faded film, which just reduces the contrast in the shadows a bit (Figure 8.38).

8.38
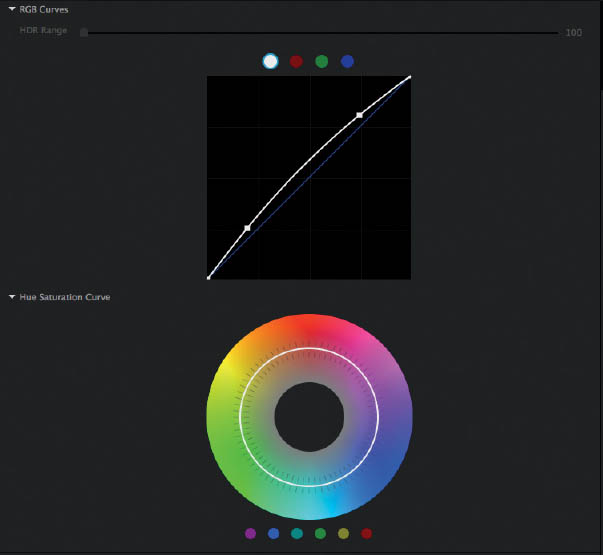
Under RGB Curves, we can make adjustments to the different tones. This works like curves in Photoshop or Lightroom. We increase the overall lightness in the midtones by pushing the mids up a bit. In curves, shadows are to the left and highlights are to the right. When you push the diagonal line upward, it brightens the tones in that region. When you pull down on the line, it darkens those regions (Figure 8.39).
8.39
In the Color Wheels section, I added more blue to the shadows and a touch of magenta to the midtones so that the clip wouldn’t feel too monotone (Figure 8.40).

8.40
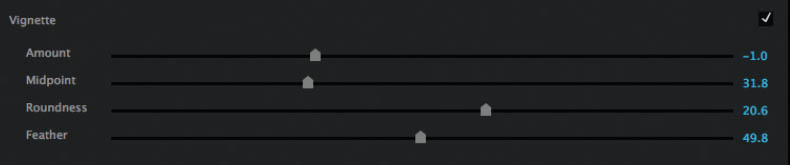
And finally, there is a Vignette portion of the panel. Used sparingly, this darkens the edges and creates focus on the center of the shot. I use vignettes very sparingly on video, but they have a lot of impact when used on the right shot. In this case, I wanted a sense of drama and mystery, and vignettes play right into that (Figure 8.41).
8.41
![]()
LUTS
ONE OF THE COOLEST THINGS to come along for stylizing video is LUTs (lookup tables, or, more accurately, color lookup tables). Without boring you with all the science, a LUT is basically a preset that you can apply to your footage to give it a certain “look” or style. LUTs are interesting because they work across a number of programs, including After Effects, Premiere pro, DaVinci Resolve, Final Cut Pro, and Photoshop.
We are going to examine some of the preset LUTs that come with Premiere Pro. Then we are going to make our own LUT in Photoshop and apply it in Premiere Pro. The same LUT will work on Final Cut Pro.
Using LUTs
When we looked at the Lumetri panel in Adobe Premiere Pro CC, I purposely left out the LUTs because I wanted to save them for their own section. In the Creative panel of the Lumetri panel, you will see the Look drop-down menu with all the installed looks (these are the LUTs). Using some footage I recently shot in Hawaii, let’s see what the looks do (Figure 8.42).
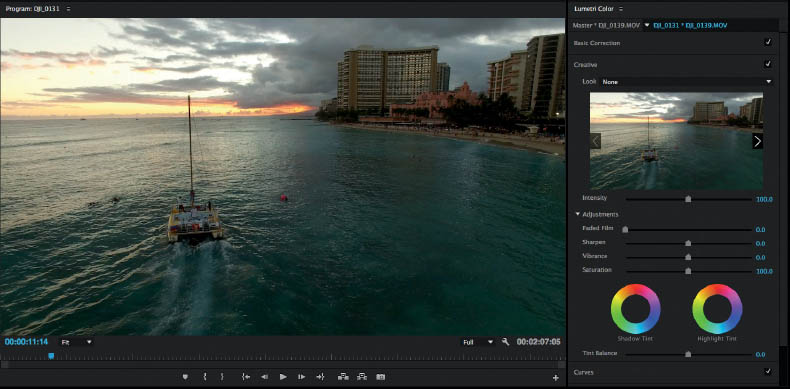
8.42
You will see a preview window that allows you to inspect the different looks. Click the arrow on the thumbnail to cycle through the LUTs and get a preview of how they will affect your footage (Figure 8.43).

8.43
When you have found the right LUT, click the preview window to apply it, or choose one from the drop-down list. You can adjust the strength of the look by moving the Intensity slider (Figure 8.44).
The look can be fine-tuned by adjusting the other settings in the Lumetri panel. Usually it’s a good idea to apply the LUT first and then dial in the settings to match your footage. Here is the shot with some adjustments made (Figure 8.45).

8.44

8.45
Scrub through your shot to make sure that the look works on all the frames. Here we are at a different frame of the same shot, and you can see the settings that I applied to customize this look (Figure 8.46).
You will notice that there is an empty slot for an input LUT in the Basic Correction panel. This is separate from the Creative LUT that we applied. Often, you apply camera LUTs first. By applying a camera LUT in the Basic Correction panel, you get a great starting point that saves time when tweaking each clip. It also allows for the use of two LUTs: the first to get a good, clean clip, and the second to be applied for creative effect. Let’s look at how to create a basic camera LUT.

8.46
Rolling Your Own LUTS
LUTs are awesome for working with presets and achieving cool and interesting looks in a single click. I’m going to show you how to make your own LUTs in Photoshop that you can use for basic, customized, or creative purposes.
MAKING A CAMERA PROFILE LUT
In this little tutorial, I’m going to show you how to make a LUT that is specific to your camera. If you have multiple drones, I suggest that you create one for each drone. This is going to save a lot of time in the future and give you a quick, accurate starting place every time. This is basic color management that will make your footage look exactly as it should.
SHOOTING A REFERENCE
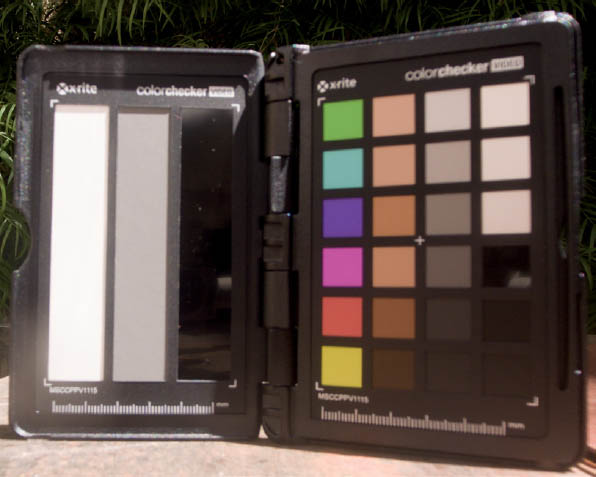
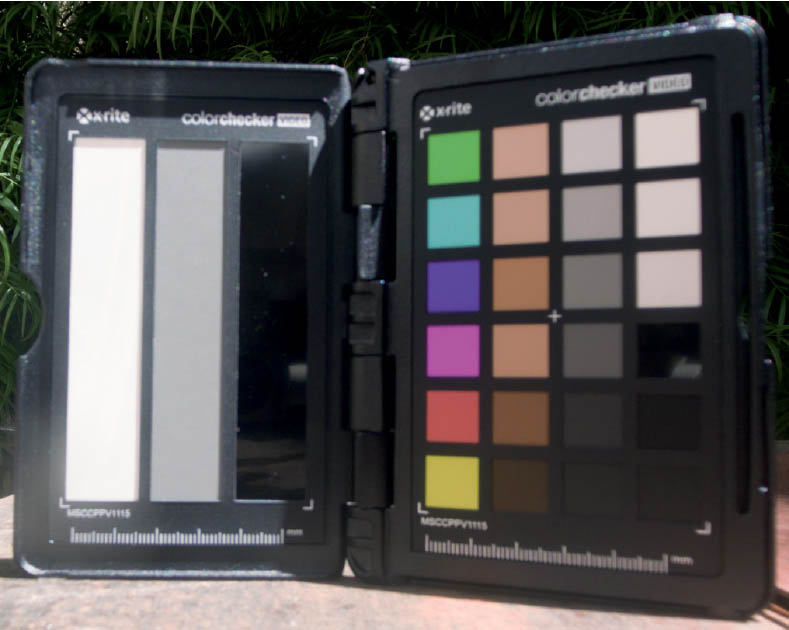
The first thing you need to do is take a picture with the camera. You can’t just take a picture of anything, though, you need to shoot a known, measurable thing. I use the X-Rite ColorChecker; experienced editors use this to match specific colors. You can also use a gray card, as long as it has 18% gray, black, and white. Wait, a picture? I thought we were working with video. We are, but the LUT we make with a photo will work on video.
Figure 8.47 is a nice shot of the ColorChecker.

8.47
Figure 8.48 is our shot from the Phantom 4.
8.48
This doesn’t look good at all, but that’s OK. That’s the point—we are going to fix it and create a LUT from the corrections. The first thing you will probably notice is that your aerial camera might have issues focusing this close to something. That’s OK; focus isn’t important as long as you get the chips in the shot. Also notice that there is a reflective black, and I positioned it so at least some of it is in shadow. The shiny black is actually capable of showing darker blacks than the matte chips.
If you want super-accurate colors, pop the ColorChecker in front of the camera and shoot it before flying to capture the ambient color temperature of your environment. Take one shot with the light striking the checker and one in the shade so that you have both of those samples. In time, you will probably end up using the direct light samples more often.
SETTING IT UP IN SOFTWARE
Open your shot into Photoshop CC (LUTs are new to Photoshop, and only work in CC). You can crop in tighter to the ColorChecker if you like. If it’s a raw file, open it in Photoshop without making any corrections. Make sure it’s flattened as a background or the LUTs won’t work.
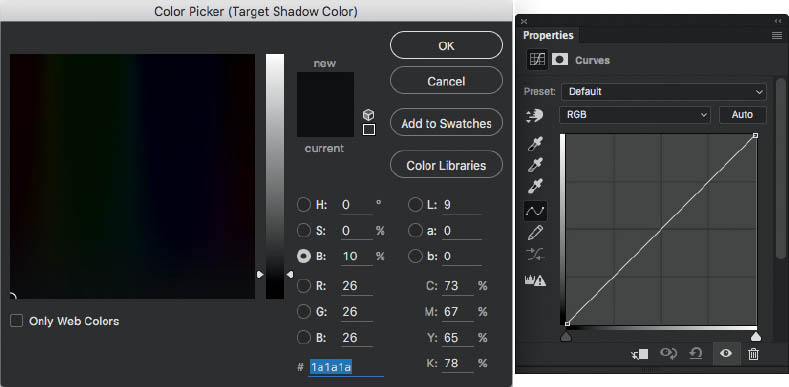
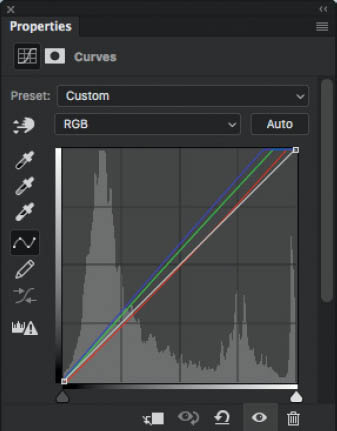
Apply a Curves adjustment layer and go to the Properties panel. You will see eyedroppers to the left; we are going to use these (Figure 8.49).
- 1. Set Black point. This will define the darkest point of your image.
- 2. Set Gray point. This sets the white balance.
- 3. Set White point. This defines the brightest part of the image as white.
The first thing we will do is fine-tune the settings. This only has to be done once. If I were to click the brightest portion of the image, it would be set to pure white with no detail, and the black point would be pure black with no detail. This will add contrast, but we want to allow for a little more dynamic range, so we are going to redefine black and white to the eyedroppers. Don’t understand yet? That’s OK; keep following along and this will make sense soon.

8.49
Double-click the white eyedropper (Figure 8.50). You will see a color picker. Change the value in B (Brightness) from 100 to 90. This will give us 10% overhead in the brights. (In print, we only add 5%, but I feel we need a little more in video. You can try 5% if you like the result better—experiment!) Click OK.

8.50
Double-click the black eyedropper, and set B to 10. At some point, a dialog may pop up asking if you want to set these as the new defaults. Click Yes, and you won’t have to perform this step in the future (Figure 8.51).
8.51
CREATING THE LUT
This is where we do the actual correction and save it as a LUT. Notice that one side of the ColorChecker is in exposed sunlight, while the other side is in shade. We are going to create two profiles: one for sunlight and one for shade. Then we’ll have the ability to use whichever one is appropriate.
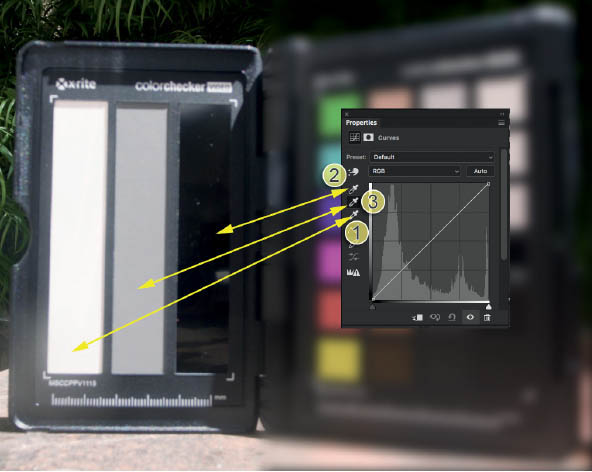
With the Curves adjustment layer still open (Figure 8.52):
- 1. Click the white eyedropper. Click into the white strip; this is pure white.
- 2. Choose the black eyedropper and click into the darkest part of the black strip.
- 3. Grab the gray eyedropper, and click into the gray strip in the photo to define the gray point (color balance). If you are using the smaller chips, choose the 18% gray option.

8.52
Figure 8.53 shows that the color chip is now properly balanced in the photo.
8.53
Notice the change in the curves. These are the exact corrections needed to color correct and balance the shots from the camera in the present lighting conditions. Now we need to transfer this information to the videos. The way to do this is to convert these adjustments into a LUT (Figure 8.54).
8.54
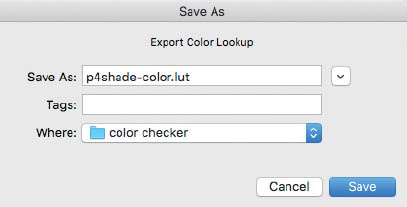
Choose Export > Color Lookup Tables. Choose the formats that you want the LUT to be in (Figure 8.55). Typically, 3DL and CUBE will cover you for video editing software. Click OK.

8.55
Now just name your LUT and save it to the location of your choosing. A LUT file will be created. In this case, I called it P4shade-color. lut. This is for Phantom 4 shade color correction. I also made one for direct sunlight and called it P4 Sunny Color. Name your LUTs however you like, as long as it makes sense for you later on. Make a set of color correction LUTs for each of your aerial cameras. A basic sun and a basic shadow LUT should be reusable for most of your shots. However, if you have a different lighting situation—such as artificial light, twilight, sunrise, or sunset—you will need to shoot the color target and create separate LUTs for those lighting conditions (Figure 8.56).
8.56
All right, now that you have made some LUTs, let’s use them in our video. Once again, I’ll be using Premiere Pro, but you can use these LUTS in any video editor, provided it has LUT support. Most professional video editors support LUTs; if yours doesn’t, there are third-party plugins and programs that support LUTs.
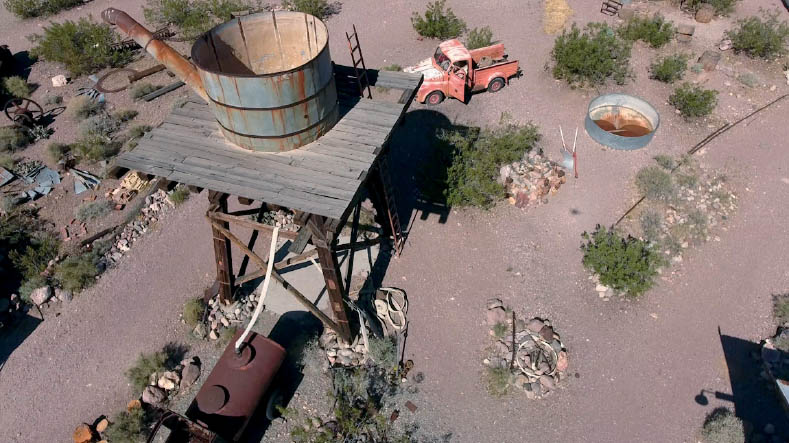
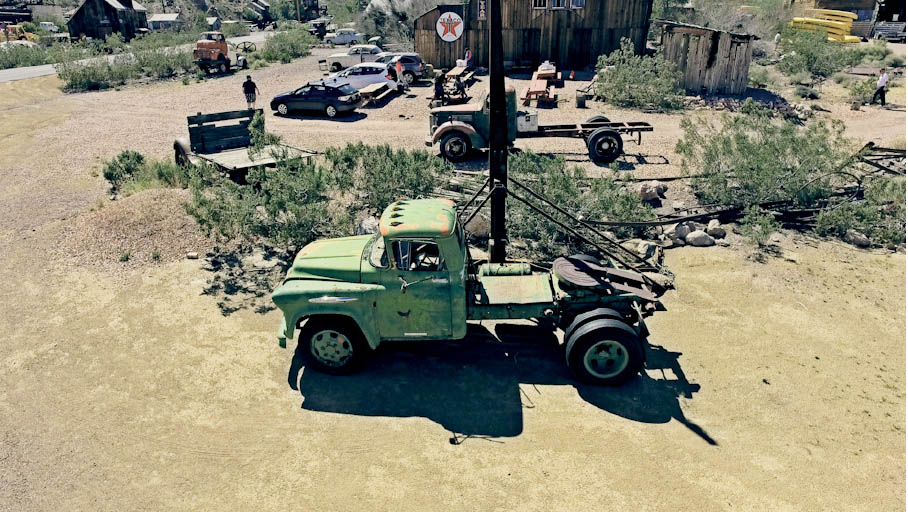
Figure 8.57 is a shot from out in the desert. It has a very warm look to it. Let’s neutralize the color using our LUT.
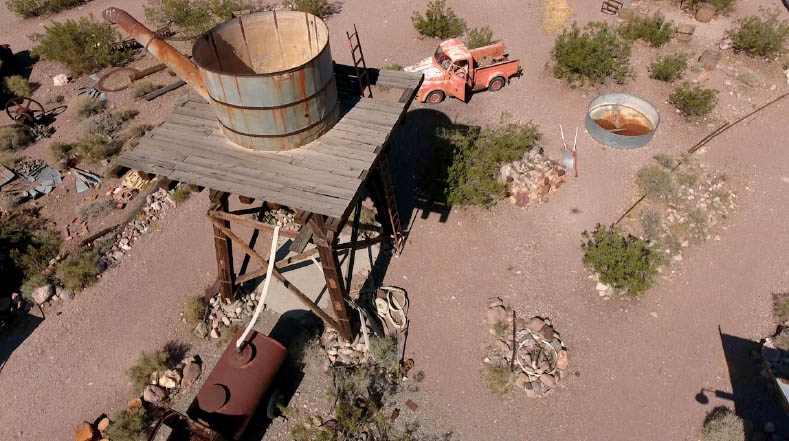
8.57
Open up the Lumetri panel. Depending on how you want to use this, open to either the Basic Correction panel or the Creative panel.
NOTE If you open it as an input LUT in the basic panel, it doesn’t provide an option to fade, but it does allow you to apply another LUT in the Creative panel to “flavor” the footage.
If you open it as a look in the Creative Panel, you have the option to fade the look, but you can’t apply a second look.
Because this is a utility look (camera LUT)—meaning that it’s fixing the footage and not applying any creative flavor—we are going to open it in the Basic Correction panel.
8.58
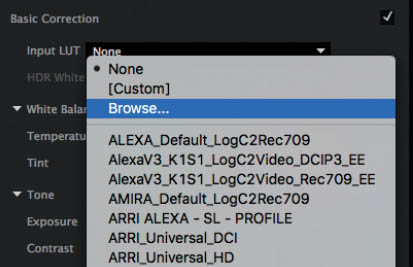
In the Basic Correction panel (Figure 8.58), click the field next to Input LUT. You will see a list of available LUTs. We are going to use our custom one. Click Browse.
Navigate to the LUT that you created earlier (in this case, P4 Sunny Color.3DL). We are using the one we created for sunlight and not shade, as the footage we are working on is in direct sunlight (Figure 8.59).

8.59
8.60

8.61
Figure 8.60 shows the color cast in the footage is neutralized in just a couple of clicks.
For some shots, this effect might appear a little sterile, as it basically removes all colored light and produces a perfectly white-balanced result. This is the intention, and it’s a great starting point to add a little flavor. It’s very difficult to apply a reproducible effect when you are trying to correct color at the same time as adding style; you might have to match multiple clips, and this camera LUT will enable you to do that.
In Figure 8.61, I added a little blue into the shadows and a touch of yellow into the highlights to warm it back up without producing an overall color shift. Using a custom camera LUT makes this possible and easy.
PLUGINS FOR STYLIZED LOOKS
I WOULD BE DOING YOU A DISSERVICE if I didn’t mention some of the most popular plugins used to create different looks quickly and easily. These are the most popular video plugins used for color from Red Giant’s Magic Bullet Suite (redgiant.com).
This collection of plugins is used in television and cinema all the time, and chances are, you’ve seen them on your favorite show. Let me show you a couple.
Magic Bullet
The first and probably most popular plugin is Magic Bullet Looks.
Figure 8.62 is a starting clip from Treasure Island, San Francisco. I shot this on a GoPro 3.
When you apply Magic Bullet Looks, not much shows in the Effect Controls panel. Click Edit, and it all happens in the plugin (Figure 8.63).

8.62
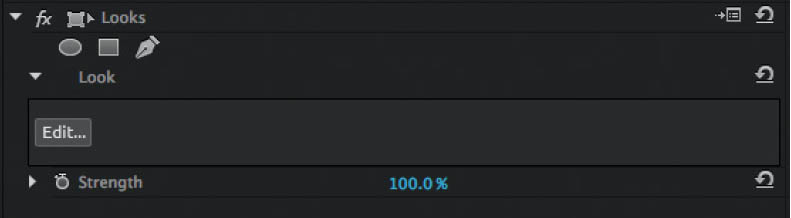
8.63
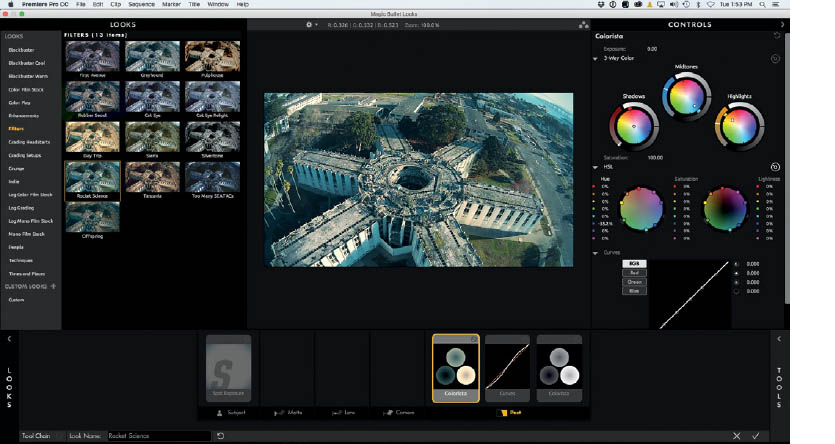
On the left, you will see all the looks. These are presets—tons of them! Most of the time, you can find exactly what you are looking for by selecting one of the many presets.
Click in the lower-right side and you will see the tools appear at the top right. These tools apply different effects to the presets (Figure 8.64).

8.64
You will see slots in the bottom. This is where all the tools and effects live. Click one of the tools and its controls will appear so that you can change just about any parameter (Figure 8.65).
As you can see in Figure 8.66, there are layers of effects in the presets; just click and adjust.
8.65

8.66
And we now have a cinematic version of the footage in a few clicks (Figure 8.67). You can apply the stock presets, or you can modify them. You can also build your own looks from scratch and save them as new presets.
8.67
Another really useful plugin is Magic Bullet Film, which emulates the look of different film stock and film processing (Figures 8.68–8.70).

8.68 Unedited footage

8.69

8.70 Edited footage
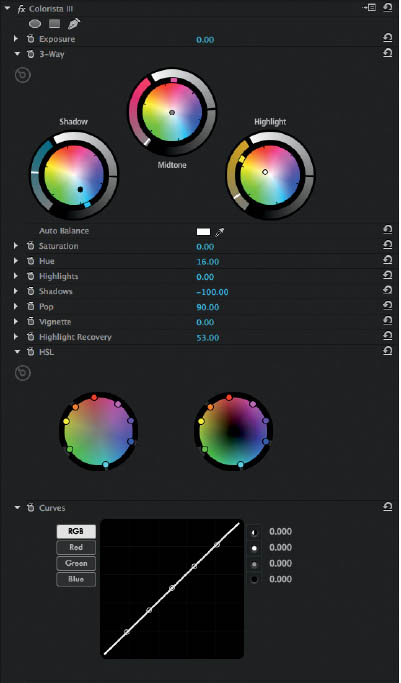
Magic Bullet Colorista III offers high-end color tools to get your footage looking great. Colorista III’s tools also allow you to apply a key and isolate the adjustment to any part of the video. So, for example, you could adjust just the sky, and it will track the adjustment as the video moves (Figure 8.71).
8.71
8.72
FIXING COMMON AERIAL VIDEO PROBLEMS
IN THIS SECTION we are going to look at how to fix some of the common annoyances that take away from the quality of our footage. This isn’t about how to apply sexy looks or a wow factor. This is the knowledge you need to create nice, clean footage.
Reducing Shake
There will be times that, despite your best efforts, there is a little shaking in your footage. Three-axis gimbals have certainly taken the brunt of camera shake out of our footage, but there are still those times when there is a mistimed gust of wind, or perhaps you made a couple of micro-adjustments during your flight path that you would really love to smooth out.
There are different stabilization features in different video editing packages, but I think that Warp Stabilizer in Adobe After Effects and Premiere Pro are the best available.
Select the clip that you want to stabilize. If you want to do a portion of a clip, cut it with the Razor tool, because you can’t contain the filter with in and out points.
Choose Warp Stabilize from the effects. (Type “stab” into the filter search bar to save time hunting.) Drag the filter onto your clip and it will begin analysis. This could take quite a while for a longer clip, so you will see a blue bar that lets you know what is going on (Figure 8.73).
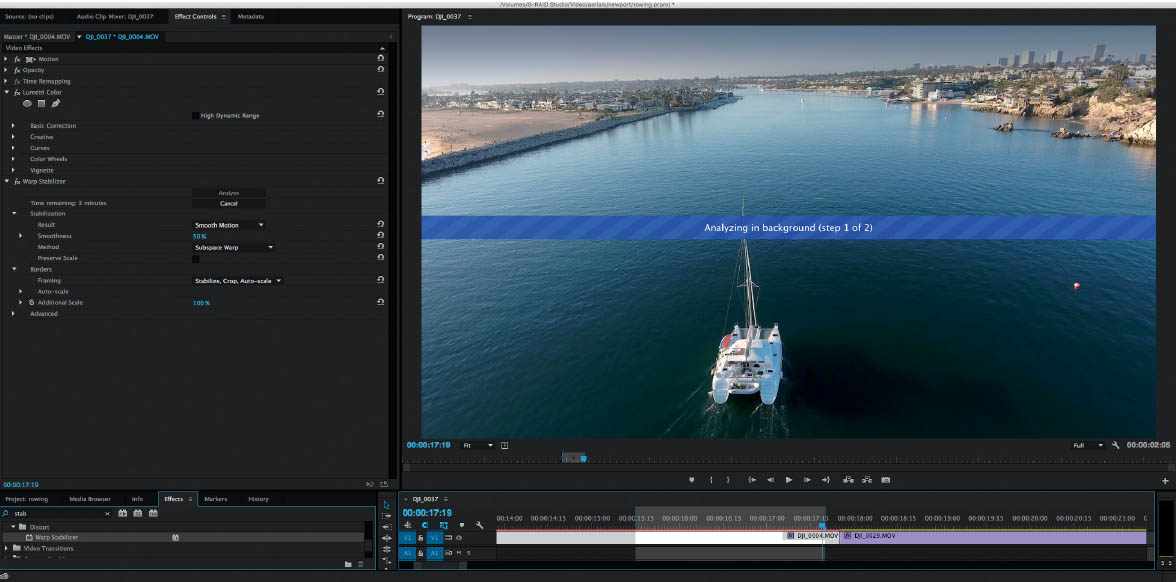
8.73
When Warp Stabilize has finished analyzing the footage, it will apply stabilization (you will see an orange bar) (Figure 8.74). Stabilization happens much more quickly than analysis.

8.74
After stabilization, you can play back your video and see how you like it. For the most part, the default settings work well. If not, there are ways to alter how this little gem works.
To make it easer to understand the settings, here is the skinny on how Warp Stabilize works. Warp Stabilize looks for the key action and tracks the objects in the footage; this is why analysis takes so long. When it has figured out the difference between desired movement and general shakiness, it locks those points down. For example, imagine a rock rolling around inside a can as someone is shaking it. The can is the frame and the rock is your footage (hopefully, it’s a bit smoother than that). Imagine that instead of a rock, you have piece of chewing gum stuck to the inside of the can. This is what Warp Stabilize does—it finds the heart of the footage and locks it to the inside of the frame.
So now that your objects are locked to the frame, where does all the shaky stuff go? If you were to zoom out you would see that the footage has been enlarged so that it can be repositioned in frame by constantly moving it around and rotating it to compensate for the shakiness. The edges of the footage are outside the frame, but because it’s zoomed in a bit, you can’t see the edges moving around.
So, basically Warp Stabilize does the following:
- Analyzes and locates shaky footage.
- Turns the main action into a pivot point by locking it into position in the frame, like sticking a pin through it.
- Slides and rotates the footage around the pinned point.
- Enlarges the footage so that you can’t see the rotating, moving edges.
Use Subspace Warp (Figure 8.75) to stretch the footage rather than having it rigid. This makes it more efficient and easier to stabilize. Although Subspace Warp works most of the time, sometimes you can get weird Jello effects. These can be reduced by choosing Position, Scale, Rotation.

8.75
A side effect of enlarging footage is a loss in resolution. Sometimes this can cause the footage to appear soft and fuzzy. The edges are hidden by using Stabilize, Crop, Auto Scale (under Framing). If this is causing the footage to look too soft, you could try Stabilize, Synthesize Edges instead. This does the equivalent of Content-Aware Fill on the edges, rather than scaling them (Figure 8.76).

8.76
You will also see the setting Crop Less <-> Smooth More. This is the balancing act. If it scales more, it gives Warp Stabilize more edges to play with and makes it possible for more smoothing, but it produces softer-looking footage because of the loss of resolution. If you want to keep the image quality high, don’t let it scale so much; the side effect is that there is less for Warp Stabilize to work with, so it doesn’t produce as much smoothing. Change these settings only if the footage is noticeably soft or you aren’t getting as much stabilization as you need.
Removing Lens Distortion
Because the lenses we use on our aerial platforms are usually wide, they can cause a fisheye effect or barreling. The Inspire, Phantom 3, and Phantom 4 do a pretty good job of removing most of this distortion, so you may not have to remove it unless it’s really obvious. However, the Phantom 2 Vision Plus and the GoPros have a ton of distortion (Figure 8.77).

8.77
This can quickly be fixed in Premiere Pro. The cost is that you will lose some of the image around the edges.
Under Filters, find Lens Distortion Removal. You will have to scroll there manually, because all the profiles will be hidden when you use the search bar. You will see common profiles, such as most of the DJI line and the GoPros. More profiles are being added all the time. Grab the profile that most closely matches your camera (if it’s not on the list, grab something close) (Figure 8.78).

8.78
In Figure 8.79, you can see that the distortion is mostly removed by adding the profile.
8.79
You can customize the amount of correction, which is especially important if there isn’t a profile for your exact camera. Change the Curvature setting in the Effect Controls panel (Figure 8.80).

8.80
Reducing Prop Shadows
Sometimes you will see dark, moving bands on the corners or sides of your video. Quite a few people are puzzled about these and wonder how they got there. This is what’s happening: When you point the camera 30 to 45 degrees into the sun, the shadows from the propellers project onto the lens. This mainly happens when the sun is higher, during the middle of the day. You won’t see it as much, if at all, early or late in the day, when the sun is lower.
To avoid this:
- Fly earlier or later in the day.
- Use a lens hood (a UV or ND filter won’t help reduce this effect).
- Shoot with the sun behind or directly in front of you, but avoid 30-to 45-degree angles.
Sometimes it’s unavoidable, and you have to reduce the propeller shadows so that a piece of footage is usable. I have found a great plugin that helps with this issue: Flicker Free, from Digital Anarchy (www.digitalanarchy.com). It works with Premiere Pro, After Effects, FCP, Resolve, and Avid. This is how it works.
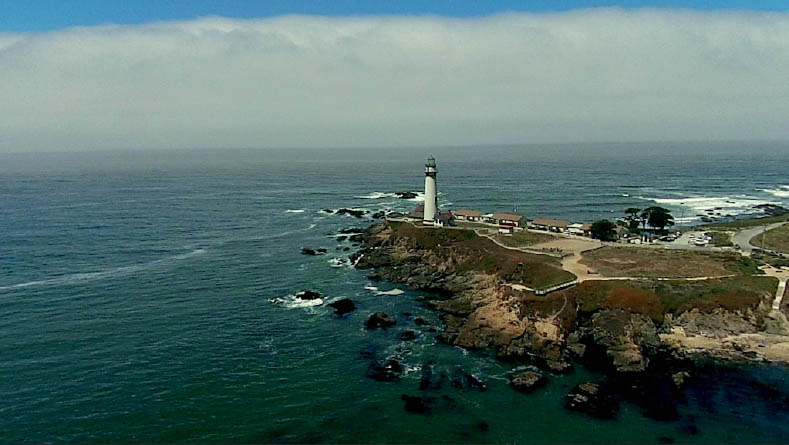
Figure 8.81 is a shot with prop shadows. They are circled in red in Figure 8.82.

8.81

8.82
In the editor (I’m using Premiere Pro), find the section of footage with prop shadows. Using the Razor tool, cut before and after the problem to isolate the trouble area. We only want to use the filter where it’s needed. Apply Flicker Free (Figure 8.83).
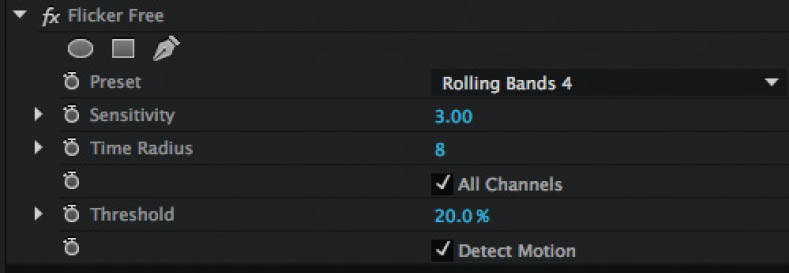
8.83
Change the Preset setting to Rolling Bands 4. Render and play back. In many cases, this is all you need for a good result. In Figure 8.84, there is a tiny bit of shadow left, but not enough for people to really notice.

8.84
If you find there are still problems, just nest the sequence by right-clicking the clip in the timeline and choosing Nest Sequence. Now you can apply Flicker Free to the nested sequence, but at a lower setting (Figure 8.85).

8.85
Reducing Noise
Although film grain may add a romantic feel to your videos, noise is just noise, and there is nothing good about it. Noise is those pesky dots on your footage. They can be colored, or they can just be grainy (Figure 8.86).

8.86
Noise is usually found in the shadow areas. If you are shooting at ISO 100, you probably won’t have much of an issue. However, when the ISO gets turned up, the sensor has to work harder and noise is produced. To properly see noise, you need to view your footage at 100%. To avoid it, try to keep your ISO at 100.
After Effects, Photoshop, and Resolve come with their own noise reduction tools, but Premiere Pro and Final Cut Pro don’t.
In Photoshop, just convert the video to a Smart Object and then use noise reduction in Camera Raw. Yes, you can edit video in Camera Raw in Photoshop. Have a look at chapter 6, where we do noise reduction in Camera Raw. It’s exactly the same process for video.
If you want to do noise reduction in Premiere Pro or After Effects, you will have to get a noise reduction plugin. The most popular is Red Giant’s Denoiser 2 filter.
To use this filter, zoom in to 100% so you can see the noise.
Apply the filter, and click Sample.
Adjust the Noise Reduction amount until the noise is gone.
You can play around with the settings in Fine Tuning if you are losing too much detail in the footage (Figure 8.87).

8.87
Figure 8.88 shows this shot with noise reduced.
8.88
![]()
ENCODING
ENCODING IS HOW YOU DELIVER THE FINAL VIDEO. The settings that you use depend on the purpose of your video. If you are saving high-quality video to be included with other footage to be further edited and produced, you’ll need a nondestructive format. The most common are Apple’s ProRes and QuickTime Animation codecs. These formats maintain all the quality and also produce very large files. These files are good for working on, but not the best for people to watch, as they require some pretty hefty resources to play back smoothly.
The second type of format is the delivery format. This is when you’re ready for the video to be shared with the world. Maybe you are going to upload it to YouTube, save it to a DVD, put it on a mobile device, or put it on your website. In those cases, you are looking for the best quality at the smallest possible file size so that the video will play back smoothly on the viewer’s device, whether it be a mobile phone or a 4K television. The most common standard for delivery is H.264, a type of mp4 video that is used on pretty much everything. The only thing that threatens to replace it is H.265, which may be the next standard, but it will take quite some time for it to be fully implemented.
The very last thing you do with your video is encode it. This is the video equivalent of printing.
Encoding from Adobe Premiere Pro
When you encode from Premiere Pro, you are actually using Adobe Media Encoder (AME), which allows you to encode more than one video at a time, as well as lots of other things. Don’t worry; I’m not going to get technical on you now. We are going to look at basic encoding using presets. There is a preset for pretty much everything you need.
To encode, choose File > Export > Media or press Ctrl/Cmd+M.
Adobe Media Encoder will open. It’s a four-step process to encode (Figure 8.89):
- 1. Make sure your timeline is not restricted to an in and out point.
- 2. Choose an output format (codec).
- 3. Note your video’s name and destination when you export it.
- 4. Start encoding.
You can see that we have chosen H.264 as the output format. There are a ton of presets. If you choose Match Source, the video will be output at the same dimensions and frame rate as the edit on the timeline.

8.89
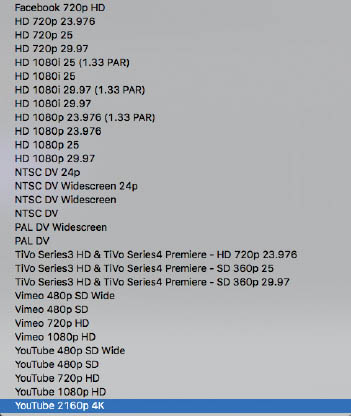
Click the Preset field to see all the presets that are available; there are presets for Apple TV, Facebook, iPhone, Android phones, Vimeo, YouTube, and more. Find the preset that matches your desired destination and you should be good to go (Figure 8.90).
8.90
Alternatively, if you want to maintain quality because you are going to edit this footage more or add it to another project, Figure 8.91 shows the settings you need:
- 1. Change the Format setting to QuickTime.
- 2. Click the Video Codec menu (Click the Video tab if it’s not highlighted).
Choose Animation from the list (Figure 8.92).
Finally, choose Export to export your video, and it will begin encoding.

8.91

8.92
If you want to continue working in Premiere Pro while it’s encoding, or you want to encode more than one clip, choose Queue.
If you choose Queue, Adobe Media Encoder will open for batch processing. Click the green arrow at the top right to begin encoding.
Encoding from Photoshop
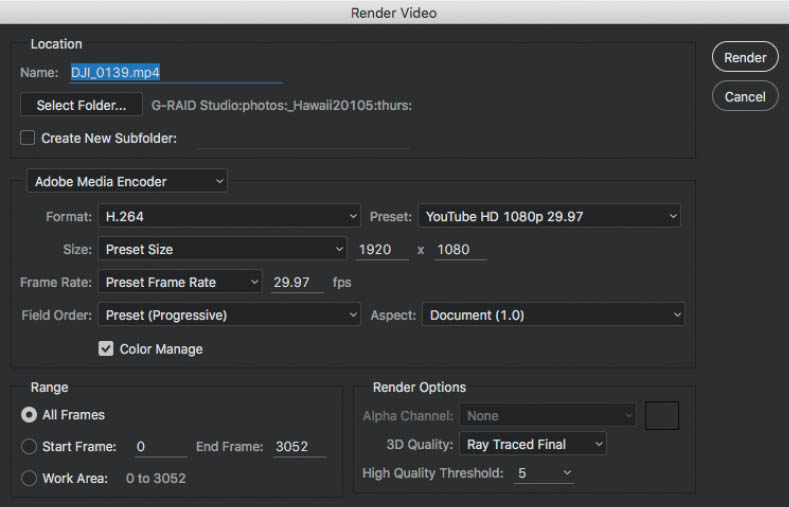
To encode video from Photoshop, choose File > Export > Render Video.
Photoshop also uses Adobe Media Encoder, albeit with fewer features.
Here in Figure 8.93, we are ready to encode at H.264. This is the default option. Choose a preset from the Presets menu. There are not as many options as in Premiere Pro, but it’s still a pretty decent list.
8.93
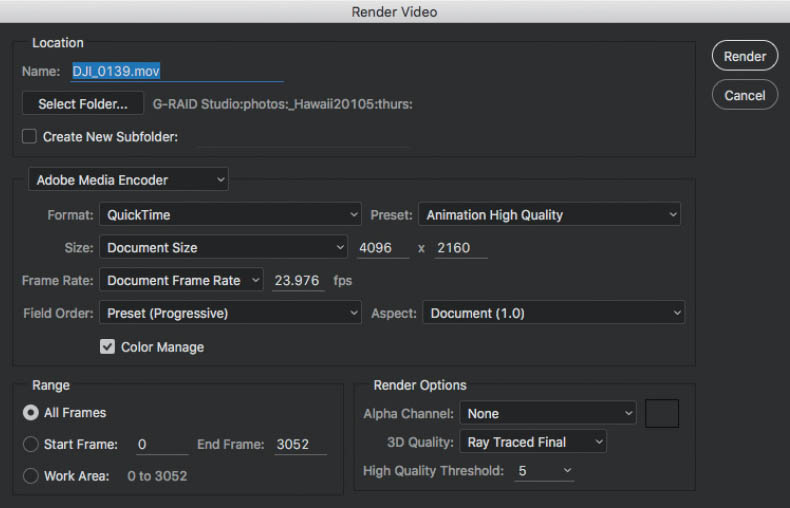
If you require higher quality for further editing, change Format to QuickTime and change Preset to Animation High Quality (Figure 8.94).
Click Render to start encoding.
8.94
PARTING WORDS
THANKS SO MUCH FOR READING THIS BOOK. I hope it’s been helpful to you. I hope that you found the answers to your most pressing questions and that you found the methods and workflows that you needed. But most importantly, I hope you found inspiration in these pages that will motivate you to take to the skies in search of beautiful photos and video.
If you need more information or resources, PhotoshopCAFE.com is rich with information, and you can’t find better books than those by Rocky Nook.