CHAPTER 2
DRONES AND GEAR
THE MOST IMPORTANT PART OF AERIAL PHOTOGRAPHY IS THE GEAR, because without it, you can’t fly or shoot. Having said that, you don’t need the biggest, best, most expensive gear to get great shots. You just have to make sure that your equipment is able to do what you need it to do. Passion, practice, perseverance, and creativity are the key ingredients to getting winning shots. However, all the talent in the world won’t get you great aerial shots if all you are doing is throwing an iPhone up in the air as high as you can. In this chapter, we discuss the stuff gear-hounds love! We look at different drones and their features and accessories. As far as what kind of drone you fly, this particular chapter is very DJI-centric, because they are currently the leading platform. It’s what I fly and have experience with. But remember that these terms and principles apply to any drone that is available today or in the near future.
DIFFERENT PLATFORMS
EARLY ON, THE RC COMMUNITY WAS MOSTLY A DIY WORLD. People built their own aircraft and flew them. Drones’ popularity really exploded with buy-and-fly, out-of-the-box aircraft. A whole generation of photographers and videographers wanted aerial imaging but didn’t want to solder wires together. The DJI Phantom changed things by providing a ready-to-go flying camera platform that was easy to fly.
Currently, the market is flooded with all kinds of flying machines. Some promise to fly off your wrist, and others take flight when you toss them in the air. At the moment, we are experiencing somewhat of a gold rush. Everyone is taking to the skies. We have seen all kinds of things on the news and on Kickstarter and Indiegogo. But let’s separate science fiction from what is readily available and reliable today.
The leaders in aerial imaging platforms today are DJI, 3DR, Yuneec, and Freefly. Let’s briefly examine some of the most popular aircraft.
DJI
DJI are currently the world leaders in aerial imaging platforms, and I don’t see that changing any time soon. In fact, it was DJI’s Phantom quadcopter that kick-started this revolution in aerial imaging.
PHANTOM
The Phantom was a very capable piece of hardware that was able to get a GoPro camera up in the air. Although other small drones existed before the Phantom, its Naza-M flight controller and its use of satellites for stabilization made the Phantom easy to fly. While this was only a few years ago, it seems like a quantum leap in technology. There was no FPV or mobile app for flight. The camera was a GoPro attached to the bottom of the aircraft.
DJI then launched the Zenmuse gimbal, with 2-axis stabilization, which allowed for smoother camera movement without the “Jello” effect—video footage that is wobbly like Jello. The 2-axis gimbal removed the vibrations and also kept the camera level while flying. It revolutionized the industry because people could shoot stable, smooth, usable footage.
If you wanted to see through the camera, you had to purchase a video transmitter and use it to send the GoPro signal to a monitor on the ground. There was no control over the camera settings. For video or photos you would have to manually start the camera on the ground and then fly with the video running all the time or with the camera in time-lapse mode, constantly taking pictures. If you wanted to know information like height and speed, then you needed to install an iOSD, which would stream back the flight telemetry. I do not miss those days.
PHANTOM 2
Along came the Phantom 2, with more powerful motors and a battery that didn’t require attaching cables and then stuffing them in the door.
One of its options was flying a GoPro with the option of a 3-axis gimbal. The third axis was rotation, which was the missing piece for super-stable footage. If you wanted FPV, you still needed to bust out the soldering iron and do some DIY hacking.
At the same time, DJI introduced the Phantom 2 Vision. I was fortunate to be one of the first to use this craft. I actually owned a pre-production unit. What made this revolutionary was the built-in FPV via the DJI Vision app. This enabled you to see what the camera was seeing through your mobile phone. You could also control camera functions through the app—there was an option to tilt the camera by using the accelerometer on your phone. Because there was no gimbal on this aircraft, you could take photographs, but video wasn’t stable enough to be usable.

2.1 Phantom 1 with prop guards attached and a Zenmuse H3-2D gimbal

2.2 Phantom 2 with homemade modifications for FPV
2.3 Phantom 2 Vision

2.4 Phantom 2 Vision+
The Phantom 2 Vision+ was the first aircraft that had it all. It had the Vision+ camera with a built-in 3-axis gimbal and an updated app for more control and better FPV. The quality of the camera was just OK, and it took a lot of postproduction work to make things look good. Still, we were able to coax some decent images and video out of it.
PHANTOM 3
The Phantom 3 was a coming-of-age product for DJI. It allowed us to easily create professional-looking photos and video. Flight control was vastly improved, with more power. This product was presented in a very slick and streamlined way. The controller was completely redesigned, with separate controls for camera movement, shutter, and exposure. There were two models: the Phantom 3 Advanced and the Phantom 3 Professional. The big difference was that the Pro could shoot 4K video, and the Advanced could shoot up to 2.7K (after a firmware update).
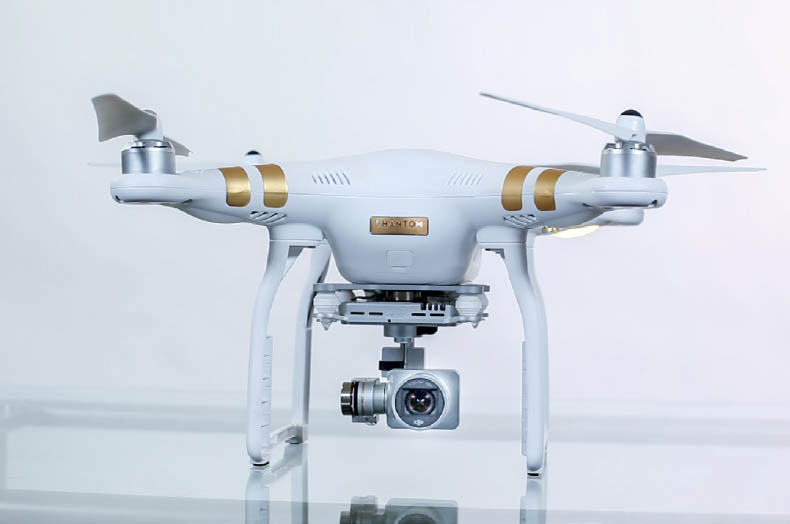
2.5 Phantom 3 Professional
A major leap forward was the inclusion of Lightbridge, an HD-quality FPV with a very long range. Lightbridge was originally available as a separate accessory for the larger spreading wings series and was only introduced as an included feature on the Inspire 1. It allows an HD signal to be displayed on your screen with almost no delay and a crystal clear image. Lightbridge works over RF, so there is no need for the additional Wi-Fi unit that powers the older FPV system in the original Vision camera. At this point, DJI migrated everything to the Go app, which connects and runs the DJI product line. The Phantom 3 also sports downward-facing sensors to provide optical flow in the same way as the Inspire 1. See the description of the Inspire 1 for more on optical flow.
Shortly afterward, DJI released two more versions of the Phantom 3—the Standard and the 4K. Reverting back to the older Wi-Fi and controllers of the Phantom 2 Vision+, neither of these models used Lightbridge. The purpose was to produce an entry-level platform at a very low cost and market it as a beginner’s drone. You can currently purchase one of these for under $500 USD. They have the same cameras as the Advanced and Pros, so technically you can capture images with the same quality as the Pro and Advanced. However, their range is a lot more limited and they don’t have physical camera controls on the remote controller. You control the camera through the app.
After a firmware update, DJI added the intelligent flight modes to the Phantom 3 range. The intelligent flight modes enable the Phantom 3 to fly itself. These flight modes are covered later in the book.
PHANTOM 4
Less that a year after the Phantom 3, DJI released the Phantom 4. The main additions to the Phantom 4 are more powerful motors, snap-on propellers, composite-integrated camera, and a more streamlined shell with a higher center of gravity for better balance. The newly designed battery is mounted higher up, as are the propellers on the longer motors. This is an attempt to get the propellers out of the frame a bit more and to sustain the faster flight speeds in the new sport mode. DJI claims that the Phantom 4 can do 47mph. So far, I have flown mine just shy of 55mph.
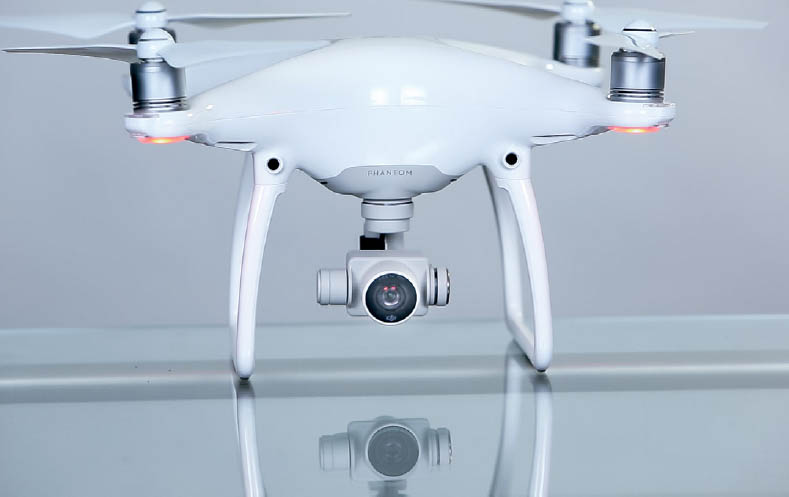
2.6 Phantom 4
Perhaps the biggest addition to the Phantom 4 is the forward-facing sensors. This enables object recognition. By detecting objects and identifying them as a person, a car, etc., the Phantom 4 can follow an object as it moves. This is called Active Track and it’s great for people trying to track an object—even themselves. A good practice is to lock onto the target and then fly around it to increase the recognition accuracy. Weaknesses in tracking happen when moving directly into the sun, where contrast is lowered, and when making sharp turns.
Another use for the forward-facing sensors is object avoidance. The sensors can detect an obstacle such as a wall, a tree, or hopefully a person. Settings can include stopping, flying over or around an obstacle, and even reversing direction if the obstacle is moving.
More sensors were added to the underneath portion of the aircraft to assist in obstacle avoidance and to increase the optical flow to 30 feet, from the previous 10 feet.
INSPIRE 1
On November 12, 2014, I was invited, along with a small group of key influencers, to an event at Treasure Island in San Francisco. All we knew was that DJI was unveiling a new product. During the speeches, the very first Inspire 1 to be seen outside DJI flew into the event space. There were gasps from the attendees, who’d never seen anything like it.
Understand that this was before the Phantom 3, and it was the first streamlined prosumer drone to be unveiled. The first thing that struck everyone was its futuristic appearance and powerful-sounding motors. Also, it was streaming live HD video from its camera onto a large screen. This was groundbreaking.

2.7 Launch event at Treasure Island

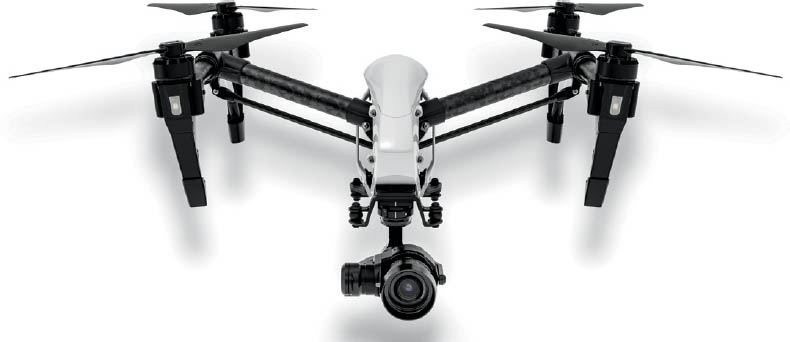
2.8 Inspire 1
Now, everyone is awaiting the Inspire 2, which will probably be available by the time this book is printed.
Let’s look at the Inspire 1.
The Inspire 1 was the first small drone to incorporate all of DJI’s separate technologies into a single aircraft, and quite frankly it was years ahead of its time. A larger and heavier aircraft than the Phantoms, this thing is jammed with tech. First of all, the legs are manufactured out of carbon fiber, to make them light and strong. From the downward landing position, they can be raised upward into flight position, lifting themselves and the propellers out of view of the camera.
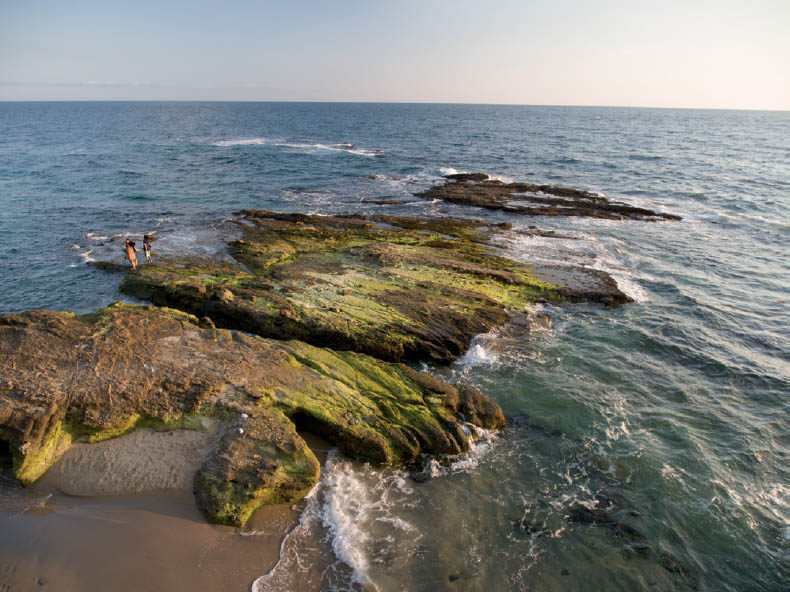
There is an optical flow system. Optical flow is a set of downward-facing sensors. It uses sonar and an optical camera to sense the ground. This enables stable flying indoors without satellites. If you have ever flown a Phantom 1 or 2 indoors, you will appreciate this feature. It can cause a little trouble when flying over tall obstacles such as high furniture, because it will cause the aircraft to rise in altitude. Another troublesome surface is moving water, such as surf and waves. When flying in these conditions, either turn off optical flow or fly above 10 feet (the effective range). The Phantom 4 (and probably the Inspire 2) has a 30-foot optical flow range.
The camera itself has a detachable gimbal and camera that can be swapped out with compatible cameras at the turn of a lever. This camera is capable of rotating 360 degrees and can be remotely controlled by the pilot. Additionally, a second controller can be used by a second operator for complete remote control of the camera while the first operator retains control of the aircraft. The camera is capable of 4K video and 12 MP stills in Adobe DNG Raw.
The Inspire 1 uses Lightbridge for long-range HD FPV with almost zero latency (the delay from camera to screen). It also uses the DJI Go app.
Several additional cameras have been released for the Inspire 1. The X5 camera is a micro 4/3 with interchangeable lenses and adjustable aperture and focus (i.e., a “real” camera). The X5R is similar to the X5, but it records images and video on an onboard SSD drive. The X5R also records lossless video as a series of RAW still images.
2.9 Zenmuse X5 camera
A regular Inspire 1 can be upgraded by attaching the X5 or X5R camera. You will need to purchase an upgrade kit that consists of a larger vibration plate, which is the camera mount and extenders for the legs. Because of the extra size of the camera, the Inspire needs a little bit more ground clearance to carry it without it touching the ground in the landing position.
The Inspire is also available with the X5 camera standard. This is known as the Inspire Pro. Once you have upgraded your Inspire, it’s very similar to a Pro and it can run the Pro firmware. The Pro does get a little more battery life than the upgraded Inspire 1 because of slightly more efficient motors.
There is one more camera available for the Inspire 1: the XT. The XT is a FLIR thermal camera, used for inspections and search and rescue. The XT is outside the scope of this book.
3D Robotics (3DR) Solo
3DR have been around for a while, manufacturing RC aircraft and components. During NAB 2015, they announced the 3DR Solo, dubbed a Smart Drone.
The Solo is a quadcopter of similar size and weight to the Phantom. Solo uses two Linux microcomputers, one in the aircraft and another in the controller. The controller itself looks like a controller one would use for video games, and was designed by the same product design team that designed the Xbox.

2.10 Solo
Solo is a BYOC (bring your own camera) drone and currently fully supports the GoPro Hero 4. With its 3-axis gimbal, you have control over the main camera settings and are able to operate the camera and video shutters remotely through the 3DR Solo app. The app works similarly to the DJI Go app and is installed on your iOS or Android device; it also doubles as FPV. If you want to fly a GoPro camera, the Solo is currently your best choice.
Solo uses GPS for stabilization, autopilot, smart shots, and return to home failsafe.
What makes the Solo special is the smart shots. There are a number of smart shots that can be programmed. Smart shots are automated to help you easily get complex shots.
Smart shots include:
- Cable Cam: Allows you to set points that the Solo will fly between. You can also automate the gimbal tilt with the Cable Cam.
- Orbit: Circles an object while keeping the camera pointed at the target.
- Follow: Follows the user automatically. Leash mode allows you to set a distance and Solo will stay behind the object that it’s following. This is a good way to avoid hitting obstacles since Solo doesn’t have any sense-and-avoid sensors.
- Selfie: Place an object in the center of the camera and then push a button. Solo will pull away and the gimbal and rotation will keep that object in the center of view the entire time. This can also be reversed for a dramatic pull-in shot.
- Pano: Can automatically shoot all the photographs that you need to create a panoramic photograph. You will still stitch them together in Lightroom or Photoshop.
- Zipline: Enables you to automatically create a flyby shot. You can fix the camera to a target, and the camera will stay locked on it as you fly the Solo past the object.
Firmware Updates
No matter what hardware you decide to fly, keep an eye out for firmware updates. These updates fix bugs and add new features to your drone. Usually the app will inform you when new firmware is available. Make sure your batteries are fully charged while running a firmware update, and don’t interrupt the update while it’s in progress. Another suggestion I have is to join some groups on Facebook and wait for the thumbs-up from the community before performing the update. I usually wait about a week to decide if I will perform the update or skip it based on feedback from the community. If a number of people are having big problems because of the update, I usually wait until things are fixed.
RETURN TO HOME (FAILSAFE)
Most, if not all, modern drones use satellites for positioning. These satellites mark the position of the aircraft. The satellites help the aircraft stay steady by using positioning information that communicates with the motors to make constant micro adjustments. There are two main satellite networks, GPS and GLONASS. One of the important tasks performed by satellites is to mark the home point. This home point is saved as a failsafe destination. That means that if the controller loses connection with the aircraft because of a malfunction, battery failure, or an accidental drop into the ocean, the aircraft doesn’t just keep on flying away by itself until it crashes into something.
Instead, the aircraft will climb to a safe altitude (this is usually programmable in your app; see the operating instructions for your aircraft), and return to the home position (or homepoint), automatically land, and shut off the motors.
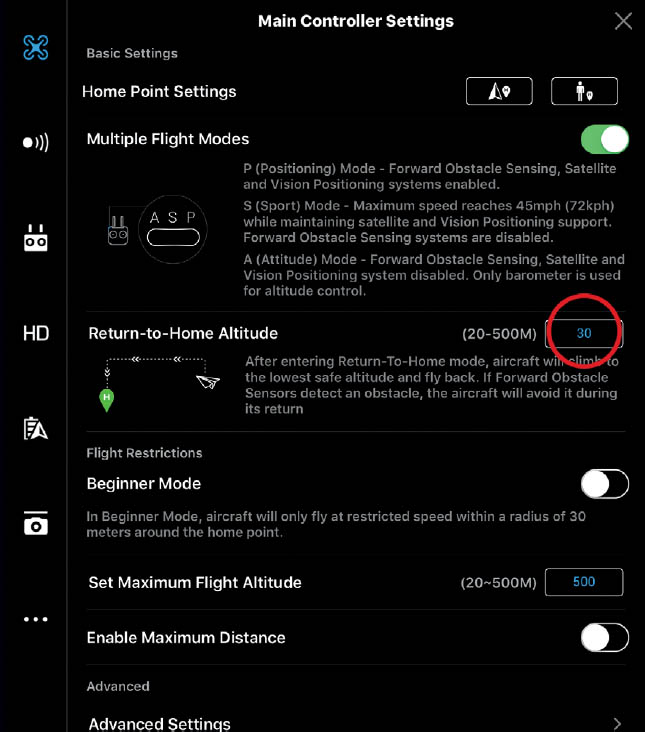
2.11 Homepoint settings
This failsafe is also used in monitoring the onboard batteries on the aircraft. When the batteries get low, the aircraft will return to the homepoint. You have the option to override this if you want to continue flying. However, once the aircraft gets critically low on power, it will go into a self-landing mode. At this point, you still have the option to guide the aircraft to a safe place to land (if you canceled return to home). Once it’s in critical mode (usually at 20% battery), you cannot cancel landing, because the software won’t allow your aircraft to run out of power in midair and fall from the sky. This is a good safety measure.
You can also force a return to home by pressing the Home button on your controller or app. Once gain, refer to the instructions for your particular aircraft to familiarize yourself with this feature before your first flight.
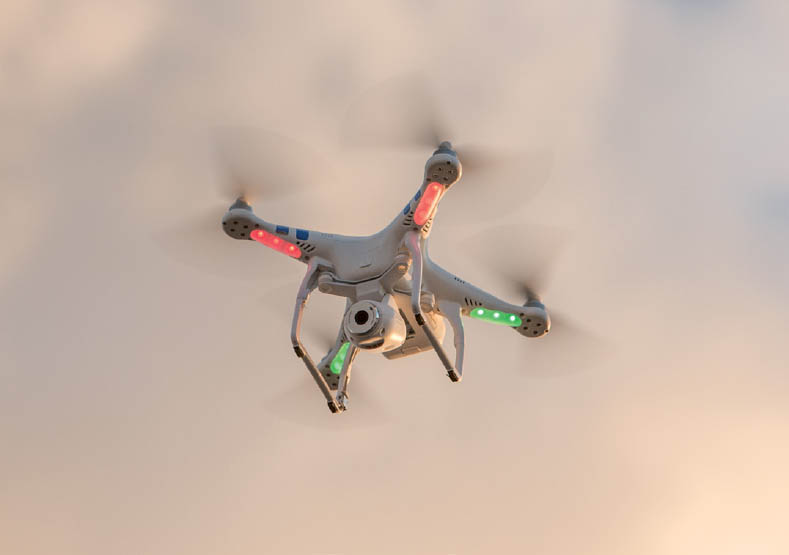
STATUS LIGHTS
Under each aircraft, usually under the arms, you will see status lights that provide important information. These lights tell you when you have satellite lock, when it’s safe for landing, when the batteries are getting low, and if there is an error.
Please refer to the instruction manual to see what the lights mean on your aircraft. Generally speaking, flashing red is never good, amber means that certain features are disabled, and green (or white on 3DR Solo) means all is well. Learn what these lights mean; your aircraft could be trying to tell you something important.
![]()
FILTERS
FILTERS MAY BE SOME OF THE MOST MISUNDERSTOOD ACCESSORIES for aerial photography and video. Whenever I post an image, I always have people ask if filters were used. This is a fair question, but I have discovered that many people think if you put an ND filter on your camera, suddenly all your photos will be sharper and more vibrant. Many times, these filters produce the opposite result and can make a photo look worse. After you read this section, the purposes and uses of filters will be clearer to you. Then when you do use filters, you will see an improvement in your images.
A filter is a thin piece of glass that screws to the front of your lens. Different types of glass have different properties that affect your photographs in different ways. The main thing is that they are distortion free, clean, and, for aerial work, lightweight.
There are several types of filters to discuss: ultraviolet (UV), circular polarizer (CP), neutral density (ND), and graduated neutral density (GND).

2.12 Filters
A UV filter is simply a clear piece of glass that sits on the front of your lens. This filter protects your lens from scratches by taking the beatings for it. Some manufacturers claim that the way the glass is honed gives you sharper images and reduces glare. Some photographers claim that the extra glass on the front creates glare and blur and undermines the benefits. I use them for protection.
CIRCULAR POLARIZER
The most useful filter for aerial photography is the polarizer. A polarizer creates richer colors while reducing glare and reflections off water and glass. When light bounces off things, it scatters and creates glare. A polarizer filters out all light except the light moving in a certain direction. By rotating the circular polarizer, you can choose which direction of light rays you want to see.
Take two pairs of polarized sunglasses and put them on top of each other. Rotate the top pair to see what I mean—at one point the lens will appear solid black, which is polarization at work.
The advantage of polarizing filters is the ability to rotate the filter to reduce or remove reflections and glare. You will get bluer skies, clearer clouds, and more highly saturated colors in your landscapes. This only works when you are at an angle to the sun, 90 degrees being the most effective. You won’t see much of a difference with the polarizer when looking directly into or away from the sun.
Polarizers do have some challenges and side effects. They will darken the exposure; this may or may not be a benefit, depending on the circumstance.

2.13 Taken on the Phantom 4 without a polarizer
2.14 Now using a polarizer—notice the richer color
You obviously can’t rotate the filter while your drone is in the air. That would require a servo on the filter, which I’m sure someone is in the process of building. The rest of us have to rotate the filter while we hold our aircraft or while it’s sitting on a secure base. The added challenge of this is that we have to have a video preview of the effects of the filter as we rotate it to get the benefits of it. This means having the camera on for this process, so we are fighting the active gimbal at the same time. This will get things perfect for a certain shot, but when we rotate for another shot, the filter may not be set up right—we either have to make do or land and adjust the filter.
The other issue with a polarizer on a wide lens is that it can’t polarize the entire sensor. This can create a darker area in the middle of the sky, with more white toward the edges (see the sky in Figure 2.14). This makes it a bad choice for shooting panoramas unless you want a leopard-skin sky.
Because of the challenges and side effects, I don’t use a polarizing filter that often because it’s such a hassle. But for certain shots it’s magical.
NEUTRAL DENSITY
If I could only have one filter, it would be the Neutral Density filter. This filter shouldn’t change the quality of light at all; it doesn’t sharpen, color, cut through glare, or any of the mystical things people think it does. All it does is reduce the amount of light entering the lens, making everything darker. Because there is less light entering the lens, you have to slow down the shutter speed to get a correct exposure. You could increase the ISO, but all you would be doing is adding unnecessary noise to your images. Let me explain ND for photography and for video (where you will use it all the time).
In photography, the shutter speed is the amount of time that the shutter is open to expose the frame. When it’s bright, you want a shorter (faster) shutter speed; otherwise, your image will be overexposed and too bright. When it’s darker, the shutter needs to be open longer (slower shutter speed); otherwise, the photo will be too dark.
With a shutter speed of 1/1000 of a second, movement will be frozen, with no blurring at all. You can see that effect with this image of water spray captured in motion (Figure 2.15).
This second photograph was shot at the much slower .6-second exposure. Because the shutter is open longer, more movement happens in that time, and is captured. This creates a flowing motion effect (Figure 2.16).
The ND filter reduces the amount of light entering the lens, so you can use a slower shutter speed. They come in different densities to allow compensation for different shutter speeds. Higher densities block more light. Unless you want to slow down the motion and create some blur on your photo, you wouldn’t use an ND filter. If your copter is moving, the entire photo could likely be blurry when using an ND. Make sure you are hovering, and let the motion happen against a stationary object. If you want tack-sharp photos, the ND filter will actually give you the opposite result.

2.15

2.16
Different manufacturers use different notations to describe their filters. Here is quick chart that shows the notations and how much light they block.

In video, the ND filter is a necessity.
It’s important to use the correct shutter speed for smooth video. While tack-sharp frames are desirable in photography, the opposite is true for video. For fluid movement and motion, a little bit of motion blur makes the video look smoother. If the shutter speed is too fast, the action appears jerky and staccato. Water drops end up looking more like sparks than they do smoothly flowing liquid.
The formula for the best shutter speed for video is 1 over 2x the frame rate. If the frame rate is 30 fps, then 1/60 is ideal. For 60 fps, use 1/120. For 24 fps, use 1/50 (there is no 1/48, so we choose the closest shutter speed available).
To get the correct exposure, often the corresponding shutter speed is much faster than what we want for video, so we need to reduce the amount of light with the ND filter. More quality video is shot with an ND than without. You will use an ND all the time when shooting video outdoors during the day unless it’s heavily overcast. It’s easy enough to tell—just zero out the meter on your camera in the app and see the shutter speed. If it’s too fast, then add an ND.
Typically, you would use an ND16 for most bright-day shooting, or go up to an ND32 when it’s very bright, such as over water or snow. If it’s a bit cloudy, the ND8 might do the trick.
Here are common shutter speeds in full-stop increments: 1/1000th of a second, 1/500, 1/250, 1/125, 1/60, 1/30, 1/15, 1/8, 1/4, 1/2, 1 second.
GRADUATED ND
The last type of filter that we’ll discuss is the GND. This filter is tinted at the top and clear at the bottom. There is a smooth gradient where the darker region blends into clear. This enables us to darken the sky without the foreground being darkened. This is a great option for shooting outdoors and shooting landscapes because the sky is usually brighter than the ground. By adding a GND, we can balance out the difference and show more detail in the sky and the ground simultaneously.
FIRST PERSON VIEW (FPV)
FPV MEANS SEEING WHAT THE CAMERA IS SEEING. Video games like Doom or Call of Duty are called first-person shooter games because they put you in the virtual driver’s seat, as if you were actually there. FPV does the same thing. It’s easier to see where you are flying when you are looking through FPV, because you can see obstacles and clearings in front of you. When the aircraft is a fair distance away, it’s hard to gauge where it is in relation to other objects because of the reduced depth perception.
While FPV is nice to have for flying, it’s really important when it comes to framing your shots. When you are making photographs, use the FPV to frame up your shot. When you are shooting video, you will use it to frame the shot, but also to maintain that frame as you move though the shot.
There are two main types of FPV: screen and goggles.
FPV SCREEN
These days, a screen usually means a phone or a tablet, but not always. Many drones, such as the Inspire 1, can have a large monitor plugged in through the HDMI jack. This allows a remote feed of what the camera sees.
Most commonly used is an iOS or Android mobile app that you download on your smartphone or tablet. These all-in-1 apps allow you to change equipment, camera, and telemetry (speed and location) settings, and provide a large real-time display of the camera feed. Some of these apps also include a flight recorder that allows you to access your flight information at a later date.
The main FPV device that I use is the iPad Air 2. Although not the latest device, it works nicely with the Phantoms and Inspires. The DJI Phantoms (3 Pro, 3 Advanced, and 4) and Inspires use Lightbridge. Lightbridge streams a real-time signal in HD. You get a crisp signal with very little flickering and almost no latency (delay). For most purposes, I like to fly line of sight and keep an eye on the FPV for reference, because I like to be aware of my surroundings. When doing a video shot, I will be looking mostly at the FPV device to make sure the framing is good and that I like the speed and movement. I will be aware of my surroundings and possibly have a spotter with me who watches the aircraft while I’m not. As soon as I’ve got the shot, I immediately look back at the aircraft and make sure everything is nice and clear.
Sun glare can be an issue, so a sunshield for your screen is important. You can make one yourself out of black foam core. Sunglasses can be worn, but make sure they aren’t polarized, because this makes it difficult to see the screen.

2.17 Remote with iPhone attached
GOGGLES
FPV goggles are a fully immersive way of looking through your FPV. When you wear these goggles, all you see is the display through the eyepieces. It provides a very clear view of the FPV, and makes it very easy to see and fly as if you were up there in the drone yourself. Because of this superior view, FPV goggles are used for drone racing.
Because I shoot photos and video, I don’t exclusively use goggles. I like to be aware of my environment and know where the drone is in space at all times. However, you could fly to position, look around, make sure there are no obstacles, and then put on a pair of goggles and fly. My favorite option is to use the Inspire in dual-operator mode. One pilot flies the aircraft using visual line of sight while the second pilot is the camera operator. They don’t have to worry about the aircraft, because they aren’t flying it. They are operating the camera. It’s really nice to be immersed in your own little world as the camera operator and get the best shots possible.
There are goggles that plug into the HDMI slot of your controller, such as the Fat Shark. These goggles let you see clearly. There are also see-through goggles like the Epson Moviero. These allow you to see your environment as well as the FPV and telemetry as a HUD (heads-up display) overlay. The HUD can be a bit difficult to see in bright sunlight.

2.18 Epson Moviero BT 200 goggles
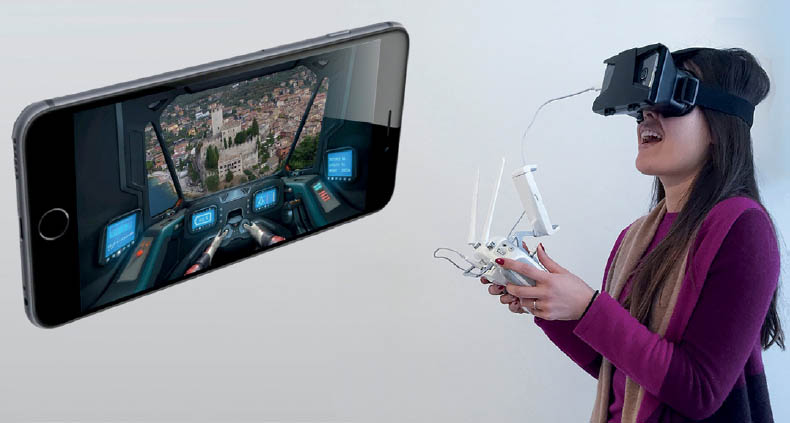
VIRTUAL REALITY (VR)
A different type of goggle that is becoming very popular right now is the VR/AR goggles. These allow you to slide in your mobile phone and use that through a specially designed hood, like Google Cardboard. You don’t need HDMI for this, as your standard USB connector will work.
The Zeiss VR One is at the top end of the spectrum and comes with a tray specifically designed for your exact phone, as well as CADs so you can 3D print your own custom trays. Install the best app (new ones are coming out all the time), and then put the phone into the goggles and start flying. You can see in 3D in a VR world. The Zeiss also allows AR (augmented reality). The camera on your phone captures images and the app overlays a display, so you can mix reality with VR.
Another option is the Visual Vertigo 3D FPV app, which not only allows you to see a 3D stereoscopic view though the single camera on your drone, but also lets you control the direction of your camera by turning your head. This app can be loaded into your iOS or Android phone and inserted into your VR headset. Visual Vertigo also makes a low-cost VR headset that has a door on the front where you insert your mobile device. All the different goggles and technologies that are coming out around drones are really quite exciting!

2.19 Zeiss VR One goggles
2.20 Visual Vertigo goggles
BATTERIES
WHY MENTION BATTERIES? You charge them; insert them; fly; rinse; and repeat, right? There are actually a few things you should know about batteries for safety and also to make them last longer.
The most common batteries used in UAVs are LiPo batteries. LiPo stands for lithium polymer or lithium ion polymer. The lithium ion isn’t that different from what’s used in the latest laptop computers. The difference is that they are wrapped in a soft polymer pouch. They are multi-cell batteries. LiPos are popular because they have extremely high power, are lightweight, and can be made in almost any shape or size.
It’s recommended to charge these batteries in a well-ventilated, fireproof area, and to not leave them unsupervised while charging. The smart chargers are a lot safer and easier because they shut off once the batteries are charged. Otherwise, the batteries could explode if overcharged, and release gasses and sparks that can catch fire. Just do an online search for exploding LiPo batteries and you will find plenty of results.
If handled properly, these batteries are quite safe and will last a long time. Just don’t puncture them, and it’s not a good idea to leave them lying out in the sun. If the batteries are looking puffy or swollen, carefully dispose of them. Don’t be tempted to grab a sharp object and relieve the swelling, as this will almost certainly lead to them catching on fire.

2.21 LiPo batteries
When you have used a battery, it will feel very warm, even hot, to the touch. Wait until the battery has fully cooled down before charging it; this will make it last much longer. Repeatedly charging a hot battery can ruin it in just a few hours.
When storing a battery for an extended time, don’t leave it fully charged or depleted. About half-charged is good. Find a cool place to store it. DJI is now using smart batteries that self discharge if not used for about 10 days. They will slowly release their charge to about half. The days until discharge can be set in the Go app. Make sure that each battery is programmed individually by inserting it into your aircraft and then choosing the setting in the app. Finally, power down and the battery will be programmed.
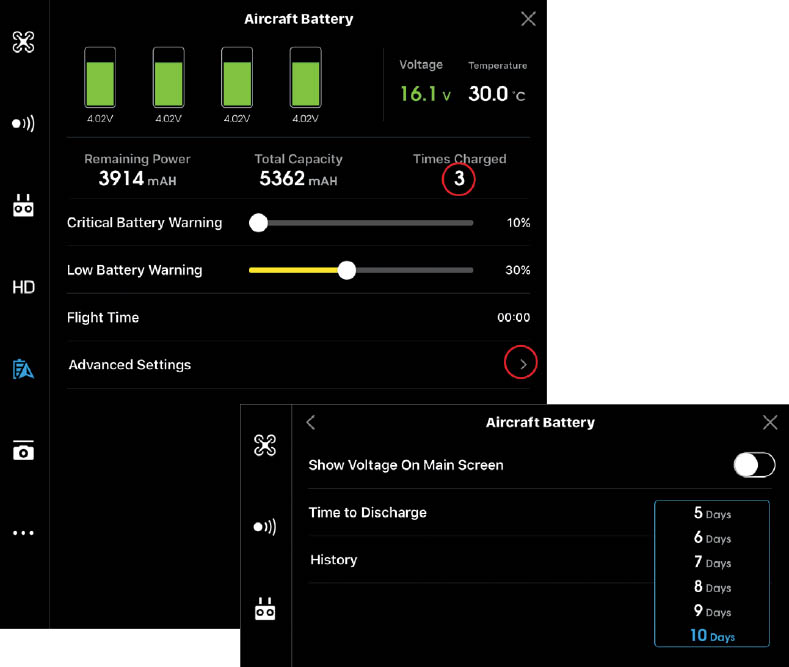
2.22 Go app settings: days till discharge
When traveling with batteries on an aircraft, make sure you carry them on and don’t check them into the cargo hold. They shouldn’t be fully charged, and the terminals should be covered. If the batteries are under 100Wh (all the Phantom and Inspire TB47s are), there is no legal limit to how many you can bring with you. If you have TB48 batteries, the limit is two on some airlines, but you can get permission to carry more. If you are looking for permission, don’t ask the people at the airport or the flight crew, because they won’t know. I was thrown off a Southwest Airlines flight from Las Vegas because I mentioned the batteries to a flight attendant who didn’t understand the rules. She talked to the pilot, who also didn’t know battery rules, and I was declared a “No Fly” and marched off the aircraft. After missing my flight and waiting for over an hour while the operations supervisor talked on the phone to their head office, I finally received an apology.
If you are going to be carrying batteries over 100Wh and need permission, call the airline office before the day you fly and talk to someone who is trained to handle these situations. This will save you a lot of headaches. I also recommend printing out the rules from the FAA (or the authorities in the country where you are traveling). You will not need these if you are able to put your bag in the overhead storage or carry them in a personal bag. However, if you can’t carry your bag on, don’t under any circumstances allow your batteries to be checked in the cargo hold. Remove the batteries from the case, but keep the printout handy. Don’t bring attention to it and you will be fine.
There are a number of reasons to keep your batteries out of the cargo hold. The first reason is that it’s illegal. (It’s perfectly legal to carry them on your person, though.) A partially charged LiPo battery isn’t going to just explode on its own without a reason—which is why batteries are declared safe in a cabin. See all those laptops? They have similar batteries.
There’s nothing in the cargo hold that will cause your batteries to catch fire or explode. However, if they do catch fire for some reason, they will be quickly noticed and easily extinguished in the main cabin. However, if they are in the cargo hold, no one will notice them smoldering until they ignite. And from what I have read, the chemicals used to extinguish a cargo hold fire are ineffective against a lithium ion fire. This is also why you aren’t allowed to check spare batteries for laptop computers, but you are allowed to carry them.
One last thing about traveling with batteries: When going through airport security, remove all the batteries from your bag and place them in a separate bin for inspection. It’s quite common for the inspectors to dust them down to check for explosive materials, because the x-ray machines can’t see inside the batteries. If you leave them in the bag, they will ask you to remove them and your bags will have to pass through the x-ray a second time, causing a delay for everyone.
All in all, I have traveled with batteries and drones many times and, with the exception of that one Southwest flight, never had a problem. Just remember to put batteries in a separate bin when going through security, keep them in a carry-on bag on the aircraft, and all should go well. Now, these laws could change, so check the rules of the airline before departure so you know what to expect.
SD CARDS AND READERS
When you are shooting, you are saving your photos and videos to a memory card. The most common type of memory card used in drones is the microSD card. These tiny little cards are popular because they are small and lightweight and allow the camera to be smaller.
It’s important to get high-quality cards—not just for reliability, but also for speed. You’ll want to use a Class 10 card at the very least. If you want to shoot 4K video, you need a card that is fast enough to write all the data. The other thing to consider is shooting photos. When you shoot a photograph, you want to be able to change settings on your camera and shoot again. On many cameras (all the DJI ones), you cannot change settings, shoot a video, or shoot another photo until the camera has finished processing. You will see a spinning blue circle over the shutter button on the Go app. The faster the card, the faster the writing process, and the sooner the camera is free again. This is especially noticeable when shooting multiple images in AEB or burst mode.
I currently use Lexar 1800x memory cards, which are UHS-II (ultra high speed 2) and can write at 100/MBs and read at 270 MBs. You really do notice a difference with these faster cards for shooting, as well as for transferring your images to a computer or hard drive after shooting.
To transfer data off the cards, you’ll need a good card reader. Many of the Lexar cards come with either a USB adapter or an SD card enclosure so you can transfer files. I use a Lexar Workflow UR2 that is a USB3 reader. This device holds three microSD cards at once. If you are using UHS-II cards, make sure your reader is also UHS-II or you won’t get the full speed out of them.
Just a little tip—when you have finished transferring your media after a shoot, don’t just erase the old files off the card. Verify that all the data has successfully transferred. Put them into your camera and format them before use; this will help with reliable writing to the card the next time you use it. Make sure you have a system (such as transferring images immediately after a shoot) so that you don’t accidentally erase the only copy of your photos or videos. That really hurts.

2.23 Lexar microSD cards
The first thing I did when I got my first drone was find a travel case for it. It’s important to have some way to transport it, and the cardboard box it came in won’t cut it for long. There are a few things to look for in a good case. First and foremost, you want it to protect your aircraft, so you want something that fits your aircraft snugly so it can’t move around. You also want a soft support so that your aircraft doesn’t get scratched. Separate compartments are good too, so you can hold all your accessories. You will be carrying your controller, spare batteries, propellers, FPV device, microSD cards, maybe some tools, and possibly a battery charger. I carry a charger or two when traveling out of town, but when I’m local I don’t drag a charger around with me. I usually have four or five batteries, depending on the aircraft, and that’s usually sufficient for most things.
The GPC hard cases (goprofessionalcases.com) are the best I have used and are the most popular today. They are watertight molded plastic. The box is very strong and sturdy, and it has a rubber seal around the opening so it won’t let moisture or dust and sand in. They have nicely designed interiors of custom waterjet-cut foam that fits your gear perfectly. Each component has its own custom-cut space that holds it safe and secure.
GPC also makes backpacks that are filled with the same custom-cut foam. They hold everything from a Phantom to an Inspire. Thinktank Photo also makes a nice backpack called the Helipack for the Phantom.
Usually when I’m hiking, I prefer the backpack. When I’m local or traveling by car or air, I’ll take the hard-shell case. The GPC hard cases also come with optional wheels, of which I’m a big fan, especially for the Inspire, which is heavy.

2.24 GPC cases