38 Special:
Photographic Special Effects
Photographer: Scott Kelby
Exposure: 1/125
Focal Length: 52mm
Aperture Value: ƒ/5.6

This is where the fun begins. Okay, I don't want to discount all the immeasurable fun you've had up to this point, but now it gets really fun. This is where we get to play around in Elements and change reality, and then send the client an invoice for our "playtime." Did the model wear a blouse that was the wrong color? No sweat, change it in Elements. Was it an overcast day when you shot the exterior of your client's house? Just drop in a new sky. Do you want to alter a photo to make it look like you shot it with a soft focus filter on your lens? Now you can do it digitally. Do you want to take your income to the next level? Just shoot a crisp shot of a $20 bill, retouch it a bit, print out a few hundred sheets on your color laser printer and head for Vegas. (Okay, forget that last one, but you get the idea.) This is where the rubber meets the road, where the nose gets put to the grindstone, where the meat meets the potatoes... (Where the meat meets the potatoes? Hey, it's late.)
Creating Drama with a Soft Spotlight
This is a great technique that lets you focus attention by using dramatic soft lighting. The technique I'm showing you here I learned from famous nature photographer Vincent Versace. I had been getting a similar look by filling a layer with black, making an oval selection, feathering the edges significantly, and then knocking a hole out of the layer (as you'll see in the next technique), but Vincent's technique, using the Lighting Effects filter, is so much easier that it's just about all I use now.
Step One
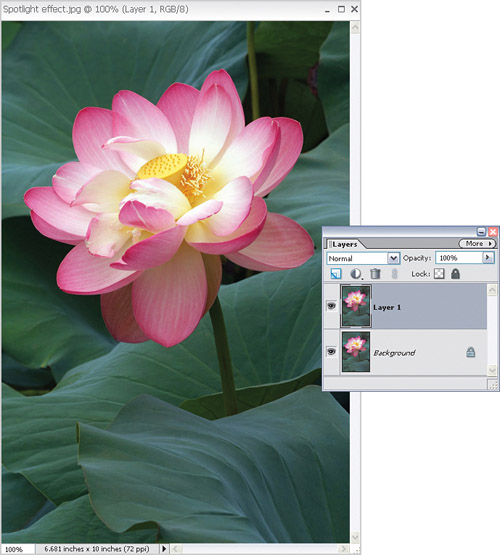
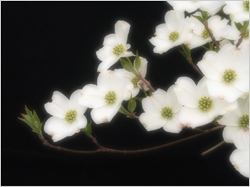
Open the RGB photo to which you want to apply the soft spotlight effect. In this example, I want to focus attention on the flower in the center by darkening the area around it. Next, press Control-J to duplicate the Background layer.
©ISTOCKPHOTO/MARK GRENIER
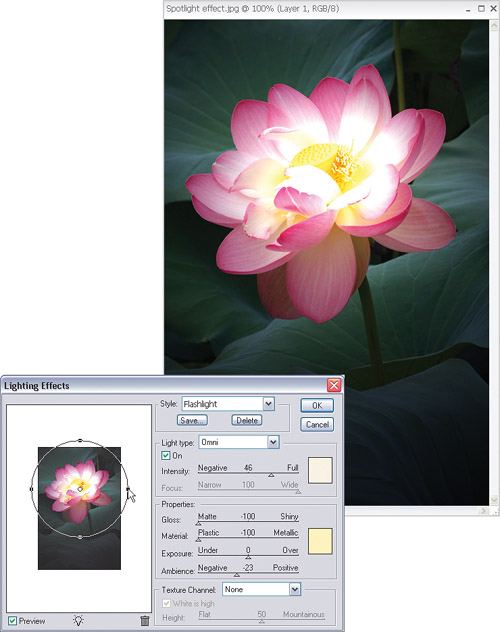
Step Two
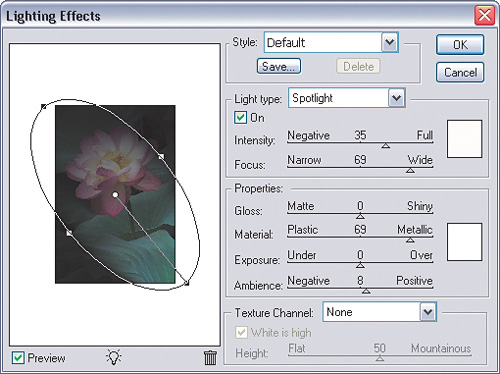
Go under the Filter menu, under Render, and choose Lighting Effects. I have to tell you, if you haven't used this filter before, it's probably because its interface (with all its sliders) looks so complex, but luckily there are built-in presets (Adobe calls them "Styles") that you can choose from, so you can pretty much ignore all those sliders. Once you ignore the sliders, the filter is much less intimidating, and you can really have some fun here. The small preview window on the left side of the dialog shows you the default setting, which is a large oval light coming from the bottom right-hand corner.
Step Three
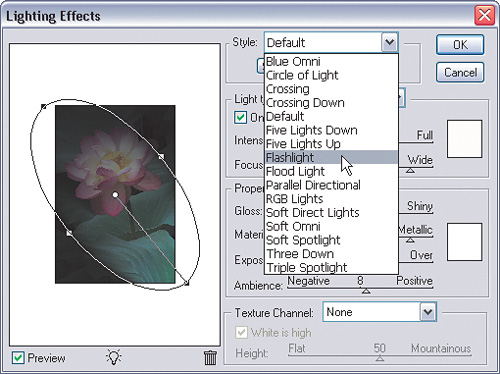
For this effect, we're going to use a very soft, narrow beam, so go under the Style pop-up menu at the top of the dialog (this is where the presets are) and choose Flashlight.
Step Four
Once you choose Flashlight, look at the preview window and you'll see a small spotlight in the center of your image. Click on the center point (inside the circle) and drag the light into the position where you want it. If you want the circle of light a little bit larger, just click on one of the side points and drag outward. When you click OK, the filter applies the effect, darkening the surrounding area and creating the soft spotlight effect you see here.
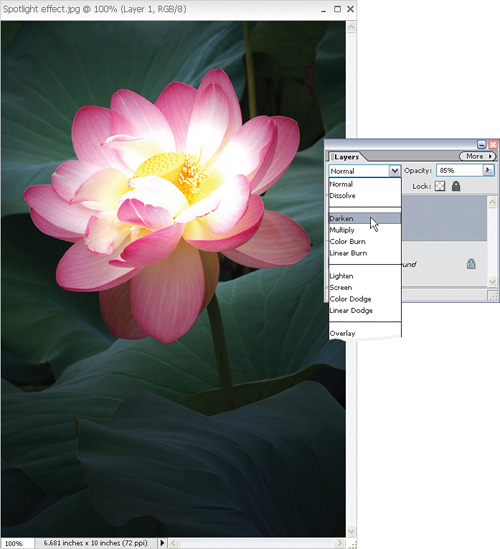
Step Five
If the Lighting Effect filter seems too intense, you can remedy it immediately after the fact by dragging the Opacity slider in the Layers palette to the left to reduce the effect of the filter. The farther you drag, the less the intensity of the effect. Then, while in the Layers palette, change the blend mode of this layer to Darken, so the flashlight effect doesn't make the colors seem too saturated.
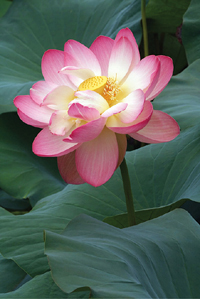
Before
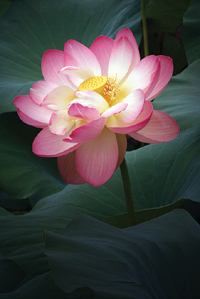
After
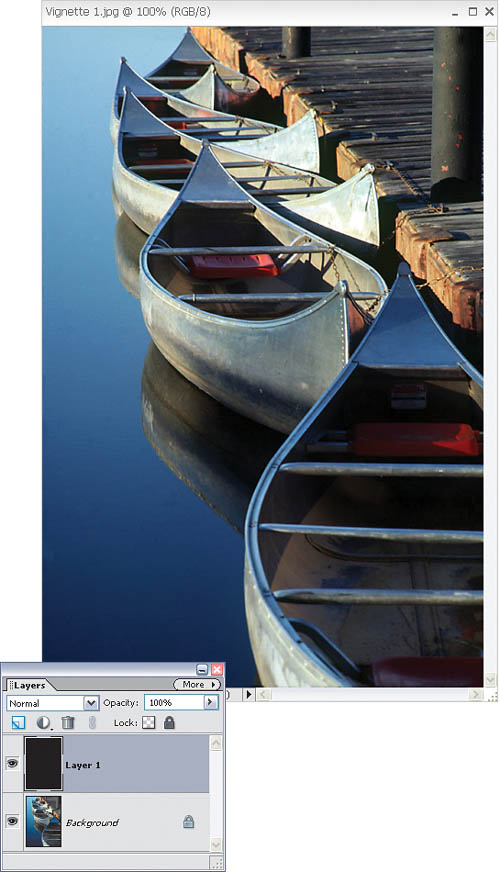
Burned-In Edge Effect (Vignetting)
If you want to focus attention on something within your image, applying a wide vignette that acts like a soft light is a great way to do this (which is really an alternative to the previous tutorial). What you're really doing is creating a dark border that will burn in the edges of your image. Here's how to do just that:
Step One
Open the photo to which you want to apply a burned-in edge effect. Just so you know, what we're doing here is focusing attention through the use of light—we're burning in all the edges of the photo (not just the corners, like lens vignetting, which I usually try to avoid), leaving the visual focus in the center of the image.
Step Two
Go to the Layers palette and add a new layer by clicking on the Create a New Layer icon at the top of the palette. Press the letter D to set your Foreground color to black, and then fill your new layer with black by pressing Alt-Backspace.
©ISTOCKPHOTO/DEAN BERGMANN
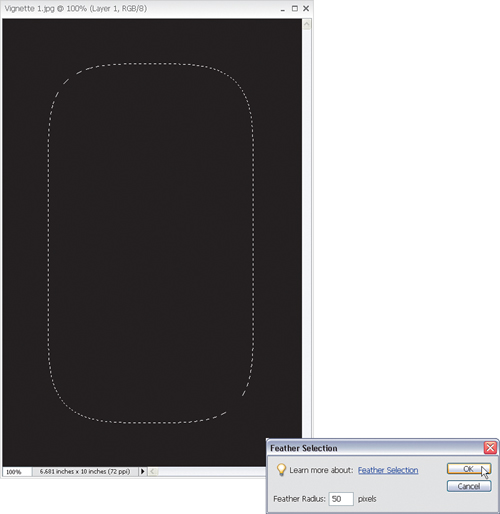
Step Three
Press M to get the Rectangular Marquee tool and drag a selection about 1" inside the edges of your photo. Then, to greatly soften the edges of your selection, go under the Select menu and choose Feather. When the dialog appears, enter 50 pixels for a low-res photo (or 170 pixels for a high-res, 300-ppi photo), and click OK.
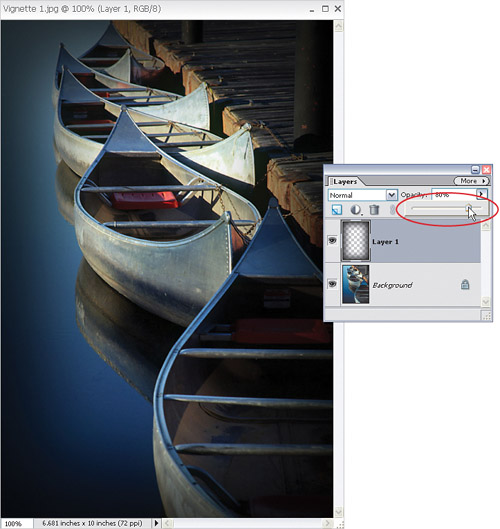
Step Four
Now that your edges have been softened, all you have to do is press Backspace, and you'll knock a soft hole out of your black layer, revealing the photo on the Background layer beneath it. Now press Control-D to deselect. Note: If the edges seem too dark, you can go to the Layers palette and lower the Opacity of your black layer (in the example shown here, I lowered the Opacity to around 80%).
Before
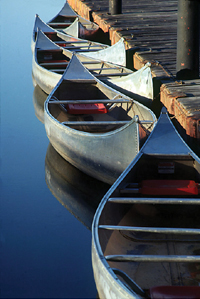
After

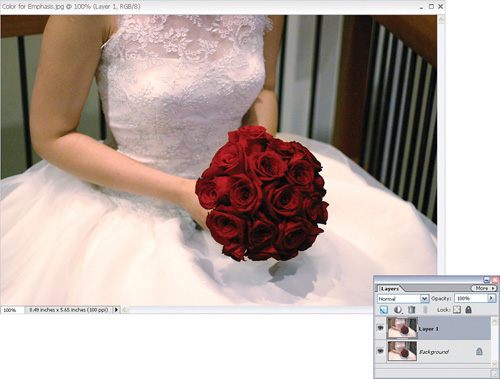
Using Color for Emphasis
This is a popular technique for focusing attention by the use of color (or really, it's more like the use of less color—if everything's in black and white, anything that's in color will immediately draw the viewer's eye). As popular as this technique is, it's absolutely a breeze to create. Here's how:
Step One
Open a photo containing an object you want to emphasize through the use of color. Go under the Layer menu, under New, and choose Layer via Copy (or just press Control-J). This will duplicate the Background layer onto its own layer (Layer 1).
©ISTOCKPHOTO/ANDREW CHAN
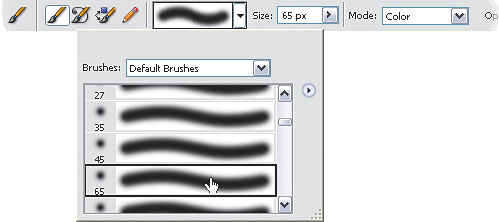
Step Two
Press B to get the Brush tool from the Toolbox and choose a medium, soft-edged brush from the Brush Picker in the Options Bar (just click on the arrow next to the Brush thumbnail to open the Picker). Also in the Options Bar, change the Mode pop-up menu to Color for the Brush tool.
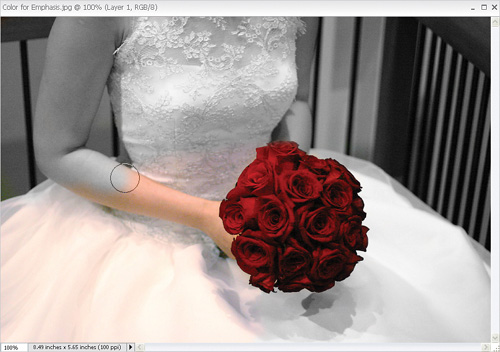
Step Three
Set your Foreground color to black by pressing the letter D and begin painting on the photo. As you paint, the color in the photo will be removed. The goal is to paint away the color from all the areas except the areas you want emphasized with color.
Tip
If you make a mistake while painting away the color or later decide that there was something else that you really wanted to keep in color, just switch to the Eraser tool by pressing the E key, paint over the "mistake" area, and the original color will return as you paint. (What you're really doing here is erasing part of the top layer, which is now mostly black and white, and as you erase, it reveals the original layer, which is still in full color.)
Before
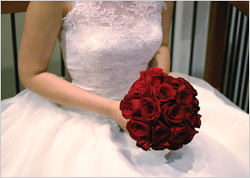
After
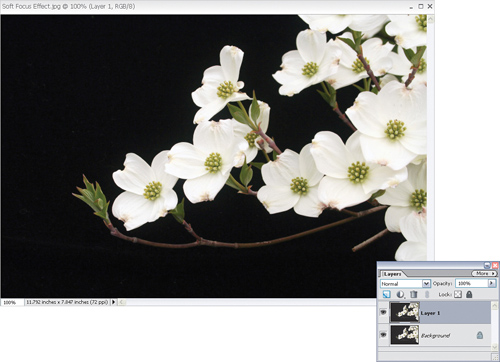
Soft Focus Effect
This is a quick way to emulate the effect of a soft focus filter on your lens. Besides being quick and easy, what I like about this effect is the soft glow it gives your images. Try this technique on a sharp photo of some trees and you'll love what it does for the image.
Step One
Open the photo to which you want to apply a soft focus effect. Duplicate the Background layer by pressing Control-J. By default, this duplicate layer is named Layer 1.
©ISTOCKPHOTO/PAMELA BURLEY
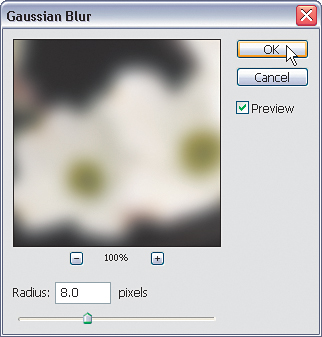
Step Two
Go under the Filter menu, under Blur, and choose Gaussian Blur. For low-res images, enter about 6–10 pixels (for high-res images, try 20 pixels instead) and click OK.
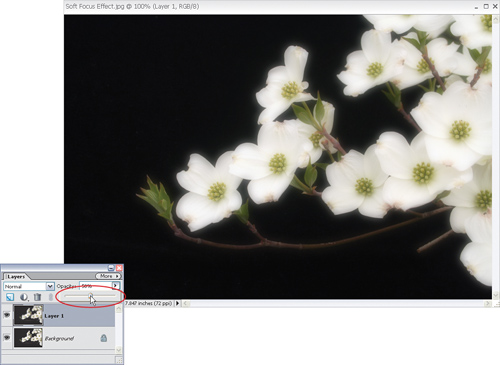
Step Three
That amount of Gaussian Blur will blur the entire image so much that it'll be hard to see any detail. So, to bring back the detail, go to the Layers palette and lower the Opacity setting of this blurred layer to 50%. Lowering the Opacity setting allows the detail to come back, but along with it comes a soft glow that gives the image a dreamy, almost painted look, which completes the effect.
Before

After
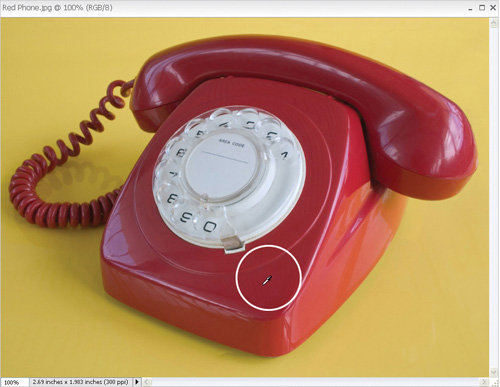
Changing an Object's Color
Have you ever wanted to change the color of an object (such as a shirt, a car, etc.) in a photo? You have? Then here's perhaps the fastest, easiest way to change the color of, well...whatever.
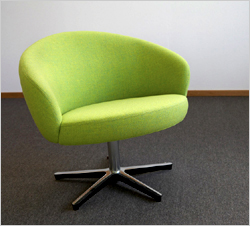
Step One
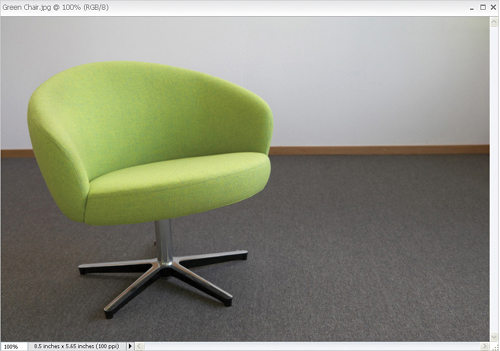
Open a photo containing an element that needs to be a different color.
©ISTOCKPHOTO
Step Two
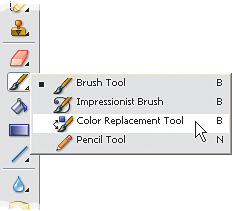
Choose the Color Replacement tool, which is found in the Brush tool's flyout menu in the Toolbox (or press the B key until you have it).
Tip
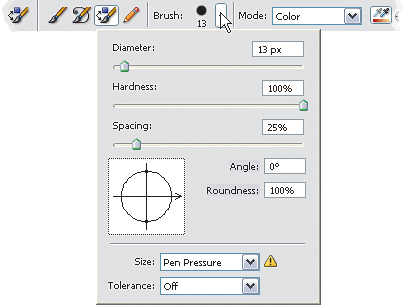
You can adjust the Color Replacement tool's settings by going to the Options Bar, clicking the down-facing arrow next to the word "Brush," and choosing your settings in the Picker that appears.
Step Three
Open another image that has the color you want to use. Alt-click the Color Replacement tool on the color you want to sample within that image. (In this example, I'm sampling the color from an old telephone.) Your cursor will temporarily switch to the Eyedropper tool.
©ISTOCKPHOTO/MARK EVANS
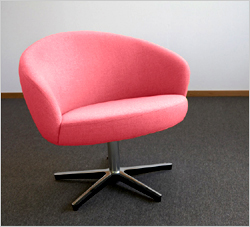
Step Four
Now return to the photo you want to colorize and start painting with the Color Replacement tool using the sampled color, completing the effect. Hint: If you make a mistake, just press Control-Z to undo and try again.
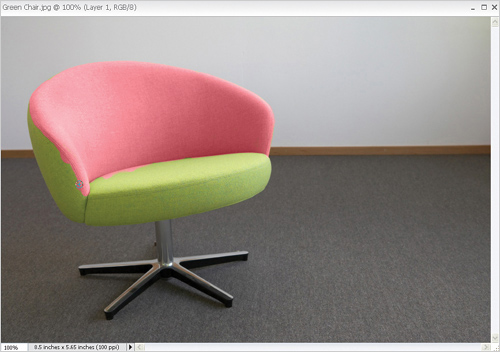
Before
After
Replacing the Sky
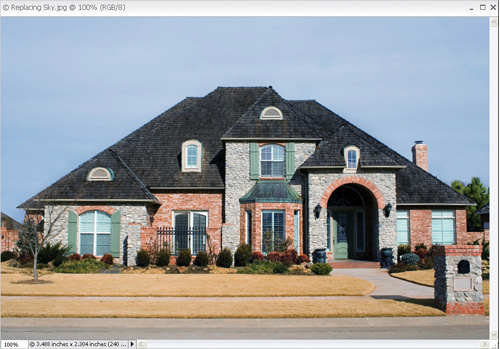
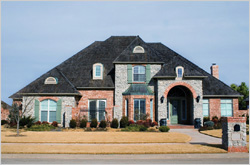
When shooting outdoors, there's one thing you just can't count on—the sun. Yet, you surely don't want to take a photo of your house on a dreary day, or shoot a photo of your car on a gray overcast day. That's why it's so important to have the ability to replace a gloomy gray sky with a bright sunny sky. Is it cheating? Yes. Is it easy? You betcha. Do people do it every day? Of course.
Step One
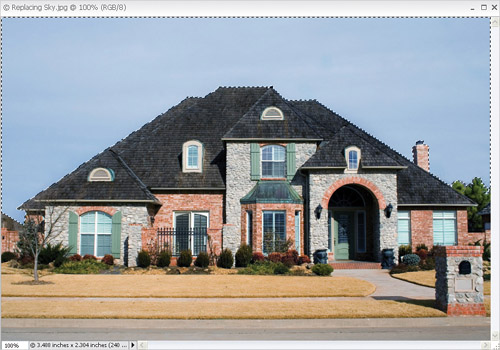
Open the photo that needs a new, brighter, bluer sky.
©ISTOCKPHOTO
Step Two
You have to make a selection around the sky. Usually, you can click in the sky area with the Magic Wand tool (W) to select most of it, and then choose Similar from the Select menu to select the rest of the sky—but as usual, it likely selected other parts of the image besides just the sky. So use the Lasso tool (L) while holding the Alt key to deselect any excess selected areas on your image. If needed, hold the Shift key while using the Lasso tool to add any unselected areas of the sky. You can use any combination of selection tools you'd like—the key is to select the entire sky area.
Step Three
Shoot some nice blue skies and keep them handy for projects like this, or steal a sky from another photo. Simply open one of those "blue sky" shots, and then go under the Select menu and choose All to select the entire photo, or use the Magic Wand or Lasso tools as you did in the previous step to select just the sky you want. Then, press Control-C to copy this sky photo into memory.
©ISTOCKPHOTO/TRACY TUCKER

Step Four
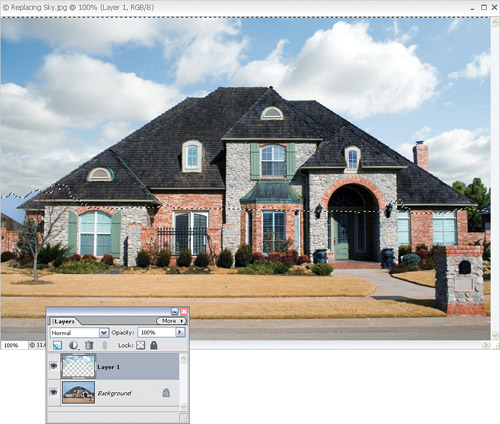
Switch back to your original photo (the selection should still be in place). Create a new layer by clicking on the Create a New Layer icon at the top of the Layers palette, then go under the Edit menu and choose Paste Into Selection. The new sky will be pasted into the selected area in your new layer, appearing over the old sky. Press Control-D to deselect.
Step Five
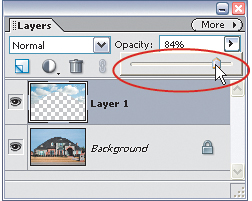
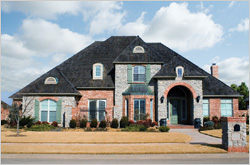
If the sky seems too bright for the photo, simply lower the Opacity of the layer in the Layers palette to help it blend in better with the rest of the photo. That's it—newer, bluer sky.
Before
After
Neutral Density Gradient Filter
One of the most popular lens filters for outdoor photographers is the neutral density filter, because often (especially when shooting scenery, like sunsets) you wind up with a bright sky and a dark foreground. A neutral density gradient lens filter reduces the exposure in the sky by a stop or two, while leaving the ground unchanged (the top of the filter is gray, and it graduates down to transparent at the bottom). Well, if you forgot to use your ND gradient filter when you took the shot, you can create your own ND effect in Photoshop Elements.
Step One
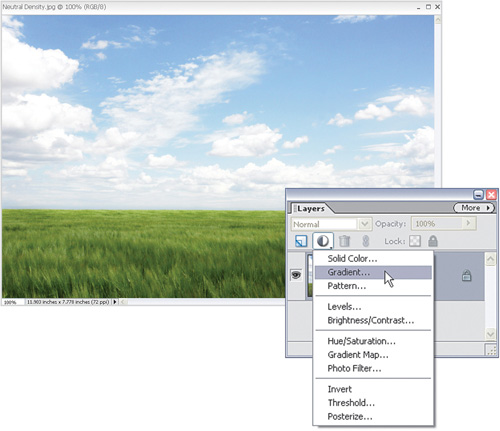
Open the photo (preferably a landscape) where you exposed for the ground, which left the sky too light. Press the letter D to set your Foreground color to black. Then, go to the Layers palette and choose Gradient from the Create Adjustment Layer pop-up menu (it's the half-white/half-black circle icon) at the top of the palette.
©ISTOCKPHOTO/JASON LUGO
Step Two
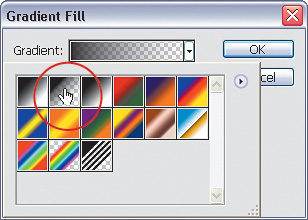
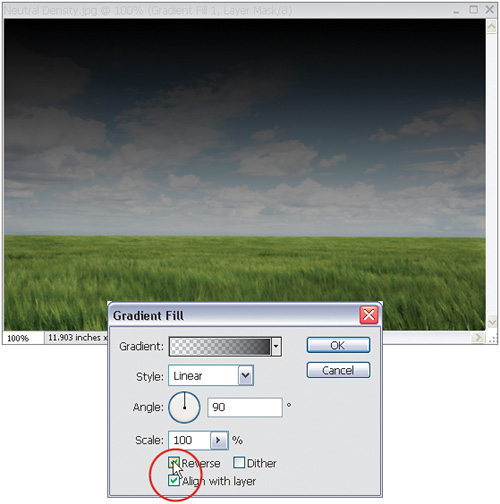
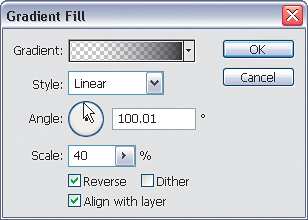
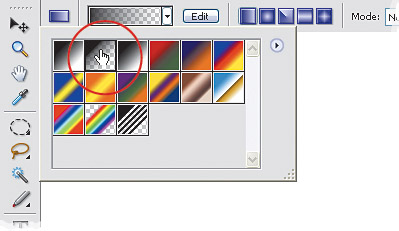
When the Gradient Fill dialog appears, click on the little, black downward-facing arrow (it's immediately to the right of the Gradient thumbnail) to bring up the Gradient Picker. Double-click on the second gradient in the list, which is the gradient that goes from Foreground to Transparent. Don't click OK yet.
Step Three
By default, this puts a dark area on the ground (rather than the sky), so click on the Reverse checkbox to reverse the gradient, putting the dark area of your gradient over the sky and the transparent part over the land. Your image will look pretty awful at this point, but you'll fix that in the next step, so just click OK.
Step Four
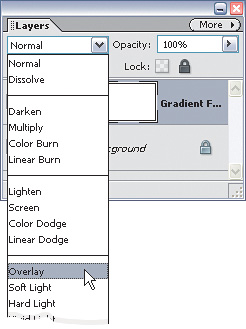
To make this gradient blend in with your photo, go to the Layers palette and change the blend mode of this adjustment layer from Normal to Overlay. This darkens the sky, but it gradually lightens until it reaches land, and then it slowly disappears. So, how does it know where the ground is? It doesn't. It puts a gradient across your entire photo, so in the next step, you'll basically show it where the ground is.
Step Five
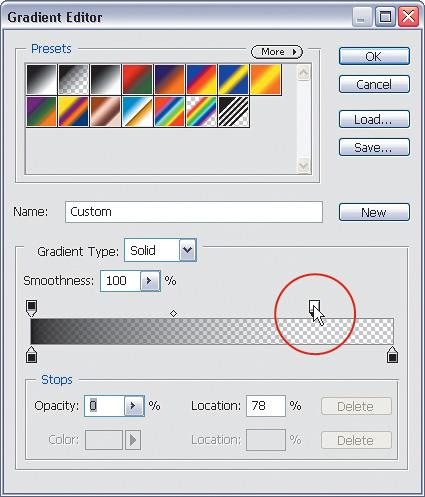
In the Layers palette, double-click on the thumbnail for the Gradient Fill adjustment layer to bring up the Gradient Fill dialog again. To control how far down the darkening will extend from the top of your photo, just click once on the Gradient thumbnail at the top of the dialog. This brings up the Gradient Editor. Grab the top-right white color stop above the gradient ramp near the center of the dialog and drag the color stop to the left; the darkening will "roll up" from the bottom of your photo, so keep dragging to the left until only the sky is affected, and then click OK in the Gradient Editor.
Step Six
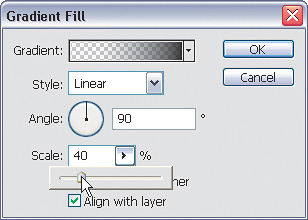
By default, the gradient you choose fills the entire image area, smoothly transitioning from a dark gray at the top center to transparent at the very bottom. It's a smooth, "soft-step" gradient. However, if you want a quicker change from black to transparent (a hard step between the two), you can lower the Scale amount in the Gradient Fill dialog.
Step Seven
Also, if the photo you're working on doesn't have a perfectly straight horizon line, you also might have to use the Angle control by clicking on the line in the center of the Angle circle and dragging slowly in the direction that your horizon is tilted. This literally rotates your gradient, which enables you to have your gradient easily match the angle of your horizon. When it looks good to you, click OK to complete the effect.
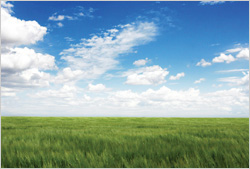
Before: Exposing for the ground makes the sky too light.

After: The ground is the same, but the sky is now bluer and more intense.
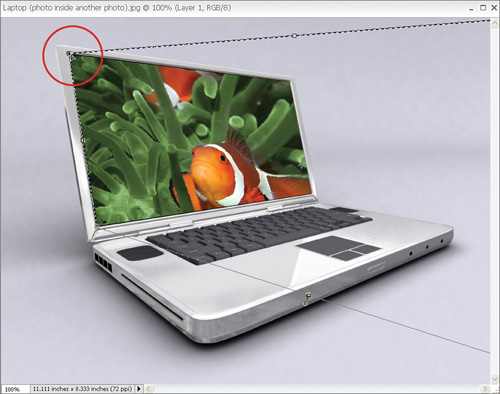
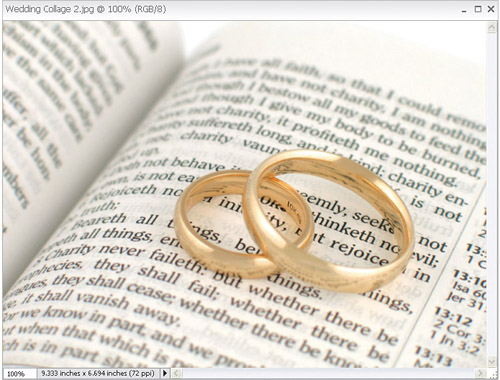
Putting One Photo Inside Another
Putting a photo inside another is a fairly popular collaging technique. But in the technique you're going to do here, you'll realistically put one image inside another, matching the angles of the photo. Here's how it's done:
Step One
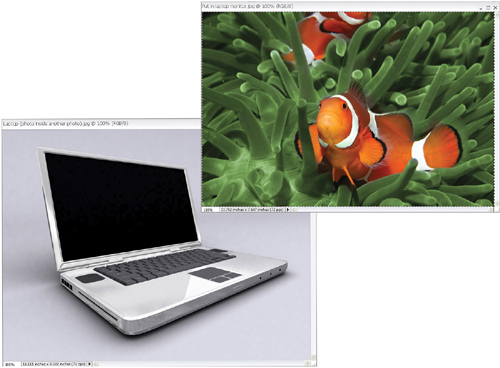
Open the photo that you want to put inside another photo. Press Control-A to put a selection around your entire photo, then press Control-C to copy that photo into memory. Next, open the image that you want the copied photo to appear within.
©ISTOCKPHOTO/DAN SCHMITT©ISTOCKPHOTO/AYAAz RATTANSI
Step Two
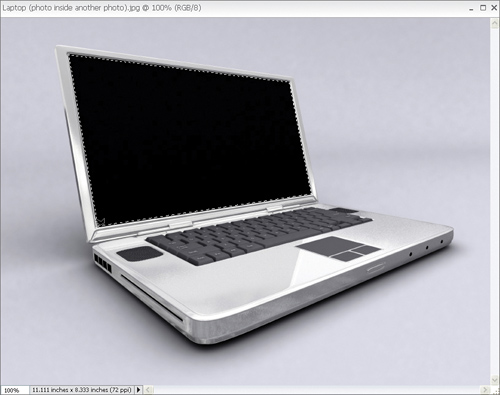
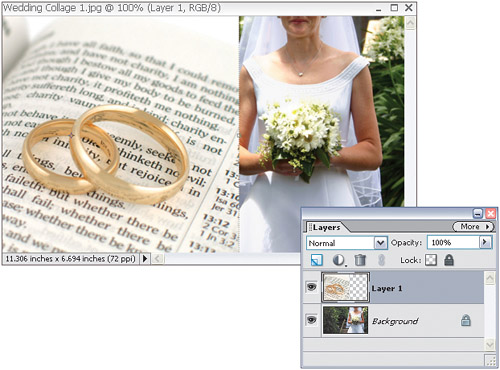
Press the L key until you get the Polygonal Lasso tool from the Toolbox (this tool draws perfectly straight selections; if your object doesn't have straight sides, use another selection tool to create a selection within your image's object). Click the Polygonal Lasso tool once on the bottom-left corner of your object, and then move your cursor up to the top-left corner and click again (a straight line is drawn between your two clicks). Keep clicking at each corner until you have all sides of the object selected (as shown here).
Step Three
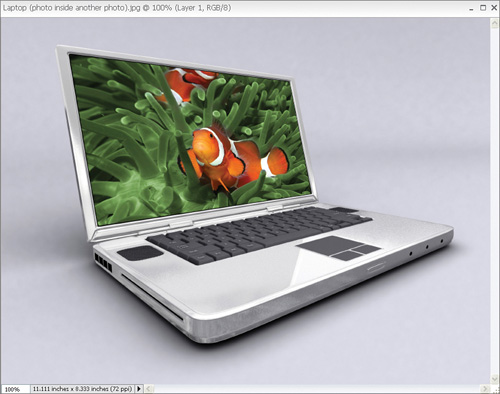
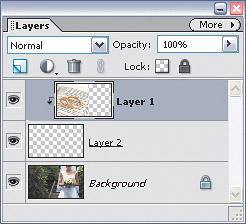
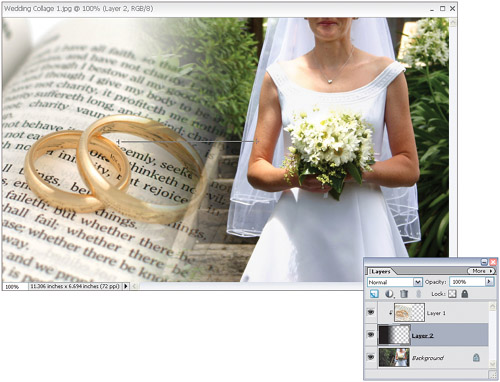
Now go under the Edit menu and choose Paste Into Selection, and the photo you had in memory will be pasted into your selection. But there's a problem—the object is likely angled and your photo probably isn't, so it looks fake. Here's how to fix it: Press Control-T to bring up the Free Transform command. Hold the Control key, grab the bottom-left corner point, and move it to where it touches the bottom-left corner of your object. You'll do the same with the other corners—dragging each one to the corresponding corner of your object.
Step Four
When all four corners are lined up, and your photo has been transformed to fit perfectly within the object, press Enter to lock in your changes, and then press Control-D to deselect, which completes the effect.
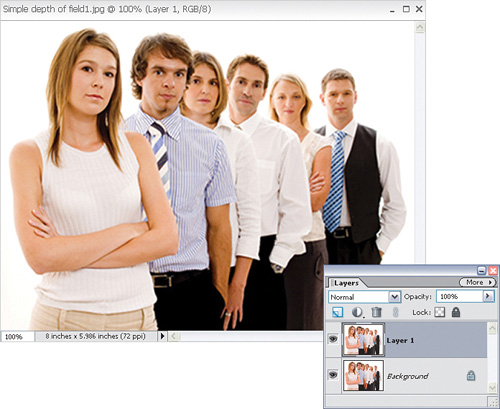
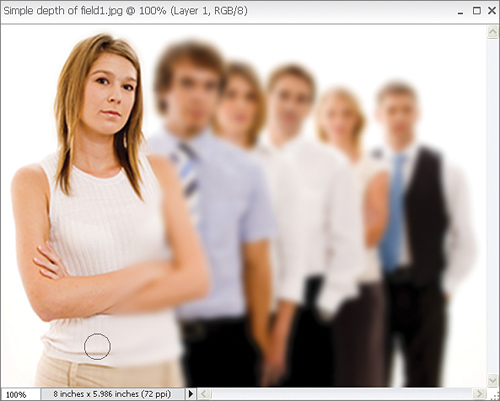
Simple Depth-of-Field Effect
If you want to create a quick depth-of-field effect (where the part of the subject closest to the camera is in sharp focus and the background is out of focus), I don't know of a faster, easier way than this.
Step One
Open the photo that you want to apply the depth-of-field effect to. Press Control-J to duplicate the Background layer to create a new layer that will be named "Layer 1."
©ISTOCKPHOTO/PHIL DATE
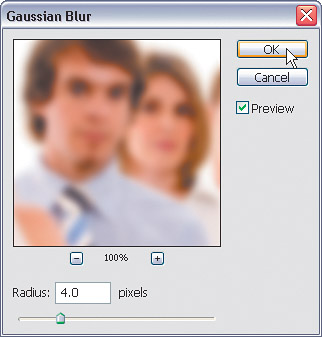
Step Two
Go under the Filter menu, under Blur, and choose Gaussian Blur. When the dialog appears, change the Radius to about 4 pixels (or more if you're using a high-res photo) and click OK to put a blur over the entire image.
Step Three
Press the E key to switch to the Eraser tool and choose a large, soft-edged brush from the Brush Picker (which is found by clicking the Brush thumbnail in the Options Bar). Start erasing over the parts of the image that appear in the foreground. Erasing on this blurred layer reveals the original, unblurred image on the Background layer. By leaving these areas sharp and the background areas blurry, it creates a simple depth-of-field effect as if you had shot it that way with your camera.
Before

After

Creating Photo Montages
Here's a great way to blend any two (or more) photos together to create a photo montage (often referred to as a collage).
Step One
Open the photo that you want to use as your base photo—this will serve as the background of your collage. (Note: Make sure you're not in Maximize Mode by deselecting it under the Window menu, under Images.) Now open the first photo that you want to collage with your background photo.
©ISTOCKPHOTO/PAIGE FALK

©ISTOCKPHOTO/JILL FROMER
Step Two
Press V to switch to the Move tool, and then click-and-drag the photo from this document right onto your background photo, positioning it where you want it. It will appear on its own layer (Layer 1) in the Layers palette of your background image.
Step Three
Hold the Control key and at the top of the Layers palette, click on the Create a New Layer icon. This creates a layer directly beneath your current layer (Layer 1). Now, click back on the top layer, then press Control-G to group your photo with the blank layer beneath it. Press the letter D to set your Foreground color to black.
Step Four
Switch to the Gradient tool by pressing G, and then press Enter to bring up the Gradient Picker (it appears below the Gradient thumbnail in the Options Bar). Choose the second gradient in the Picker (this is the Foreground to Transparent gradient).
Step Five
Click on the middle (blank) layer in the Layers palette to make it active. Although you can't see your top photo, try to click the Gradient tool near the center of this photo and drag toward the center of the document. The point where you first clicked on the top layer will be at 100% opacity, and the point where you stop dragging will be totally transparent. Everything else will blend in between. If you want to start over—easy enough—just press Control-Z to undo and click-and-drag again. (Be careful: If you drag beyond the image's border, your Foreground color will appear in the gradient.)
Step Six
If you want to blend in another photo, click-and-drag that image onto your montage, click on the top layer in the Layers palette, then start again from Step Three. Add as many images as you'd like.
©ISTOCKPHOTO/BRADLEY L. MARLOW

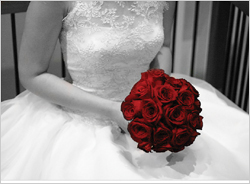
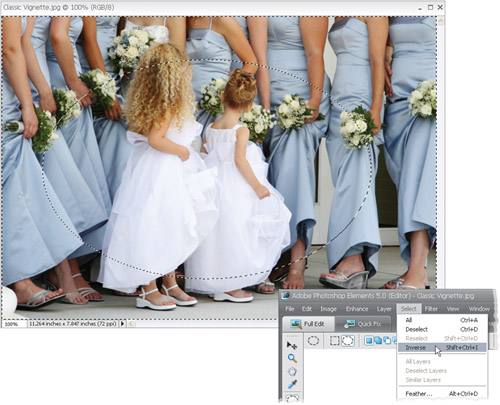
Creating the Classic Vignette Effect
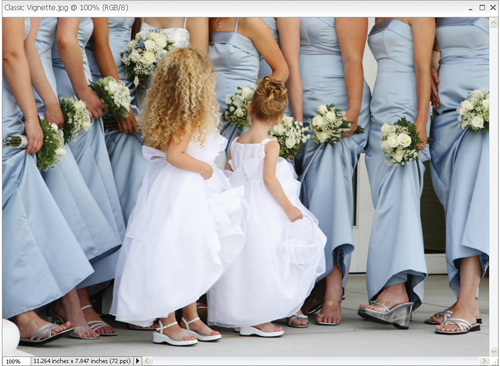
Here's how to create the classic soft-edged vignette that was originally made popular decades ago by portrait photographers, and still remains popular for wedding photos and portraits of children. A rectangular version is often used for photos used in print ads of high-priced items such as fine homes, jewelry, perfume, etc.
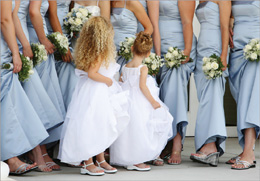
Step One
Open the photo to which you want to apply the classic vignette effect.
©ISTOCKPHOTO/KEVIN RUSS
Step Two
Press M until you get the Elliptical Marquee tool from the Toolbox and draw an oval-shaped selection around the part of the photo you want to remain visible.

Step Three
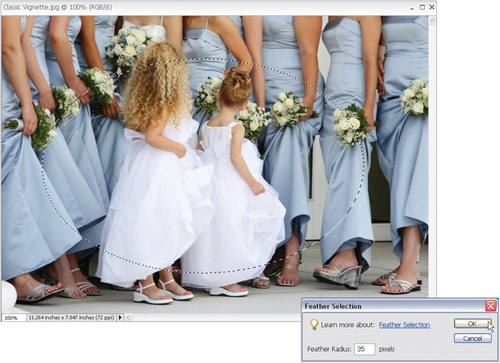
To soften the edge of your selection, go under the Select menu and choose Feather. When the Feather Selection dialog appears, enter 35 or more pixels (the higher the number, the softer the edge) and click OK.
Step Four
Here's the thing—you have your subject in a circular selection, and that's the part you want to keep intact. However, you want everything else deleted, so go under the Select menu and choose Inverse. Doing this selects everything except the area you want to keep intact.
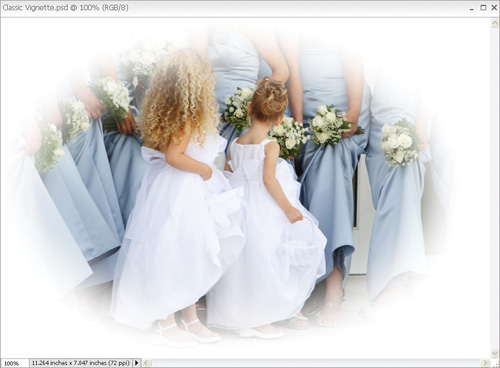
Step Five
Now, press Backspace to remove the back-ground areas, and then press Control-D to deselect. Because you feathered the oval in Step Three, the edges are soft, completing the vignette effect.
Tip
If you'd like to use this soft-edged vignette for collaging with other photos, you'll need the white areas outside the edge to be transparent and not solid white. To do that, just before Step Two, double-click on the Background layer in the Layers palette. A dialog will appear; just click OK to change your Background layer to Layer 0, and then go on to Step Two.
Before
After

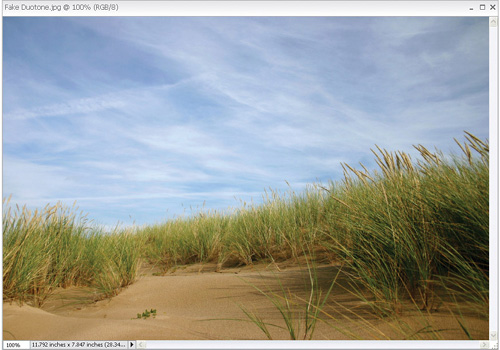
Fake Duotone
The duotone tinting look is all the rage right now, but creating a real two-color duotone, complete with curves, that will separate in just two colors on press is a bit of a chore. However, if you're outputting to an inkjet printer, or to a printing press as a full-color job, then you don't need all that complicated stuff—you can create a fake duotone that looks at least as good (if not better).
Step One
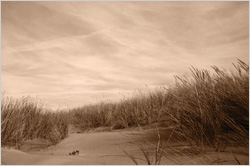
Open the color RGB photo that you want to convert into a duotone (again, I'm calling it a duotone, but we're going to stay in RGB mode the whole time). Now, the hard part of this is choosing which color to make your duotone. I always see other people's duotones, and think, "Yeah, that's the color I want!" but when I go to the Foreground color swatch and try to create a similar color in the Color Picker, it's always hit or miss (usually miss). That's why you'll want to know this next trick.
©ISTOCKPHOTO/GUNTA KLAVINA
Step Two
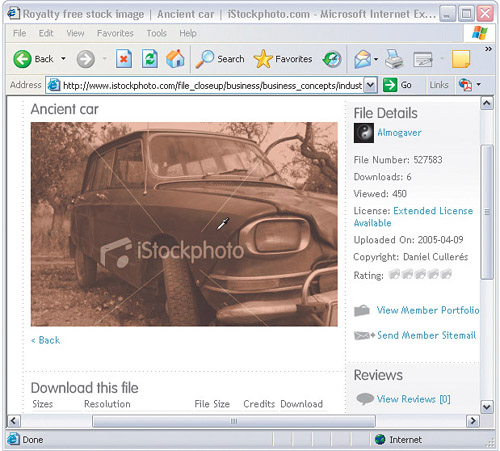
If you can find another duotone photo that has a color you like, you're set. So I usually go to a stock-photo web-site (like iStockphoto.com) and search for "duotones." When I find one I like, I return to Elements, press I to get the Eyedropper tool, click-and-hold any-where within my image area, and then (while keeping the mouse button held down) I drag my cursor outside Elements and onto the photo in my Web browser to sample the color I want. Now, mind you, I did not and would not take a single pixel from someone else's photo—I'm just sampling a color.
©ISTOCKPHOTO/DANIEL CULLERÉS
Step Three
Return to your image in Elements. Go to the Layers palette and click on the Create a New Layer icon. Then, press Alt-Backspace to fill this new blank layer with your sampled color. The color will fill your image area, hiding your photo, but we'll fix that.
Step Four
While still in the Layers palette, change the blend mode of this sampled color layer to Color.

Step Five
If your duotone seems too dark, you can lessen the effect by clicking on the Background layer, and then going under the Enhance menu, under Adjust Color, and choosing Remove Color. This removes the color from your RGB photo without changing its color mode, while lightening the overall image. Pretty sneaky, eh?
Getting the Polaroid™ Look
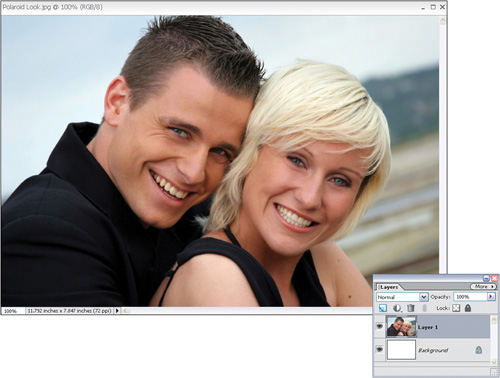
This is a quick technique that lets you turn any photo into what looks like a Polaroid snapshot. This is an ideal effect to apply when you really want that "scrapbook" feel, or you're looking for that spontaneous "my-family-on-vacation" feel. Give this one a try—it's much, much easier than it looks.
Step One
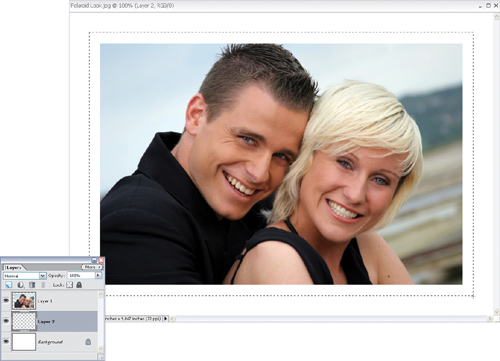
Open the photo you want to turn into a Polaroid. Press D to set your colors to the default black and white. Now, press Control-A to put a selection around the entire image. Go under the Layer menu, under New, and choose Layer via Cut (or press Control-Shift-J) to remove the photo from the Background layer and put it on a separate layer (Layer 1) above the background.
©ISTOCKPHOTO/UMBAR SHAKIR
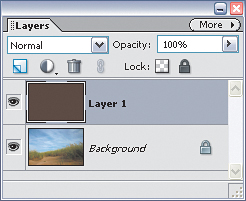
Step Two
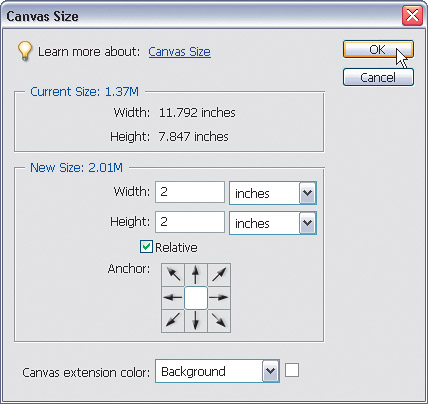
To create this effect, you'll need a little more working room around your photo, so go under the Image menu, under Resize, and choose Canvas Size. When the Canvas Size dialog appears, ensure the Relative checkbox is turned on, then add at least 2 inches of space to both the Width and Height. Choose Background in the Canvas Extension Color pop-up menu, and click OK.
Step Three
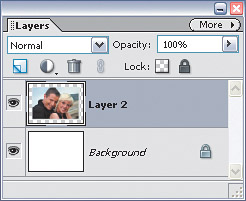
Create a new blank layer directly beneath your current layer by Control-clicking on the Create a New Layer icon at the top of the Layers palette (the new layer will be titled "Layer 2"). Press the M key to switch to the Rectangular Marquee tool, and on this layer draw a selection that's about a ½-inch larger than your photo on all sides. This will act as the border for your Polaroid image.
Step Four
Click on the Foreground color swatch in the Toolbox, choose a very light gray in the Color Picker (I used R=232, G=232, B=232), and then fill your selection with this light gray by pressing Alt-Backspace. Now you can deselect by pressing Control-D. In the Layers palette, click on your top layer (your photo layer) and press Control-E to combine (merge) your photo with the gray rectangle layer below it, creating just one layer.
Step Five
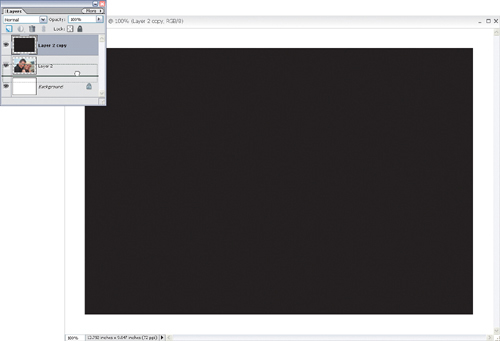
Make a duplicate of this merged layer by dragging it to the Create a New Layer icon at the top of the Layers palette (this copied layer will be titled "Layer 2 copy"). Press the D key to set your Foreground color to black. Then, press Alt-Shift-Backspace to fill your copied layer with black. Now, in the Layers palette, drag the black layer directly beneath your photo layer. You're going to "bend" this black-filled layer and use it as the shadow for the Polaroid.
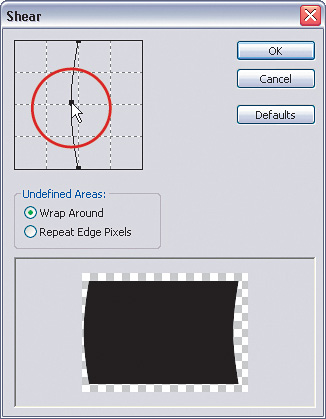
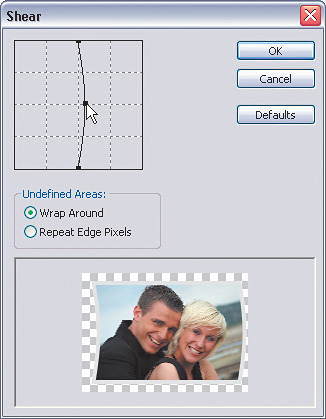
Step Six
Go under the Filter menu, under Distort, and choose Shear. When the Shear dialog appears, click on the center of the line that appears vertically at the center of the grid. This adds a point to the line. Click-and-drag this point to the left. The bottom of the dialog shows a preview of how your shear will look. When it looks good to you, click OK.
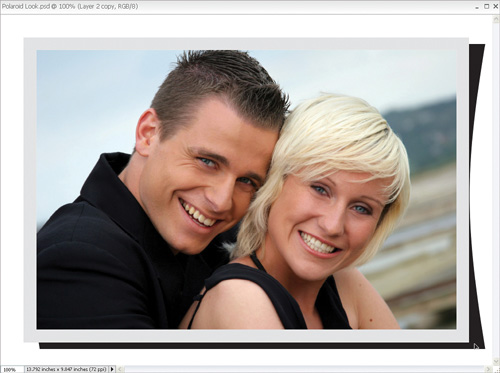
Step Seven
With the "shadow" layer still active in the Layers palette, press the V key to switch to the Move tool. Then drag this black, sheared layer directly to the right until the corners are peering out, giving the impression that the Polaroid's shadow is bent.
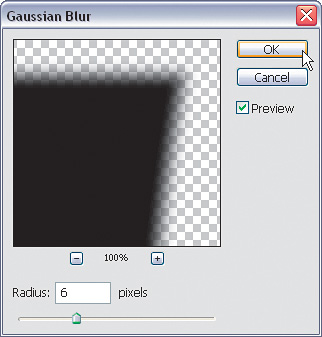
Step Eight
To soften the edges of your shadow (and make them look, well...shadow-like), go under the Filter menu, under Blur, and choose Gaussian Blur. Enter a Radius of 6 and click OK (enter a Radius of 14 for high-res, 300-ppi images).
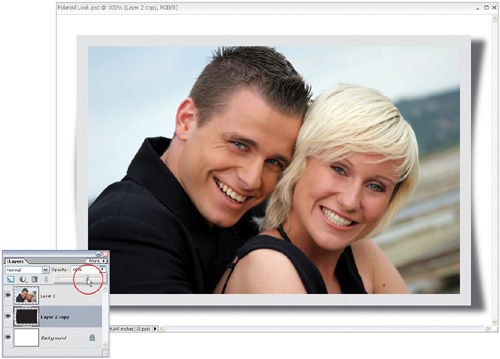
Step Nine
Now that the shadow is soft, you'll need to lower its opacity to make it appear more subtle. Go to the Layers palette and lower the Opacity setting to around 65%. (You can go lower if you like—it's up to you.) Now that your shadow is finished, to make the effect look more realistic, you'll have to bend the edges of the photo itself.
Step Ten
In the Layers palette, click on your photo layer (Layer 2) to make it active. Then, go under the Filter menu, under Distort, and choose Shear. When the Shear dialog appears, it will still have the last settings you applied in the grid. Click-and-drag the center point on the line to the right to bend your photo in the opposite direction of the shadow. When it looks good to you, click OK. Now use the Move tool to reposition your image above the shadow.
Step Eleven
Merge the shadow layer and the photo layer into one layer by pressing Control-E. Then, press Control-T to bring up the Free Transform bounding box. Move your cursor outside the bounding box, then click-and-drag upward to rotate the Polaroid. Press Enter to lock in your transformation, giving you the final effect.

Photo to Sketch in 60 Seconds Flat
I learned this technique from Rich Harris, the former creative guru over at Wacom Technologies. He sent me a bunch of PDFs with some special effects he had come up with, and this one just blew me away, so I asked Rich if I could include it in the book. It does the best job I've seen yet of converting a photo into a color pencil sketch.
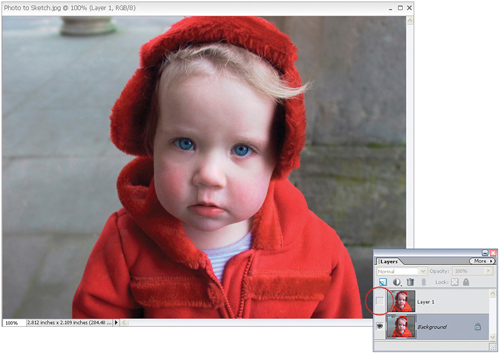
Step One
Open the photo you want to convert into a color sketch. Duplicate the Background layer by going to the Layer menu, under New, and choosing Layer via Copy (or by pressing Control-J). Hide this duplicate layer (Layer 1) by going to the Layers palette and clicking on the Eye icon to the left of this layer. Now click on the Background layer.
©ISTOCKPHOTO
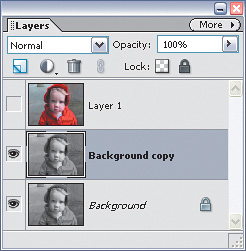
Step Two
Press Control-Shift-U to remove the color from the Background layer (technically, this is called "desaturating," but in Elements it's the Remove Color command, which is found under the Enhance menu's Adjust Color submenu). Then press Control-J to duplicate the gray Background layer (this copied layer is titled "Background copy").
Step Three
With the Background copy layer active, press Control-I to invert the photo (giving you a photo-negative look).
Step Four
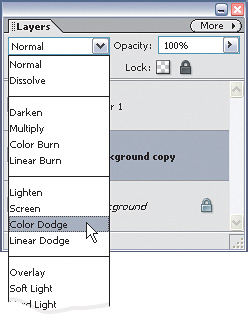
Go to the Layers palette and change the layer blend mode for the layer to Color Dodge. This turns your photo white (it looks like a blank document, but in the next step, you'll bring back the photo).
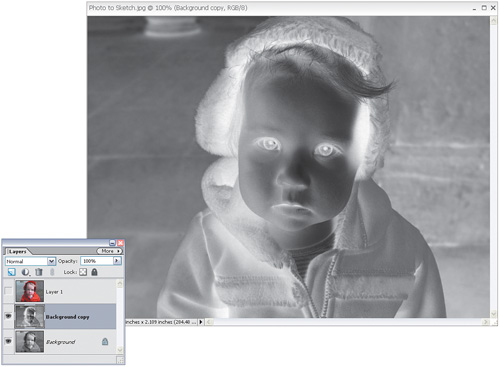
Step Five
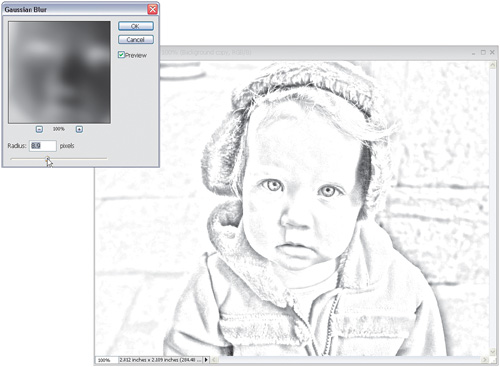
Go under the Filter menu, under Blur, and choose Gaussian Blur. When the dialog appears, drag the Radius slider all the way to the left, and then slowly drag it back to the right, and as you do your sketch will begin to appear. Click OK when the lines look dark, and the photo doesn't look too blurry.
Step Six
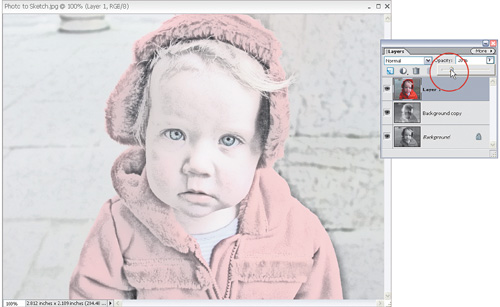
Go to the Layers palette and make the top layer (the color layer) visible again by clicking in the empty box where the Eye icon used to be. Now lower the Opacity of this layer to 20% to bring back a hint of the original color of the photo.
Step Seven
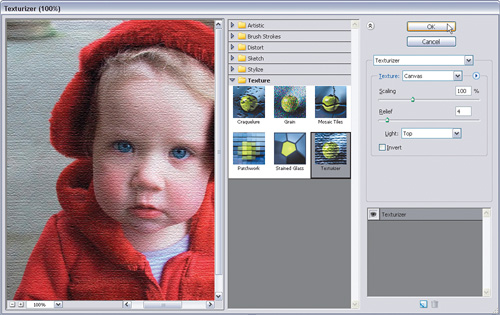
To add some texture to your sketch, go under the Filter menu, under Texture, and choose Texturizer. When the Texturizer dialog appears, you'll use the default settings (which are: Texture pop-up menu set to Canvas, Scaling set at 100%, Relief at 4, and Light set to Top). Click OK to apply your canvas texture. Now press Control-F to apply the filter again to make the effect a little more intense, completing the technique.
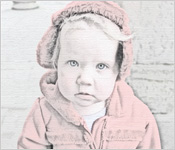
Before
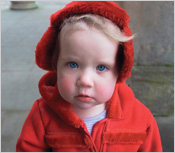
After
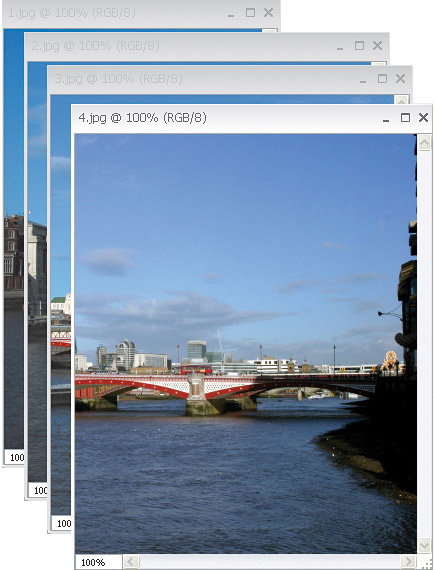
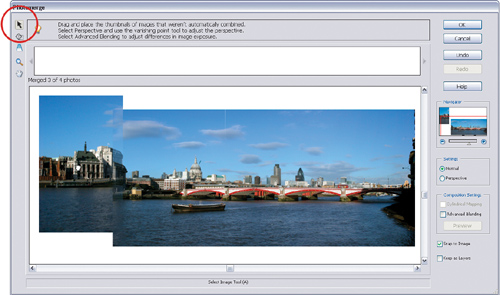
Automated Pano Stitching with Photomerge™
If you've taken the time to get your pano set up right during the shoot (in other words, you used a tripod and overlapped the shots by about 15% to 20% each), then you can have Elements 5's Photomerge feature automatically stitch your panorama images together. If you handheld your pano shoot, you can still use Photomerge: it's just going to be much more manual with you doing most of the work rather than Elements doing it for you.
Step One
Open the photos that you want Photomerge to stitch together as one panoramic image (you can also open individual images or a folder of images directly from within the Photomerge dialog if you like). In the example shown here, I had four shots already open in Elements.
©ISTOCKPHOTO/MELANIE DAYUS
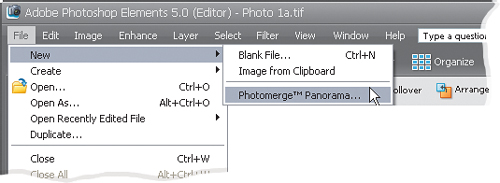
Step Two
Go under the File menu, under New, and choose Photomerge™ Panorama.
Step Three
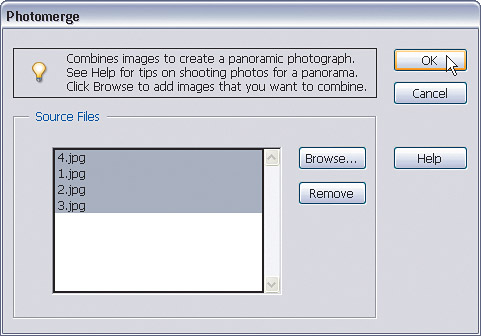
When you choose Photomerge, a dialog appears asking which files you want to combine into a panorama. Any files you have open will appear in the window, or you can click the Browse button and navigate to the photos you need to open. Control-click to select individual files in the Open dialog or if the files are contiguous, click on the first file, press-and-hold the Shift key, then click on the last file. Now click Open and then click OK in the Photomerge dialog.
Step Four
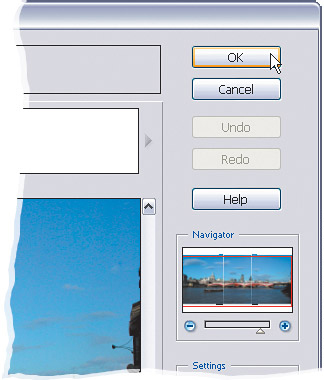
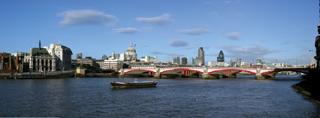
If your pano images were shot correctly (as I mentioned in the introduction of this technique), Photomerge will generally stitch them together seamlessly. If that's the case, click OK and your final panorama will appear as one image. Then you just use the Crop tool (C) to trim away any excess areas in your pano. This is what we call the "best-case scenario," when you've shot the panos on a tripod and overlapped them just like you should so Photomerge had no problems and did its thing right away. It was perfect the first time. But you know, and I know, life just isn't like that.
©ISTOCKPHOTO/MELANIE DAYUS
Step Five
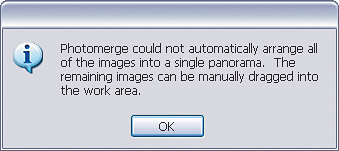
More likely what you'll get (especially if you handheld your camera or didn't allow enough overlap) is this warning dialog that lets you know that Photomerge "ain't gonna do it for you" (that's a technical phrase coined by Adobe's Alabama tech office). In other words—it's up to you.
Step Six
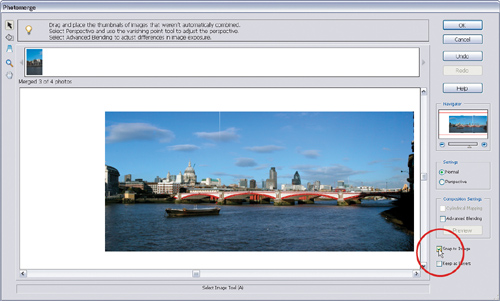
Once you click OK in that warning dialog, Photomerge will at least try to merge as many segments together as possible. The segments it couldn't merge will appear in the "Lightbox" (that horizontal row across the top). Although Photomerge didn't do all the work for you, it still can help—just make sure the Snap to Image checkbox on the right-hand side is turned on.
Step Seven
Get the Select Image tool (it looks like the Move tool) from the Toolbox on the left of the dialog and drag the image's thumbnail from the Lightbox down to your work area near the first image. Slightly overlap the image above the other merged images, release your mouse button, and if Photomerge detects a common overlapping area, it will snap them together, blending any visible edges. It actually works surprisingly well. If you need to rotate a segment to get it lined up, click on it with the Select Image tool first, then switch to the Rotate tool and click-and-drag within the segment to rotate. See, it's not that bad (especially using the Snap to Image option).
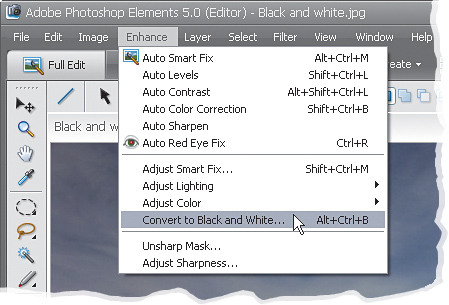
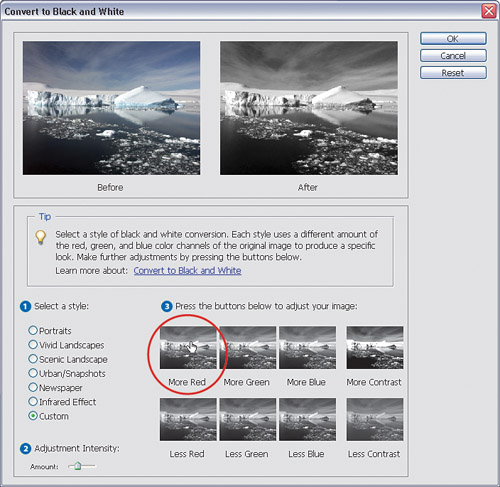
Converting to Black and White
One of my favorite new features in Elements 5 is its new black-and-white conversion tool. Well, it's not really a tool, it's more like a dialog where you decide how you want your color photo converted into black and white. It's a very visual way to make the jump from color to black and white, and if you can point-and-click, you can do it. Here's how it's done:
Step One
Open the color photo you want to convert to black and white (yes, you need to start with a color photo), and then go under the Enhance menu and choose Convert to Black and White (as shown here).
Step Two
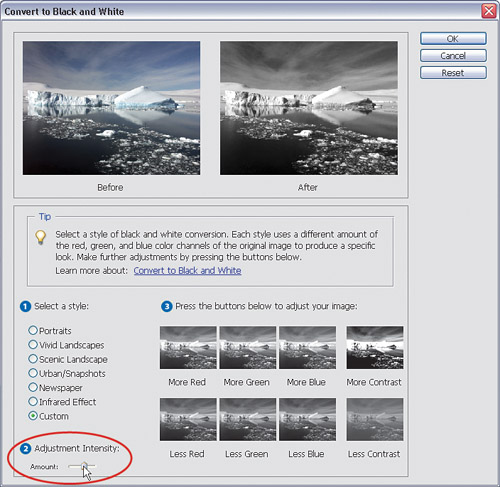
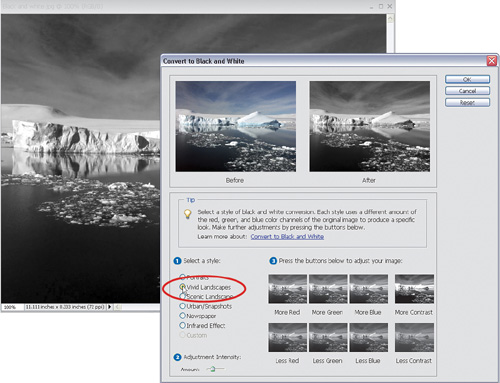
When you choose Convert to Black and White, a dialog appears and your photo (behind the dialog) is converted to black and white on the spot (in other words, you get a live preview of your changes). At the top of the dialog is a before and after, showing your color photo on the left, and your black-and-white conversion on the right, which honestly is of little help, especially since you can see your full-sized photo behind the dialog. Anyway, your first step is to choose which style of photo you're converting from the list of styles on the lower-left side of the dialog. These styles are really just preset starting points that are fairly well-suited to each type of photo. The default setting is Scenic Landscape, which is a fairly non-exciting setting. Since I'm generally looking to create high-contrast, black-and-white photos with lots of depth, I recommend the Vivid Landscapes style, which is much punchier. Go ahead and choose that now, just so you can see the difference.
©ISTOCKPHOTO/VERA BOGAERTS
Step Three
Whether you stay with the default Scenic Landscape, or try my suggested Vivid Landscapes (or any of the other styles to match the subject of your photo), these are just starting places—you'll need to tweak the settings to really match your photo, and that's done by simply clicking on one (or more) of the thumbnails found in the two rows in Section 3. So that's it—you're going to click on any thumbnail that looks better than your current image (either the one at the top of the dialog, or your actual photo which still appears behind it. By the way, if you have a big enough display, just drag the dialog over to the right so you can see more of your original photo. Bigger previews are better!
Step Four
The final tweak of your photo comes from the Adjustment Intensity slider, which is found in Section 2. Now, you're probably wondering why I went out of order (I went 1, 3, and now 2, instead of 1-2-3. That's because I think this is the best method. Choose which photo thumbnail looks best, and then turn up the volume [so to speak] if you need to). If you make some changes that don't look good, just press the Reset button found in the upper-right corner of the dialog, right below the Cancel button. When your conversion looks good to you, just click the OK button, and your photo now appears in black and white. However, luckily, Elements 5 leaves your photo in RGB mode, so if you wanted to add a tint to your black-and-white photo (maybe to get a duotone effect), you can do just that using a Hue/Saturation adjustment layer found in the Layers palette. Just choose it, turn on the Colorize checkbox, and drag the Hue slider. That's it.