
CHAPTER 5
THE PEN TOOL AND VECTOR MASKS
No book about selections would be complete without a section on the Pen Tool. I remember when I first gave it a try and consequently got completely lost and made a right mess of things. Bezier curves? What on earth? Why is it doing this? Why is it doing that? The Pen Tool had me completely foxed, so in truth, I avoided using it for quite some time.
However, it was inevitable that if I wanted to get really good at making selections, then I had to make friends with it, so that’s what I did, and you know what? The Pen Tool is the BEST tool there is, bar none, when it comes to making selections around objects that have a defined outline. So, it’s not good for making selections of hair, fur, grass, or the like, but for anything with a defined outline, it’s my tool of choice.
My intention with this chapter is to give you an overview of how you can get the most out of the Pen Tool. There are two keys on your keyboard that are going to totally change things for the better: Command and Option if you’re using an Apple computer, or Ctrl and Alt if you’re on a Windows-based computer. Knowing these two keys will make using the Pen Tool really, really easy!
Oh, and if all seems to be going wrong when you’re using the Pen Tool, you can always use the Edit > Undo command (Command (Mac)/Ctrl (PC) + Z) to go back a few steps.
Right, that’s enough of the promises; let’s get to it . . .
DOING IT WRONG
To start off, select the Pen Tool from the toolbar (Figure 5.1), and in the options bar at the top of the screen, make sure you have the Path option selected (Figure 5.2). We use the Pen Tool to first create a path, and then we turn the path into a selection.
To use the Pen Tool, we click down to add anchor points and join the anchor points together. We can then control how each of the anchor points are joined together, be it with a straight line or a curve, and if it’s with a curve, we can control how smooth or abrupt that curve is.

FIGURE 5.1

FIGURE 5.2
When I first started using the Pen Tool, I didn’t understand what was happening, so I used it completely wrong. I started by clicking down (Figure 5.3) and then adding more and more anchor points close together as I traced around the object (Figure 5.4).
Of course, this would eventually create a selection, but if the object had a curve to it, then the curve would be very jagged. It would also be very time-consuming to add all the dots, let alone frustrating if I accidentally knocked a key on the keyboard and lost what I’d spent so much time doing.

FIGURE 5.3

FIGURE 5.4
DOING IT RIGHT
Instead of adding lots and lots of dots (anchor points) and joining them together, we can add fewer dots and create perfect straight lines, angles, and perfectly smooth curves. And because we’re using the Pen Tool, they’re sharp, defined, and accurate. So, let’s take a look at how we do this . . .
Here, I have a new blank document open in Photoshop and all I’m going to do is click down to add a starting anchor point for the path I’m going to create (Figure 5.5). Then I’m going to add another anchor point, but this time as I click down, I will not release the mouse. Instead, I’m going to click and drag along the outline of whatever it is I want to select (Figure 5.6).
When I do this, you can see that some handles appear. These are what we use to control the smoothness or abruptness of the curve we wish to create. The further we drag, the smoother the curve will be.
If you don’t want to create a curve, just click and release—don’t click and drag.

FIGURE 5.5

FIGURE 5.6
I can now continue clicking and dragging to create a path with big, swooping curves or shorter abrupt curves (Figure 5.7), which I would do a mixture of as I trace around the object I’m selecting.
NOTEThe fewer anchor points you add, the smoother the path will be.

FIGURE 5.7
COMMAND (MAC)/CTRL (PC) KEY
When we’re using the Pen Tool to create a path, we might want to move an anchor point or change the extent of the curve. This is where the Command (Mac)/Ctrl (PC) key comes into play.
With Command (Mac)/CTRL (PC) pressed down, we can click directly onto any of the anchor points we have placed and then drag to reposition it, as I have done here (Figure 5.8).
Can you see how the curve is quite sharp and abrupt where I moved one of the anchor points (Figure 5.9)? This is because the handles on either side of it are short. Do you remember how I said that the longer these handles are, the smoother the curve is? Well, here we can press down the Command (Mac)/Ctrl (PC) key, click on the left or right handle (click on the round end), and drag it outward. As I drag outward, notice how I can make the curve bigger and smoother (Figure 5.10).
NOTEYou can drag the handles in all directions to change the appearance of the curve.
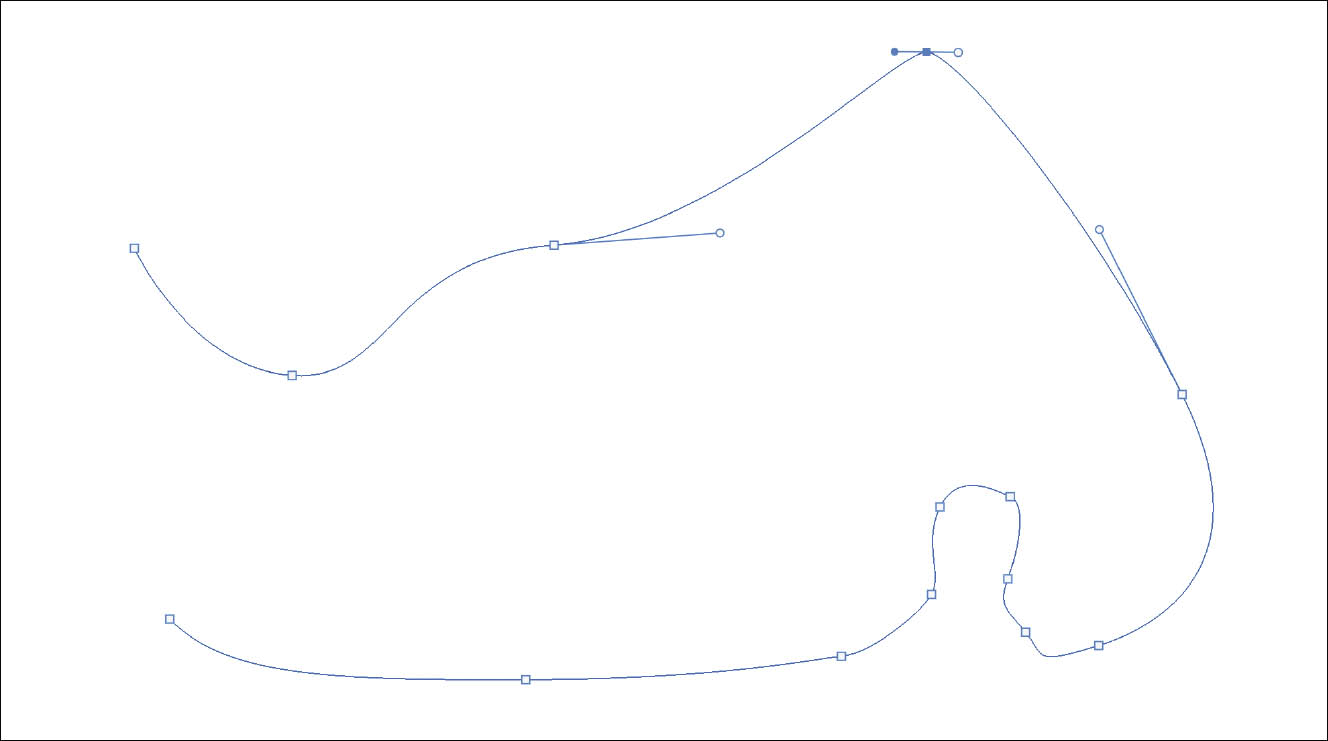
FIGURE 5.8

FIGURE 5.9
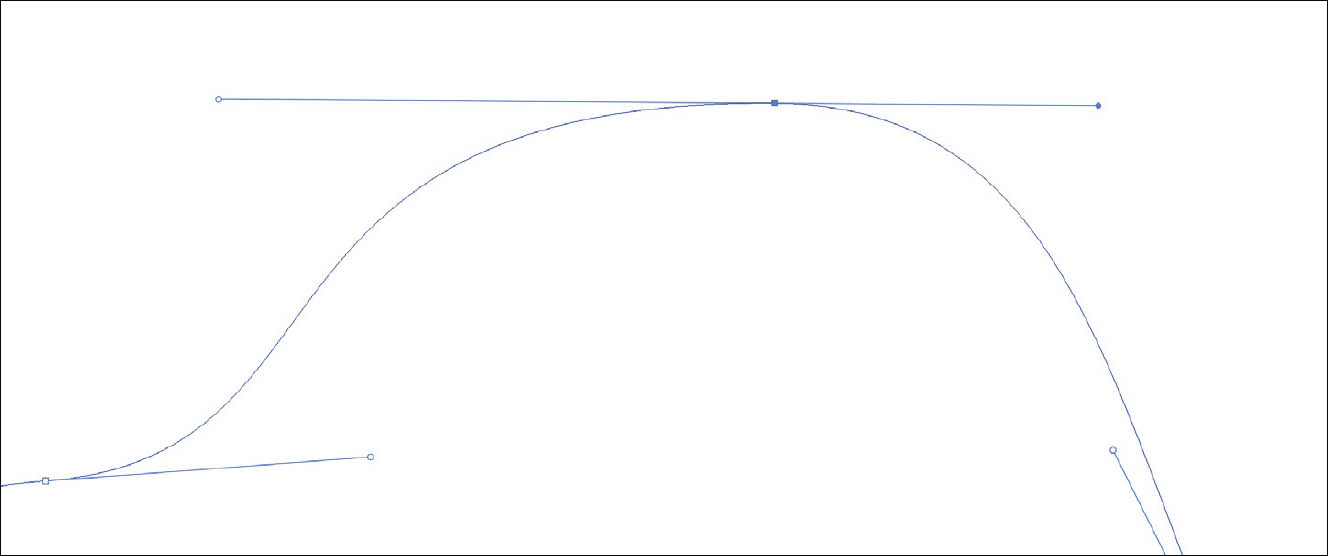
FIGURE 5.10
We can also press Command (Mac)/Ctrl (PC), click directly on a curve, and drag to change it, rather than using the curve control handles (Figure 5.11). Notice how when you do this, the curve control handles change in length, too, showing what you would have needed to do with them to have made the same change.
When we’re creating a path using the Pen Tool, to make it complete so that we can convert it into a selection, we simply need to click back on the starting anchor point (Figure 5.12).

FIGURE 5.11

FIGURE 5.12
Once the path is complete, if you want to move any point, you can do so by holding down the Command (Mac)/Ctrl (PC) key and clicking directly on it so that it becomes active (it will be solid blue in color, whereas all other points will be little white squares with a blue outline—Figure 5.13). Once it’s active, continue holding down the Command (Mac)/Ctrl (PC) key and drag the point to a new position.

FIGURE 5.13
OPTION (MAC)/ALT (PC) KEY
With the Option (Mac)/Alt (PC) key we can create defined angles when making a path. To do this, hold down the Option (Mac)/Alt (PC) key, and use the Pen Tool to click and drag on a curve control point (Figure 5.14).
Notice now how we don’t create a smooth curve, but instead a definite angle, which is obviously going to be very useful when creating a path around some objects.
Also, holding down the Option (Mac)/Alt (PC) key and clicking directly on the anchor point will remove the curve control, meaning you can create a straight line.

FIGURE 5.14
ESCAPE KEY
It’s worth mentioning, too, that should you wish to cancel a path, pressing the escape key once will hide the anchor points (more on those soon), and pressing it a second time will remove the path completely.
PATHS PANEL
Now that we’ve created a complete path, head to the Paths Panel, which you’ll likely find next to the Layers and Channels panels (Figure 5.15).
If you click underneath the Work Path thumbnail, you deactivate the path, and you’ll notice that the anchor points are no longer visible (Figure 5.16). If you zoom right up close on the path, you can see how smooth the curves are, unlike curves we saw before when making curved selections. This is because they’re not pixel-based, but instead are created using geometric formulas—or, to put it in another way, they’re mathematics-based.

FIGURE 5.15
To show the anchor points again, choose the Path Selection Tool from the toolbar (Figure 5.17) and click anywhere on the path.
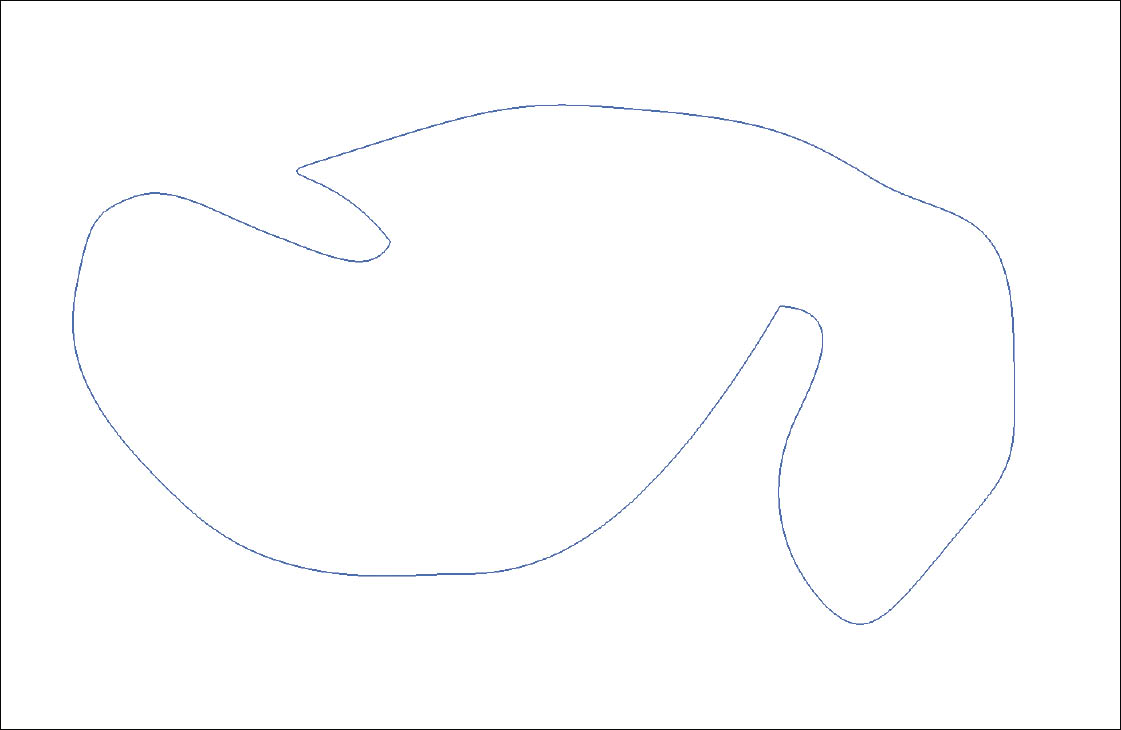
FIGURE 5.16

FIGURE 5.17
ADDING (MORE) ANCHOR POINTS
Should you want to add more anchor points to the path you’ve already created, or add anchor points back along a path you’re currently creating, make sure the Pen Tool is selected and add a checkmark to the Auto Add/Delete checkbox in the options bar at the top of the screen (Figure 5.18).
With this ticked, position the Pen Tool anywhere along the path, and a moveable anchor point will appear at that location (Figure 5.19).
To set the point in place, simply click down. Upon doing so, the curve control points will appear as normal, and you can then hold down the Command (Mac)/Ctrl (PC) key and drag the handles to change the curve, or click directly on the new anchor point and drag to reposition it.

FIGURE 5.18

FIGURE 5.19
TURNING A PATH INTO A SELECTION
Once you’ve created a path, it’s very easy to turn it into a selection. At the bottom of the Paths panel there are a number of icons, one of which is a circle of dots—this is the icon for Load Path as a Selection (Figure 5.20). Click on it and we now see our path has turned into an active selection (marching ants) (Figure 5.21).
NOTEIf the icons are grayed out, click on the thumbnail of the path in the Paths panel.
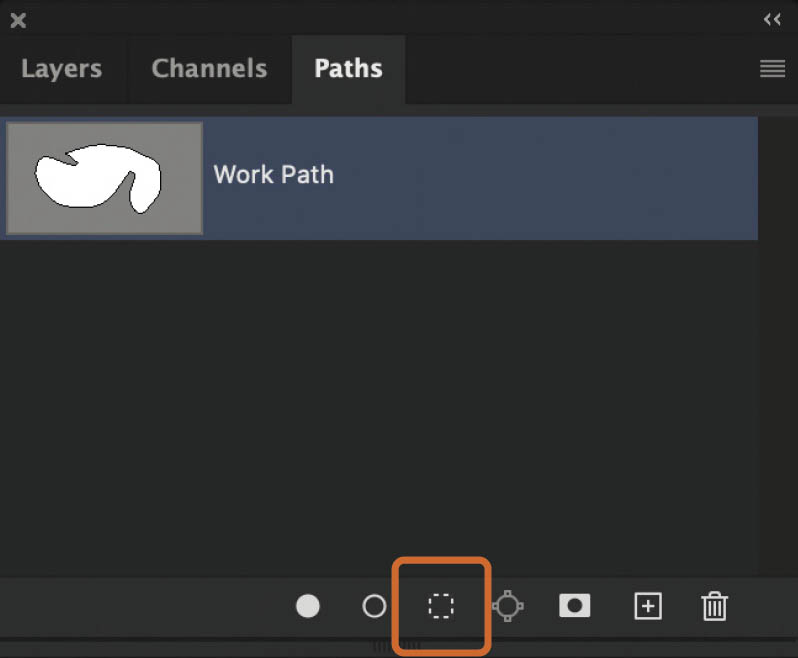
FIGURE 5.20

FIGURE 5.21

FIGURE 5.22
With the Pen Tool selected, the options bar contains three Make options, one of which is Selection (Figure 5.22). Clicking on this opens the Make Selection dialog box, which gives us a little more control over the selection with controls for feathering and anti-aliasing (Figure 5.23).
Another really quick way to convert a path to a selection is to simply hold down the Command (Mac)/Ctrl (PC) key and press Return (Mac)/Enter (PC).

FIGURE 5.23
PEN TOOL EXTRAS
The last couple of things I want to mention before we look at a workflow using the Pen Tool for making selections are in the options bar.
Next to the Auto Add/Delete checkbox is a small gear icon with a downward-pointing arrow beneath it. Clicking on this gear icon brings up the Path Options (Figure 5.24).
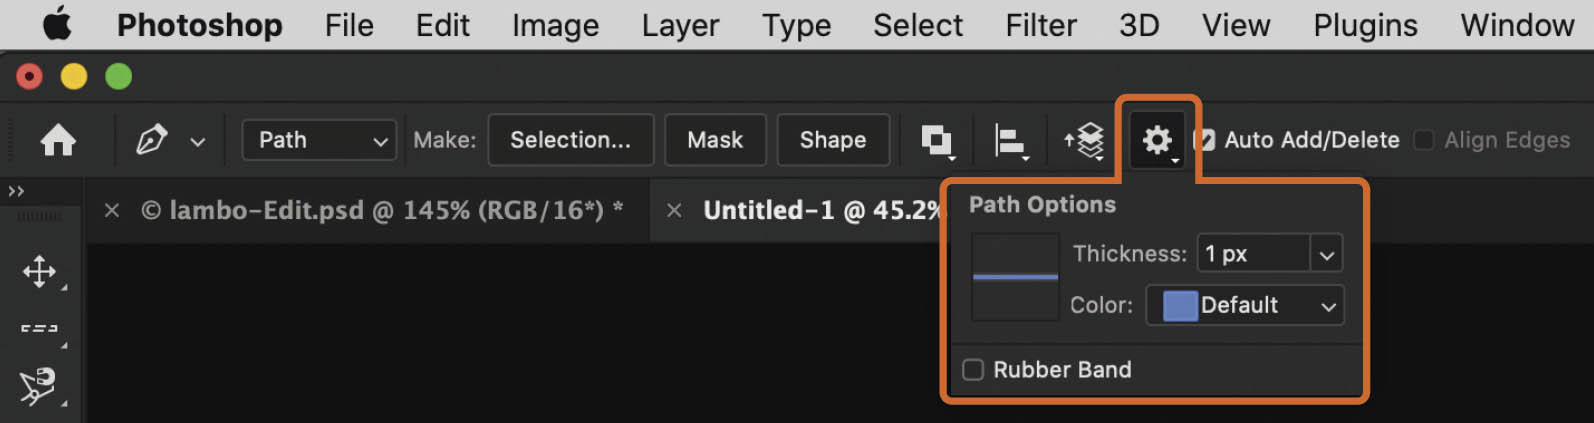
FIGURE 5.24
In here, we can actually alter the thickness of the path. This is particularly handy if you’re creating a path on a very busy image and the default thickness makes it challenging to see. We can also change the color of the path from blue to any color we like (a blue path on a blue area of an image might be difficult to see).
Finally, there’s the Rubber Band checkbox. Ticking this checkbox adds another dimension to the Pen Tool in that once you add an anchor point, the path is visible and moves wherever you go with the Pen Tool. So, before you place another anchor point, you can see in real time how that part of the path will look. This is really useful when you’re first getting used to using the Pen Tool, but you’ll likely turn this option off after a while because it can get a little distracting.
![]() TIPHolding down the Option (Mac)/Alt (PC) key and clicking on an anchor point will remove the curve controls and the path joining will become straight instead of curved.
TIPHolding down the Option (Mac)/Alt (PC) key and clicking on an anchor point will remove the curve controls and the path joining will become straight instead of curved.
PEN TOOL WORKFLOW
Now that we’ve gone through the basics, and pretty much all you need to know to get great results with the Pen Tool, I want to finish the chapter with a workflow showing how I would use it to make a selection and cutout of this supercar (Figure 5.25), the shape of which is a great mixture of curves and angles. Open the supercar.jpg file to follow along.

Download all the files you need to follow along step-by-step at: http://rockynook.com/PLSW

FIGURE 5.25
- 1.Select the Pen Tool from the toolbar and click to add an anchor point on the top left of the roof, at the point where it touches the windshield. Click-and-hold to add another anchor point at the base of the aerial point on the back of the roof and then drag to the right, angling down until the curve matches the curve of the roof line (Figure 5.26).
- 2.Hold down the Option (Mac)/Alt (PC) key and click on the second anchor point to remove the curve control. Add anchor points around the aerial point.
Once you’ve reached the other side of the aerial point, hold down the Option (Mac)/Alt (PC) key and click on the anchor point at the base of the aerial, as we now need to change the direction quite sharply to follow the line of the roof.
Click-and-hold to add an anchor point on the next part of the roof at the top of the step and then drag so that the curve again follows the slope (Figure 5.27).

FIGURE 5.26

FIGURE 5.27
- 3.Actually, looking at what I’ve done, I think I need to reposition the anchor points around the aerial, so I’ll hold down the Command (Mac)/Ctrl (PC) key as I click on each and drag them into place. I’ll also add another anchor in the middle and drag that to match the curve in the top of the aerial (Figure 5.28).

FIGURE 5.28
- 4.Hold down the Command (Mac)/Ctrl (PC) key and click on the farthest anchor point to tell Photoshop that we’re carrying on around the car. We now need to turn the path sharply to follow the step in the roofline, so hold down the Option (Mac)/Alt (PC) key and click on the anchor point. Click to add another anchor point at the base of the step.
Hold down the Option (Mac)/Alt (PC) key again and click on this new anchor point to tell Photoshop we need to turn sharply again to follow the line down the back of the car.
- 5.It looks like the back part of the roof has a very slight curve to it, so first, I’m going to add an anchor point where the roof meets the rear spoiler (Figure 5.29).
Then I’ll add an anchor point around the middle of this part of the path (between the point at the base of the step and the one at the base of the spoiler), and then while holding down the Command (Mac)/Ctrl (PC) key, drag upward to create a slight curve to follow the roofline (Figure 5.30).
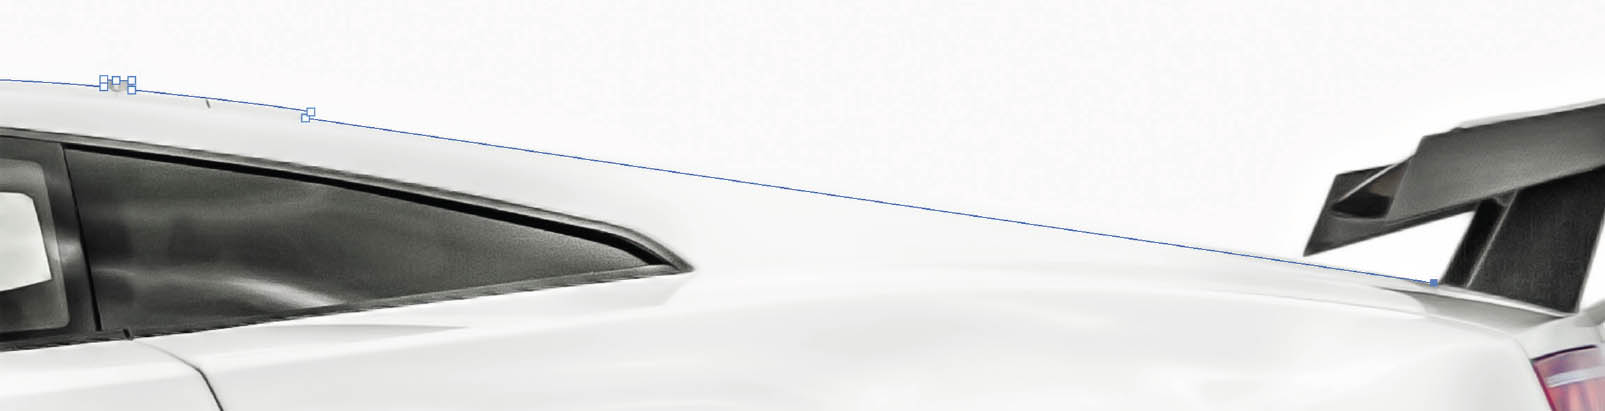
FIGURE 5.29

FIGURE 5.30
- 6.The spoiler is mostly straight lines and sharp angles, so all I’ll do here is click to add anchor points and straight lines up until the point where there is a curve (Figure 5.31).
I’ll then click-and-hold to add an anchor point at the end of this curve and drag to make the path follow the curve in the spoiler (Figure 5.32).
![]() TIPWhen you’re creating a path on a curve, click to add an anchor point at the start of the curve, and then click-and-hold to add an anchor point at the end of the curve and drag outward so that the path matches the curve.
TIPWhen you’re creating a path on a curve, click to add an anchor point at the start of the curve, and then click-and-hold to add an anchor point at the end of the curve and drag outward so that the path matches the curve.

FIGURE 5.31

FIGURE 5.32
Now, I don’t think it’s necessary for me to write down every click, drag, and key press, but up to this point, you can see how I would work my way around the supercar to make a path.
Let’s now pick it up at the point when the path is complete (Figure 5.33). We’ve gone all the way around the car and clicked on the original anchor point to close the path.
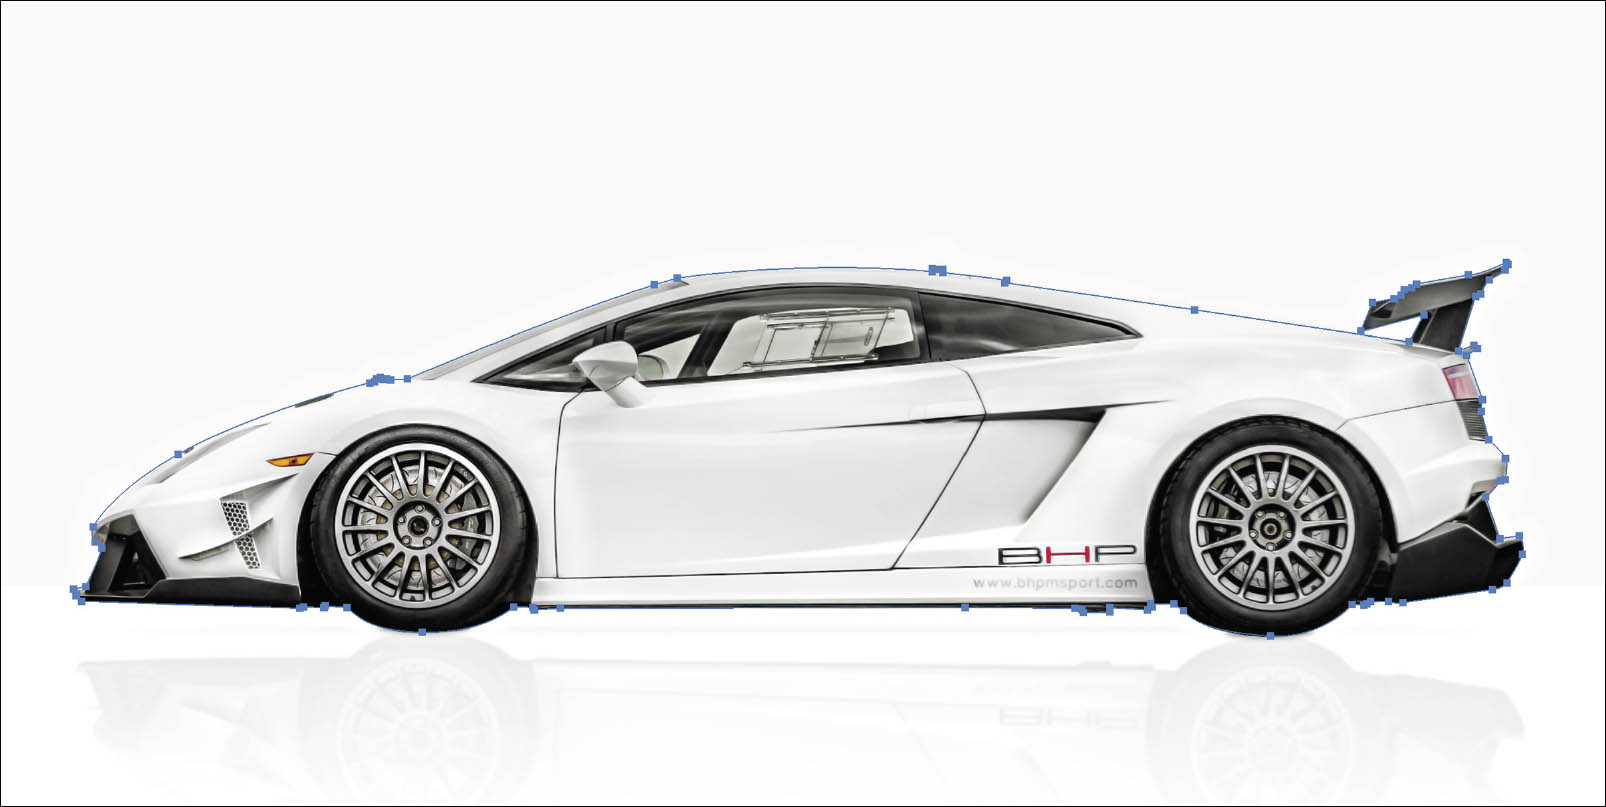
FIGURE 5.33
- 7.In the options bar at the top of the screen, I’ll click on Make: Selection, and then in the Make Selection dialog box, I’ll add 0.5 pixels of Feather Radius so that the outline is still very defined, but not so defined that it’s razor sharp and obvious (this will also help the car to blend if I move it).
I’ll also ensure that Anti-aliased is ticked so that when the path becomes a pixel-based selection, it maintains a smoothness to the curves.
Under Operation, New Selection is the default option, as there is no other selection present (Figure 5.34). Click OK.
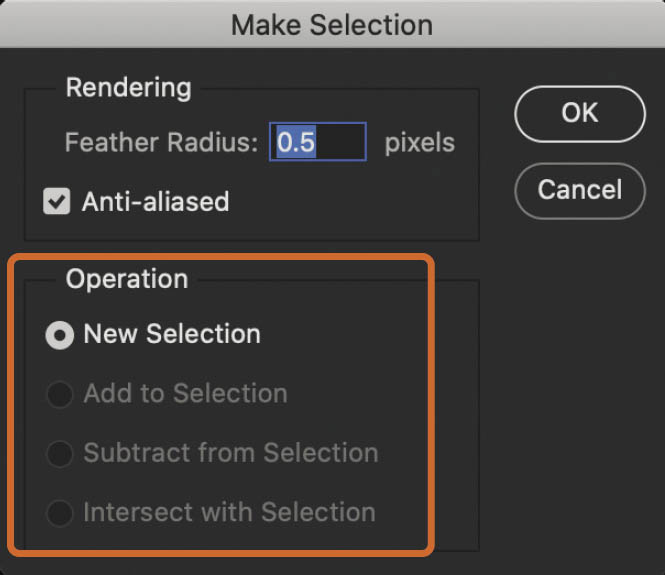
FIGURE 5.34
- 8.We now have an active selection, as we can see the marching ants around the car (Figure 5.35). Save this selection just as I showed in chapter 3 by going to Select > Save Selection. In the Save Selection dialog box, name the selection car (Figure 5.36) and click OK. All that work is now safe.

FIGURE 5.35
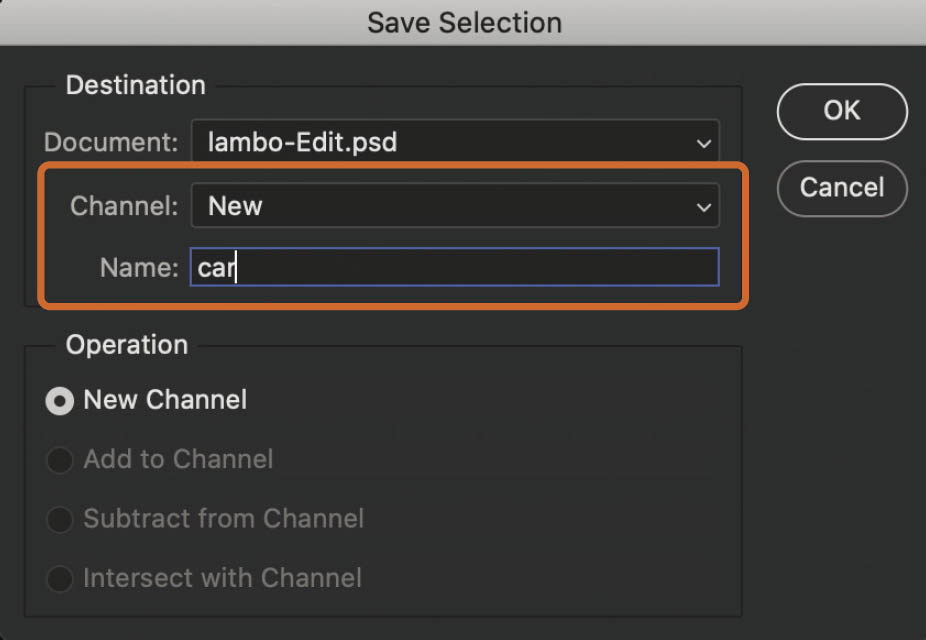
FIGURE 5.36
- 9.With a selection now around the car, meaning it is now isolated, we can do whatever we want. If I want to cut it out, for example, I would do that nondestructively by using a layer mask. So, while the marching ants are visible, simply click on the Add Layer Mask icon at the bottom of the Layers panel (Figure 5.37). Doing so adds a layer mask with the selected area filled with white, meaning we can see the contents within the selection, and everything outside of the selection is filled with black, meaning we can’t see it (Figure 5.38).

FIGURE 5.37

FIGURE 5.38
VECTOR MASKS
We’ve covered how to use the Pen Tool to make a path and then turn that path into a selection. But now I want to take it up a notch and show you an even better way to use the path to make a cutout without first turning it into a selection.
Now, remember what I said about selections being pixel-based and paths being mathematics-based, and how this means paths are more defined and create perfect curves? Well, if we turn a path into a selection, we’re not taking full advantage of it because we’re taking something mathematics-based and changing it to be pixel-based.
Pixel-based selections are fantastic for organic things such as hair, fur, and that kind of stuff, but when it comes to man-made objects or stuff with defined outlines, mathematics-based is the way to go. So we’re talking paths, which we then use with vector masks to make a cutout. Let me explain . . .
Going back to the supercar we’ve been working on, we have a couple of options: we can use the Pen Tool to create a path around it, or we can create a selection and then turn that into a path.
In Figure 5.39 I have used the Select Subject command to make a selection of the supercar, and then used Quick Mask to clean it up. The selection looks great, but it’s pixel-based, and we can make it even better by making it mathematics-based.

FIGURE 5.39
- 1.With the active selection/marching ants visible, go to the Paths panel, hold down the Option (Mac)/Alt (PC) key, and click on the Make Work Path from Selection icon (Figure 5.40).
- 2.We now see the Make Work Path dialog box where we input a Tolerance level (Figure 5.41). The lower the Tolerance, the more anchor points are created along the path, and you’ll remember earlier that I said it’s best to use as few anchor points as possible. The Tolerance ranges from 0.5 to 10. To create a path around the supercar, I found a Tolerance of 5 pixels to be about right. Then click OK.
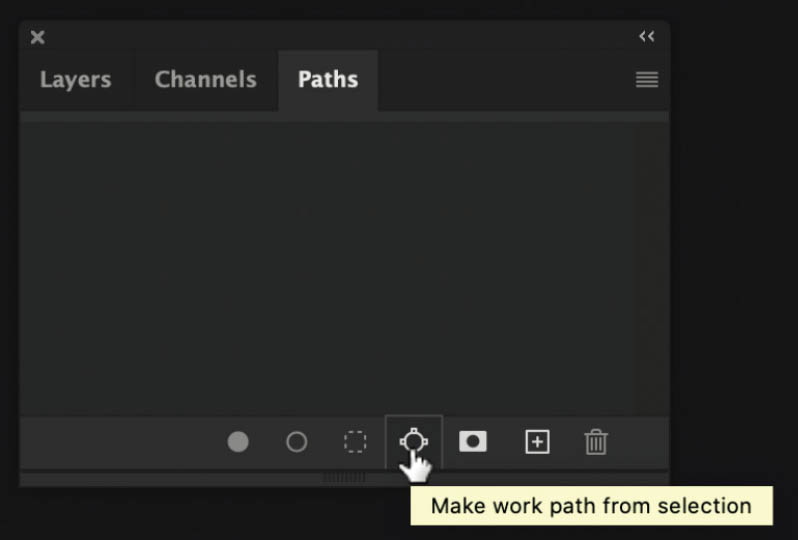
FIGURE 5.40

FIGURE 5.41
We now have a path with anchor points around the supercar, much like what we created earlier with the Pen Tool. This was a lot quicker, though, huh? ![]() But we’re not finished yet because the path needs altering a little bit.
But we’re not finished yet because the path needs altering a little bit.
- 3.Grab the Pen Tool, and then using the controls I mentioned earlier, reposition some anchor points (Command (Mac)/Ctrl (PC) key), create straight paths where necessary (Option (Mac)/Alt (PC) key), delete anchor points by pressing delete, and so on until you’re happy with the path around the supercar (Figure 5.42).

FIGURE 5.42
![]() TIPIf you see no anchor points on the path, grab the Path Selection Tool (Figure 5.43) and click directly on the path.
TIPIf you see no anchor points on the path, grab the Path Selection Tool (Figure 5.43) and click directly on the path.
- 4.Once you’re happy with the path, go to the Layers panel, hold down the Command (Mac)/Ctrl (PC) key, and click on the Add Layer Mask icon at the bottom of the Layers panel (Figure 5.44).

FIGURE 5.43
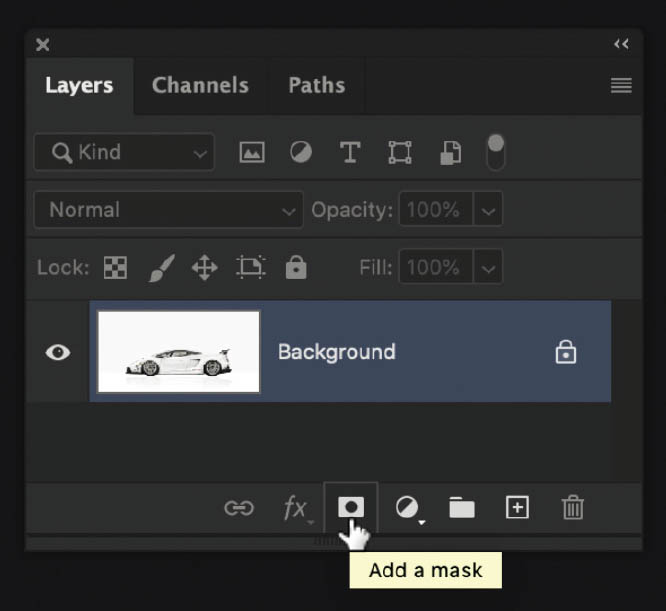
FIGURE 5.44
This creates a vector mask, which is gray and white (Figure 5.45), unlike a pixel-based mask, which is black and white. It’s mathematics-based, and thus keeps the cutout pin-sharp with perfect curves (Figure 5.46).
- 5.To hide the path and anchor points on the cutout, go to the Paths panel and click on an area underneath the vector mask so that it’s no longer highlighted (Figure 5.47).

FIGURE 5.45

FIGURE 5.46
NOTEThis vector mask is completely editable. To do so, go to the Paths panel and click on the Vector Mask thumbnail so that it is highlighted. The path and anchor points are now visible so that you can edit them.

FIGURE 5.47
So, there you go, the Pen Tool and vector masks—fantastic for making the best possible selections and cutouts with pin-sharp lines and curves. Hopefully this has made you want to stick with it; it’ll just take a bit of practice using it, but the work will be well worth it.
If you think a short video might also help, I do have one that I recorded over on my YouTube channel. Just head to https://www.youtube.com/glyndewis and look for the video titled “The Pen Tool made EASY.”
Right, lots more to cover, so let’s dive into the next chapter where we’ll be going through Select and Mask.