
Chapter 14. Authentication
“Thanks goodness [sic], there’s only about a billion of these because DHH doesn’t think auth/auth [sic] belongs in the core.”
—George Hotelling at http://del.icio.us/revgeorge/authentication
I bet every web app you’ve ever worked on has needed some form of user security, and some people assume it makes sense to include some sort of standard authentication functionality in a “kitchen-sink” framework such as Rails. However, it turns out that user security is one of those areas of application design that usually involves a bit more business logic than anyone realizes upfront.
David Heinemeier Hansson has clearly stated his opinions1 on the matter, to help us understand why Rails does not include any sort of standard authentication mechanism:
Context beats consistency. Reuse only works well when the particular instances are so similar that you’re willing to trade the small differences for the increased productivity. That’s often the case for infrastructure, such as Rails, but rarely the case for business logic, such as authentication and modules and components in general.
For better or worse, we need to either write our own authentication code or look outside of Rails core for a suitable solution. It’s not too difficult to write your own authentication code, to the extent that it isn’t that difficult to write anything in Rails. But why reinvent the wheel? That’s not the Rails way!
As alluded to in the chapter quote, we have many different options out there to choose from. It seems that since authentication is one of the first features you add to a new application, it is also one of the first projects undertaken by many an aspiring plugin writer.
14.1 Authlogic
Authlogic2 is a flexible, unobtrusive authentication framework for Ruby applications. It supports basic authentication with storage in a relational database out of the box, but can use other authentication means like OpenID or LDAP through the use of addons to the base framework.
14.1.1 Getting Started
Install Authlogic by adding the Authlogic gem to your application’s Gemfile. There are no generators to run but there will be a few extra items that will need to be created in order to get Authlogic running properly.
14.1.2 Creating the Models
Depending on the model that you want to authenticate, you will need to create a corresponding session model for it. This pattern allows Authlogic to be flexible in what is authenticated and provides an easy mechanism for providing this functionality to multiple models in a single application.
For the purposes of our examples, we will have a User model that needs authentication. First we will create our User model and a corresponding UserSession model.
rails generate model user
rails generate model user_session
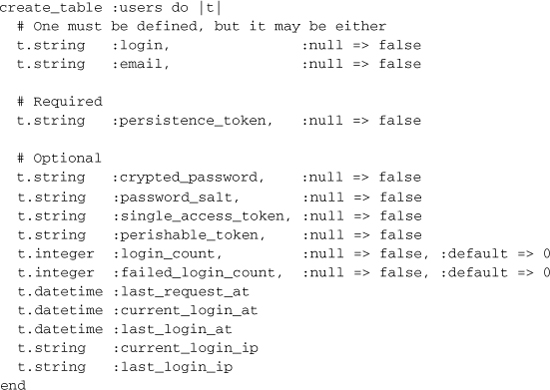
Then edit the create_user migration to add the columns that your application needs to satisfy its authentication requirements. Some columns are required by Authlogic, whereas others are optional but will get used if the framework sees that they exist.
The only required columns are persistence_token and either login or email, depending on your personal preference.
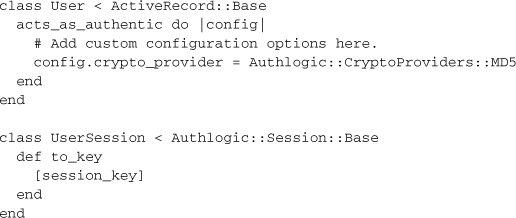
Next, set up your User and UserSession models, supplying them with optional configuration or use the defaults. The UserSession model will need to additionally provide a to_key method that returns an array with the session key in it.
14.1.3 Setting Up the Controllers
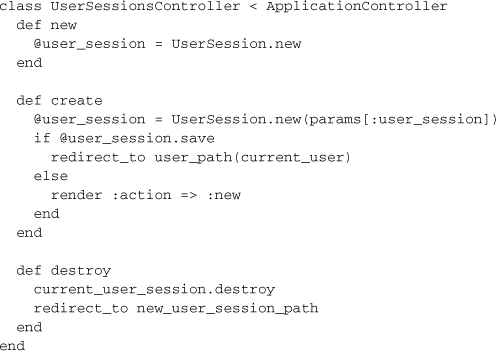
Authlogic handles the ability to login and logout through a controller that manages the session object for your authenticated model. In this case, we would create a UserSessionsController to handle this, as well as our UsersController to create our objects to authenticate.
rails generate controller user_sessions
rails generate controller users
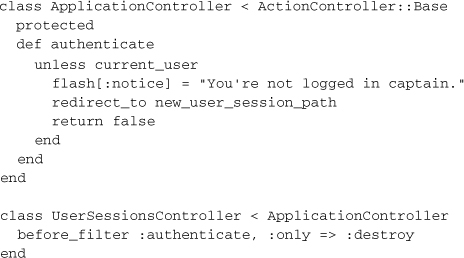
In your ApplicationController you will need to provide access to the current user session and the current user, so that all of your controllers can access this information easily.

The UserSessionsController should respond to new, create, destroy in order to leverage all basic login and logout functionality. The UsersController implementation will depend on your own application’s requirements.
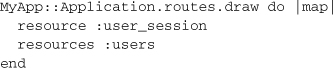
Make sure you’ve added the routes for the new controllers.
14.1.4 Controller, Limiting Access to Actions
Now that you are authenticating, you will want to control access to specific controller actions. A common pattern for handling this is through the use of filters in your controllers, where the common checks reside in your ApplicationController.
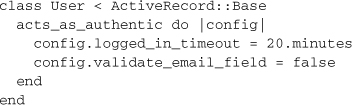
14.1.5 Configuration
Situations may arise where you want to configure the way Authlogic behaves to suit your individual application needs. This is handled by setting options in your authenticated model’s Authlogic, acts_as_authentic block.
Authlogic has a wide range of configuration options, from setting password encryption algorithms to adding validation options to various fields that the framework uses internally. In addition to the options listed below, several additional ways to configure the validation options for various fields not listed. Please see Authlogic’s documentation for details on how to configure those settings.
• email_field:
Changes the name of the field that stores the email address.
• validate_email_field:
Toggles whether email validation is on or off.
• logged_in_timeout:
Sets the timeout to determine if the user is still signed in to the application.
• login_field:
Change the name of the field that stores the login.
• validate_login_field:
Toggles whether login validation is on or off.
• check_passwords_against_database:
Sets if the object or database is queried when asking if a password is valid.
• crypted_password_field:
Changes the name of the crypted_password field in the database.
• crypto_provider:
Changes the encryption algorithm used on the password.
• ignore_blank_passwords:
Allows ignoring password presence for new objects or when crypted passwords are blank.
• password_salt_field:
Changes the name of the password_salt field in the database.
• require_password_confirmation:
Sets whether password confirmation is required.
• transition_from_crypto_providers:
Can be added if you initially stored passwords with a different algorithm.
• disable_perishable_token_maintenance:
Turns off Authlogic’s internal updating of the perishable token.
• perishable_token_valid_for:
Specifies the length of time the perishable token is valid for.
• act_like_restful_authentication:
Set this to true if you were previously using restful_authentication and want to make no code or database changes.
• transition_from_restful_authentication:
Similar to acting like restful auth, this will resave user passwords with a new algorithm when the login.
• maintain_sessions:
Tells Authlogic to use automatic session maintenance or not.
• session_class:
If the session class cannot be inferred by the name, define it here.
• change_single_access_token_with_password:
Allows for single access tokens to change when a user password is changed.
• validations_scope:
Sets the scope of all validations, similar to validates_uniqueness_of.
14.1.6 Summary
Authlogic is a mature framework that’s had plenty of use in the community. It is highly configurable and leaves the business logic of authentication in the hands of the application developer with very little code needed to implement it. It is easily extended and has a wide range of add-ons if you are looking to do different types of authentication, like OpenID or LDAP.
Authlogic is however tied to Active Record so if you are living on the edge with a non-relational store Authlogic will not work for you. Also, if you want to write almost no code at all and use a more standard solution (that can easily be extended to persist to multiple databases).
14.2 Devise
Devise3 is a highly modular Rack-based authentication framework that sits on top of Warden. It has a robust feature set and leverages the use of Rails generators, and you only need to use what is suitable for your application.
14.2.1 Getting Started
Add the devise gem to your project’s Gemfile and bundle install. Then you can generate the Devise configuration by running:
rails generate devise_install
This will create the initializer for devise, and an English version i18n YAML for Devise’s messages. Devise will also alert you at this step to remember to do some mandatory Rails configuration if you have not done so already. This includes setting your default host for ActionMailer, setting up your root route, and making sure your flash messages will render in the application’s default layout.
14.2.2 Modules
Adding authentication functionality to your models using Devise is based on the concept of adding different modules to your class, based on only what you need. The available modules for you to use are:
• database_authenticatable:
Handles authentication of a user, as well as password encryption.
Adds the ability to require email confirmation of user accounts.
• lockable:
Can lock an account after n number of failed login attempts.
• recoverable:
Provides password reset functionality.
• registerable:
Alters user sign up to be handled in a registration process, along with account management.
• rememberable:
Provides remember me functionality.
• timeoutable:
Allows sessions to be expired in a configurable time frame.
• token_authenticatable:
Allows sign in of a user based on single access tokens.
• trackable:
Stores login counts, timestamps, and IP addresses.
• validatable:
Adds customizable validations to email and password.
Knowing which modules you wish to include in your model is important for setting up your models, migrations, and configuration options later on.
14.2.3 Models
To set up authentication in a model, run the Devise generator for that model and then edit it. For the purpose of our examples, we will use the ever-so-exiting User model again.
rails generate devise User
This will create your model, a database migration, and route for your shiny new model. Devise will have given some default modules to use, which you will need to alter in your migration and model if you want to use different modules. In our example, we only use a subset of what is offered.
Our resulting database migration looks like
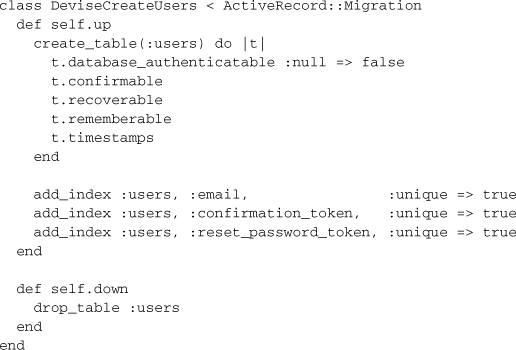
We then modify our User model to mirror the modules we included in our migration.
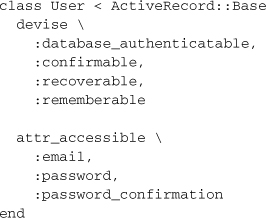
Now we’re ready to rake db:migrate and let the magic happen.
14.2.4 Controllers
Devise provides some handy helper methods that can be used in your controllers to authenticate your model or get access to the currently signed-in person. For example, if you want to restrict access in a controller you may use one of the helpers as a before_filter.
class MeatProcessorController < ApplicationController
before_filter :authenticate_user!
end
You can also access the currently signed-in user via the current_user helper method, or the current session via the user_session method. Use user_signed_in? if you want to check if the user had logged in without using the before_filter.
Thais says ...
The helper methods are generated dynamically, so in the case where your authenticated models are named differently, use the model name instead of user in the examples. An instance of this could be with an Admin model—your helpers would be current_admin, admin_signed_in?, and admin_session.
14.2.5 Devise, Views
Devise is built as a Rails Engine, and comes with views for all of your included modules. All you need to do is write some CSS and you’re off to the races. However, there may be some situations where you want to customize them, and Devise provides a nifty script to copy all of the internal views into your application.
rails generate devise_views
If you are authenticating more than one model and don’t want to use the same views for both, just set the following option in your config/initializers/devise.rb:
config.scoped_views = true
14.2.6 Configuration
When you first set up Devise using rails generate devise_install, a devise.rb was tossed into your config/initializers directory. This initializer is where all the configuration for Devise is set, and it is already packed full of commented-out goodies for all configuration options with excellent descriptions for each option.
Durran says ...
Using MongoDB as your main database? Under the general configuration section in the initializer switch the require of active_record to mongoid for pure awesomeness.
Devise comes with internationalization support out of the box and ships with English message Devise, internationalization definitions located in config/locales/ devise.en.yml. (You’ll see this was created after you ran the install generator at setup.) This file can be used as the template for Devise’s messages in any other language by staying with the same naming convention for each file. Create a Chilean Spanish translation in config/locales/devise.cl.yml weon!4
14.2.7 Extensions
There are plenty of third-party extensions out there for Devise that come in handy if you are authenticating using different methods.
• cas_authenticatable:
Allows for single sign on using CAS.
• facebook_connectable:
Provides support for authorizing through authenticating with Devise Facebook.5
• imapable:
Adds authentication support through IMAP.
• ldap_authenticatable:
Authenticates users using LDAP.
• openid_authenticatable:
Provides authentication via OpenID.
• rpx_connectable:
Adds support for using RPX authentication.
A complete list of extensions can be found at: http://wiki.github.com/plataformatec/devise/3rd-party-extensions
14.2.8 Summary
Devise is an excellent solution if you want a large number of standard features out of the box while writing almost no code at all. It has a clean and easy-understand API and can be used with little to no ramp-up time on any application.
14.3 Conclusion
We’ve covered the two most popular authentication frameworks for Rails at the moment, but there are plenty more out there to examine if these are not suited for your application. It’s easy to even roll your own simple solution if basic authentication is all you need.