A Step-by-Step Approach to Success
Developing a basic bot does not require programming experience. But there is still a learning curve. And if you really want to push the limits, you will need to have an understanding of such things as APIs, VB.net, and other technical tools.
UiPath is one of the most popular systems on the market.
There is a free version of the software.
UiPath has a modern interface that is relatively easy to use.
There are helpful features like search, debugging, and monitoring of bots.
UiPath comes with hundreds of prebuilt actions, which helps to streamline the bot development process.
The software can record actions across many environments like the desktop, web, terminals, and Citrix applications.
There are a large number of integrations, such as with Google and Microsoft.
This is not to imply that you should use UiPath. As we saw in chapter 5, there are a myriad of factors to consider when making a selection.
Again, in this chapter, the use of UiPath is really for demonstration purposes.
Let’s get started.
Preliminaries
Compared to the rest of the chapters in the book, this one is challenging. This is especially the case for those without a technical background. Thus, when going through this chapter, do not rush things. I would also install the UiPath software and follow along, which will really help to reinforce the concepts.
In this chapter, we will start with the core elements of bot design, such as creating a workflow or flow chart of the functions. We’ll then get to more advanced topics – involving programming – like variables, conditionals, and loops. Finally, we’ll cover some of the basics of debugging.
What if you do not plan to use UiPath? Well, in this case, you should definitely check out the vendor’s educational materials.
But for the most part, they will likely be similar to what is in this chapter. So even scanning some of this chapter can be helpful in getting an understanding of what it takes to create a bot.
Installation of UiPath
There are two main versions of UiPath. There is the Enterprise platform, which requires the payment of a license (based on factors like the number of bots used). However, you can evaluate it for free for up to 60 days.
Then there is the Community edition, which is free. You also get access to support on the forum. So yes, in this chapter, we will highlight this version.
Yet UiPath does have some rules with the Community edition. An individual or a small company (with a limit of five machines) can use the Studio for business purposes. But this is not the case with the Orchestrator. This is only for evaluation and training.
And if the company is considered an enterprise, then both the Studio and Orchestrator will be for evaluation and training purposes.
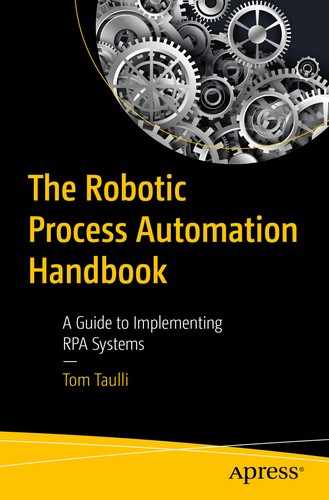
As for the installation, go to the following: https://www.uipath.com/start-trial. Then select “Try It” for the Community Cloud version and create a login with either your e-mail or Google, Microsoft, or LinkedIn credential. You will then fill out some information, such as your country and company name.
This is the portal screen for UiPath
A good first step is to click the “Getting Started” button, which will provide a three-minute video on how to use of the core features of UiPath.
Next, I would then install the UiPath Studio (this is where you will create your bots). It is available for a Windows desktop and the download will take a few minutes to complete.

This is the initial screen for the UiPath Studio
Open: You can navigate your computer system to select a UiPath process or select one you’ve already saved. The “Clone or Check Out” is an advanced feature, which allows you to use version control (say with Github). This means you can track the development of the process with comments and other information. This can be particularly useful when working in collaboration with others.
New Project: Here, you can create a new process completely from scratch or you can make one for later reuse (it will become part of a library).
New Template: These are prebuilt processes. If one meets your needs, you can speed up the development process. For example, there is a template that has a flow chart. Then there are more advanced ones, such as for developing enterprise-grade bots.
Help: This is comprehensive, including product documentation, community forum, help center, academy, and release notes. Also, when you click the “Help” button, you will see details on the right side of the screen. One is the activation ID (this is helpful if you want to upgrade) and the “Update Channel,” which means UiPath Studio will either be updated with the stable release or betas (which are not as reliable and may have bugs).
Settings: You have functions like auto backup and the changing of the UI theme (either light or dark).
Tools : Here, you can install functions to allow the use of different browsers, like Chrome, Edge, and Firefox. There are also extensions for Java, Citrix, and advanced Windows functions.
Getting Started
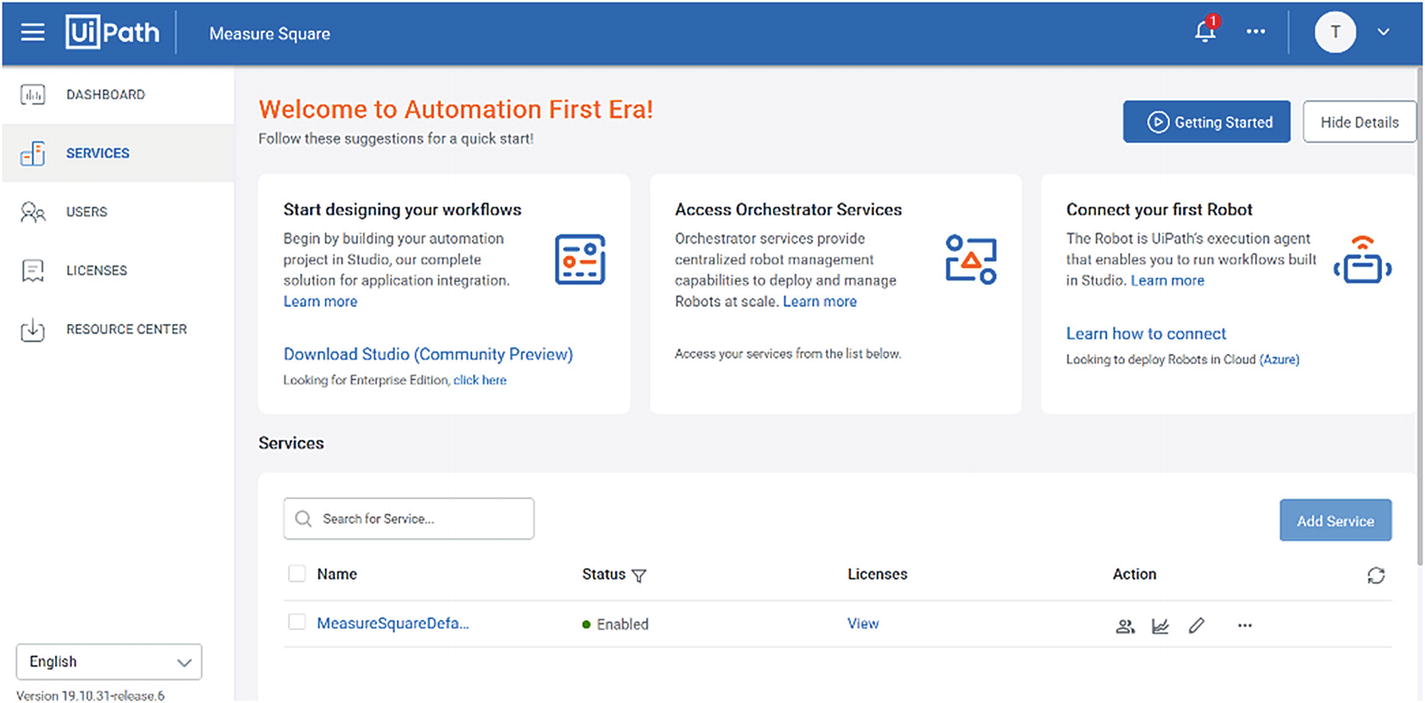
In the initial screen of the UiPath Studio, select “Process.” You’ll see a screen that asks for the name of the process, the directory to put the files in, and the description. As for the name, you cannot use spaces and the convention is to use Pascal case. This means that you will capitalize the first letters of each word. Example: HelloWorld.

This is the design screen for the UiPath Studio
At the top of the screen, there are three menu items. Home brings you back to the initial screen. You can then toggle between the Design and Debug screens.
Official: These are the activities that UiPath has created. Some examples include functions for PDFs, forms, databases, and so on.
Microsoft Visual Studio Offline Packages: With these, you will get added capabilities for coding, such as with the C# language and the .Net platform.
Nuget.org: Here you will see a diverse set of packages for things like JQuery, Bootstrap, and MongoDB.
When you add a package, it will automatically show up in the dependencies. It will also appear on the Activities tab. This is where you can drag and drop functions onto the center of the screen. But first you must select “Open Main Workflow.” By doing this, the middle of the screen will have a canvas that’s called Main and it will be here that you will drag and drop the activities.
OK, let’s first create a basic bot. Go to the Activities tab and select Sequence. You can do this by entering this in the search box above or click Workflow ➤ Control ➤ Sequence. As the name implies, the Sequence is a placeholder for other activities.

Here’s a bot that prints “Hello World!”
To run this, either click the run button on the menu at the top or press F5.
That’s it! You’ve created your first bot! Granted, it is very simple. But this does provide a general look at the workflow.
Here’s the pop-up menu for when you press + in the Sequence
On the Sequence, you can click the top of the box and you can then rename it. This can be extremely helpful in making your workflows more understandable.
And you can click the icon on the top right to collapse the box. Again, this can be useful when getting a sense of the organization (the activities can get quite busy!). At the top right of the Main screen, you can also select Expand All or Collapse All. Then at the bottom left, there are other helpful buttons to manage your screen (Fit to Screen, Overview, and Zoom).
Another good feature is Properties. By clicking the Sequence or an activity, you will see the box on the right side of the screen that shows the details about the configuration. For example, with the Message Box, you can change the text, the name of the box, the type of button, etc.

If you click within the sequence or activity, you will see the properties in the panel on the right side of the screen
Activities
When creating bots, you will spend much time in the Design part of the UiPath Studio and work quite a bit with the Activities . Some of these will involve simple drag and drops with a little configuration. But others will be more involved and intricate.
Workflow: When creating a bot, you will usually start here, say, with a flowchart or sequence. With the Sequence, there are a myriad of programming-type constructs that help with the logic. Just some include Do While, For Each, If, Break and Continue, just to name a few.
UI Automation: Here are the main types of automations for OCR (screen scraping and extraction), text, windows, image management, elements (like the mouse and keyboard), and the browser. For example, when you select browser, you can navigate across web pages and even include JavaScript. Or, with a window, you can do things like hide it, maximize it, and restore it.
User Events: You can monitor for keypresses or other triggers.
Programming: This involves more sophisticated coding functions. You can engage in database actions, debugging, and setting of variables.
Orchestrator : This is where you can manage and schedule bots. You can also work with setting up credentials for access.
App Integration: This is a major area and UiPath Studio comes with a handful of integrations like CSV, Excel, and mail.
Computer Vision: Here you will find powerful AI features to help with identification of text and other items on a screen.
System: This shows how extensive UiPath works with a desktop system. You can create/copy/append/move files, detect if a path or file exists, work with the clipboard, open and close applications, manage environment variables and passwords, and invoke PowerShell scripts .
Flowcharts and Sequences
It’s recommended to start the creation of a bot with the flowchart or a sequence. The reason? Both are a great way to provide a structure and visualization, which will go from the top of the screen to the bottom.

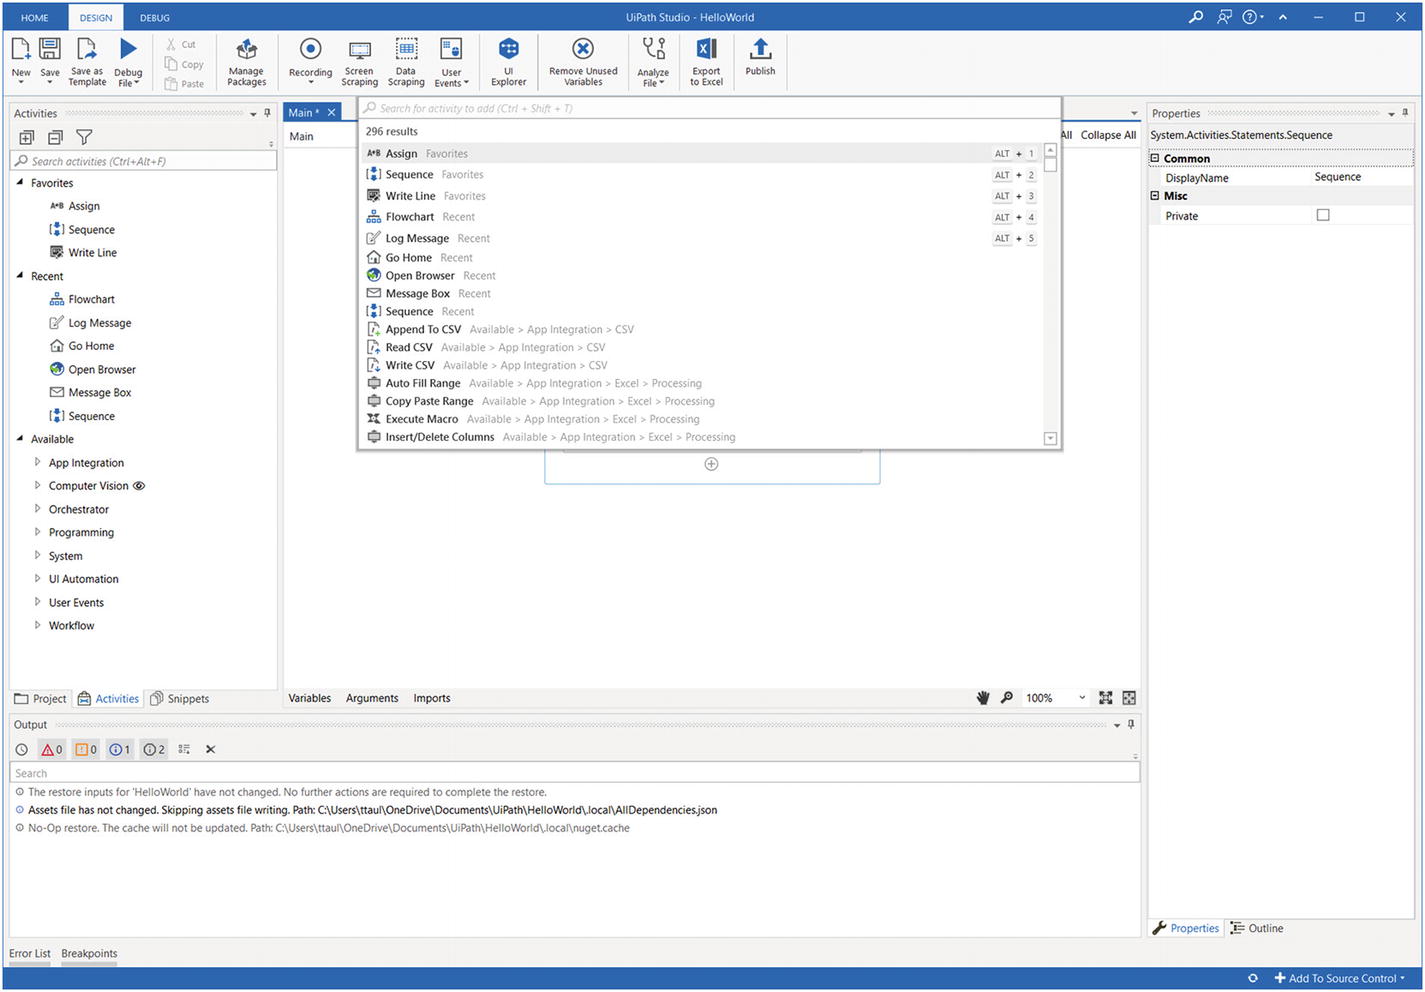
This is the start of a flowchart activity
Then, as like we’ve seen with the Sequence, you can drag and drop activities onto the Flowchart.
But they will not run automatically; rather, you will need to create the types of relationships between the activities.
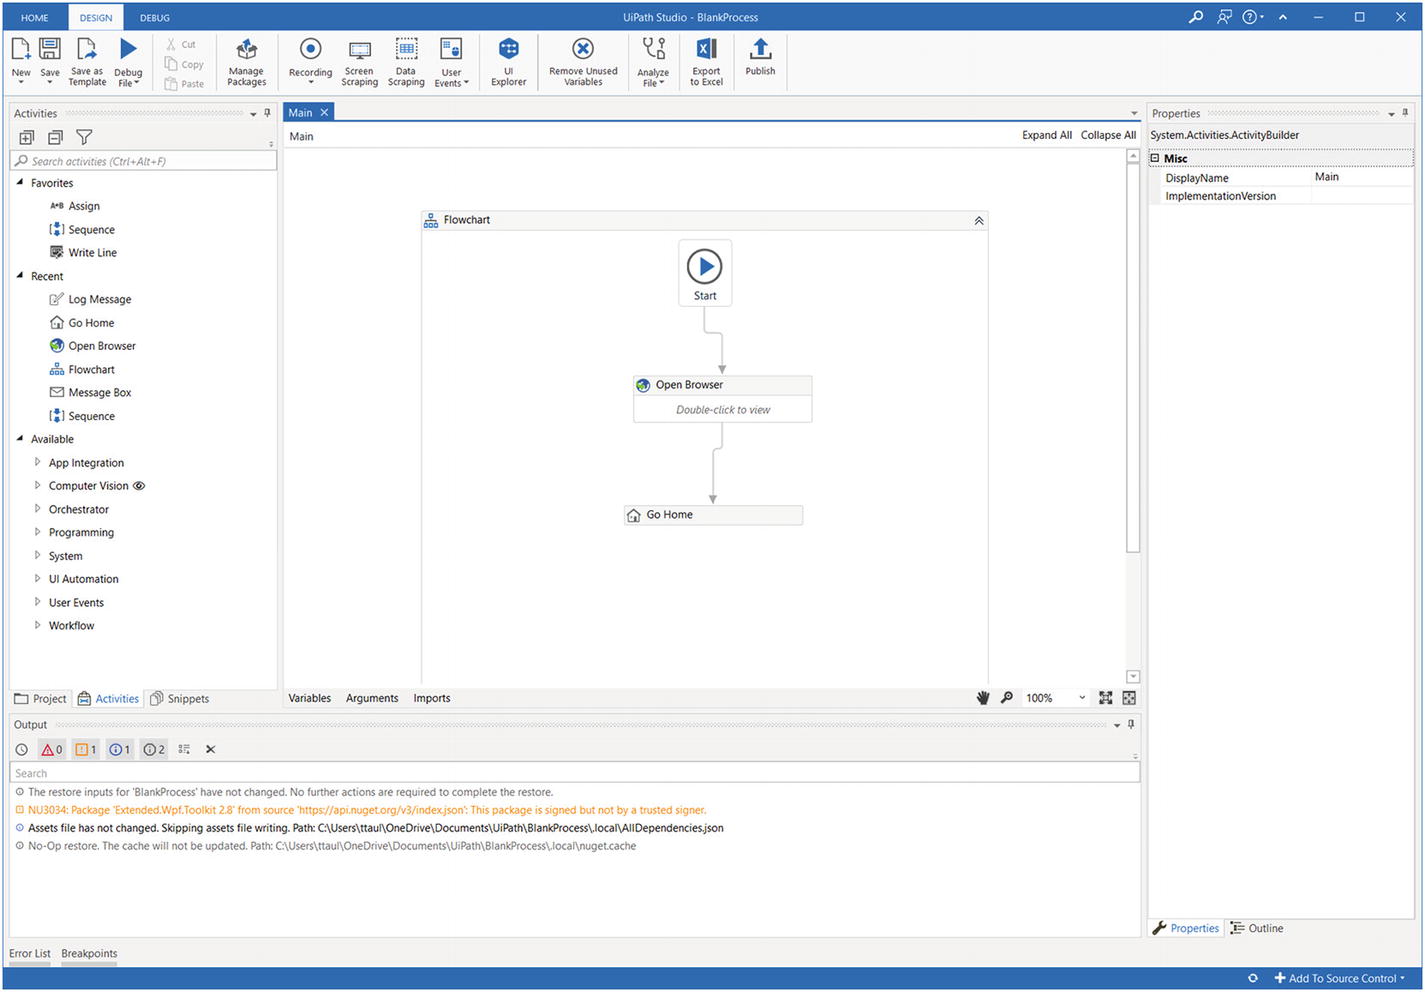
The Open Browser activity (UI Automation ➤ Browser ➤ Browser)
The Go Home activity (UI Automation ➤ Browser ➤ Go Home)
Now let’s connect them. First, right click the Open Browser activity and select “Set As Start Node.” By doing this, UiPath Studio puts an arrow from the Start to the Open Browser activity.
Or you can hover over the Start button and you’ll see four small boxes on every edge of the button. You can then drag one of these to the Open Browser (or any activity) and the arrow will show up and make the connection. As you will see when in UiPath, there are often several ways of doing the same thing.
Next, drag the bottom box on the Open Browser Activity and connect the arrow to the Go Home activity.
This is a look at a flowchart
If you select Start or F5, you will get an error, which says “The workflow has validation errors. Review and resolve them first.” In fact, UiPath Studio already provided a warning, with the “!” point on the top-right of Open Browser activity.
The problem? If you click the !, it will say that you need to provide a URL. So put in something like “www.google.com” and then start the bot.
From here, you can actually put in sequences or even more flowcharts! In other words, UiPath is highly flexible. But it is important to try to not get too convoluted with the workflows.
Log Message
As a bot gets more advanced, you want to take steps to document the workflow. One approach with UiPath Studio is to use the Log Message activity (it’s at Programming ➤ Debut ➤ Log Message). Drag and drop this onto a flowchart or sequence and then enter a comment. You will also indicate the type or log level: Fatal, Error, Warn, Info, and Trace.

The output screen shows the Log Message
Variables
To use RPA, you need to have a good understanding of variables. They are containers – which you give a name – that hold data, such as text and numbers.
To create a variable in UiPath Studio, you will click the Variables tab, which is at the bottom of the Main screen. Select “Create variable” and then enter a name. There should not be any spaces and it’s recommended to use Pascal case.
Boolean: This has only two values – that is, true and false. This is usually for loops and if/then/else statements.
Int32: This variable can only hold integers, which means there are no decimal points.
String: This is text data, such as contact information, articles, etc.
Object: This is a custom-built data type, which may include a blend of other variable types. For example, you could create an object that holds contact information.
System.Data.DataTable: This is to handle large datasets. This is actually common for RPA since it deals with such things as Excel spreadsheets.
Array of [T]: An array is a string of values. You can use loops to manipulate this type of data.
Browse for Types: This will open a new menu that provides a large assortment of other unique variable types. This allows you to access the .Net framework, which makes it possible to access deeper into your computer’s system. Just some of the types include decimal, date, and password.
Then what does Scope mean? It describes in which part of the workflow you can use the variable. To understand this, let’s take an example. Suppose you have a bot that has a Sequence that includes two activities: an Input Dialog and Log Message activity. You also have a string variable called FirstName that you set for the scope of Sequence. This means you can use it anywhere in the Sequence, including the two activities. However, if you set the scope to the Input Dialog, the variable will not be available in the Sequence.
Why do this? It’s really about better management of your coding. If you have extensive scope for many of your variables, it can be tough to keep track of things and debug the code. The general rule of thumb is to keep scope as narrow as possible.
What’s more, you can set a default value for the variable. And if you do not do so, it will be set to null.

Here is the creation of a new variable called FirstName
In some cases, you may have a large number of variables. To help navigate this, you can click the top of the column to sort them (by name, variable type, and scope). If you want to delete a variable, click the row and just press Delete. By highlighting a row, you can also create an annotation, which is a description for the variable. This can be helpful when working with a group of people so everyone understands the purpose for each of the variables.
Oh, and there is another way to create a variable. Click a Sequence, Flowchart or activity and press the right mouse button. Then choose Create Variable.
When working with variables in UiPath, there is a useful activity called Assign, which can both create and manipulate variables within the Main screen workflow. To see, let’s take an example. Drag and drop a Sequence and place the Assign activity in it (Workflow ➤ Control Flow ➤ Assign). In the “To” box, right-click inside and select “Create Variable.” Select this and enter “FirstName” and in the “Enter a VB expression,” enter “Tom.”
Then click the “Variables” tab at the bottom of Main and you will see the FirstName variable show up. Select “String” for the “Variable type.”
Next, drag and drop a Log Message activity on the Sequence (Programming ➤ Debug ➤ Log Message) and chose “Info” for the Log level and type out “The first name is “ + FirstName.
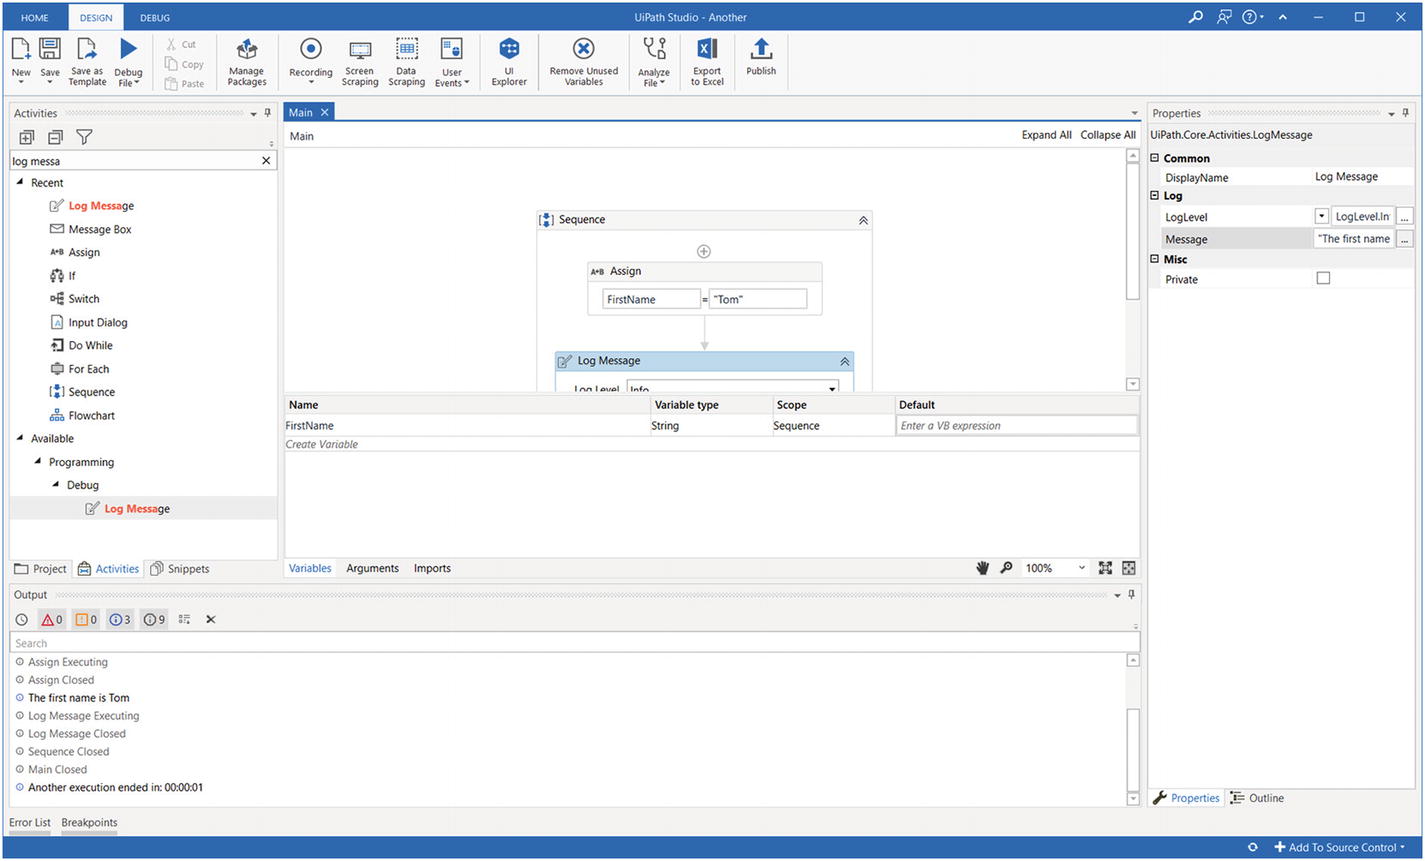
This shows the use of the Assign activity
Loops and Conditionals
Loops are a core part of computer programming languages. It is a way to repeat a set of instructions – say, to search for something and add numbers – until a condition is met.
For Each
Do While
Switch
Then there are conditionals, which are pathways for the underlying logic of computer code. Even with fairly simple constructs, it is possible to create intricate applications.
In the next few sections , we’ll take a look at For Each and Do While/While loops as well as the If/Then/Else and Switch conditionals.
For Each Loop

The structure for a For Each loop
Thus, this will loop through each of the items in the data that is specified in the right box at the top (where it says “Enter a VB expression”). Each time this happens, the instructions in the Body will be executed. Click the For Each box and take a look at the Properties on the right. In the TypeArgument area, you can choose the type of data you want to cycle through.
If you click the part with the three periods, you will be taken to a larger input box.
Item is a variable that stores each of the names as the loop is repeated.
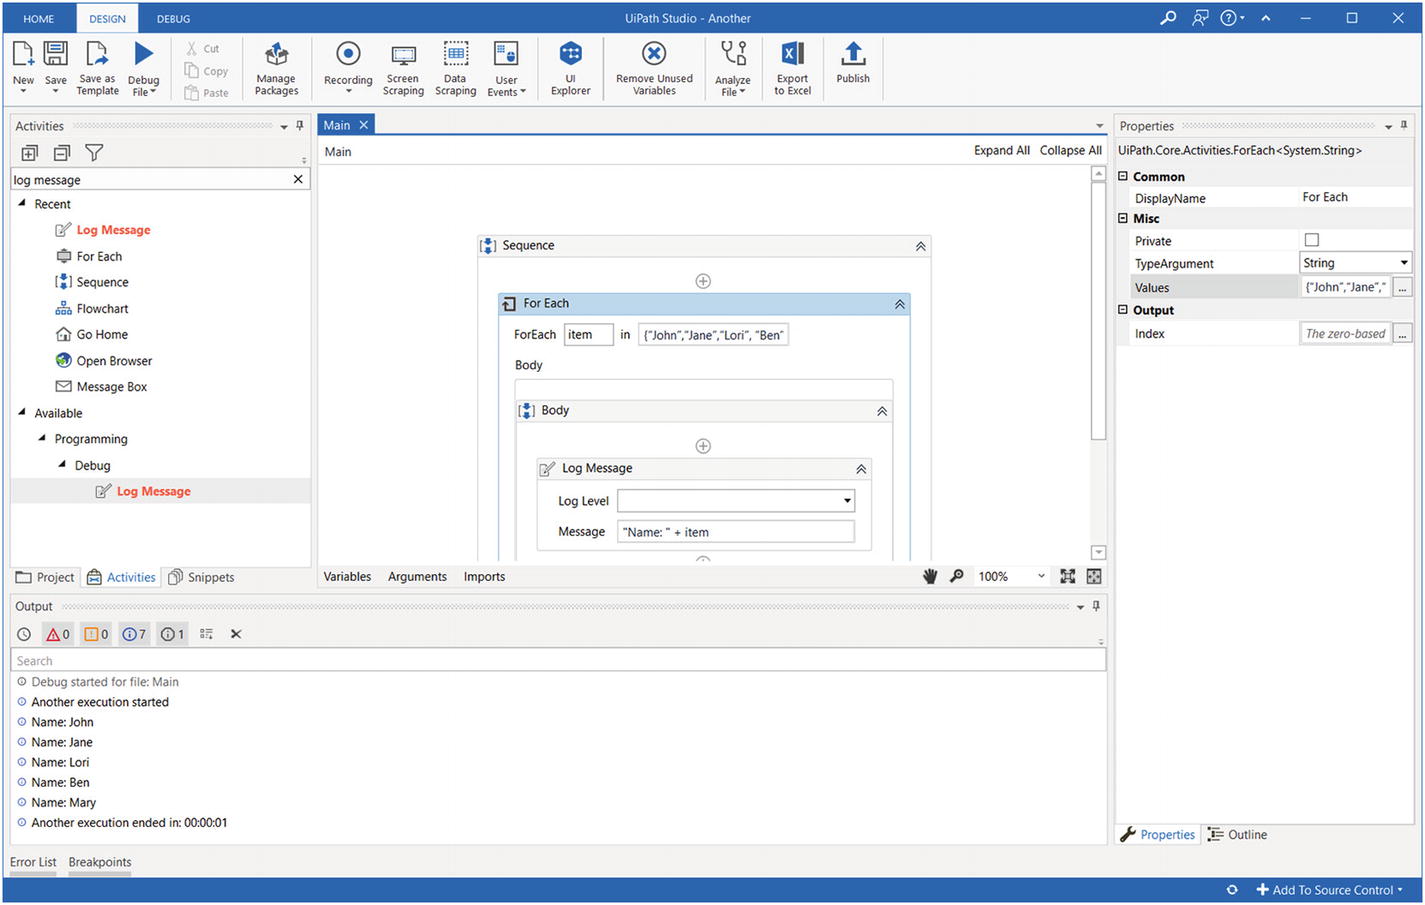
This is the output for the For Each loop
As you can see in the Output box below, the For Each loop prints out all the names.
Do While Loop and While Loop
A Do While Loop will continue until a condition is triggered. Unlike a For Each loop, you do not know how many times it will cycle through or if it will even need to do so.
Here’s an example. Drag and drop a Sequence on the Main screen and put the Do While Loop activity inside it (at Workflow ➤ Control ➤ Do While). In the Body, drag and drop the Assign activity (at Workflow ➤ Control ➤ Assign).
Next, go to the bottom of Main and select Variables and click Create variable. From here, enter the “Counter” for the “Name” and chose int32 for the Variable type. We do this since we want to track the value of Counter as it goes through the loop.
Then go to where it says “To” and enter “Counter” and where it says “Enter a VB expression,” you will enter “Counter + 1.” In other words, every time there is a loop, the value of one will be added to Counter.
“The Count is “ + Counter.ToString
You use the .ToString to convert the integer to a string. If not, you will get an error since UiPath Studio does not allow you to mix different data types.
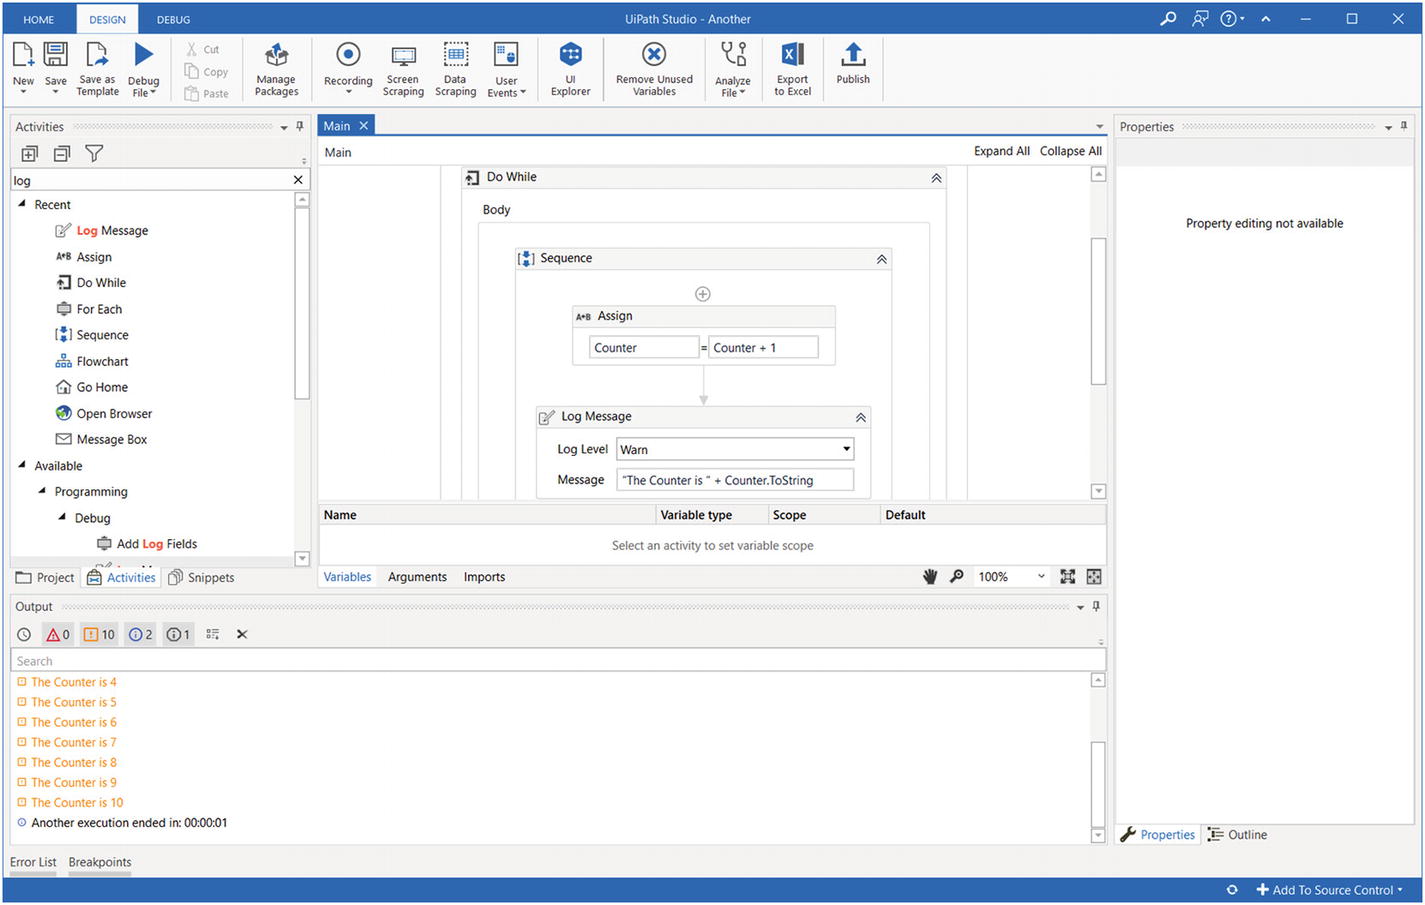
This shows the results of the Do While loop
As you can see, the Do While loop counts the numbers until it reaches 10. After this, the loop is terminated.
Then how is the While Loop different? It’s essentially the same thing but the condition is at the top of the sequence. This means that the loop may not necessarily be executed. Thus, in our example, this would be the case if the value of Counter is 11 when the While loop is executed.
IF/THEN/ELSE Conditionals
Yes, this is self-explanatory. You can also use the IF/THEN/ELSE approach with bots.
Here’s how. First you will drag and drop a Sequence and then create a variable called “InputNumber,” which will be an int32. Then you will put an Input Dialog activity inside the Sequence (at System ➤ Dialog ➤ Input Dialog). In the Title, enter “Number Box” and in Label put “Enter a number.”
Condition: InputNumber <= 10
Then: Drag and drop a Log Message (Programming ➤ Debut ➤ Log Message) and select Info for the Log Level and enter this for the Message: “The number entered is 10 or less.”
Else: Like what we did previously, place a Log Message, select Info for Log Level, and enter this message: “The number entered is more than 10.”

This is an example of using the If activity
Switch
While the If activity is quite useful, there are certainly drawbacks. Perhaps the biggest is when you have multiple possible pathways – say, more than three. Using the If activity is usually too cumbersome.
But there is an alternative: the Switch statement .
To see how this works, let’s go through an example. Create a variable called ChatInput and you will classify it as a String.
Title: Enter “Chatbot”
Label: Enter “What do you want to do?”
Result (this is in the Properties Box): Enter ChatInput
Next, you will drag and drop the Switch activity on the Sequence (Workflow ➤ Control ➤ Switch).
Click the Switch box and then change the TypeArgument on the Properties box to String. In Expression, enter “ChatInput.” This means that after the user enters text in the Input Dialog, it will be evaluated.
OK, in this chatbot app we are creating, it can only understand three words: Help, Hello, and Purchase! These will be put in separate case statements.
For example, you will click “Add a new case” and then enter Help (note that you do not use quotes). You do this also for Hello and Purchase.
Help: “How can I help you?”
Hello: “Hi, how are you doing?”
Purchase: “What do you want to buy?”
Default: “I cannot understand the question.”
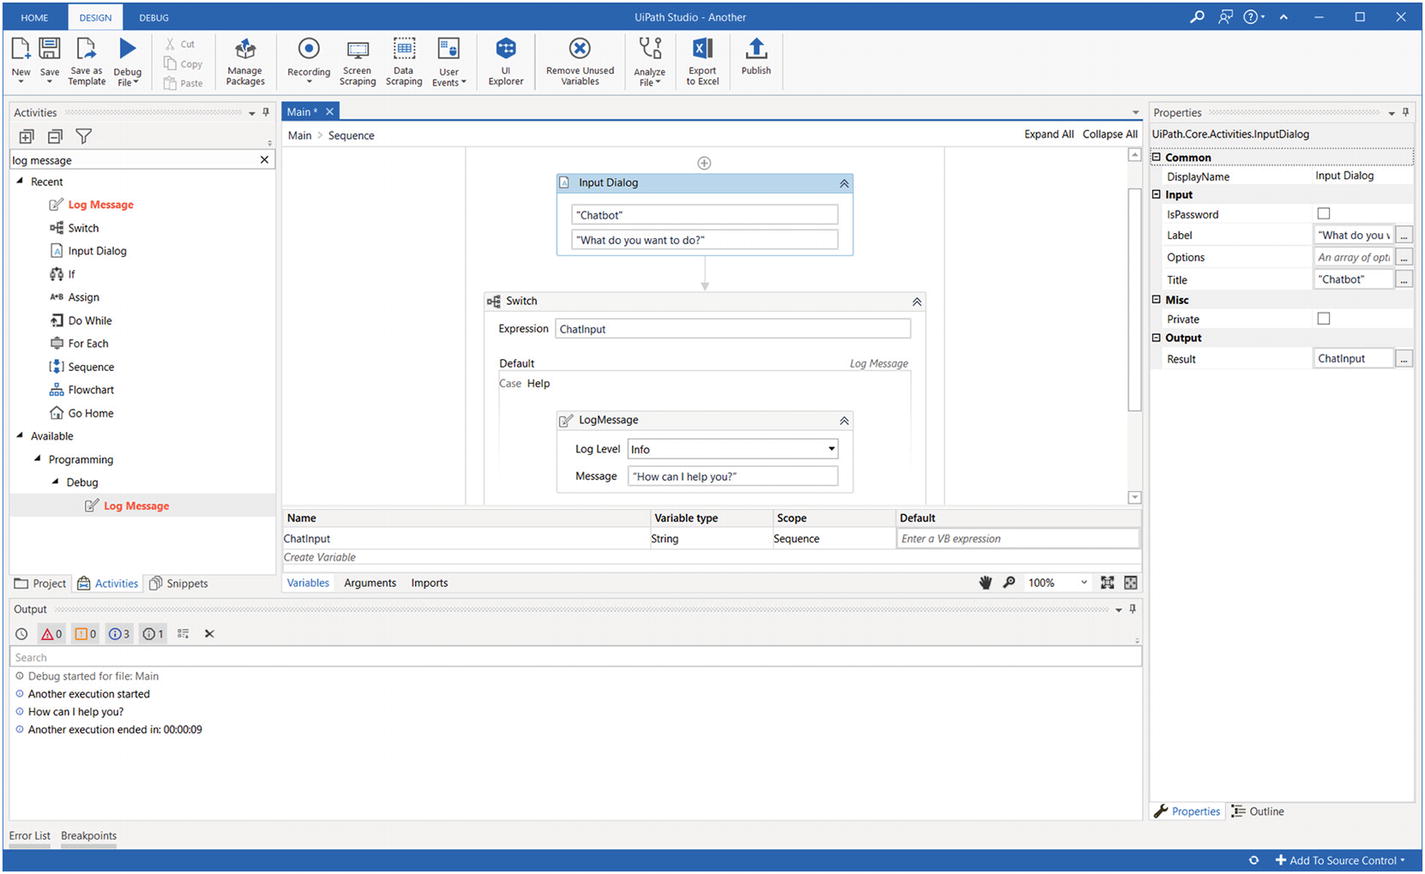
This is an example of using the Switch activity
UiPath also has the Flow Switch activity. This is essentially the same as Switch except it is used for a Flowchart.
Debug
Coding a bot can be fairly quick. What really takes time? It’s usually the debugging. In some cases, it can take quite a while. According to the late computer scientist Alan Jay Perlis: “There are two ways to write error-free programs; only the third one works.”1
The good news is that RPA systems like UiPath have extensive documentation and helpful forums. A quick search on Google can also provide some links to solutions.
As noted earlier in the chapter, the UiPath platform has a Debug section, which you click on the top of the screen. This provides an array of tools that should help fix problems with the bot.
One is to create more detailed log files, which show the instructions executed, values impacted, and time stamps. This can help pinpoint the nagging issues. To allow for this, you will click the Log Activities. Then you will run the bot by either clicking on the Debug File button or pressing F9. After this, you can find the log file by clicking on Open Logs.
You’ll notice that this process can be quick. So by clicking the Pick Slow Step icon and selecting Highlight Activities, the speed will be much more reasonable and you will also see each element highlighted (by the color yellow).
The UiPath Debug system has the ability to set Breakpoints within the workflow. You can do this where you think there may be a problem or before where the bot triggers an error.
Once you reach the Breakpoint, you have a couple options. One is to click the Locals tab, which will show you the contents of the variables. This will indicate if the bot is taking the right actions with the data.
Also, at a Breakpoint, you can then press the Step Into button. This will execute the next step in the workflow – and you can then see how things change. By doing this, you should get a sense of what is happening and where the problems are. Or you can click the Step Over button, which will take you to the next activity.
Another way of debugging a bot is to use exception handling – that is, with the Try/Catch construct. To see how it works, let’s first try by dragging and dropping a Sequence (Workflow ➤ Control ➤ Sequence) onto the Main screen and then putting a Message Box (System ➤ Dialog ➤ Message Box) on it. You will then enter the following in Message: “Hello, World!” But do not put in the quotes.
When you press the Start button or F5, you will get an error and the bot will stop. But what if you do not want this happen? Suppose you instead want the bot to continue but only provide you with a warning?
This is where Try/Catch comes in. Drag and drop this onto the Main screen (Workflow ➤ Error Handling ➤ Try Catch). You will then right click the top of the Log Message box and select Cut. Then go to Try and paste it inside .
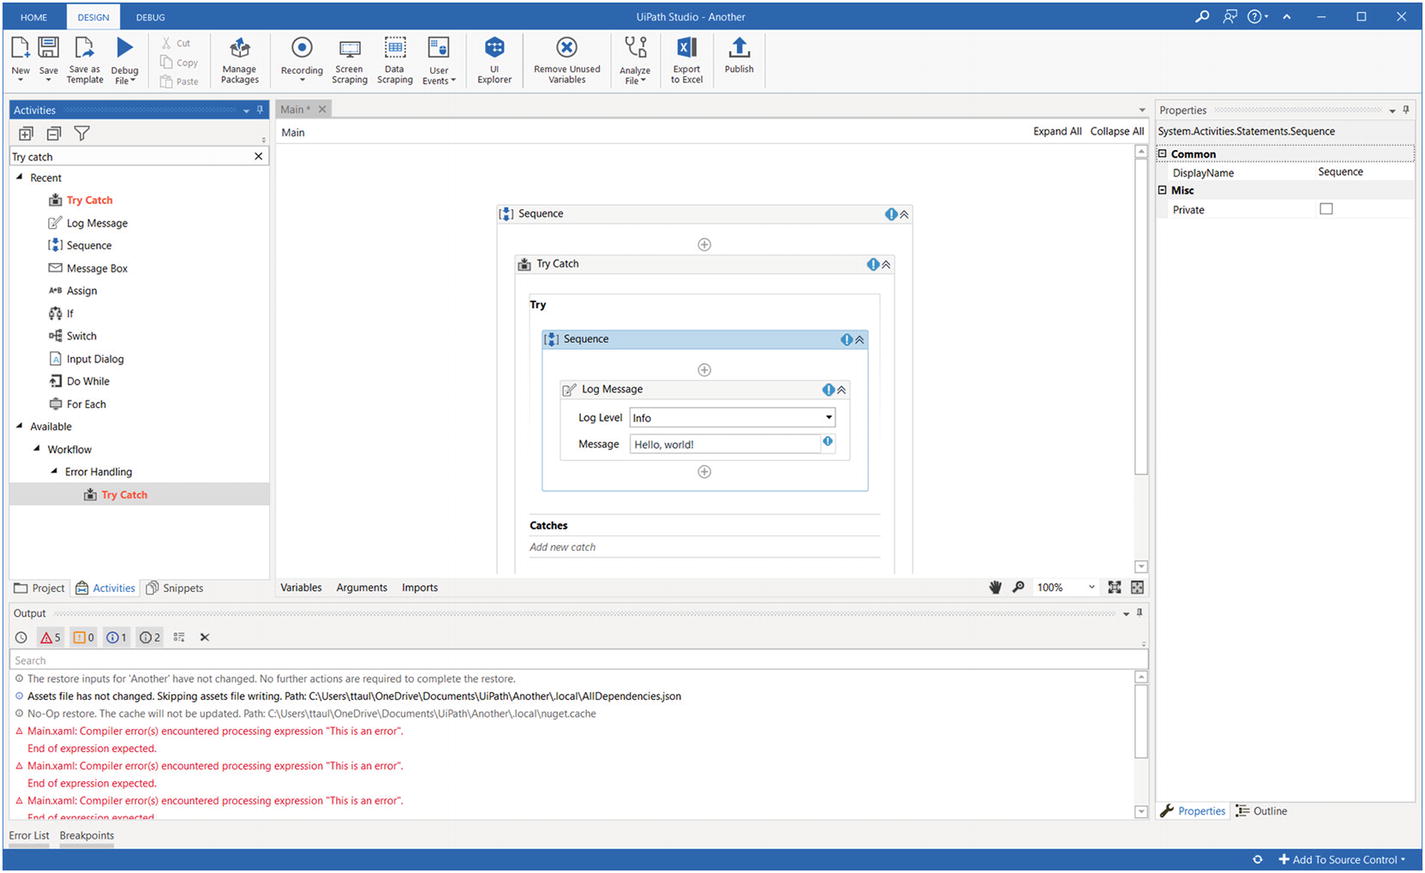
This shows the use of the Try/Catch activity
You will then click “Add new catch” and then select System.Exception, which is a generic option. Next, click to the right side and drag and drop a Log Message inside. Select Warn for the Log level and enter this for the Message: “An error has been detected.” And make sure to include the quotes.
When you launch this bot, the first Log Message will be triggered (the “try”). But since it has an error , the code will execute the second Log Message (the “catch”). In other words, by doing this, the program will continue to run – but you will still be able to track the potential problems.
Common UiPath Functions
We have looked at the different types of workflows and programming structures for UiPath. But as you create bots, you will encounter certain types of scenarios like logins and screen scraping. These are at the core of RPA functionality.
So let’s start with a login. Actually, UiPath has provided a test environment – called Acme System 1 – to help with this, which is at https://acme-test.uipath.com/account/login. It essentially emulates a company, such as with accounts for vendors, checks, and invoices. For the most part, you can fairly easily test the numerous functions of UiPath.
To use Acme System 1, press Register and enter your e-mail and password. Next, we will create a bot to login. To do this, you must have the Microsoft Edge extension installed, which you can access from the Tools menu item on the start screen of the UiPath Studio. You will then press Launch and Turn On after it is downloaded.
Go to create a bot by dragging and dropping a Sequence on the Main screen (Workflow ➤ Control ➤ Sequence). Then go to the Record at the top and select “Web.” As the name implies, this will record your actions on a web site, which will be Acme System 1. After you are done, press to stop the Record and your Sequences will have the workflows for the login. As you use UiPath – or any other RPA system – the recording of actions will be quite common.
But there also must be ways to help customize this. After all, what if someone else is logging into the system? In this case, you want to allow UiPath to make the adjustment – which is done by using Arguments. This is available at the bottom Tab on the Main screen. You will specify the name of the argument – say, the username or password – and then indicate the type and default value.
Another common function of RPA is Screen Scraping. UiPath Studio actually makes it fairly easy to do this. You will select “Screen Scraping” at the top of the screen and then go to a web page that has information. For example, it may be a table of data and UiPath will automatically detect this. It will then ask if you want to scrape all of it. It will also see if the data spans multiple pages and UiPath will handle this, such as put it in a Data Table. This makes it easy to manipulate within the bot with Excel or another application.
The UiPath Orchestrator
So far in this chapter, we have covered the UiPath Studio. But once you have finished creating a bot, you will need to manage it. This is done by using the UiPath Orchestrator.
In terms of deployment, you can either have this software on your own servers or the cloud (at cloud.uipath.com). Regardless of which option you choose, you can have separate instances of the software. For example, you could have ones for development, staging, and production, which should help simplify the bot development process. Or you could have instances for different departments, say, for human resources, finance, and marketing.
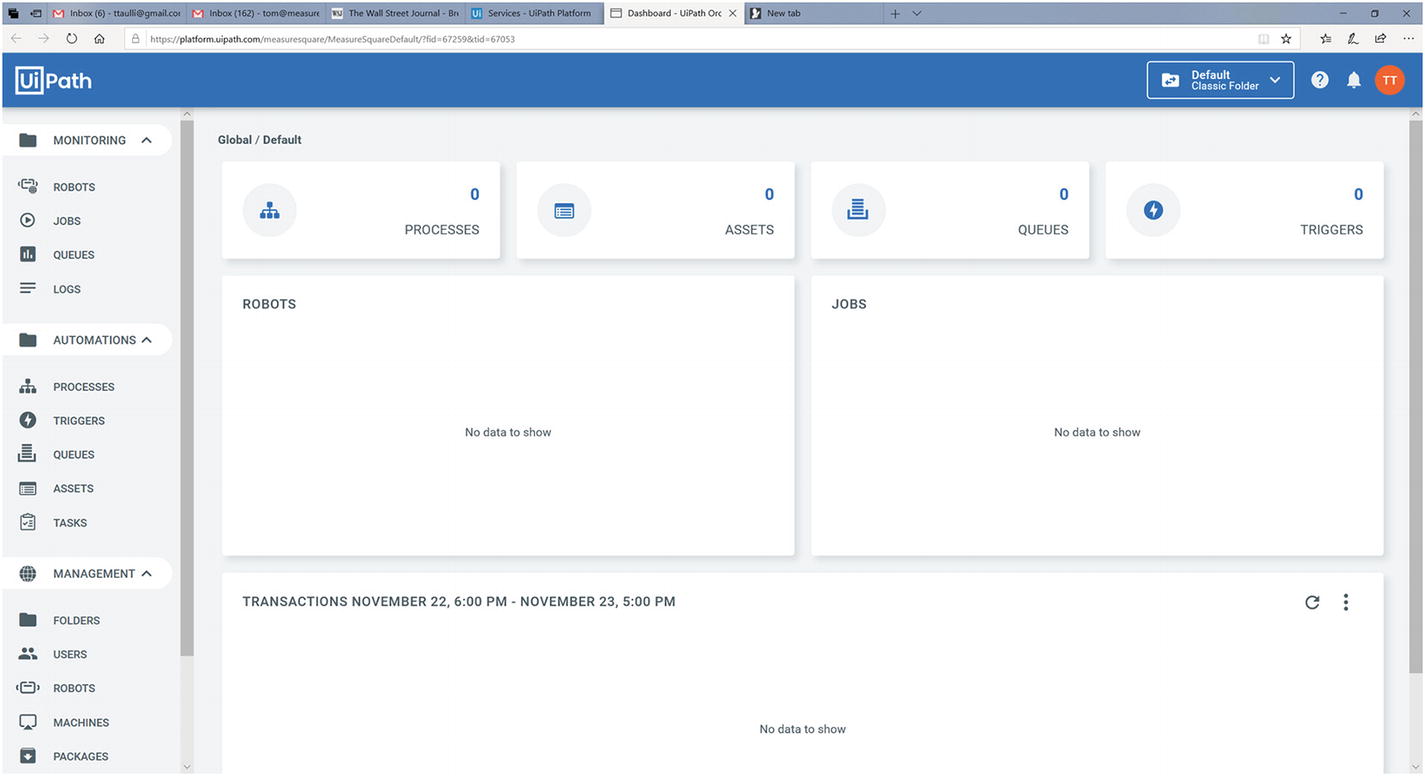
This shows the Orchestrator
First go to the top right of the page and click your user icon and then select Settings. In the general tab, you can choose your time zone. If you belong to a global organization, you might want to set this for “(UTC) Coordinated Universal Time.” In the other parts of the Settings section, you can integrate with your e-mail system, find the details of the deployment URLs and provide for security.
Robots: This is where you can register your bots.
Processes: On the left side, there is a + button, which allows for the creation of new processes. This essentially brings in the bots that were created in the UiPath Studio.
Jobs: This shows the bots that are in operation or have been in operation.
Schedules: You can set the times for deploying the bots.
Assets: You can create variables for the Orchestrator (text, Boolean, integer, and credential, which is for the logins).
Queues: This is an advanced system to help manage bots.
To see how all this works, here’s an example. We’ll start with a simple bot that pops up a message with “Hello, world!” (we created this earlier in the chapter).
We’ll then look at how to connect the bot to the cloud. First, go to the main screen and select Machines and press +. You will get three icons: “Standard Machine,” “Machine Template,” and “Close.” We’ll use the first one (which, by the way, is the most common one to use).
Before doing this, you need to locate the ID of your computer. To do this, bring up the Windows Explorer (which shows the files on your Windows system) and right-click “This PC.” You will find your machine ID at “Computer Name:” or “Device Name:” You will then enter this when you select “Standard Machine” and click “PROVISION.”
You will then want to get another piece of information: the machine key. You will find this by pressing the “…” (which are vertical).
Now click “ROBOTS” at the right side of the screen, click +, and you will see three icons: “Standard Robot,” “Floating Robot,” and “Close.” Choose the first one and select the computer name from the dropdown. Then enter “Hello” as the name for the bot and then the login credentials for your Windows machine.
UiPath will update the screen to show the robot but also indicate that it is disconnected. To make the connection, you will need to launch the UiPath Robot application, which you can find on your Windows Start menu. At the top, click the settings icon and enter the machine ID and then put https://platform.uipath.com for the Orchestrator URL. This will then activate the bot.
Best Practices for Bot Development
Templates and Bot Stores: Before designing a bot, see if there is already one available. The top RPA providers have their own stores as well as libraries. So do some checking first.
Reusable Workflows: This means you can design your bot from smaller parts. Of course, this helps to reduce the complexity. But there is another important benefit: easier updates. For example, suppose when you create a bot, you repeat the creation of a certain Sequence. You may have, say, 20 bots that use it. But then later you need to make some changes to the configuration. Well, this means you will need to go back to each of the bots and make the change. However, if it had a reusable workflow, then you would just have to change this once.
Be the Bot! Actually, designing an effective bot takes a change in mindset. It’s not about completely replicating the actions of a human. One reason is that the process may be fairly inefficient. What’s more, a bot will run 24/7 (a human, of course, can put in about eight hours or so). The key is that you should think like…a bot! True, this sounds kind of tough and strange. Can humans really think like a computer program? Not necessarily. But when designing the bot, it’s important to take a “blank slate” approach and not just focus on typical human approaches.
Readability: Take the time to make sure your workflows and code are easy to understand. One part of this is to set up a standard naming convention for the activities and variables. It is also a good idea to make comments within the bot that describe the different steps.
Think About the Business: “Bot development should involve the business teams and the IT teams working together,” said Asheesh Mehra, who is the cofounder and CEO of AntWorks. “This is key since RPA development should work toward automating the identified business process. These teams should be sure to employ technology and develop solutions that can scale as needed. And they should clearly define business rules, including exceptions and when a human must get involved.”
Conclusion
Even though we covered lots of ground in this chapter, we still only looked at the beginner level of UiPath! The software is definitely powerful and allows for deep usage of an IT environment. Although, with what we have looked at in this chapter, you would still be able put together some useful automations.
Next we’ll look at deployment and monitoring.
Key Takeaways
Most RPA vendors have a trial version of their software and some even have free versions (although there are limitations on the usage). Such options make it easy to get a sense of the capabilities of the software.
A traditional RPA system will have two key parts: a studio or designer (which is where you create the bot) and the Orchestrator (where you manage the bots).
When a team develops bots, it is a good idea to use features like version control, which tracks and documents the steps in the process.
Even the most sophisticated RPA systems cannot have every feature or integration. This is why you will have the option to install modules.
An RPA system will have a workflow like a sequence or flowchart. This is a top-down visualization of the bot, which makes it easier to understand. It is also recommended to give descriptive names for each of the sequences and flowcharts.
It is important to provide comments and annotations with the features/steps of a bot. After all, this will help lessen the learning curve when new developers are brought onto the team.
You can also log messages as a way to document the code. They will then show up on the orchestrator.
To develop a bot, you will need to understand variables. These are containers that hold data that can be manipulated. Some of the basic data types include Boolean (this is either a yes or no), integers (numbers without decimal points), strings (they hold text information), and custom-built structures (say, to hold contact information about customers). But of course, an RPA system will allow for more sophisticated data collection, such as with internal system variables.
The scope of a variable is where it is available to be used. This is critically important since you do not want variables that could potentially impact other parts of the bot.
Bots use other common structures of a computer language like loops and conditionals.
A loop is a way to repeat a set of instructions until a condition is met. Some of the main ones include For Each, Do While, and While.
A conditional will branch to a certain part of the program based on a condition (say, if a number is greater than a particular value). Some examples include IF/THEN/ELSE and Switch.
Often debugging takes more time than creating the initial bot. In fact, the process can be quite complicated. But RPA systems provide debugging tools. They include setting breakpoints – which stops at certain points in the code – and then allowing for you to step in over different sections. You can also embed the bot in a try/catch. This will execute the code even though an error is triggered.
Key recording is a standard feature in an RPA system. This will capture a person’s keyboard/mouse movements, which can then be embedded in a bot. There are also ways to customize the process (e.g., by asking for login credentials).
With an RPA system, you may want to have different instances of the software. This could be based on the stage of the bot creation – development, staging, and production – or the department.
Before creating a bot, it’s recommended to see if there is already a bot available, say, with a template or from a bot store.
If a bot has a repeated workflow, then you might want to make this reusable. This helps to reduce the development time.