
2. Printing and Mirroring
Although programming focuses on crafting artifacts through code, it’s important to remember that code serves the developer as well as the end user. Code doesn’t need to just compile: It should communicate clearly, coherently, and effectively as well. Both Swift and Xcode support meta-development tasks with technologies that assist you from debugging to documentation. This chapter introduces developer-facing language features including printing, mirroring, Quick Look, and Quick Help. Each of these is a first-class element worthy of your interest and development time.
The features discussed in this chapter cover the gamut of output scenarios that range from user-facing write operations to developer-facing debugging support, particularly the latter. This chapter surveys these technologies and explores how you can precisely build feedback and output to fit your development and debugging needs.
Basic Printing
Swift’s print function offers a simple way to display nearly any value. Here’s a simple example that outputs “Hello World”:
// Outputs "Hello World" with line feed
print("Hello World")
As this example demonstrates, you call print, supply an argument—in this case, a string—and let the function output a representation of that value. You can print any value, whether numbers, structures, enumerations, or so forth. Simply wrap the print request in parentheses, as in the following examples:
print(23) // prints 23
print(CGPoint(x: 50, y:20)) // prints (50.0, 20.0)
enum Coin{case Heads, Tails}
print(Coin.Heads) // prints Coins.Heads
func plus1(x: Int) {x + 1}
print(plus1) // prints (Function)
Some printed values (for example, Coins.Heads) provide more meaningful output in their default form than others (for example, (Function)). Apple continues to improve default print output in each Swift update.
When the content of the default output is not suitable for your needs, you can customize it. Swift has evolved quickly with ever-improving representation. Nearly all standard print results are now usable, if not always perfect.
Printing Multiple Items
Swift supports multiple print parameters. Here’s what those print declarations look like:
public func print(items: Any..., separator: String = default,
terminator: String = default)
public func print<Target: OutputStreamType>(items: Any...,
separator: String = default, terminator: String = default,
inout toStream output: Target)
In each call, the items label followed by the Any... type indicates that the function accepts variadic (that is, a variable number of) arguments. This means you can print several values at once:
print(value1, value2, value3)
The Any item type means you can mix and match types for a heterogeneous argument list:
print("String:", myStringValue, "Int:", myIntValue, "Float:", myFloatValue)
Unlike printf or NSLog, print does not use a format string and arguments to create its output. This may seem inflexible, but it offers greater runtime safety. Although the default implementation doesn’t offer output precision and alignment features, you can access those through the String class (via a format-based initializer) or by defining custom protocols and standalone functions that manipulate values for printing.
For example, you might extend the ConvertibleNumberType protocol in Chapter 4, “Closures and Functions,” to add a precision feature:
public extension ConvertibleNumberType {
public func toPrecision(digits: Int) -> String {
if digits == 0 {return "(lrint(self.doubleValue))"}
let factor = pow(10.0, Double(digits))
let trunc = round(self.doubleValue * factor) / factor
var result = String(trunc)
while result.rangeOfString(".")?
.startIndex.distanceTo(result.endIndex) < (digits + 1) {
result += "0"
}
return result
}
}
You can easily expand this concept to introduce padding, hex/octal/binary representation, and other standard formatting features.
Adding Item Separators
The optional separator parameter adds a text string between each pair of printed items. The following call prints out a comma-delineated list of integers:
print(1, 5, 2, 3, 5, 6, separator:", ") // 1, 5, 2, 3, 5, 6
Use the separator argument to provide a natural visual break between printed items. This argument defaults to a single space (" ") when not otherwise specified.
String Interpolation
Swift enables you to embed value output in strings with string interpolation. Supply a value or expression and wrap it within backslash-escaped parentheses for use in printing or creating strings to supply to other consumers. Here’s an example of what interpolation looks like using basic values:
let value = 23
print("Value: (value)") // prints Value: 23
let square = value * value
print("The square of (value) is (square)")
// prints The square of 23 is 529
Alternatively, skip the intermediate variable and insert a simple expression:
print("The square of (value) is (value * value)")
The multiple-output example earlier in this chapter uses the following call:
print("String:", myStringValue, "Int:", myIntValue, "Float:", myFloatValue)
And produces this output, which is not particularly beautiful:
String: Hello Int: 42 Float: 2.0
The result is not improved by adding comma separators:
print("String:", myStringValue, "Int:", myIntValue,
"Float:", myFloatValue, separator: ", ")
// String:, Hello, Int:, 42, Float:, 2.0
String interpolation shows its strength in the following tweak:
print("String: (myStringValue)", "Int: (myIntValue)",
"Float: (myFloatValue)", separator: ", ")
String: Hello, Int: 42, Float: 2.0
The print statement chunks labels and values together using string interpolation, and then applies the separator to the label/value pairs.
Use embedded expressions for very short, very precise insertions. Complex string interpolation provides a good way to confuse a compiler that has yet to achieve notable maturity and stability:
let count = "hello".characters.count
print("The count is (count)")
Interpolated material inserted in a string matches the output you expect from printing. When you customize the way an instance represents itself, that description is used for interpolation as well as print output.
Controlling Line Feeds
By default, print appends a newline and writes to standard output. The terminator parameter controls a termination string. Its default value is "
", a standard newline. To print on a single line without that carriage return, assign the print call’s terminator parameter to "" or any other non-newline string. The following example joins the output from the Hello and World print requests into a line of output that ends with a single carriage return:
// Outputs "Hello World" followed by carriage return
print("Hello ", terminator: "")
print("World")
Skip carriage returns to blend multiple results together on a single line. if statements let you combine optional elements together. In the following snippet, a view displays tags, stored constraint counts, and external constraint references when values are significant:
print("[(debugViewName) (frame)", terminator: "") // start of line
if tag != 0 { // optional
print(" tag: (tag)", terminator: "")
}
if viewConstraints.count > 0 { // optional
print(" constraints: (viewConstraints.count)", terminator: "")
}
if constraintsReferencingView.count > 0 { // optional
print(" references: (constraintsReferencingView.count)",
terminator: "")
}
print("]") // end of line
This next example shows how you might use the terminator parameter to sequentially build and combine labels and results. This snippet pulls out the long string initializer into its own print statement:
// Create star output
for n in 1...5 {
print("(n): ", terminator: "")
print(String(count: n, repeatedValue: Character("*")))
}
This code produces labeled stars:
1: *
2: **
3: ***
4: ****
5: *****
IRC servers often require you to send both
and
to terminate each line. If you’re writing a client, you could automate this by tweaking the terminator argument like so:
print(myText, terminator: " ", toStream: &myIRCStream)
This example uses a custom stream destination for the IRC communications. You’ll read about output streams like this in the next section.
Recipe: Printing to Custom Destinations
To redirect print output from its default stdout destination, create a construct that conforms to the OutputStreamType protocol. This protocol requires a single write function, which you implement to send string data to an output destination of your choice:
protocol OutputStreamType {
/// Append the given `string` to this stream.
mutating func write(string: String)
}
Here’s a trivial example that uses fputs to write to stderr:
/// StderrStream conforms to OutputStreamType
public struct StderrStream: OutputStreamType {
static var shared = StderrStream()
public func write(string: String) {
fputs(string, stderr)
}
}
Use a custom standard error output stream by incorporating it in print statements. This snippet creates a new instance and then prints, supplying values to both the toStream and terminator arguments:
// Print "Hello World" to stderr
print("Hello ", terminator: "", toStream: &StderrStream.shared)
print("World", toStream: &StderrStream.shared)
This example declared shared as a mutable static class property. Constructs that conform to OutputStreamType must be mutable as each stream is passed as an inout argument to print. Use the inout prefix (&) to annotate streams in your print requests.
An inout parameter enables Swift to modify values using a copy-and-write-back mechanism. It’s required for printing because output streams may mutate their targets. You encounter this mutability when you print directly to strings, as you’ll read about in the following section.
Printing to Strings
The OutputStreamType protocol is adopted by Swift’s String type. This conformance means you can use print to output to strings as well as to file streams. Here’s an example that prints Hello World to a string:
var s = ""
print("Hello World", toStream: &s) // s is "Hello World
"
print(s)
When this print(s) statement executes, it writes two carriage returns. The first is added when printing to the string; the second is added when the string is printed to stdout. To avoid that extra line, skip the newline either when constructing the string or when printing it:
s = ""
print("Hello ", terminator: "", toStream: &s)
print("World", terminator: "", toStream: &s)
print(s) // "Hello World" plus newline
More commonly, you’ll want to use the inverse of the preceding example. Instead of suppressing new lines, add carriage returns on each print request to build a line-delimited log. Here’s an example of what that approach might look like:
var log = ""
print("(NSDate()): Hello World", toStream: &log)
print("(NSDate()): Hello World", toStream: &log)
print("(NSDate()): Hello World", toStream: &log)
print(log, terminator: "")
In this example, the log variable grows with each call. The results can be printed (as shown here), saved to a file, or sent to a consumer such as a text view. You can even use a property observer like didSet to update the text view each time print is called. Combining string interpolation with string printing gives you a simple and powerful way to iteratively grow text in your data.
Printing to Custom Output Streams
Recipe 2-1 expands the custom output stream that only printed to stderr to a more flexible implementation. Predefined stderr() and stdout() constructors enable you to pull ready-made streams. This listing builds two public output streams for these typical use cases.
This class can also initialize with a path and then print to that file. An optional append parameter (which defaults to false) prevents rewriting the file on open:
if var testStream = OutputStream(
path: ("~/Desktop/output.txt" as NSString).stringByExpandingTildeInPath) {
print("Testing custom output", toStream: &testStream)
print("Hello ",terminator:"", toStream: &testStream)
print("World", toStream: &testStream)
print("Output sent to (testStream.path)")
} else {
print("Failed to create custom output")
}
This recipe is built around a class implementation. It adds a crucial deinitializer that closes open file pointers if they were used to construct an instance. This is a good example of a place where deinit wins out over defer statements. The lifetime of an output stream normally extends long beyond a single scope, which is the limiting factor for defer clean-up.
Recipe 2-1 Configurable Output Stream
public class OutputStream: OutputStreamType {
let stream: UnsafeMutablePointer<FILE> // Target stream
var path: String? = nil // File path if used
// Create with stream
public init(_ stream: UnsafeMutablePointer<FILE>) {
self.stream = stream
}
// Create with output file
public init?(var path: String, append: Bool = false) {
path = (path as NSString).stringByExpandingTildeInPath
if append {
stream = fopen(path, "a")
} else {
stream = fopen(path, "w")
}
if stream == nil {return nil}
self.path = path
}
// stderr
public static func stderr() -> OutputStream {
return OutputStream(Darwin.stderr)
}
// stdout
public static func stdout() -> OutputStream {
return OutputStream(Darwin.stdout)
}
// Conform to OutputStreamType
public func write(string: String) {
fputs(string, stream)
}
// Clean up open FILE
deinit {
if path != nil {fclose(stream)}
}
}
// Pre-built instances
public var errStream = OutputStream.stderr()
public var stdStream = OutputStream.stdout()
Recipe: Printing and String Formats
Cocoa’s standard logger is NSLog. Available in the Foundation framework, the NSLog utility function uses string formatting to construct log messages that are sent to standard error and the system console. Unlike print, NSLog supports standard %-delimited format specifiers as well as Apple-supplied extensions. Apple’s String Programming Guide details its support for and extensions to the IEEE printf specification (see http://pubs.opengroup.org/onlinepubs/009695399/functions/printf.html).
You pass NSLog a format string followed by a variadic list of Objective-C-compatible parameters:
NSLog("Dictionary: %@, Double: %0.2f", ["Hello":3], 2.7)
The parameters map to specifiers embedded within the format string. The result is a string that combines the format specifiers and the arguments into coherent text.
Swift and Format Specifiers
Swift supports format specifiers as one way the standard library offers to create and initialize strings:
/// Returns a `String` object initialized by using a given
/// format string as a template into which the remaining argument
/// values are substituted according to the user's default locale.
init(format: String, arguments: [CVarArgType])
This initializer enables you to build a custom SWLog logger that mimics NSLog. Recipe 2-2 combines string formatting with Recipe 2-1’s errStream to create a minimal stderr log-alike: It prints to standand error output but doesn’t mirror output to the system console. This implementation also minimizes the printed time shown for each log entry to just minutes, seconds, and fractions of a second rather than the exhaustive date output provided by NSLog. For example, this:
SWLog("Hello world") // no args
SWLog("Formatted double: %2.3f", 5.2) // one arg
SWLog("Double plus string %2.3f, %@", 5.2, "Hello world") // multiple
Produces this:
55:40.706: Hello world
55:40.707: Formatted double: 5.200
55:40.708: Double plus string 5.200, Hello world
Format Limitations
You cannot use format arguments to express Swift constructs like enumerations, functions, and structs as they do not conform to the CVarArgType protocol. For example, this line results in a compile-time error:
SWLog("Struct: %@, Int: %03zd", CGPoint(x: 50, y: 20), 5)
However, you can add Swift string interpolation to format string initialization:
SWLog("Struct: (CGPoint(x: 50, y: 20)), Int: %03zd", 5)
If your interpolated material contains anything that looks like a % token, formatting may break and possibly crash your application. It is ridiculously easy to create potential format errors that pass the compiler smell test but crash when run. Compile and execute the following example to see this issue in action:
let formatSpecifierInsert = "%s %ld"
let s = String(format:
"Hello (formatSpecifierInsert) %@", arguments: ["world"])
This is probably not the outcome you’re hoping for.
In nearly every case, Swift printing and string interpolation is safer than using format specifiers as Swift can determine safety at compile time.
Conditional Compilation
Recipe 2-2 differentiates logging output between debug and release configurations. The build configuration test in the SWLog function uses command-line flags for conditional compilation (#if DEBUG). The function prints only when the DEBUG flag is set.
Figure 2-1 shows how you can add the DEBUG flag. Navigate to TARGETS > Your Target > Build Settings > Other Swift Flags. Select the Debug configuration and add –D DEBUG. Swift detects this flag when it compiles and uses it to include or exclude material marked within #if guards.
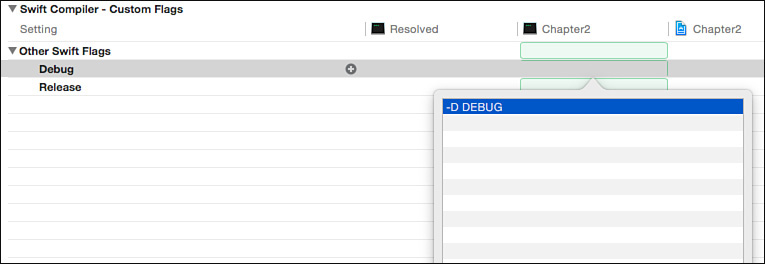
Figure 2-1 Differentiate between Debug and Release configurations by adding flags in Build Settings.
Note
You cannot add build configurations to playgrounds. Although you can use a predefined configuration suite for conditional playground builds, you cannot add compile-time tests that depend on developer-defined flags. Built-in tests include target OS (OSX, iOS, watchOS, tvOS) and target architecture (x86_64, arm, arm64, i386). You can combine tests using the || or operator, which is handy when you want to create cross-platform code that differentiates not just between OSX and iOS but also between the (more iOS-like) newer platforms.
internal func BuildSimpleTimeFormatter() -> NSDateFormatter {
let dateFormatter = NSDateFormatter()
// Alternatively pass mmssSSS. Extraneous punctuation is ignored
dateFormatter.dateFormat =
NSDateFormatter.dateFormatFromTemplate("mm:ss:SSS",
options: 0, locale: NSLocale.currentLocale())
return dateFormatter
}
internal let dateFormatter = BuildSimpleTimeFormatter()
public func SWLog(format: String, _ args: CVarArgType...) {
#if DEBUG
// Prints only for DEBUG build configurations
let timeString = dateFormatter.stringFromDate(NSDate())
print("(timeString):",
String(format: format, arguments: args), toStream: &errStream)
#endif
}
Debug Printing
Swift’s debugPrint() function offers a developer-facing alternative to the user-facing print() function. Unlike normal print commands, debug print requests show instance representations that are most suitable for debugging. With debug printing, "1..<6" becomes "Range(1..<6)", and the grinning face created with UnicodeScalar(0x1f601) becomes "u{0001F601}". Each result offers additional utility that supports your development.
Custom Stream Output
Both print and debugPrint enable you to establish custom representations and integrate them into Swift constructs. This is not to say that Swift’s default output is unacceptable. Consider the following Point structure:
struct Point {
var x = 0.0
var y = 0.0
}
The default description for instances of this struct looks like this: "Point(x: 1.0, y: 1.0)". This output string includes both a type name and current property values. In Swift 2, nearly every construct presents with an acceptably readable representation. However acceptable, that output carries no semantics. This string may not match the user’s expectations of a traditional (x, y) point presentation nor support a developer who might require additional information computed from the point values.
Swift enables you to build use-specific representations for logging, playground previews, LLDB output, and so forth. Each technology is built using protocols. For streams and string interpolation, the print and debugPrint functions task two developer-customizable protocols: CustomStringConvertible and CustomDebugStringConvertible. As the names suggest, these protocols describe behaviors that convert values to string presentations. Each uses a custom text representation property—description for print and debugDescription for debugPrint:
/// A textual representation of `self`.
var description: String { get }
/// A textual representation of `self`, suitable for debugging.
var debugDescription: String { get }
If you implement one protocol and not the other, each one falls back to the other. So if you print and there’s only a debug description, it will print the debug description in favor of the default output and vice versa. Here’s how the print fallback cascade works:
![]() If an instance conforms to
If an instance conforms to Streamable, call instance.writeTo(s) on an empty string s and print s.
![]() If an instance conforms to
If an instance conforms to CustomStringConvertible, return the instance’s description.
![]() If the instance conforms to
If the instance conforms to CustomDebugStringConvertible, return the instance’s debugDescription.
![]() Return the value supplied by the Swift standard library.
Return the value supplied by the Swift standard library.
The debugPrint fallback cascade reverses the priority of the first three bullets. The textual representation uses the following preferences order: CustomDebugStringConvertible, CustomStringConvertible, Streamable. If none of these conformances are available, Swift uses a default text representation.
The following snippet implements the Point structure and demonstrates conformance for both CustomStringConvertible and CustomDebugStringConvertible:
struct Point: CustomStringConvertible, CustomDebugStringConvertible {
var x = 0.0
var y = 0.0
var description: String {return "((x), (y))"}
var theta: Double {return atan2(y, x)}
var degrees: Double {return theta * 180.0 / M_PI}
var debugDescription: String {
let places = pow(10.0, 3)
let trunc = round(theta * places) / places
return "((x), (y)) (degrees)°, (trunc)"
}
}
var p = Point(x:1.0, y:1.0)
print(p) // (1.0, 1.0)
debugPrint(p) // (1.0, 1.0) 45.0°, 0.785
Recipe: Postfix Printing
When developing and debugging, I find it handy to use a special operator that prints a value in-place. This operator passes through whatever value it’s printing so it can easily be added, tested, and discarded on the fly:
let x = 5
let y = 3
let z = x*** + y // prints 5
let v = (((3 + 4) * 5)*** + 1)*** // prints 35, then 36
let w = 1 + z*** // prints 8, w is now 9
Recipe 2-3 implements two versions of the operator, one with three stars that uses standard printing and one with four that uses debug printing instead. Embed the operator to the right of any expression you wish to display. This star-delimited approach enables you to use global find-and-replace to remove or comment out print requests. As you see in Recipe 2-3, the operator implementation takes a DEBUG flag into account (like Recipe 2-2 did), preventing stray items from printing in release builds.
Nearly everyone I’ve shown this operator to reacts with noticeable horror, but its utility cannot be denied. It’s a handy item to have in your development toolbox, especially for playground use.
Recipe 2-3 Adding Postfix Printing Operators
postfix operator *** {}
public postfix func *** <T>(object: T) -> T {
#if DEBUG
print(object)
#endif
return object
}
postfix operator **** {}
public postfix func **** <T>(object: T) -> T {
#if DEBUG
debugPrint(object)
#endif
return object
}
Quick Looks
Xcode and Swift implement two kinds of Quick Look technologies. Quick Look for Custom Types offer a way for Xcode to preview NSObject-based type instances and present them to the developer in a clear, visual, and inspectable form. Playground Quick Look (CustomPlaygroundQuickLookable) extends preview support to Swift constructs. The Swift-specific version is used only in playgrounds. The general form can be used in both playgrounds and with the Xcode debugger.
Quick Look for Custom Types
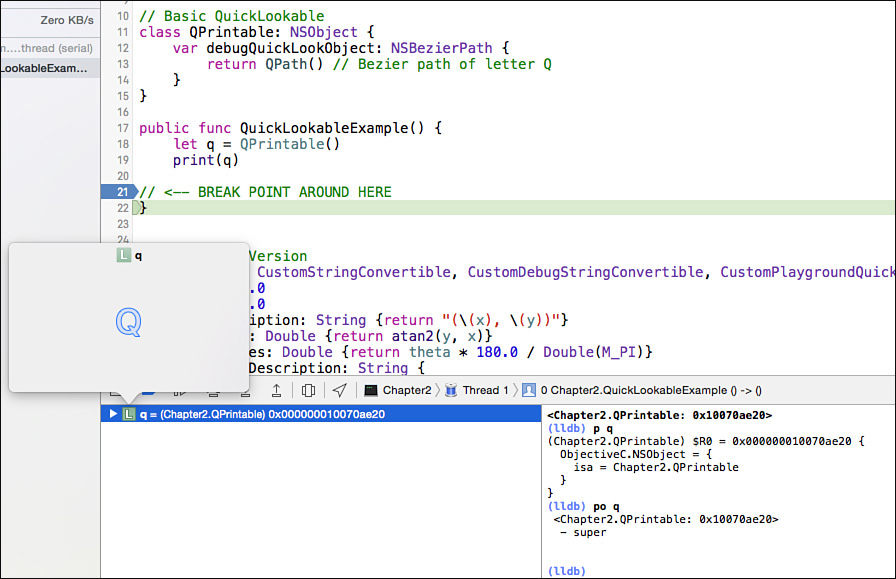
Quick Look for Custom Types was first introduced in Xcode 5.1. The Xcode debugger enables you to view variables in pop-up displays, creating a graphical rendering of object contents. Figure 2-2 shows this Quick Look technology in action.
Add Quick Look by implementing a debugQuickLookObject method. (There is not an associated protocol.) Your classes must be marked @objc / and descend from NSObject, which makes Quick Look of limited use for Swift development. (Your internal/public classes will be @objc by default, but private classes won’t be.) The method must return a valid Quick Look type: images, cursors, colors, Bezier paths, locations, views, strings (and attributed strings), data, URLs, or Sprite Kit classes. Apple details these types in its Quick Look for Custom Types in the Xcode Debugger support document. Search the web for the most recent version of this document.
In this example, the QPrintable class includes a single method: the debugQuickLookObject required for Quick Look previews. It returns a Bezier path consisting of the letter Q. The p (print expression) and po (print object) commands issued in the debugger confirm that a class instance otherwise consists solely of a pointer (isa) to an NSObject superclass. When you select an instance in the debugger and press the spacebar, Xcode renders and displays the associated Quick Look to a pop-up.
Apple writes in Quick Look for Custom Types, “Because your debugQuickLookObject method runs in the debugger, when you are inside your paused application, it is best to be economical in your method implementation. Write as little code as needed to represent your variable’s state as a useful visual graphic. Remember that running code when in a paused application can have side effects. If possible, cache the item you want to return.”
Quick Looks for Custom Types in Playgrounds
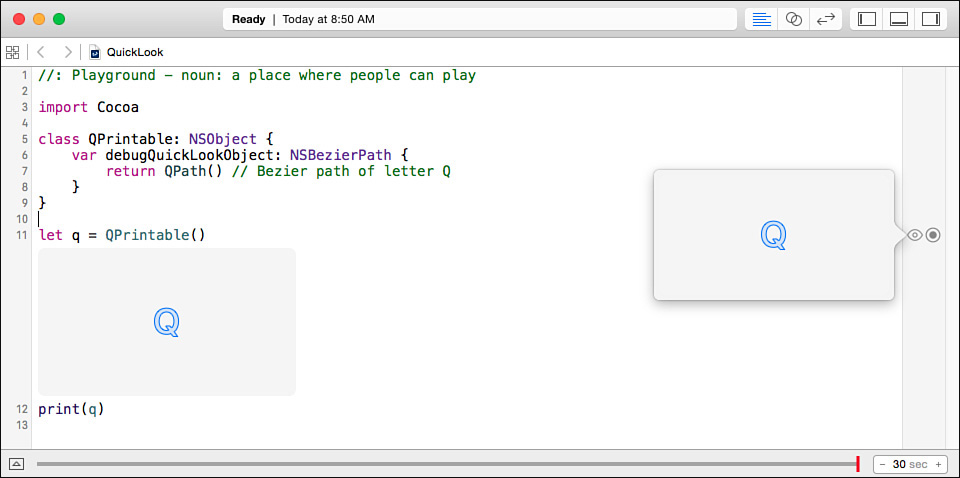
Standard Quick Look also renders in playgrounds (see Figure 2-3), where it is accessed by the Quick Look button. As this figure demonstrates, Quick Look output can also be embedded into the timeline (between lines 11 and 12) using value history panes. As with the debugger, playground-sourced standard Quick Looks are limited to NSObject descendants. Fortunately, Swift now has a Quick Look protocol more suitable for non-Objective-C constructs.
Playground Quick Looks
Swift playgrounds can render any construct that provides Quick Look compliance. Many system-supplied structures, classes, and enumerations already offer built-in implementations. Figure 2-4 shows a playground displaying some of these ready-made Quick Looks in its timeline.
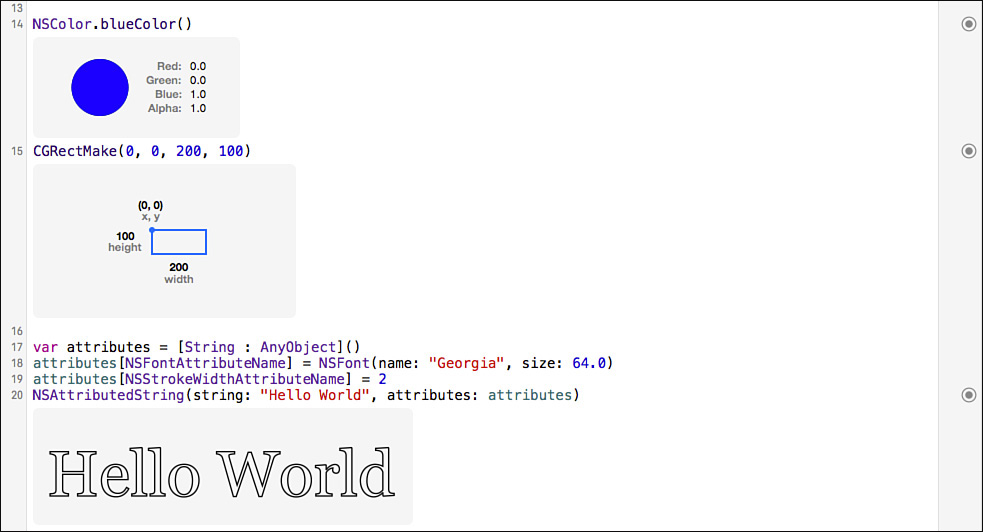
From top to bottom, this playground first presents a color instance. This comprises a swatch and an RGBA channel breakdown. Next, you see a CGRect structure. Its display includes an origin along with height and width values. A proportionate preview enables you to visualize the rectangle’s shape. Below that you find an attributed string with a custom font and stroke pattern.
I particularly like the output for CGRect. It provides one of my favorite built-in Quick Look previews. I cannot think of many circumstances in which you need to visualize what a rectangle looks like (think about it), but the care and layout in this overview is outstanding. The presentation provides a clear design that relates the structure’s fields with its inherent geometry. Notable details include multicolored fonts that differentiate labels and values and an outline with a small dot that emphasizes the rectangle’s origin.
This representation makes me want to up my game for my own Quick Look previews. Your Quick Looks can be as complex or as simple as needed (or wanted). You may want to reevaluate priorities if you find yourself spending more time building an exciting Quick Look (that your end users will never see) than on the actual class the Quick Look represents.
Creating Custom Quick Looks for Playgrounds
When your instance does not provide a built-in Quick Look option or you want to enhance a Quick Look to something more elegant, add custom support. Swift makes it easy to create Quick Look items that express constructs as images, paths, sprites, and other representations. Just conform to CustomPlaygroundQuickLookable and implement a customPlaygroundQuickLook() function that returns a member of the PlaygroundQuickLook enumeration.
It’s always easiest to leverage an existing built-in Quick Look for custom constructs. In Figure 2-5, the Point class redirects to the similarly named PlaygroundQuickLook.Point enumeration. This abstract structure expresses a one-to-one correspondence with a built-in enumeration. That happy coincidence doesn’t always work out so perfectly, but you can usually build at least a string or an image that represents your constructs in an expressive and semantically valuable way.
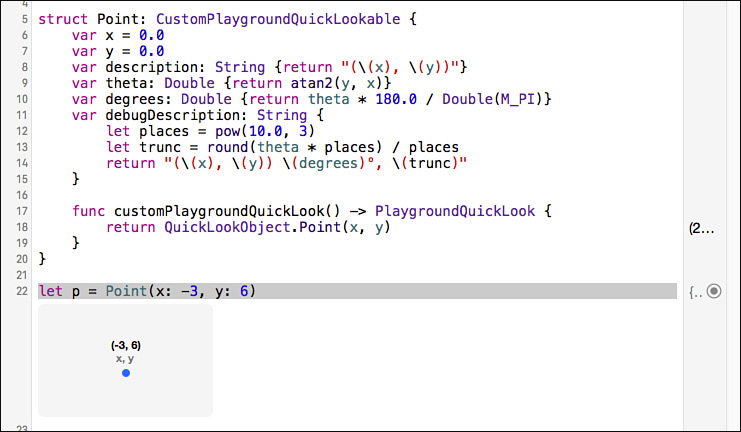
Built-in Quick Look Types
Here is the current list of Quick Look types and the associated values they support:
/// The sum of types that can be used as a quick look representation.
enum PlaygroundQuickLook {
case Text(String)
case Int(Int64)
case UInt(UInt64)
case Float(Float32)
case Double(Float64)
case Image(Any)
case Sound(Any)
case Color(Any)
case BezierPath(Any)
case AttributedString(Any)
case Rectangle(Float64, Float64, Float64, Float64)
case Point(Float64, Float64)
case Size(Float64, Float64)
case Logical(Bool)
case Range(UInt64, UInt64)
case View(Any)
case Sprite(Any)
case URL(String)
}
You must return an enumeration instance populated with a value from your conforming type. As you can see from this list, there’s a large overlap between PlaygroundQuickLook support and types that can be returned for Quick Look for Custom Types.
As a rule, prefer established PlaygroundQuickLook types when available. If you require a custom Quick Look, create a presentation such as an image, a shape, or a description and return a populated enumeration instance, as in Figure 2-6. This example replaces the point enumeration returned by customPlaygroundQuickLook() in Figure 2-5 with PlaygroundQuickLook.BezierPath(path).
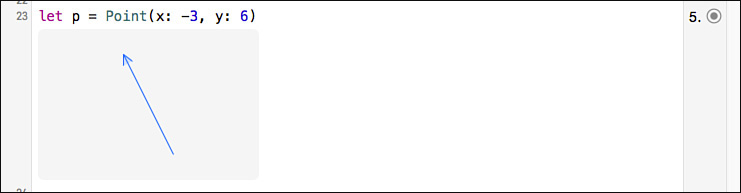
The arrow path is meant to represent a vector from the origin to the point instance. A full graph with axes and scale ticks would provide an even more valuable visualization. (You would need to build an image and return PlaygroundQuickLook.Image(image) in that case.) Always weigh the costs and rewards of custom Quick Looks against the development support returns over time.
Third-Party Rendering
Figure 2-6’s crude arrow represents a poor standard for custom playground Quick Looks. Third-party libraries and web services enable you to effectively visualize Swift constructs, as you see in Figure 2-7. This playground includes a value history Quick Look established by Google Charts. Services like Google, Wolfram Alpha, and others provide well-tested, easy-to-leverage tools that limit the effort you invest in rendering instances.
Figure 2-7 This Quick Look presentation was built using Google Charts. Although Charts remains active for use, it was officially deprecated in 2012.
Web-based rendering involves risks such as connection errors and delays. Always prepare fallback visualizations with off-site presentations, as you see in Figure 2-7 on line 35. Also consider the loads you will place on external servers if playgrounds continually update after edits. Consider the real costs of tasking APIs with rate limits or pay-per-call access. You can disable real-time updates by requiring manual execution. Use the pop-up found at the upper left of the playground debug area. The debug area is normally shown at the bottom of the playground and can be opened with the View > Debug Area menu.
Visualization libraries provide another worthy alternative with additional caveats. For standalone playground use, they must offer raw Swift sources, which Xcode compiles into the running playground page. Otherwise, you must build a workspace with a custom module and co-locate the playground within that workspace to access data presentations. Both approaches enhance your playground value presentations, regardless of whether you proceed with service-based or library-based rendering.
Using Dump Functions
Swift supports an additional mechanism for reviewing constructs. The dump() function prints to output streams, just like print() and debugPrint(), but it creates structure-specific results. Its output represents an item’s mirror—that is, the description and components that represent a type, including its logical children. Mirroring functions and protocols create an alternative to simple logging by presenting a structure for inspection.
Here, for example, is a point structure:
struct Point {
var x = 0.0
var y = 0.0
var theta: Double {return atan2(y, x)}
var degrees: Double {return theta * 180.0 / Double(M_PI)}
}
You call dump() on a value. That value can be any type, whether a construct such as a class, an enum, or a struct or, in this example, an instance:
let p = Point(x: -3.0, y: 6.0)
dump(p)
The output for this request is as follows:
![]() Chapter2.Point
Chapter2.Point
- x: -3.0
- y: 6.0
In this example, the logical children are the structure’s x and y properties. Value types (enums, tuples, and structs) are automatically labeled and indented. Reference types use a more traditional Objective-C-style presentation.
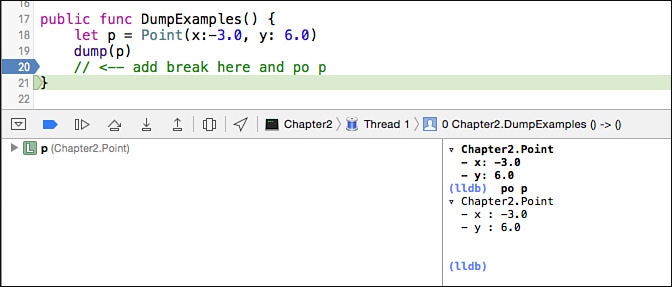
Here is the standard library declaration for dump. As you can see, dump offers a fairly comprehensive list of customizable properties, but you almost never use these directly. You either dump from code (for example, using dump(x)) or you print from the debugger, as in Figure 2-8:
/// Dump an object's contents using its mirror to the specified output stream.
func dump<T, TargetStream: OutputStreamType>(x: T,
inout _ targetStream: TargetStream,
name: String? = default,
indent: Int = default,
maxDepth: Int = default,
maxItems: Int = default) -> T
Building Custom Mirrors
By default, dump() describes the structures of your Swift constructs. That information is helpful but limited. Custom mirrors enable you to expand output to represent the content of your instances and additional semantics. Consider Figure 2-9. The debugger output displays both the default dump() contents and enhanced object po / expr –O output. In addition to showing the raw x and y values, these results contain derived information: the angle of the point relative to a zero origin in both radians and degrees.
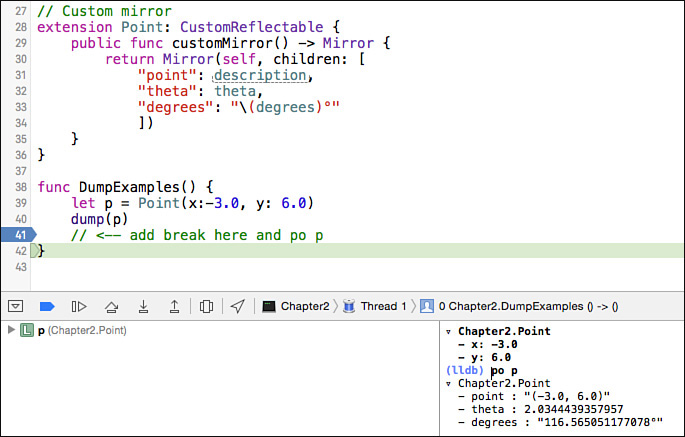
Figure 2-9 Adding a custom mirror enables you to create semantically rich debugger results. Use p or expr (without the –O argument) for a complete list of fields and values.
Custom mirrors were introduced in Swift 2. Developer-designed mirrors enable you to represent both raw content and the semantic meaning of that content in terms of your application. You saw an example (involving CustomStringConvertible and CustomDebugStringConvertible) that demonstrated a transformation between structure and semantics earlier in this chapter. In the absence of custom mirrors, output works like this: Conformance to CustomDebugStringConvertible is most preferred, followed by CustomStringConvertible. When neither conformance is present, descriptions mimic Objective-C class output.
Mirrors offer two main differences. First, unlike with custom print and debugPrint output, you generally consume mirror output in the debugger or a playground and not in files or strings. Second, you typically present custom mirror output as a dictionary instead of as a string.
Note
Before exploring custom mirrors in the playground, comment out any custom Quick Look work you may have added. The one tends to overwhelm the other.
Build mirrors by conforming to CustomReflectable. As with custom stream descriptions, be flexible. Your mirror needn’t adhere to the underlying data structure that powers your instance. You can add any description and information that supports understanding your construct in a way that speaks to you as a developer.
Implement CustomReflectable by adding a customMirror method. Return a Mirror initialized with the value you’re reflecting and a dictionary composed of keys and values that describe the instance. The following reflection implementation, which you also see in Figure 2-9, breaks out the point, the angle in radians, and in degrees:
extension Point: CustomReflectable {
public func customMirror() -> Mirror {
return Mirror(self, children: [
"point": description,
"theta": theta,
"degrees": "(degrees)°"
])
}
}
The dictionary created by this example provides greater semantic understanding of how the Point structure is used within an app. By raising the abstraction, this reflection is more pertinent to specific development and debugging details instead of just dumping raw values.
Recursive Reflection
There is a point where the built-in system with its mirror dictionaries doesn’t really get you where you want to go. The best example of this is when you’re working with a construct that uses virtual children, such as with bit flags. A bit flag is essentially an integer. It combines bit-keyed flags into a single value. There are no “real” children involved. All the semantics are embedded into the internal raw value. At the same time, you might want to create a mirror that breaks out the individual flags and represents them as part of the mirror hierarchy.
At this time, the best you can do really is to build an embedded array or dictionary in your customMirror implementation and present those children as strings or numbers. Although the standard library defines a _MirrorType protocol, this avenue is not generally accessible to developers.
Here’s an approach you might use to pull out flags from the underlying integer. This method enumerates through a human-consumable array of strings, using each string’s index to test a bit flag. As shown here, pass the resulting array of collected strings to a mirror dictionary to provide a more meaningful presentation:
public var names: [String] {
var nameArray = [String]()
let featureStrings = ["Alarm System", "CD Stereo",
"Chrome Wheels", "Pin Stripes", "Leather Interior",
"Undercoating", "Window Tint"]
for (flagLessOne, string) in featureStrings.enumerate()
where self.contains(Features(rawValue: 1<<(flagLessOne + 1))) {
nameArray.append(string)
}
return nameArray
}
For example, instead of rawValue: 34, you’d see [Alarm System, Leather Interior].
Presumably at some point in the future, Swift may support bit flag decomposition mirrors the way it automatically creates human-consumable output for enumeration members. Until then, this approach helps transition those raw values to a semantically rich member list.
Building Basic Mirror Descriptions Using Protocol Conformance
Improve your default mirror output with a simple trick I learned from developer guru Mike Ash. Consider the following otherwise identical classes. The second conforms to a protocol called DefaultReflectable, while the first does not:
public class NonConformantClass {
var x = 42; var y = "String"; var z = 22.5
}
public class ConformantClass: DefaultReflectable {
var x = 42; var y = "String"; var z = 22.5
}
As you construct and inspect instances, you see the difference. The first shows a monolithic NonConformantClass result in its mirror and print output. The second breaks down its class members for greater clarity. It presents the instance’s individual properties:
NonConformantClass() // Chapter2.NonConformantClass
ConformantClass() // ConformantClass(x=42 y=String z=22.5)
You basically get this behavior for free through the magic of protocol extensions. Declaring conformance is all it takes to leverage this protocol and the description property it implements. Recipe 2-4 implements the DefaultReflectable protocol, whose extension provides the default behavior.
Recipe 2-4 Adding Default Mirroring Through Protocols
// Coerce to label/value output where possible
public protocol DefaultReflectable: CustomStringConvertible {}
extension DefaultReflectable {
// Construct the description
internal func DefaultDescription<T>(instance: T) -> String {
// Establish mirror
let mirror = Mirror(reflecting: instance)
// Build label/value pairs where possible, otherwise
// use default print output
let chunks = mirror.children.map {
(label: String?, value: Any) -> String in
if let label = label {
return "(label)=(value)"
} else {
return "(value)"
}
}
// Construct and return subject type / (chunks) string
if chunks.count > 0 {
let chunksString = chunks.joinWithSeparator(", ")
return "(mirror.subjectType)((chunksString))"
} else {
return "(instance)"
}
}
// Conform to CustomStringConvertible
public var description: String {return DefaultDescription(self)}
}
Adding Header Docs
Printing, mirroring, and Quick Looks all communicate developer-facing representations of application values. Quick Help augments that communication by adding intent to that mix. You leverage Xcode’s built-in documentation system by adding Quick Help–compliant annotation to your code. This commenting technology augments your documentation. It creates well-structured usage information for yourself, for future-you (looking back at a project from the distance of time), for members of your team, and for any other consumer of your code.
Quick Help offers concise in-line reference docs for symbols, build settings, and interface objects, as well as classes, structures, enums, and their members. Quick Help annotates your code to create custom details that display via pop-ups (Option-click symbols) and the Quick Help inspector (View > Utilities > Show Quick Help Inspector).
Note
Quick Help enables you to document individual local constants and variables. Although Cocoa conventions encourage you to use human-readable names instead of i, j, k and x, y, z, it can be valuable to add Quick Help comments to remind yourself further down in the algorithm what you wanted to store in that symbol.
This is where you document usage, parameters, expectations, and preconditions. For example, you might note that some function Requires: string is non-empty or Postcondition: memory is allocated and initialized to zero. Specify any edge cases and list your return value types. Make sure to mention any side effects the code might produce, as well as whether the code is thread safe, and provide information about possible failure cases that might be involved when using these routines.
Keep your documentation short and clean and use consistent language and terms throughout. If you’re looking for inspiration, look at similar methods in Apple’s frameworks to see how they are documented. You won’t go wrong by following Apple’s in-house style.
Building Header Documentation
A Quick Help comment consists of either triple-slashed (as in Figure 2-10) or double-asterisked comments, as in the following examples:
/// This is a quick help comment
/**
And so is this
*/
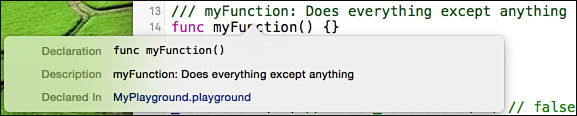
A Quick Help comment placed just before a function is automatically interpreted to annotate that function, whether or not the comment mentions the function by name. It probably shouldn’t actually mention the name. Xcode automatically adds function names to the declaration, as you see in Figure 2-10.
“Header documentation” remains applicable in Swift even though the language does not use header files. Follow Apple’s example and document everything in your source rather than just the material intended for public consumption. You and your team are first-class consumers of Quick Help comments.
Markdown Support
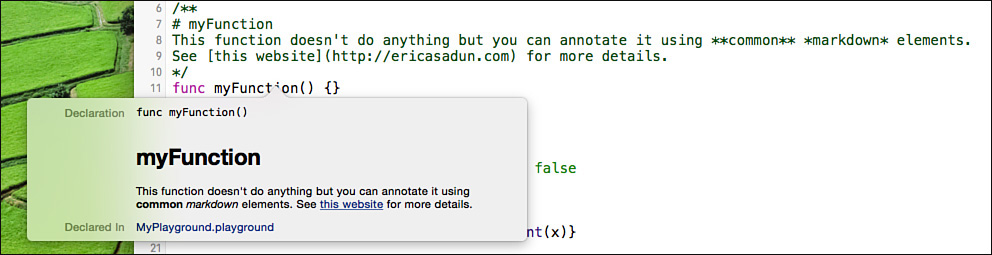
Quick Help supports a robust set of basic markdown syntax, a lightweight formatting syntax developed by John Gruber that’s popular on most development platforms. You can add headers, links, horizontal rules, bolding, and italics to your core description. Figure 2-11 shows marked-up output rendered by the Quick Help engine. Apple’s implementation covers all the basics. It includes the features you’ll find on standard markdown cheat sheets.
The basics are flexible. You can add code insets, as in Figure 2-12, to demonstrate usage within the Quick Help pop-up. Use the ```swift code fence or add four spaces or more to indicate code sections.
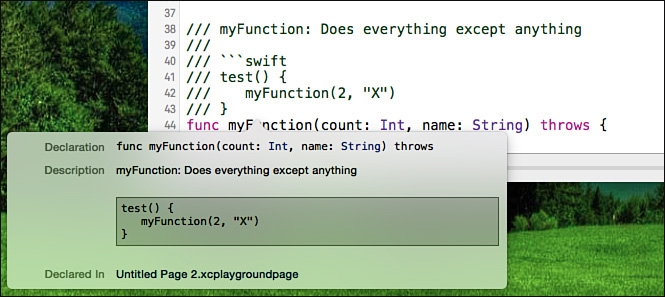
As you see in this example, Xcode treats adjacent triple-slashed comments as a single comment block. Xcode unifies the material that flows from one line to the next.
Keywords
Quick Help supports parameter, returns, and throws keywords. These create category callouts in the pop-up; you see some of these realized in Figure 2-13. These keywords are case-insensitive and preceded by a hyphen or an asterisk:
/// - returns: term
/// - throws: error-lists
/// - parameter term: definition
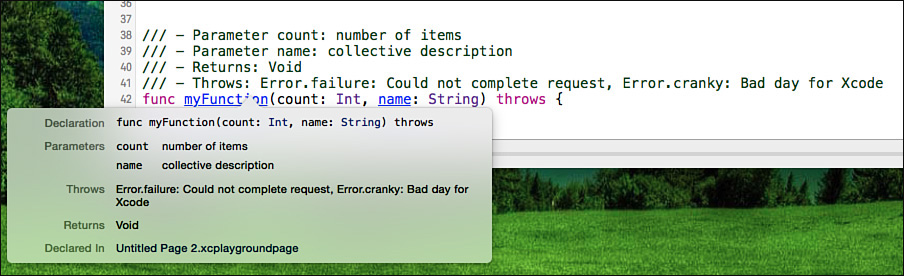
returns requires a colon. The colon for parameter is optional but recommended as it creates a more readable tab-aligned parameter list. Unfortunately, you cannot break out errors into lists the way you do with parameters. For example, the following does not parse properly. You end up with one of the two throws declarations eaten by Xcode:
/// - Throws: Error.failure: Could not complete request
/// - Throws: Error.cranky: Bad day for Xcode
The parameter outline syntax supports two styles. You can specify:
- parameter x: ...
- parameter y: ...
or:
- Parameters:
- x: ...
- y: ...
Both approaches produce equivalent output. Apple writes in Xcode’s release notes, “You can mix and match these forms as you see fit in any order or continuity throughout the doc comment. Because these are parsed as list items, you can nest arbitrary content underneath them.”
Other sections noted in the Quick Help template (Availability, Reference, Related, Guides, Sample Code, and Related Declarations) do not appear to be developer configurable at this time.
Quick Help recognizes several other keywords and uses bolding to highlight them (see Figure 2-14): Attention, Author, Authors, Bug, Complexity, Copyright, Date, Experiment, Important, Invariant, Note, Postcondition, Precondition, Remark, Requires, SeeAlso, Since, TODO, Version, and Warning.
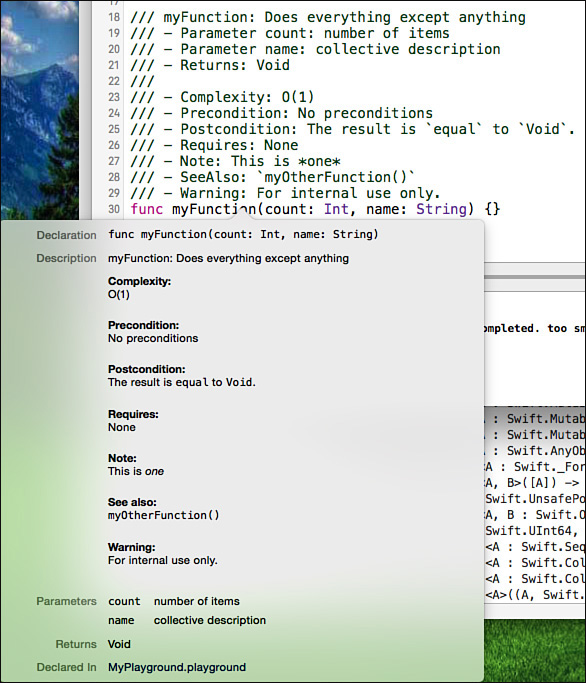
The section label terms overlap with and appear to be influenced by other header documentation standards, like Doxygen and reStructuredText. There is minor overlap with Apple’s older HeaderDoc standard for Objective-C. Here’s a quick summary of the label terms and their uses:
![]() Attributions (
Attributions (author, authors, copyright, date) create a documentation trail for authorship.
![]() Availability (
Availability (since, version) specifies when material was added to the code or updated, enabling you to lock down both release conformance and real-world time.
![]() Admonitions (
Admonitions (attention, important, note, remark, warning) caution about use. These establish design rationales and point out limitations and hazards.
![]() Development state (
Development state (bug, TODO, experiment) expresses progress of ongoing development, marking out areas needing future inspection and refinement.
![]() Performance characteristics (
Performance characteristics (complexity) express a code’s time and space complexity.
![]() Functional semantics (
Functional semantics (precondition, postcondition, requires, invariant) detail argument characteristics before and after calls. Preconditions and requirements limit the values and conditions under which the code should be accessed. Postconditions specify observable results that are true after execution. Invariant elements presumably do not change during a call.
![]() Cross-references (
Cross-references (seealso) enable you to point out related material to add background to the documented implementation.
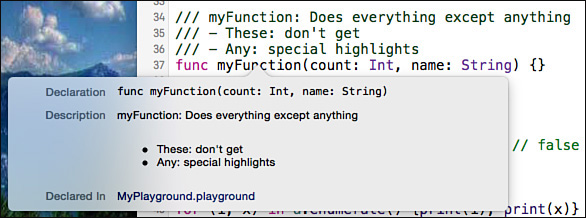
You can use a hyphen/asterisk-space-colon layout for other items, but they don’t receive preferred markup, as you see in Figure 2-15. The results are simply the bulleted list you’d expect to build with markdown.
Special Swift Concerns
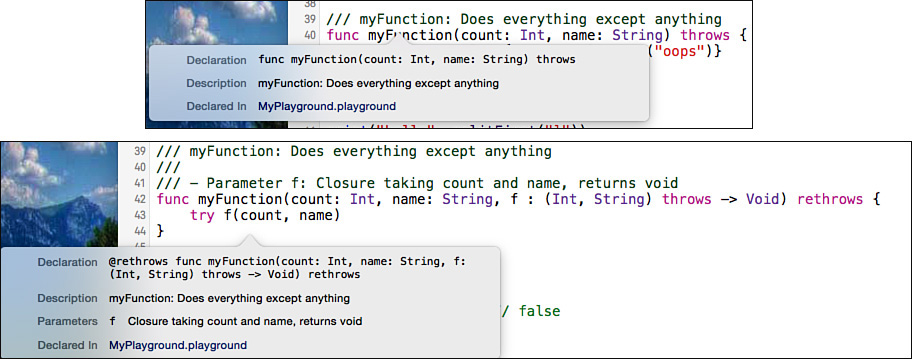
Method/function annotations appear in-line with the declaration, for example, when a function throws (see Figure 2-16). This looks a little ugly but is syntactically appropriate for Swift 2. Quick Help incorporates most declaration attributes—for example, noescape, noreturn, and so on—into the declaration line as well. You see this in Figure 2-16 with rethrows.
Adding Images to Header Docs
You add images to header documentation by including URLs to assets stored on the web or to files with absolute URLs on the local file system (see Figure 2-17). Unlike rich playground comments, header docs cannot read in-app resources, but they can read from a full path to the current desktop, which is what is used in this example. Because image use is so rigid, I recommend against using them with header docs at this time as your source material may move and break links.

Figure 2-17 Quick Help supports image integration. (Royalty-free image of sub sandwich by Billy Alexander via freeimages.com.)
Wrap-up
Never forget that you are your own best customer. The time you spend building code and documentation to support your development efforts pays you back over the lifetime of your tools. While you’re probably not best served by creating the most perfect Quick Look previews for in-house classes and structures, building visualizations and semantically meaningful output can dramatically decrease debugging overhead because the information you need in order to proceed is right at your fingertips.
This chapter has introduced techniques that enable you to present values that expand beyond simple raw data. With these developer-facing tools, you’ll be able to get better and more meaningful feedback for your Swift development efforts.