4. Closures and Functions
Lexical closures provide the basis for methods, functions, and “block” parameters, all of which power the Swift applications you develop. By encapsulating state and functionality, they promote behavior to first-class constructs. Closures enable you to pass functionality as parameters and to treat actions as variables, ready for later execution and repeat use. If you’re entering Swift from other languages, you might already know these features as lambdas, blocks, or anonymous functions. This chapter explores closures, showing how they work in Swift and how to best incorporate them into your applications.
Building a Function
When I first started learning Swift, I decided to see how many ways I could rewrite one basic function, a simple test that compares two integer values for equality:
func testEquality(x: Int, y: Int) -> Bool {
return x == y
}
Like any other Swift function, this example creates a named and parameterized sequence of behaviors:
![]() The
The func keyword declares a new function, which is named testEquality.
![]() Parameters are listed between parentheses after the function name. These use integer type (
Parameters are listed between parentheses after the function name. These use integer type (Int), and a colon separates each parameter name from its type.
![]() The function returns a Swift truth value (
The function returns a Swift truth value (Bool). This return type is listed after a return token arrow composed of a hyphen and a greater-than symbol (->).
![]() Behavior statements appear between braces.
Behavior statements appear between braces.
In Swift, as in many other programming languages, there are many ways to achieve a single goal. Exploring that flexibility was a valuable learning experience for me. The following sections revisit that exercise and give you a chance to consider some of the features you’ll encounter when building functionality.
Parameter Names
You call the testEquality function by passing to it arguments in parentheses. By convention, the Swift compiler does not create an external label for the first parameter. That’s why there’s no x: used in the following calls:
testEquality(0, y: 1) // returns false
testEquality(1, y: 1) // returns true
In this contrived case, the convention is a mismatch to how the function will be used. Since the way this function is named and called doesn’t follow Swift convention, it should just go ahead and use x: and y: labels. Fortunately, the extra label issue is easily tweaked. Adding a second x to the function declaration instructs the compiler to require an explicit label in function calls:
func testEquality(x x: Int, y: Int) -> Bool {
return x == y
}
Now you call the function using labels for both the x and y parameters. This promotes both labels and differentiates the values they assign:
testEquality(x: 0, y: 1) // returns false
testEquality(x: 1, y: 1) // returns true
The doubled-x solution distinguishes between external parameter names that are used for calling and local parameter names that are internal to the function. The first x tells the compiler how the function signature looks to external consumers. This overrides the normal default no-label convention. The second x provides a semantically appropriate name to use within the implementation scope. In this example, the external and internal parameters match. This is not always the case.
Label Conventions
The Swift 2 convention that skips the first label mimics Objective-C descriptive signatures that extend beyond the function name to include parameter labels. This language version matters as different rules held sway prior to the Swift 2 redesign. Swift 2 makes label rules apply more consistently across most use cases. In Swift 2 and later, you adapt a function name to incorporate the first parameter label, as you see in the following sample calls:
constructColorWithRed(0.2, green: 0.3, blue:0.1)
lengthOfString("Hello")
testEqualityBetweenX(3, andY:3)
Each of these examples encourages you to continue reading past the function name to incorporate labels into how the function describes itself. The results create descriptors that incorporate prepositions like with, of, and between. You “construct color with red, green, and blue,” test the “length of string,” or “test equality between x and y.” A natural fluency relates the function name and its labels to a story about how the function will be used. The result is self-documenting, without relying on memory or lookup to determine which parameters and types are to be provided in each ordered spot.
Without this convention, calls are terser and drop helper words that encourage you to relate parameters to their roles. Here are the same calls in their less fluent forms:
constructColor(red:0.2, green: 0.3, blue:0.1)
length(string: "Hello")
testEquality(x:3, y:3)
When you use the underscore token for external labels, Swift enables you to drop the label level down further to more C-like function calls:
constructColor(0.2, 0.3, 0.1)
length("Hello")
testEquality(3, 3)
You can argue whether the context is sufficiently clear for each of the modified calls, but it’s obvious that the current Swift conventions make parameter usage clearer. Although labels add overhead to your typing (ignoring the convenience of autocomplete), they encourage better communication to both future-you and to any developers who will eventually collaborate on or inherit your code. Encouraging readability and self-documentation is always a positive thing.
Until Swift 2, descriptive signatures were used primarily for methods, which are functions bound to a class, an enumeration, or a structure. Starting in Swift 2, the fluid convention extends to all functions, whether or not they’re used as methods or declared at another scope. You can choose to override this default, as testEquality does, by adding an explicit label that instructs the compiler to require all labels, including the first one.
A fully descriptive label mandate (that is, a label for each parameter) applies to constructors, which are initializers that build type instances. Except in cases that mimic typecasting—for example, String(5) or Int("3")—initializers typically use labels for every value passed. Swift initializers are called either with parentheses following a type name or explicitly with init:
struct MyStruct{
let x: Int
init(x: Int) {self.x = x}
func myMethod(y: Int, z: Int){}
}
let s = MyStruct(x: 1) // first label by default
// let s = MyStruct.init(x: 1) // equivalent
s.myMethod(2, z: 3) // no first label by default
Swift’s init-by-label convention makes clear how each parameter will be used to create new instances and clarify which initializer will be called.
Naming Methods and Functions
Apple offers suggestions in its Cocoa coding guidelines (https://developer.apple.com/library/mac/documentation/Cocoa/Conceptual/CodingGuidelines/CodingGuidelines.html) that generally extend to Swift. The following are some of its recommendations, as passed through a Swift-centric filter.
Be both brief and clear. Add nouns to contextualize verbs and prepositions. Prefer removeObject(object, atIndex: index) over remove(object, at: index). An excess of brevity should not compromise clarity.
Avoid abbreviations. Prefer printError(myError) to printErr(myErr) and setBackgroundImage(myImage) to setBGImage(myImg). Apple offers a list of “acceptable” abbreviations online, but I encourage you to avoid them in Swift except for conventionally universal abbreviations like max and min.
Avoid ambiguity. Consider whether a function or method name has multiple interpretations. For example, in displayName, is the word display a noun or a verb? If it’s unclear, rework the name to eliminate that confusion.
Be consistent. Use the same terms throughout your apps and libraries to describe concepts. For example, avoid using fetchBezierElements() in one method and listPathComponents() in another.
Don’t reference constructs. Avoid using struct, enum, class, instance, and object in your names. Prefer buildDeckOfCards to buildDeckOfCardsStruct. This suggestion does not apply to collection names such as array, set, dictionary, and so forth, where the collection type adds valuable details about the action (for example, sortArray or selectBestChoiceFromSet).
Use lowercase for method names. Apply common-sense adjustments to this rule for functions that start with an acronym like URLForAsset or QRCodeFromImage. Although most developers use lowercase for functions outside a type scope, you can capitalize without committing a moral crime. Uppercase function names are immediately distinguishable from methods but are currently out of fashion. This practice was quite common up to and including name-spacing, when it suddenly went extinct. It’s like a million capitalized voices cried out and were suddenly silenced.
Integrate the word value into a type-based label. Prefer toIntValue to toInt and withCGRectValue to withCGRect.
Skip get. Functions that retrieve state information should describe the thing they’re returning. Prefer extendedExecutionIsEnabled() or isExtendedExecutionEnabled() to getExtendedExecutionIsEnabled(). When computed state information does not produce side effects or perform actions that extend beyond the instance, prefer computed properties to methods.
Use prepositions; avoid and. and is the one word that Apple specifically says to avoid. Instead of initializing with (view:, andPosition:), use (view:, position:) arguments.
If you’re truly set on using and, reserve it for when there’s a semantic link between groups of arguments, such as when constructing colors with “red, green, and blue” floating-point values. In such cases, it’s unlikely that future keyword tweaks will interrupt the relationship between these items. Purists will continue to disapprove.
The one case where Apple endorses the use of and is when a method describes two distinct actions, as in openFile(withApplication:, andDeactivate:).
Use American phrases where standard. Prefer initialize to initialise and color to colour as these words are Apple supplied. However, feel free to accessoriseAgeingDataCentreStore.
When in doubt, mimic Apple. Search for an Apple API with a similar concept and use that method signature as a guideline. Be prepared to be inspired by Objective-C. As a rule, not all Apple APIs have been reviewed for Swift. Their automatic translation may not offer sufficiently well-considered examples.
External and Local Parameters
Separate external and local parameter names enable you to differentiate the way a function is called and consumed. The following testEqualityBetweenX:andY: example creates a function called with an andY: external parameter label:
func testEqualityBetweenX(x: Int, andY y: Int) -> Bool {
return x == y
}
testEqualityBetweenX(1, andY: 2) // false
Internally, the function uses the more implementation-appropriate y.
Using an underscore (_) for external parameter names enables you to create label-free calls. The following example modifies testEquality to accept two no-label parameters:
func testEquality(x: Int, _ y: Int) -> Bool {
return x == y
}
testEquality(1, 2) // false
Swift’s conventions mean you only need to modify the external name for y. The compiler already expects to skip the first parameter’s label.
Defaults
You make parameters optional by adding default values. Callers can provide specific custom values or skip the parameter and accept the value declared in the default argument clause. For example, you call the flip method in the following Coin enumeration with either no arguments (flips once) or an integer (the number of times to flip the coin):
enum Coin {
case Heads, Tails
mutating func flip(times: Int = 1) {
if times % 2 == 0 {return} // even means no flip
switch self {
case Heads: self = Tails
case Tails: self = Heads
}
}
}
var coin = Coin.Heads
coin.flip() // tails
coin.flip(50) // tails
If you skip the argument, the parameter defaults to 1, a single flip.
Note
The mutating keyword used in the flip declaration marks a method that modifies structures. Class methods can always modify instances and do not require this keyword.
Default parameters enable you to adjust Swift function calls in ways you might not expect. When you add default parameters, you can reorder arguments based on labels, as you see in the following example:
extension Coin {
func prettyPrint(lhs lhs: String = "[", rhs: String = "]") {
print("(lhs)(self)(rhs)")
}
}
coin.prettyPrint() // [Coin.Tails]
coin.prettyPrint(rhs: ">") // [Coin.Tails>
coin.prettyPrint(lhs: "<") // <Coin.Tails]
coin.prettyPrint(lhs: ">", rhs: "<") // >Coin.Tails<
coin.prettyPrint(rhs: ">", lhs: "<") // <Coin.Tails>
The compiler infers calling intent based on the position and labels of the arguments you supply.
The preceding prettyPrint example adds an external name to lhs (that is, lhs lhs) to ensure that each argument has an explicit label. Without that external name, Swift offers the following slightly bizarre behavior:
extension Coin {
func prettyPrintNoLabel(lhs: String = "[", rhs: String = "]") {
print("(lhs)(self)(rhs)")
}
}
coin.prettyPrintNoLabel() // [Coin.Tails]
coin.prettyPrintNoLabel(rhs: ">") // [Coin.Tails>
coin.prettyPrintNoLabel("<") // <Coin.Tails]
coin.prettyPrintNoLabel(">", rhs: "<") // >Coin.Tails<
coin.prettyPrintNoLabel(rhs: ">", "<") // <Coin.Tails>
You can still reorder arguments, and the no-label argument remains bound to the first parameter.
When you omit both external names, the Swift compiler can no longer differentiate between the arguments except by position, so it mandates specific position-to-parameter binding. The following example shows how this works in the presence of default values:
extension Coin {
func prettyPrintNoLabelsAtAll(lhs: String = "[", _ rhs: String = "]") {
print("(lhs)(self)(rhs)")
}
}
coin.prettyPrintNoLabelsAtAll() // [Coin.Tails], both defaults
coin.prettyPrintNoLabelsAtAll("<") // <Coin.Tails], second default
coin.prettyPrintNoLabelsAtAll(">", "<") // >Coin.Tails<, no defaults
Constant and Variable Parameters
Swift variables use let and var to indicate whether their values are immutable (cannot be changed after the initial assignment) or mutable (can be updated at will). Some developers don’t realize that closure and function parameters can also be annotated by var and let. For example, the following function declaration uses let and var keywords to indicate parameter mutability:
func test(let x: String, var y: String) {}
The let keyword is redundant: All parameters default to constant parameters; they cannot be changed within the function scope. This compile-time check avoids situations where you mistakenly change the value of a parameter without meaning to. Mandating a var keyword ensures that any value updates for parameters are intentional. For example, the following snippet raises a compile-time error as you cannot assign a new value to the constant value x:
func test(x: String, var y: String) {x = "Hello"} // error!
Here’s an example where assignment does work. You can adjust y to a new value because it is a variable parameter:
func test(x: String, var y: String) {y += " World"; print(y)}
Even though you tweak y within this function, the y parameter and any variable it was called with do not change outside the function. The parameter’s value is copied and then updated within this scope.
Modifying Parameters
To change the value of an external variable, use Swift’s inout call-by-reference copy and write-back mechanism. Add an inout keyword and pass the variable you intend to mutate by prefixing it with &. Here’s an example that combines all these concepts. The adjustValues function showcases calls using each kind of parameter:
func adjustValues(
var varParameter: Int,
letParameter: Int,
inout inoutParameter: Int) {
varParameter++ // updates only within function scope
// letParameter++ // compile-time error
inoutParameter++ // updates within and outside function scope
print("((varParameter, letParameter, inoutParameter))")
}
var x = 10; var y = 20; var z = 30 // assign
print("Before: ((x, y, z))") // (10, 20, 30), check
AdjustValues(varParameter: x, letParameter:y, inoutParameter: &z)
// prints (11, 20, 31)
print("After: ((x, y, z))")
// (10, 20, 31) z has now changed and x has not
In this example, varParameter increases within the function but does not propagate back to the original variable. inoutParameter also increases, but that change updates the value of z. In Swift, you do not have to dereference a pointer during assignment to an inout parameter.
Now consider the following assignment:
let w = 40
You can pass w to either or both of AdjustValue’s first and second parameters. Immutability outside the function scope does not affect use within the function. However, you cannot pass &w to the AdjustValue’s third parameter without a compiler error. You cannot assign new values to immutable variables in this way.
Closures and Functions
In Swift, closures and functions are more or less the same thing, although slight details differentiate the two. For the most part, closures are anonymous (that is, nameless) functions, and functions are named closures. They both offer an executable block of functionality, and they both capture values from their enclosing scope.
Function Types
Every function or closure has a type. The type for the following testEquality function is (Int, Int) -> Bool:
func testEquality(x x Int, y: Int) -> Bool {
return x == y
}
The (Int, Int) -> Bool type consists of an input type tuple, an arrow token, and an output type. Tuple refers to a sequence of elements surrounded by parentheses that contain items separated by commas. Tuples may look a bit like arrays but are syntactically distinct from them. Tuples represent fixed-length vectors of potentially distinct types, while arrays are ordered collections of data that share a unifying type.
Confirm the type for testEquality by typing the function into a Swift source file or playground and then print testEquality.dynamicType. The console shows (Swift.Int, Swift.Int) -> Swift.Bool, prepending each type name with the Swift module that defines the type.
You can duplicate a method’s functionality by assigning a closure instance to a constant or variable, as in the following example:
let testEqualityClosure = {
(x x: Int, y y: Int) -> Bool in
return x == y
}
Notice the slightly different label convention. By default, closure parameters do not use external names. This assignment adds external x and y labels, using x x and y y to duplicate the calling pattern used for the standalone function.
The closure consists of a signature that defines parameter binding and a return type followed by statements. The in keyword that appears after the signature and before the function statements says “use these parameters in these statements.” This keyword is required whenever you add an explicit signature to the start of the closure.
The resulting assignment enables you to call the closure using the same parameter values and labels as with the function built with func:
testEqualityClosure(x: 1, y: 2) // false
testEqualityClosure(x: 1, y: 1) // true
At the time this book was being written, Apple was still settling on how to have the compiler handle function type conversion. Apple writes in its release notes for an early Swift 2.1 beta, “Conversions between function types are now supported, exhibiting covariance in function result types and contravariance in function parameter types. For example, it is now legal to assign a function of type Any -> Int to a variable of type String -> Any.” This behavior may change by the time you read this book.
Using Tuple Arguments
Swift allows you to pass tuples to functions and closures as argument sets. The compiler matches the correspondences between the arguments you supply and the input type tuple, which means you can pass all your parameters in a single argument.
Tuple arguments are, internally, anonymous structures with ordered members. An (x:, y:) tuple with .x and .y labels is essentially identical to an unlabeled tuple of matching types with implicit .0 and .1 labels:
let testArgs = (x:1, y:1)
print(testEquality(testArgs)) // prints true
print(testEqualityClosure(testArgs)) // prints true
In the current Swift incarnation, tuple labels must match the function or closure signature. You’ll encounter compile-time errors if the expected labels do not agree.
Combine tuple arguments with Swift mapping for appealing results. For example, you can use Swift’s zip function to create labeled tuples from parameter arrays and then apply the function or closure to each tuple pair by using map. Here’s what that approach might look like:
let pairs = zip([1, 2, 3, 4], [1, 5, 3, 8]).map({(x:$0.0, y:$0.1)})
let equalities = pairs.map({testEquality($0)})
let equalities2 = pairs.map({testEqualityClosure($0)})
print(equalities) // true, false, true, false
print(equalities2) // true, false, true, false
The first statement creates labeled tuple pairs. This example compares items in the two arrays, checking whether similarly positioned items are equal. The closure passed to map redirects each (x:, y:) tuple. Alternatively, you can cast the (Int, Int) tuple to use (x: Int, y: Int) labels in the map closure’s signature:
let equalities3 = zip([1, 2, 3, 4], [1, 5, 3, 8]).map({
(tuple: (x:Int, y:Int)) in testEquality(tuple)})
Using Shorthand Argument Names
When Swift knows types and positions, it doesn’t really need parameter names. This next version of testEquality is a simple closure whose arguments are defined by position, starting with $0 for the first argument and then continuing to $1, $2, and so on:
let testEquality: (Int, Int) -> Bool = {return $0 == $1}
testEquality(1, 2) // false, but no labels in call
testEquality(2, 2) // true, but no labels in call
These positional, anonymous arguments are called shorthand argument names. The closure doesn’t define x or y or any other parameter identifiers. In this example, the function prototype moves outside the scope of the closure. This (Int, Int) -> Bool prototype declares testEquality’s type, enabling the compiler to match it to the behavior on the right. Without explicit typing, Swift is unable to infer the roles of the two anonymous closure arguments or determine whether they can be compared using the == operator.
To match previous examples, add external labels to the signature. The following example introduces labels while retaining the anonymous internal bindings:
let testEquality: (x: Int, y: Int) -> Bool = {return $0 == $1}
testEquality(x: 1, y: 2) // false
testEquality(x: 2, y: 2) // true
When using explicit typing, you can bind positions to names using a simple labels-in approach, as in the following example:
let testEquality: (x: Int, y: Int) -> Bool = {x, y in return x == y}
The compiler knows the external labels and types from the explicit type assignment. It relates these to the internal names that precede the in keyword. Compare this implementation to the following fully qualified version:
let testEqualityFull: (x: Int, y: Int) -> Bool = { // typed closure assignment
(x: Int, y: Int) -> Bool in // closure signature
return x == y // statements
}
testEqualityFull(x:1, y:2) // false
testEqualityFull(x:2, y:2) // true
Swift’s standard library offers ways to coerce data into positional arguments. The forEach function processes each member of a sequence. Use withExtendedLifetime to create positional arguments within a closure:
[1, 5, 2, 9, 6].forEach{print($0)}
[(2, 3), (5, 1), (6, 7)].forEach{print($0)} // pairs
[(2, 3), (5, 1), (6, 7)].forEach{print("a: ($0) b: ($1)")} // split
let a = 1; let b = 2
withExtendedLifetime(a, {print("a: ($0)")})
withExtendedLifetime((a, b)){print("a: ($0) b: ($1)")}
In addition to guaranteeing that values are not destroyed before the end of the closure’s lifetime, withExtendedLifetime’s anonymous arguments enable you to capture and use values without creating intermediate variables.
A tuple shuffle enables you to perform simultaneous permuting assignments from one anonymous tuple to another:
(x, y) = (y, x)
(x, y, z, w) = (w, x, y z)
In optimized compilation, performance is indistinguishable from that of swap(&x, &y) and let tmp = x; x = y; y = tmp, and the simpler declaration helps make your intent clear.
Inferred Closure Types
Use caution when creating untyped closure assignment, as in the following examples. The compiler can infer only so much. Here are a couple of well-behaved assignments:
let hello = {print("Hello")}
let random = {return Int(arc4random_uniform(100))}
Call these functions by adding () after their name—for example, hello() and random(). The first function is typed ()->Void. It has no parameters and returns no result. The second returns an integer between 0 and 99. It is typed ()->Int.
Note
The keyword Void is aliased to (). Prefer Void for return types and () for empty parameter lists.
Now, consider the following more problematic declaration. The compiler cannot process it due to ambiguity:
let printit = {print($0)} // this is problematic
Swift’s compiler has no way to infer the type of the positional $0 parameter. By default, the compiler wants to type this no-return-value closure as ()->Void, but the source code references an anonymous positional parameter. This is not a good thing. The rule of thumb to take from this is that you always want to combine positional parameters with well-typed signatures.
You use anonymous parameters almost exclusively in the realm of closure arguments rather than standalone functions. For example, MutableCollectionType’s sortInPlace function takes one parameter, a closure with two arguments that returns a truth value:
mutating func sortInPlace(isOrderedBefore:
(Self.Generator.Element, Self.Generator.Element) -> Bool).
Implement the sort by passing a closure that compares the two arguments. The returned truth value indicates whether the first argument is ordered before the second. Since the closure type is hard-wired into the parameter, you are free to use positional parameters to return a succinct ordering test, as in the following example:
let random = {return Int(arc4random_uniform(100))}
var nums = (1...5).map({_ in random()}) // 5 random Ints
nums.sortInPlace({$0 > $1}) // reverse sort
Note
Use sort with the same arguments to return a sorted copy of the original collection without updating the original. You cannot use sortInPlace with an immutable array assigned with let.
Because the closure is the final (and, in this case, only) parameter to the sortInPlace function, you may omit the parentheses that normally would surround it. Instead of this:
nums.sortInPlace({$0 < $1})
You can use this:
nums.sortInPlace{$0 < $1}
This is called a trailing closure. It is added outside and after any parentheses used for other arguments. Prefer trailing closures for procedural elements that do not pass through values or that will be used strictly for procedural execution (such as in Grand Central Dispatch or Notification Center). Naked braces indicate standalone scopes. Retain parentheses for any function whose scope returns consumable values. This practice instantly differentiates between procedural and functional closures, especially when chaining results.
Note
Some developers like to add a space to separate trailing closures from the calls they complete, like this: functioncall {}. I prefer the abutting format, which is what you see throughout this book. Spaces between braces and code are another common practice to add readability to single-line calls: functioncall{ ...code... }.
The closure for the sort-in-place example omits a return keyword. That’s because the return can be implied from the context. When working with a closure with a return type, Swift assumes that a single line creates a return value. When used with testEquality, you establish an even simpler closure than the one that started this section:
let testEquality: (Int, Int) -> Bool = {$0 == $1}
Parameter Type Inference
Swift offers some interesting declaration variations. For example, you can use an already-declared closure type to infer variable roles by position. In this example, the x and y argument types are known to be integers. Swift matches them to the prototype in the variable declaration outside the closure:
let testEquality: (Int, Int) -> Bool = {
(x, y) -> Bool in
x == y
}
The declaration establishes the return type so you can skip the Bool return type inside the closure since it’s redundant:
let testEquality: (Int, Int) -> Bool = {
(x, y) in
x == y
}
You can also squoosh all the code together if you like, so x == y appears on the same line as (x, y) in:
let testEquality: (Int, Int) -> Bool = {(x, y) in x == y}
If you really really are looking for the simplest possible expression, well, look no further than this example, which supplies an operator function. At this point, you’ve omitted pretty much every detail that can be inferred:
let testEquality: (Int, Int) -> Bool = (==)
Declaring Type Aliases
A type alias, as the name suggests, gives you an alternative way to refer to a type. You create one by using the typealias keyword. It’s most commonly used to simplify complex types into consistent reusable components and to conform types to Swift protocols. Declaring a type alias simplifies repeated declarations, particularly when you’re using closures as parameters. The following snippet declares a CompareClosureType, which is set to (Int, Int) -> Bool. Once declared, you can use the alias anywhere you’d normally specify the type:
typealias CompareClosureType = (Int, Int) -> Bool
let testEquality: CompareClosureType = {$0 == $1}
Xcode is now optimized to show originating type annotation in error messages. For example, you might try to access a nonexistent property on the newly declared testEquality constant:
print(testEquality.nonExistentProperty)
Because the diagnostic involves a type alias, Xcode adds a note with aka (also known as) and the original type:
error: value of type 'CompareClosureType' (aka '(Int, Int) -> Bool') has no member 'nonExistentProperty'
This behavior enables you to instantly see not only a direct type name but also its underlying definition.
Nested Functions
As functions are a first-class type, a function can return another function as its value. Recipe 4-1 selects and returns one of its nested functions.
Recipe 4-1 Returning Embedded Function References
// Kinds of comparison
enum CompareType{case Equal, Unequal}
// Comparison function factory
func compareFunction(comparison: CompareType) -> (Int, Int) -> Bool {
// Function that tests equality
func testEquality(x: Int, y: Int) -> Bool {return x == y}
// Function that tests inequality
func testInequality(x: Int, y: Int) -> Bool {return x != y}
// Return a function
switch comparison {
case .Equal: return testEquality
case .Unequal: return testInequality
}
}
compareFunction(.Equal)(1, 2) // false
compareFunction(.Equal)(1, 1) // true
More commonly, nesting Swift functions enable you to tuck away details by providing implementation-specific utility that isn’t needed at a wider scope. In Recipe 4-2, the nested factorial function is not exposed.
Recipe 4-2 Basic Function Nesting for Reusable Internal Components
// Return n choose i
// This is not an efficient or ideal implementation
func n(n: Int, choose i: Int) -> Int {
// n >= i
precondition(i < n, "n choose i is not legal when n ((n)) < i ((i))")
// i > 0 guarantees that n > 0
precondition(i > 0, "choose value i ((i)) must be positive")
// Nested factorial function helps organize code
func factorial(n: Int) -> Int {return (1...n).reduce(1, combine:*)}
// Compute the choose results
return factorial(n) / (factorial(i) * factorial(n - i))
}
print(n(5, choose:3)) // 10
print(n(10, choose:4)) // 210
You can nest in closures as well as functions, as you see in Recipe 4-3.
Recipe 4-3 Nesting Functions Within Closures
let myFactorialFactoryClosure: () -> (Int) -> Int = {
func factorial(n: Int) -> Int {return (1...n).reduce(1, combine:*)}
return factorial
}
let fac = myFactorialFactoryClosure()
fac(5) // 120
Nested functions have access to variables declared in the outer function’s scope. In the following example, the inner incrementN function modifies the n variable each time it is called:
func outerFunc() -> Int {
var n = 5
func incrementN() {n++}
incrementN()
incrementN()
return n
}
outerFunc() // 7
Tuples
In Swift, as in many other modern languages, tuples group items. A Swift tuple appears in parentheses as a sequence of comma-delineated elements. So far, you’ve read a little bit about tuples and their role in working with closures and functions. This section explores these features more fully, offering a deep dive into their workings.
Tuples are essentially anonymous structures. They allow you to combine types in an addressable fashion. For example, a tuple of (1, "Hello", 2.2) is more or less equivalent to the following struct instance:
struct MyStruct {
var a: Int
var b: String
var c: Double
}
let mystruct = MyStruct(a: 1, b: "Hello", c: 2.2)
The (1, "Hello", 2.2) tuple doesn’t use labels, while the struct does. You access the tuple properties with .0, .1, .2, and you access the struct properties with .a, .b, .c. As you saw earlier in this chapter, you can add labels to tuples; for example, (a:1, b:”Hello”, c:2.2) is a legal tuple:
let labeledTuple = (a:1, b:"Hello", c:2.2)
labeledTuple.1 // "Hello"
labeledTuple.b // "Hello"
When a tuple is defined using labels, you access the tuple both by order (.0, .1, .2) and name (.a, .b, .c). However, you cannot refer to a structure by field order. Swift doesn’t offer a grand unified structure/tuple/class type. While these things seem more alike than different, people familiar with the language internals assure me that there are compelling reasons this has not happened yet.
You can access child properties in a limited way by using reflection. The following example shows how you can visualize each child of the structure or tuple:
let mirror1 = Mirror(reflecting: mystruct)
mirror1.children.count
mirror1.children.forEach{print("($0.label): ($0.value)")}
let mirror2 = Mirror(reflecting: labeledTuple)
mirror2.children.count
mirror2.children.forEach{print("($0.label): ($0.value)")}
You cannot, however, consume these Any-typed values in any meaningful way. At this time, mirroring is limited to debugging output.
When you run the previous example, the mystruct and labeledTuple mirrors reveal identical values but distinct labels:
Optional("a"): 1
Optional("b"): Hello
Optional("c"): 2.2
Optional(".0"): 1
Optional(".1"): Hello
Optional(".2"): 2.2
From Tuples to Structs
You cannot easily convert a struct to a tuple, but you can convert a tuple to a struct in a limited fashion:
let labeledTuple = (a:1, b:"Hello", c:2.2)
let mystruct = MyStruct(labeledTuple)
This compiles and runs, but you’re not actually creating a struct from the tuple. You’re using the tuple as arguments to the struct’s initializer. Tuples can be passed to nearly any argument list—for initializers, functions, methods, closures, and so forth.
Because of the way structs create default initializers, you cannot build a MyStruct struct with an unlabeled tuple, such as (1, "Hello", 2.2). You must first add an initializer that doesn’t require labels. The following example creates that second initializer:
struct MyStruct {
var a: Int
var b: String
var c: Double
init (a: Int, b: String, c: Double) {
self.a = a; self.b = b; self.c = c
}
init (_ a: Int, _ b: String, _ c: Double) {
self.init(a:a, b:b, c:c)
}
}
let labeledTuple = (a:1, b:"Hello", c:2.2)
let mystruct = MyStruct(labeledTuple)
let unlabeledTuple = (1, "Hello", 2.2)
let mystruct2 = MyStruct(unlabeledTuple)
Once you add initializers that match both labeled and unlabeled elements, you can construct structs from either kind of tuple.
Tuple Return Types
Functions, methods, and closures may return tuples as well as any other return type. Tuples provide a convenient way to group related information together as an informal anonymous struct. In the following example, MyReturnTuple returns a labeled tuple:
func MyReturnTuple() -> (a:Int, b:String, c:Double) {
return (1, "Hello", 2.2)
}
For a more meaningful example, a web service method might return an HTTP status code tuple such as (404, "Page not Found"):
func fetchWebStatus(url: NSURL) -> (Int, String) {
// ...function code here...
return (418, "I'm a Teapot (see RFC 2324)")
}
You decompose the tuple by assignment. A single assignment stores the entire tuple value. A tuple assignment extracts component elements by position:
let returnValues = fetchWebStatus() // returns tuple
let (statusCode, statusMessage) = returnValues // breaks tuple into components
When you’re only interested in some of the tuple values, use the underscore _ “ignore” character to skip specific assignments. Instead of saying this, for example, to fetch the status message by position:
let statusMessage = returnValues.1
you can use this:
let (_, statusMessage) = returnValues
Variadic Parameters
Sometimes you don’t know in advance how many parameters you’ll need to pass to a function. As the name suggests, a variadic parameter varies with the number of items passed to it. For example, Recipe 4-4 prints a current tally as it creates a running sum from the values passed to it.
Recipe 4-4 Using Variadic Parameters to Compute a Sum
func RunningSum(numbers: Int...) {
var sum = 0
for eachNumber in numbers {
sum += eachNumber
print("(eachNumber): (sum)")
}
print("Sum: (sum)")
}
The three periods after the Int type indicate that numbers is a variadic parameter. When you declare the parameter in this fashion, you can pass zero or more input values to it:
RunningSum()
RunningSum(1, 5, 3, 2, 8)
The function sees these parameters as a typed array—in this example, [Int]—even though the items are not passed using array notation. You can define one variadic parameter per function, and the variable argument can appear at any position, as in this example, where a list of items appears at the start of the method call:
func contextString(items: Any..., file: String = __FILE__,
function: String = __FUNCTION__, line: Int = __LINE__) -> String {
return "(function):(self.dynamicType):(file):(line) " +
items.map({"($0)"}).joinWithSeparator(", ")
}
Recipe 4-5 offers another example of using variadic assignments. This Array extension enables array lookups using multiple indices. You might create an array and want to index it with array[3, 5] or array[7, 9, 10, 4]. The extension adds subscripting for two or more indices on top of the single-index subscript already built into Array.
Recipe 4-5 Multi-index Array Subscripting
extension Array {
typealias ArrayType = Element
subscript(i1: Int, i2: Int, rest: Int...) -> [ArrayType] {
var result = [self[i1], self[i2]]
for index in rest {
result += [self[index]]
}
return result
}
}
This implementation uses three parameters to avoid conflict with the single-subscript implementation. Any implementation that accepts (Int, Int...) parameters is indistinguishable from (Int) at runtime if called with a single index. That’s because variadic parameters accept zero or more values. To make this work, you need a signature that won’t confuse Swift. The proper solution uses two nonvariadic arguments followed by a third variadic one: (Int, Int, Int...). Whenever at least two parameters are passed, Swift knows to call this function instead:
let foo = [1, 2, 3, 4, 5, 6, 7]
print(foo[2]) // prints 3, defaults to built-in implementation
print(foo[2, 4]) // prints [3, 5]
print(foo[2, 4, 1]) // prints [3, 5, 2]
print(foo[2, 4, 1, 5]) // prints [3, 5, 2, 6]
var item = 25
var closure = {print("Value is (item)")}
item = 35
closure()
It creates a closure that prints out the value of the variable item. When it runs, should it print out 25, the value of the variable at the time the closure was created, or 35, the current contents of the memory pointed to by the variable reference?
If you run this in an app or a playground, you’ll find that this code prints 35 rather than 25. Swift closures default to capturing references, not values. This behavior is distinct from Objective-C blocks, where you need to explicitly use the __block keyword to get this behavior. Whatever value is stored in item at the time of execution, and not at the time of declaration, is printed. To change this behavior and capture the value at the time the closure is defined, use a capture list, as in the following example:
var item = 25
var closure = {[item] in print(item)}
item = 35
closure()
The use of [i] enables you to capture the value of i at the time you create the closure instead of at a later runtime. Capture lists appear as the first item in a closure, before any parameter clauses or identifier lists, and require the in keyword to be used. Here’s another example, which uses a class instance instead of an integer:
class MyClass {
var value = "Initial Value"
}
var instance = MyClass() // original assignment
var closure2 = {[instance] in print(instance.value)}
instance = MyClass() // updated assignment
instance.value = "Updated Value"
closure2() // prints "Initial Value"
If you omit the [instance] from the capture list, this example prints out Updated Value, using the updated variable assignment stored in the referenced instance. With the capture list, it prints Initial Value. This is the value stored by the original assignment captured by the closure.
A capture list enables you to avoid reference cycles, where a closure owns a reference to the instance that owns the closure. Reference cycles commonly pop up when you’re working with completion blocks, notification handlers, and Grand Central Dispatch blocks. In nearly every case, you’ll want to use weak references to break reference cycles.
Add the weak keyword to the capture list and unwrap the value before using it. Here’s an example of what that pattern looks like in real-world use:
class Bumpable {
var weakBumpValueClosure: () -> Void = {}
private var value = 0
func showValue() {print("Value is now (value)")}
init() {
self.weakBumpValueClosure = {
[weak self] in
if let strongSelf = self {
strongSelf.value++
strongSelf.showValue()
}
}
}
This closure uses weak self capture; a weak reference may revert to nil when an instance is deallocated. Because of this, you must always treat them as optionals and unwrap them before use. This example uses an if-let statement to bind the optional. If the instance is still valid at the start of the binding, the binding ensures that it remains valid throughout the scope in which it is used. If the self reference is already invalidated, the captured value reverts to nil, and the if-let statement shortcuts. No harm, no foul.
There’s a second, far more dangerous, approach you can use: unowned capture. This is equivalent to Objective-C’s unsafe-unretained, and I cannot recommend using it. Apple writes that unowned references should be used when “the closure and the instance it captures will always refer to each other, and will always be deallocated at the same time.” Unlike weak references that may revert to nil when an instance is deallocated, an unowned reference is not optional. It must stick around for as long as the closure exists. An unowned reference is roughly equivalent to and as desirable as using a weak value with forced unwrapping.
The advantage—if that’s even the right word to use—is that an unowned reference is not an optional value and can be used directly without unwrapping. Consider the following example:
public func dispatch_after(delay: NSTimeInterval,
queue:dispatch_queue_t = dispatch_get_main_queue(),
block: dispatch_block_t) {
let delay = Int64(delay * Double(NSEC_PER_SEC))
dispatch_after(
dispatch_time(DISPATCH_TIME_NOW, delay),
queue, block)
}
class Bumpable {
// If unownedBumpValueClosure was marked as private,
// [unowned self] would be safe. The only ref would be to
// the parent instance and they'd be deallocated together
var unownedBumpValueClosure: () -> Void = {}
private var value = 0
func showValue() {print("Value is now (value)")}
init() {
self.unownedBumpValueClosure= {
[unowned self] in
self.value++
self.showValue()
}
}
}
// Setting up for failure
var bumper = Bumpable()
dispatch_after(2.0, block: bumper.unownedBumpValueClosure)
bumper.showValue()
If the bumper instance deallocates at any time within the first two seconds before the dispatched block is called, the closure will crash during execution, as the co-deallocation guarantee cannot be maintained.
Note
Swift functions and closures are reference types. Apple writes, “Whenever you assign a function or a closure to a constant or a variable, you are actually setting that constant or variable to be a reference to the function or closure.” Reference typing enables constant (let) closures to update as well as read the variables they’ve captured. It ensures that closures, no matter how assigned or passed, always refer to the same instance. Because of this, captured values don’t depend on the context where the closure is executed.
Autoclosures
A Swift autoclosure creates an implicit closure for an expression passed as a parameter without explicit braces. That expression is automatically converted to a closure. Consider this example:
func wait(@autoclosure closure: () ->()) {
print("Happens first");
closure() // Executes now
print("Happens last");
}
wait(print("This goes in the middle"))
Like any other closures, autoclosures enable you to delay statement evaluations until a later time but do not require you to enclose those calls in braces. This differentiates an autoclosure from simply passing the results of a normal expression as an argument, which would be executed immediately. Autoclosures cannot accept parameters (that is, the first part of their function type must be () or Void), although they can return any type desired.
Apple offers the following as its standard autoclosure example:
func simpleAssert(@autoclosure condition: () -> Bool, _ message: String) {
if !condition() {print(message)}
}
This function produces less dramatic feedback than assert and precondition. Instead of stopping program execution, it prints out a warning when a condition is not met, creating a kinder, gentler in-code assertion mechanism.
For example, you might test whether a percentage falls between 0.0 and 1.0:
simpleAssert(0.0...1.0 ~= percent , "Percent is out of range")
Some developers use autoclosures in deployment to differentiate statements between phone and tablet targets—for example, idiom<T>(@autoclosure phone: () -> T, @autoclosure pad: () -> T). Others find them handy lazy multiway unwrappers—for example, when performing JSON parsing. At one point, I decided that UIView animations really needed autoclosures. I felt that an inline property assignment like this:
UIView.animate(2.0, view.backgroundColor = .blueColor())
was more aesthetically pleasing than the default syntax in the following examples, which can be written with or without trailing closures:
UIView.animateWithDuration(2.0, animations:{
view.backgroundColor = .blueColor()})
UIView.animateWithDuration(2.0){
view.backgroundColor = .blueColor()
}
So I built the following extension:
extension UIView {
class func animate(duration: NSTimeInterval,
@autoclosure _ animations: () -> Void) {
UIView.animateWithDuration(duration, animations: animations) // error
}
}
It didn’t work but threw a compiler error. Specifically, the complier complained that I was attempting to use a non-escaping function (the autoclosure) in an escaping context (the animateWithDuration call). autoclosure defaults to noescape, an attribute which ensures that parameters are not stored for later execution and will not outlive the lifetime of the call.
You add no-escape implementation by marking closure parameters with the @noescape keyword, as in the following example:
typealias VoidBlockType = () -> Void
func callEscape(closure: VoidBlockType) {closure()}
func callNoEscape(@noescape closure: VoidBlockType) {closure()}
class MyClass {
var value = 0
func testNoEscape() {
callNoEscape{print(value++)}
}
func testEscape() {
// reference to property 'value' in closure requires
// explicit 'self.' to make capture semantics explicit
// callEscape{print(value++)} // error
callEscape{print(self.value++)}
}
}
Using noescape introduces performance optimizations and bypasses the need to annotate properties and methods with self. Normally, Swift can infer self in method bodies, so you don’t need to include it with many property and method calls. In escaping closures, Swift requires that you add explicit self references. This signals and disambiguates capture semantics; it’s clear that you’re capturing self and may potentially create retain cycles.
Since animateWithDuration hasn’t been updated to take no-escaping into account, the autoclosure parameter cannot be used in its default state. In Recipe 4-6, the escaping annotation overrides this limitation, solving the issue and enabling my custom animate method to work with an extended lifetime.
Recipe 4-6 Adding Autoclosure to UIView Animation
extension UIView {
class func animate(duration: NSTimeInterval,
@autoclosure(escaping) _ animations: () -> Void) {
UIView.animateWithDuration(duration, animations: animations)
}
}
When using no-escape closures, do not try to assign them to escaping variables, pass them to escaping contexts, use them as asynchronous blocks that may outlive the parent, or embed them in other, escaping closures. Here’s a function that calls a noescape parameter:
func callNoEscape(@noescape closure: VoidBlockType) {
// Using @noescape means closure ends its lifetime when its scope
// ends its lifetime and closure will not be stored or used later
// Invalid uses
// Non-escaping function in escaping context
// Cannot pass as escaping parameter
// dispatch_async(dispatch_get_main_queue(), closure)
// let observer = NSNotificationCenter.defaultCenter()
// .addObserverForName(nil, object: nil,
// queue: NSOperationQueue.mainQueue(), usingBlock: closure)
// Non-escaping function in escaping context
// Cannot store as escaping param
// let holdClosure: VoidBlockType = closure
// Closure use of @noescape parameter 'closure' may allow it to escape
// Cannot use in normal escaping scope
// let otherClosure = {closure()}
closure() // call the no-escape closure
}
Adding Default Closures
Optional closures enable you to call functions both with and without trailing closures. For example, you might call a function with myFunction() or with myFunction(){...}, with the final closure an optional item. You achieve this by adding a default value to your closure, as in this example:
func doSomethingWithCompletion(completion: () -> Void = {}) {
// ... do something ...
completion()
}
The Swift compiler is smart enough to recognize that an omitted block argument, even a trailing one, should fall back to the default value, which in this case is a simple empty closure. That closure’s type is automatically inferred through its declaration.
You can, of course, supply more complex defaults:
let defaultClosure: () -> Void = {print("Default")}
func doSomethingWithCompletion(completion: () -> Void = defaultClosure) {
completion()
}
doSomethingWithCompletion() // "Default"
doSomethingWithCompletion(){print("Custom")} // "Custom"
The overhead for an empty default closure is minimal, especially with optimization enabled. Any time you add default arguments, there’s a minor check involved. Method calls without default values run faster, which you can see if you run tens of millions of tests at once. For single calls, the difference is trivial.
Currying
Currying in Swift (and other programming languages) involves translating a function that accepts an argument tuple into a series of functions with single arguments. Wikipedia defines currying as follows:
In mathematics and computer science, currying refers to the technique of translating the evaluation of a function that takes multiple arguments (or a tuple of arguments) into evaluating a sequence of functions, each with a single argument (partial application). It was introduced by Moses Schönfinkel and later developed by Haskell Curry.
In Swift, functions normally look like this:
public func convolve(var kernel: [Int16], image: UIImage) -> UIImage? {...}
This function, which I’ve elided here, uses the Accelerate framework to perform basic image processing. Specifically, it convolves a UIImage instance against an arbitrary kernel made up of weighted Int16 values. This is a very handy way of creating special effects. It’s also a perfect example of a function that benefits from currying.
Note
A convolution operation multiplies a matrix of number values (called a kernel) against the pixels of an image to create special effects such as blurring, sharpening, embossing, and so forth. The kernel passes over each image pixel (excluding areas at the very edge of the image where the kernel cannot fully fit within the image) and multiplies each of its values against the pixels that surround the center.
When curried, the preceding function’s declaration looks like this:
public func convolve(var kernel: [Int16])(_ image: UIImage) -> UIImage? {...}
Notice the one major change? It’s subtle. Instead of a single argument tuple, the declaration consists of a series of one-argument tuples before the return type. There’s an extra set of parentheses in there between [Int16] and image.
Normally, you call this function with two arguments:
convolve(kernel, image)
With currying, you use two 1-tuples:
convolve(kernel)(image)
The extra parentheses are a dead giveaway that there’s currying.
Why Curry?
Currying enables you to break up functions into partially specified components and then use and reuse those components however you like. And that’s where this language feature becomes deeply powerful. You can decouple the convolve(kernel) portion of this call from (image). Separating these enables you to delay setting an image argument until some indefinite time in the future. You can now perform assignments like this:
public var blur7Kernel: [Int16] = [Int16](count: 49, repeatedValue:1)
public let blur7 = convolve(blur7Kernel)
This snippet creates a reusable 7×7 blur effect. You can apply it to any image by calling this:
blur7(image)
Here’s the best part: This isn’t a throwaway. You establish a new function that can be used over and over by many programs in many circumstances: The customization is useful in and of itself, but the code that drives the customization is decoupled.
When you update the centralized convolution routine, every curried version updates as well. It’s the same benefit as if you had written a full wrapper function, like the one that follows, but with significantly less overhead:
func blur7(image: UIImage) -> UIImage? {
var blur7Kernel: [Int16] = [Int16](count: 49, repeatedValue:1)
return convolve(blur7Kernel, image)
}
Building Libraries
In fact, with currying, I can now build an entire suite of common image processing functions by passing various kernels, as you see in Recipe 4-7. Each definition raises the level of abstraction and prevents me from having to redevelop kernels (or even think about the math) when I want to emboss, blur, or sharpen an image.
Recipe 4-7 Creating a Convolution Library with Currying
// Embossing
public var embossKernel: [Int16] = [
-2, -1, 0,
-1, 1, 1,
0, 1, 2]
public let emboss = convolve(embossKernel)
// Sharpening
public var sharpenKernel: [Int16] = [
0, -1, 0,
-1, 8, -1,
0, -1, 0
]
public let sharpen = convolve(sharpenKernel)
// Blurring
public var blur3Kernel: [Int16] = [Int16](count: 9, repeatedValue:1)
public let blur3 = convolve(blur3Kernel)
public var blur5Kernel: [Int16] = [Int16](count: 25, repeatedValue:1)
public let blur5 = convolve(blur5Kernel)
public var blur7Kernel: [Int16] = [Int16](count: 49, repeatedValue:1)
public let blur7 = convolve(blur7Kernel)
public var gauss5Kernel: [Int16] = [
1, 4, 6, 4, 1,
4, 16, 24, 16, 4,
6, 24, 36, 24, 6,
4, 16, 24, 16, 4,
1, 4, 6, 4, 1
]
public let gauss5 = convolve(gauss5Kernel)
Everything here uses one central function. While each of these filters relies on distinct kernel presets, none of these assignments affects how convolution takes place.
Partial Application
What currying does and why it’s particularly important in Swift and in other languages is that it lets you utilize partial application. According to Wikipedia, “In computer science, partial application (or partial function application) refers to the process of fixing a number of arguments to a function, producing another function of smaller arity.”
Without built-in currying, you can still create partially applied functions in Swift. For this example, you could build wrapper closures around the convolve function by setting kernels like this:
public func createConvolveFunction(kernel: [Int16]) ->
(UIImage -> UIImage?) {
return {(image: UIImage) -> UIImage? in
return convolve(kernel, image)}
}
This isn’t too difficult to put together, but why bother? This kind of intermediate work isn’t needed in Swift. Built-in currying gives you this feature for free: Just add parentheses.
Currying Costs
Currying does involve some costs, but for most purposes, they’re pretty minor. Kevin Roebuck writes, in Functional Programming Languages: High-Impact Strategies, “Curried functions may be used in any language that supports closures; however, uncurried functions are generally preferred for efficiency reasons, since the overhead of partial application and closure creation can then be avoided for most function calls.”
Reserve currying for highly parameterized functions. Currying enables you to specialize these to establish reusable already-primed-and-ready default configurations.
Currying and Callbacks
Many Cocoa and Cocoa Touch APIs use target action. In the following typical scenario, the addTarget(_:, action:, forControlEvents:) pattern enables you to assign a callback for when a user taps this button:
class Delegate: NSObject {
func callback(sender: AnyObject) {
// do something
}
}
let delegate = Delegate()
let button = UIButton()
button.addTarget(delegate, action: "callback:",
forControlEvents: .TouchUpInside)
In Swift, currying leverages this pattern in a new way for new types. It won’t help you with the UIButton, which is stuck back in existing Cocoa Touch libraries, but it offers great possibility for new implementations. Instead of using a selector, store a reference to the method you wish to use:
let callbackMethod = Delegate.callback
Here’s the fully qualified version of this assignment:
let callbackMethod: Delegate -> (AnyObject) -> Void = Delegate.callback
Using Delegate.callback points to the method without tying it to any particular instance. To associate it with an instance, add the target in parentheses:
let targetedCallback = callbackMethod(target)
You execute the callback by adding a parameter tuple:
targetedCallback(parameters)
The preceding call is equivalent to these direct (and more obviously curried) versions:
Delegate.callback(target)(parameters) // and
callbackMethod(target)(parameters)
When using currying with multiple parameters, you pass method parameters as a single n-ary tuple. Here’s an example of a method that accepts three parameters:
class TestClass {
func multiParameterMethod(arg1: Int, _ arg2: Int, _ arg3: Int) {
print("(arg1) (arg2) (arg3)")
}
}
To call this method on an instance, pass the parameters after establishing the instance for the method to apply to:
let test = TestClass()
TestClass.multiParameterMethod(test)(1, 2, 3)
Practical Currying
It can help to think of curried functions in terms of staging. Add a tuple break to each point where a new client takes over. Consider the approach used in ProjectFunctionToCoordinateSystem. This utility transforms a (CGFloat) -> CGFloat function into the coordinate system defined by two points, p0 and p1, and applies that function at a given x value. Unlike the image examples, Recipe 4-8 uses multiple currying points and differs in terms of how many parameters are supplied at each partial application. The middle set of parameters, which establishes the target coordinate system, accept two points.
Recipe 4-8 Currying and Partial Application
public typealias FunctionType = (CGFloat) -> CGFloat
public func projectFunctionToCoordinateSystem(
function f: FunctionType)(p0: CGPoint, p1: CGPoint)
(x: CGFloat) -> CGPoint {
let dx = p1.x - p0.x
let dy = p1.y - p0.y
let magnitude = sqrt(dy * dy + dx * dx)
let theta = atan2(dy, dx)
var outPoint = CGPoint(x: x * magnitude, y: f(x) * magnitude)
outPoint = CGPointApplyAffineTransform(outPoint,
CGAffineTransformMakeRotation(theta))
outPoint = CGPointApplyAffineTransform(outPoint,
CGAffineTransformMakeTranslation(p0.x, p0.y))
return CGPoint(x: outPoint.x, y: outPoint.y)
}
Currying enables you to establish reusable partially applied elements. In this projectFunctionToCoordinateSystem example, you might establish a projectable Sin function. The following fSin closure maps values from x to sin(x * Pi). The projectableSinFunction created using this closure is typed (p0: CGPoint, p1: CGPoint) -> (x: CGFloat) -> CGPoint:
let fSin: FunctionType = {CGFloat(sin($0 * CGFloat(M_PI)))}
let projectableSinFunction = projectFunctionToCoordinateSystem(function: fSin)
Once this is established, you can use and reuse projectableSinFunction with any two points. This step applies the projectable function to a specific coordinate system. This next example creates a ready-to-use (x: CGFloat) -> CGPoint function by projecting to x == y:
let pA = CGPointZero; let pB = CGPoint(x:100, y:100)
let xequalySin = projectableSinFunction(p0: pA, p1: pB)
Note
Swift offers a CGPoint.zero alternative to CGPointZero. As a dinosaur, I tend to use the latter. As a rule, prefer the former if your fingers are not hardwired for old-style usage. Theoretically, inferencing enables you to drop the CGPoint prefix to use just .zero when the type is known in advance. There’s a real point where the coolness of the compiler’s capabilities starts interfering with general code readability, and this is probably that point or, more correctly, that CGPoint.
Once again, the result is a reusable component—in this case, the xequalySin function. BuildPath uses this function to create the Bezier path you see in Figure 4-1.
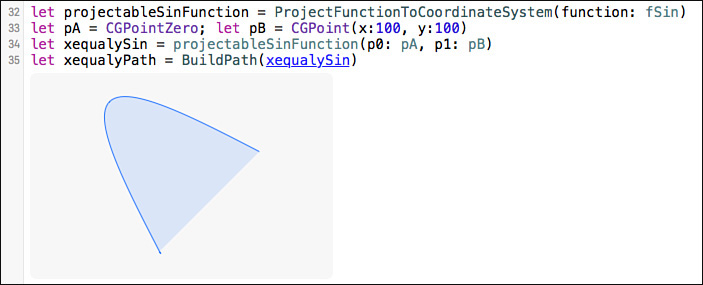
As you see from this example, currying enables you to build reusable, decomposable functional components. Partially applied functions provide exceptionally easy-to-create and easy-to-maintain elements that unify multistage processes.
The sample code that accompanies this chapter uses this curried example to build SpriteKit animations that enable you to move sprites from one point to another along nonlinear paths. It’s a great example of the synchronicity between Swift language features and decomposable mathematics. When running the samples, open the assistant editor to view the live animations.
Passing Closures as Function Parameters
Swift 2 enables you to pass closures to a parameter that expects a function pointer. I do a lot of work with Bezier paths, and until this feature was added to the Swift language, I literally had to write a custom description parser because I could not access the C-based CGPathApply function that iterates through path elements:
typealias CGPathApplierFunction = (UnsafeMutablePointer<Void>,
UnsafePointer<CGPathElement>) -> Void
func CGPathApply(_ path: CGPath!, _ info: UnsafeMutablePointer<Void>,
_ function: CGPathApplierFunction!)
Under the new system, you use a convention attribute to create a compatible closure type. The default convention is swift. It provides standard Swift-style calling for function values. To work with CGPathApply, use an Objective-C-compatible block. The block convention indicates an Objective-C-compatible block reference:
typealias CGPathApplierClosureType =
@convention(block) (CGPathElement) -> Void
Apple explains in The Swift Programming Language, “The function value is represented as a reference to the block object, which is an id-compatible Objective-C object that embeds its invocation function within the object. The invocation function uses the C calling convention.”
While this example uses the block convention, you can also use c—that is, @convention(c)—for C function types. Apple says, “The c argument is used to indicate a C function reference. The function value carries no context and uses the C calling convention.”
You need not create type aliases. You can use the convention annotation inline, as in this example:
let myObjCCompatibleCallback: @convention(block) (CGPathElement) -> Void =
{element in print(element)}
or as shown here:
let myCCompatibleCallback: @convention(c) (value: CGFloat) -> CGFloat =
{(value: CGFloat) -> CGFloat in return value * 180.0 / CGFloat(M_PI)}
In Recipe 4-9, the new CGPathApplierClosureType type alias helps create a simple wrapper function to call the applier function. This little CGPathApplyWithSwiftClosure function is based on sample code provided by Apple on the Developer Forum. It’s ugly; it’s scary; it works. Importantly, this code enables you to create the super-simple and Swift-friendly decomposePath implementation that follows it.
decomposePath iterates through CGPathElement source items to construct new Swift-based BezierElement enumerations. The odd numbering in this implementation (the destination point is variously at indices 0, 1, or 2) is based on how CGPathElement orders its point data.
Recipe 4-9 Passing Closures to C Functions
// Simple Swift enumeration to store path elements
public enum BezierElement {
case CloseSubpath
case MoveToPoint(point: CGPoint)
case AddLineToPoint(point: CGPoint)
case AddQuadCurveToPoint(point: CGPoint, controlPoint1: CGPoint)
case AddCurveToPoint(point: CGPoint,
controlPoint1: CGPoint, controlPoint2: CGPoint)
}
// Apply Swift closure to CGPath elements
// Thanks, Quinn the Eskimo
typealias CGPathApplierClosureType =
@convention(block) (CGPathElement) -> Void
func CGPathApplyWithSwiftClosure(
path: CGPath, closure: CGPathApplierClosureType) {
CGPathApply(path,
unsafeBitCast(closure, UnsafeMutablePointer<Void>.self)){
info, element in
let block = unsafeBitCast(info, CGPathApplierClosureType.self)
block(element.memory)
}
}
// Decompose a UIBezierPath into BezierElement components
func decomposePath(path: UIBezierPath) -> [BezierElement] {
var points = [BezierElement]()
CGPathApplyWithSwiftClosure(path.CGPath){
element in
switch element.type {
case .CloseSubpath:
points.append(.CloseSubpath)
case .MoveToPoint:
points.append(.MoveToPoint(point:element.points[0]))
case .AddLineToPoint:
points.append(.AddLineToPoint(point:element.points[0]))
case .AddQuadCurveToPoint:
points.append(.AddQuadCurveToPoint(point:element.points[1],
controlPoint1: element.points[0]))
case .AddCurveToPoint:
points.append(.AddCurveToPoint(point:element.points[2],
controlPoint1: element.points[0],
controlPoint2: element.points[1]))
}
}
return points
}
The best way to validate your decomposed path is to reconstruct and inspect it. This extension enables you to append an element to a Bezier path instance:
extension BezierElement {
func appendToPath(path: UIBezierPath) {
switch self {
case .CloseSubpath: path.closePath()
case .MoveToPoint(let point): path.moveToPoint(point)
case .AddLineToPoint(let point): path.addLineToPoint(point)
case .AddQuadCurveToPoint(let point, let controlPoint1):
path.addQuadCurveToPoint(point, controlPoint: controlPoint1)
case .AddCurveToPoint(let point, let controlPoint1, let controlPoint2):
path.addCurveToPoint(point, controlPoint1: controlPoint1,
controlPoint2: controlPoint2)
}
}
}
let path = UIBezierPath()
decomposePath(QPath()).forEach{$0.appendToPath(path)}
If your code has been done properly, the two paths should be visually identical, and the new path’s deconstruction should be the same element-by-element—a comparison process that you can automate for testing. Misordering points is the most common reason that path deconstruction fails, which is why it’s so vital to correctly position the points indices with your Swift representation.
Wrap-up
Swift transforms functionality into first-class objects. Its functions and closures enable you to build and deploy encapsulated behavior for both direct and indirect use. Whether you’re currying, nesting, capturing values, or supplying blocks for deferred execution, Swift functions introduces flexible solutions that take your code to new and powerful places.