3. Optionals?!
nil happens. When dictionary lookups fail, when instance properties are case dependent, when asynchronous operations have not completed, when failable initializers cannot create instances, and in dozens of other situations where values may or may not have been set, Swift may return nil instead of some other more concrete content. Swift provides nil as a powerful tool for expressing situations in which values are unavailable for use.
Swift differentiates these “no content” scenarios from error handling. In error handling, control flow changes to offer failure mitigation and reporting. With nil, a value-of-no-value represents an absence of data. It offers a testable placeholder to be used when no data is otherwise available.
Unlike in many other languages, in Swift, nil is not a pointer. It is a safe and expressive way to represent the potential for both a valid and invalid value within a single construct. In Swift, the Optional type encapsulates this concept and enables you to differentiate between successful value assignments and nil cases.
Learning how to recognize and use optionals is an essential step in mastering the Swift language. This chapter introduces optionals and surveys the supporting constructs you need to create, test, and successfully use optionals in your code.
Optionals 101
Question marks and exclamation points are the hallmark of Swift optionals. Any variable marked with ? may—or may not—contain a valid value. To get a sense of this language feature, consider the following example:
var soundDictionary = ["cow": "moo", "dog": "bark", "pig": "squeal"]
print(soundDictionary["cow"] == "moo") // prints true
print(soundDictionary["fox"]) // What does the fox say?
What does the fox say? In Swift, the answer is nil. In Swift, nil indicates “no value.” Unlike in Objective-C, in Swift, nil is not a pointer. Swift nil indicates a semantic missing non-existence, a count of Monte Cristo, a cup of “not tea,” an honest politician. A nil item means “nothing to see here, move along, move along, move along.”
In this soundDictionary example, the variable stores a string dictionary. With strings for both keys and values, its type is Swift.Dictionary<Swift.String, Swift.String>. You can also represent this type as [String: String], using square brackets and a colon. Swift infers this type from the concrete data provided on the right-hand side of the soundDictionary assignment. Alternatively, you can use explicit type annotation in your code by adding a colon and a type in the variable declaration:
var soundDictionary: [String: String] =
["cow": "moo", "dog": "bark", "pig": "squeal"]
Although the dictionary uses String keys and values, when you look up any item in this dictionary, the value returned is not a String. It’s typed String?. That question mark is critical to understanding dictionaries because it indicates an Optional type. Dictionary lookups may succeed or fail. Optional return types encapsulate both possibilities.
Contrast this behavior with arrays, where it’s the programmer’s job to check whether an index exists before accessing it. Both types could easily be implemented with the other convention, of course, but the Swift people chose the more likely use case for each type. Arrays are highly bounded with a small domain of legal lookup indexes. Dictionaries are often sparse compared against their possible key domain. Optionals enables dictionaries to better represent their “may or may not map to a value” results.
Confirm the return type with Quick Help. Enter the dictionary and the following assignment in Xcode. Then Option-click the sound symbol (as in Figure 3-1) or select the symbol and open View > Utilities > Show Quick Help Inspector. The declaration line in the Quick Help presentation confirms that the type assigned to sound is String?:
var sound = soundDictionary["cow"] // sound is typed String?

While it might appear that the dictionary returns "moo" on success or nil for failed lookups, this is actually misleading. Print the output to the Xcode console, with print(sound). A successful result looks like Optional("moo"), with its value embedded in an optional wrapper. In this case, the Optional type uses a .Some enumeration, and its associated value is the "moo" string.
You cannot use this optional directly as a string. The following example fails because you must unwrap Optional types before using their values:
let statement = "The cow says " + sound
The + operator in this case works on two string values, not on a string and an optional. Unwrapping gives you access to the string stored within the optional wrapper, enabling you to perform tasks like appending values.
Unwrapping Optionals
Optional types always return either a wrapped value or nil. Wrapping means that any actual content is stored within a logical outer structure. You cannot get to that value (in this case, "moo") without unwrapping it. In the Swift world, it is always Christmas, and there are always presents—or at least variables—to unwrap.
Swift offers a variety of mechanisms for unwrapping optionals and recovering the underlying data type stored within them. There are more ways to get at a wrapped optional value than you might expect. The expressive possibilities expanded in Apple’s Swift 2 update to provide greater developer flexibility.
Forced Unwrapping
The simplest way to extract an optional value is to append an exclamation point:
print("The sound is (sound!)") // may or may not crash
This is also the most dangerous approach, and you want to generally avoid it in production code.
If the value is wrapped (that “optional” result you just read about), the exclamation point returns the value stored within the wrapped element. If the value is nil, you experience a fatal runtime error—which is not nearly as fun or gratifying for your workday.
The nil value is the Swift equivalent of your aunt’s home-crocheted vest with a large friendly moose decoration on it. It’s pretty important to check whether an item is nil before unwrapping it. You can more safely unwrap with an exclamation point within an if statement because this sound is nominally guaranteed to be non-nil in non-extreme (that is, nonthreaded) situations:
if sound != nil {
print("The sound is (sound!)") // doesn't crash
}
Safety is a relative thing. While this forced unwrap is pretty safe at compile time and runtime in its current use, it’s dangerous while editing. If you accidentally move that print line out of the if block, the compiler cannot warn you about it, and you will ship broken code.
In this example, the sound variable is also not weak. It won’t deallocate between the nil test and unwrapping. Never use forced unwraps with weak variables because they may do just that.
As a rule, avoiding forced unwraps, even within if clauses, helps you avoid potential disasters.
Conditional Binding
Conditional binding provides a better and safer approach that avoids forced unwrapping. In conditional binding, you optionally bind (that is, assign) a value to a new constant or variable using an if-let or if-var statement. When the optional is not nil, Swift unwraps the value, assigns it, and executes a block of code. When nil, you either enter an else clause or continue to the next statement:
if let sound = soundDictionary[animal] {
print("The (animal) says (sound)")
} else {
print("Any sound the (animal) says is unknown to modern science")
}
It’s conventional in Swift to use identical identifiers in conditional bindings for both wrapped and unwrapped versions. In the following snippet, a mySound constant is unwrapped within the if-let (or if-var) scope but wrapped outside it:
let mySound = soundDictionary[animal] // mySound is wrapped
if let mySound = mySound {
print(mySound) // mySound is unwrapped
}
Using the same identifier makes it clear that you’re working with the same semantics in different states of undress. Conditional binding clauses tend to be short. This enables you to verify your overloaded symbol intent with a glance.
The right-hand value in an if-let assignment must be an optional. You cannot use this construct with an already-unwrapped item. The following statement leads to an error, complaining that a conditional binding initializer must have Optional type:
if let sound = soundDictionary["cow"]! { // error!
print("The cow says (sound)")
}
Conditional Binding and Type Casts
Type casting enables you to re-interpret an instance’s type at runtime. Swift offers two distinct type-casting operators (is and as) with four variations: is, as, as?, and as!. These operators enable you to check value types and cast values to other types. The is operator checks whether you can convert an instance’s type to another, typically more specialized, type:
let value = 3
value is Any // true
value is Int // true
value is String // false
The as operator casts to other types and can test whether an item conforms to a protocol. These are its three forms:
![]() The
The as operator applies direct casts. The compiler must determine at compile time that the cast will succeed.
![]() The
The as? variant contains a question mark. It performs a conditional cast that always returns an optional value. If the cast succeeds, it’s wrapped in an optional instance. If not, it returns nil. This is the cast I use most often in day-to-day coding. The compiler issues warnings when it detects that a cast will always succeed (for example, String to NSString) or always fail (String to NSArray).
![]() The forced variant
The forced variant as! includes an exclamation point. It either returns an unwrapped item or raises a runtime error. This is the most dangerous cast type. Use it when you know a cast will always succeed or when you want your application to prematurely crash.
Conditional binding and conditional casting work hand-in-hand. Figure 3-2 demonstrates why. In this screenshot, Swift code creates a string-indexed dictionary that stores arbitrary Any instance types. Even when a lookup returns a valid integer for the "Three" key, a forced unwrap still reports Any type. To use this value as a number, you must downcast from Any to Int.
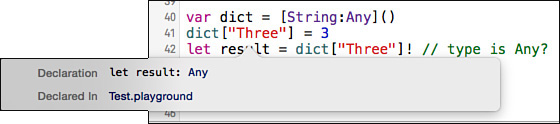
Figure 3-2 Lookups from a [String:Any] dictionary return Optional<Any> values. The type remains Any even after forced unwrapping.
The as? type operator produces optionals even when used with non-optional values:
let value = 3 // Int
let optionalValue = value as? Int // Int?
Conditional binding enables you to apply a cast, test the resulting optional, and then bind unwrapped values to a local variable. In the following example, result is bound as an Int constant within the if clause code block:
if let result = dict["Three"] as? Int {
print("(result + 3) = 6") // 6 = 6
}
This conditional pattern of fetch, cast, and bind commonly appears when working with structured data from web services and databases. Swift enables you to use type safety while navigating through key paths down to data leaves.
Recipe 3-1 searches a UIView hierarchy, using conditional casting to match subviews against a supplied type, returning the first subview that matches that type. The as? type operator returns an optional, which is conditionally bound to a local view variable. If the binding succeeds and a type match is found, the function returns. Otherwise, it recurses down the tree in a depth-first search.
Recipe 3-1 Using Conditional Binding to Test Types
public func fetchViewWithType<T>(
type t: T.Type, contentView: UIView) -> T? {
for eachView in contentView.subviews {
if let view = eachView as? T {return view}
if let subview = fetchViewWithType(
type: t.self, contentView:eachView) {
return subview
}
}
return nil
}
Binding Cascades
Although useful for accessing values, if-let bindings build into code structures colloquially known as pyramids of doom. Each successive test indents your code further and further to the right, creating a triangle of empty space to the left of the if statements and then the closing brackets:
if let cowSound = soundDictionary["cow"] {
if let dogSound = soundDictionary["dog"] {
if let pigSound = soundDictionary["pig"] {
// use sounds here
}
}
}
It’s the sort of code you don’t want to bring home to your project manager—or your mummy.
Using multiple optional bindings within a single test enables you to avoid this structural mess. First introduced in Swift 1.2, cascading permits any number of conditional bindings tests within a unified conditional:
if let
cowSound = soundDictionary["cow"],
dogSound = soundDictionary["dog"],
pigSound = soundDictionary["pig"] {
// use sounds here
}
If any assignment fails, evaluation stops, and control moves past the if statement. This approach is particularly useful when working with web-sourced data, such as JSON, where each step may depend on the results of the previous conditional binding. The following example is from a script that checks prices on the iTunes App Store:
if let
json = json as? NSDictionary,
resultsList = json["results"] as? NSArray,
results = resultsList.firstObject as? NSDictionary,
name = results["trackName"] as? String,
price = results["price"] as? NSNumber {
// Process results
}
This code pulls data from the App Store and deserializes it with NSJSONSerialization.JSONObjectWithData. The results list is extracted from the JSON data, and the app results from that list, and so forth.
While this approach avoids pyramid indentation, it introduces a bad tendency toward code constipation. Increased blockiness makes if-let cascades hard to mentally process. Copious commenting and spacing can mitigate this. As shown here, the results are faster for the brain to parse, make it easier to spot errors, and are better for adding, removing, and reordering intermediate steps:
if let
// Access JSON as dictionary
json = json as? NSDictionary,
// Retrieve results array
resultsList = json["results"] as? NSArray,
// Extract first item
results = resultsList.firstObject as? NSDictionary,
// Extract name and price
name = results["trackName"] as? String,
price = results["price"] as? NSNumber {
// Process results
}
guard Statements
The guard statement was first introduced in Swift 2. It offers another way to unwrap and use optionals. Although guard is not limited to use with optionals—you can use it with general Boolean conditions as well—it provides a major development advantage that’s specific to optional handling. In particular, guard statements move code out of indented scopes by offering early-return error handling.
Early-return inverts the handling of success and failure paths. Errors are handled first, enabling success code to be written at the highest possible scope. Compare this to if-let, where you cannot put the failure path first and your success conditions must be handled in a child scope. Without guard statements, all conditionally bound values must be used with the if statement code block that binds them. For example, the following snippet conditionally binds a cowSound constant using if-let, and the cowSound constant is undefined outside that scope:
if let cowSound = soundDictionary["cow"] {
// cowSound is unwrapped within this scope
}
// cowSound is undefined outside the scope
Like if-let, a guard statement conditionally unwraps and binds optional variables. When that binding fails, it executes a mandatory else clause, which must exit the current scope, using throw, break, continue, or return statements. Otherwise, the guard statement unwraps the optional value and binds it to a variable you can use throughout the remaining lifetime of the current scope:
guard let cowSound = soundDictionary["cow"] else {throw Error.MissingValue}
// cowSound now defined and unwrapped
Think of a guard statement as a soldier that will not permit the flow of execution to continue forward unless its condition or conditions are met. Unlike if-let, guard does not establish new scopes. Instead, it guides traffic through the existing scope.
Like if-let, a single guard statement can express multiple conditions, separated by comma delineators. For example, you might perform multiple constant assignments:
guard let
cowSound = soundDictionary["cow"],
dogSound = soundDictionary["dog"]
else {throw Error.MissingValue}
Or you might include a more general test along with assignments:
guard
soundDictionary.count > 2,
let cowSound = soundDictionary["cow"],
let dogSound = soundDictionary["dog"]
else {throw Error.MissingValue}
Implicitly Unwrapped Optionals
Swift provides a feature called implicitly unwrapped optionals, which you declare by appending an exclamation point to the end of the type. Unlike normal optionals, these versions unwrap themselves, much like a jack-in-the-box or the hired entertainment at a bachelor party. Use implicitly unwrapped optionals cautiously. They’re a fairly dangerous feature as they introduce fatal runtime errors if you attempt to access values stored inside a nil case optional.
Here’s an example of first an assignment to a normally typed constant and then to an implicitly unwrapped one. The difference is what happens when you access the wrapped value. That’s where the name comes from because during access, the value is implicitly unwrapped:
var animal = "cow" // 1
let wrappedSound = soundDictionary[animal] // Optional("moo")
let unwrappedSound: String! = soundDictionary[animal] // "moo"
// prints: The unwrapped sound is "moo"
let soundString = """ + unwrappedSound + """ // 2
print("The unwrapped sound is (soundString)")
In this example, when you use unwrappedSound in the string assignment, its value is not Optional("moo"). Its value is accessed as moo, and it behaves like a simple string. Implicit unwrapping extracts the value from an optional item and uses the data type you’d expect from a successful dictionary lookup. Once unwrapped, you can use the variable directly. You don’t have to add that “unwrap this variable” exclamation point or use conditional binding.
A real danger arises from unwrapping nil values. If you replace the assignment to animal in the line marked 1 with "fox" instead of "cow", this code raises a fatal error in the line marked 2. The runtime complains that it unexpectedly found nil while unwrapping an Optional value. With great unwrapping comes great responsibility. Take care that you properly guard these items to ensure that you don’t attempt to unwrap nil.
Limit implicit unwrapping to when you know in advance that a variable will always have a value after some logical point. For example, if you’re responding to button taps or menu clicks, you probably don’t have to wonder “does this button or menu item exist?” It does. If it didn’t, you would never have reached your callback.
Don’t use implicit unwrapping for more general cases like dictionary lookups. That’s just asking for trouble. You can, however, print unwrapped items and test them against nil:
print(unwrappedSound) // prints nil
if unwrappedSound != nil {
print("Valid:", unwrappedSound)
}
An error won’t be raised until you perform an operation that attempts to access the value inside.
As a rule, it is legal to assign a value, an optional value, or nil to an implicitly unwrapped variable. The following code is legal and will compile without error:
var myImplicitlyUnwrappedOptional: String!
myImplicitlyUnwrappedOptional = Optional("Value")
myImplicitlyUnwrappedOptional == "Value" // true
myImplicitlyUnwrappedOptional = nil // do not test except against nil
myImplicitlyUnwrappedOptional == nil // true
myImplicitlyUnwrappedOptional = "Value"
myImplicitlyUnwrappedOptional == "Value" // true
Assignments to both optional and non-optional values end with non-optional results, which you see by comparing against the non-optional string literal "Value". The danger lies in the nil assignment. A non-nil comparison tries to access the value and ends in a runtime error. The win is that you can perform an assignment to either optional or non-optional values with a single assignment.
An implicitly unwrapped scenario is common when working with Interface Builder. A view binding is optional; it may or may not be properly instantiated in the interface file. The view use is normally non-optional; presumably you set up the binding correctly. Implicit unwrapping simplifies code access to views at the cost of potential crashes during development and testing.
Swift 2’s one-line guard statement more or less offers a shorthand summary for the following initialization pattern:
let cowSound: String! = soundDictionary["cow"]
if cowSound == nil {throw Error.missingValue} // Handle nil case
// cowSound's value is now usable without explicit unwrapping
This assignment uses implicit unwrapping and then tests against nil. This is a safe check because the code makes no attempt to access an associated value. If the optional is nil, the if statement’s conditional block executes, transferring control away from this scope. Otherwise, execution continues, and the unwrapped cowSound constant is now available for use.
An implicitly unwrapped approach is both wordier and less safe than guard. It uses multiple statements compared with guard’s one, and it makes no conditions about leaving the current scope. If the throw request were replaced with a print statement, the nil case would continue forward. In doing so, it might encounter a use of cowSound’s nonexistent value and a nasty runtime crash.
Use implicit unwrapping cautiously and prefer guard where possible.
Guarding Failable Initializers
When an initializer returns an optional instance, it’s called a failable initializer. The initializer may succeed in establishing a new instance, or it may fail and return nil. For example, the following structure can be initialized only with even numbers:
struct EvenInt {
let number: Int
init?(_ number: Int) {
if number % 2 == 0 {self.number = number} else {return nil}
}
}
Mark failable initializers by appending a question mark or an exclamation point to the init keyword (init? or init!). The punctuation choice depends on whether the initializer returns a normal optional instance or an implicitly unwrapped one. The implicitly unwrapped variation is almost never used in real life. According to my technical editor Kevin Ballard, you might theoretically encounter one when working with legacy code ported from Core Foundation or from any unaudited Objective-C API.
Use guard to test assignments from failable initialization. Here’s an example built around the EvenInt struct. When created with an odd number, an EvenInt initializer returns nil. The guard statement throws an error and exits the scope:
do {
guard let even2 = EvenInt(2) else {throw Error.Odd}
print(even2) // prints EvenInt(number: 2)
guard let even3 = EvenInt(3) else {throw Error.Odd} // fails
print(even3) // never gets here
} catch {print(error)}
Although you can use any approach for testing and unwrapping optionals, guard statements offer a natural synchronicity with failable initializers. Guarding initializers once again enables you to test for failed initialization at the point where you declare variables and constants and ensures that these bindings remain valid for the remaining scope.
Optionals and Sentinel Values
It is tempting to use optionals to signal when an operation has failed. The following snippet represents Swift prior to version 2 and is common to Apple’s traditional Cocoa patterns:
func doSomething() -> String? {
let success = (arc4random_uniform(2) == 1) // flip a coin
if success {return "success"} // succeed
return nil // fail
}
if let result = doSomething() {
// use result here
}
An unsuccessful operation returns nil, and a successful one returns a value.
Starting in Swift 2, reserve nil failures for initialization (although you can also use throws in initializers as well as in normal code) and prefer guard over if-let. Instead of using optionals as sentinels—that is, to signal success and fail conditions—use Swift’s new error-handling system. Error handling enables you to redirect the flow of control to mitigate errors and provide recovery support:
func betterDoSomething() throws -> String {
let success = (arc4random_uniform(2) == 1) // flip a coin
if success {return "success"} // succeed
throw Error.failure // fail
}
do {
let result = try betterDoSomething()
} catch {print(error)}
This refactoring skips optionals; the nil case is never of interest to the client code. Swift 2 error handling means you never have to unwrap.
When a thrown error is not of interest to its consumer, the try? operator can discard errors and convert results to optionals. This lets you integrate new-style errors with old-style optional handling. A try? expression returns a wrapped value for successful calls and nil for thrown errors:
guard let foo = try? somethingThatMayThrow else {
// ...handle error condition and leave scope
}
if let foo = try? somethingThatMayThrow {}
The new error-handling system profoundly affects Cocoa-sourced APIs. Calls that used NSError pointers pre-Swift 2 change their return type from optional to non-optional, add the throws keyword, and eliminate error pointers from API calls. The new system sends NSError through do-try-catch. Compare the old approach with the new one:
// Old
func dataFromRange(range: NSRange,
documentAttributes dict: [NSObject: AnyObject],
error: NSErrorPointer) -> NSData?
// New
func dataFromRange(range: NSRange,
documentAttributes dict: [String: AnyObject]) throws -> NSData
By introducing error handling, optionals can eliminate overloaded “failed call” semantics. It’s always better to use throws with well-defined errors than to use optional sentinel values. When you really have no information to pass back to the caller other than “I failed,” Swift 2’s updated error system simplifies creating an error enumeration to explain why that failure occurred. It is ridiculously easy to add informative errors that don’t require complicated NSError initializers:
enum Error: ErrorType {case BadData, MemoryGlitch, ItIsFriday}
Although many current APIs, especially asynchronous handlers and calls based on Core Foundation, have yet to transition to the new system, I encourage you to update your code to avoid using optionals as sentinel values. Return your optionals to the “contains a value or does not contain a value” semantics they were designed to handle.
Coalescing
Swift’s nil-coalescing operator ?? unwraps optionals and provides fallback values for the nil case. This next example checks uses nil-coalescing to assign a value to the sound constant:
let sound = soundDictionary["fox"] ?? "unknown"
If the lookup succeeds and the dictionary returns a wrapped value, the operator unwraps it and assigns it to sound. If not, it assigns the fallback value, which is "unknown". In either case, the assignment is not optional. sound uses a String type, not String?.
Use nil coalescing when you can supply fallback values that won’t interrupt a normal operational flow. When you cannot, choose guard instead and handle nil as an error case in the else clause.
Note
If the optional is non-nil, the right-hand side of the operator is never evaluated. The operation short-circuits, as with the Boolean operators && and ||.
Optional Assignment
In nil coalescing, you must supply a valid unwrapped fallback value. In cases where a fallback does not exist, consider optional assignment instead. This approach shortcuts any case where an optional value is unavailable. Normally, you embed assignments into an if-let scope. If the conditional binding succeeds, you assign the unwrapped value.
Alternatively, you might consider creating a custom operator that conditionally assigns values to a target, as in the following example:
// Thanks, Mike Ash
infix operator =? {}
public func =?<T>(inout target: T, newValue: T?) {
if let unwrapped = newValue {
target = unwrapped
}
}
This snippet builds an =? operator that supports simple assignment by wrapping and hiding its underlying if-let approach with a basic infix call.
The following assignments show this operator in action. The s string variable updates only for non-nil assignments:
var s: String = "initial value"
s =? "value 1" // value 1
s =? nil // value 1
Hiding if-let overhead makes the resulting conditional assignments cleaner and potentially more intuitively obvious to read through.
Optional Patterns
A Swift pattern matches a value’s structure rather than just the value itself. Patterns decompose and express a data structure, including component elements. They enable you to refer to an item’s subconstructs when testing instead of dealing with instances as a monolithic whole. Using patterns is a powerful and nuanced way to represent an instance, and it’s extremely handy for working with optionals.
The optional enumeration consists of two cases, .None and .Some. The .Some case contains an associated value of an arbitrary type:
enum Optional<T> {
case None
case Some(T)
}
With optionals, pattern matching enables you to limit statements to work only with the .Some case. You can reach into that case and bind the internal value using a single declaration. Follow the case keyword with a specific enumeration (the .Some case) and then bind the value nestled within it using let or var:
switch soundDictionary[animal] {
case .Some(let sound):
print("Using case, the unwrapped sound is (sound)")
default: break
}
The result is an unwrapped value, ready for access.
The case .Some(let constant) expression provides a one-to-one pattern match with the underlying optional. Optionals with the None case don’t match this pattern, so the case code need not consider nil scenarios.
There’s no denying that the case (case .Some(let constant)) is awkward to process visually. It lacks grace. Responding to the complexity of this optional pattern-matching code, Swift 2 introduces shorthand using a postfixed question mark:
switch soundDictionary[animal] {
case let sound?:
print("Using case, the unwrapped sound is (sound) [2]")
default: break
}
This postfixed question mark is nothing more than syntactic sugar for the .Some case. The results are simpler and more readable because this case matches and unwraps its optionals.
The preceding example shortchanges Swift because there’s still no major advantage in using this one-case switch statement over, say, if-let. When you introduce a simple where clause, you begin to see where pattern-matching optionals adds power and concision.
The following snippet uses a switch statement to differentiate unwrapped optionals whose string values are longer than five characters from those that are shorter:
switch soundDictionary[animal] {
case let sound? where sound.characters.count > 5:
print("The (sound) is long")
case let sound?:
print("The (sound) sound is under 5 characters")
default: break
}
Swift’s switch cases may experience significant logical overlap where small details select which case to execute.
Using pattern matching with if statements enables you to drop switch statement overhead and simplify one-case code even further. You lose the default statement and the surrounding switch, and you reduce the check to just a simple pattern comparison with where clause support. This if statement uses both pattern matching and a where clause for precise testing:
if case let sound? = soundDictionary[animal] where sound.hasPrefix("m") {
print("Sound (sound) starts with m")
}
The where clause isn’t limited to if-case. You can construct a similar statement using if-let:
if let sound = soundDictionary[animal] where sound.hasPrefix("m") {
print("Sound (sound) starts with m")
}
Pattern matching also enables you to iterate through an array and perform actions on unwrapped non-nil values. The for-case-let approach simplifies working with optional collections, as you see in the following snippet:
// Collect sound optionals into array
let soundOptionals = ["cow", "rhino", "dog", "goose", "hippo",
"pig"].map({soundDictionary[$0]})
print(soundOptionals) // [Optional("moo"), nil, Optional("bark"),
// nil, nil, Optional("squeal")]
for case let sound? in soundOptionals {
print("The sound "(sound)" appears in the dictionary")
}
You can also use pattern matching with guard statements:
guard case let .Some(sound) = soundDictionary["cow"] else {fatalError()}
print(sound)
This example from Apple sample code uses a GameplayKit enumeration. It performs an enumeration pattern match and binds the targetAgent associated value:
guard case let .HuntAgent(targetAgent) = mandate else {return}
Optional Chaining
In Swift, you chain methods and properties by appending period-delimited selectors. Each function in the chain returns an intermediate value. This allows calls to be joined into a single statement without requiring variables that store intermediate results:
soundDictionary.description.characters.count
This approach creates a fluent interface, which is ideally a parsimonious and more readable expression of a set of operations you want to consider as a single unit. A danger, of course, lies in over-chaining. If you’re producing enormous lines of code that are difficult to debug and hard to read and that cannot be easily commented or differentiated on updates, you’re probably doing this wrong. Ask yourself, “Would I ever need to put a breakpoint in this statement or step through it?” If the answer is yes, you are over-chaining.
Swift introduces a powerful feature called optional chaining. Swift method calls may return optionals, and you must take this into account when forming chains. Swift provides a way that an entire chain can fail gracefully on encountering nil.
Optional chaining involves adding question marks after optional values. For example, you might look up an animal in the sound dictionary and use optional chaining to return a capitalized version of the sound:
soundDictionary[animal]?.capitalizedString // Moo or nil
Even though capitalizedString normally returns a non-optional, this chain returns String?. It may succeed or fail, depending on the lookup.
Add question marks to any chain participants that return optionals:
soundDictionary[animal]?.characters.first?.hashValue // returns Int?
You can add forced unwrapping to any chain item by replacing the question mark with an exclamation point. This usage comes with the same forced unwrapping dangers discussed earlier in this chapter:
soundDictionary[animal]!.capitalizedString // Moo or Runtime Error
Here’s a real-world example of where you might use optional chaining to simplify an if-let pattern. This code extends Array to return the index of a possible maximum element. Swift’s standard library maxElement() function returns an optional based on whether a sequence has values to compare (Apple writes in the standard library, “Returns the maximum element in `self` or `nil` if the sequence is empty.”):
extension Array where Element:Comparable {
var maxIndex: Int? {
if let e =
self.enumerate().maxElement({$1.element > $0.element}) {
return e.index
}
return nil
}
}
Introducing optional chaining greatly simplifies this code, enabling you to shortcut the index lookup and returning nil if the maxElement call fails. Recipe 3-2 returns the index of an array’s maximum value.
Recipe 3-2 Using Optional Chaining to Shortcut Evaluations
extension Array where Element:Comparable {
var maxIndex: Int? {
return self.enumerate().maxElement(
{$1.element > $0.element})?.index
}
}
Extend Recipe 3-2’s functionality to all collection types with the following snippet:
extension CollectionType where Generator.Element: Comparable {
var maxIndex: Index? {
return self.indices.maxElement({self[$1] > self[$0]})
}
}
Selector Testing and Optional Chaining
Optional chaining isn’t just about transforming your code into bite-sized lines. It also acts as shorthand to test whether an item responds to a method or property selector. Optional chaining offers a rough equivalent to Objective-C’s respondsToSelector: method, enabling you to determine whether it’s safe to execute calls on particular instances.
Commonly, you work with subclasses that are directly related to each other but that implement distinct method sets. For example, you might retrieve a collection of SpriteKit nodes from a scene and then adjust the line widths of the shape nodes. This snippet uses a failable cast followed by an optionally chained property assignment:
for node in nodes {(node as? SKShapeNode)?.lineWidth = 4.0}
This selector-testing approach also works in pure Swift, as in the following example:
// Root class put two subclasses
class Root {func rootFunc() {}}
class Sub1: Root {func sub1Func() {print("sub1")}}
class Sub2: Root {func sub2Func() {print("sub2")}}
// Create heterogeneous array of items
var items: [Root] = [Sub1(), Sub2()]
// Conditionally test and run selectors
(items[0] as? Sub1)?.sub1Func() // runs
(items[0] as? Sub2)?.sub2Func() // no-op, nil
This snippet constructs a heterogeneous array of Root subclasses. It then performs conditional casts and uses selector tests before calling class-specific methods.
Selector testing enables you to test whether a method exists before constructing a new instance. Adding the question mark ensures that the NSString call won’t fail with a runtime “unrecognized selector” exception:
let colorClass: AnyClass = UIColor.self
let noncolorClass: AnyClass = NSString.self
colorClass.blueColor?() // returns a blue color instance
noncolorClass.blueColor?() // returns nil
This is a special behavior of AnyClass and AnyObject that works only with Objective-C methods, for compatibility with Class and id. These are special cases because these types return functions as implicitly unwrapped optionals. Other types don’t do that.
Subscripts
Contrary to expectations, optional chaining with subscripts doesn’t introduce safe lookups. This is an important factor that you should internalize as soon as possible and recognize in your code. In the following example, if you try to access index 8 (aka the ninth element of this six-element array), your code dies with a fatal Array index out of range error:
let array: Array? = [0, 1, 2, 3, 4, 5]
array?[0] // 0
// array?[8] // still fails
In this example, the question mark does not qualify the lookup for safety. It is required for subscripting after array, which is optional. With subscripts, you add chain annotations in-line after the optional value and before the subscript brackets.
Optional chaining is meant solely to set and retrieve values for subscripts used with optional values. It does not and cannot short-circuit failed subscripts unless you build a failable subscripting extension, as in the following example:
extension Array {
subscript (safe index: UInt) -> Element? {
return Int(index) < count ? self[Int(index)] : nil
}
}
Once you add a simple array safe-index extension, you can optionally chain the safe version of the subscript. In the following calls, the Element? results of the safe: subscript are now optional and can be chained:
print(array?[safe: 0]?.dynamicType) // nil
print(array?[safe: 8]?.dynamicType) // Optional(Swift.Int)
Optional Mapping
Swift’s map and flatMap functions enable you to conditionally apply functions to optional values. Their calls are similar, as you see in the following declarations, and both are incredibly useful tools:
/// If `self == nil`, returns `nil`. Otherwise, returns `f(self!)`.
func map<U>(f: @noescape (T) -> U) -> U?
/// Returns `f(self)!` iff `self` and `f(self)` are not nil.
func flatMap<U>(f: @noescape (T) -> U?) -> U?
The map closures return type U, which may or may not be an optional, while flatMap closures specifically return type U?, which is always an optional. This practical limitation simply means you can use map with closures that return non-optionals, but you cannot do the same with flatMap:
// flatMap must return optional
print(word.map({string->String in string})) // compiles
// print(word.flatMap({string->String in string})) // errors
Maps and Chaining
When working with optionals, map and flatMap both act like chaining, but you supply an arbitrary closure instead of a chained method name or property:
var word: String? = "hello"
var cap = word?.capitalizedString // Optional("Hello")
cap = word.map({$0.capitalizedString}) // Optional("Hello")
When you just want to unwrap-and-apply, use map. This mapping:
UIImage(named:"ImageName").map({print($0.size)})
is equivalent to this if-let:
if let image = UIImage(named:" ImageName ") {
print(image.size)
}
Both the mapping and if-let include about the same level of code complexity for this particular example. Both unwrap the optional returned by UIImage(named:) and then print the size. You can argue which approach is better. Both bind the unwrapped result to a local constant whether that constant does or does not have an explicit name.
Filtering nil Values with flatMap
The flatMap function offers great utility both in the realm of optionals and outside it. With optionals, you can use flatMap to filter away nil values and easily convert an array of optionals to an array of unwrapped values:
let optionalNumbers: [Int?] = [1, 3, 5, nil, 7, nil, 9, nil]
let nonOptionals = optionalNumbers.flatMap({$0})
print(nonOptionals) // [1, 3, 5, 7, 9]
Recipe 3-3 uses a single flatMap call to eliminate nil instances and extract values from their optional wrappers.
Recipe 3-3 Extracting Members from an Optionals Array
func flatMembers<T>(array: [T?]) -> [T] {
return array.flatMap({$0})
}
Unmanaged Wrappers
In rare cases (which are growing rarer by the day), a Core Foundation function may return a C pointer or an object reference embedded in an Unmanaged wrapper. You encounter these in the older, dustier, and stranger parts of Cocoa, where grues still lurk in shadows. Keychain Services is a notorious offender in this regard. You must transfer Unmanaged references into the normal memory management system before working with them.
An Unmanaged wrapper, like an Optional wrapper, provides a layer of safety between your code and a potentially nasty crash. The Unmanaged<T> type stores a pointer whose memory is not controlled by the Swift runtime system. Before using this data, you take responsibility for how this memory should stay alive.
In Cocoa, this works very much like bridging in Objective-C. Unwrap any object with an existing +1 retain count using takeRetainedValue(). This applies to any item built with Create or Copy in its name. Use takeUnretainedValue() for +0 returns.
If you have an Objective-C framework or are developing one that you would like people to use in their Swift application—and if there are methods or functions in your Objective-C framework that return Core Foundation objects—decorate your methods or function names with CF_RETURNS_RETAINED or CF_RETURNS_NOT_RETAINED. If you don’t decorate your methods or functions, Core Foundation objects are returned as unmanaged.
In Swift 2, CF-IMPLICIT-BRIDGING-ENABLED and CF-IMPLICIT-BRIDGING-DISABLED automatically bridge based on Core Foundation naming conventions. So if you audit your APIs and ensure that they follow get/copy/create conventions, you can avoid specific method decoration.
For example, UTTypeCopyPreferredTagWithClass returns a +1 CFString instance. Assign this result with takeRetainedValue(), making sure to test for failed calls. Unwrapping nil causes nasty crashes that even blessed potions of restore life will not fix. Recipe 3-4 demonstrates how to use unmanaged wrappers by returning a preferred file extension for a given universal type indicator.
Recipe 3-4 Conditional Binding from Unmanaged Wrappers
import MobileCoreServices
Import Foundation
enum Error: ErrorType {case NoMatchingExtension}
public func preferredFileExtensionForUTI(uti: String) throws -> String {
if let result = UTTypeCopyPreferredTagWithClass(
uti, kUTTagClassFilenameExtension) {
return result.takeRetainedValue() as String
}
throw Error.NoMatchingExtension
}
This recipe uses conditional binding. The UTTypeCopyPreferredTagWithClass() function returns Unmanaged<CFString>?, which is an optional instance. If the call fails and returns nil, the function throws an error. Test the recipe by passing it a few common UTIs, such as public.jpeg and public.aiff-audio:
let shouldBeJPEG = try PreferredFileExtensionForUTI("public.jpeg")
let shouldBeAIFF = try PreferredFileExtensionForUTI("public.aiff-audio")
Use takeUnretainedValue() to unwrap any object built by a Core Foundation function with Get in its name (for example, CFAllocatorGetDefault()) and constants passed as unmanaged objects (for example, kLSSharedFileListSessionLoginItems). These items are not automatically retained for you. Unlike with takeRetainedValue(), calling takeUnretainedValue() won’t consume a retain upon unwrapping.
These functions follow the patterns established in Apple’s Memory Management Programming Guide for Core Foundation, where you can read more about the “create rule,” the “get rule,” and other details about memory ownership policies. Search the web for the latest update of this document.
Wrap-up
Optionals are an invaluable component of Swift development. With their “possible value” semantics, they enable you to store and represent the results of lookup operations whose data may or may not exist. Optionals are a powerful workhorse construct that you regularly use in day-to-day operations.
Swift’s new early-return guard statement is a gift that eliminates awkwardness from your code. Now you can assign, unwrap, and use values with a clear path for missing values. Between guard and nil coalescing, Swift 2 can elegantly express both fail-on-nil and fallback-on-nil scenarios with a minimum of overhead and indenting.
Swift 2’s revised error handling has also started to eliminate the role of optionals as sentinel values. This usage continues to be common as it’s simple to use optionals to represent fail and success states for method calls. Ideally, optional sentinels will shrivel and die as the language matures and Apple’s APIs catch up with current language features. Until then, know that it’s always better to use throws with well-defined errors than to use optional-style sentinels in the code you control.
nil happens. Be prepared.