
Guide 3 explained the extensibility of TYPO3 using extensions, and in Guide 4, we built custom content types to extend TYPO3’s content element rendering. A lot of TYPO3’s flexibility comes through the extension API, which allows you to add functionality without changing the core.
In this guide, we’ll create an extension to display reading dates for our promotion tour, with the option to show only the next three upcoming events based on the current date. In TYPO3, extensions that contain dynamic functionality for the frontend are called “plugins.”
The results of this guide can also be achieved more rapidly by using the extension called “extension builder.”1 It will create the Table Configuration Array (TCA), domain models, controllers, and controller actions for you. This guide steps you through how it all works in detail, so that you understand the concepts underlying the system.
Most plugins are built with a model-view-controller (MVC) framework called “Extbase”. Plugins can load data from anywhere, such as the database or external sources like an RSS feed or Twitter stream. Published extensions already provide a wide range of features, such as forums, guest books, and ecommerce functionality.
In the MVC pattern, the model is a representation of the data structure, the view (in TYPO3’s case, a Fluid template) handles display, and the controller and its actions handle output, user input, and changes to the model data. You can read more about it in the book TYPO3 Extbase: Modern Extension Development for TYPO3 CMS with Extbase and Fluid2 by Michael Schams or in the documentation for Extbase and Fluid.3
At the end of this tutorial...
You will know how to create an extension and its required directory structure.
You will understand the basic concepts of the TCA.
You will know how records can be edited if there is a TCA in place.
You will see how custom records are output with the power of Extbase.
Prerequisites
Considerations before you start
Technical difficulty
This guide gets quite detailed. It is not aimed at general editors or frontend users. No coding is required (code samples are provided). To benefit the most from it, you’ll need some knowledge of file formats and PHP code. This will help you understand what is happening and how to tell the software to behave when you’re doing your own work later.
Workspace setup
In these steps, we’re going to be using the browser to work in the backend and to preview the frontend and the file system to create and edit files. When we make a change in the file system or the TYPO3 backend, we will refresh the frontend display to see those changes.
Step 1: Create the extension structure
- 1.
In the file system for your site, navigate to public/typo3conf/ext/, and create a folder called “promotionevents”.
- 2.
In this folder, create a file called ext_emconf.php.
- 3.
Paste the following metainformation into the file:
Expected outcome: In your TYPO3 backend, the Admin Tools ➤ Extensions module shows the Promotion Events site extension as disabled and grayed out.
Step 2: Add a custom data structure
Next, we will create a custom database table so that we can manage records that are not bound to the content.
A title
A simple description (with rich text editing capabilities)
The event date (we’ll call it “promotiondate”)
The start time for the event
A single-line text field for the location
A link to the location (e.g., the website of the bookstore or coffee shop where the event is taking place)
- 1.
In the “promotionevents” directory, create a file called “ext_tables.sql”.
- 2.Paste the following contents:CREATE TABLE tx_promotionevents_domain_model_event (title varchar(200) DEFAULT '',description text DEFAULT '' NOT NULL,promotiondate DATE,promotiontime TIME,location varchar(200) DEFAULT '',locationlink varchar(1024) DEFAULT '');
- 3.
Now, we need to set up the Table Configuration Array (TCA) so that TYPO3 knows how each database field should be rendered in the backend. Navigate to the “promotionevents” directory; create a new directory called “Configuration” and one called “TCA” inside it (giving you this directory structure: promotionevents/Configuration/TCA).
- 4.
In this directory, create a file called tx_promotionevents_domain_model_event.php. The file name must use the name of the database table plus the “.php” file type extension.
- 5.Paste the following into the file:<?phpreturn ['ctrl' => [# A text for TYPO3 listings'title' => 'Promotion Tour Events',# The main label for TYPO3 listings, plus alternative fields which should be shown along'label' => 'promotiondate','label_alt' => 'headline,promotiontime','label_alt_force' => true,# order records in TYPO3's Backend by the date'default_sortby' => 'promotiondate DESC',# an icon for the records in TYPO3 Backend, custom icons can be registered as well'typeicon_classes' => ['default' => 'mimetypes-x-sys_note'],# TYPO3 will automatically create control-fields in the database here'tstamp' => 'updatedon','crdate' => 'createdon','cruser_id' => 'createdby','enablecolumns' => ['disabled' => 'hidden']],# definition of each field from ext_tables.sql'columns' => ['title' => ['label' => 'Title','config' => ['type' => 'input','size' => 50,'max' => 200,'eval' => 'required'],],'description' => ['label' => 'Additional information','config' => ['type' => 'text','renderType' => '','cols' => 80,'rows' => 15,'enableRichtext' => true,]],'promotiondate' => ['label' => 'Date of the Event','config' => ['type' => 'input','renderType' => 'inputDateTime','eval' => 'date,required','dbType' => 'date',]],'promotiontime' => ['label' => 'Start time of the Event','config' => ['type' => 'input','renderType' => 'inputDateTime','eval' => 'time,required','dbType' => 'time',]],'location' => ['label' => 'Location','config' => ['type' => 'input','size' => 50,'max' => 200,'eval' => 'required'],],'locationlink' => ['label' => 'Optional Link to the location','config' => ['type' => 'input','renderType' => 'inputLink','size' => 50,'max' => 1024,'fieldControl' => ['linkPopup' => ['options' => ['title' => 'LLL:EXT:frontend/Resources/Private/Language/locallang_ttc.xlf:header_link_formlabel',],],],'softref' => 'typolink']],],# define the order on how the fields should be shown in TYPO3s Backend Editing view'types' => [1 => ['showitem' => 'title,promotiondate,promotiontime,location,locationlink,description,']]];
Read the TCA Reference guide4 to learn more about the many available options.
With this TCA information, TYPO3 will generate some additional metafields automatically (such as unique ID, page ID, creation date, etc.) once the extension is activated, which we’ll do in step 3.
Expected outcome: You have created two new files, “ext_tables.sql” and “tx_promotionevents_domain_model_event.php” that configure a table and fields for a new, custom record type in the database.
Step 3: Activate the extension and add events
- 1.
Go to the TYPO3 backend and navigate to the Admin Tools ➤ Extensions module. This is the extension manager; it lists all installed extensions. The “promotionevents” extension should appear in the list, though deactivated and grayed out (Figure 9-1).

The deactivated “promotionevents” extension, with the Activate button circled
- 2.
Click the Activate button to activate the extension.
- 3.
Navigate to the Page ➤ List module and create a new page.
- 4.
Set the Type to “Folder” and give it the title “Promotion Events,” and then save and close (Figure 9-2).
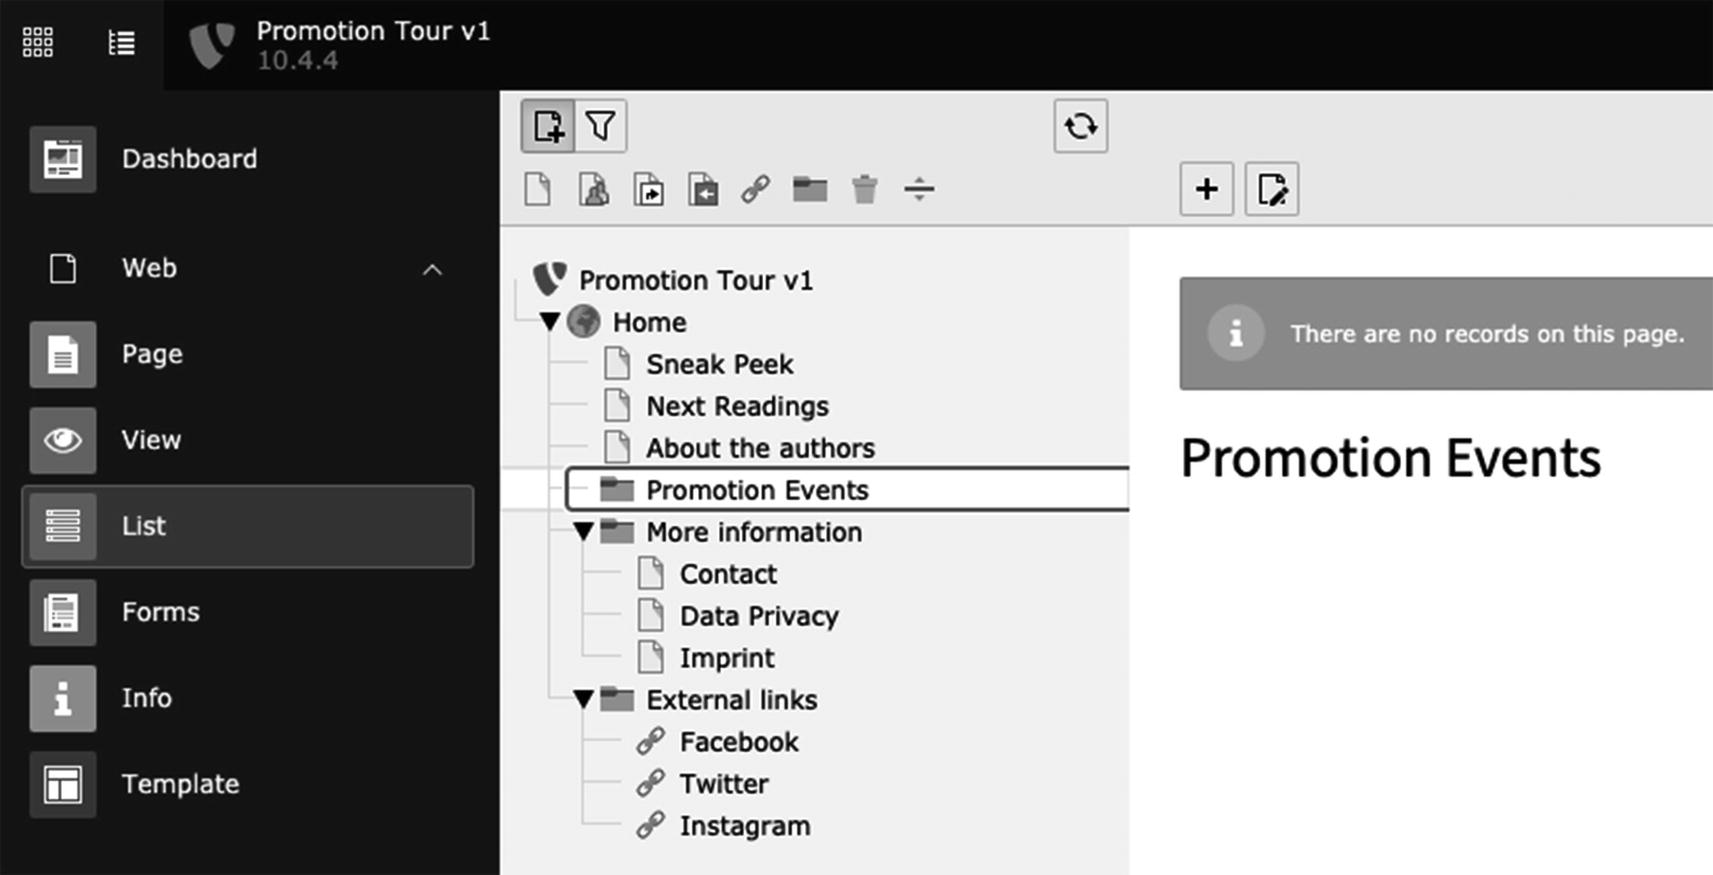
The Promotion Events folder in the page tree
- 5.
In the page tree, select the Promotion Events folder you just created, and then click the + button (Create New Record). A list of the possible records you can create is displayed (Figure 9-3).
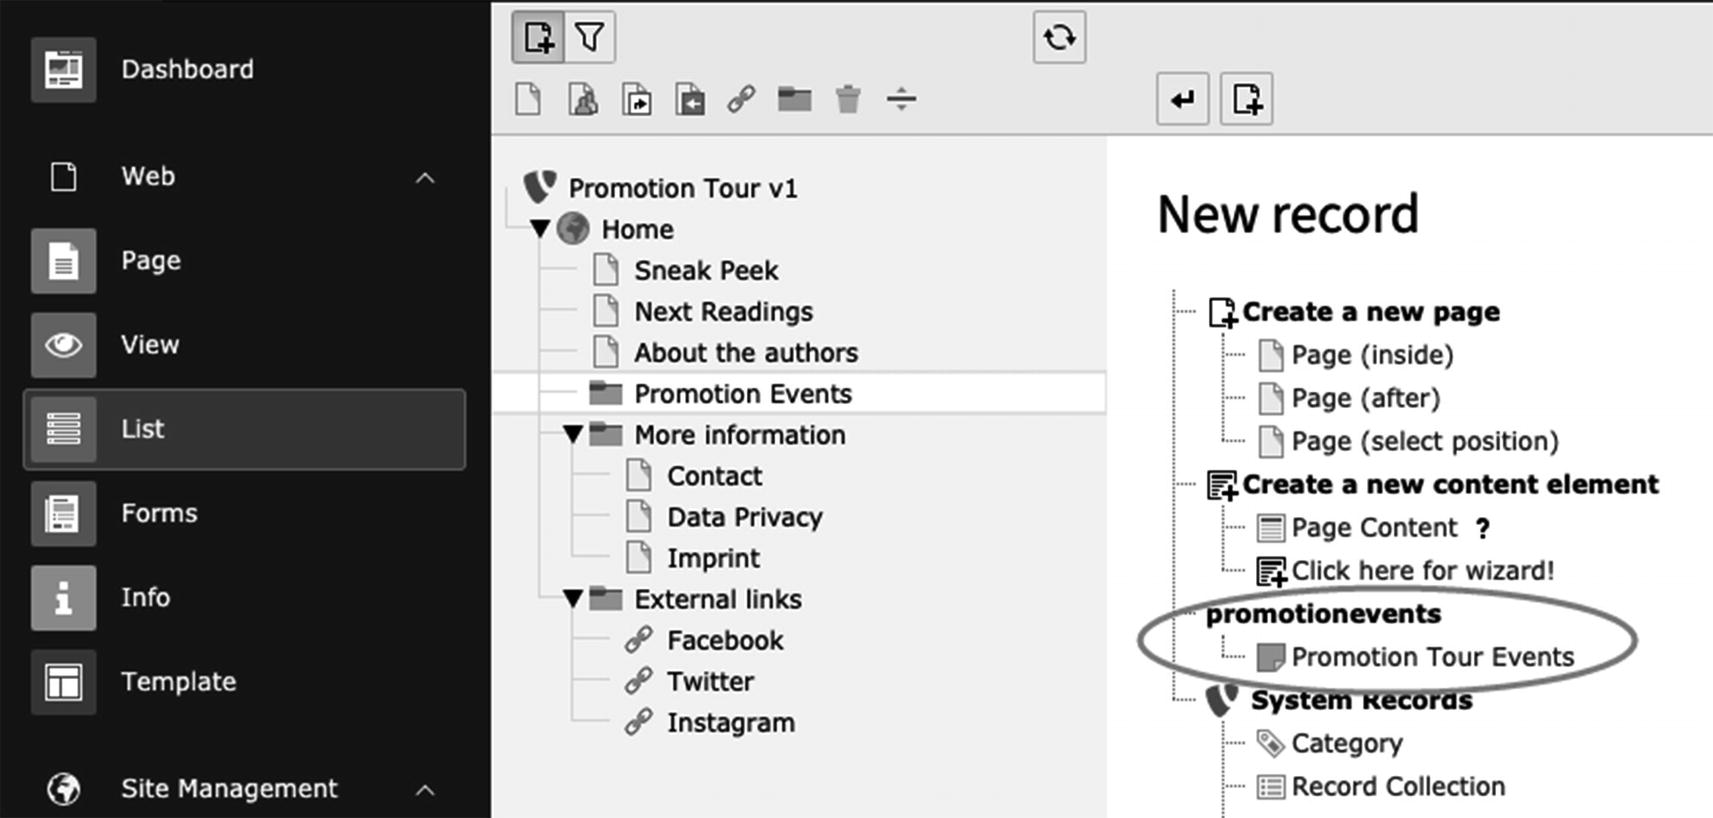
The possible records you can create in the Promotion Events folder, with the Promotion Tour Events record circled
- 6.
Click Promotion Tour Events, and fill out the details of the event. It might look something like Figure 9-4.

A Promotion Tour Events record
- 7.
Save and close the event record.
- 8.
Create another five events with dates in the future.
Expected outcome: Your Promotion Events folder lists a number of future events.
Step 4: Create the plugin
To create the plugin, we need to register it in two places:
The Create New Content Element window, so that editors can add Promotion Events to a page.
The output definition (TypoScript and Fluid) to specify how the Promotion Events should be rendered on the website.
- 1.
In the extension directory, create a new file in the directory Configuration/TCA/Overrides called “plugins.php”. The name of the file does not matter here, but the folder structure is important.
- 2.Paste in the following:<?phpdefined('TYPO3_MODE') or die();TYPO3CMSExtbaseUtilityExtensionUtility::registerPlugin('promotionevents', // Extension Name'Upcoming', // Plugin identifier'Upcoming Promotion Events', // Label'EXT:promotionevents/Resources/Public/Icons/Extension.png' // Icon);
- 3.
In the root directory of the “promotionevents” extension, create a file named “ext_localconf.php”.
- 4.Paste the following code:<?phpdefined('TYPO3_MODE') or die();TYPO3CMSExtbaseUtilityExtensionUtility::configurePlugin('promotionevents', // Extension Name'Upcoming', // Plugin identifier[// A group of all controllers and actions for this pluginPromotionTourWebsitePromotionEventsControllerEventsController::class => 'upcoming,detail'],[// No uncacheable plugin actions]);
Note This file references a PHP class that does not exist yet, but we will create it soon.
- 5.
In your browser, go to the TYPO3 backend. At the top right of the screen, click the lightning bolt icon and select Flush all caches.
- 6.
Go to the Web ➤ Page module and select the “Next Readings” page in the page tree.
- 7.
Click the + Content button. The Create new content element window displays.
- 8.
Go to the Plugins tab and select General Plugin (Figure 9-5).
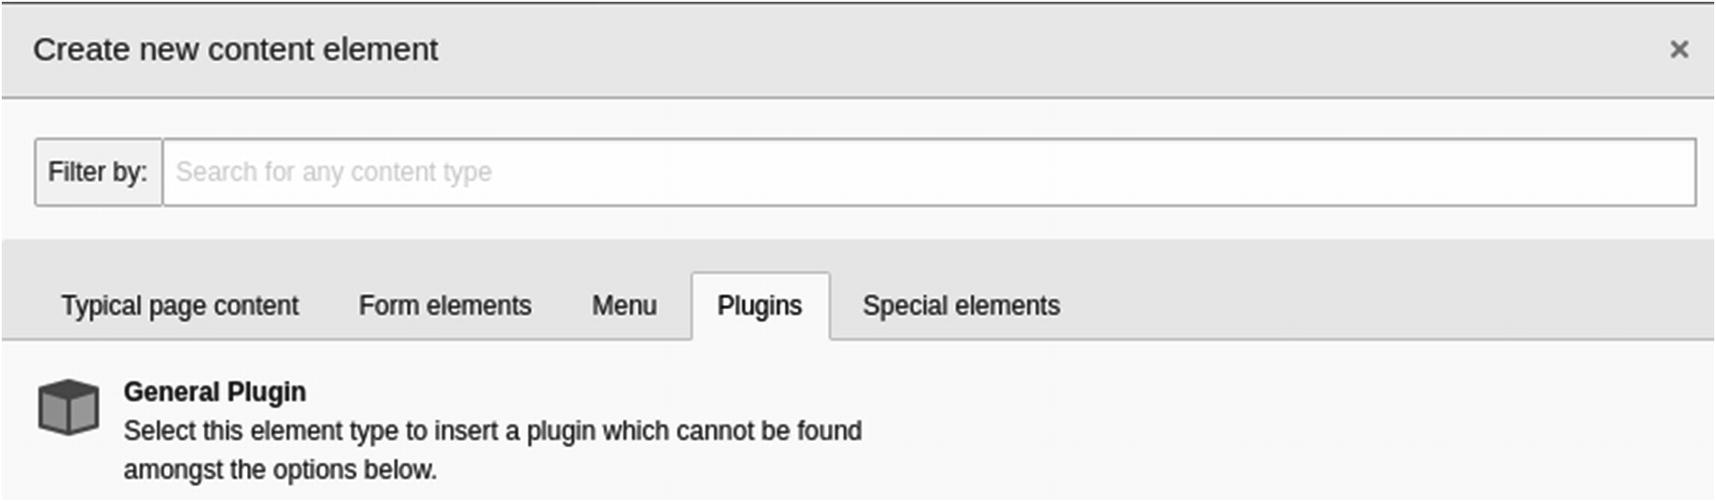
The Plugins tab on the Create new content element window
- 9.
In the Plugin tab, click the Selected Plugin menu, and choose “Upcoming Promotion Events” (Figure 9-6).

The Selected Plugin menu on the Plugin tab
- 10.
In the Record Storage Page field, find and select the “Promotion Events” page (Figure 9-7).

The Record Storage Page field
- 11.
Save and close the content element record.
- 12.
In your file system, create the following directory in the extension root folder Classes/Controller/.
- 13.
Create a file called “EventsController.php” and paste in the following:
- 14.
In Guides 1 and 2, we installed TYPO3 via Composer, which means the class cannot be found until we declare it in a composer.json file. In a real-life project, you would use a composer.json file within the extension. For the sake of brevity, you can add the following to the composer.json file in our root project directory instead:
- 15.
In a terminal, run “composer dumpautoload” via the command line.
- 16.
In the file system, create the template file public/typo3conf/ext/promotionevents/Resources/Private/Templates/Events/Upcoming.html, and add this HTML code to it to test the output on the frontend:
- 17.
Go to the TYPO3 backend in your browser. At the top right of the screen, click the lightning bolt icon and select Flush all caches.

Placeholder events listed on the frontend
Step 5: Fetch content from the database
- 1.
For the domain repository PHP class, create a folder in the “promotionevents” root directory called Classes/Domain/Repository/.
- 2.
In this folder, create a file called “EventRepository.php” with the following content:
- 3.
Next, we place the domain model in the Classes/Domain/Model/ directory. Create a file called “Event.php” with the following content:
- 4.
Now, we need to instruct the controller action, to fetch the upcoming events from the repository and hand the records over to the view—which is in our case using the “Upcoming.html” fluid template. In the promotionevents/Classes/Controller folder, we adapt the EventsController.php so that the contents of the file look like this:
- 5.
In the public/typo3conf/ext/promotionevents/Resources/Private/Templates/Events/ directory, adapt the contents of the Fluid template to render the upcoming event data. Modify the contents of the “Upcoming.html” file to look like this:
- 6.
Go to the TYPO3 backend and flush all caches.
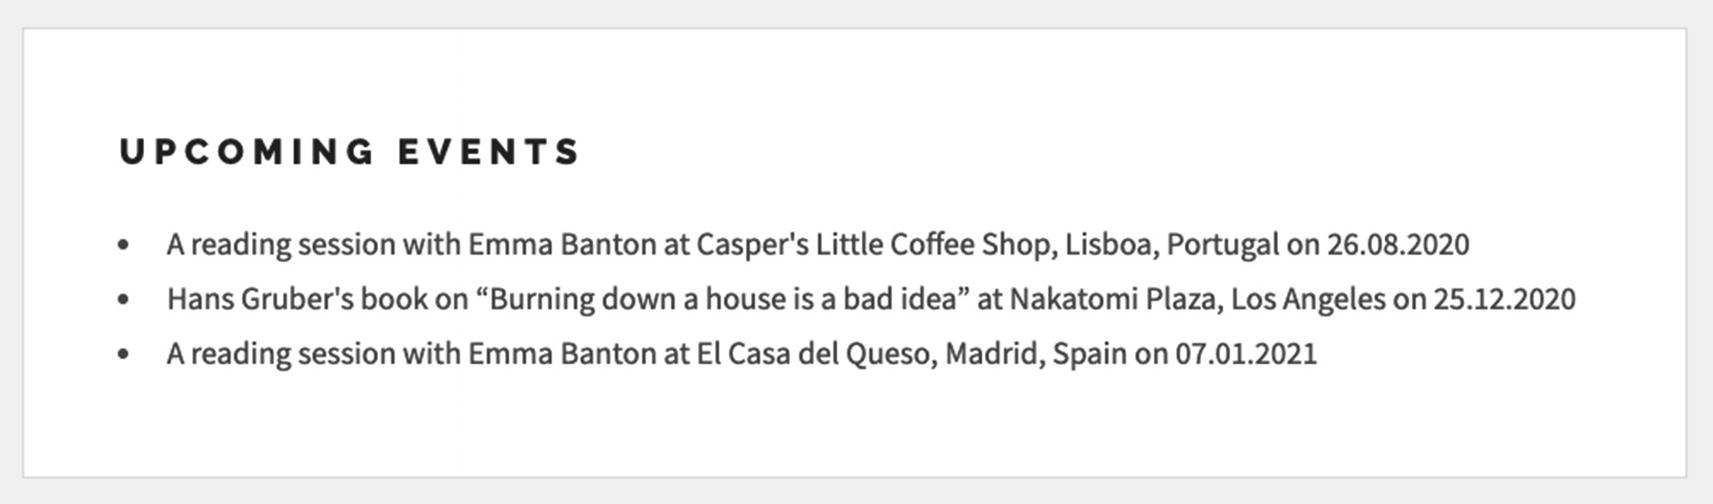
List of upcoming events displayed on the frontend
Step 6: Create a detail view for an event
Now, let’s create a link from each event to a page displaying all the event information, including the description text.
A new detailAction method in the controller PHP class
A new Detail.html Fluid template
A link to the detail action in the Upcoming.html Fluid template
- 1.In the classes/controller directory, update the EventsController.php file to look like the following:<?phpnamespace PromotionTourWebsitePromotionEventsController;use PromotionTourWebsitePromotionEventsDomainModelEvent;use PromotionTourWebsitePromotionEventsDomainRepositoryEventRepository;use TYPO3CMSExtbaseMvcControllerActionController;class EventsController extends ActionController{/*** @var EventRepository*/protected $eventRepository;public function __construct(EventRepository $eventRepository){$this->eventRepository = $eventRepository;}public function upcomingAction(){$upcomingEvents = $this->eventRepository->findUpcoming();$this->view->assign('upcomingEvents', $upcomingEvents);}public function detailAction(Event $event){$this->view->assign('event', $event);}}
- 2.Create a new Fluid template file in Resources/Private/Templates/Events/ called “Detail.html” to render all details:<h2>{event.title}</h2><p>Location: {event.location}<br><f:if condition="{event.locationlink}"><f:link.typolink parameter="{event.locationlink}">Location details</f:link.typolink></f:if></p><p><f:format.date format="d.m.Y">{event.promotiondate}</f:format.date> – starts at <f:format.date format="H:i">{event.promotiontime}</f:format.date></p><f:format.html>{event.description}</f:format.html>
- 3.Update the Upcoming.html file to link to the detail action:<h2>Upcoming Events</h2><ul><f:for each="{upcomingEvents}" as="event"><li>{event.title} at {event.location} on <f:format.date format="d.m.Y">{event.promotiondate}</f:format.date><br><f:link.action action="detail" arguments="{event: event}">More details</f:link.action></li></f:for></ul>
- 4.
Go to the TYPO3 backend and flush all caches.

Each upcoming event now includes a link to more details

More details displayed about an event
Summary
Congratulations! You have created a dynamic extension for the frontend called a plugin. Now that you understand the basic Extbase model-view-controller (MVC) concept, you can continue to add functionality to your plugin.
What’s next?
Create a second plugin in the same extension to display an archive of past events, and place it on a separate page.
Add another database field to the event TCA record (of type checkbox) called “sold out.”
Rearrange the event editing form in the TYPO3 backend to place the “Date” and “Time” fields side by side.
Resources: Learn more
Find out more about the extension called “extensionbuilder.”5 It has a graphical interface and can generate TCA, models, repositories, and language files to help you build Extbase-based TYPO3 extensions. This extension has a comprehensive supporting documentation.6
Read more about Extbase and Fluid in the guide “Developing TYPO3 Extensions with Extbase and Fluid,”7 which covers the basic design principles and the model-view-controller (MVC) programming paradigm.