
7 Infrastructure testing
In the last chapter we built a multi-environment architecture and workflow for Terraform. This helps us manage change in our infrastructure. One of the steps in our workflow was testing. If you’re an application developer or software engineer, you are probably familiar with tests and testing.
Software tests validate that your software does what it is supposed to do. Loosely, they’re a combination of quality measures and correctness measures. We’re going to apply some of the principles of software testing to our infrastructure. Wait, what? Yep. A software unit test, at its heart, confirms that an isolated unit of code performs as required. Inputs to the unit of code are applied, the code is run, and the outputs are confirmed as valid. A Terraform resource is a unit of isolated code about which we can reason and write tests to ensure the combination of the inputs and execution result in the correct outputs. With Terraform this is made even easier by the declarative nature of resources.
We can even apply more advanced software testing approaches like Test-driven development (TDD) to infrastructure testing. In TDD the requirements of your software are turned into a series of unit tests. These unit tests are written before the code itself. This means all of our unit tests fail initially, but slowly begin to pass as we code to satisfy our requirements. TDD ensures a developer focuses on the requirements before writing the code.
In this chapter we’re going to look at a testing framework on top of our multi-environment architecture. We’re going to build on top of the code we developed in Chapter 6, write tests for some of that code, and demonstrate how we use those tests.
Testing on Terraform is still in the early stages and has limitations. At the moment there are a limited set of testing frameworks and harnesses that support Terraform. We’re going to see what we can achieve now by looking at a tool called Test Kitchen. This chapter will evolve as tools get better and easier to use.
7.1 Test Kitchen
Test Kitchen is a test harness to execute infrastructure and configuration management code on isolated platforms. It builds your infrastructure, configuration, or environment, and then validates it against a series of tests. It relies on a series of drivers that target various providers and platforms: Amazon, Digital Ocean, Vagrant, Docker, etc. One of the plugin drivers available is Terraform.
As Test Kitchen is a test harness, a wide variety of testing frameworks are supported including InSpec, Serverspec, and RSpec.
7.1.1 InSpec
We’re going to use InSpec with Test Kitchen to test our Terraform-built infrastructure. InSpec is an infrastructure-testing framework built around the concept of compliance controls. You write a series of “controls”—compliance statements backed with individual tests, for example:
- Control — SSH should be enabled and securely configured.
- Tests
- Is the
sshddaemon running? - Is
Protocol 2set? - Is the
sshddaemon running on port 2222? - Etc.
- Is the
- Tests
7.1.2 How Test Kitchen works
Test Kitchen works by creating the infrastructure we want to test, connecting to it, and running a series of tests to validate the right infrastructure has been built.
The integration with Terraform comes via an add-on called kitchen-terraform. The kitchen-terraform add-on is installed via a gem. It is made up of a series of plugins:
Driver — This is a wrapper around the
terraformbinary and allows Test Kitchen to execute Terraform commands.Provisioner — The bridge between Terraform and Test Kitchen. It manages the Terraform configuration and works with the driver to process Terraform state during test runs.
Transport — The networking code that allows Test Kitchen to connect to your Terraform-built hosts.
Verifier — The verifier is a wrapper around InSpec. The verifier runs our actual tests and returns the results.
We’re going to need to install some prerequisites to get Test Kitchen up and running.
7.1.3 Prerequisites
The biggest prerequisite is that Test Kitchen requires SSH access to any hosts upon which you want to run tests. This means that you need to be able to reach your hosts via SSH. In your SSH access is via a bastion or jump host then Test Kitchen also supports using a proxy connection to run your tests.
Test Kitchen is written in Ruby and requires Ruby 2.6.3 or later installed. If your platform doesn’t have native Ruby 2.6.3 installed, you can manage Ruby with tools like rvm and rbenv.
7.1.3.1 rbenv
Assuming we don’t have Ruby 2.6.3 available, let’s quickly install rbenv and add the correct Ruby version.
brew install rbenv to install rbenv.
Add the rbenv binary to your path. On Bash we’d run:
We then enable auto-activation of rbenv. To do this follow the instructions emitted from:
$ ~/.rbenv/bin/rbenv init
# Load rbenv automatically by appending
# the following to ~/.bash_profile:

eval "$(rbenv init -)"
So, if we were running a Bash shell we’d add the eval.
Restart your terminal to update the path and activate rbenv. You can then confirm it is working using:
We can now install the required Ruby version with the rbenv binary.
$ rbenv install 2.6.3
Downloading ruby-2.6.3.tar.bz2...
-> https://cache.ruby-lang.org/pub/ruby/2.3/ruby-2.6.3.tar.bz2
. . .We can then confirm that Ruby 2.6.3 is installed like so:
Our Ruby install should also provide RubyGems and the gem binary.
7.1.3.2 Gems and Bundler
Next we need to install the Bundler gem and bundle some gems. The gem installation is specific to each Test Kitchen installation so we need to do this inside our ~/dc directory.
If we’ve installed rbenv, we need to ensure our local Terraform directory is using it.
This will set the local Ruby version to 2.6.3 and create a file called .ruby-version with our Ruby version in it. You can add this file to your repository to set the version for other users if they clone your repository.
We can now install Bundler.
Next, we create a Gemfile in ~/dc to hold the list of gems to install. We populate it like so:
Now we run Bundler to install the gems.
7.1.4 Creating a test configuration
Now that we have everything we need for Test Kitchen installed, we can create a test configuration. We’re going to create a configuration in each environment, currently development and production. Let’s start with development.
Test Kitchen stores all of its information about state in a special directory called .kitchen at the root of our environment. Test Kitchen also uses a special YAML configuration file, .kitchen.yml, that tells Test Kitchen how and what to test. Let’s create a .kitchen.yml at the root of the development environment, ~/dc/development.
---
driver:
  name: terraform

provisioner:
  name: terraform
  variable_files:
    - terraform.tfvars

platforms:
  - name: ubuntu

verifier:
  name: terraform
  format: doc
  systems:
  - name: bastion
    backend: ssh
    hosts_output: bastion_host_dns
    user: ubuntu

suites:
  - name: default
7.1.4.1 Driver
Our first piece of configuration, the driver, specifies which driver our tests will use. Ours is the terraform driver and it doesn’t have, nor require, any configuration options.
7.1.4.2 Provisioner
Next we specify the provisioner, again terraform. The provisioner needs to know about our Terraform configuration and where to find it. By default it looks in the current directory for any Terraform configuration files—in our case that will be the files in the ~/dc/development directory. When the terraform driver runs Terraform plan and apply commands, it’ll expect to find everything it needs in this directory.
We also need to tell the provisioner about any Terraform variable definition files, our terraform.tfvars file, and any other variable definition files we’ve created. In our case we’ve used the variable_files option to tell Test Kitchen about our terraform.tfvars file. This will load all the variable values prior to any infrastructure being built or tests being run.
7.1.4.3 Platforms
The platforms block specifies the target operating systems for our tests. Here we only have one: ubuntu. All of our AMIs are Ubuntu 16.04 hosts. This option allows you to customize tests for specific operating systems.
7.1.4.4 Verifier
The next block is the verifier. The verifier block defines our test configuration and performs the actual test verification. Our verifier is named terraform, and we’ve configured a few different attributes for it.
The first attribute is the format of our test output. We’ve selected doc which is neat and structured documentation-style output. We could also output in json or other formats. If you’re reviewing your test output on screen, then doc is probably going to work best. The doc output looks something like:
Service sshd
  should be enabled
  should be running

Finished in 0.30054 seconds (files took 2.53 seconds to load)
2 examples, 0 failures
This should be fairly familiar if you’ve used Ruby-based testing frameworks like RSpec before. The tests that are executed are shown, and a summary is presented with the number of tests that ran as well as the number of failures.
In our verifier block we also specify systems. Each system is a collection of tests and infrastructure we’d like to test against. We’ve only specified one system: bastion.
verifier:
  name: terraform
  format: doc
  systems:
  - name: bastion
    backend: ssh
    hosts_output: bastion_host_dns
    user: ubuntu
    key_files:
     - ~/.ssh/james_aws
There are a number of attributes you can configure for each system. The backend specifies who to connect when running the tests. In our case we use ssh, which uses SSH to connect to each host to run the tests.
The hosts_output attribute contains the list of hostnames of the hosts that belong to this system. Test Kitchen needs the hostnames so that it can connect to them using SSH.
Test Kitchen expects to see the value of the hosts_output attribute as an output from your current configuration. In our case we’ve specified the bastion_host_dns output.
We also specify the user and the location of the SSH key file(s) that Test Kitchen should use to sign in to the target hosts—in our case the user will be ubuntu to match the default Ubuntu user.
7.1.4.5 Suites
Finally, we specify test suites. Test suites are collections of tests. We’ve specified one suite, called default.
7.1.4.6 Directory structure
The suites block also dictates the Test Kitchen directory structure. Test Kitchen expects to find a directory called controls under a test/integration/default directory in our development environment. Let’s create the structure now.
The default directory is the root of our test suite, and the controls directory is going to hold our controls and their associated tests.
We then need to create an inspec.yml inside the default directory to let Test Kitchen know this is the right place.
Populating the inspec.yml file:
---
name: default
title: 'Default suite of tests'
summary: 'A collection of controls to test baseline host configuration'
maintainer: 'James Turnbull'
copyright: 'Turnbull Press'
license: 'MIT'
version: 1.0.0
You can populate the inspec.yml file with a variety of metadata to identify the suite of tests. The name setting is the only required setting, but other settings help to describe the purpose of your suite.
We can test whether the resulting suite of tests is valid is using the inspec binary. Let’s do that now.
$ cd ~/dc/development
$ bundle exec inspec check test/integration/
Location:    test/integration/
Profile:     default
Controls:    0
Timestamp:   2019-05-27T11:26:05-04:00
Valid:       true

  !  No controls or tests were defined.

Summary:     0 errors, 1 warning
We’ve used the bundle exec command to run the inspec binary. We specify the check command and the location of our test suites, test/integration.
7.1.5 Creating our first control
We specified a single test suite in our .kitchen.yml configuration: default. Test Kitchen will run all of the controls it finds in the test/integration/default/controls directory.
We’re going to start by creating a control called operating_system. Our operating_system control will test that the right AMI is being built for our bastion host instance with a series of tests. Let’s create our base control and an initial test now.
For a control named operating_system, Test Kitchen expects to find a file called operating_system_spec.rb in the test/integration/default/controls directory. We put our operating_system controls inside that file.
control 'operating_system' do
  describe command('lsb_release -a') do
    its('stdout') { should match (/Ubuntu 16.04/) }
  end
end
Test Kitchen’s InSpec controls are expressed in a Ruby DSL (Domain Specific Language) that will be familiar to anyone who has used RSpec, as it’s built on top of it. In our example, we can see two of the most common DSL blocks: control and describe.
The control block wraps a collection of controls. The describe block wraps individual controls. The describe block must contain at least one control. A control block must contain at least one describe block, but may contain as many as needed.
The describe block is constructed like so:
Each control is made up of resources and matchers that are combined into tests. Resources are components that execute checks of some kind for a test: run a command, check a configuration setting, check the state of a service, and so on. InSpec has a long list of built-in resources and has the ability for you to write your own custom resources. Matchers are a series of methods that check, by various logic, if output from a resource matches the output you expect. So a matcher might test equality, presence, or a regular expression.
Inside our describe block, we use a resource to perform an action on the host. For example, this block uses the command resource to run a command on the host. The command resource’s output is captured in stdout, and then we specify a block for the test itself. So our test unfolds like so:
- The
lsb_releasebinary is run via thecommandresource and captures the output. - The
stdoutof thecommandis then checked for a regular expressionmatchofUbuntu 16.04. - If the match is made, the test passes. Otherwise, it fails.
7.1.6 Decorating controls with metadata
You can also decorate control blocks with metadata. For example:
control 'operating_system' do
  title 'Operating system controls'
  desc "
    Checks that the host's operating system is correctly
    configured.
  "
  tag 'operating_system', 'ubuntu'

. . .

end
This adds metadata to the test to help folks understand what the test does and, importantly, why the test failing matters. In this example we’ve decorated our control with a title and a description—a plain-English explanation of what it is and how it works. We’ve also added a couple of tags to the control.
7.1.7 Adding another test to our control
Let’s add another test to our control. We’re going to confirm that several services are enabled and running. We’re also going to see how we can intermingle Ruby with our InSpec controls.
control 'operating_system' do

. . .

  services = [ 'cron', 'rsyslog' ]

  services.each do |service|
    describe service(service) do
      it { should be_enabled }
      it { should be_running }
    end
  end
end
We’ve added an array of service names: cron and rsyslog. We’ve then iterated through that array and passed each element into a describe block. Inside the describe block we’ve now got two tests. These tests use the service resource, which helps you test the state of services from a variety of service managers. For each service passed to the block, we test if they are enabled and if they are running. If one, or both, fail, we’ll see corresponding output.
Now let’s finish setting up our Test Kitchen environment, then run our new controls and see what happens!
7.1.8 Setting up a Test Kitchen instance
Test Kitchen has a simple workflow.
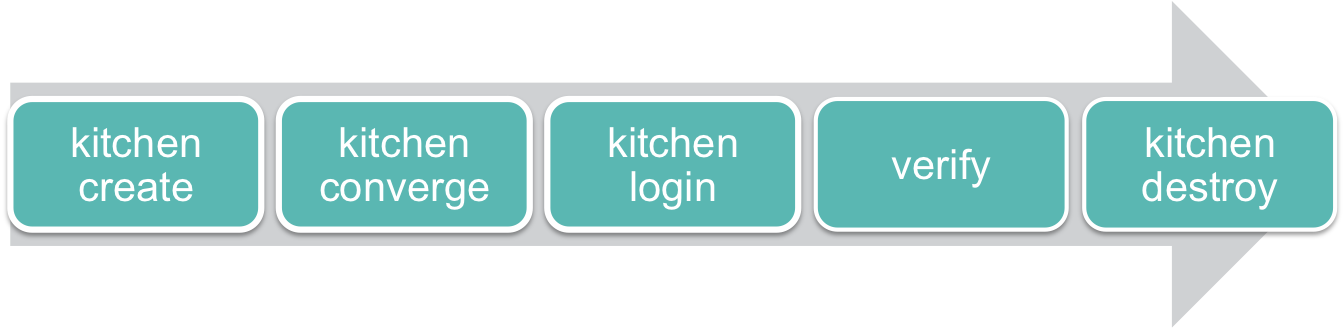
Test Kitchen runs tests, in our case our InSpec controls, inside what it calls an “instance.” You can think about the instance as the test environment state. An instance usually exists for the period of a test run: it is created, converges our infrastructure, verifies that the tests pass, and then it’s destroyed.
The name of the instance is the combination of a test suite and a platform. In our case we have one platform defined, ubuntu, and one test suite defined, default—so our instance is called default-ubuntu.
Let’s create that instance now.
$ cd ~/dc/development
$ bundle exec kitchen create
-----> Starting Kitchen (v1.13.2)
       Terraform 0.12.3

-----> Creating <default-ubuntu>...
       Finished creating <default-ubuntu> (0m0.00s).
-----> Kitchen is finished. (0m0.94s)
We can then list the created instance using the kitchen list command.
$ bundle exec kitchen list
Terraform v0.12.3
Instance       Driver    Provisioner Verifier  Transport Last Action
default-ubuntu Terraform Terraform   Terraform Ssh       Created
The listing shows our instance, default-ubuntu, from the concatenation of the platform and test suite, its driver, provisioner, verifier, and transport. It also shows the last action taken on the instance. Here our instance is in the Created state because we’ve just run kitchen create.
Our next step is to converge our infrastructure. This ensures our infrastructure is running and up-to-date. Let’s do that now.
$ bundle exec kitchen converge
-----> Starting Kitchen (v2.2.5)
       Terraform v0.12.3

-----> Converging <default-ubuntu>...
       Get: git::https://github.com/turnbullpress/tf_api.git (update)
       Get: git::https://github.com/turnbullpress/tf_vpc.git?ref=v0.0.4
        (update)
       Get: git::https://github.com/turnbullpress/tf_web.git (update)
       Refreshing Terraform state in-memory prior to plan...
       The refreshed state will be used to calculate this plan, but
       will not be persisted to local or remote state storage.

       module.vpc.aws_vpc.environment: Refreshing state... (ID: vpc-9dcbd0fa)
. . .
We’ve used the bundle exec command to run the kitchen converge command. This checks the current state of our infrastructure against the Terraform state. If it varies, it’ll apply the plan until the infrastructure is up-to-date.
Let’s look at our instance now.
$ bundle exec kitchen list
Terraform v0.12.3

Instance       Driver    Provisioner Verifier  Transport Last Action
default-ubuntu Terraform Terraform   Terraform Ssh       Converged
Note the last action is now Converged. From here we can actually run our tests.
7.1.9 Running the controls
Now that our instance is ready and our infrastructure converged, we can run the controls using the kitchen verify command.
$ bundle exec kitchen verify
-----> Starting Kitchen (v2.2.5)
       Terraform v0.12.3
-----> Setting up <default-ubuntu>...
       Finished setting up <default-ubuntu> (0m0.00s).
-----> Verifying <default-ubuntu>...
       Terraform v0.12.3

. . .

       Verifying host 'ec2-107-23-238-219.compute-1.amazonaws.com' of system 'bastion'

Command lsb_release -a
  stdout
    should match /Ubuntu 16.04/

Service cron
  should be enabled
  should be running

Service rsyslog
  should be enabled
  should be running

Finished in 0.65346 seconds (files took 4.72 seconds to load)
5 examples, 0 failures
The kitchen verify command executes our controls. We can see it ensuring our instance, default-ubuntu, is set up. It then uses the bastion system to determine the hosts on which to run the tests. It takes the list of hosts from the output we created, in our case our one bastion host, and runs each control and their tests.
We can see the output from each control and each test. We now know:
- That our host has the right operating system and version installed.
- That the
cronandrsyslogservices are enabled and running.
Finally, we see a summary of the verify run that shows that all five examples have passed.
7.1.10 Adding a new control
Let’s now add another control to our bastion system. We’re going to test the settings of our SSH daemon. We’ll add our control to the default test suite (as we have no others). We add a file called sshd_spec.rb in the test/integration/default/controls directory. Let’s populate that file now.
control 'sshd' do
  title 'SSHd controls'
  desc "
    Checks that the host's SSH daemon is correctly configured.
  "
  tag 'sshd', 'ubuntu'

  describe service('sshd') do
    it { should be_enabled }
    it { should be_running }
  end

  describe sshd_config do
     its('Protocol') { should eq '2'}
     its('Port') { should eq('2222') }
  end
end
We’ve added a new control called sshd with some useful metadata. Inside our control are two describe blocks. The first ensures our sshd daemon is enabled and running. The second block uses a new resource: sshd_config. The sshd_config resources allows you to test the SSH daemon’s configuration is correct. We’re testing two matchers: the Protocol and Port settings inside the /etc/ssh/sshd_config configuration file. We want to ensure that Protocol is set to 2 and the SSH daemon is listening on port 2222.
Let’s run our new controls. We can use a new Test Kitchen command, kitchen test, to do this. The kitchen test command runs all the steps in our workflow: create, converge, and verify. We’re also going to pass in a command line flag: --destroy passing. The --destroy flag potentially destroys the instance after our tests run. The passing option constrains it to only destroy the infrastructure if all the tests pass. An alternative is the --destroy always flag, which always destroys the instance.
$ bundle exec kitchen test --destroy passing
. . .
Service sshd
  should be enabled
  should be running

SSH Configuration
  Protocol
    should eq "2"
  Port
    should eq "2222" (FAILED - 1)

Failures:

  1) SSH Configuration Port should eq "2222"
     Failure/Error: DEFAULT_FAILURE_NOTIFIER = lambda { |failure, _opts| raise failure }

       expected: "2222"
            got: "22"

       (compared using ==)
     # ./test/integration/default/controls/sshd_spec.rb:9:in `block (3 levels) in load_with_context'

Finished in 0.84653 seconds (files took 18.67 seconds to load)
9 examples, 1 failure
Damn! Our test failed. The SSH daemon is set to port 22 still. Now we can go and fix that issue. As we specified the --destroy passing command flag, our instance still exists. Let’s jump onto the host and fix the issue, then run our controls again.
$ bundle exec kitchen test --destroy passing
. . .

Service sshd
  should be enabled
  should be running

SSH Configuration
  Protocol
    should eq "2"
  Port
    should eq "2222"

Finished in 1.05 seconds (files took 20.03 seconds to load)
9 examples, 0 failures

       Finished verifying <default-ubuntu> (0m3.84s).
-----> Destroying <default-ubuntu>...
       Finished destroying <default-ubuntu> (0m0.00s).
       Finished testing <default-ubuntu> (0m20.78s).
-----> Kitchen is finished. (0m21.76s)
Excellent. All tests are passing and the instance is destroyed as a result. This doesn’t mean our infrastructure is destroyed though. If you want to remove the infrastructure, you’ll need to run terraform destroy.
We could now extend this to cover testing beyond these examples. Other areas we could test are network configuration and host status and connectivity, files, JSON or YAML configuration files, configuration, or other operating system properties.
Or you can use custom resources you create yourself.
7.1.11 Building custom InSpec resources
InSpec also offers you the capability to create your own custom resources. Let’s look at a simple example that tests the contents of the /etc/resolv.conf DNS resolver configuration file. Test Kitchen expects to find custom resources in the libraries directory under the test/integration/default directory (or the name of our suite of controls in which we use the resource). Let’s create that directory now.
With this directory created, let’s now create a custom resource. Like Test Kitchen, custom resources are written in Ruby. Let’s create and populate a file called resolv_conf.rb to hold our resolv.conf custom resource.
class ResolvConf < Inspec.resource(1)
  name 'resolv_conf'

  desc '
    Checks resolv.conf configuration.
  '

  example "
    describe resolv_conf do
    its('nameserver') { should eq('10.0.0.2') }
    end
  "

  def initialize
    @path = "/etc/resolv.conf"
    @file = inspec.file(@path)

    begin
      @params = Hash[*@file.content.split("
")
                           .reject{ |l| l =~ /^#/ }
                           .collect { |v| [ v.chomp.split ] }
                      .flatten]
    rescue StandardError
      return skip_resource "#{@file}: #{$!}"
    end
  end

  def exists?
    @file.file?
  end

  def method_missing(name)
    @params[name.to_s]
  end
end
This code parses the resolv.conf file, ignores comments, and parses each line assuming it is a rough key/value pair. For example:
# Dynamic resolv.conf(5) file for glibc resolver(3) generated by resolvconf(8)
#     DO NOT EDIT THIS FILE BY HAND -- YOUR CHANGES WILL BE OVERWRITTEN
nameserver 8.8.8.8
nameserver 8.8.4.4
We can then create a control that uses this custom resource. Let’s create a file called resolv_conf_spec.rb in the test/integration/default/controls directory.
control 'resolv.conf' do
  title 'Resolv.conf tests'
  desc '
   Tests the contents of the resolv.conf file.
  '
  tag 'resolv.conf', 'ubuntu'

  describe resolv_conf do
    its('nameserver') { should eq('10.0.0.2') }
  end
end
Here we’re testing that the resolv.conf file has a name server of 10.0.0.2 configured. We can now run our new control.
$ bundle exec kitchen test --destroy passing
-----> Starting Kitchen (v1.13.2)
       Terraform v0.12.3

. . .

resolv_conf
  nameserver
    should eq "10.0.0.2"

. . .

Finished in 0.91426 seconds (files took 19.6 seconds to load)
10 examples, 0 failures
We can see our new control has been executed and passed.
Again, this process only destroys the Test Kitchen instance. It does not destroy our infrastructure. If you want to destroy the stack we’ve used for the tests, we can use the terraform destroy command.
We’ve also created a Git repository for our data center environment and tests which you can find on GitHub here.
kitchen-terraform GitHub repository.
7.2 Alternative infrastructure testing frameworks
As it’s the early days for Terraform, there aren’t a lot of alternatives for testing. The current Test Kitchen solution requires direct SSH access to connect, which is an unfortunate limitation.
There is, however, an alternative using another framework called Serverspec. John Vincent has provided a Gist showing how you might integrate Serverspec with Terraform. This chapter will be updated as alternatives and new solutions evolve.
Another approach, specifically for AWS and using awspec, has been documented by Dean Wilson.
7.3 Summary
In this chapter we’ve learned how we can write tests for our infrastructure and its configuration. We saw how to install and integrate a testing harness, Test Kitchen, into our multi-environment architecture.
We also learned about the InSpec testing framework and how to write tests to determine if our infrastructure is correct. We saw some of the built-in resources in InSpec available to test infrastructure settings. We also saw how to create your own custom resources.
From here you should be able to build infrastructure with Terraform, manage the life cycle of that infrastructure, and write appropriate tests to validate the correctness of your infrastructure.