
5 Collaborating with Terraform
In the previous chapters we’ve been running Terraform locally and with the assumption that you’re an individual developer. This makes sense when you’re getting started with Terraform. But in the real world, it’s likely you’ll be working with others on your team on your Terraform configurations. This means maintaining the local state on your host is no longer feasible. Your colleagues need to know and be able to query the state of your infrastructure. We like to think about managing state like this as service discovery for infrastructure.
In this chapter we’re going to look at solutions for sharing Terraform state and working with others to collaboratively build infrastructure. Later in the chapter we’ll also extend our state management directly into the service discovery world by using Consul to store our remote state. Consul is a highly available key-value store, also written by the folks at HashiCorp, that we’re going to use to store configuration values and state from Terraform. Other folks can then query that data and state from Consul to use in their own configurations.
5.1 Terraform state
In Chapter 2 we introduced the Terraform state. The state is populated when we apply our configuration and ends up locally in the terraform.tfstate file. This is a JSON representation of all the resources in our configuration. If we delete this state file, Terraform loses track of the state of our infrastructure.
terraform.tfstate.backup.
Also in Chapter 2, we recommended not adding your Terraform state to version control. This omission is acceptable for a single user. It’s relatively easy to protect your state from accidental deletion and provides very simple management of your state. You could even potentially share the state between multiple users via an out-of-band mechanism. But, if someone else uses your configuration and adjusts it, they will end up with a new state file of their own.
If you’re sharing the state file, you’ll then need to merge others’ changes, and you’ll need to incorporate them into your own state. The frequency of changes to infrastructure, the potential for conflicts, and the complexity of resolving those conflicts makes this approach problematic.
To help address this issue Terraform offers two options. The first is making use of Hashicorp’s Terraform Enterprise product. This option requires spending some money and the book won’t cover it directly. The second option is to make use of Terraform’s built-in remote state storage capability. We’re going to focus on the latter and learn how to manage our remote state.
5.2 Remote state
Terraform has the ability to store its state remotely, in a variety of backends. This includes tools like Artifactory, etcd, and Consul, as well as going directly to storage such as with Amazon’s S3 file system.
You can store some or all of your Terraform state in a backend. Why would you only store some state? This allows delegation to different groups of different parts of your infrastructure. Let’s think about the VPC we configured in Chapter 3. We might have a central group that manages and controls VPC configuration and provides this infrastructure to other groups. By sharing that state with other teams, they don’t need to replicate it and can focus on their own infrastructure.
You can start using Terraform with remote state or, as we’ll see shortly, you can migrate your existing state into remote storage. You can also go back to local state storage from remote if required.
Sadly, this remote state management is not quite perfect and some common problems emerge with it.
5.2.1 No state protection
The specific remote state for a configuration is identified via a path or key. For example, you might have a state file for every environment: development, testing, production… In your remote backend these environments may be identified something like this:
If you misconfigure your remote state configuration—for example, if you run it in the wrong environment—it’s easy to overwrite the wrong state on your remote backend. This is again why many folks wrap Terraform in a script.
refresh. The refresh command reconciles the state file with real state of your infrastructure. It modifies your state file but does not change any infrastructure. Any proposed change will take place during the next plan or apply.
5.2.2 Not all backends have locking
First, some remote states storage are missing a key component: locking. Currently, state is managed when you apply configuration. During the execution process Terraform will download the current state and apply your infrastructure and any changes based on it. At the end of execution it’ll push up the new state to the remote backend. For some of the remote backends, there is no way to lock access to this state while the plan is being executed. This means if someone else applies configuration at the same time as you, your configuration could get out of sync.
terraform state. You can list the contents of the current state using the terraform state list command. You can use the terraform state show command to show the state of a specific resource. You can move items in the state or to another state. You can also remove items from the state.
We’ll look at ways to address some of these concerns in this chapter. We’ll also look at a few ideas for managing some of the risks of Terraform’s remote state. Let’s start looking at remote state by setting up a backend.
5.3 Creating an S3 remote state backend
We’re going to be very meta in this chapter and use Terraform to configure our remote state backends. We’ll start with our initial remote state backend: an S3 bucket. The S3 bucket is a good choice for a backend as it’s highly available and yet still a simple file system.
Configuring our S3 backend is a straightforward task—all we need to do is create the bucket we want to store our configuration in and then configure it as Terraform’s remote state backend. We’ll create this configuration as a module to allow us to reuse it elsewhere.
5.3.1 Creating a module for an S3 remote state
Let’s start by creating our remote state module to make our S3 bucket. First we create a new directory under our ~/terraform directory to hold our remote backend configuration, create a README.md file, and initialize our directory as a Git repository.
Let’s create a .gitignore file to ensure we don’t accidentally commit any state or variables values we don’t want in our repository.
Next, let’s add an interface.tf file to hold our Terraform variables.
variable "region" {
  default     = "us-east-1"
  description = "The AWS region."
}

variable "prefix" {
  default     = "examplecom"
  description = "The name of our org, i.e. examplecom."
}

variable "environment" {
  default     = "development"
  description = "The name of our environment, i.e. development."
}
We’ve defined a simple set of variables, the region we want to launch the bucket in, a configurable prefix we’ll apply to our bucket name, and the name of an environment or stack we’ll use to identify our bucket. We’ve assumed you’re using shared credentials for your secret and access keys rather than specifying them locally.
Lastly, let’s define a main.tf to create our actual S3 bucket.
resource "aws_s3_bucket" "remote_state" {
  bucket = "${var.prefix}-remote-state-${var.environment}"
  acl    = "authenticated-read"

  lifecycle {
    prevent_destroy = true
  }

  versioning {
    enabled = true
  }

  tags = {
    Name = "${var.prefix}-remote-state-${var.environment}"
    Environment = var.environment
  }
}
We’ve defined a single resource, an s3_bucket resource, to hold our remote state.
The s3_bucket.remote_state resource starts with a bucket name. Since AWS bucket names are globally unique, we’ve started with a configurable prefix contained in the var.prefix variable. You would add an appropriate prefix for your team and organization. We have then appended the value of our var.environment variable to the bucket name.
We’ve also specified a default Access Control List (ACL) to protect our configuration file. The authenticated-read ACL is one of AWS’s canned policies. This ACL allows the owner to read and write and authenticated users to read. This ACL mimics the delegation behavior we discussed earlier in this chapter: the owner can write to the state but other teams, if authenticated, can only read.
We’ve also enabled S3 bucket versioning, which keeps a version history of any changes to the bucket. This helps protect us from accidental deletion of state data and allows us to potentially revert to a previous state.
We could have also used a new meta-argument called lifecycle. The lifecycle meta-argument provides the ability to control the life cycle of a resource. It has several options you can configure:
create_before_destroy— If a resource is going to be recreated, then the new resource is created before the old resource is deleted. This is useful for creating resources that replace others, such as creating a new DNS record before you delete an old one.ignore_changes— Allows you to specify a list of attributes that will be ignored by Terraform.prevent_destroy— Does not delete the resource, even if a plan requires it. Any plan or execution that proposes destroying this resource will exit with an error.
If we want to protect the resource from deletion, we could enable this last attribute, prevent_destroy, as an extra safeguard against someone accidentally deleting the bucket. Once enabled, any execution plan that tries to delete the bucket will fail.
We’ve also added some tags to name and identify our bucket further.
Finally, let’s add an output for our remote_state module in our interface.tf file.
This will return the ID of the bucket we’re creating.
5.3.2 Planning the remote state module
Let’s test that our module does what we expect. To do that we need to initialize it and then plan it. Let’s initialize it first.
Now we can run the plan to see.
$ terraform plan
. . .
+ aws_s3_bucket.remote_state
acceleration_status: "<computed>"
acl: "authenticated-read"
arn: "<computed>"
bucket: "examplecom-remote-state-development"
force_destroy: "false"
hosted_zone_id: "<computed>"
region: "<computed>"
request_payer: "<computed>"
tags.%: "2"
tags.Environment: "development"
tags.Name: "examplecom-remote-state-development"
versioning.#: "1"
versioning.69840937.enabled: "true"
website_domain: "<computed>"
website_endpoint: "<computed>"
Plan: 1 to add, 0 to change, 0 to destroy.Okay! Looks good. We can see our new S3 bucket, aws_s3_bucket.remote_state, is going to be created using our default var.environment of development.
5.3.3 Applying our remote state module
Let’s now apply our configuration to absolutely confirm it all works.
$ terraform apply
aws_s3_bucket.remote_state: Creating...
acceleration_status: "" => "<computed>"
acl: "" => "authenticated-read"
arn: "" => "<computed>"
bucket: "" => "examplecom-remote-state-development"
force_destroy: "" => "false"
hosted_zone_id: "" => "<computed>"
region: "" => "<computed>"
request_payer: "" => "<computed>"
tags.%: "" => "2"
tags.Environment: "" => "development"
tags.Name: "" => "examplecom-remote-state-development"
versioning.#: "" => "1"
versioning.69840937.enabled: "" => "true"
website_domain: "" => "<computed>"
website_endpoint: "" => "<computed>"
aws_s3_bucket.remote_state: Creation complete
Apply complete! Resources: 1 added, 0 changed, 0 destroyed.
. . .
State path: terraform.tfstate
Outputs:
s3_bucket_id = examplecom-remote-state-developmentNeat! We can also see that our new S3 bucket has been created and that we’re ready to use this module to configure Terraform for our remote state.
5.3.4 Uploading the remote state module
Let’s now commit our code. We’ll then create a repository on GitHub and upload our new module.
You can see our final module, tf_remote_state, on GitHub.
5.4 Configuring Terraform to use remote state
Let’s configure the web stack configuration we’ve used in the last couple of chapters to use a remote state. Let’s change into that configuration’s home directory to get started and create a sub-directory for our remote state bucket creation. We’re creating a separate sub-directory because we want to create our bucket independently, and not store it in the web application’s state. That way we don’t accidentally delete or co-mingle its management with our web stack.
Let’s create a variables.tf file to hold our bucket’s configuration.
Let’s add the var.region, var.prefix and var.environment variables we’re going to use to identify this configuration to the variables.tf file.
variable "region" {
description = "The AWS region"
default = "us-east-1"
}
variable "prefix" {
default = "examplecom"
description = "The name of our org, i.e. examplecom."
}
variable "environment" {
default = "web"
description = "The name of the environment."
}We’ve specified defaults of us-east-1 for the region and examplecom and web, the name of our current stack.
Let’s create a main.tf file to hold our remote state bucket configuration and populate it.
provider "aws" {
region = var.region
}
module "remote_state" {
source = "github.com/turnbullpress/tf_remote_state.git"
prefix = var.prefix
environment = var.environment
}Now let’s get our new module.
We’ve fetched our new module and can now plan and apply our configuration to confirm our new bucket is created and ready.
$ terraform plan
. . .
+ module.remote_state.aws_s3_bucket.remote_state
acceleration_status: "<computed>"
acl: "authenticated-read"
arn: "<computed>"
bucket: "examplecom-remote-state-web"
force_destroy: "false"
hosted_zone_id: "<computed>"
region: "<computed>"
request_payer: "<computed>"
tags.%: "2"
tags.Environment: "web"
tags.Name: "examplecom-remote-state-web"
versioning.#: "1"
versioning.69840937.enabled: "true"
website_domain: "<computed>"
website_endpoint: "<computed>"
Plan: 1 to add, 0 to change, 0 to destroy.We can see our new proposed bucket, aws_bucket.remote_state, with a name of examplecom-remote-state-web. Let’s create it now.
$ terraform apply
. . .
module.remote_state.aws_s3_bucket.remote_state: Creating...
acceleration_status: "" => "<computed>"
acl: "" => "authenticated-read"
arn: "" => "<computed>"
bucket: "" => "examplecom-remote-state-web"
force_destroy: "" => "false"
hosted_zone_id: "" => "<computed>"
region: "" => "<computed>"
request_payer: "" => "<computed>"
tags.%: "" => "2"
tags.Environment: "" => "web"
tags.Name: "" => "examplecom-remote-state-web"
versioning.#: "" => "1"
versioning.69840937.enabled: "" => "true"
website_domain: "" => "<computed>"
website_endpoint: "" => "<computed>"
module.remote_state.aws_s3_bucket.remote_state: Creation complete
Apply complete! Resources: 1 added, 0 changed, 0 destroyed.
. . .Our new bucket, examplecom-remote-state-web, is now created. Now we have the bucket, we can go back to our web module and the bucket as the source of our remote state.
5.4.1 Setting the remote state
Going back to our web module, we can now add the remote state configuration.
Configuring where Terraform stores state is done using standard Terraform code. Let’s create a configuration now. in our web module.
provider "aws" {
region = var.region
}
terraform {
backend "s3" {
bucket = "examplecom-remote-state-web"
key = "terraform.tfstate"
region = "us-east-1"
}
}
. . .To configure the remote state backend we specify a new configuration block: terraform. The terraform block is designed to hold Terraform specific configuration.
terraform {
backend "s3" {
region = "us-east-1"
bucket = "examplecom-remote-state-web"
key = "terraform.tfstate"
}
}backend configuration cannot contain interpolated variables. This is because this configuration is initialized prior to Terraform parsing these variables.
We then specify a backend block inside our terraform block. Like a Terraform resource, each backend has a type, in our case s3. Other types include Consul, etcd and an ironically named local remote state backend.
Each backend type has a set of available configuration options. For the S3 backend we need to specify the region in which the bucket is located. In our case this is the us-east-1 region. We also need to specify the name of the bucket, in our case examplecom-remote-state-web. You’ll need to update the examplecom to reflect the value of the var.prefix variable you’ve set. Last, we need to specify the key. The key is the location of the state file. In an S3 bucket this is the path to the file.
In our case, we’ve chosen to place the state file in a dedicated bucket named after our prefix variable, examplecom, and our environment variable, web. Remember each directory containing Terraform configuration generates its own state file. This means we can maintain individual states for each stack or application configured in Terraform.
Instead of bucket per environment or configuration, we could specify a single bucket and use the key configuration setting to specify a state file per directory. For example:
key = web/terraform.tfstate
We prefer the stand-alone bucket approach to protect our state as much as possible from mishaps.
After configuring our backend we need to initialize it. We do this using the terraform init command. You won’t be able to run Terraform until you initialize your backend. Indeed, let’s try and run terraform plan now and see what happens.
$ terraform plan
Backend reinitialization required. Please run "terraform init".
Reason: Initial configuration of the requested backend "s3"
. . .
Failed to load backend: Initialization required. Please see the error message above.We’ve cut a bit of text here but Terraform is telling us we can’t proceed without the terraform init command.
Let’s run the terraform init command now and see if we can resolve this.
$ terraform init
Downloading modules (if any)...
Get: git::https://github.com/turnbullpress/tf_vpc_basic.git?ref=v0.0.1
Initializing the backend...
Successfully configured the backend "s3"! Terraform will automatically
use this backend unless the backend configuration changes.
Terraform has been successfully initialized!
You may now begin working with Terraform. Try running "terraform plan" to see
any changes that are required for your infrastructure. All Terraform commands
should now work.
If you ever set or change modules or backend configuration for Terraform,
rerun this command to reinitialize your environment. If you forget, other
commands will detect it and remind you to do so if necessary.First, Terraform downloads our modules and then configures our backend. If we were to run terraform plan again now we’d be able to proceed.
So what just happened? There are two major changes. The first is that the terraform.tfstate file has disappeared from our web directory. This is because our state has been pushed to our S3 bucket.
terraform.tfstate.backup file has been created it’ll still be in your web directory.
The second change is the presence of a new terraform.tfstate file in the .terraform directory.
.terraform directory. Your local cache of the remote state file is also stored there. As we’ve discussed elsewhere, you’ll want to add this directory and the terraform.tfstate file to your .gitignore file to ensure neither are committed to version control.
Let’s look at this file and see how it’s different from the state we saw in Chapter 2.
{
"version": 3,
"serial": 0,
"lineage": "6d79daf5-6cc0-415f-b45d-447bcd723653",
"backend": {
"type": "s3",
"config": {
"bucket": "examplecom-remote-state-web",
"key": "terraform.tfstate",
"region": "us-east-1"
. . .We can see our state file contains a new section: backend. This tells us that the original state for this configuration is stored remotely in our S3 bucket.
The S3 backend also provides a locking capability. When you run Terraform it will use a DynamoDB database under the covers to provide a lock. This means if anyone else tries to run a Terraform apply using this configuration they’ll receive an error message indicating you already have a Terraform operation in progress.
5.4.2 Disabling remote state
If we want to disable remote state we remove the backend block from our Terraform code. This will require also re-running the terraform init command to return to our previous, locally-stored, state. Terraform will warn us of this before letting us plan or apply any new configuration.
$ terraform plan
Backend reinitialization required. Please run "terraform init".
Reason: Unsetting the previously set backend "s3"
. . .So let’s see what happens when we re-run the terraform init command to disable our remote state storage.
$ terraform init
Downloading modules (if any)...
Get: git::https://github.com/turnbullpress/tf_remote_state.git
Get: git::https://github.com/turnbullpress/tf_vpc_basic.git?ref=v0.0.1
Do you want to copy the state from "s3"?
Terraform has detected you're unconfiguring your previously set backend.
Would you like to copy the state from "s3" to local state? Please answer
"yes" or "no". If you answer "no", you will start with a blank local state.
Enter a value: yes
. . .We can see that Terraform has again downloaded our modules but it has also asked us if we’d like to copy our existing state back to the local host. If we answer yes, this will remove the state from the backend and rewrite it into a local terraform.tfstate state file in our ~/terraform/web/.terraform directory. If you answer no you’ll get a blank local state.
In addition to our state being synchronized, when we configure the remote backend, it is also updated whenever we run Terraform operations like plan or apply. It is refreshed when commands are run and updated if any resources are changed.
You can also manually sync the state via the terraform state pull and terraform state push commands. Let’s see what happens when we pull our state.
$ terraform state pull
{
"version": 3,
"terraform_version": "0.12.0",
"serial": 0,
"lineage": "bf841743-b81f-41ce-8100-61e63761bd0e",
"modules": [
{
"path": [
"root"
],
. . .We can see that our current state being outputted in its JSON form. The terraform state push will try to push a local state configuration to the remote backend. It’s generally done automatically but can be used manually if you have failed to connect to the backend for some reason.
5.5 Using and sharing remote state
Now that we’ve configured our Terraform remote state, how do we use it? There are two principal ways:
- Sharing state between users.
- Using data from the remote state.
5.5.2 Externally loading remote state backends
One thing you remember we mentioned is that the backend block doesn’t support interpolated variables. This means hard-coding variables, especially variables like the AWS region, that are likely to change regularly in dynamic environment. There is a work around for this issue though that can you can use. The terraform init command has a flag that allows you to pass a remote state backend configuration to it.
You’ll still need to configure the skeleton of a remote state in your Terraform code, for example for an S3 backend:
We then create a file to hold the rest of our backend configuration. Let’s call ours s3_backend.
The s3_backend file contains key/value pairs containing any required configuration for our backend. Let’s populate that file now:
We can then run the terraform init command with the -backend-config flag.
Terraform will complete our S3 remote state backend configuration with the values from the s3_backend file. This allows you to do a few different things:
- Stops you needing to store authentication keys or passwords in your Terraform code.
- Allows you to programmatically construct a backend configuration, suitable for scripting or in more dynamic environments.
You can now easily write a wrapper script that uses the terraform init command and populates your backend configuration appropriately, depending on the required context.
-backend-config configuration flag like so: -backend-config=key=value.
5.5.3 Using remote state data
The second use of our state data is to provide data to help us build other infrastructure. Let’s say we’ve built our VPC environment using the vpc module we created in Chapter 3. We can make use of the data that module outputs to configure other resources and environments.
To make use of remote state data we can take advantage of a data source called terraform_remote_state enabled by the terraform provider. Remember that data sources provide read-only data that can be used in your configuration. The terraform_remote_state data source allows us to query remote state. Let’s see it in action.
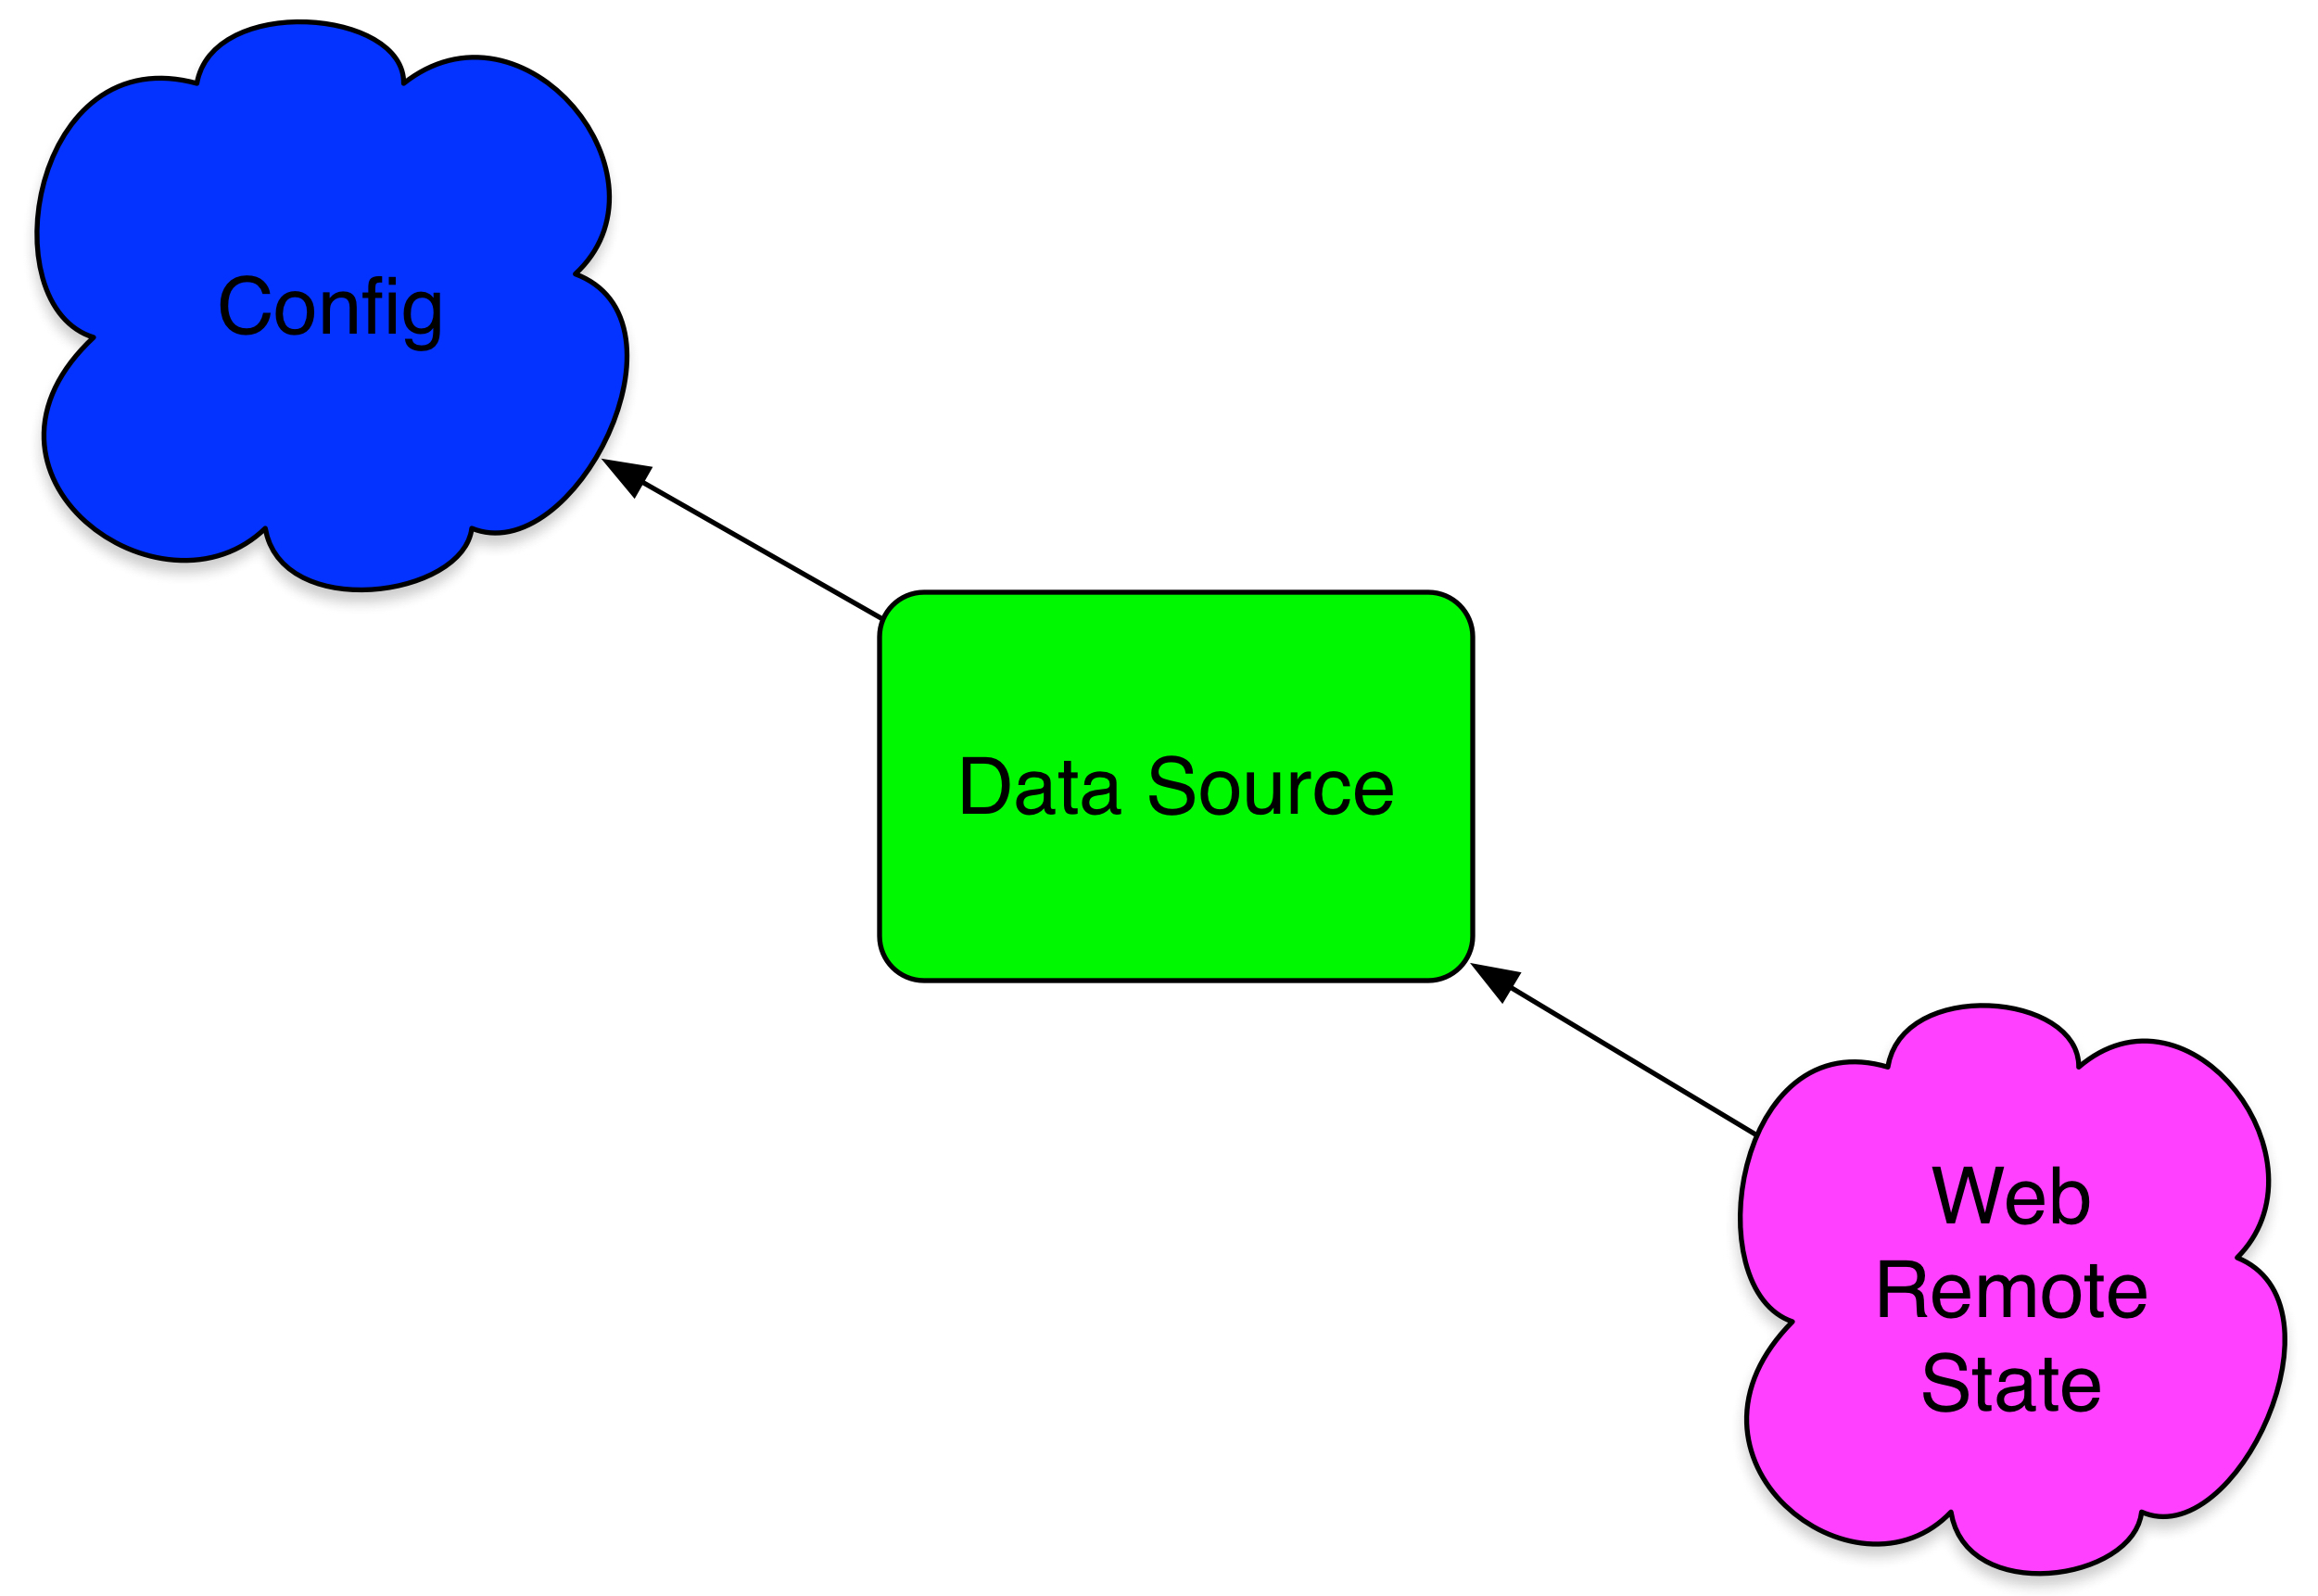
To do this we’re going to use some of the state of our web stack configuration in the base configuration we created in Chapter 2. Normally you would not be able to refer to values in another configuration; we cannot use attribute references between two configurations because Terraform doesn’t know the other configuration exists. Using the terraform_remote_state data source makes this possible.
5.5.4 Moving our base state remote
Let’s start by moving our base configuration’s state to a remote state using an S3 bucket for consistency.
We’ll then create a sub-directory to hold our remote state bucket configuration and populate it with a variables.tf file and a main.tf to create and manage our bucket.
And then populate each file, startng with variables.tf.
variable "region" {
description = "The AWS region."
default = "us-east-1"
}
variable "prefix" {
description = "The name of our org, i.e. examplecom."
default = "examplecom"
}
variable "environment" {
description = "The environment name."
default = "base"
}And then main.tf.
provider "aws" {
region = var.region
}
module "remote_state" {
source = "github.com/turnbullpress/tf_remote_state.git"
prefix = var.prefix
environment = var.environment
}Then we’ll get the module.
And then we’ll apply it.
$ terraform apply
. . .
module.remote_state.aws_s3_bucket.remote_state: Creating...
acceleration_status: "" => "<computed>"
acl: "" => "authenticated-read"
arn: "" => "<computed>"
bucket: "" => "examplecom-remote-state-base"
force_destroy: "" => "false"
hosted_zone_id: "" => "<computed>"
region: "" => "<computed>"
request_payer: "" => "<computed>"
tags.%: "" => "2"
tags.Environment: "" => "base"
tags.Name: "" => "examplecom-remote-state-base"
versioning.#: "" => "1"
versioning.69840937.enabled: "" => "true"
website_domain: "" => "<computed>"
website_endpoint: "" => "<computed>"
module.remote_state.aws_s3_bucket.remote_state: Creation complete
. . .
Apply complete! Resources: 1 added, 0 changed, 0 destroyed.We can see our new bucket, examplecom-remote-state-base, has been created.
We can now configure the base configuration to move our state to that bucket. Back in the main base stack, we can edit the base.tf file to add the remote state.
provider "aws" {
region = var.region
}
terraform {
backend "s3" {
region = "us-east-1"
bucket = "examplecom-remote-state-base"
key = "terraform.tfstate"
}
}
. . .We then run terraform init to initialize the remote state and now our base configuration state is uploaded to our examplecom-remote-state-base bucket. We can also check in the .terraform directory for our local cached state file.
5.5.5 Adding the data source to the base configuration
Let’s add the terraform_remote_state data source to the base configuration so we can read the web stack’s remote state. We’ll add the data source to the top of our base.tf file after the aws provider.
. . .
data "terraform_remote_state" "web" {
backend = "s3"
config {
region = var.region
bucket = "examplecom-remote-state-web"
key = "terraform.tfstate"
}
}
. . .Our data source is specified within the data block. The type of the data source is terraform_remote_state and the name is web.
Inside our terraform_remote_state data source we configure the remote state we wish to query. We first define a backend to query. Ours is s3, the backend we configured earlier in this chapter. We then specify the connection details of our data source inside a map called config. These are the same options we specify using the backend block in the terraform configuration block. We set the region we’re querying. We also set the bucket name—we’re using our web stack’s state and the specific key we’d like to query.
terraform_remote_state data source multiple times. Remember that each data source, like our resources, needs to be named uniquely.
Let’s see what this offers us. We can update the Terraform configuration by using the terraform apply command.
We need to use the terraform apply command here, rather than the terraform plan command, because the data source is a resource. If we only plan then this resource is not added to the base configuration.
$ terraform apply
data.terraform_remote_state.web: Refreshing state...
aws_instance.base: Refreshing state... (ID: i-eaf428fc)
aws_eip.base: Refreshing state... (ID: eipalloc-b9286486)
Apply complete! Resources: 0 added, 0 changed, 0 destroyed.We can see that Terraform has connected to our data.terraform_remote_state.web data source and refreshed its state, together with our other resources.
Now let’s look at the data that Terraform has gotten from our remote state. We can do this with the terraform show command.
$ terraform show
aws_eip.base:
id = eipalloc-b9286486
association_id = eipassoc-a01e699c
domain = vpc
instance = i-eaf428fc
. . .
data.terraform_remote_state.web:
id = 2016-10-08 02:25:31.134813974 +0000 UTC
addresses.# = 2
addresses.0 = 52.87.170.139
addresses.1 = 54.83.165.201
backend = s3
config.% = 3
config.bucket = examplecom-remote-state-web
config.key = terraform.tfstate
config.region = us-east-1
elb_address = web-elb-67413180.us-east-1.elb.amazonaws.com
public_subnet_id = subnet-ae6bacf5All of our resources, including our new data.terraform_remote_state.web data source, are present in the output. We can also see a list of attributes available from our data source.
These attributes are now available for us to use in our base configuration. Let’s use one of them now. We’re going to use the VPC public subnet ID created in our web stack in our base configuration. We’ll get this value by querying the web stack’s remote state using the terraform_remote_state data source.
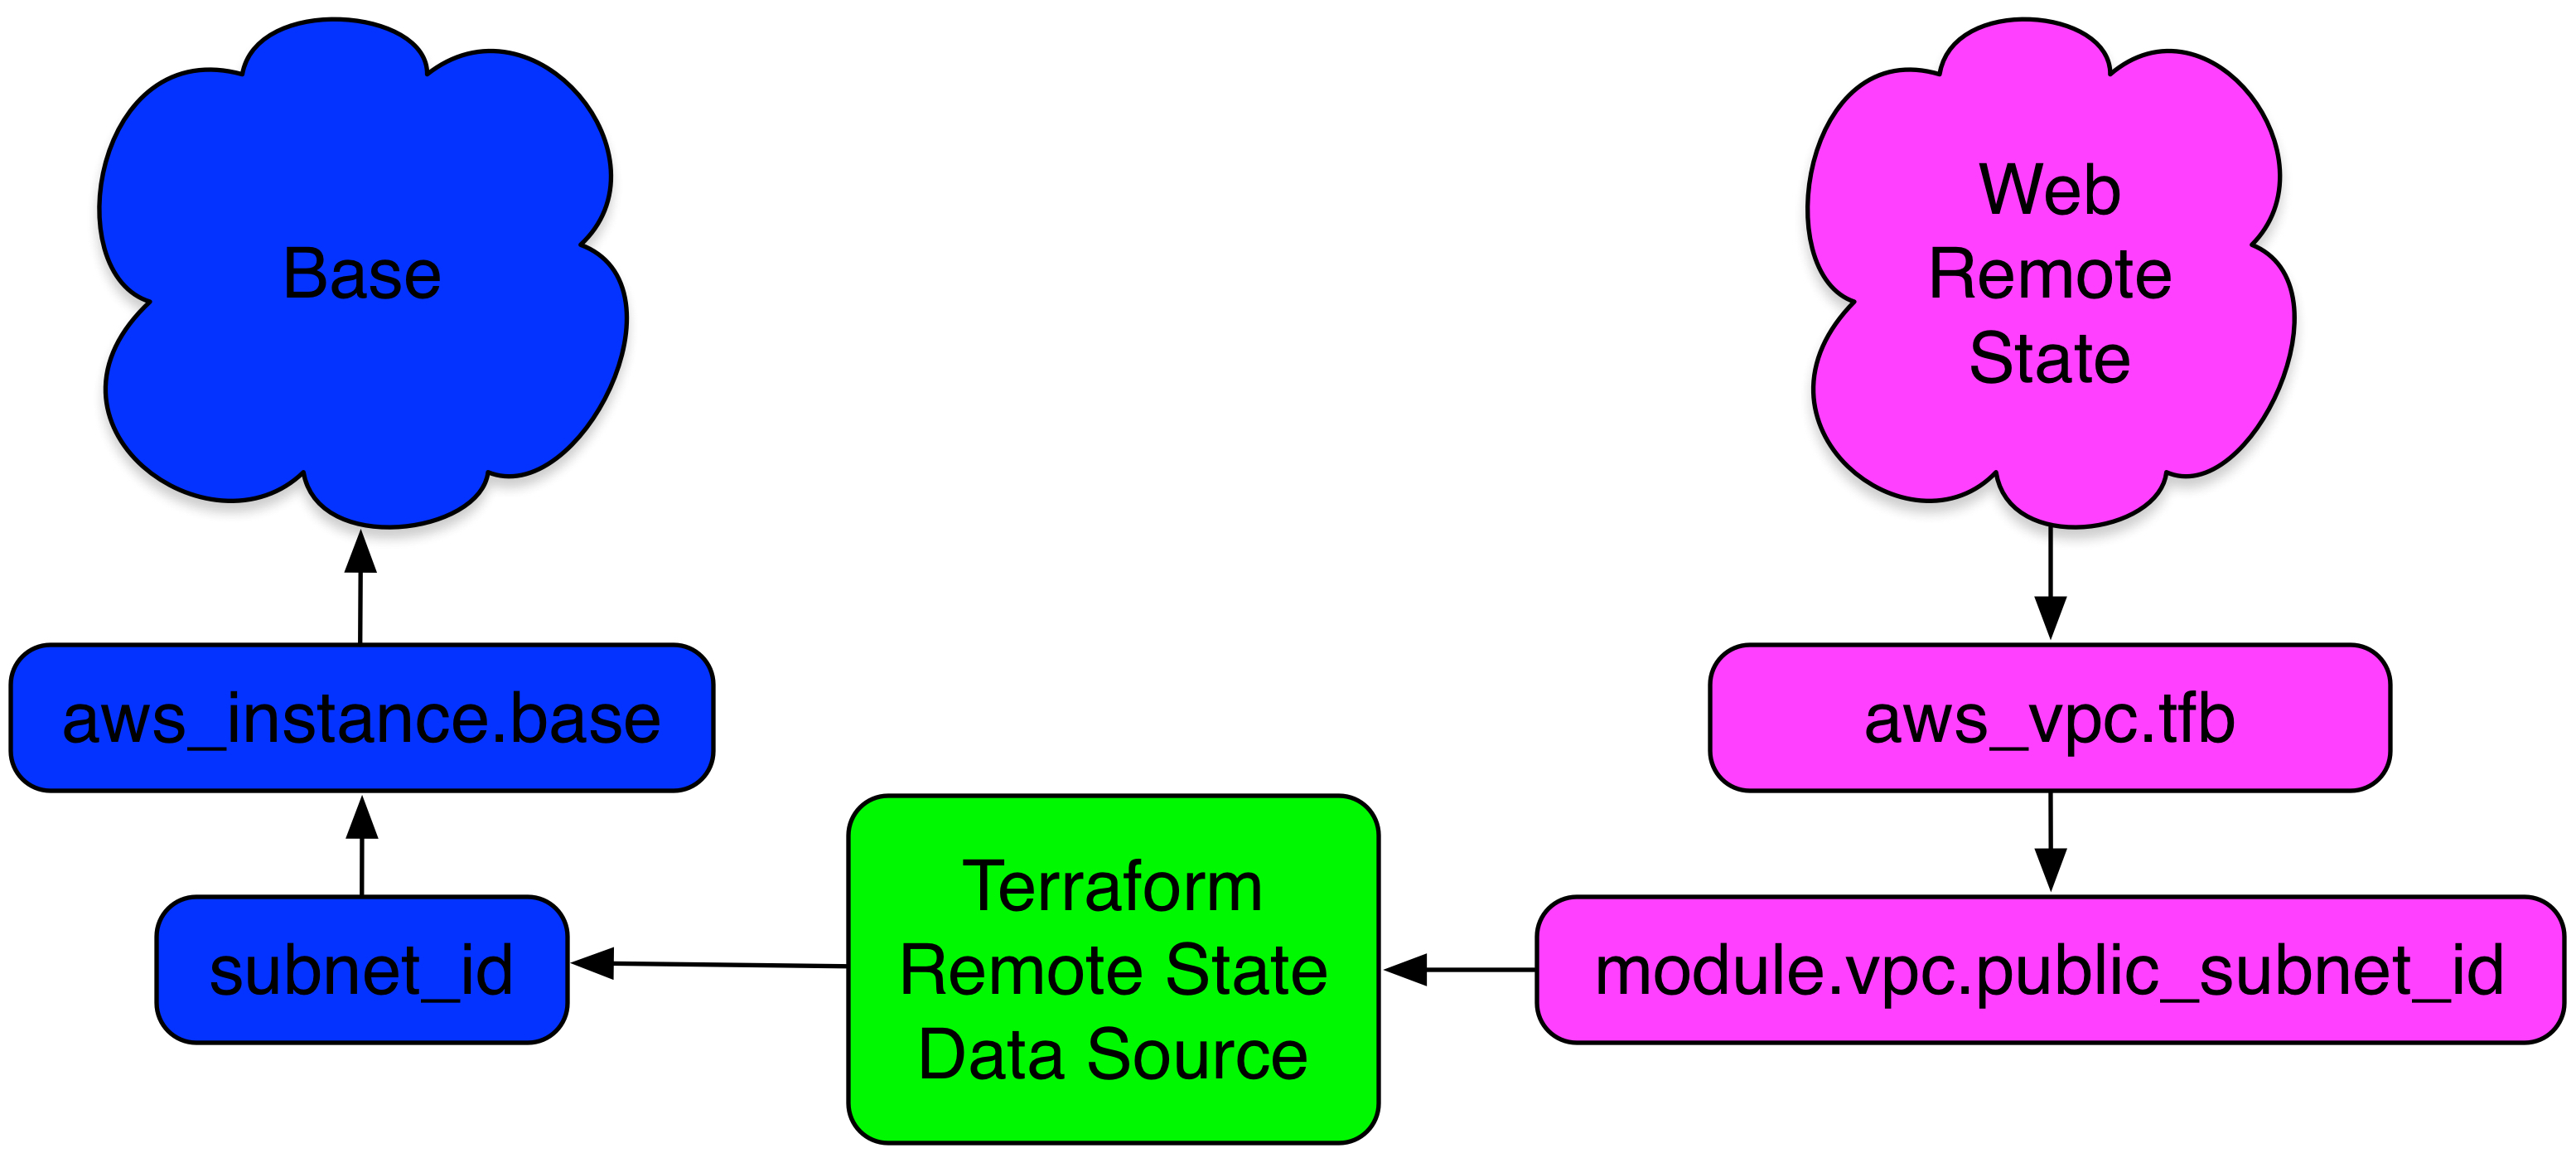
Let’s start by adding a value from the web stack remote state via a data source variable.
resource "aws_instance" "base" {
ami = var.ami[var.region]
instance_type = "t2.micro"
subnet_id = data.terraform_remote_state.web.public_subnet_id
}
resource "aws_eip" "base" {
instance = aws_instance.base.id
vpc = true
}You can see we’ve added the attribute:
data.terraform_remote_state.web.public_subnet_id
As the value of the subnet_id of our AWS instance. Note the variable is constructed with a prefix of data, the type of data source, the name of the data source, and finally the specific output we’re using. If we run terraform plan again, we’ll see the proposed change.
$ terraform plan
. . .
~ aws_eip.base
instance: "i-eaf428fc" => "${aws_instance.base.id}"
-/+ aws_instance.base
ami: "ami-4cc3b85b" => "ami-4cc3b85b"
availability_zone: "us-east-1a" => "<computed>"
ebs_block_device.#: "0" => "<computed>"
ephemeral_block_device.#: "0" => "<computed>"
instance_state: "running" => "<computed>"
instance_type: "t1.micro" => "t1.micro"
key_name: "" => "<computed>"
network_interface_id: "eni-d36f5bd5" => "<computed>"
placement_group: "" => "<computed>"
private_dns: "ip-172-31-11-212.ec2.internal" => "<computed>"
private_ip: "172.31.11.212" => "<computed>"
public_dns: "ec2-52-5-148-165.compute-1.amazonaws.com" => "<computed>"
public_ip: "52.5.148.165" => "<computed>"
root_block_device.#: "1" => "<computed>"
security_groups.#: "0" => "<computed>"
source_dest_check: "true" => "true"
subnet_id: "subnet-a48f23ed" => "subnet-ae6bacf5" (forces new resource)
tenancy: "default" => "<computed>"
vpc_security_group_ids.#: "1" => "<computed>"
Plan: 1 to add, 1 to change, 1 to destroy.We can see our proposed change will cause Terraform to recreate the resource (because the subnet it belongs to can only be changed at launch) as indicated by the (forces new resource) in the output. If we were to run terraform apply now, our resources would be recreated or changed. Terraform would update the subnet our aws_instance.base is in to be the same subnet as our web stack resources and would change its Elastic IP address. This is a simple and powerful way to ensure standardization of your resources and environments.
The classic use case for this is shared infrastructure, such as a VPC, load balancer, or storage. You can have one group responsible for building the infrastructure and outputting the relevant information required by other teams to use it: addresses, versions, ID, etc. Teams can then consume this in their Terraform configurations without risking others changing the base configuration.
5.6 State and service discovery
We’ve seen how we can use our remote state in another configuration. Let’s extend the principle to enable service discovery. Service discovery allows the automatic detection of applications and services in your environment. Clients or other applications query a service discovery tool, and it returns the IP address or port numbers or other relevant information that allows them to find the service they want.
So when should you use remote state versus service discovery? Remote state best lends itself to provisioning use. There are variables or data you want to make use of when you build your stack. They’re often only used once or twice during that process. They don’t require you to regularly query that data source while your application or service is being run. Service discovery tends to be used at runtime and exercised regularly when applications and services run—for example, by querying the address of a required service. It generally requires a more resilient and faster service with a higher availability than our remote state.
We’re going to enable service discovery using another HashiCorp tool: Consul. Consul includes a highly available key-value store that we’re going to use to store configuration values from Terraform. Other folks can then query that data and state from Consul for use in their own configurations.
We’ll create a Consul cluster using Terraform, show you how other Terraform configurations can be made aware of Consul, and then we’ll look at how to store their service information in Consul.
5.6.1 Creating a Consul cluster
In order to use Consul, we first need to create a Consul server cluster. We’ve created a new module to do this, which you can find on GitHub. Our module, about which we’re not going to go into deep detail, creates a three-node Consul cluster in a VPC in a public subnet. The module does not produce an overly secure Consul cluster. It will allow external access to the Consul nodes and is only lightly secured, with ACL enabled and set to default allow and encryption between nodes.
You should review the module or look at alternative modules. The module will output the public DNS address of the first Consul node and the private IP addresses of the cluster nodes. We’ll store this data in remote state and make use of it to connect to our Consul server later in this chapter.
Let’s create a new configuration to use this module and create our cluster.
We’ll then start with a variable.tf file to hold our variables.
variable "region" {
default = "us-east-1"
description = "The AWS region."
}
variable "prefix" {
description = "The name of our org, i.e. examplecom."
default = "examplecom"
}
variable "environment" {
description = "The name of our environment, i.e. development."
}
variable "private_key_path" {
default = "~/.ssh/james.key"
description = "The path to the AWS key pair to use for resources."
}
variable "key_name" {
default = "james"
description = "The AWS key pair to use for resources."
}
variable "vpc_cidr" {
description = "The CIDR of the VPC."
}
variable "public_subnet" {
description = "The public subnet to populate."
}
variable "token" {
description = "Consul server token"
}
variable "encryption_key" {
description = "Consul encryption key"
}We’ve seen a lot of these variables before, but we’ve added a few new ones: token and encryption_key. These will configure access control lists, ACLs, and cluster encryption to provide some basic security for Consul.
We’ll also create values for our token, encryption_key, and other variables in a terraform.tfvars file.
token = "yourtoken"
encryption_key = "yourkey"
environment = "consul"
vpc_cidr = "10.0.0.0/16"
public_subnet = "10.0.5.0/24"Your encryption_key needs to be a 16-byte Base64-encoded string. There are several ways you can generate one. The first is to download Consul and use the consul keygen command. Or you can generate one on the command line using something like this:
This assumes you have the openssl binary available, and it uses the rand command to return a Base64-encoded key. If you don’t have the openssl binary you can do something like:
This method uses the current date, runs it through a SHA256, Base64 encodes it, and then returns the first 16 bytes.
For the token we tend to use a UUID. You can generate one on most hosts like so:
Now let’s create some outputs for our configuration in an outputs.tf file.
output "consul_server_address" {
value = [module.consul.consul_dns_addresses]
}
output "consul_host_addresses" {
value = [module.consul.consul_host_addresses]
}We’re outputting both of the Consul module’s output variables here.
Last, we want to add a consul.tf file to instantiate our cluster.
provider "aws" {
region = var.region
}
module "vpc" {
source = "github.com/turnbullpress/tf_vpc_basic.git?ref=v0.0.1"
name = "consul"
cidr = var.vpc_cidr}"
public_subnet = var.public_subnet}"
}
module "consul" {
source = "github.com/turnbullpress/tf_consul.git"
environment = var.environment
token = var.token
encryption_key = var.encryption_key
vpc_id = module.vpc_basic.vpc_id
public_subnet_id = module.vpc_basic.public_subnet_id
region = var.region
key_name = var.key_name
private_key_path = var.private_key_path
}Our consul.tf uses two modules: the VPC module that will create a new VPC to hold our Consul cluster and the Consul module to create the cluster itself.
Let’s initialize the configuration and grab those modules now.
$ pwd
~/terraform/consul
$ terraform init

. . .
$ terraform get -update
Get: git::https://github.com/turnbullpress/tf_vpc_basic.git?ref=v0.0.1 (update)
Get: git::https://github.com/turnbullpress/tf_consul.git (update)We can then terraform plan and terraform apply our Consul configuration. Let’s assume we’ve run terraform plan and jump straight to an apply.
$ terraform apply

. . .

Apply complete! Resources: 8 added, 0 changed, 0 destroyed.

Outputs:

consul_host_addresses = [
    10.0.5.57,
    10.0.5.171,
    10.0.5.192
]
consul_server_address = [
    ec2-54-221-122-241.compute-1.amazonaws.com
]
We can see our Consul cluster has been created and our outputs emitted.
We can confirm our Consul cluster is running by browsing to the web UI by adding port 8500 to the DNS address in the consul_server_address output.

We can move the state we’ve just created into the S3 bucket. We create our backend block inside our consul.tf file.
. . .

terraform {
  backend "s3" {
    region = "us-east-1"
    bucket = "examplecom-remote-state-consul"
    key    = "terraform.tfstate"
  }
}
This, combined with the terraform init command, will put our state into the examplecom-remote-state-consul S3 bucket we just created.
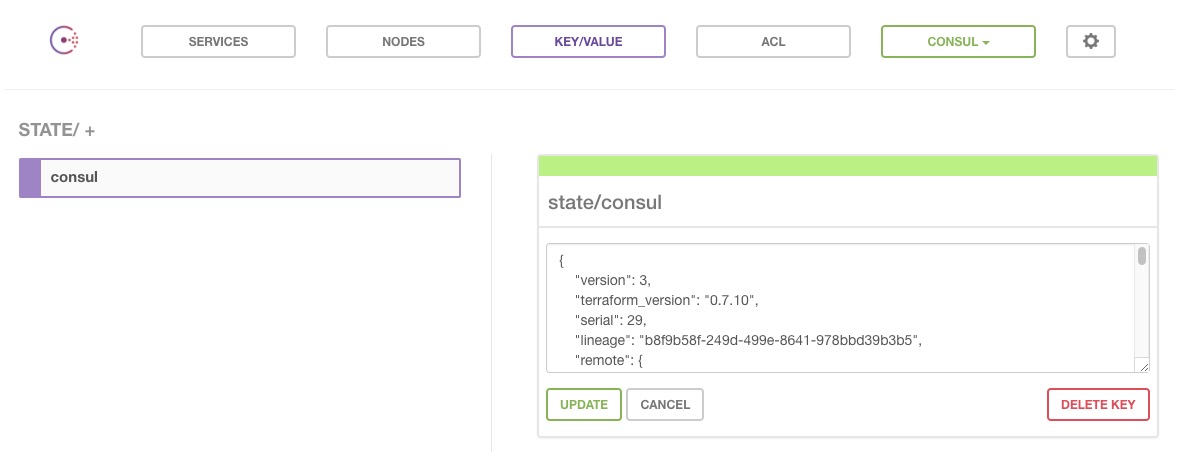
Alternatively, we could use Consul itself to store the remote state. We can store our remote state as a key inside Consul’s key/value store.
. . .

terraform {
  backend "consul" {
    path         = "state/consul"
    access_token = "yourtoken"
    address      = "ec2-54-221-122-241.compute-1.amazonaws.com:8500"
    datacenter   = "consul"
  }
}

. . .
This will upload our state as a key state/consul to our Consul server. We’ve specified the address of our Consul server, suffixed with the 8500 port. We’ve also specified the datacenter to use, which we defined with the var.environment variable, here with a value of consul, in our Consul module.
access_token you could use the CONSUL_HTTP_TOKEN environment variable or specify it via the -backend-config command line flag. This keeps your token out of your local state.
You should now be able to see our remote state in the web UI.
Let’s make use of that state.
5.6.2 Using Consul and remote state
At this point we should revisit our web configuration. Remember our configuration creates some AWS instances and an Elastic Load Balancer. Let’s add some Consul integration to that configuration. We’re going to:
- Allow the
webconfiguration to query the Consul remote state for the Consul server’s DNS address. - Store some configuration from the
webenvironment in our new Consul cluster. - Query that configuration data.
The first step is to add our Consul configuration’s remote state to our web environment, as we saw earlier in the chapter. Let’s assume we’re still storing it in S3 rather than Consul. Let’s open up the ~/terraform/web/web.tf file and add the terraform_remote_state data source.
. . .

data "terraform_remote_state" "consul" {
  backend = "s3"
  config {
    region = var.region
    bucket = "examplecom-remote-state-consul"
    key    = "terraform.tfstate"
  }
}

. . .
Here we’ve used the terraform_remote_state data source to query the remote state of the Consul cluster we’ve just created. It’ll look inside the S3 bucket’s remote state and make the outputs from that configuration available in our web configuration. Let’s run terraform apply now to update the configuration.
Now the web configuration knows about the Consul state. Let’s explore what it knows in a bit more depth.
$ terraform show
. . .
data.terraform_remote_state.consul:
id = 2016-11-10 12:48:44.453771993 +0000 UTC
backend = s3
config.% = 3
config.bucket = examplecom-remote-state-consul
config.key = terraform.tfstate
config.region = us-east-1
consul_host_addresses.# = 3
consul_host_addresses.0 = 10.0.5.12
consul_host_addresses.1 = 10.0.5.11
consul_host_addresses.2 = 10.0.5.163
consul_server_address.# = 1
consul_server_address.0 = ec2-54-221-122-241.compute-1.amazonaws.com
. . .We can see that our configuration knows where to find the Consul server via the consul_server_address.0 output in the remote state. Let’s take advantage of that now.
We’re going to add a new provider to the web configuration: consul. The consul provider allows you to connect to a Consul server and interact with it. Let’s add it to the web.tf file.
. . .
provider "consul" {
address = "${data.terraform_remote_state.consul.consul_server_address[0]}:8500"
datacenter = "consul"
}
. . .Here we’ve added a new provider block. The consul provider has two required attributes: an address and a datacenter. We’re extracting the address from the Consul configuration’s remote state with our data source, querying:
data.terraform_remote_state.consul.consul_server_address[0]
We’ve added the port to which Consul is bound on that address, 8500, to the variable. In our Consul configuration and module we’ve used the value of the environment variable as the value of the Consul datacenter.
Lastly, to connect to our Consul server and interact with it, we need to add a single variable: token. Remember we added some basic security to our Consul cluster, including specifying a token used for updating data in the cluster. Let’s add that variable to variables.tf now.
We then want to add a value to our terraform.tfvars file for this token.
Now let’s add a resource that makes use of this new provider and our token variable. We’re going to use the consul_key_prefix resource to add some key/values to Consul. The consul_key_prefix resource configures a namespace containing a series of keys. We’ll populate those keys with attributes from our web configuration.
. . .
resource "consul_key_prefix" "web" {
token = var.token
path_prefix = "web/config/"
subkeys = {
"public_dns" = aws_elb.web.dns_name
}
}
. . .Our new resource consumes our var.token variable. We’ve specified a path_prefix, here web/config/, that will prefix any key/value pairs we add to Consul. This allows us to group our keys under a namespace. We’ve also added a single key to that namespace. The key is called public_dns—or with our prefix, web/config/public_dns—and its value is the DNS name of the Elastic Load Balancer we’re creating in the web configuration: aws_elb.web.dns_name.
Let’s instantiate this key by applying our configuration.
$ terraform apply
data.terraform_remote_state.consul: Refreshing state...

. . .
consul_key_prefix.web: Creating...
datacenter: "" => "<computed>"
path_prefix: "" => "web/config/"
subkeys.%: "" => "1"
subkeys.public_dns: "" => "web-elb-1887901826.us-east-1.elb.amazonaws.com"
token: "" => "yourtoken"
consul_key_prefix.web: Creation complete
Apply complete! Resources: 1 added, 0 changed, 0 destroyed.
. . .We can see our new key has been created and populated with the public DNS name of the Elastic Load Balancer. You’ll also note that the token is in the state and the output.
We can now query the Consul cluster to use this key. We could use the key in another Terraform configuration using the consul_keys data source. Or we could use a Consul client or HTTP client to fetch the ELB address from the key. Let’s see it from the command line using curl.
$ curl -s 'ec2-54-221-122-241.compute-1.amazonaws.com:8500/v1/kv/web/config/public_dns?token=yourtoken' | jq
[
  {
    "LockIndex": 0,
    "Key": "web/config/public_dns",
    "Flags": 0,
    "Value": "d2ViLWVsYi0xODg3OTAxODI2LnVzLWVhc3QtMS5lbGIuYW1hem9uYXdzLmNvbQ==",
    "CreateIndex": 1402,
    "ModifyIndex": 1402
  }
]
Here we’ve curled to the Consul key/value HTTP API and pulled the web/config/public_dns key. This returns a JSON hash, which we’ve piped through jq to prettify it. Our ELB address is in the Value key (don’t panic—it’s not gibberish, just Base64-encoded to allow you to use non-UTF8 characters). Let’s decode it.
$ echo d2ViLWVsYi0xODg3OTAxODI2LnVzLWVhc3QtMS5lbGIuYW1hem9uYXdzLmNvbQ== | base64 --decode
web-elb-1887901826.us-east-1.elb.amazonaws.com
Or you can fancily do the curl and decode all in one step.
$ curl -q ec2-54-221-122-241.compute-1.amazonaws.com:8500/v1/kv/web/config/public_dns?token=yourtoken | jq '.[] | .Value' | tr -d """ | base64 --decode | awk '{ print $1 }'Or you could do this via a programmatic process in your application or client code.
We can now use that value in a service or application. We get provisioning, updates to our service discovery tool, and service discovery data available to be consumed by applications, services, or monitoring.
5.7 Other tools for managing Terraform state
There are some other tools available to help manage Terraform’s state:
- Terrahelp: Go utility that provides Vault-based encryption and decryption of state files.
- Terragrunt: Go tool for managing locking and state that can be used as glue in a multi-environment setup.
- Terraform_exec: Go wrapper that allows Terraform projects to have multiple environments synced to S3.
5.8 Summary
In this chapter we’ve learned more about managing Terraform’s state and sharing that state with others. We’ve learned how to configure remote state, setup an S3 bucket backend, and manage our state with others.
We can also see that remote state management isn’t quite perfect with Terraform yet. It requires some cooperation and collaboration between folks working on shared configuration.
We’ve also seen how to use our remote state data in our configurations and potentially how to integrate remote state with service discovery.
In the next chapter we’re going to build on this to introduce a much more fully featured and complex state management architecture across multiple environments.