
2 Installing and introducing Terraform
Welcome to the world of infrastructure as code. In this chapter, we’ll take you through the process of installing Terraform on a variety of platforms. This isn’t the full list of supported platforms but a representative sampling to get you started. We’ll look at installing Terraform on:
- Linux.
- Microsoft Windows.
- Mac OS X.
You’ll discover that the lessons here from installing Terraform can be extended to the other supported platforms.
After we’ve installed Terraform, we’ll start to learn about how to use it to create and manage infrastructure. We’ll learn about Terraform’s workflow for creating, managing, and destroying infrastructure. We’ll also start to delve into Terraform’s configuration language. Finally, we’ll build some simple infrastructure using Terraform to see it in action.
2.1 Installing Terraform
Terraform is shipped as a single binary file. The Terraform site contains zip files containing the binaries for specific platforms. Currently Terraform is supported on:
- Linux: 32-bit, 64-bit, and ARM.
- Max OS X: 32-bit and 64-bit.
- FreeBSD: 32-bit, 64-bit, and ARM.
- OpenBSD: 32-bit and 64-bit
- Illumos Distributions: 64-bit
- Microsoft Windows: 32-bit and 64-bit
You can also find SHA256 checksums for Terraform releases, and you can verify the checksums signature file has been signed using HashiCorp’s GPG key. This allows you to validate the integrity of the Terraform binary.
Older versions of Terraform are available from the Hashicorp releases service.
2.1.1 Installing Terraform on Linux
To install Terraform on a 64-bit Linux host we can download the zipped binary file. We can use wget or curl to get the file from the download site.
Now let’s unpack the terraform binary from the zip file, move it somewhere useful, and change its ownership to the root user.
$ unzip terraform_0.12.3_linux_amd64.zip
$ sudo mv terraform /usr/local/bin/
$ sudo chown -R root:root /usr/local/bin/terraform
We can now test if Terraform is installed and in our path by checking its version.
2.1.2 Installing Terraform on Microsoft Windows
To install Terraform on Microsoft Windows we need to download the terraform executable and put it in a directory. Let’s create a directory for the executable using Powershell.
Now download the terraform executable from the download site into the C: erraform directory:
Unzip the executable using a tool like 7-Zip into the C: erraform directory. Finally, add the C: erraform directory to the path. This will allow Windows to find the executable. To do this run this command inside Powershell.
You should now be able to run the terraform executable.
2.1.3 Alternative Microsoft Windows installation
You can also use a package manager to install Terraform on Windows. The Chocolatey package manager has a Terraform package available. You can use these instructions to install Chocolatey and then use the choco binary to install Terraform.
2.1.4 Alternative Mac OS X installation
In addition to being available as a binary for Mac OS X, Terraform is also available from Homebrew. If you use Homebrew to provision your Mac OS X hosts then you can install Terraform via the brew command.
Homebrew will install the terraform binary into the /usr/local/bin directory. We can test it is operating via the terraform version command.
2.1.4.1 Installing via configuration management
There are also configuration management resources available for installing Terraform. You can find:
- A Puppet module for Terraform.
- A Chef cookbook for Terraform.
- An Ansible role for Terraform.
- A Terraform Docker container.
2.2 Getting started with Terraform
Now that we’ve got Terraform installed, let’s see what it can do. The core of Terraform’s functionality is provided by the terraform binary. Terraform behaves like most command line tools: we specify commands with arguments to execute specific functions. We’ve already returned Terraform’s version with the version command. To return Terraform’s help text we run the terraform binary with the help command.
$ terraform help
usage: terraform [--version] [--help] <command> [args]

. . .

Common commands:
    apply              Builds or changes infrastructure
    destroy            Destroy Terraform-managed infrastructure
    fmt                Rewrites config files to canonical format
    get                Download and install modules...

. . .

All other commands:
    state              Advanced state management
We can see the list of commands available to us (we’ve abbreviated that list in this output). In this chapter we’re going to focus on three of those commands:
plan: Shows us what changes Terraform will make to our infrastructure.apply: Applies changes to our infrastructure.destroy: Destroys infrastructure built with Terraform.
–help flag—for example, terraform plan –help.
Let’s start by creating some configuration to work with.
2.2.1 Adding some configuration
Let’s define some infrastructure to be built by Terraform. We’ll begin by creating a directory under our home directory called terraform to hold this Terraform configuration.
Let’s now make a directory to hold our first example of Terraform configuration inside this directory. We’ll call it base.
Now we’ll initialize the base directory as a Git version control repository. You’ll want to always store your Terraform configuration in a version control system. We’re going to use Git in the book to track our Terraform code. A version control system allows us to:
- Manage and version our Terraform code, just like we should manage and version our application code.
- Share our configuration across a team or organization.
- Ensure our infrastructure is tracked like our code.
- Allow us to apply development principles and life cycle to our infrastructure. In Chapters 5, 6, and 7, we’ll see more details on sharing, collaboration, and development workflow for our infrastructure.
We like Git because it’s easy, distributed, and integrates with GitHub, which is useful for hosting our source code.
Let’s also be good citizens and add a README.md file to tell folks what code is in this directory.
# Our first AWS configuration for Terraform

An initial configuration for Terraform.

## Usage

```
$ terraform plan
$ terraform apply
```

## License

MIT
We can then add our README.md to Git and commit it.
Now the next person who comes along will at least know something about this configuration.
2.2.2 Terraform configuration files
When Terraform runs inside a directory it will load any Terraform configuration files. Any non-configuration files are ignored and Terraform will not recurse into any sub-directories. Each file is loaded in alphabetical order, and the contents of each configuration file are appended into one configuration.
Terraform then constructs a DAG, or Directed Acyclic Graph, of that configuration. The vertices of that graph— its nodes—are resources—for example, a host, subnet, or unit of storage; the edges are the relationships, the order, between resources. For example, a network may be required before a host can be created in order to assign it an IP address. The graph determines this relationship and then ensures Terraform builds your configuration in the right order to satisfy this.
The configuration loading model allows us to treat individual directories, like base, as standalone configurations or environments. A common Terraform directory structure might look like:
Each directory could represent an environment, stack, or application in our organization.
Let’s create an initial configuration file inside the ~/terraform/base directory. We’ll call it base.tf.
Terraform configuration files are normal text files. They are suffixed with either .tf or .tf.json. Files suffixed with .tf are in Terraform’s native file format, and .tf.json files are JSON-formatted.
The two configuration file formats are for two different types of audiences:
- Humans.
- Machines.
2.2.2.1 Humans
The .tf format, also called the HashiCorp Configuration Language or HCL, is broadly human-readable, allows inline comments, and is generally recommended if humans are crafting your configuration.
2.2.2.2 Machines
The .tf.json format is pure JSON. The .tf.json format is meant for machine interactions, where a machine is building your configuration files.
You can use JSON if you’d prefer, but the HCL file format is definitely easier to consume and we recommend using it primarily.
2.2.3 Setting up Amazon Web Services
We’re going to use Amazon Web Services to build our initial infrastructure. Amazon Web Services have a series of free plans (they call them tiers) that we can use to test Terraform at no charge. We’ll use those tiers in this chapter.
If you haven’t already got a free AWS account, you can create one at:
https://aws.amazon.com/
Then follow the Getting Started process.
As part of the Getting Started process you’ll receive an access key ID and a secret access key. If you have an Amazon Web Services (AWS) account you should already have a pair of these. Get them ready. You’ll use them shortly.
Alternatively, you should look at IAM or AWS Identity and Access Management. IAM allows multi-user role-based access control to AWS. It allows you to create access credentials per user and per AWS service.
Configuring it is outside the scope of this book, but here are some good places to learn more:
2.2.4 Our first configuration file
Let’s now populate the base.tf file with some initial Terraform configuration.
/* This is a multi-line comment. This is a multi-line comment. This is a multi-line comment. This is a multi-line comment. This is a multi-line comment. This is a multi-line comment. */
provider "aws" {
  access_key = "abc123"
  secret_key = "abc123"
  region     = "us-east-1"
}

# This is a single-line comment.
resource "aws_instance" "base" {
  ami           = "ami-0d729a60"
  instance_type = "t2.micro"
}#. Multi-line comments can be wrapped in /* multi-line comment **/. Whitespace is not meaningful in Terraform configurations.
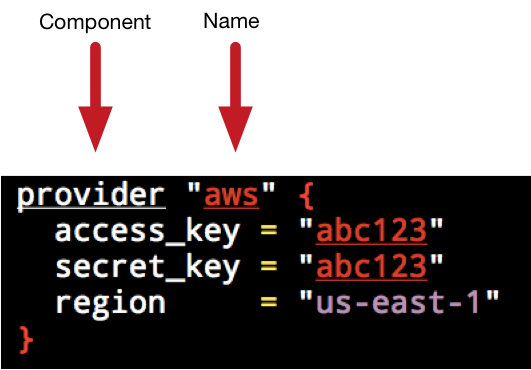
You can see we’ve specified two configuration objects in the file: a provider and a resource.
2.2.4.1 Providers
Providers connect Terraform to the infrastructure you want to manage—for example, AWS, Microsoft Azure, or a variety of other Cloud, network, storage, and SaaS services. They provide configuration like connection details and authentication credentials. You can think about them as a wrapper around the services whose infrastructure we wish to manage.
Providers are not shipped with Terraform since Terraform 0.10. In order to download the providers you’re using in your environment you need to run the terraform init command to install any required providers. Let’s do that now to get the aws provider.
This will initialize Terraform’s setup and download the aws provider and make it available for our Terraform configuration. In this case, we’re using the aws provider. The aws provider lets us create and manage Amazon Web Services infrastructure. We’ll need to specify some connections details—like to which AWS region we’d like to connect. We’ll also need to specify some authentication credentials—the access and secret key we discussed above—that will allow us to use our AWS account from Terraform.
You can find a full list of the available providers and what they can manage in the Terraform provider documentation.
We can see our provider specifies a label, here aws, and a block of configuration inside braces: { }. Our configuration is a series of key = value arguments. Blocks and arguments are the key constructs of the Terraform language. A block is a container for other content. Each block has a type, for example our provider block, generally with one or more mandatory labels. Blocks can be nested but only some blocks, like our provider block, are considered top-level blocks and can be specified outside other blocks.
An argument assigns a value to a name. The name is on the left of the equals sign and the value is on the right, for example:
access_key = "abc123"
Here the access_key name is assigned a value of abc123. In this case we’re specifying three arguments:
access_key: Our AWS access key ID.secret_key: Our AWS secret access key.region: The AWS region in which to manage infrastructure.
With this information Terraform can connect to AWS and perform any operations in the us-east-1 region.
2.2.4.2 Resources
Our second block is a resource. Resources are the bread and butter of Terraform. They represent the infrastructure components you want to manage: hosts, networks, firewalls, DNS entries, etc. The resource object is constructed of a type, name, and a block containing the configuration of the resource.
The type of resource here is aws_instance, which manages AWS EC2 host instances. Each type of the resource is linked to a provider; you can tell which by the leftmost value in the type, here aws. This indicates that this type of resource is provided by the aws provider.
The name of the resource is specified next. This name is defined by you—here we’ve named this resource base. The name of the resource should generally describe what the resource is or does.
The combination of type and name must be unique in your configuration.
Hence there can be only one aws_instance named base in your configuration. If you specify more than one resource type with the same name you’ll see an error like so:
* aws_instance.base: resource repeated multiple times
This restriction is what allows Terraform’s graph to be constructed correctly. Each resource is a vertex or node in that graph. Each node is uniquely identified, its edges examined to determine its relationship with other nodes in the graph, and an order determined for the creation of those resources.
Inside the block we specify the configuration of the resource. Each resource type has a different set of attributes you can configure. In our aws_instance.base resource we’re defining two configuration attributes:
amiinstance_type
The ami specifies which Amazon Machine Image we want to launch, and the instance_type is the class of instance we want to launch. In this case we’re launching one of Amazon’s free tier AMIs of the t2.micro class.

us-east-1 region and that your Amazon account has a default VPC and is not in EC2 Classic. If you are in EC2 Classic you can replace these values with an AMI of ami-408c7f28 and a type of t1.micro. If you’re not in us-east-1 then replace the AMIs with appropriate stock Ubuntu 16.04 AMIs from your region.
2.2.5 Building our first resource
So we’ve got a connection to AWS defined and a single resource, an AWS instance, defined. Now how do we get Terraform to create that resource? Terraform calls the process of creating and managing infrastructure an execution plan. You will likely run execution plans in one of two modes:
- Plan - Display the proposed changes to make.
- Apply - Apply the changes.
Let’s start with showing our execution plan by running the terraform binary with the plan command inside the ~/terraform/base directory. The plan command lets us see what Terraform is proposing to do, a check that we’re going to make the right changes. This is useful for ensuring you are doing the right thing and not about to break your infrastructure. We recommend always running a plan before you apply any changes.
$ terraform plan
Refreshing Terraform state in-memory prior to plan...

. . .

+ aws_instance.base
    ami:                      "ami-0d729a60"
    availability_zone:        "<computed>"
    instance_state:           "<computed>"
    instance_type:            "t2.micro"
    key_name:                 "<computed>"
    network_interface_id:     "<computed>"
    placement_group:          "<computed>"
    private_dns:              "<computed>"
    private_ip:               "<computed>"
    public_dns:               "<computed>"
    public_ip:                "<computed>"

. . .

Plan: 1 to add, 0 to change, 0 to destroy.base.tf file.
We can see our AWS instance is listed and that Terraform has created an identifier for the resource by merging the type and name:
aws_instance.base
You can see the resource identifier is prefixed with a +. This indicates that this resource is a planned change that has not yet been made. Think about the + like you would in a version control system. It indicates a new, pending change. There are a series of similar indicators:
+: A resource that will be added.-: A resource that will be destroyed.-/+: A resource that will be destroyed and then added again.~: A resource will be changed.
We then see the configuration of the resource. Some of the attributes have values, like the ami and instance_type attributes we configured earlier, but others say <computed>. A <computed> value is one that Terraform does not know the value of yet. The value of the configuration item will only be known when the resource is actually created—that is to say Terraform does not yet know what IP address AWS will assign to our instance.
After reviewing our plan output, everything looks good. The next stage of the process is to actually create our resource. This is done using the apply command. Let’s build our instance now.
terraform apply command now prompts interactively like the terraform plan command. You can override this behavior with the -auto-approve flag.
$ terraform apply
An execution plan has been generated and is shown below.
Resource actions are indicated with the following symbols:
  + create

Terraform will perform the following actions:

  + aws_instance.base
      id:                           <computed>
      ami:                          "ami-0d729a60"
      associate_public_ip_address:  <computed>
      availability_zone:            <computed>

. . .

Plan: 1 to add, 0 to change, 0 to destroy.

Do you want to perform these actions?
  Terraform will perform the actions described above.
  Only 'yes' will be accepted to approve.

  Enter a value:
You’ll first see a breakdown of Terraform’s proposed actions and an interactive prompt asking whether you want to continue. You’ll need to answer yes to continue or anything else (or Ctrl-C) to kill the command.
If you enter yes then Terraform will start creating our resources.
aws_instance.base: Creating...
  ami:                      "" => "ami-0d729a60"
  availability_zone:        "" => "<computed>"

. . .

  tenancy:                  "" => "<computed>"
  vpc_security_group_ids.#: "" => "<computed>"
aws_instance.base: Still creating... (10s elapsed)
aws_instance.base: Still creating... (20s elapsed)
aws_instance.base: Still creating... (30s elapsed)
aws_instance.base: Creation complete

Apply complete! Resources: 1 added, 0 changed, 0 destroyed.
We can see that Terraform has created our resource. You’ll see that the + is now missing from the resource identifier, meaning that Terraform is creating our resource in this execution and not just planning it.
So now that it’s created our resource, how does Terraform keep track of it and its state?
2.2.6 Terraform state
After creating our resource, Terraform has saved the current state of our infrastructure into a file called terraform.tfstate in our base directory. This is called a state file. The state file contains a map of resources and their data to resource IDs.
The state is the canonical record of what Terraform is managing for you. This file is important because it is canonical. If you delete the file Terraform will not know what resources you are managing, and it will attempt to apply all configuration from scratch. This is bad. You should ensure you preserve this file.
terraform.tfstate.backup.
Some Terraform documentation recommends putting this file into version control. We do not. The state file contains everything in your configuration, including any secrets you might have defined in them. We recommend instead adding this file to your .gitignore configuration.
$ pwd
~/terraform/base
$ echo "terraform.tfstate*" >> .gitignore
$ git add .gitignore
$ git commit -m "Adding .gitignore file"Let’s take a peek into the terraform.tfstate file.
{
    "version": 3,
    "terraform_version": "0.12.3",
    "serial": 14,
    "lineage": "019fad87-3f05-425d-9dec-3ab78db61db8",
    "modules": [
        {
            "path": [
                "root"
            ],
            "outputs": {},
            "resources": {
                "aws_instance.base": {
                    "type": "aws_instance",
                    "depends_on": [],
                    "primary": {
                        "id": "i-1c763b0a",
                        "attributes": {
                            "ami": "ami-0d729a60",
                            "availability_zone": "us-east-1e",
. . .
We can see that our terraform.tfstate file is a JSON representation of all the resources you’re managing. The JSON is topped with some metadata, including the version of Terraform that created the state file.
As this file is the source of truth for the infrastructure being managed, it’s critical to only use Terraform to manage that infrastructure. If you make a change to your infrastructure manually, or if you use another tool, it can be easy for this state to get out of sync with reality. You can then lose track of the state of your infrastructure and its configuration, or have Terraform reset your infrastructure back to a potentially non-functioning configuration when it runs.
We strongly recommend that if you want to manage specific infrastructure with Terraform that it becomes the sole way of managing that infrastructure.
2.2.7 Showing our resource
Now that we’ve created the aws_instance.base resource, let’s take a closer look at it. To do this we can use the terraform show command.
$ terraform show
aws_instance.base:
  id = i-1c763b0a
  ami = ami-0d729a60
  availability_zone = us-east-1d
  instance_state = running
  instance_type = t2.micro
  private_dns = ip-172-31-22-157.ec2.internal
  private_ip = 172.31.22.157
  public_dns = ec2-52-87-195-107.compute-1.amazonaws.com
  public_ip = 52.87.195.107

. . .

  subnet_id = subnet-8dc734d6
  vpc_security_group_ids.717946557 = sg-4f713c35
We can see the full list of the resource’s attributes and their values. This includes the values of the attributes we configured earlier and some new values, computed when we created the resource. This means all the <computed> attributes have now been replaced with actual values from Amazon. For example, now that we’ve created our aws_instance.base resource, we know its IP address, DNS, ID, and other useful information.
If we go to the Amazon console we’ll see our EC2 instance is running.

2.2.8 Adding a second resource
Managing one resource isn’t very exciting. Let’s add another resource to our base.tf configuration file.
resource "aws_instance" "base" {
  ami           = "ami-0d729a60"
  instance_type = "t2.micro"
}

resource "aws_eip" "base" {
  instance = aws_instance.base.id
}
After our aws_instance.base resource, we’ve specified a new resource called aws_eip.base. The aws_eip type manages Amazon Elastic IP Addresses. We’ve named the resource base. The configuration of our aws_eip.base resource contains one attribute: instance. The value of our instance attribute is especially interesting:
aws_instance.base.id
Here we’ve referenced an attribute, id, from our aws_instance.base resource. Attribute references are variables and are very useful. They allow us to use values from one resource in another resource.
aws_instance.base.id}
to the actual value:
i-1c763b0a
Terraform uses this value to connect our Elastic IP address to the EC2 instance we’ve just created. You can consider this as creating an implicit dependency in the graph Terraform creates when it runs between our Elastic IP address and our EC2 instance.
2.2.8.1 Validating and formatting
Two useful commands we might run before planning our configuration are terraform validate and terraform fmt. The validate command checks the syntax and validates your Terraform configuration files and returns any errors. The fmt command neatly formats your configuration files.
You could even specify both as a pre-commit hook in your Git repository. There’s an example of a hook like this in this gist.
2.2.8.2 Planning our second resource
Now, let’s see what happens when we run terraform plan.
$ terraform plan
Refreshing Terraform state in-memory prior to plan...
The refreshed state will be used to calculate this plan, but
will not be persisted to local or remote state storage.

aws_instance.base: Refreshing state... (ID: i-1c763b0a)

. . .

+ aws_eip.base
    allocation_id:     "<computed>"
    association_id:    "<computed>"
    domain:            "<computed>"
    instance:          "i-1c763b0a"
    network_interface: "<computed>"
    private_ip:        "<computed>"
    public_ip:         "<computed>"
    vpc:               "<computed>"


Plan: 1 to add, 0 to change, 0 to destroy.
We can see Terraform is refreshing our state to determine the current state of our infrastructure. To do this it connects to AWS and checks that the configuration of our aws_instance.base resource matches the definition.
Every Terraform plan or apply follows the same process:
- We query the state of the resources, if they exist now.
- We compare that state against any proposed changes to be made, building the graph of resources and their relationships. As a result of the graph, Terraform will only propose the set of required changes.
- If they are not the same, either show the proposed change, if in the plan phase, or make the change, if in the apply phase.
Our plan process also lets us know that this is just a plan and running this command won’t change the current state.
We can then see our new resource, aws_eip.base, prefixed with a + to indicate it is a new, pending change. Again, most of the attributes are <computed>, but we can see that our instance attribute has been interpolated to the ID of our aws_instance.base resource. When we apply the configuration this will connect our Elastic IP to our EC2 instance.
If any other changes had been made to our infrastructure, outside of Terraform, then Terraform would also show us what would be needed to bring the infrastructure back in line with our Terraform configuration.
2.2.8.3 Applying our second resource
Let’s apply our configuration now.
terraform apply commands we’re going to skip the interactive prompt and assume you’ve typed yes to save some space in the output.
$ terraform apply
aws_instance.base: Refreshing state... (ID: i-1c763b0a)
aws_eip.base: Creating...
  allocation_id:     "" => "<computed>"
  association_id:    "" => "<computed>"
  domain:            "" => "<computed>"
  instance:          "" => "i-1c763b0a"
  network_interface: "" => "<computed>"
  private_ip:        "" => "<computed>"
  public_ip:         "" => "<computed>"
  vpc:               "" => "<computed>"
aws_eip.base: Creation complete

Apply complete! Resources: 1 added, 0 changed, 0 destroyed.
We can see our new Elastic IP address has been created and assigned to our aws_instance.base instance. You’ll note that Terraform did not recreate our whole configuration; rather it examined the current state, compared the differences, and only applied the relevant changes.
Where possible, Terraform will aim to perform the smallest incremental change rather than rebuilding every resource. In some cases, however, changing a resource requires recreating it. Since this is a destructive action, you should always carefully read the proposed actions in a terraform apply before saying yes or run terraform plan first to understand the impact of executing the change. The last thing you want to do is inadvertently destroy a running application.
2.2.9 Outputting plans
Terraform has an approach for trying to limit the risk of large-scale destructive changes to our environment and allowing us to make increment changes. To do this Terraform captures the proposed changes by outputting the plan it intends to run to a file.
Terraform calls this a plan output. We capture the plan by specifying the -out flag on a terraform plan command. This will capture the proposed changes in a file we specify. The plan output means we can make small, incremental changes to our infrastructure.
Let’s assume we haven’t applied our configuration with our second resource: aws_eip.base. Let’s run terraform plan and output the contents of the plan.
$ terraform plan -out base-`date +'%s'`.plan

. . .

aws_instance.base: Refreshing state... (ID: i-e729627e)

. . .

Your plan was also saved to the path below. Call the "apply" subcommand
with this plan file and Terraform will exactly execute this execution
plan.

Path: base-1477640557.plan

+ aws_eip.base
    allocation_id:     "<computed>"
    association_id:    "<computed>"
    domain:            "<computed>"
    instance:          "i-e729627e"
    network_interface: "<computed>"
    private_ip:        "<computed>"
    public_ip:         "<computed>"
    vpc:               "<computed>"


Plan: 1 to add, 0 to change, 0 to destroy.
We can see we’ve run terraform plan with a new flag, -out. As the value of the -out flag, we’ve specified the location of a plan output. We’ve also appended the current Unix epoch date to the file name to ensure it is unique using the date +'%s' command. You can structure your plan output file names any way that suits.
We will now see a new file, base-1477640557.plan—our plan output has been created in the ~/terraform/base directory. This captures the changes proposed in our planning run: the addition of the aws_eip.base resource.
We can use this plan when applying our configuration.
$ terraform apply base-1477640557.plan
aws_eip.base: Creating...
  allocation_id:     "" => "<computed>"
  association_id:    "" => "<computed>"
  domain:            "" => "<computed>"
  instance:          "" => "i-e729627e"
  network_interface: "" => "<computed>"
  private_ip:        "" => "<computed>"
  public_ip:         "" => "<computed>"
  vpc:               "" => "<computed>"
aws_eip.base: Creation complete

Apply complete! Resources: 1 added, 0 changed, 0 destroyed.

. . .
Here we’ve run the terraform apply command, appending the plan file name to command. Terraform will then apply only the proposed changes in the plan output we specified. You can see it has also skipped the interactive prompt asking you to okay the action!
So this looks like we made the same change as if we’d run terraform apply alone. Why is this useful? First, we don’t have to apply this change immediately. The plan output can be kept and stored as a potential incremental change. Let’s say we go on to make a series of additional changes to our Terraform configuration after saving our plan output, adding more resources or changing other configuration variables. We can continue to make changes, run terraform plan, and save each additional change as a plan output. These plan outputs then become small steps we could apply to our infrastructure, incrementally and carefully.
We can then change as much of the infrastructure as we want in the Terraform configuration and apply each specific plan output as we wish in a systematic and careful way.
This is also the way we’d typically run automated Terraform actions, for example in a script or continuous integration tool. This avoids terraform apply’s interactive mode because obviously in most scripts you can’t answer yes. If you don’t want to use plans (and this is fairly risky!) you can run terraform apply -auto-approve to also skip the interactive prompt.
2.2.10 Targeting resources
To help with the systematic and incremental rollout of resources, Terraform has another useful flag: -target. You can use the -target flag on both the terraform plan and terraform apply commands. It allows you to target a resource—or more if you specify multiple -target flags—to be managed in an execution plan.
Here we’ve told Terraform to plan only for the aws_eip.base resource. The -target flag will produce a reduced version of our graph that only includes the specified resources and any resources linked or dependent on it. In the case of our aws_eip.base resource, this will be the sole resource. If we were to target the aws_instance.base resource, Terraform would plan for it and the aws_eip.base resource, as they are linked.
2.2.11 Failed plans
If our execution plan had failed, then Terraform would not roll back the resources. It’ll instead mark the failed resource as tainted. The tainted state is Terraform’s way of saying, “This resource may not be right.” Why tainting instead of rolling back? Terraform always holds to the execution plan: it was asked to create a resource, not delete one. If you run the execution plan again, Terraform will attempt to destroy and recreate any tainted resources.
2.2.12 Showing all the resources
Let’s use terraform show to see both of our resources.
$ terraform show
aws_eip.base:
  id = eipalloc-5ed0a061
  association_id = eipassoc-a4e85398
  domain = vpc
  instance = i-1c763b0a
  network_interface = eni-8754ff81
  private_ip = 172.31.2.44
  public_ip = 52.0.192.210
  vpc = true
aws_instance.base:
  id = i-1c763b0a

. . .
We can see our new aws_eip.base resource in the output. You’ll note that it appears first in our configuration output, but we specified it last in our base.tf file. What does this mean for the ordering of resources in our configuration files? Terraform configurations do not depend on the order in which they are defined.
Terraform is a declarative system; you specify the proposed state of your resources rather than the steps needed to create those resources. When you specify resources, Terraform builds a dependency graph of your configuration. The dependency graph represents the relationships between the resources in your configuration. When you plan or apply that configuration, Terraform walks that graph, works out which resources are related, and hence knows the order in which to apply them.
For example, we’ve specified the aws provider and two AWS resources. We’ve told Terraform we’d like the EC2 resource to use the Elastic IP address resource. This is an implicit dependency. When we plan or apply the configuration, Terraform builds the dependency graph, walks the graph, and knows to create the EC2 instance prior to the Elastic IP address because of that dependency.
2.2.13 Viewing the Terraform graph
One of the nice features of Terraform is that we can actually view this graph. To do that we run the graph command.
$ terraform graph
digraph {
 compound = "true"
 newrank = "true"
 subgraph "root" {
  "[root] aws_eip.base" [label = "aws_eip.base", shape = "box"]
  "[root] aws_instance.base" [label = "aws_instance.base", shape = "box"]
  "[root] provider.aws" [label = "provider.aws", shape = "diamond"]
  "[root] aws_eip.base" -> "[root] aws_instance.base"
  "[root] aws_instance.base" -> "[root] provider.aws"
 }
}
The graph command outputs our dependency graph in the DOT graph format. That output can be piped to a file so we can visualize the graph.
We can then view this graph in an application like Graphviz.
2.2.13.1 Installing Graphviz
If you need to install Graphviz, you can do it on OS X via brew.
Or on Ubuntu via apt.
Or on Microsoft Windows you can download a binary MSI installer from the Graphviz site.
Or if you used Chocolatey to install Terraform earlier, you can also install Graphviz via the choco binary.
If you don’t want to install Graphviz then you can use the online WebGraphviz tool.
2.2.13.2 Creating an image
We can then use the Graphviz tools to create a viewable image from our base.dot file.
This will create a base.svg image file we should be able to view.
2.2.13.3 Viewing our graph
If we now load the base.svg file in an image viewer or browser we can see:

We can see that both resources and the provider that instantiated them are defined and connected: the provider at the base, the instance above it, and the Elastic IP address above the instance. This represents the dependency relationship—and the order of creation—of these resources.
2.2.14 Destroying infrastructure
In addition to planning and applying configuration with Terraform we can also destroy it. Let’s destroy our EC2 instance and associated Elastic IP address using the destroy command.
$ terraform destroy
Do you really want to destroy?
  Terraform will delete all your managed infrastructure.
  There is no undo. Only 'yes' will be accepted to confirm.

  Enter a value: yes

aws_instance.base: Refreshing state... (ID: i-1c763b0a)
aws_eip.base: Refreshing state... (ID: eipalloc-5ed0a061)
aws_eip.base: Destroying...
aws_eip.base: Destruction complete
aws_instance.base: Destroying...
aws_instance.base: Still destroying... (10s elapsed)
aws_instance.base: Still destroying... (20s elapsed)
aws_instance.base: Destruction complete

Destroy complete! Resources: 2 destroyed.
You can see we’re first prompted to enter yes to confirm we really want to destroy these resources. The state is then queried for each resource and it is destroyed. Finally, Terraform reports the success or failure of the destruction.
The terraform destroy command, without any options, destroys everything!
terraform destroy. You can easily destroy your entire infrastructure.
If you only want to destroy a specific resource then you can use the -target flag. For example, to only destroy the aws_eip.base resource we’d use:
$ terraform destroy -target=aws_eip.base
Do you really want to destroy?
  Terraform will delete the following infrastructure:
    aws_eip.base
  There is no undo. Only 'yes' will be accepted to confirm.

  Enter a value: yes

aws_eip.base: Refreshing state... (ID: eipalloc-ca1466f5)
aws_eip.base: Destroying...
aws_eip.base: Destruction complete

Destroy complete! Resources: 1 destroyed.
You can see only our aws_eip.base resource is destroyed. The -target flag will also destroy any dependencies of the resource specified. So using the -target flag to destroy the aws_instance.base resource would also destroy the aws_eip.base resource.
You can also plan the terraform destroy process by passing the -destroy flag to the terraform plan command and saving a plan file.
This command will save a plan that will destroy all resources as base-destroy-epochtime.plan.
The destruction of resources will update and remove them from the state file.
apply. It doesn’t change the resource but rather the current state of the resource. Untainting reverses the marking.
2.3 Summary
In this chapter we’ve learned how to install Terraform on a variety of platforms. We then were introduced to Terraform’s configuration language and files. We covered the basics of working with the terraform binary by building some basic infrastructure.
We learned about how to define basic resources and how to plan their execution. We then created those resources, were introduced to the basics of Terraform state, and learned how to graph the state. Finally, we destroyed our resources.
In the next chapter, we’re going to build a much more complex infrastructure. We’ll learn more about Terraform’s configuration language and how to manage interactions between resources.