I don’t think there’s any doubt so far that there are a huge number of features included in Windows 10 that you can use to help boost your productivity and the enjoyment of using your PCs and devices. It doesn’t end there because there are a wide variety of smaller tools and features that can also help make your workday more pleasurable.
Shake It All About!
How many windows do you have open on your desktop at any one time? It’s very common for people to having as many as ten or more windows open. When you need to concentrate on one specific app or task , though, this clutter can make it difficult to concentrate.
A quick workaround is to grab the top of the window that you need to concentrate on, and give it a good shake. This causes all the other windows on your desktop to minimize. Don’t worry, when you want those windows back, shake the app again and they’ll all reappear just as they were before.
Tip
Sometimes shaking the mouse can be annoying, especially if you have motor or reflex problems, or if you just find it difficult using a mouse. The ability to disable shake has not been built into the Settings panel at the time of writing (although it may be worth searching for it in the future in the Ease of Access ➤ Mouse options).
Search in the Start menu for the Control Panel. From there open the Ease of Access Center, and then click Make the mouse easier to use. You see a check box that enables you to Prevent windows from being automatically arranged when moved to the edge of the screen. This disables shake, but bear in mind that it also disables the snap feature.
Taking a Quick Peek
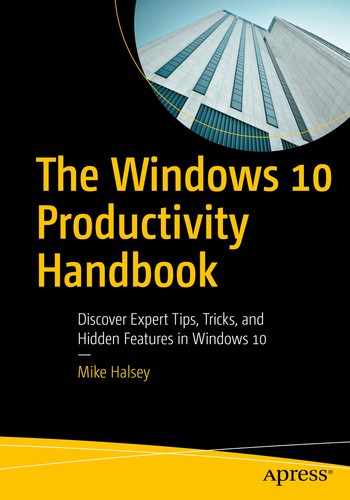
While we’re on the subject of having many apps and windows open at once, you may also have many running apps minimized to the taskbar. If you want to check an app, hover your mouse over its taskbar icon— a thumbnail image of the app will pop up (see Figure 4-1). If you then move your mouse over the thumbnail image, the full app will appear on your desktop, and all the other windows are temporarily hidden.
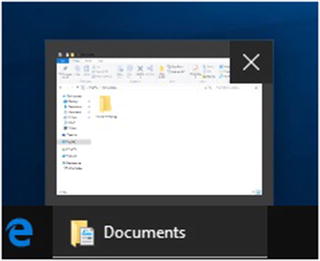
Figure 4-1. You can peek at previews of minimized apps
Tip
In previous versions of Windows, you might remember that you could click the far right edge of the taskbar to make all of your windows become transparent, so you could see any widgets of sticky notes that you have placed on the desktop. This feature still exists in Windows 10, although it is disabled in some versions.
To activate it, right-click the taskbar and from the menu that appears, open the settings. Here you can disable or enable the options to Use peek to preview the desktop when you move your mouse to the Show desktop button at the end of the taskbar.
Keeping Things Quiet
Nothing is more annoying than pop-up alerts and messages bugging you when you’re trying to concentrate; although as I’m writing this (as it often happens when I write), there’s some quiet Jean-Michel Jarre playing in the background.
Windows 10 offers a feature called Quiet hours , which is activated from the quick actions buttons in the Action Center (see Figure 4-2). Clicking the Quiet hours button automatically silences all notifications and pop-up alerts.
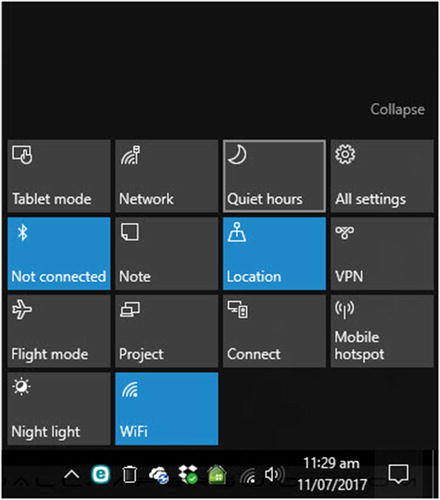
Figure 4-2. You can enable quiet hours in Windows 10
Additionally, you can configure what apps are allowed to display pop-up alerts and notifications, and disable those you don’t want to see. You can do this in the Settings panel, by clicking System ➤ Notifications & actions, where you see a list of apps that can display notifications; each has an on/off switch (see Figure 4-3).
Figure 4-3. You can manage what apps display alerts and pop-up menus
It’s well worth spending a little time configuring what apps are, and are not allowed to pester you with alerts. As an example, you’re probably going to check your social media and messaging feeds several times a day, so do you really need them to alert you immediately upon receipt of a message or other notification, or can these wait for a short while so you can press on with something else? It’s all a matter of personal preferences and priorities, and it’s worth considering when configuring notifications and alerts.
Manage Your Quick Actions Buttons
While we’re on the subject, you can customize your quick actions buttons by opening the Settings panel and clicking System ➤ Notifications & actions, where you will see an option to Add or remove quick actions. The panel allows you to drag-and-drop quick actions icons onto its 4×4 grid, so you can have the buttons that you use and need the most where you want them to be (see Figure 4-4).

Figure 4-4. You can customize your quick actions buttons
One thing to bear in mind when configuring your quick actions buttons is that if you are using a laptop or tablet, and you travel frequently, it might be worth putting Airplane mode (Flight mode in some countries) near the top of the list. Conversely, on a desktop, you can deprecate this and perhaps other buttons, such as Tablet mode and Mobile hotspot, if you see them in the list.
Smart Search
We all need to search our PCs for files and documents, and search online for—well, just about everything. I’ll cover search in much more depth in Chapter 3, but to summarize here, Cortana has some clever search functionality built-in that can help you define the parameters of your search effectively. When you begin typing in Cortana, you see some icons and a Filters option appear at the top of the search results window (see Figure 4-5).
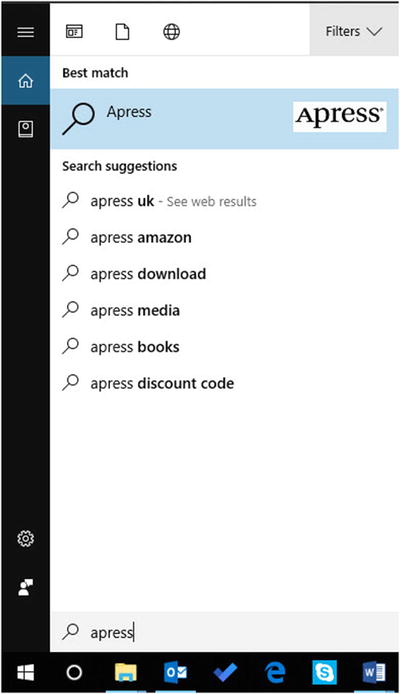
Figure 4-5. Cortana provides filters for searching files and documents on your PC
The Icons allow you to specify your search is for installed apps on the PC, documents, or if you want to search online. Additionally the filters allow you to specify what type of document to search for, such as videos or music. Below these options in the Filters section is a button to Change where Windows searches. You can use this option to add (or remove) search locations, which can be especially useful if you are storing documents on a disk that is not automatically indexed by Windows.
File Explorer also includes a search box (near its upper-right corner). If you click here, a search tab opens on the ribbon, where you have some advanced searching options (see Figure 4-6).
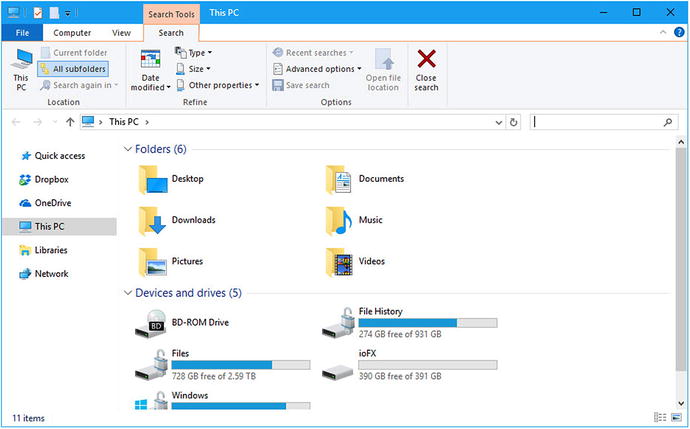
Figure 4-6. File Explorer contains advanced search options
You can choose from the options available, such as date modified or kind, or you can type a search command directly into the search box. This is called Advanced Query Syntax and I have included a full list of all the search commands available in Windows 10 in Appendix D at the end of this book.
At first, this might seem complex, but Windows 10 helps you with your search; for example, if you type Kind: in the search box to search for a specific type of file, you get a drop-down menu with valid options from which you can choose. This context menu changes according to the search term that you type (see Figure 4-7). Search in Windows 10 is covered in more depth in Chapter 3.

Figure 4-7. You can use Advanced Query Syntax to search your PC
Tip
If you regularly search for the same thing in File Explorer, you can click the Save search button to save that search so you can use it again (see Figure 4-8). This saves the search to your [Username] ➤ Searches folder, although you can choose to save it to another location if you wish, such as your desktop. Every time you run the search, it automatically and dynamically updates to include and reflect any new and changed files and documents that are relevant.
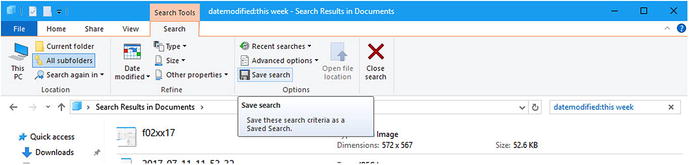
Figure 4-8. You can save searches in Windows 10
Managing Battery Life and Background Apps
In Chapter 1, I detailed some of my top tips for maximizing the battery life on your laptop or tablet, but there are also finer and more granular controls available. Open the Settings panel and click System ➤ Power & sleep. You’ll be faced with the options to change when the screen turns off and when the PC goes to sleep.
The Additional power settings link opens more options. Here you can choose the action of the Power button, such as enable and disable features like Sleep and Hibernate (see Figure 4-9).
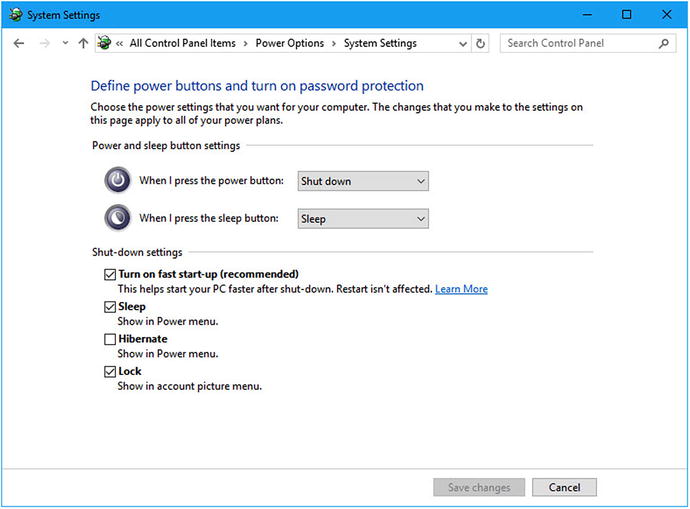
Figure 4-9. You can change additional power settings
Note
What is the difference between Sleep and Hibernate? Sleep keeps the memory of the PC intact, so you can start working again extremely quickly when you return to your PC. This does use power, however, so the Hibernate option writes the contents of the PC’s memory to the hard disk, enabling it to stop using power. Once a PC has been in sleep mode for the few hours it automatically hibernates to save the battery.
Additionally you can create power plans for the PC, so you can more easily control the power usage of the PC. Doing so also allows you to Change advanced power settings in which there are options to control when devices such as your hard disk or USB devices are powered down.
Using the Mobility Center
On a laptop or tablet, the Mobility Center , which is most easily accessed from the pop-up menu that appears when you press the Windows key + X, is a great place from which to control your display brightness, volume, battery options, and screen rotation. It’s also where you activate Presentation mode (see Figure 4-10).

Figure 4-10. Windows Mobility Center offers useful functionality
Presentation mode silences pop-up alerts and notifications (as the Quiet hours feature does), but it also prevents the screen from turning off or the PC going to sleep or into hibernation when you are using it during presentations.
Summary
Clearly, there are a multitude of features and utilities in Windows 10 that you can use to enhance your productivity and to make the desktop a more pleasant environment in which to work.
We’re still not done, though, because in the next chapter, we’ll look at how you can maximize your Windows experience. In Chapter 6, we’ll examine how you can search for files, documents, folders, messages, and people online. I’ll bring together what we’ve covered so far, and look at how we can organize our desktops and PCs to create an optimal working environment.