So far in this book, I’ve shown you a whole raft of features and utilities that you can use to help you become more productive when using your PC, and to help you enjoy the experience more. Individually they can perhaps seem quite complex and daunting, so I want to spend some time looking at how all of this fits together, so you can create a cohesive working experience, and how you can use some of the more useful features in more depth.
Getting Your Day Started
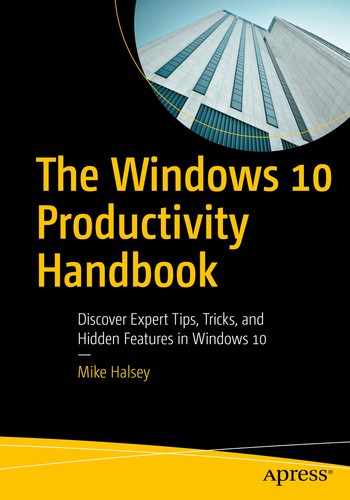
Your day starts at the lock screen (see Figure 5-1). Bleary-eyed you’ll stare at it for a few seconds before dismissing it, and signing in to start another dreary day. Well, this might be exaggerating the point somewhat but I’m sure you know what I mean. The lock screen is just an artificial barrier between you and your working environment.
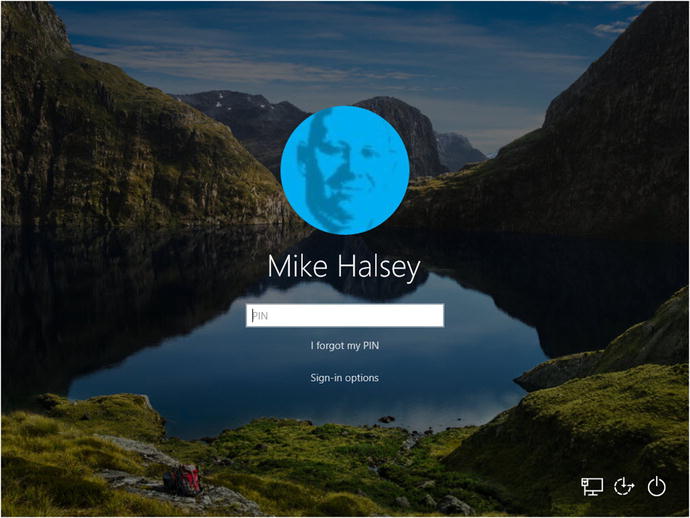
Figure 5-1. The Windows 10 lock screen
But wait! Stop just for a moment and consider how useful the lock screen can be to you if correctly configured. Remember that it’s the first thing you look at but the time in which you’re doing so can set you up for the next tasks you’ll perform.
In the Settings panel, which you access by clicking the gear icon above the Power button in the bottom-left corner of the Start menu, under Personalization ➤ Lock screen, you can configure apps to display useful information (see Figure 5-2).
Figure 5-2. You can configure the lock screen to display useful information
This includes one app that can show detailed information, and another seven to display a counter. In the example here, the Calendar is set to display full information. This means that at a glance I can immediately see if I have anything coming that day. Below that, I only have three apps displaying information.
This might have been the way I wanted it set up, but properly configured, you can see at a glance the number of emails, instant messages, alerts, text messages, and notifications from financial or other business apps that you have waiting for you. All of this information helps you determine, at a glance, what you want to prioritize and what might end up being a time-sink if you dive into it too early.
Organizing Your Workspace
Okay, so you’ve dismissed the lock screen, are safely ignoring the huge mass of email that can only mean some crisis or another has arisen, that everybody will be looking to you to sort, and you’re now staring at a blank desktop. Now what?
Well, you open apps, right? You open Outlook and other Office apps, such as Excel or PowerPoint . When you open your customer relationship manager, or finance or reporting app, you almost definitely open a web browser, such as Microsoft Edge or Google Chrome, or an app such as Microsoft Teams.
Within a couple of minutes, your workspace can become a complete jumbled mess of apps, meaning that you can find it confusing about what’s what, what’s where, and what just went bing!
In Chapter 3, I showed you how to use two really helpful features within Windows 10 to organize your desktop. The first was Snap!. This allows you to pin up to four windows (per monitor) to your desktop and dynamically resize them to make sure that all four are visible at any time.
After that came virtual desktops, which creates separate working environments (or hides eBay and Angry Birds from the boss, obviously). You could use these separate virtual desktops to have one desktop for communications and email, another for a specific project you’re working on, and a third for general additive clutter.
Figure 5-3 shows my working desktops at the moment I’m writing this chapter. There are three virtual desktops. The first desktop contains the Word document that I’m using for this chapter and a File Explorer window in which I can easily access the other chapters I’ve written, images, and related files.

Figure 5-3. Virtual desktops can help you organize apps
The second desktop contains Outlook and my web browser . The third desktop (which you can’t see very well here) contains the Groove Music app , which is currently playing the excellent chill out/electronica album Suzuki by Tosca (useful work music, and a change from my usual Jean-Michel Jarre).
This setup means that each environment is separated in a meaningful way so as to minimize distraction, and to help me concentrate on the most important tasks, such as bringing in enough money to keep my dogs in the fashion to which they have become accustomed. And believe me, they’re extremely pampered pooches.
This setup also helps prevent me from casually flicking open my web browser and clicking through gaming forums or tech and political news sites. And if you think these are a time-sink, don’t even think about opening a Facebook tab.
Managing Virtual Desktops
So now you’re organized , but you could still be working more efficiently and effectively. For this, you can use keyboard shortcuts to very quickly and easily switch between all these running apps and desktops. Here’s how…
Snap an app left or right. Press the Windows key + Left and Right cursor keys to snap an app to the left or right of your screen
Snap an app up or down. Press the Windows key + the Up or Down cursor keys to move a snapped app to the top or bottom left or right corner of the screen
Resize snapped apps. Grab the edges of a snapped app to resize it; but for left and right snapped apps, it resizes the other app to ensure that the screen is full at all times.
Create a new virtual desktop. Press the Windows key + Ctrl + D.
Switch between virtual desktops. Press the Windows key + Ctrl + the Left or Right cursor keys.
Close the current app. Press the Windows key + F4.
Minimize all the windows on your desktop at once. Swipe downward on your laptop’s trackpad with three fingers. Swipe upward with three fingers to restore the windows.
There is a full list of all keyboard shortcuts for Windows 10 in Appendix A. A list of Windows 10 touch and trackpad gestures is in Appendix B.
Where the Heck Did I Put that Report?
Okay, so your desktop is organized. Big whoop! This is great, but it’s pretty useless if you can’t find that damn report you were just working on, and that has to be on the client’s desk this afternoon.
You can open the File tab in Word, Excel or another Office 365 app to display a list of recently accessed documents. This can be a good way to access the file, but anything that requires more than two clicks to open a file is, let’s face it, inefficient and time-consuming.
I’ve loved the Jump List feature ever since it was first introduced in Windows 7. I use it all the time, every single day. This feature is invoked by right-clicking, or touching and holding, an icon on the taskbar to display a menu (see Figure 5-4).
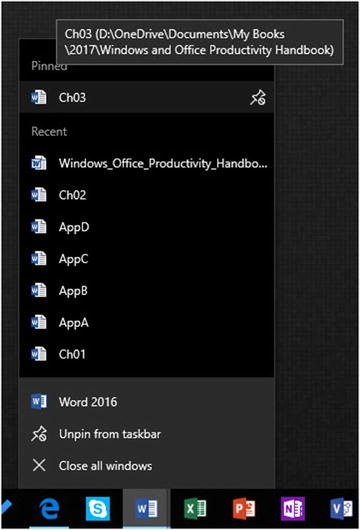
Figure 5-4. Jump Lists are a great way to get quick access to files
The items that appear in a Jump List vary according to the app, but they can include recently opened files, create a new file, send a message or an email, create a new calendar appointment, and much more.
What I personally find most useful is the ability to pin files and documents to the Jump List. When you move your cursor over the file list, you see a pin icon appear to the right of each item. Clicking this pin icon pins or unpins a file to the Jump List. Pinning files and documents is a great way to make sure that they are always available to open with just two clicks, a real time-saver.
Hey, Cortana… Where the Heck Did I Put that Report?
Alas, speaking this into Cortana in Windows 10 will merely open a web search for “Where the heck did I put that report?” which isn’t massively helpful, but that’s because Cortana isn’t intelligent enough to know what you mean by “that report”… at least not yet! Microsoft’s artificial intelligence researchers are working on it, though.
What you can do is ask Cortana for specific searches; typing these into Cortana also works. A search for “Show me all documents about Claridge’s” (my dog likes it there) uses intelligent search to search not only file names, but also the text within documents, emails, contacts, and more to provide results (see Figure 5-5).
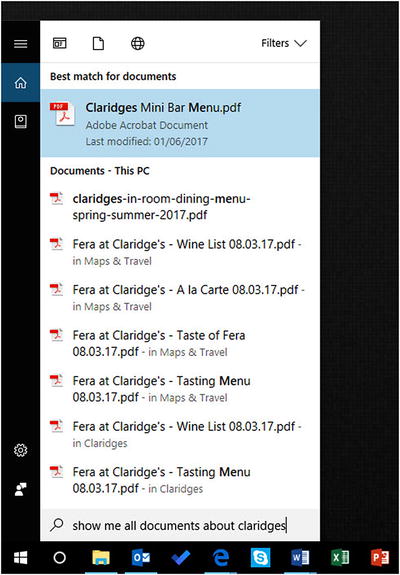
Figure 5-5. Cortana uses intelligent file search
As I mentioned in Chapter 2, you can use the Filters feature in the top-right corner of the search results window to further refine your search. This means you can filter the search to videos, web search, or just folders on the PC.
Cortana is capable of performing some highly intelligent, natural language search. In Figure 5-6, you see a search for “Show me documents I’m currently working on.” Cortana interprets this query correctly, and displays a list of all the documents that have been created or opened in the last few days, with the document I have worked on most recently, this chapter, highlighted at the top of the list.
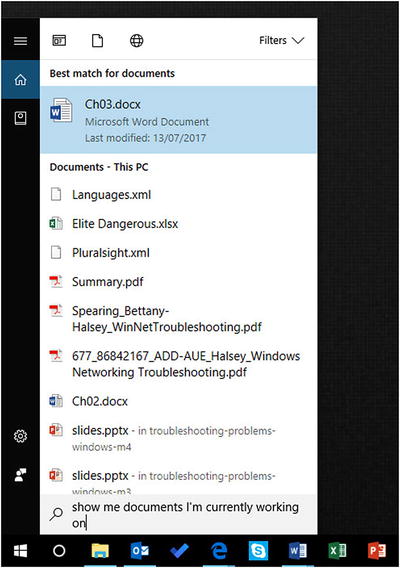
Figure 5-6. Cortana can perform very intelligent, natural language search
It’s worth experimenting with Cortana to see what she’s capable of, as new functionality is added a couple of times a year with updates to Windows 10.
Summary
Being organized is one thing, and Cortana and the basic search functionality is great, but many of us build up huge volumes of files and documents, and just working on a project at work can end up producing many more documents itself. Navigating your way through all of this can be daunting, so in the next chapter, we’re going to delve into the advanced search and retrieval facilities available in Windows 10.