
4. iMovie Beyond the Basics
Using the techniques covered so far, you can make all kinds of great videos in iMovie. Having a firm grasp of the basics helps you edit projects faster, so you’re spending more time enjoying your content and less time feeling your way through the software. But you’re bound to run into special situations: What to do when you want to fine-tune the way a transition works between two clips? What if your footage suffers from unexpected camera shake, or if the audio is muddled?
iMovie includes many tools for dealing with special situations, as well as for improving what you’ve already shot. For example, the color correction controls can boost saturation, adjust white balance, and apply eye-catching video effects. In this chapter, I also dig into advanced editing techniques and building photo slideshows.
Learn Advanced Editing Techniques Project
Difficulty level: Intermediate
Editing video is a process of repeating a few movements—placing, trimming, adjusting—hundreds or thousands of times. So, you won’t be surprised that iMovie offers shortcuts to make the work easier. The techniques described here are ones you can use in any movie project, and they focus on inserting clips and replacing existing clips with new ones. I also go into detail about the Precision Editor, a great way of making fine adjustments to the edit points of your clips, and about extracting audio from video clips, a valuable but often overlooked capability.
Insert a clip into the middle of another clip
In Chapter 2, I explained how to split a clip, a technique often used to drop a new clip into the space between the two segments. An easier method is to use iMovie’s Insert function.
Inserting a clip
- In the Event browser, select a section of video you want to add to your project.
- Drag the clip to the Project browser and drop it onto an existing clip (Figure 4.1).
Figure 4.1. Drag a clip to be inserted.
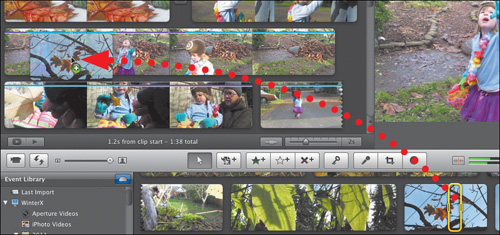
- From the pop-up menu that appears, choose Insert (Figure 4.2).
The clip in the Project browser is split, and the new clip appears where you dropped it (Figure 4.3).

Tip
When you insert a clip, the next portion of the clip that got split continues where the first portion left off. If you’re looking to insert a clip but not interrupt the scene (for example, you want the audio from the first clip to continue while the inserted clip is visible), use a cutaway. See “Create a Cutaway Project,” later in this chapter.
Replace clips
I recommend assembling a movie fairly quickly, and then spending time later fine-tuning it. Often, you find that a clip you added isn’t as good as another one that would fit in the same place. Instead of deleting the clip and adding the new one, use the Replace commands. This option is particularly helpful when the incoming clip must remain the same duration as the one it’s replacing.
Replacing clips
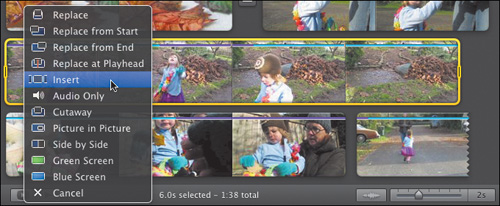
- Drag a clip from the Event browser onto the top of the clip you want to replace in the Project browser.
- From the pop-up menu that appears, choose one of the following (Figure 4.4):
• Replace. The incoming clip completely replaces the clip onto which it was dropped.
• Replace from Start. The first frame of your selection becomes the start of the replaced clip (just as the regular Replace function works). However, the duration of the clip remains the same as the clip you’re replacing.
So, for example, if you want to replace a 10-second clip in your project with a 5-second clip from an Event, choosing Replace from Start results in a 10-second clip. iMovie grabs 5 seconds outside your selection to fill the gap.
• Replace from End. Similar to the previous option, Replace from End uses the last frame of your selection as the anchor point when replacing a clip. In the example above, 5 seconds of additional footage are pulled from before the selection to maintain the original clip’s 10-second duration.
• Replace at Playhead. The first frame of your selection appears wherever you position the playhead and release the mouse button. In this case, using the example above, iMovie may grab footage from before or after the selection to fit within the 10-second gap.
Figure 4.4. I’m replacing a 10-second clip in the project (top) with a 5-second selection from the Event browser.
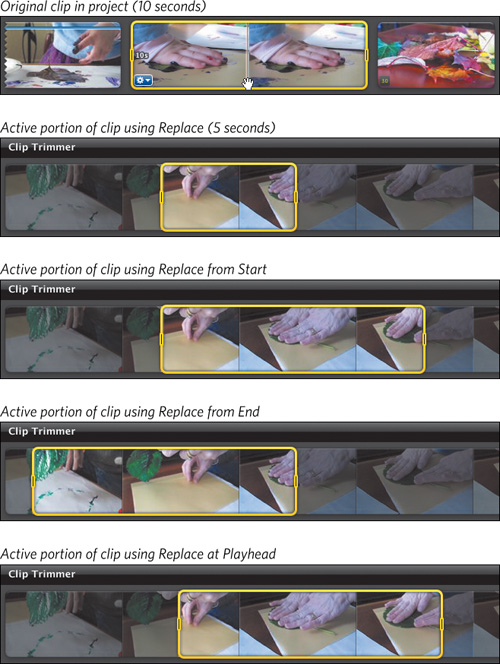
To make it easier to see which footage is used with each Replace command, I’ve made the replacement and then opened the new project clip in the Clip Trimmer (below, with visible footage selected in yellow). In each case, the same 5-second selection was dragged to the original clip in the movie.
Tip
Remember, you can always open the replaced clip in the Clip Trimmer and adjust the visible portion of the footage without changing the duration: Click and drag in the middle of the selection to “slip” the clip.
Note
If there isn’t enough available footage to perform a replace action, iMovie warns you that the edit will shorten the duration of the movie. In my example, if I were to select the first 4 seconds of the clip and drop it into the project using the Replace from End option, iMovie wouldn’t have enough source footage to fill the 10-second gap from the end.
Edit with the Precision Editor
Moving selection handles in the Project browser is a quick way to edit a clip, but it’s not always as precise as you’d like. The Precision Editor, like the Clip Trimmer, is another interface for editing clips, but in this case you get to manipulate the point where two clips meet (including a transition if present), which is referred to as the cut point. Having this control is great for fine-tuning not just how a clip ends, but how it interacts with the next clip in the movie.
The Precision Editor looks simple, but there are several ways to edit the elements surrounding a cut point. You can see exactly where two clips overlap, adjust the duration of a transition, and even offset a video clip’s audio without extracting it as a separate clip (a technique I discuss a few pages ahead).
To open the Precision Editor, do one of the following:
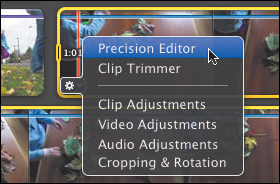
• Click the Action button on any clip and choose Precision Editor from the menu (Figure 4.5).
Figure 4.5. The Precision Editor pop-up menu item
• If a transition appears between two clips, choose Precision Editor from the Action button that appears below the transition icon when you move your mouse pointer over it.
• Select a clip and press Command-/ (forward slash).
• For a faster, easier method, double-click the space between two clips; or, if a transition is present, double-click the space above the transition icon.
Editing video at a cut point
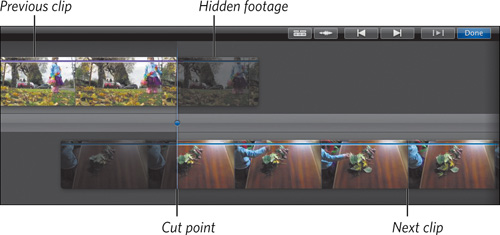
The Precision Editor displays the clips on either side of a cut point on two levels: the previous clip above and the next clip after (Figure 4.6). Visible footage appears in full color, while the hidden portion of a clip is dimmed.
Figure 4.6. The Precision Editor
To adjust the cut point, use any of the following methods:
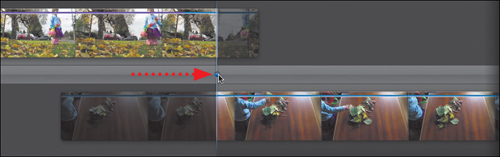
• Drag the center of the cut point left or right. This edit changes the duration of each clip but retains the duration of the overall project (Figure 4.7).
Figure 4.7. Adjusting the cut point
• Drag one of the clips left or right to reposition the cut point of just that clip. For example, dragging the top clip in the figure above would adjust where the clip ends. This technique changes the duration of the project, because you’re adding or removing frames from the clip.
• Click once on a clip to set that frame as the cut point. This is often a faster method than dragging the clip.
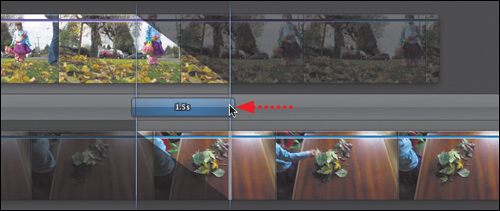
• Drag the cut point for just one clip (Figure 4.8). Doing so doesn’t change the cut point in the other clip.
Figure 4.8. Adjusting the cut point for just one clip

To quickly preview how the edit looks, click the Play Current Edit button. iMovie plays three seconds of footage around the edit point.
Tip
Give yourself more room to work in the Precision Editor by minimizing the size of the Viewer. Choose Window > Viewer > Small, or press Command-8.
Adjusting the duration of a transition
Transitions appear on the middle bar in the Precision Editor and give you a good visual idea of which footage is being used to combine clips. You can also change the duration of a transition by dragging one of its side handles; the time appears as you drag (Figure 4.9).
Figure 4.9. Changing the duration of a transition
Tip
You can change the transition style without opening the Transitions browser by double-clicking the transition in the Precision Editor to bring up the inspector. Then, click the Transition pop-up menu and choose a new style.
Offsetting an audio transition
One effective way to switch scenes is to start playing audio from the next clip before the visuals appear (think of a scene where dialogue from the previous clip bleeds over the visuals of the next clip, for example). Using the Precision Editor, you can change the audio’s offset by dragging a special audio cut point handle.
- Click the Show or Hide Audio Waveforms button to view the clips’ waveforms.
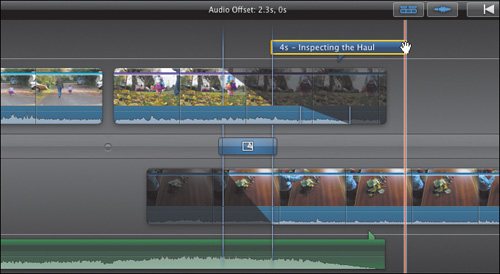
- Drag the cut point within the audio portion left or right; the amount of offset appears at the top of the Precision Editor (Figure 4.10).
Figure 4.10. Offsetting an audio transition

To offset the audio in both clips—and prevent overlapping sound—hold Shift as you drag the audio cut point.
Editing extras in the Precision Editor
![]()
Other elements around the edit point, such as titles or sound effects, can be edited in the Precision Editor, too. Click the Show or Hide Extras button to reveal them (Figure 4.11). You can then change their durations or reposition them within the movie; you need to return to the Project browser to perform other edits, such as adjusting clip volume levels or title wording and styles.
Tip
Jump to other edit points without leaving the Precision Editor by clicking the space between clips in the Project browser; by clicking the circle icons in the Precision Editor; or by clicking the Show Previous Edit and Show Next Edit buttons.
Detach audio from a video clip
Nothing says you need to keep audio and video in sync throughout your movie. You may find a bit of dialogue or background noise that you’d like to use over different visuals. In that case, you want to extract the audio clip from its video clip, so you can work with the audio independently. iMovie provides two methods for doing this: detaching audio from a clip in the Project browser, or adding just the audio portion of a clip from the Event browser.
Let’s look at a couple of real-world examples. If you encounter unexpected audio in a scene—something drops, a person sneezes—or you just want to maintain an even level of background noise, you can borrow the audio from a different clip and hide the distraction. (Remember in Chapter 1 when I recommended that you record ambient noise when shooting? Here’s where it comes in handy.) Or, perhaps you have a great line of dialogue, but the clip’s visuals aren’t as compelling as another clip’s. Here are two methods of using just the audio from other video clips.
Detaching audio from a video clip in the Project browser
- Locate the clip that has the audio you want to use.
- Select the clip and choose Clip > Detach Audio, or choose Detach Audio from the contextual menu. A new audio clip appears below the video, and the video track is muted (Figure 4.12).
Figure 4.12. The original clip includes distracting sounds of dishes clattering in this café. The audio from the third clip contains a steady level of background noise.
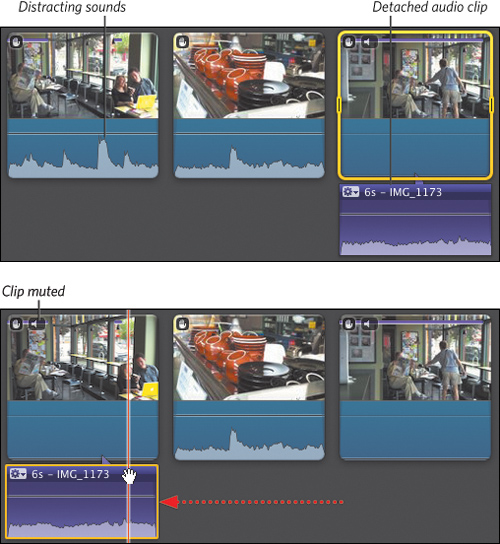
After detaching the audio to its own clip, I reposition it under the first, noisy, clip. Then, to hide the distractions, I mute the first video clip.
- Drag the detached audio to the section in your movie where you want it to appear.
Don’t forget to mute or lower the volume on the video clip over which you’re adding the new audio.
Adding just the audio from a video clip
- In the Event browser, locate the section of the clip that has the audio you want to use.
- Drag the selection to the Project browser, dropping it onto the top of a clip where you want the audio to begin.
- From the pop-up menu that appears, choose Audio Only. The clip appears as an audio clip below the video (Figure 4.13).
Figure 4.13. Audio from a video clip added to the project

Create a Photo Slideshow Project
Much of this book is focused on bending video to your will, but don’t forget that iMovie can also import and work with digital still photos. They’re given the “Ken Burns Effect,” named after the famed documentary filmmaker who popularized the technique of moving the camera over a still photo to give it a sense of motion. iMovie offers controls for customizing the effect, or ignoring it altogether. You can intersperse photos with video footage or, as I describe here, make a slideshow movie that’s composed entirely of photos.
Import photos
If you use iPhoto or Aperture to manage your photo library, or want to grab snapshots from Photo Booth, iMovie can access the photos directly. You can also import photos from the Desktop or other locations on your hard disk.
Importing photos from iPhoto, Aperture, or Photo Booth
![]()
- Click the Photo browser button in the toolbar to view your photo libraries.
- At the top of the Photo browser, select a photo source. Clicking the disclosure triangle to the left of the application name reveals your events, photos, faces, places, albums, and smart albums in the program (Figure 4.14).
Figure 4.14. The Photo browser

- In the lower portion of the browser, click a photo to preview it in the Viewer.
- Drag the photo to the Project browser to add it to your movie. A green checkmark appears on the photo thumbnail in the Photo browser to indicate it’s in your project.
Tip
To view more thumbnails in the Photo browser, drag the separator between the libraries and the photos. Drag it high enough and the source list becomes a space-saving pop-up menu.
Importing photos from the hard disk
- Locate the photo you wish to use in the Finder.
- Drag the photo directly to iMovie’s Project browser, dropping it where you want it to appear in the movie (Figure 4.15).
Figure 4.15. Importing a photo from the Finder

Adding a source folder to the Photo browser
You can take advantage of the Photo browser even if you don’t use iPhoto or Aperture. Drag any folder from the Finder to the top pane of the Photo browser; it appears within a new folder called Folders, and it reveals its images when clicked.
Adjust Ken Burns Effect settings
iMovie automatically applies the Ken Burns Effect to incoming photos. Also known as pan and zoom, the effect makes it appear as if the camera is moving over the surface of the photo, with a gradual zoom in or zoom out. It’s a technique that works especially well if you want to focus on something specific, like a person’s face, and then back out to reveal their surroundings. You can, of course, change how the effect appears by setting the start and end positions. If you’d rather remove the Ken Burns Effect, jump ahead to “Fit or crop a photo.”
Adjusting the Ken Burns Effect
- Select the photo you wish to edit in the Project browser, and open the photo editing interface in the Viewer by clicking the Crop button on the toolbar; double-clicking the Crop icon in the corner of the photo clip’s thumbnail; or pressing the C key (Figure 4.16).
Figure 4.16. The Ken Burns Effect editing interface
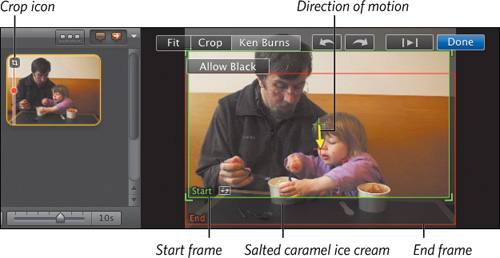
- Drag the corner handles of the green Start rectangle to specify the appearance of the first frame of the effect; the area inside the rectangle will resize to fill the frame when played. Also, drag within the rectangle to reposition it (Figure 4.17).
Figure 4.17. Setting the Start and End frames, and the result

- Drag the corner handles of the red End rectangle to set the last frame. Click the Play button to preview how it will appear.
- Want to swap the Start and End positions? Click the Reverse button.
- Click Done to apply the changes.
Note
Regardless of the original dimensions of the photo, iMovie crops the image to fill the video frame. As you can see in Figure 4.17, that ends up cutting off a fair bit of the image at the top and bottom. If you want to keep the full image in view, albeit with black bars at the sides, click the Allow Black button.
Tip
Now this is clever: When you add multiple photos at once, iMovie reverses the Ken Burns Effect settings for alternate stills. So, if the first photo zooms in, the second photo zooms out, and so on, to make a smooth viewing experience.
Fit or crop a photo
The Ken Burns Effect is snazzy, but too much panning and zooming can give your viewers a headache. If you want to display a photo without movement, set it to be either cropped to the frame or made to fit with black bars visible. The photo controls can also rotate photos, such as portrait-oriented pictures that were not automatically rotated when you imported them from the camera.
Fitting or cropping a photo
- After adding a picture to your project, view the photo controls (I prefer to double-click the Crop icon or select the clip and press C).
- Click the Fit button to get as much of the image into frame as possible (Figure 4.18).
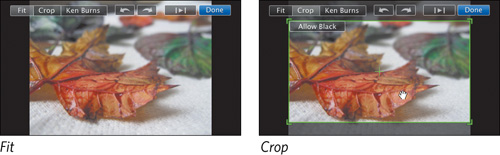
Or, click the Crop button and then drag the frame’s corners to define the visible area. Cropping is also great when you want to focus on one area of an image and exclude another, just as you would crop a photo in iPhoto.
- Click Done to apply the changes.
Tip
If you set a Crop area and then decide to apply the Ken Burns Effect, the area you defined becomes the Start frame.
Rotating photos
- Select a photo in your project and bring up the photo controls.

- Click the Rotate Counterclockwise or Rotate Clockwise button to turn the photo in 90-degree increments.
- Click Done.
Change a photo’s duration
Incoming photos are given a 4-second duration by default, but you can make them as long as you want. Photos with the Ken Burns Effect applied automatically adjust the timing of the effect based on the clip’s duration.
Changing a photo’s duration
- Double-click the photo you want to edit (or press the I key) to bring up the Clip inspector.
- Enter a new time in the Duration field (Figure 4.19).
Figure 4.19. Setting a clip duration
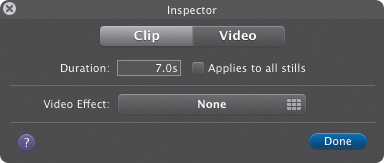
If you want all photos in your slideshow to match the same duration, click the “Applies to all stills” checkbox.
- Click Done.
Tip
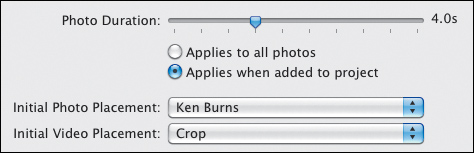
In iMovie’s Project Properties dialog, you can specify the default behavior of imported photos. For example, every new picture can be set to Crop instead of to the Ken Burns Effect, and can be set at a different duration. Choose File > Project Properties, or press Command-J. Be sure the “Applies when added to project” option is enabled; otherwise the settings apply to all photos already within the project (Figure 4.20).
Figure 4.20. Photo-specific project settings
Edit the rest of the slideshow
Now that you know the basics of adding and manipulating still images, continue to edit the rest of the slideshow movie using the editing techniques discussed so far in the book. Rearrange clips to your liking; add transitions, titles, and music; and apply color correction and video effects to photo clips just as you would to video clips (see “Correct Color Project,” later in this chapter). (However, although iMovie’s color controls are surprisingly powerful, I recommend performing your primary image editing in iPhoto or other software before bringing pictures into iMovie.)
Tip
By far my favorite aspect of iMovie’s photo-editing features is this: The settings apply to video as well as to still images. Select a video clip in the Project browser, click the Crop button in the toolbar or press the C key, and you can apply a Ken Burns Effect to video, or crop the clip to remove distractions from the edge of the frame. (Cropping generates better results on HD footage, since the video must be enlarged to fit the frame after you’ve cropped it, reducing the resolution.)
Create a Cutaway Project
Difficulty level: Easy
A common video editing technique is to cut between scenes while a consistent section of audio plays. For example, someone is being interviewed, and while you listen to them describe a place they visited, the image switches to video of that place. That clip is called a cutaway, and it’s easy to create in iMovie. Cutaways are also frequently used as a clever way to hide visual flubs: If you’re watching an interview and the camera cuts to the interviewer asking a question, chances are the subject being interviewed had to scratch his or her nose or take a drink of water just then.
Add the cutaway clip
If you’ve used a video editor such as Final Cut Express, you may miss the capability to overlay clips on multiple video tracks. iMovie offers just one video track—or does it? Although it’s not immediately obvious, iMovie does support a second video track for things like cutaways and picture-in-picture effects. That makes implementing a scene like this vastly easier than chopping clips and inserting other clips to accomplish the same task.
Adding a cutaway
- In the Event browser, select a section of clip you want to use as the cutaway.
- Drag the selection to the spot in your movie where the cutaway begins, dropping it directly onto the clip.
- From the pop-up menu that appears, choose Cutaway (Figure 4.21).
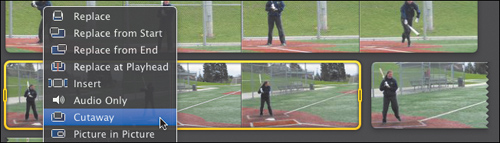
The cutaway appears above the main video track. A shaded area indicates video is hidden in favor of the cutaway clip (Figure 4.22).
Figure 4.22. The cutaway in the project
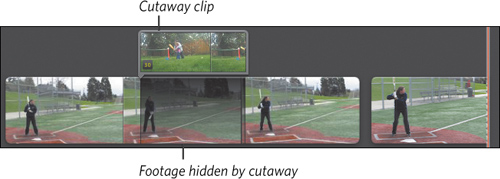
The advantage to this approach is that you can reposition or trim the cutaway clip without having to touch the base video clip at all. And because the cutaway is just a regular video clip, you can perform other edits and effects on it.
Edit the cutaway clip settings
You can also edit a couple of attributes that are specific to cutaway clips: whether it appears suddenly or with a fade-in (and disappears with a fade-out), and the opacity of the clip.
Applying a fade transition to a cutaway
- Double-click a cutaway clip, or select it and press the I key, to bring up the Clip inspector.
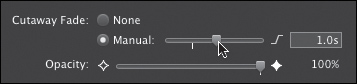
- Change the Cutaway Fade setting to Manual, and optionally change the duration of the fade (Figure 4.23). This setting applies to the start and end of the clip, and your only option is to fade the clip; you can’t choose other transition styles.
Figure 4.23. Cutaway-specific settings
Changing the clip’s opacity
In the Clip inspector, drag the Opacity slider to adjust how transparent the clip appears (perfect for scenes of ghostly apparitions).
Create a Picture in Picture or Side by Side Scene Project
Difficulty level: Easy
Similar to a cutaway, the Picture in Picture feature provides the opportunity to display a second clip without disrupting the main video, only in this case the clip appears in a box in the corner of the screen. Another option is the Side by Side effect, which splits the screen to display two clips at once.
Add the Picture in Picture or Side by Side clip
Creating a Picture in Picture or Side by Side clip works the same way as creating a cutaway, with the clip appearing above the main video track. In the case of the Picture in Picture effect, other controls are also available.
Adding a Picture in Picture or Side by Side clip
- Select a range of video from the Event browser and drag it onto a clip in your project.
- Choose Picture in Picture or Side by Side from the pop-up menu.
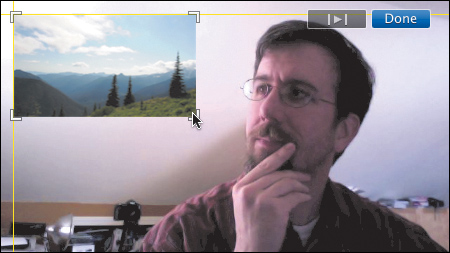
- If you added a Picture in Picture clip, go to the Viewer and drag the clip to change its location within the frame. You can also resize the box by dragging the corner handles (Figure 4.24).
Figure 4.24. Resizing a Picture in Picture clip
Edit the clip settings
Double-click the Picture in Picture or Side by Side clip to bring up the Clip inspector, where you’ll find settings specific to each effect, such as the option to apply a border style to the Picture in Picture clip.
Setting Picture in Picture options
• PIP Effect: This option controls how the picture box appears. From the pop-up menu, choose Dissolve for a fade-in effect, or Zoom to enlarge the box from a corner. Then, set a duration for the effect using the slider (Figure 4.25).
The PIP Effect pop-up menu also includes a curious gem: Swap. When that’s enabled, the Picture in Picture clip occupies the entire frame while the base clip appears in the box.
Figure 4.25. Settings for Picture in Picture

• Border Width: Click a button to specify no border (the default) or a thin or thick border around the box.
• Border Color: “Color” is a bit of a stretch here, but if the Border Width is set to thin or thick, use this option to set the border as black, gray, or white.
• Drop Shadow: Click the Visible checkbox to make the box cast a subtle shadow.
Setting Side by Side options
• Side by Side: Choose on which side of the screen the Side by Side clip should appear, left or right (Figure 4.26).
Figure 4.26. Side by Side settings

• Slide: Click the Manual button and adjust the duration slider to make the clip slide into frame from the side specified in the pop-up menu.
Stabilize Shaky Footage Project
Not too long ago, if your footage exhibited camera shake—that slight bouncing or jittery motion introduced by shooting with a lightweight camera—either you compensated by locking the camera to a tripod, or you accepted the shaky video and passed it off as “edgy.” Now, iMovie can analyze and stabilize that footage.
Analyze for image stabilization
To smooth shaky video, iMovie analyzes each frame to identify similar objects. Then, it figures out how much zoom and rotation to apply to each frame to make the objects line up, effectively removing the shake.
Given that most clips contain 24 or 30 frames per second, analyzing for stabilization can take quite a while—four to eight times the duration of the original footage, or potentially several hours if you analyze a lot of video in one batch. Fortunately, you have several opportunities to perform the analysis, allowing you to analyze a large batch at once, or smaller sections as you edit.
Analyzing a clip for stabilization
You can analyze video at any of the following points:
• When you add video to iMovie, click the “After import analyze for Stabilization” checkbox in the Import dialog. iMovie scans all the footage being imported, tying up the program until it’s finished. This is a good option to use if you want to import a lot of video overnight while you’re sleeping.
• Select a clip in the Event browser and choose File > Analyze Video > Stabilization. The entire clip is analyzed, even if you’ve selected only a portion of it. (You can also choose to analyze for stabilization and people in the same pass.)
• Select a clip in the Project browser and choose File > Analyze Video > Stabilization. iMovie scans just the section in your movie, not the entire clip in the Event browser. However, if you add more video from the same clip in your project, iMovie analyzes it again.
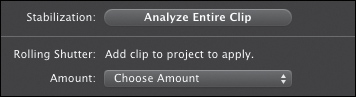
• Double-click a clip to bring up the Clip inspector. If the clip is in the Event browser, click the Analyze Entire Clip button (Figure 4.27). If you’ve selected a clip in the Project browser, click the “Stabilization: Smooth clip motion” checkbox.
Figure 4.27. Stabilization button in the inspector
Tip
If you have the time, I recommend analyzing clips in a large batch, such as during import. That enables you to apply stabilization during editing without having to wait for iMovie to scan footage on the fly.
Apply image stabilization
With your footage analyzed, you can control how much stabilization is applied. iMovie doesn’t actually re-render the video; instead, it keeps track of how much zoom and rotation each frame needs to match surrounding frames.
Applying image stabilization
![]()
If the footage was previously analyzed in the Event browser, all you need to do is add the clip to your project; stabilization is automatically applied, indicated by an icon in the corner of the clip. For any clip in the Project browser that isn’t yet analyzed, open the Clip inspector (double-click the clip, or select it and press the I key) and enable the “Stabilization: Smooth clip motion” checkbox.
To control the amount of stabilization applied, drag the Maximum Zoom slider in the Clip inspector. iMovie assumes you want the most stable footage, but you may want to ease back on the setting occasionally. If the clip has a lot of motion, iMovie must zoom further in to get frames to match up—sometimes cutting out important sections of the scene, like slicing off the tops of people’s heads (Figure 4.28).
Figure 4.28. Maximum Zoom settings compared

Tip
Some portions of clips contain too much camera shake for iMovie to compensate. You’ll see a squiggly red line to indicate those frames (Figure 4.29). To hide those sections, click the Hide Excessive Shake button.

Compensate for rolling shutter
Many of today’s cameras use CMOS sensors, which record each frame in horizontal lines, scanning from top to bottom. When camera shake or sudden movement is introduced during shooting, the objects in the video appear “bendy,” like they’re made of rubber, due to an effect called rolling shutter. Although the best advice is to try to capture steady video in the first place, iMovie can help take the elasticity out of the clips (although the effectiveness varies widely, depending on the source footage).
Compensating for rolling shutter
- Make sure the clip you’re editing has been analyzed for stabilization, and then open the Clip inspector.
- Under Rolling Shutter, click the “Reduce motion distortion” checkbox (Figure 4.30).
Figure 4.30. Rolling Shutter settings

- Choose a setting from the Amount pop-up menu; iMovie defaults to Medium, but try the other amounts to see if they improve the clip.
Correct Color Project
Difficulty level: Intermediate
As you know, the way to get the best picture when you shoot is to start with great original footage. However, that’s not always possible; maybe the white balance was set wrong, or lighting shifted while filming. Or, perhaps you just want to increase the saturation of a clip to make it pop. iMovie’s color correction tools are surprisingly effective, and they can help you tweak your image in subtle or strong ways.
The program also offers several video effects for when you want to dramatically change the appearance of your clips, from making them grayscale to applying an X-ray look.
Correct a clip’s color
If you’ve used the color correction tools in iPhoto, you’ll be familiar with the controls in iMovie.
Correcting color
- Select a clip to edit; corrections apply to entire clips, so if you want to affect just a portion of a clip, you need to first split the section into its own clip.
- Open the Video inspector by double-clicking the clip and clicking the Video button in the inspector, or by just pressing the V key.
- I recommend letting iMovie take the first stab at fixing color: Click the Auto button. If the clip looks good to you, click the Done button to close the inspector. Or, continue to the next step.
- Using the controls in the inspector, make any of the following adjustments (Figure 4.31):
Figure 4.31. Controls in the Video inspector

• Levels. The histogram at the top of the window represents the levels of red, blue, and green in the current frame. The sliders below the graph represent the darkest and lightest values (pure black or white).
Drag the left slider toward the middle to darken the image; drag the right slider similarly to lighten the image. Doing so treats the furthermost colors on the outside edges as darkest or lightest.
• Exposure. This slider brightens or darkens the video’s highlights.
• Brightness. This slider controls the overall lightness of the clip.
• Contrast. Accentuate the differences between light and dark.
• Saturation. Drag this slider to change the color intensity.
• Gain sliders. Adjust these slider values to compensate for color casts (to reduce a green tint, for example). The Gain sliders appear only when Show Advanced Tools is enabled in iMovie’s preferences.
• White Point. This control tells iMovie which color value equals white; the rest of the colors are based on that value. Move the point within the color wheel to adjust the white point, which can also affect the clip’s color cast. Or, click within the Viewer to specify which color should be treated as white (it also bases its settings on gray values).
• Revert to Original. If you don’t like the adjustments you made, click here to go back to the original settings.
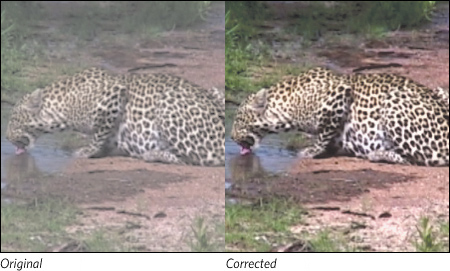
For an example of the color adjustment controls in action, I used the settings in Figure 4.31 to bring out detail and color in an otherwise washed-out clip (Figure 4.32).
Figure 4.32. Color correction applied
Tip
Color correction can be applied to clips in both the Project browser and the Event browser. So, you can adjust color before adding anything to your movie if you choose.
Apply video effects
If you’re looking for an easier way to change the appearance of a clip, choose from iMovie’s collection of 19 premade video effects.
Applying video effects
- Select the clip you want to adjust.
- Double-click the clip to bring up the Clip inspector.
- Click the Video Effect button, which exposes a grid of the available effects.
- Move your mouse over each effect to preview its appearance in the Viewer before making your choice (Figure 4.33).
Figure 4.33. Previewing a video effect

- Click the effect you want to use to apply it.
Tip
With the effects picker visible, press the spacebar to play the selected clip in a loop. As you move your mouse pointer over the effects, the preview continues to play, using the option currently under the pointer to give you a better idea of how the effect works on the entire clip, not just one frame.
Tip
Unfortunately, you can apply only one video effect at a time, with one exception. If you want to make a clip black and white, and then apply an effect on top of that, do this: In the Video inspector, first drag the Saturation slider down to zero. Then, go to the Clip inspector and choose a video effect.
To remove an effect, bring up the Choose Video Effect window again and click the None option.
Change How a Clip Sounds Project
Difficulty level: Intermediate
Just as you can apply video effects to a clip, you can change how audio sounds by using several preset effects. Or, if you’re looking for subtler options, you can adjust the volume of background clips (“ducking”), change the audio balance using an equalizer, and filter background noise.
Apply audio effects
Want to make a scene sound like it’s in a larger room than the one in which you shot it? Make a person sound like they are talking on the telephone or were transported from another planet? iMovie’s audio effects range from fanciful to practical.
Applying audio effects
- Click the clip you want to edit.
- Open the Clip inspector, and then click the Audio Effects button to bring up the Choose Audio Effect dialog (Figure 4.34). iMovie automatically starts playing a preview of the clip.
Figure 4.34. Make Planet Claire sound like a real cosmic thing using audio effects.

- Move your mouse pointer over an effect name to hear how it changes the audio.
- Click the effect you want to use.
“Duck” a clip
Often, if someone is talking in a scene, you don’t want the volume of background music to drown out the dialogue. Using iMovie’s ducking feature, the background audio can automatically be lowered so it doesn’t compete. When the foreground clip ends, the background audio comes back up, without you having to make the adjustments manually.
Ducking a clip
- Select the clip that you want to remain at regular volume.
- Bring up the Audio inspector by double-clicking the clip and clicking the Audio button, or by pressing the A key.
- Click the Ducking checkbox (Figure 4.35).
Figure 4.35. The Ducking checkbox and slider
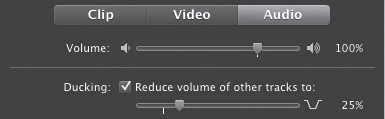
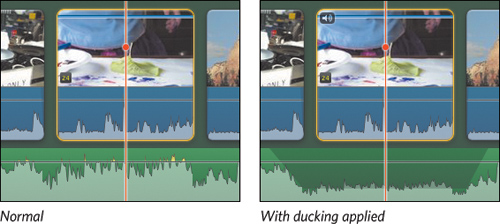
- Adjust the slider to specify the volume level of other tracks that appear with the selected clip (Figure 4.36).
Figure 4.36. The volume of the background song is reduced after ducking is enabled for the video clip.
Change equalizer settings
It’s not the same as the giant mixing boards you’ll find in a sound studio, but iMovie’s equalizer can help you shape your clips’ audio. Presets like Voice Enhance, Music Enhance, and Hum Reduction are tailored to the sound recorded by video cameras.
Changing equalizer settings
- Select a clip you want to edit.
- Open the Audio inspector by double-clicking the clip and then clicking the Audio button in the inspector, or by pressing the A key.
- From the Equalizer pop-up menu, choose a preset (Figure 4.37). Or, mark the Equalizer checkbox and adjust the sliders manually.
Figure 4.37. Equalizer presets

Tip
Another common audio problem you’re likely to run into is varying volume levels among all clips in a movie. One thing to try is normalizing the clips: Select one, bring up the Audio inspector, and click the Normalize Clip Volume button.
Reduce background noise
If your video contains a persistent hiss or hum, or if there’s just enough background white noise in an environment to be distracting, you can filter the noise in iMovie. I’ve found this feature to be hit or miss, so it really depends on the audio in the clip—it’s better at minimizing subtle white noise than something more specific like wind noise. Still, it’s worth a try, and it’s easy to enable.
Reducing background noise
- Select a clip you want to edit.
- Open the Audio inspector by double-clicking the clip and then clicking the Audio button in the inspector, or by pressing the A key.
- In the Enhance section, enable the “Reduce background noise by” checkbox and drag the slider to specify a percentage of the effect to apply (Figure 4.38).
Figure 4.38. Reducing background noise
